- Spring核心基礎
- Spring - 首頁
- Spring - 概述
- Spring - 架構
- Spring - 環境搭建
- Spring - Hello World 示例
- Spring - IoC 容器
- Spring - Bean 定義
- Spring - Bean 作用域
- Spring - Bean 生命週期
- Spring - Bean 後處理器
- Spring - Bean 定義繼承
- Spring - 依賴注入
- Spring - 注入內部 Bean
- Spring - 注入集合
- Spring - Bean 自動裝配
- 基於註解的配置
- Spring - 基於 Java 的配置
- Spring - Spring 中的事件處理
- Spring - Spring 中的自定義事件
- Spring - Spring 框架中的 AOP
- Spring - JDBC 框架
- Spring - 事務管理
- Spring - Web MVC 框架
- Spring - 使用 Log4J 進行日誌記錄
- Spring 問題與解答
- Spring - 問題與解答
- Spring 有用資源
- Spring 快速指南
- Spring - 有用資源
- Spring - 討論
Spring 快速指南
Spring 框架 - 概述
Spring 是最流行的企業級 Java 應用開發框架。全球數百萬開發人員使用 Spring 框架來建立高效能、易於測試和可重用的程式碼。
Spring 框架是一個開源的 Java 平臺。它最初由 Rod Johnson 編寫,並於 2003 年 6 月在 Apache 2.0 許可下首次釋出。
Spring 在大小和透明度方面都很輕量級。Spring 框架的基本版本大約 2MB。
Spring 框架的核心功能可用於開發任何 Java 應用程式,但也有擴充套件程式可在 Java EE 平臺之上構建 Web 應用程式。Spring 框架旨在簡化 J2EE 開發,並透過啟用基於 POJO 的程式設計模型來促進良好的程式設計實踐。
使用 Spring 框架的優勢
以下是使用 Spring 框架的一些主要優勢:
Spring 使開發人員能夠使用 POJO 開發企業級應用程式。僅使用 POJO 的好處是您不需要 EJB 容器產品(例如應用程式伺服器),而是可以選擇僅使用強大的 servlet 容器(例如 Tomcat)或某些商業產品。
Spring 以模組化的方式組織。即使包和類的數量很大,您也只需要關注需要的那些,而忽略其餘的。
Spring 並沒有重新發明輪子,而是真正利用了一些現有的技術,例如幾種 ORM 框架、日誌框架、JEE、Quartz 和 JDK 計時器以及其他檢視技術。
使用 Spring 編寫的應用程式易於測試,因為與環境相關的程式碼已移至此框架中。此外,透過使用 JavaBean 風格的 POJO,更容易使用依賴注入來注入測試資料。
Spring 的 Web 框架是一個設計良好的 Web MVC 框架,它為諸如 Struts 或其他過度設計或不太流行的 Web 框架提供了很好的替代方案。
Spring 提供了一個方便的 API 來將特定於技術的異常(例如由 JDBC、Hibernate 或 JDO 引發的異常)轉換為一致的、未經檢查的異常。
輕量級 IoC 容器往往很輕量級,尤其是在與 EJB 容器相比時。這對於在記憶體和 CPU 資源有限的計算機上開發和部署應用程式非常有益。
Spring 提供了一個一致的事務管理介面,可以縮小到本地事務(例如,使用單個數據庫)並擴充套件到全域性事務(例如,使用 JTA)。
依賴注入 (DI)
Spring 最為著名的技術是控制反轉的依賴注入 (DI)。控制反轉 (IoC)是一個通用概念,可以用多種不同的方式表達。依賴注入只是控制反轉的一個具體示例。
在編寫複雜的 Java 應用程式時,應用程式類應儘可能獨立於其他 Java 類,以增加重用這些類的可能性,並在單元測試時獨立於其他類進行測試。依賴注入有助於將這些類粘合在一起,同時保持它們的獨立性。
依賴注入究竟是什麼?讓我們分別看看這兩個詞。這裡的依賴部分轉化為兩個類之間的關聯。例如,類 A 依賴於類 B。現在,讓我們看看第二部分,注入。所有這一切都意味著,類 B 將由 IoC 注入到類 A 中。
依賴注入可以透過傳遞引數給建構函式或透過構造後使用 setter 方法來實現。由於依賴注入是 Spring 框架的核心,我們將在單獨的章節中結合相關示例解釋此概念。
面向方面程式設計 (AOP)
Spring 的關鍵元件之一是面向方面程式設計 (AOP) 框架。跨越應用程式多個點的函式稱為橫切關注點,這些橫切關注點在概念上與應用程式的業務邏輯是分開的。方面的各種常見示例包括日誌記錄、宣告式事務、安全性、快取等。
OOP 中模組化的關鍵單元是類,而在 AOP 中,模組化的單元是方面。DI 幫助您將應用程式物件彼此解耦,而 AOP 幫助您將橫切關注點與它們影響的物件解耦。
Spring 框架的 AOP 模組提供了一個面向方面程式設計的實現,允許您定義方法攔截器和切點,以清晰地解耦實現應分離的功能的程式碼。我們將在單獨的章節中詳細討論 Spring AOP 概念。
Spring 框架 - 架構
Spring 潛在地可以成為您所有企業應用程式的一站式商店。但是,Spring 是模組化的,允許您選擇哪些模組適用於您,而無需引入其餘模組。以下部分詳細介紹了 Spring 框架中所有可用的模組。
Spring 框架提供了大約 20 個模組,可以根據應用程式的需求使用。
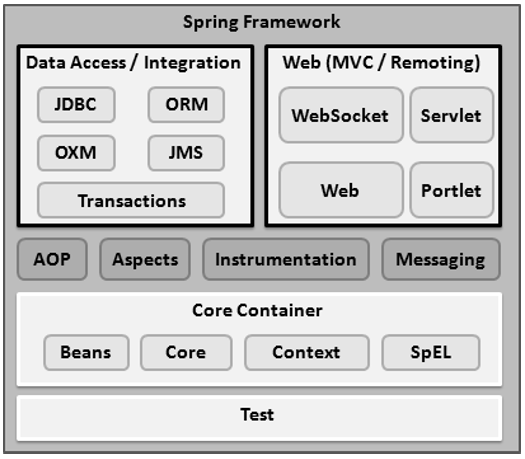
核心容器
核心容器由核心、Bean、上下文和表示式語言模組組成,其詳細資訊如下:
核心模組提供框架的基礎部分,包括 IoC 和依賴注入功能。
Bean模組提供 BeanFactory,它是工廠模式的複雜實現。
上下文模組構建在核心和 Bean 模組提供的堅實基礎之上,它是訪問已定義和配置的任何物件的媒介。ApplicationContext 介面是上下文模組的焦點。
SpEL模組提供了一個強大的表示式語言,用於在執行時查詢和操作物件圖。
資料訪問/整合
資料訪問/整合層由 JDBC、ORM、OXM、JMS 和事務模組組成,其詳細資訊如下:
JDBC模組提供了一個 JDBC 抽象層,消除了對繁瑣的 JDBC 相關編碼的需求。
ORM模組為流行的物件關係對映 API 提供整合層,包括 JPA、JDO、Hibernate 和 iBatis。
OXM模組提供了一個抽象層,支援 JAXB、Castor、XMLBeans、JiBX 和 XStream 的物件/XML 對映實現。
Java 訊息服務JMS模組包含用於生成和使用訊息的功能。
事務模組支援對實現特殊介面的類以及所有 POJO 的程式化和宣告式事務管理。
Web
Web 層由 Web、Web-MVC、Web-Socket 和 Web-Portlet 模組組成,其詳細資訊如下:
Web模組提供基本的 Web 導向整合功能,例如多部分檔案上傳功能以及使用 servlet 偵聽器和麵向 Web 的應用程式上下文初始化 IoC 容器。
Web-MVC模組包含 Spring 的 Web 應用程式模型-檢視-控制器 (MVC) 實現。
Web-Socket模組支援 Web 應用程式中客戶端和伺服器之間的基於 WebSocket 的雙向通訊。
Web-Portlet模組提供要在 portlet 環境中使用的 MVC 實現,並映象 Web-Servlet 模組的功能。
其他
還有一些其他重要的模組,例如 AOP、Aspects、Instrumentation、Web 和 Test 模組,其詳細資訊如下:
AOP模組提供了一個面向方面程式設計的實現,允許您定義方法攔截器和切點,以清晰地解耦實現應分離的功能的程式碼。
Aspects模組提供與 AspectJ 的整合,AspectJ 又是一個強大且成熟的 AOP 框架。
Instrumentation模組提供類檢測支援和類載入器實現,可在某些應用程式伺服器中使用。
Messaging模組支援 STOMP 作為 Websocket 子協議在應用程式中使用。它還支援用於從 Websocket 客戶端路由和處理 STOMP 訊息的註解程式設計模型。
Test模組支援使用 JUnit 或 TestNG 框架測試 Spring 元件。
Spring - 環境搭建
本章將指導您如何準備開發環境以開始使用 Spring 框架。它還將教您在設定 Spring 框架之前如何在您的機器上設定 JDK、Tomcat 和 Eclipse:
步驟 1 - 設定 Java 開發工具包 (JDK)
您可以從 Oracle 的 Java 網站下載最新版本的 SDK:Java SE 下載。 您將在下載的檔案中找到安裝 JDK 的說明,請按照給定的說明安裝和配置設定。最後,設定 PATH 和 JAVA_HOME 環境變數以引用包含 java 和 javac 的目錄,通常分別為 java_install_dir/bin 和 java_install_dir。
如果您執行的是 Windows 並已將 JDK 安裝在 C:\jdk1.6.0_15 中,則必須將以下行新增到 C:\autoexec.bat 檔案中。
set PATH=C:\jdk1.6.0_15\bin;%PATH%
set JAVA_HOME=C:\jdk1.6.0_15
或者,在 Windows NT/2000/XP 上,您必須右鍵單擊“我的電腦”,選擇“屬性”→“高階”→“環境變數”。然後,您必須更新 PATH 值並單擊“確定”按鈕。
在 Unix(Solaris、Linux 等)上,如果 SDK 安裝在 /usr/local/jdk1.6.0_15 中並且您使用的是 C shell,則必須將以下內容新增到您的 .cshrc 檔案中。
setenv PATH /usr/local/jdk1.6.0_15/bin:$PATH
setenv JAVA_HOME /usr/local/jdk1.6.0_15
或者,如果您使用的是整合開發環境 (IDE),例如 Borland JBuilder、Eclipse、IntelliJ IDEA 或 Sun ONE Studio,則必須編譯並執行一個簡單的程式以確認 IDE 知道您安裝了 Java 的位置。否則,您必須按照 IDE 文件中給出的說明進行正確的設定。
步驟 2 - 安裝 Apache Common Logging API
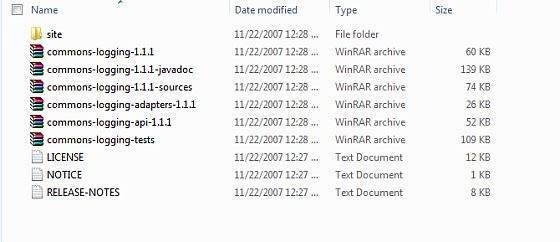
您可以從 https://commons.apache.org/logging/ 下載最新版本的 Apache Commons Logging API。下載安裝後,將二進位制發行版解壓縮到方便的位置。例如,在 Windows 上為 C:\commons-logging-1.1.1,在 Linux/Unix 上為 /usr/local/commons-logging-1.1.1。此目錄將包含以下 jar 檔案和其他支援文件等。
確保您正確設定了此目錄上的 CLASSPATH 變數,否則在執行應用程式時會遇到問題。
步驟 3 - 設定 Eclipse IDE
本教程中的所有示例都是使用 Eclipse IDE 編寫的。因此,我們建議您應該在您的機器上安裝最新版本的 Eclipse。
要安裝 Eclipse IDE,請從https://www.eclipse.org/downloads/下載最新的 Eclipse 二進位制檔案。下載安裝程式後,將二進位制分發包解壓縮到方便的位置。例如,在 Windows 上為 C:\eclipse,在 Linux/Unix 上為 /usr/local/eclipse,最後適當地設定 PATH 變數。
可以透過在 Windows 機器上執行以下命令啟動 Eclipse,或者只需雙擊 eclipse.exe
%C:\eclipse\eclipse.exe
可以透過在 Unix(Solaris、Linux 等)機器上執行以下命令啟動 Eclipse:
$/usr/local/eclipse/eclipse
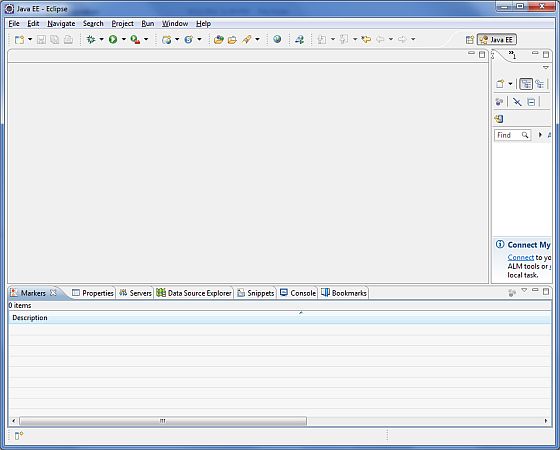
成功啟動後,如果一切正常,則應顯示以下結果:
步驟 4 - 設定 Spring 框架庫
現在,如果一切正常,您可以繼續設定 Spring 框架。以下是將框架下載並安裝到您的機器上的簡單步驟。
選擇您是想在 Windows 還是 Unix 上安裝 Spring,然後繼續下一步下載 Windows 的 .zip 檔案和 Unix 的 .tz 檔案。
從 https://repo.spring.io/release/org/springframework/spring下載最新版本的 Spring 框架二進位制檔案。
在編寫本教程時,在 Windows 機器上下載了spring-framework-4.1.6.RELEASE-dist.zip。解壓縮下載的檔案後,它會在 E:\spring 中生成以下目錄結構。
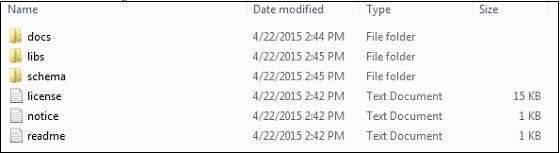
您將在E:\spring\libs目錄中找到所有 Spring 庫。確保正確設定此目錄上的 CLASSPATH 變數,否則在執行應用程式時會遇到問題。如果您使用的是 Eclipse,則無需設定 CLASSPATH,因為所有設定都將透過 Eclipse 完成。
完成此最後一步後,您就可以在下一章中繼續進行您的第一個 Spring 示例。
Spring - Hello World 示例
讓我們開始使用 Spring Framework 進行實際程式設計。在開始使用 Spring 框架編寫您的第一個示例之前,您必須確保已正確設定 Spring 環境,如Spring - 環境設定章節中所述。我們還假設您對 Eclipse IDE 有些瞭解。
現在讓我們繼續編寫一個簡單的 Spring 應用程式,該應用程式將根據 Spring Bean 配置檔案中完成的配置列印“Hello World!”或任何其他訊息。
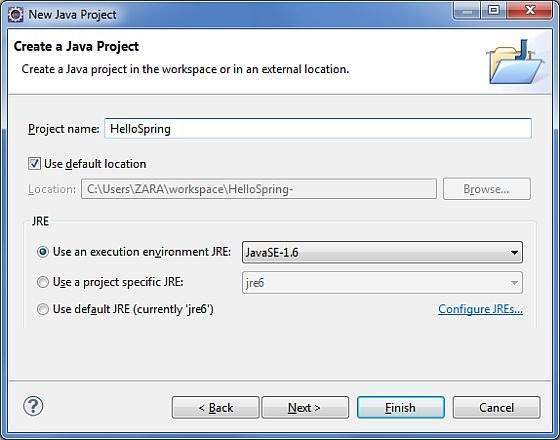
步驟 1 - 建立 Java 專案
第一步是使用 Eclipse IDE 建立一個簡單的 Java 專案。選擇檔案 → 新建 → 專案選項,最後從嚮導列表中選擇Java 專案嚮導。現在使用嚮導視窗將您的專案命名為HelloSpring,如下所示:
成功建立專案後,您的專案資源管理器中將包含以下內容:

步驟 2 - 新增所需的庫
第二步,讓我們在專案中新增 Spring 框架和通用日誌記錄 API 庫。為此,右鍵單擊專案名稱HelloSpring,然後按照上下文選單中提供的以下選項操作:構建路徑 → 配置構建路徑,以顯示 Java 構建路徑視窗,如下所示:

現在使用庫選項卡下可用的新增外部 JAR按鈕,從 Spring 框架和通用日誌記錄安裝目錄新增以下核心 JAR:
commons-logging-1.1.1
spring-aop-4.1.6.RELEASE
spring-aspects-4.1.6.RELEASE
spring-beans-4.1.6.RELEASE
spring-context-4.1.6.RELEASE
spring-context-support-4.1.6.RELEASE
spring-core-4.1.6.RELEASE
spring-expression-4.1.6.RELEASE
spring-instrument-4.1.6.RELEASE
spring-instrument-tomcat-4.1.6.RELEASE
spring-jdbc-4.1.6.RELEASE
spring-jms-4.1.6.RELEASE
spring-messaging-4.1.6.RELEASE
spring-orm-4.1.6.RELEASE
spring-oxm-4.1.6.RELEASE
spring-test-4.1.6.RELEASE
spring-tx-4.1.6.RELEASE
spring-web-4.1.6.RELEASE
spring-webmvc-4.1.6.RELEASE
spring-webmvc-portlet-4.1.6.RELEASE
spring-websocket-4.1.6.RELEASE
步驟 3 - 建立原始檔
現在讓我們在HelloSpring專案下建立實際的原始檔。首先,我們需要建立一個名為com.tutorialspoint的包。為此,右鍵單擊包資源管理器部分中的src,然後選擇新建 → 包選項。
接下來,我們將在 com.tutorialspoint 包下建立HelloWorld.java和MainApp.java檔案。
以下是HelloWorld.java檔案的內容:
package com.tutorialspoint;

public class HelloWorld {
   private String message;

   public void setMessage(String message){
      this.message  = message;
   }
   public void getMessage(){
      System.out.println("Your Message : " + message);
   }
}
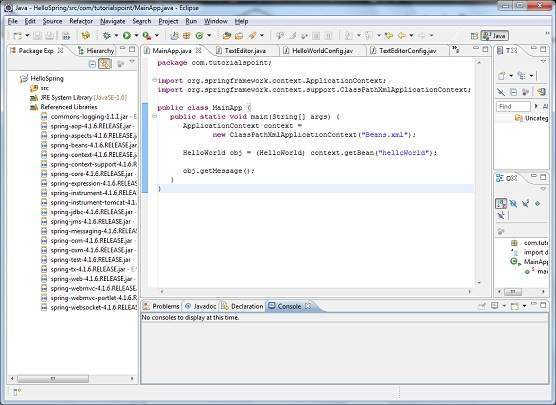
以下是第二個檔案MainApp.java的內容:
package com.tutorialspoint;

import org.springframework.context.ApplicationContext;
import org.springframework.context.support.ClassPathXmlApplicationContext;

public class MainApp {
   public static void main(String[] args) {
      ApplicationContext context = new ClassPathXmlApplicationContext("Beans.xml");
      HelloWorld obj = (HelloWorld) context.getBean("helloWorld");
      obj.getMessage();
   }
}
關於主程式,需要注意以下兩點:
第一步是建立一個應用程式上下文,我們使用框架 API ClassPathXmlApplicationContext()。此 API 載入 bean 配置檔案,並最終根據提供的 API,負責建立和初始化配置檔案中提到的所有物件(即 bean)。
第二步是使用已建立上下文的getBean()方法獲取所需的 bean。此方法使用 bean ID 返回一個泛型物件,最終可以將其轉換為實際物件。獲得物件後,您可以使用此物件呼叫任何類方法。
步驟 4 - 建立 Bean 配置檔案
您需要建立一個 Bean 配置檔案,這是一個 XML 檔案,充當將 bean(即類)粘合在一起的粘合劑。此檔案需要在src目錄下建立,如下面的螢幕截圖所示:
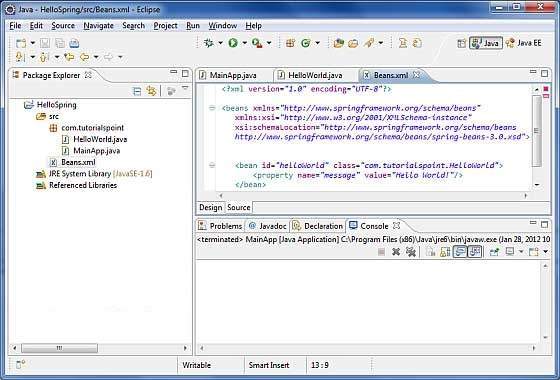
開發人員通常將此檔案命名為Beans.xml,但您可以隨意選擇任何名稱。您必須確保此檔案在 CLASSPATH 中可用,並在建立應用程式上下文時在 MainApp.java 檔案中使用相同的名稱。
Beans.xml 用於為不同的 bean 分配唯一的 ID,並控制建立具有不同值的物件,而不會影響任何 Spring 原始檔。例如,使用以下檔案,您可以為“message”變數傳遞任何值,並且可以列印不同的訊息值,而不會影響 HelloWorld.java 和 MainApp.java 檔案。讓我們看看它是如何工作的:
<?xml version = "1.0" encoding = "UTF-8"?>

<beans xmlns = "http://www.springframework.org/schema/beans"
   xmlns:xsi = "http://www.w3.org/2001/XMLSchema-instance"
   xsi:schemaLocation = "http://www.springframework.org/schema/beans
   http://www.springframework.org/schema/beans/spring-beans-3.0.xsd">

   <bean id = "helloWorld" class = "com.tutorialspoint.HelloWorld">
      <property name = "message" value = "Hello World!"/>
   </bean>

</beans>
當 Spring 應用程式載入到記憶體中時,框架使用上面的配置檔案建立所有已定義的 bean,併為它們分配在<bean>標籤中定義的唯一 ID。您可以使用<property>標籤傳遞物件建立時使用的不同變數的值。
步驟 5 - 執行程式
建立原始檔和 bean 配置檔案後,您就可以進行此步驟了,即編譯和執行程式。為此,保持 MainApp.Java 檔案選項卡處於活動狀態,並使用 Eclipse IDE 中可用的執行選項或使用Ctrl + F11來編譯和執行您的MainApp應用程式。如果您的應用程式一切正常,這將在 Eclipse IDE 的控制檯中列印以下訊息:
Your Message : Hello World!
恭喜,您已成功建立您的第一個 Spring 應用程式。您可以透過更改“message”屬性的值並保持兩個原始檔不變來檢視上述 Spring 應用程式的靈活性。
Spring - IoC 容器
Spring 容器是 Spring 框架的核心。容器將建立物件、將它們連線在一起、配置它們並管理它們從建立到銷燬的整個生命週期。Spring 容器使用 DI 來管理構成應用程式的元件。這些物件稱為 Spring Bean,我們將在下一章中討論。
容器透過讀取提供的配置元資料來獲取有關要例項化、配置和組裝哪些物件的指令。配置元資料可以透過 XML、Java 註解或 Java 程式碼來表示。下圖顯示了 Spring 工作原理的高階檢視。Spring IoC 容器使用 Java POJO 類和配置元資料來生成完全配置且可執行的系統或應用程式。

Spring 提供以下兩種不同型別的容器。
| 序號 | 容器和描述 |
|---|---|
| 1 | Spring BeanFactory 容器
這是最簡單的容器,提供對 DI 的基本支援,並由org.springframework.beans.factory.BeanFactory介面定義。BeanFactory 和相關的介面(例如 BeanFactoryAware、InitializingBean、DisposableBean)仍然存在於 Spring 中,目的是為了向後相容大量與 Spring 整合的第三方框架。 |
| 2 | Spring ApplicationContext 容器
此容器添加了更多特定於企業的功能,例如能夠從屬性檔案解析文字訊息以及能夠將應用程式事件釋出給感興趣的事件偵聽器。此容器由org.springframework.context.ApplicationContext介面定義。 |
ApplicationContext容器包含BeanFactory容器的所有功能,因此通常建議使用ApplicationContext而不是BeanFactory。BeanFactory 仍然可以用於輕量級應用程式,例如移動裝置或基於 applet 的應用程式,在這些應用程式中,資料量和速度非常重要。
Spring - Bean 定義
構成應用程式主幹並由 Spring IoC 容器管理的物件稱為bean。bean 是由 Spring IoC 容器例項化、組裝和管理的物件。這些 bean 是使用您提供給容器的配置元資料建立的。例如,您已經在前面的章節中看到的 XML <bean/> 定義的形式。
Bean 定義包含稱為配置元資料的資訊,容器需要這些資訊來了解以下內容:
- 如何建立 bean
- bean 的生命週期詳細資訊
- bean 的依賴項
所有上述配置元資料都轉換為構成每個 bean 定義的一組以下屬性。
| 序號 | 屬性和描述 |
|---|---|
| 1 |
class 此屬性是必需的,它指定用於建立 bean 的 bean 類。 |
| 2 |
name 此屬性唯一地指定 bean 識別符號。在基於 XML 的配置元資料中,您使用 id 和/或 name 屬性來指定 bean 識別符號。 |
| 3 |
scope 此屬性指定從特定 bean 定義建立的物件的範圍,我們將在 bean 範圍章節中討論。 |
| 4 |
constructor-arg 這用於注入依賴項,我們將在後續章節中討論。 |
| 5 |
properties 這用於注入依賴項,我們將在後續章節中討論。 |
| 6 |
自動裝配模式 這用於注入依賴項,我們將在後續章節中討論。 |
| 7 |
延遲初始化模式 延遲初始化 Bean 會告訴 IoC 容器在第一次請求時建立 Bean 例項,而不是在啟動時建立。 |
| 8 |
初始化方法 在容器設定 Bean 的所有必要屬性之後立即呼叫的回撥函式。這將在 Bean 生命週期章節中討論。 |
| 9 |
銷燬方法 在包含 Bean 的容器被銷燬時使用的回撥函式。這將在 Bean 生命週期章節中討論。 |
Spring 配置元資料
Spring IoC 容器完全與實際編寫此配置元資料的格式解耦。以下是向 Spring 容器提供配置元資料的三個重要方法:
- 基於 XML 的配置檔案。
- 基於註解的配置
- 基於 Java 的配置
您已經瞭解瞭如何向容器提供基於 XML 的配置元資料,但讓我們看看另一個基於 XML 的配置檔案示例,其中包含不同的 Bean 定義,包括延遲初始化、初始化方法和銷燬方法:
<?xml version = "1.0" encoding = "UTF-8"?>

<beans xmlns = "http://www.springframework.org/schema/beans"
   xmlns:xsi = "http://www.w3.org/2001/XMLSchema-instance"
   xsi:schemaLocation = "http://www.springframework.org/schema/beans
   http://www.springframework.org/schema/beans/spring-beans-3.0.xsd">

   <!-- A simple bean definition -->
   <bean id = "..." class = "...">
      <!-- collaborators and configuration for this bean go here -->
   </bean>

   <!-- A bean definition with lazy init set on -->
   <bean id = "..." class = "..." lazy-init = "true">
      <!-- collaborators and configuration for this bean go here -->
   </bean>

   <!-- A bean definition with initialization method -->
   <bean id = "..." class = "..." init-method = "...">
      <!-- collaborators and configuration for this bean go here -->
   </bean>

   <!-- A bean definition with destruction method -->
   <bean id = "..." class = "..." destroy-method = "...">
      <!-- collaborators and configuration for this bean go here -->
   </bean>

   <!-- more bean definitions go here -->

</beans>
您可以檢視Spring Hello World 示例,瞭解如何定義、配置和建立 Spring Bean。
我們將在單獨的章節中討論基於註解的配置。我們有意在單獨的章節中討論它,因為我們希望您在開始使用註解進行 Spring 依賴注入程式設計之前,掌握其他一些重要的 Spring 概念。
Spring - Bean 作用域
在定義`
Spring 框架支援以下五個作用域,其中三個只有在使用 Web 感知 ApplicationContext 時才可用。
| 序號 | 作用域和描述 |
|---|---|
| 1 |
singleton 此作用域將 Bean 定義的作用域限定為每個 Spring IoC 容器一個例項(預設值)。 |
| 2 |
prototype 此作用域將單個 Bean 定義的作用域限定為任意數量的物件例項。 |
| 3 |
request 此作用域將 Bean 定義的作用域限定為 HTTP 請求。僅在 Web 感知 Spring ApplicationContext 的上下文中有效。 |
| 4 |
session 此作用域將 Bean 定義的作用域限定為 HTTP 會話。僅在 Web 感知 Spring ApplicationContext 的上下文中有效。 |
| 5 |
global-session 此作用域將 Bean 定義的作用域限定為全域性 HTTP 會話。僅在 Web 感知 Spring ApplicationContext 的上下文中有效。 |
在本章中,我們將討論前兩個作用域,其餘三個將在我們討論 Web 感知 Spring ApplicationContext 時討論。
singleton 作用域
如果作用域設定為 singleton,則 Spring IoC 容器將建立由該 Bean 定義確定的物件的單個例項。此單個例項儲存在此類 singleton Bean 的快取中,所有後續對該命名 Bean 的請求和引用都將返回快取的物件。
預設作用域始終是 singleton。但是,當您只需要一個 Bean 例項時,可以在 Bean 配置檔案中將scope屬性設定為singleton,如下面的程式碼片段所示:
<!-- A bean definition with singleton scope -->
<bean id = "..." class = "..." scope = "singleton">
   <!-- collaborators and configuration for this bean go here -->
</bean>
示例
讓我們準備好一個可用的 Eclipse IDE,並按照以下步驟建立一個 Spring 應用程式:
| 步驟 | 描述 |
|---|---|
| 1 | 建立一個名為SpringExample的專案,並在建立的專案中src資料夾下建立一個com.tutorialspoint包。 |
| 2 | 如Spring Hello World 示例章節中所述,使用新增外部 JAR選項新增所需的 Spring 庫。 |
| 3 | 在com.tutorialspoint包下建立 Java 類HelloWorld和MainApp。 |
| 4 | 在src資料夾下建立 Bean 配置檔案Beans.xml。 |
| 5 | 最後一步是建立所有 Java 檔案和 Bean 配置檔案的內容,然後執行應用程式,如下所述。 |
以下是HelloWorld.java檔案的內容:
package com.tutorialspoint;

public class HelloWorld {
   private String message;

   public void setMessage(String message){
      this.message  = message;
   }
   public void getMessage(){
      System.out.println("Your Message : " + message);
   }
}
以下是MainApp.java檔案的內容:
package com.tutorialspoint;

import org.springframework.context.ApplicationContext;
import org.springframework.context.support.ClassPathXmlApplicationContext;

public class MainApp {
   public static void main(String[] args) {
      ApplicationContext context = new ClassPathXmlApplicationContext("Beans.xml");
      HelloWorld objA = (HelloWorld) context.getBean("helloWorld");

      objA.setMessage("I'm object A");
      objA.getMessage();

      HelloWorld objB = (HelloWorld) context.getBean("helloWorld");
      objB.getMessage();
   }
}
以下是 singleton 作用域所需的配置檔案Beans.xml:
<?xml version = "1.0" encoding = "UTF-8"?>

<beans xmlns = "http://www.springframework.org/schema/beans"
   xmlns:xsi = "http://www.w3.org/2001/XMLSchema-instance"
   xsi:schemaLocation = "http://www.springframework.org/schema/beans
   http://www.springframework.org/schema/beans/spring-beans-3.0.xsd">

   <bean id = "helloWorld" class = "com.tutorialspoint.HelloWorld" scope = "singleton">
   </bean>

</beans>
建立原始碼和 Bean 配置檔案後,讓我們執行應用程式。如果應用程式一切正常,它將列印以下訊息:
Your Message : I'm object A
Your Message : I'm object A
prototype 作用域
如果作用域設定為 prototype,則 Spring IoC 容器每次請求特定 Bean 時都會建立一個新的 Bean 例項。通常,對於所有有狀態 Bean 使用 prototype 作用域,對於無狀態 Bean 使用 singleton 作用域。
要定義 prototype 作用域,可以在 Bean 配置檔案中將scope屬性設定為prototype,如下面的程式碼片段所示:
<!-- A bean definition with prototype scope -->
<bean id = "..." class = "..." scope = "prototype">
   <!-- collaborators and configuration for this bean go here -->
</bean>
示例
讓我們準備好一個可用的 Eclipse IDE,並按照以下步驟建立一個 Spring 應用程式:
| 步驟 | 描述 |
|---|---|
| 1 | 建立一個名為SpringExample的專案,並在建立的專案中src資料夾下建立一個com.tutorialspoint包。 |
| 2 | 如Spring Hello World 示例章節中所述,使用新增外部 JAR選項新增所需的 Spring 庫。 |
| 3 | 在com.tutorialspoint包下建立 Java 類HelloWorld和MainApp。 |
| 4 | 在src資料夾下建立 Bean 配置檔案Beans.xml。 |
| 5 | 最後一步是建立所有 Java 檔案和 Bean 配置檔案的內容,然後執行應用程式,如下所述。 |
以下是HelloWorld.java檔案的內容
package com.tutorialspoint;

public class HelloWorld {
   private String message;

   public void setMessage(String message){
      this.message  = message;
   }
   public void getMessage(){
      System.out.println("Your Message : " + message);
   }
}
以下是MainApp.java檔案的內容:
package com.tutorialspoint;

import org.springframework.context.ApplicationContext;
import org.springframework.context.support.ClassPathXmlApplicationContext;

public class MainApp {
   public static void main(String[] args) {
      ApplicationContext context = new ClassPathXmlApplicationContext("Beans.xml");
      HelloWorld objA = (HelloWorld) context.getBean("helloWorld");

      objA.setMessage("I'm object A");
      objA.getMessage();

      HelloWorld objB = (HelloWorld) context.getBean("helloWorld");
      objB.getMessage();
   }
}
以下是 prototype 作用域所需的配置檔案Beans.xml:
<?xml version = "1.0" encoding = "UTF-8"?>

<beans xmlns = "http://www.springframework.org/schema/beans"
   xmlns:xsi = "http://www.w3.org/2001/XMLSchema-instance"
   xsi:schemaLocation = "http://www.springframework.org/schema/beans
   http://www.springframework.org/schema/beans/spring-beans-3.0.xsd">

   <bean id = "helloWorld" class = "com.tutorialspoint.HelloWorld" scope = "prototype">
   </bean>

</beans>
建立原始碼和 Bean 配置檔案後,讓我們執行應用程式。如果應用程式一切正常,它將列印以下訊息:
Your Message : I'm object A
Your Message : null
Spring - Bean 生命週期
Spring Bean 的生命週期很容易理解。當例項化 Bean 時,可能需要執行一些初始化操作才能使其處於可用狀態。同樣,當不再需要 Bean 並將其從容器中移除時,可能需要進行一些清理工作。
雖然在 Bean 例項化和銷燬之間會發生很多幕後活動,但本章只討論 Bean 生命週期中的兩個重要回調方法,這些方法在 Bean 初始化和銷燬時都需要。
要為 Bean 定義設定和拆卸操作,我們只需使用init-method和/或destroy-method引數宣告`
初始化回撥
org.springframework.beans.factory.InitializingBean 介面指定了一個方法:
void afterPropertiesSet() throws Exception;
因此,您可以簡單地實現上述介面,並在afterPropertiesSet()方法中完成初始化工作,如下所示:
public class ExampleBean implements InitializingBean {
   public void afterPropertiesSet() {
      // do some initialization work
   }
}
對於基於 XML 的配置元資料,可以使用init-method屬性指定具有 void 無引數簽名的方法的名稱。例如:
<bean id = "exampleBean" class = "examples.ExampleBean" init-method = "init"/>
以下是類定義:
public class ExampleBean {
   public void init() {
      // do some initialization work
   }
}
銷燬回撥
org.springframework.beans.factory.DisposableBean介面指定了一個方法:
void destroy() throws Exception;
因此,您可以簡單地實現上述介面,並在destroy()方法中完成最終處理工作,如下所示:
public class ExampleBean implements DisposableBean {
   public void destroy() {
      // do some destruction work
   }
}
對於基於 XML 的配置元資料,可以使用destroy-method屬性指定具有 void 無引數簽名的方法的名稱。例如:
<bean id = "exampleBean" class = "examples.ExampleBean" destroy-method = "destroy"/>
以下是類定義:
public class ExampleBean {
   public void destroy() {
      // do some destruction work
   }
}
如果您在非 Web 應用程式環境中使用 Spring 的 IoC 容器;例如,在富客戶端桌面環境中,您可以向 JVM 註冊一個關閉鉤子。這樣做可以確保優雅地關閉並呼叫 singleton Bean 上的相關 destroy 方法,以便釋放所有資源。
建議不要使用 InitializingBean 或 DisposableBean 回撥,因為 XML 配置在命名方法方面提供了更大的靈活性。
示例
讓我們準備好一個可用的 Eclipse IDE,並按照以下步驟建立一個 Spring 應用程式:
| 步驟 | 描述 |
|---|---|
| 1 | 建立一個名為SpringExample的專案,並在建立的專案中src資料夾下建立一個com.tutorialspoint包。 |
| 2 | 如Spring Hello World 示例章節中所述,使用新增外部 JAR選項新增所需的 Spring 庫。 |
| 3 | 在com.tutorialspoint包下建立 Java 類HelloWorld和MainApp。 |
| 4 | 在src資料夾下建立 Bean 配置檔案Beans.xml。 |
| 5 | 最後一步是建立所有 Java 檔案和 Bean 配置檔案的內容,然後執行應用程式,如下所述。 |
以下是HelloWorld.java檔案的內容:
package com.tutorialspoint;

public class HelloWorld {
   private String message;

   public void setMessage(String message){
      this.message = message;
   }
   public void getMessage(){
      System.out.println("Your Message : " + message);
   }
   public void init(){
      System.out.println("Bean is going through init.");
   }
   public void destroy() {
      System.out.println("Bean will destroy now.");
   }
}
以下是MainApp.java檔案的內容。在這裡,您需要註冊一個關閉鉤子registerShutdownHook()方法,該方法在 AbstractApplicationContext 類上宣告。這將確保優雅地關閉並呼叫相關的 destroy 方法。
package com.tutorialspoint;

import org.springframework.context.support.AbstractApplicationContext;
import org.springframework.context.support.ClassPathXmlApplicationContext;

public class MainApp {
   public static void main(String[] args) {
      AbstractApplicationContext context = new ClassPathXmlApplicationContext("Beans.xml");

      HelloWorld obj = (HelloWorld) context.getBean("helloWorld");
      obj.getMessage();
      context.registerShutdownHook();
   }
}
以下是 init 和 destroy 方法所需的配置檔案Beans.xml:
<?xml version = "1.0" encoding = "UTF-8"?>

<beans xmlns = "http://www.springframework.org/schema/beans"
   xmlns:xsi = "http://www.w3.org/2001/XMLSchema-instance"
   xsi:schemaLocation = "http://www.springframework.org/schema/beans
   http://www.springframework.org/schema/beans/spring-beans-3.0.xsd">

   <bean id = "helloWorld" class = "com.tutorialspoint.HelloWorld" init-method = "init"
      destroy-method = "destroy">
      <property name = "message" value = "Hello World!"/>
   </bean>

</beans>
建立原始碼和 Bean 配置檔案後,讓我們執行應用程式。如果應用程式一切正常,它將列印以下訊息:
Bean is going through init.
Your Message : Hello World!
Bean will destroy now.
預設初始化和銷燬方法
如果您有很多 Bean 具有相同名稱的初始化和/或銷燬方法,則無需在每個 Bean 上宣告init-method和destroy-method。相反,框架提供了使用`
<beans xmlns = "http://www.springframework.org/schema/beans"
   xmlns:xsi = "http://www.w3.org/2001/XMLSchema-instance"
   xsi:schemaLocation = "http://www.springframework.org/schema/beans
   http://www.springframework.org/schema/beans/spring-beans-3.0.xsd"
   default-init-method = "init"
   default-destroy-method = "destroy">

   <bean id = "..." class = "...">
      <!-- collaborators and configuration for this bean go here -->
   </bean>

</beans>
Spring - Bean 後處理器
BeanPostProcessor介面定義了您可以實現的回撥方法,以提供您自己的例項化邏輯、依賴關係解析邏輯等。您還可以透過插入一個或多個 BeanPostProcessor 實現來實現一些自定義邏輯,這些邏輯在 Spring 容器完成 Bean 的例項化、配置和初始化之後執行。
您可以配置多個 BeanPostProcessor 介面,並且可以透過設定 BeanPostProcessor 實現的order屬性來控制這些 BeanPostProcessor 介面的執行順序Ordered介面。
BeanPostProcessors 對 Bean(或物件)例項進行操作,這意味著 Spring IoC 容器例項化 Bean 例項,然後 BeanPostProcessor 介面執行其工作。
ApplicationContext會自動檢測任何定義為實現BeanPostProcessor介面的 Bean,並將這些 Bean 註冊為後處理器,然後在容器建立 Bean 時由容器適當地呼叫。
示例
以下示例顯示瞭如何在 ApplicationContext 的上下文中編寫、註冊和使用 BeanPostProcessors。
讓我們準備好一個可用的 Eclipse IDE,並按照以下步驟建立一個 Spring 應用程式:
| 步驟 | 描述 |
|---|---|
| 1 | 建立一個名為SpringExample的專案,並在建立的專案中src資料夾下建立一個com.tutorialspoint包。 |
| 2 | 如Spring Hello World 示例章節中所述,使用新增外部 JAR選項新增所需的 Spring 庫。 |
| 3 | 在com.tutorialspoint包下建立 Java 類HelloWorld、InitHelloWorld和MainApp。 |
| 4 | 在src資料夾下建立 Bean 配置檔案Beans.xml。 |
| 5 | 最後一步是建立所有 Java 檔案和 Bean 配置檔案的內容,然後執行應用程式,如下所述。 |
以下是HelloWorld.java檔案的內容:
package com.tutorialspoint;

public class HelloWorld {
   private String message;

   public void setMessage(String message){
      this.message  = message;
   }
   public void getMessage(){
      System.out.println("Your Message : " + message);
   }
   public void init(){
      System.out.println("Bean is going through init.");
   }
   public void destroy(){
      System.out.println("Bean will destroy now.");
   }
}
這是一個實現 BeanPostProcessor 的非常基本的示例,它會在任何 Bean 初始化之前和之後列印 Bean 名稱。您可以在初始化 Bean 之前和之後實現更復雜的邏輯,因為您可以訪問後處理器方法中的 Bean 物件。
以下是InitHelloWorld.java檔案的內容:
package com.tutorialspoint;

import org.springframework.beans.factory.config.BeanPostProcessor;
import org.springframework.beans.BeansException;

public class InitHelloWorld implements BeanPostProcessor {
   public Object postProcessBeforeInitialization(Object bean, String beanName)
      throws BeansException {

      System.out.println("BeforeInitialization : " + beanName);
      return bean;  // you can return any other object as well
   }
   public Object postProcessAfterInitialization(Object bean, String beanName)
      throws BeansException {

      System.out.println("AfterInitialization : " + beanName);
      return bean;  // you can return any other object as well
   }
}
以下是MainApp.java檔案的內容。在這裡,您需要註冊一個關閉鉤子registerShutdownHook()方法,該方法在 AbstractApplicationContext 類上宣告。這將確保優雅地關閉並呼叫相關的 destroy 方法。
package com.tutorialspoint;

import org.springframework.context.support.AbstractApplicationContext;
import org.springframework.context.support.ClassPathXmlApplicationContext;

public class MainApp {
   public static void main(String[] args) {
      AbstractApplicationContext context = new ClassPathXmlApplicationContext("Beans.xml");

      HelloWorld obj = (HelloWorld) context.getBean("helloWorld");
      obj.getMessage();
      context.registerShutdownHook();
   }
}
以下是 init 和 destroy 方法所需的配置檔案Beans.xml:
<?xml version = "1.0" encoding = "UTF-8"?>

<beans xmlns = "http://www.springframework.org/schema/beans"
   xmlns:xsi = "http://www.w3.org/2001/XMLSchema-instance"
   xsi:schemaLocation = "http://www.springframework.org/schema/beans
   http://www.springframework.org/schema/beans/spring-beans-3.0.xsd">

   <bean id = "helloWorld" class = "com.tutorialspoint.HelloWorld"
      init-method = "init" destroy-method = "destroy">
      <property name = "message" value = "Hello World!"/>
   </bean>

   <bean class = "com.tutorialspoint.InitHelloWorld" />

</beans>
建立原始碼和 Bean 配置檔案後,讓我們執行應用程式。如果應用程式一切正常,它將列印以下訊息:
BeforeInitialization : helloWorld
Bean is going through init.
AfterInitialization : helloWorld
Your Message : Hello World!
Bean will destroy now.
Spring - Bean 定義繼承
Bean 定義可以包含許多配置資訊,包括建構函式引數、屬性值和容器特定資訊,例如初始化方法、靜態工廠方法名稱等等。
子 Bean 定義從父定義繼承配置資料。子定義可以根據需要覆蓋某些值或新增其他值。
Spring Bean 定義繼承與 Java 類繼承無關,但繼承的概念相同。您可以將父 Bean 定義定義為模板,其他子 Bean 可以從父 Bean 繼承所需的配置。
當您使用基於 XML 的配置元資料時,您可以使用parent屬性指示子 Bean 定義,並將父 Bean 指定為此屬性的值。
示例
讓我們準備好一個可用的 Eclipse IDE,並按照以下步驟建立一個 Spring 應用程式:
| 步驟 | 描述 |
|---|---|
| 1 | 建立一個名為SpringExample的專案,並在建立的專案中src資料夾下建立一個com.tutorialspoint包。 |
| 2 | 如Spring Hello World 示例章節中所述,使用新增外部 JAR選項新增所需的 Spring 庫。 |
| 3 | 在com.tutorialspoint包下建立 Java 類HelloWorld、HelloIndia和MainApp。 |
| 4 | 在src資料夾下建立 Bean 配置檔案Beans.xml。 |
| 5 | 最後一步是建立所有 Java 檔案和 Bean 配置檔案的內容,然後執行應用程式,如下所述。 |
以下是配置檔案Beans.xml,我們在其中定義了具有兩個屬性message1和message2的"helloWorld" Bean。接下來,"helloIndia" Bean 透過使用parent屬性定義為"helloWorld" Bean 的子 Bean。子 Bean 按原樣繼承message2屬性,並覆蓋message1屬性,並引入另一個屬性message3。
<?xml version = "1.0" encoding = "UTF-8"?>

<beans xmlns = "http://www.springframework.org/schema/beans"
   xmlns:xsi = "http://www.w3.org/2001/XMLSchema-instance"
   xsi:schemaLocation = "http://www.springframework.org/schema/beans
   http://www.springframework.org/schema/beans/spring-beans-3.0.xsd">

   <bean id = "helloWorld" class = "com.tutorialspoint.HelloWorld">
      <property name = "message1" value = "Hello World!"/>
      <property name = "message2" value = "Hello Second World!"/>
   </bean>

   <bean id ="helloIndia" class = "com.tutorialspoint.HelloIndia" parent = "helloWorld">
      <property name = "message1" value = "Hello India!"/>
      <property name = "message3" value = "Namaste India!"/>
   </bean>
</beans>
以下是HelloWorld.java檔案的內容:
package com.tutorialspoint;

public class HelloWorld {
   private String message1;
   private String message2;

   public void setMessage1(String message){
      this.message1 = message;
   }
   public void setMessage2(String message){
      this.message2 = message;
   }
   public void getMessage1(){
      System.out.println("World Message1 : " + message1);
   }
   public void getMessage2(){
      System.out.println("World Message2 : " + message2);
   }
}
以下是HelloIndia.java檔案的內容:
package com.tutorialspoint;

public class HelloIndia {
   private String message1;
   private String message2;
   private String message3;

   public void setMessage1(String message){
      this.message1 = message;
   }
   public void setMessage2(String message){
      this.message2 = message;
   }
   public void setMessage3(String message){
      this.message3 = message;
   }
   public void getMessage1(){
      System.out.println("India Message1 : " + message1);
   }
   public void getMessage2(){
      System.out.println("India Message2 : " + message2);
   }
   public void getMessage3(){
      System.out.println("India Message3 : " + message3);
   }
}
以下是MainApp.java檔案的內容:
package com.tutorialspoint;

import org.springframework.context.ApplicationContext;
import org.springframework.context.support.ClassPathXmlApplicationContext;

public class MainApp {
   public static void main(String[] args) {
      ApplicationContext context = new ClassPathXmlApplicationContext("Beans.xml");

      HelloWorld objA = (HelloWorld) context.getBean("helloWorld");
      objA.getMessage1();
      objA.getMessage2();

      HelloIndia objB = (HelloIndia) context.getBean("helloIndia");
      objB.getMessage1();
      objB.getMessage2();
      objB.getMessage3();
   }
}
建立原始碼和 Bean 配置檔案後,讓我們執行應用程式。如果應用程式一切正常,它將列印以下訊息:
World Message1 : Hello World!
World Message2 : Hello Second World!
India Message1 : Hello India!
India Message2 : Hello Second World!
India Message3 : Namaste India!
如果您在這裡觀察到,我們在建立"helloIndia" Bean 時沒有傳遞 message2,但它由於 Bean 定義繼承而被傳遞。
Bean 定義模板
您可以建立一個 Bean 定義模板,其他子 Bean 定義可以使用它,而無需付出太多努力。在定義 Bean 定義模板時,不應指定class屬性,而應指定abstract屬性,並應將 abstract 屬性的值指定為true,如下面的程式碼片段所示:
<?xml version = "1.0" encoding = "UTF-8"?>

<beans xmlns = "http://www.springframework.org/schema/beans"
   xmlns:xsi = "http://www.w3.org/2001/XMLSchema-instance"
   xsi:schemaLocation = "http://www.springframework.org/schema/beans
   http://www.springframework.org/schema/beans/spring-beans-3.0.xsd">

   <bean id = "beanTeamplate" abstract = "true">
      <property name = "message1" value = "Hello World!"/>
      <property name = "message2" value = "Hello Second World!"/>
      <property name = "message3" value = "Namaste India!"/>
   </bean>

   <bean id = "helloIndia" class = "com.tutorialspoint.HelloIndia" parent = "beanTeamplate">
      <property name = "message1" value = "Hello India!"/>
      <property name = "message3" value = "Namaste India!"/>
   </bean>

</beans>
父 Bean 無法獨立例項化,因為它是不完整的,並且顯式標記為abstract(抽象)。當定義像這樣是抽象的時,它只能用作純模板 Bean 定義,作為子定義的父定義。
Spring - 依賴注入
每個基於 Java 的應用程式都有一些物件協同工作,共同呈現終端使用者所看到的正在執行的應用程式。在編寫複雜的 Java 應用程式時,應用程式類應儘可能獨立於其他 Java 類,以增加重用這些類的可能性,並在單元測試期間獨立於其他類對其進行測試。依賴注入(有時稱為連線)有助於將這些類粘合在一起,同時保持它們的獨立性。
假設您有一個包含文字編輯器元件的應用程式,並且您想提供拼寫檢查功能。
public class TextEditor {
   private SpellChecker spellChecker;

   public TextEditor() {
      spellChecker = new SpellChecker();
   }
}
我們在這裡所做的是,在 TextEditor 和 SpellChecker 之間建立了依賴關係。在控制反轉場景中,我們將改為執行以下操作:
public class TextEditor {
   private SpellChecker spellChecker;

   public TextEditor(SpellChecker spellChecker) {
      this.spellChecker = spellChecker;
   }
}
在這裡,TextEditor 不必擔心 SpellChecker 的實現。SpellChecker 將獨立實現,並在 TextEditor 例項化時提供給 TextEditor。整個過程由 Spring 框架控制。
在這裡,我們移除了 TextEditor 的全部控制權,並將它放在其他地方(即 XML 配置檔案),並且依賴項(即 SpellChecker 類)透過類建構函式注入到 TextEditor 類中。因此,控制流已被依賴注入 (DI)“反轉”,因為您已有效地將依賴關係委託給某個外部系統。
注入依賴的第二種方法是透過 TextEditor 類的Setter 方法,我們將在此建立 SpellChecker 例項。此例項將用於呼叫 setter 方法來初始化 TextEditor 的屬性。
因此,DI 存在兩種主要變體,接下來的兩個小節將分別用示例介紹這兩種變體:
| 序號 | 依賴注入型別和描述 |
|---|---|
| 1 | 基於建構函式的依賴注入
當容器呼叫具有多個引數的類建構函式時,每個引數都代表對另一個類的依賴關係,就會實現基於建構函式的 DI。 |
| 2 | 基於 Setter 的依賴注入
基於 Setter 的 DI 是透過容器在呼叫無引數建構函式或無引數靜態工廠方法來例項化 Bean 後,呼叫 Bean 上的 setter 方法來實現的。 |
您可以混合使用基於建構函式和基於 Setter 的 DI,但一個好的經驗法則是:對於強制依賴項使用建構函式引數,對於可選依賴項使用 Setter。
使用 DI 原則,程式碼更簡潔,當為物件提供其依賴項時,解耦更加有效。物件不查詢其依賴項,也不瞭解依賴項的位置或類,所有這些都由 Spring 框架處理。
Spring - 注入內部 Bean
如您所知,Java 內部類是在其他類的範圍內定義的,同樣,內部 Bean是在另一個 Bean 的範圍內定義的 Bean。因此,`
<?xml version = "1.0" encoding = "UTF-8"?>

<beans xmlns = "http://www.springframework.org/schema/beans"
   xmlns:xsi = "http://www.w3.org/2001/XMLSchema-instance"
   xsi:schemaLocation = "http://www.springframework.org/schema/beans
   http://www.springframework.org/schema/beans/spring-beans-3.0.xsd">

   <bean id = "outerBean" class = "...">
      <property name = "target">
         <bean id = "innerBean" class = "..."/>
      </property>
   </bean>

</beans>
示例
讓我們準備好一個可用的 Eclipse IDE,並按照以下步驟建立一個 Spring 應用程式:
| 步驟 | 描述 |
|---|---|
| 1 | 建立一個名為SpringExample的專案,並在建立的專案中src資料夾下建立一個com.tutorialspoint包。 |
| 2 | 如Spring Hello World 示例章節中所述,使用新增外部 JAR選項新增所需的 Spring 庫。 |
| 3 | 在 `com.tutorialspoint` 包下建立 Java 類 `TextEditor`、`SpellChecker` 和 `MainApp`。 |
| 4 | 在src資料夾下建立 Bean 配置檔案Beans.xml。 |
| 5 | 最後一步是建立所有 Java 檔案和 Bean 配置檔案的內容,然後執行應用程式,如下所述。 |
以下是TextEditor.java檔案的內容:
package com.tutorialspoint;

public class TextEditor {
   private SpellChecker spellChecker;

   // a setter method to inject the dependency.
   public void setSpellChecker(SpellChecker spellChecker) {
      System.out.println("Inside setSpellChecker." );
      this.spellChecker = spellChecker;
   }

   // a getter method to return spellChecker
   public SpellChecker getSpellChecker() {
      return spellChecker;
   }
   public void spellCheck() {
      spellChecker.checkSpelling();
   }
}
以下是另一個依賴類檔案SpellChecker.java的內容:
package com.tutorialspoint;

public class SpellChecker {
   public SpellChecker(){
      System.out.println("Inside SpellChecker constructor." );
   }
   public void checkSpelling(){
      System.out.println("Inside checkSpelling." );
   }
}
以下是MainApp.java檔案的內容:
package com.tutorialspoint;

import org.springframework.context.ApplicationContext;
import org.springframework.context.support.ClassPathXmlApplicationContext;

public class MainApp {
   public static void main(String[] args) {
      ApplicationContext context = new ClassPathXmlApplicationContext("Beans.xml");
      TextEditor te = (TextEditor) context.getBean("textEditor");
      te.spellCheck();
   }
}
以下是配置檔案Beans.xml,它使用內部 Bean配置基於 Setter 的注入:
<?xml version = "1.0" encoding = "UTF-8"?>

<beans xmlns = "http://www.springframework.org/schema/beans"
   xmlns:xsi = "http://www.w3.org/2001/XMLSchema-instance"
   xsi:schemaLocation = "http://www.springframework.org/schema/beans
   http://www.springframework.org/schema/beans/spring-beans-3.0.xsd">

   <!-- Definition for textEditor bean using inner bean -->
   <bean id = "textEditor" class = "com.tutorialspoint.TextEditor">
      <property name = "spellChecker">
         <bean id = "spellChecker" class = "com.tutorialspoint.SpellChecker"/>
      </property>
   </bean>

</beans>
建立原始碼和 Bean 配置檔案後,讓我們執行應用程式。如果應用程式一切正常,它將列印以下訊息:
Inside SpellChecker constructor.
Inside setSpellChecker.
Inside checkSpelling.
Spring - 注入集合
您已經瞭解瞭如何在 Bean 配置檔案中使用 `
現在,如果您想傳遞多個值,例如 Java 集合型別(如 List、Set、Map 和 Properties),該怎麼辦?為了處理這種情況,Spring 提供了四種類型的集合配置元素,如下所示:
| 序號 | 元素和描述 |
|---|---|
| 1 |
<list> 這有助於連線,即注入一系列值,允許重複。 |
| 2 |
<set> 這有助於連線一系列值,但不允許重複。 |
| 3 |
<map> 這可用於注入名稱-值對的集合,其中名稱和值可以是任何型別。 |
| 4 |
<props> 這可用於注入名稱-值對的集合,其中名稱和值都是字串。 |
您可以使用 `` 或 `
您將遇到兩種情況:(a)傳遞集合的直接值和(b)傳遞 Bean 的引用作為集合元素之一。
示例
讓我們準備好一個可用的 Eclipse IDE,並按照以下步驟建立一個 Spring 應用程式:
| 步驟 | 描述 |
|---|---|
| 1 | 建立一個名為SpringExample的專案,並在建立的專案中src資料夾下建立一個com.tutorialspoint包。 |
| 2 | 如Spring Hello World 示例章節中所述,使用新增外部 JAR選項新增所需的 Spring 庫。 |
| 3 | 在 `com.tutorialspoint` 包下建立 Java 類 `JavaCollection` 和 `MainApp`。 |
| 4 | 在src資料夾下建立 Bean 配置檔案Beans.xml。 |
| 5 | 最後一步是建立所有 Java 檔案和 Bean 配置檔案的內容,然後執行應用程式,如下所述。 |
以下是JavaCollection.java檔案的內容:
package com.tutorialspoint;
import java.util.*;

public class JavaCollection {
   List addressList;
   Set  addressSet;
   Map  addressMap;
   Properties addressProp;

   // a setter method to set List
   public void setAddressList(List addressList) {
      this.addressList = addressList;
   }

   // prints and returns all the elements of the list.
   public List getAddressList() {
      System.out.println("List Elements :"  + addressList);
      return addressList;
   }

   // a setter method to set Set
   public void setAddressSet(Set addressSet) {
      this.addressSet = addressSet;
   }

   // prints and returns all the elements of the Set.
   public Set getAddressSet() {
      System.out.println("Set Elements :"  + addressSet);
      return addressSet;
   }

   // a setter method to set Map
   public void setAddressMap(Map addressMap) {
      this.addressMap = addressMap;
   }

   // prints and returns all the elements of the Map.
   public Map getAddressMap() {
      System.out.println("Map Elements :"  + addressMap);
      return addressMap;
   }

   // a setter method to set Property
   public void setAddressProp(Properties addressProp) {
      this.addressProp = addressProp;
   }

   // prints and returns all the elements of the Property.
   public Properties getAddressProp() {
      System.out.println("Property Elements :"  + addressProp);
      return addressProp;
   }
}
以下是MainApp.java檔案的內容:
package com.tutorialspoint;

import org.springframework.context.ApplicationContext;
import org.springframework.context.support.ClassPathXmlApplicationContext;

public class MainApp {
   public static void main(String[] args) {
      ApplicationContext context = new ClassPathXmlApplicationContext("Beans.xml");
      JavaCollection jc=(JavaCollection)context.getBean("javaCollection");

      jc.getAddressList();
      jc.getAddressSet();
      jc.getAddressMap();
      jc.getAddressProp();
   }
}
以下是配置檔案Beans.xml,它包含所有型別集合的配置:
<?xml version = "1.0" encoding = "UTF-8"?>

<beans xmlns = "http://www.springframework.org/schema/beans"
   xmlns:xsi = "http://www.w3.org/2001/XMLSchema-instance"
   xsi:schemaLocation = "http://www.springframework.org/schema/beans
   http://www.springframework.org/schema/beans/spring-beans-3.0.xsd">

   <!-- Definition for javaCollection -->
   <bean id = "javaCollection" class = "com.tutorialspoint.JavaCollection">

      <!-- results in a setAddressList(java.util.List) call -->
      <property name = "addressList">
         <list>
            <value>INDIA</value>
            <value>Pakistan</value>
            <value>USA</value>
            <value>USA</value>
         </list>
      </property>

      <!-- results in a setAddressSet(java.util.Set) call -->
      <property name = "addressSet">
         <set>
            <value>INDIA</value>
            <value>Pakistan</value>
            <value>USA</value>
            <value>USA</value>
         </set>
      </property>

      <!-- results in a setAddressMap(java.util.Map) call -->
      <property name = "addressMap">
         <map>
            <entry key = "1" value = "INDIA"/>
            <entry key = "2" value = "Pakistan"/>
            <entry key = "3" value = "USA"/>
            <entry key = "4" value = "USA"/>
         </map>
      </property>

      <!-- results in a setAddressProp(java.util.Properties) call -->
      <property name = "addressProp">
         <props>
            <prop key = "one">INDIA</prop>
            <prop key = "one">INDIA</prop>
            <prop key = "two">Pakistan</prop>
            <prop key = "three">USA</prop>
            <prop key = "four">USA</prop>
         </props>
      </property>
   </bean>

</beans>
建立原始碼和 Bean 配置檔案後,讓我們執行應用程式。如果應用程式一切正常,它將列印以下訊息:
List Elements :[INDIA, Pakistan, USA, USA]
Set Elements :[INDIA, Pakistan, USA]
ap Elements :{1 = INDIA, 2 = Pakistan, 3 = USA, 4 = USA}
Property Elements :{two = Pakistan, one = INDIA, three = USA, four = USA}
注入 Bean 引用
以下 Bean 定義將幫助您瞭解如何將 Bean 引用作為集合元素之一注入。您甚至可以將引用和值混合在一起,如下面的程式碼片段所示:
<?xml version = "1.0" encoding = "UTF-8"?>

<beans xmlns = "http://www.springframework.org/schema/beans"
   xmlns:xsi = "http://www.w3.org/2001/XMLSchema-instance"
   xsi:schemaLocation = "http://www.springframework.org/schema/beans
   http://www.springframework.org/schema/beans/spring-beans-3.0.xsd">

   <!-- Bean Definition to handle references and values -->
   <bean id = "..." class = "...">

      <!-- Passing bean reference  for java.util.List -->
      <property name = "addressList">
         <list>
            <ref bean = "address1"/>
            <ref bean = "address2"/>
            <value>Pakistan</value>
         </list>
      </property>

      <!-- Passing bean reference  for java.util.Set -->
      <property name = "addressSet">
         <set>
            <ref bean = "address1"/>
            <ref bean = "address2"/>
            <value>Pakistan</value>
         </set>
      </property>

      <!-- Passing bean reference  for java.util.Map -->
      <property name = "addressMap">
         <map>
            <entry key = "one" value = "INDIA"/>
            <entry key = "two" value-ref = "address1"/>
            <entry key = "three" value-ref = "address2"/>
         </map>
      </property>
   </bean>

</beans>
要使用上述 Bean 定義,您需要定義 setter 方法,以便它們能夠處理引用。
注入 null 和空字串值
如果您需要將空字串作為值傳遞,則可以按如下方式傳遞:
<bean id = "..." class = "exampleBean">
   <property name = "email" value = ""/>
</bean>
上述示例等效於 Java 程式碼:`exampleBean.setEmail("")`
如果您需要傳遞 NULL 值,則可以按如下方式傳遞:
<bean id = "..." class = "exampleBean">
   <property name = "email"><null/></property>
</bean>
上述示例等效於 Java 程式碼:`exampleBean.setEmail(null)`
Spring - Bean 自動裝配
您已經學習瞭如何使用 `
Spring 容器可以自動裝配協作 Bean 之間的關聯,而無需使用 `
自動裝配模式
以下是自動裝配模式,可用於指示 Spring 容器使用自動裝配進行依賴注入。您可以使用 `
| 序號 | 模式和描述 |
|---|---|
| 1 |
no
這是預設設定,這意味著沒有自動裝配,您應該使用顯式 Bean 引用進行連線。您無需為此連線執行任何特殊操作。這就是您已經在依賴注入章節中看到的。 |
| 2 | byName
按屬性名稱自動裝配。Spring 容器檢視在 XML 配置檔案中 `autowire` 屬性設定為 `byName` 的 Bean 的屬性。然後,它嘗試將這些屬性與其在配置檔案中定義的名稱相同的 Bean 匹配並連線。 |
| 3 | byType
按屬性資料型別自動裝配。Spring 容器檢視在 XML 配置檔案中 `autowire` 屬性設定為 `byType` 的 Bean 的屬性。然後,如果其型別與配置檔案中 Bean 名稱完全匹配,它會嘗試匹配並連線屬性。如果存在多個此類 Bean,則會丟擲致命異常。 |
| 4 | constructor
類似於 byType,但型別適用於建構函式引數。如果容器中建構函式引數型別的 Bean 不只有一個,則會引發致命錯誤。 |
| 5 | autodetect
Spring 首先嚐試使用 `constructor` 自動裝配,如果失敗,Spring 嘗試使用 `byType` 自動裝配。 |
您可以使用byType或constructor自動裝配模式來連線陣列和其他型別化集合。
自動裝配的侷限性
在整個專案中一致地使用自動裝配效果最佳。如果通常不使用自動裝配,則開發人員可能難以使用它來連線一兩個 Bean 定義。儘管自動裝配可以顯著減少指定屬性或建構函式引數的需求,但在使用它們之前,您應該考慮自動裝配的侷限性和缺點。
| 序號 | 侷限性和描述 |
|---|---|
| 1 |
覆蓋可能性 您仍然可以使用 ` |
| 2 |
基本資料型別 您無法自動裝配所謂的簡單屬性,例如基元型別、字串和類。 |
| 3 |
容易混淆 自動裝配不如顯式連線精確,因此,如果可能,請優先使用顯式連線。 |
Spring - 基於註解的配置
從 Spring 2.5 開始,可以使用註解配置依賴注入成為可能。因此,無需使用 XML 來描述 Bean 連線,您可以透過在相關的類、方法或欄位宣告上使用註解,將 Bean 配置移動到元件類本身。
註解注入在 XML 注入之前執行。因此,對於透過這兩種方法連線的屬性,後一種配置將覆蓋前一種配置。
預設情況下,Spring 容器中不會啟用註解連線。因此,在我們使用基於註解的連線之前,我們需要在 Spring 配置檔案中啟用它。因此,如果您想在 Spring 應用程式中使用任何註解,請考慮以下配置檔案:
<?xml version = "1.0" encoding = "UTF-8"?>

<beans xmlns = "http://www.springframework.org/schema/beans"
   xmlns:xsi = "http://www.w3.org/2001/XMLSchema-instance"
   xmlns:context = "http://www.springframework.org/schema/context"
   xsi:schemaLocation = "http://www.springframework.org/schema/beans
   http://www.springframework.org/schema/beans/spring-beans-3.0.xsd
   http://www.springframework.org/schema/context
   http://www.springframework.org/schema/context/spring-context-3.0.xsd">

   <context:annotation-config/>
   <!-- bean definitions go here -->

</beans>
一旦配置了 `
| 序號 | 註解和描述 |
|---|---|
| 1 | @Required
@Required 註解應用於 Bean 屬性 Setter 方法。 |
| 2 | @Autowired
@Autowired 註解可以應用於 Bean 屬性 Setter 方法、非 Setter 方法、建構函式和屬性。 |
| 3 | @Qualifier
@Qualifier 註解與 @Autowired 一起使用,可以透過指定要連線的確切 Bean 來消除混淆。 |
| 4 | JSR-250 註解
Spring 支援基於 JSR-250 的註解,包括 @Resource、@PostConstruct 和 @PreDestroy 註解。 |
Spring - 基於 Java 的配置
到目前為止,您已經瞭解瞭如何使用 XML 配置檔案配置 Spring Bean。如果您熟悉 XML 配置,那麼實際上不需要學習如何進行基於 Java 的配置,因為您將使用任何可用的配置來實現相同的結果。
基於 Java 的配置選項使您可以編寫大部分 Spring 配置而無需 XML,而是藉助本章介紹的一些基於 Java 的註解。
@Configuration 和 @Bean 註解
使用@Configuration註解一個類表示該類可以被Spring IoC容器用作bean定義的來源。@Bean註解告訴Spring,用@Bean註解的方法將返回一個物件,該物件應該在Spring應用程式上下文中註冊為一個bean。最簡單的@Configuration類如下所示:
package com.tutorialspoint;
import org.springframework.context.annotation.*;

@Configuration
public class HelloWorldConfig {
   @Bean
   public HelloWorld helloWorld(){
      return new HelloWorld();
   }
}
以上程式碼等效於以下XML配置:
<beans>
   <bean id = "helloWorld" class = "com.tutorialspoint.HelloWorld" />
</beans>
這裡,用@Bean註解的方法名作為bean ID,它建立並返回實際的bean。你的配置類可以宣告多個@Bean。一旦定義了配置類,就可以使用AnnotationConfigApplicationContext載入並將其提供給Spring容器,如下所示:
public static void main(String[] args) {
   ApplicationContext ctx = new AnnotationConfigApplicationContext(HelloWorldConfig.class);

   HelloWorld helloWorld = ctx.getBean(HelloWorld.class);
   helloWorld.setMessage("Hello World!");
   helloWorld.getMessage();
}
你可以載入各種配置類,如下所示:
public static void main(String[] args) {
   AnnotationConfigApplicationContext ctx = new AnnotationConfigApplicationContext();

   ctx.register(AppConfig.class, OtherConfig.class);
   ctx.register(AdditionalConfig.class);
   ctx.refresh();

   MyService myService = ctx.getBean(MyService.class);
   myService.doStuff();
}
示例
讓我們準備好一個可用的 Eclipse IDE,並按照以下步驟建立一個 Spring 應用程式:
| 步驟 | 描述 |
|---|---|
| 1 | 建立一個名為SpringExample的專案,並在建立的專案中src資料夾下建立一個com.tutorialspoint包。 |
| 2 | 如Spring Hello World 示例章節中所述,使用新增外部 JAR選項新增所需的 Spring 庫。 |
| 3 | 因為你使用了基於Java的註解,所以你還需要新增Java安裝目錄中的CGLIB.jar和ASM.jar庫,後者可以從asm.ow2.org下載。 |
| 4 | 在com.tutorialspoint包下建立Java類HelloWorldConfig、HelloWorld和MainApp。 |
| 5 | 最後一步是建立所有 Java 檔案和 Bean 配置檔案的內容,然後執行應用程式,如下所述。 |
以下是HelloWorldConfig.java檔案的內容
package com.tutorialspoint;
import org.springframework.context.annotation.*;

@Configuration
public class HelloWorldConfig {
   @Bean
   public HelloWorld helloWorld(){
      return new HelloWorld();
   }
}
以下是HelloWorld.java檔案的內容
package com.tutorialspoint;

public class HelloWorld {
   private String message;

   public void setMessage(String message){
      this.message  = message;
   }
   public void getMessage(){
      System.out.println("Your Message : " + message);
   }
}
以下是MainApp.java檔案的內容
package com.tutorialspoint;

import org.springframework.context.ApplicationContext;
import org.springframework.context.annotation.*;

public class MainApp {
   public static void main(String[] args) {
      ApplicationContext ctx =
         new AnnotationConfigApplicationContext(HelloWorldConfig.class);

      HelloWorld helloWorld = ctx.getBean(HelloWorld.class);
      helloWorld.setMessage("Hello World!");
      helloWorld.getMessage();
   }
}
建立完所有原始檔並新增所需的附加庫後,讓我們執行應用程式。請注意,不需要配置檔案。如果你的應用程式一切正常,它將列印以下訊息:
Your Message : Hello World!
注入Bean依賴項
當@Beans相互依賴時,表達這種依賴就像讓一個bean方法呼叫另一個方法一樣簡單,如下所示:
package com.tutorialspoint;
import org.springframework.context.annotation.*;

@Configuration
public class AppConfig {
   @Bean
   public Foo foo() {
      return new Foo(bar());
   }
   @Bean
   public Bar bar() {
      return new Bar();
   }
}
這裡,foo bean透過建構函式注入接收對bar的引用。現在讓我們來看另一個工作示例。
示例
讓我們準備好一個可用的 Eclipse IDE,並按照以下步驟建立一個 Spring 應用程式:
| 步驟 | 描述 |
|---|---|
| 1 | 建立一個名為SpringExample的專案,並在建立的專案中src資料夾下建立一個com.tutorialspoint包。 |
| 2 | 如Spring Hello World 示例章節中所述,使用新增外部 JAR選項新增所需的 Spring 庫。 |
| 3 | 因為你使用了基於Java的註解,所以你還需要新增Java安裝目錄中的CGLIB.jar和ASM.jar庫,後者可以從asm.ow2.org下載。 |
| 4 | 在com.tutorialspoint包下建立Java類TextEditorConfig、TextEditor、SpellChecker和MainApp。 |
| 5 | 最後一步是建立所有 Java 檔案和 Bean 配置檔案的內容,然後執行應用程式,如下所述。 |
以下是TextEditorConfig.java檔案的內容
package com.tutorialspoint;
import org.springframework.context.annotation.*;

@Configuration
public class TextEditorConfig {
   @Bean
   public TextEditor textEditor(){
      return new TextEditor( spellChecker() );
   }

   @Bean
   public SpellChecker spellChecker(){
      return new SpellChecker( );
   }
}
以下是TextEditor.java檔案的內容
package com.tutorialspoint;

public class TextEditor {
   private SpellChecker spellChecker;

   public TextEditor(SpellChecker spellChecker){
      System.out.println("Inside TextEditor constructor." );
      this.spellChecker = spellChecker;
   }
   public void spellCheck(){
      spellChecker.checkSpelling();
   }
}
以下是另一個依賴類檔案SpellChecker.java的內容
package com.tutorialspoint;

public class SpellChecker {
   public SpellChecker(){
      System.out.println("Inside SpellChecker constructor." );
   }
   public void checkSpelling(){
      System.out.println("Inside checkSpelling." );
   }
}
以下是MainApp.java檔案的內容
package com.tutorialspoint;

import org.springframework.context.ApplicationContext;
import org.springframework.context.annotation.*;

public class MainApp {
   public static void main(String[] args) {
      ApplicationContext ctx =
         new AnnotationConfigApplicationContext(TextEditorConfig.class);

      TextEditor te = ctx.getBean(TextEditor.class);
      te.spellCheck();
   }
}
建立完所有原始檔並新增所需的附加庫後,讓我們執行應用程式。請注意,不需要配置檔案。如果你的應用程式一切正常,它將列印以下訊息:
Inside SpellChecker constructor.
Inside TextEditor constructor.
Inside checkSpelling.
@Import註解
@Import註解允許從另一個配置類載入@Bean定義。考慮如下所示的ConfigA類:
@Configuration
public class ConfigA {
   @Bean
   public A a() {
      return new A();
   }
}
你可以在另一個Bean宣告中匯入上面的Bean宣告,如下所示:
@Configuration
@Import(ConfigA.class)
public class ConfigB {
   @Bean
   public B b() {
      return new B();
   }
}
現在,不需要在例項化上下文時同時指定ConfigA.class和ConfigB.class,只需要提供ConfigB,如下所示:
public static void main(String[] args) {
   ApplicationContext ctx = new AnnotationConfigApplicationContext(ConfigB.class);

   // now both beans A and B will be available...
   A a = ctx.getBean(A.class);
   B b = ctx.getBean(B.class);
}
生命週期回撥
@Bean註解支援指定任意初始化和銷燬回撥方法,就像Spring XML中bean元素上的init-method和destroy-method屬性一樣:
public class Foo {
   public void init() {
      // initialization logic
   }
   public void cleanup() {
      // destruction logic
   }
}
@Configuration
public class AppConfig {
   @Bean(initMethod = "init", destroyMethod = "cleanup" )
   public Foo foo() {
      return new Foo();
   }
}
指定Bean範圍
預設範圍是單例,但你可以使用@Scope註解覆蓋它,如下所示:
@Configuration
public class AppConfig {
   @Bean
   @Scope("prototype")
   public Foo foo() {
      return new Foo();
   }
}
Spring中的事件處理
在所有章節中,你都看到Spring的核心是ApplicationContext,它管理bean的完整生命週期。ApplicationContext在載入bean時釋出某些型別的事件。例如,啟動上下文時釋出ContextStartedEvent,停止上下文時釋出ContextStoppedEvent。
ApplicationContext中的事件處理是透過ApplicationEvent類和ApplicationListener介面提供的。因此,如果一個bean實現了ApplicationListener,那麼每次將ApplicationEvent釋出到ApplicationContext時,都會通知該bean。
Spring提供以下標準事件:
| 序號 | Spring內建事件和描述 |
|---|---|
| 1 |
ContextRefreshedEvent 當ApplicationContext被初始化或重新整理時,就會發布此事件。這也可以使用ConfigurableApplicationContext介面上的refresh()方法觸發。 |
| 2 |
ContextStartedEvent 當使用ConfigurableApplicationContext介面上的start()方法啟動ApplicationContext時,就會發布此事件。在收到此事件後,你可以輪詢資料庫,或者重新啟動任何已停止的應用程式。 |
| 3 |
ContextStoppedEvent 當使用ConfigurableApplicationContext介面上的stop()方法停止ApplicationContext時,就會發布此事件。收到此事件後,你可以進行必要的收尾工作。 |
| 4 |
ContextClosedEvent 當使用ConfigurableApplicationContext介面上的close()方法關閉ApplicationContext時,就會發布此事件。關閉的上下文將結束其生命週期;它無法重新整理或重新啟動。 |
| 5 |
RequestHandledEvent 這是一個特定於Web的事件,它告訴所有bean已處理HTTP請求。 |
Spring的事件處理是單執行緒的,因此如果釋出了一個事件,除非所有接收者都收到訊息,否則程序將被阻塞,並且流程將不會繼續。因此,如果要使用事件處理,在設計應用程式時應注意。
監聽上下文事件
要監聽上下文事件,bean應該實現ApplicationListener介面,該介面只有一個方法onApplicationEvent()。因此,讓我們編寫一個示例來檢視事件如何傳播以及如何根據某些事件編寫程式碼來執行所需的任務。
讓我們準備好一個可用的 Eclipse IDE,並按照以下步驟建立一個 Spring 應用程式:
| 步驟 | 描述 |
|---|---|
| 1 | 建立一個名為SpringExample的專案,並在建立的專案中src資料夾下建立一個com.tutorialspoint包。 |
| 2 | 如Spring Hello World 示例章節中所述,使用新增外部 JAR選項新增所需的 Spring 庫。 |
| 3 | 在com.tutorialspoint包下建立Java類HelloWorld、CStartEventHandler、CStopEventHandler和MainApp。 |
| 4 | 在src資料夾下建立 Bean 配置檔案Beans.xml。 |
| 5 | 最後一步是建立所有 Java 檔案和 Bean 配置檔案的內容,然後執行應用程式,如下所述。 |
以下是HelloWorld.java檔案的內容
package com.tutorialspoint;

public class HelloWorld {
   private String message;

   public void setMessage(String message){
      this.message  = message;
   }
   public void getMessage(){
      System.out.println("Your Message : " + message);
   }
}
以下是CStartEventHandler.java檔案的內容
package com.tutorialspoint;

import org.springframework.context.ApplicationListener;
import org.springframework.context.event.ContextStartedEvent;

public class CStartEventHandler
   implements ApplicationListener<ContextStartedEvent>{

   public void onApplicationEvent(ContextStartedEvent event) {
      System.out.println("ContextStartedEvent Received");
   }
}
以下是CStopEventHandler.java檔案的內容
package com.tutorialspoint;

import org.springframework.context.ApplicationListener;
import org.springframework.context.event.ContextStoppedEvent;

public class CStopEventHandler
   implements ApplicationListener<ContextStoppedEvent>{

   public void onApplicationEvent(ContextStoppedEvent event) {
      System.out.println("ContextStoppedEvent Received");
   }
}
以下是MainApp.java檔案的內容
package com.tutorialspoint;

import org.springframework.context.ConfigurableApplicationContext;
import org.springframework.context.support.ClassPathXmlApplicationContext;

public class MainApp {
   public static void main(String[] args) {
      ConfigurableApplicationContext context =
         new ClassPathXmlApplicationContext("Beans.xml");

      // Let us raise a start event.
      context.start();

      HelloWorld obj = (HelloWorld) context.getBean("helloWorld");
      obj.getMessage();

      // Let us raise a stop event.
      context.stop();
   }
}
以下是配置檔案Beans.xml
<?xml version = "1.0" encoding = "UTF-8"?>

<beans xmlns = "http://www.springframework.org/schema/beans"
   xmlns:xsi = "http://www.w3.org/2001/XMLSchema-instance"
   xsi:schemaLocation = "http://www.springframework.org/schema/beans
   http://www.springframework.org/schema/beans/spring-beans-3.0.xsd">

   <bean id = "helloWorld" class = "com.tutorialspoint.HelloWorld">
      <property name = "message" value = "Hello World!"/>
   </bean>

   <bean id = "cStartEventHandler" class = "com.tutorialspoint.CStartEventHandler"/>
   <bean id = "cStopEventHandler" class = "com.tutorialspoint.CStopEventHandler"/>

</beans>
建立原始碼和 Bean 配置檔案後,讓我們執行應用程式。如果應用程式一切正常,它將列印以下訊息:
ContextStartedEvent Received
Your Message : Hello World!
ContextStoppedEvent Received
如果你願意,可以釋出你自己的自定義事件,然後可以捕獲這些事件來對這些自定義事件採取任何行動。如果你有興趣編寫你自己的自定義事件,可以檢視Spring中的自定義事件。
Spring中的自定義事件
編寫和釋出你自己的自定義事件需要多個步驟。按照本章中給出的說明編寫、釋出和處理自定義Spring事件。
| 步驟 | 描述 |
|---|---|
| 1 | 建立一個名為SpringExample的專案,並在建立的專案中的src資料夾下建立一個包com.tutorialspoint。所有類都將在此包下建立。 |
| 2 | 如Spring Hello World 示例章節中所述,使用新增外部 JAR選項新增所需的 Spring 庫。 |
| 3 | 透過擴充套件ApplicationEvent建立一個事件類CustomEvent。此類必須定義一個預設建構函式,該建構函式應繼承自ApplicationEvent類的建構函式。 |
| 4 | 定義事件類後,可以從任何類(例如實現ApplicationEventPublisherAware的EventClassPublisher)釋出它。你還需要在XML配置檔案中將此類宣告為bean,以便容器可以識別該bean為事件釋出者,因為它實現了ApplicationEventPublisherAware介面。 |
| 5 | 釋出的事件可以在一個類(例如實現ApplicationListener介面併為自定義事件實現onApplicationEvent方法的EventClassHandler)中處理。 |
| 6 | 在src資料夾下建立bean配置檔案Beans.xml和一個MainApp類,該類將用作Spring應用程式。 |
| 7 | 最後一步是建立所有 Java 檔案和 Bean 配置檔案的內容,然後執行應用程式,如下所述。 |
以下是CustomEvent.java檔案的內容
package com.tutorialspoint;

import org.springframework.context.ApplicationEvent;

public class CustomEvent extends ApplicationEvent{
   public CustomEvent(Object source) {
      super(source);
   }
   public String toString(){
      return "My Custom Event";
   }
}
以下是CustomEventPublisher.java檔案的內容
package com.tutorialspoint;

import org.springframework.context.ApplicationEventPublisher;
import org.springframework.context.ApplicationEventPublisherAware;

public class CustomEventPublisher implements ApplicationEventPublisherAware {
   private ApplicationEventPublisher publisher;

   public void setApplicationEventPublisher (ApplicationEventPublisher publisher) {
      this.publisher = publisher;
   }
   public void publish() {
      CustomEvent ce = new CustomEvent(this);
      publisher.publishEvent(ce);
   }
}
以下是CustomEventHandler.java檔案的內容
package com.tutorialspoint;

import org.springframework.context.ApplicationListener;

public class CustomEventHandler implements ApplicationListener<CustomEvent> {
   public void onApplicationEvent(CustomEvent event) {
      System.out.println(event.toString());
   }
}
以下是MainApp.java檔案的內容
package com.tutorialspoint;

import org.springframework.context.ConfigurableApplicationContext;
import org.springframework.context.support.ClassPathXmlApplicationContext;

public class MainApp {
   public static void main(String[] args) {
      ConfigurableApplicationContext context =
         new ClassPathXmlApplicationContext("Beans.xml");

      CustomEventPublisher cvp =
         (CustomEventPublisher) context.getBean("customEventPublisher");

      cvp.publish();
      cvp.publish();
   }
}
以下是配置檔案Beans.xml
<?xml version = "1.0" encoding = "UTF-8"?>

<beans xmlns = "http://www.springframework.org/schema/beans"
   xmlns:xsi = "http://www.w3.org/2001/XMLSchema-instance"
   xsi:schemaLocation = "http://www.springframework.org/schema/beans
   http://www.springframework.org/schema/beans/spring-beans-3.0.xsd">

   <bean id = "customEventHandler" class = "com.tutorialspoint.CustomEventHandler"/>
   <bean id = "customEventPublisher" class = "com.tutorialspoint.CustomEventPublisher"/>

</beans>
建立原始碼和 Bean 配置檔案後,讓我們執行應用程式。如果應用程式一切正常,它將列印以下訊息:
y Custom Event
y Custom Event
Spring框架的AOP
Spring框架的關鍵元件之一是面向方面程式設計(AOP)框架。面向方面程式設計需要將程式邏輯分解成不同的部分,稱為所謂的關注點。跨越應用程式多個點的函式稱為橫切關注點,這些橫切關注點在概念上與應用程式的業務邏輯是分開的。日誌記錄、稽核、宣告式事務、安全、快取等是各種常見的方面示例。
OOP中的模組化關鍵單元是類,而在AOP中,模組化單元是方面。依賴注入幫助你將應用程式物件彼此解耦,而AOP幫助你將橫切關注點與它們影響的物件解耦。AOP就像Perl、.NET、Java等程式語言中的觸發器。
Spring AOP模組提供攔截器來攔截應用程式。例如,當執行方法時,可以在方法執行之前或之後新增額外功能。
AOP術語
在我們開始使用AOP之前,讓我們熟悉AOP的概念和術語。這些術語並非Spring所特有,而是與AOP相關的。
| 序號 | 術語和描述 |
|---|---|
| 1 |
方面 這是一個模組,它具有一組提供橫切需求的API。例如,日誌記錄模組將被稱為用於日誌記錄的AOP方面。應用程式可以根據需要擁有任意數量的方面。 |
| 2 |
連線點 這表示應用程式中你可以插入AOP方面的一個點。你也可以說,這是應用程式中使用Spring AOP框架採取行動的實際位置。 |
| 3 |
建議 這是要在方法執行之前或之後採取的實際操作。這是Spring AOP框架在程式執行期間呼叫的實際程式碼段。 |
| 4 |
切點 這是一組一個或多個連線點,建議應該在這些連線點上執行。可以使用表示式或模式指定切點,正如我們將在AOP示例中看到的那樣。 |
| 5 |
引入 引入允許你向現有類新增新方法或屬性。 |
| 6 |
目標物件 被一個或多個方面建議的物件。此物件始終是一個代理物件,也稱為建議物件。 |
| 7 |
織入 織入是將方面與其他應用程式型別或物件連結以建立建議物件的程序。這可以在編譯時、載入時或執行時完成。 |
建議型別
Spring方面可以處理以下五種建議:
| 序號 | 建議和描述 |
|---|---|
| 1 |
before 在方法執行之前執行建議。 |
| 2 |
after 在方法執行之後執行建議,無論其結果如何。 |
| 3 |
after-returning 僅當方法成功完成時,才在方法執行後執行建議。 |
| 4 |
after-throwing 僅當方法透過丟擲異常退出時,才在方法執行後執行建議。 |
| 5 |
around 在呼叫建議方法之前和之後執行建議。 |
自定義方面實現
Spring支援@AspectJ註解樣式方法和基於模式的方法來實現自定義方面。以下各節將詳細解釋這兩種方法。
| 序號 | 方法和描述 |
|---|---|
| 1 | 基於XML模式
方面是使用常規類以及基於XML的配置來實現的。 |
| 2 | 基於@AspectJ
@AspectJ指的是將方面宣告為使用Java 5註解註釋的常規Java類的一種樣式。 |
Spring - JDBC框架概述
使用普通的JDBC操作資料庫時,編寫不必要的異常處理程式碼、開啟和關閉資料庫連線等會變得很繁瑣。但是,Spring JDBC框架負責所有底層細節,從開啟連線、準備和執行SQL語句、處理異常、處理事務到最終關閉連線。
因此,您只需要定義連線引數,指定要執行的SQL語句,並在從資料庫獲取資料時為每次迭代執行所需的操作。
Spring JDBC提供了幾種方法和相應的不同類來與資料庫互動。我將採用經典且最流行的方法,該方法使用框架的JdbcTemplate類。這是管理所有資料庫通訊和異常處理的核心框架類。
JdbcTemplate類
JDBC Template類執行SQL查詢、更新語句、儲存過程呼叫,對ResultSet進行迭代,並提取返回的引數值。它還會捕獲JDBC異常,並將它們轉換為org.springframework.dao包中定義的通用、更具資訊量的異常層次結構。
JdbcTemplate類的例項一旦配置後就是執行緒安全的。因此,您可以配置單個JdbcTemplate例項,然後安全地將此共享引用注入到多個DAO中。
使用JDBC Template類時,一種常見的做法是在Spring配置檔案中配置一個DataSource,然後將該共享DataSource bean依賴注入到您的DAO類中,並在DataSource的setter中建立JdbcTemplate。
配置資料來源
讓我們在我們的TEST資料庫中建立一個數據庫表Student。我們假設您使用的是MySQL資料庫,如果您使用的是其他資料庫,則可以相應地更改您的DDL和SQL查詢。
CREATE TABLE Student(
   ID   INT NOT NULL AUTO_INCREMENT,
   NAME VARCHAR(20) NOT NULL,
   AGE  INT NOT NULL,
   PRIMARY KEY (ID)
);
現在我們需要向JDBC Template提供一個DataSource,以便它可以自行配置以獲取資料庫訪問許可權。您可以在XML檔案中使用如下所示的程式碼片段來配置DataSource:
<bean id = "dataSource"
   class = "org.springframework.jdbc.datasource.DriverManagerDataSource">
   <property name = "driverClassName" value = "com.mysql.jdbc.Driver"/>
   <property name = "url" value = "jdbc:mysql://:3306/TEST"/>
   <property name = "username" value = "root"/>
   <property name = "password" value = "password"/>
</bean>
資料訪問物件 (DAO)
DAO代表資料訪問物件,通常用於資料庫互動。DAO的存在是為了提供一種讀取和寫入資料庫資料的方法,它們應該透過一個介面公開此功能,應用程式的其餘部分將透過該介面訪問它們。
Spring中的DAO支援使您可以以一致的方式使用JDBC、Hibernate、JPA或JDO等資料訪問技術。
執行SQL語句
讓我們看看如何使用SQL和JDBC Template物件對資料庫表執行CRUD(建立、讀取、更新和刪除)操作。
查詢整數
String SQL = "select count(*) from Student";
int rowCount = jdbcTemplateObject.queryForInt( SQL );
查詢長整數
String SQL = "select count(*) from Student";
long rowCount = jdbcTemplateObject.queryForLong( SQL );
使用繫結變數的簡單查詢
String SQL = "select age from Student where id = ?";
int age = jdbcTemplateObject.queryForInt(SQL, new Object[]{10});
查詢字串
String SQL = "select name from Student where id = ?";
String name = jdbcTemplateObject.queryForObject(SQL, new Object[]{10}, String.class);
查詢並返回一個物件
String SQL = "select * from Student where id = ?";
Student student = jdbcTemplateObject.queryForObject(
   SQL, new Object[]{10}, new StudentMapper());

public class StudentMapper implements RowMapper<Student> {
   public Student mapRow(ResultSet rs, int rowNum) throws SQLException {
      Student student = new Student();
      student.setID(rs.getInt("id"));
      student.setName(rs.getString("name"));
      student.setAge(rs.getInt("age"));

      return student;
   }
}
查詢並返回多個物件
String SQL = "select * from Student";
List<Student> students = jdbcTemplateObject.query(
   SQL, new StudentMapper());

public class StudentMapper implements RowMapper<Student> {
   public Student mapRow(ResultSet rs, int rowNum) throws SQLException {
      Student student = new Student();
      student.setID(rs.getInt("id"));
      student.setName(rs.getString("name"));
      student.setAge(rs.getInt("age"));

      return student;
   }
}
將一行插入表中
String SQL = "insert into Student (name, age) values (?, ?)";
jdbcTemplateObject.update( SQL, new Object[]{"Zara", 11} );
更新表中的一行
String SQL = "update Student set name = ? where id = ?";
jdbcTemplateObject.update( SQL, new Object[]{"Zara", 10} );
從表中刪除一行
String SQL = "delete Student where id = ?";
jdbcTemplateObject.update( SQL, new Object[]{20} );
執行DDL語句
您可以使用jdbcTemplate中的execute(..)方法執行任何SQL語句或DDL語句。以下是如何使用CREATE語句建立表的示例:
String SQL = "CREATE TABLE Student( " +
   "ID   INT NOT NULL AUTO_INCREMENT, " +
   "NAME VARCHAR(20) NOT NULL, " +
   "AGE  INT NOT NULL, " +
   "PRIMARY KEY (ID));"

jdbcTemplateObject.execute( SQL );
Spring JDBC框架示例
基於上述概念,讓我們檢查一些重要的示例,這些示例將幫助您理解在Spring中使用JDBC框架。
| 序號 | 示例和描述 |
|---|---|
| 1 | Spring JDBC示例
此示例將解釋如何編寫簡單的基於JDBC的Spring應用程式。 |
| 2 | Spring中的SQL儲存過程
學習如何在Spring中使用JDBC呼叫SQL儲存過程。 |
Spring - 事務管理
資料庫事務是一系列被視為單個工作單元的操作。這些操作應該要麼完全完成,要麼完全無效。事務管理是面向RDBMS的企業應用程式的重要組成部分,用於確保資料完整性和一致性。事務的概念可以用以下四個關鍵屬性來描述,稱為ACID:
原子性 - 事務應被視為單個操作單元,這意味著要麼整個操作序列成功,要麼不成功。
一致性 - 這表示資料庫參照完整性、表中唯一主鍵等的一致性。
隔離性 - 可能同時存在許多使用相同資料集的事務處理。每個事務都應該與其他事務隔離,以防止資料損壞。
永續性 - 一旦事務完成,此事務的結果必須永久儲存,並且由於系統故障而不能從資料庫中刪除。
真實的RDBMS資料庫系統將保證每個事務的全部四個屬性。使用SQL向資料庫發出事務的簡化檢視如下:
使用begin transaction命令開始事務。
使用SQL查詢執行各種刪除、更新或插入操作。
如果所有操作都成功,則執行commit,否則rollback所有操作。
Spring框架在不同的底層事務管理API之上提供了一個抽象層。Spring的事務支援旨在透過向POJO新增事務功能來提供EJB事務的替代方案。Spring支援程式設計式和宣告式事務管理。EJB需要應用程式伺服器,但是Spring事務管理無需應用程式伺服器即可實現。
本地事務與全域性事務
本地事務特定於單個事務資源(如JDBC連線),而全域性事務可以跨越多個事務資源,例如分散式系統中的事務。
本地事務管理在應用程式元件和資源位於單個站點且事務管理僅涉及在單個機器上執行的本地資料管理器的情況下非常有用。本地事務更容易實現。
在所有資源分佈在多個系統上的分散式計算環境中,需要全域性事務管理。在這種情況下,需要在本地和全域性級別進行事務管理。分散式事務或全域性事務在多個系統上執行,其執行需要全域性事務管理系統和所有相關係統的所有本地資料管理器之間的協調。
程式設計式與宣告式
Spring支援兩種型別的事務管理:
程式設計式事務管理 - 這意味著您必須藉助程式設計來管理事務。這提供了極大的靈活性,但難以維護。
宣告式事務管理 - 這意味著您將事務管理與業務程式碼分離。您只需使用註釋或基於XML的配置來管理事務。
儘管宣告式事務管理不如程式設計式事務管理靈活,程式設計式事務管理允許您透過程式碼控制事務,但宣告式事務管理更可取。但作為一種橫切關注點,宣告式事務管理可以用AOP方法模組化。Spring透過Spring AOP框架支援宣告式事務管理。
Spring事務抽象
Spring事務抽象的關鍵由org.springframework.transaction.PlatformTransactionManager介面定義,如下所示:
public interface PlatformTransactionManager {
   TransactionStatus getTransaction(TransactionDefinition definition);
   throws TransactionException;

   void commit(TransactionStatus status) throws TransactionException;
   void rollback(TransactionStatus status) throws TransactionException;
}
| 序號 | 方法和描述 |
|---|---|
| 1 |
TransactionStatus getTransaction(TransactionDefinition definition) 此方法根據指定的傳播行為返回當前活動事務或建立新事務。 |
| 2 |
void commit(TransactionStatus status) 此方法提交給定事務及其狀態。 |
| 3 |
void rollback(TransactionStatus status) 此方法回滾給定事務。 |
TransactionDefinition是Spring事務支援的核心介面,其定義如下:
public interface TransactionDefinition {
   int getPropagationBehavior();
   int getIsolationLevel();
   String getName();
   int getTimeout();
   boolean isReadOnly();
}
| 序號 | 方法和描述 |
|---|---|
| 1 |
int getPropagationBehavior() 此方法返回傳播行為。Spring提供了EJB CMT中熟悉的所有事務傳播選項。 |
| 2 |
int getIsolationLevel() 此方法返回此事務與其他事務工作的隔離程度。 |
| 3 |
String getName() 此方法返回此事務的名稱。 |
| 4 |
int getTimeout() 此方法返回事務必須完成的時間(秒)。 |
| 5 |
boolean isReadOnly() 此方法返回事務是否為只讀。 |
以下是隔離級別的可能值:
| 序號 | 隔離和描述 |
|---|---|
| 1 |
TransactionDefinition.ISOLATION_DEFAULT 這是預設隔離級別。 |
| 2 |
TransactionDefinition.ISOLATION_READ_COMMITTED 指示髒讀被阻止;可能發生不可重複讀和幻讀。 |
| 3 |
TransactionDefinition.ISOLATION_READ_UNCOMMITTED 指示可能發生髒讀、不可重複讀和幻讀。 |
| 4 |
TransactionDefinition.ISOLATION_REPEATABLE_READ 指示髒讀和不可重複讀被阻止;可能發生幻讀。 |
| 5 |
TransactionDefinition.ISOLATION_SERIALIZABLE 指示髒讀、不可重複讀和幻讀都被阻止。 |
以下是傳播型別的可能值:
| 序號 | 傳播和描述 |
|---|---|
| 1 |
TransactionDefinition.PROPAGATION_MANDATORY 支援當前事務;如果沒有當前事務,則丟擲異常。 |
| 2 |
TransactionDefinition.PROPAGATION_NESTED 如果存在當前事務,則在巢狀事務中執行。 |
| 3 |
TransactionDefinition.PROPAGATION_NEVER 不支援當前事務;如果存在當前事務,則丟擲異常。 |
| 4 |
TransactionDefinition.PROPAGATION_NOT_SUPPORTED 不支援當前事務;而是始終非事務性地執行。 |
| 5 |
TransactionDefinition.PROPAGATION_REQUIRED 支援當前事務;如果不存在,則建立一個新事務。 |
| 6 |
TransactionDefinition.PROPAGATION_REQUIRES_NEW 建立一個新事務,如果存在當前事務則掛起當前事務。 |
| 7 |
TransactionDefinition.PROPAGATION_SUPPORTS 支援當前事務;如果不存在則非事務性地執行。 |
| 8 |
TransactionDefinition.TIMEOUT_DEFAULT 使用底層事務系統的預設超時,如果不支援超時則為無。 |
TransactionStatus介面為事務程式碼提供了一種簡單的方法來控制事務執行和查詢事務狀態。
public interface TransactionStatus extends SavepointManager {
   boolean isNewTransaction();
   boolean hasSavepoint();
   void setRollbackOnly();
   boolean isRollbackOnly();
   boolean isCompleted();
}
| 序號 | 方法和描述 |
|---|---|
| 1 |
boolean hasSavepoint() 此方法返回此事務是否內部攜帶儲存點,即是否基於儲存點建立為巢狀事務。 |
| 2 |
boolean isCompleted() 此方法返回此事務是否已完成,即它是否已提交或回滾。 |
| 3 |
boolean isNewTransaction() 如果當前事務是新的,則此方法返回true。 |
| 4 |
boolean isRollbackOnly() 此方法返回事務是否已被標記為只回滾。 |
| 5 |
void setRollbackOnly() 此方法將事務設定為只回滾。 |
Spring - MVC 框架
Spring Web MVC 框架提供模型-檢視-控制器 (MVC) 架構和現成的元件,可用於開發靈活且鬆散耦合的 Web 應用程式。MVC 模式使應用程式的不同方面(輸入邏輯、業務邏輯和 UI 邏輯)分離,同時在這些元素之間提供鬆散耦合。
模型 (Model) 封裝應用程式資料,通常由 POJO 組成。
檢視 (View) 負責呈現模型資料,通常生成客戶端瀏覽器可以解釋的 HTML 輸出。
控制器 (Controller) 負責處理使用者請求,構建相應的模型並將其傳遞給檢視進行呈現。
DispatcherServlet
Spring Web 模型-檢視-控制器 (MVC) 框架圍繞一個DispatcherServlet 設計,該DispatcherServlet 處理所有 HTTP 請求和響應。下圖說明了 Spring Web MVC DispatcherServlet 的請求處理工作流程:

以下是對應於傳入的 HTTP 請求到DispatcherServlet 的事件序列:
在收到 HTTP 請求後,DispatcherServlet 會諮詢HandlerMapping 以呼叫相應的Controller。
Controller 獲取請求並根據使用的 GET 或 POST 方法呼叫相應的服務方法。服務方法將根據定義的業務邏輯設定模型資料,並將檢視名稱返回給DispatcherServlet。
DispatcherServlet 將藉助ViewResolver 來獲取請求的定義檢視。
一旦檢視確定,DispatcherServlet 將模型資料傳遞給檢視,最終在瀏覽器上呈現。
所有上述元件,即 HandlerMapping、Controller 和 ViewResolver 都是WebApplicationContext 的一部分,WebApplicationContext 是普通ApplicationContext 的擴充套件,它具有一些 Web 應用程式所需的額外功能。
所需配置
您需要使用web.xml 檔案中的 URL 對映來對映您希望DispatcherServlet 處理的請求。以下是一個示例,顯示HelloWeb DispatcherServlet 示例的宣告和對映:
<web-app id = "WebApp_ID" version = "2.4"
   xmlns = "http://java.sun.com/xml/ns/j2ee"
   xmlns:xsi = "http://www.w3.org/2001/XMLSchema-instance"
   xsi:schemaLocation = "http://java.sun.com/xml/ns/j2ee
   http://java.sun.com/xml/ns/j2ee/web-app_2_4.xsd">

   <display-name>Spring MVC Application</display-name>

   <servlet>
      <servlet-name>HelloWeb</servlet-name>
      <servlet-class>
         org.springframework.web.servlet.DispatcherServlet
      </servlet-class>
      <load-on-startup>1</load-on-startup>
   </servlet>

   <servlet-mapping>
      <servlet-name>HelloWeb</servlet-name>
      <url-pattern>*.jsp</url-pattern>
   </servlet-mapping>

</web-app>
web.xml 檔案將儲存在 Web 應用程式的 WebContent/WEB-INF 目錄中。在初始化HelloWeb DispatcherServlet 時,框架將嘗試從應用程式 WebContent/WEB-INF 目錄中名為[servlet-name]-servlet.xml 的檔案中載入應用程式上下文。在本例中,我們的檔案將是HelloWebservlet.xml。
接下來,<servlet-mapping> 標籤指示哪些 URL 將由哪個 DispatcherServlet 處理。這裡所有以.jsp 結尾的 HTTP 請求都將由HelloWeb DispatcherServlet 處理。
如果您不想使用預設檔名[servlet-name]-servlet.xml 和預設位置WebContent/WEB-INF,您可以透過在您的 web.xml 檔案中新增 servlet 監聽器ContextLoaderListener 來自定義此檔名和位置,如下所示:
<web-app...>

   <!-------- DispatcherServlet definition goes here----->
   ....
   <context-param>
      <param-name>contextConfigLocation</param-name>
      <param-value>/WEB-INF/HelloWeb-servlet.xml</param-value>
   </context-param>

   <listener>
      <listener-class>
         org.springframework.web.context.ContextLoaderListener
      </listener-class>
   </listener>

</web-app>
現在,讓我們檢查 Web 應用程式WebContent/WEB-INF 目錄中HelloWeb-servlet.xml 檔案所需的配置:
<beans xmlns = "http://www.springframework.org/schema/beans"
   xmlns:context = "http://www.springframework.org/schema/context"
   xmlns:xsi = "http://www.w3.org/2001/XMLSchema-instance"
   xsi:schemaLocation = "http://www.springframework.org/schema/beans
   http://www.springframework.org/schema/beans/spring-beans-3.0.xsd
   http://www.springframework.org/schema/context
   http://www.springframework.org/schema/context/spring-context-3.0.xsd">

   <context:component-scan base-package = "com.tutorialspoint" />

   <bean class = "org.springframework.web.servlet.view.InternalResourceViewResolver">
      <property name = "prefix" value = "/WEB-INF/jsp/" />
      <property name = "suffix" value = ".jsp" />
   </bean>

</beans>
以下是關於HelloWeb-servlet.xml 檔案的重要幾點:
[servlet-name]-servlet.xml 檔案將用於建立定義的 bean,覆蓋全域性範圍內定義的任何同名 bean 的定義。
<context:component-scan...> 標籤將用於啟用 Spring MVC 註解掃描功能,允許使用@Controller 和@RequestMapping 等註解。
InternalResourceViewResolver 將具有定義的規則來解析檢視名稱。根據上述定義的規則,名為hello 的邏輯檢視將委託給位於/WEB-INF/jsp/hello.jsp 的檢視實現。
以下部分將向您展示如何建立實際元件,即控制器、模型和檢視。
定義控制器
DispatcherServlet 將請求委託給控制器以執行特定於它的功能。@Controller 註解表示特定類充當控制器的角色。@RequestMapping 註解用於將 URL 對映到整個類或特定處理程式方法。
@Controller
@RequestMapping("/hello")
public class HelloController {
   @RequestMapping(method = RequestMethod.GET)
   public String printHello(ModelMap model) {
      model.addAttribute("message", "Hello Spring MVC Framework!");
      return "hello";
   }
}
@Controller 註解將類定義為 Spring MVC 控制器。這裡,@RequestMapping 的第一次使用表示此控制器上的所有處理方法都相對於/hello 路徑。下一個註解@RequestMapping(method = RequestMethod.GET) 用於將 printHello() 方法宣告為控制器的預設服務方法,用於處理 HTTP GET 請求。您可以定義另一個方法來處理同一 URL 上的任何 POST 請求。
您可以以另一種形式編寫上述控制器,您可以在其中新增其他屬性到@RequestMapping 中,如下所示:
@Controller
public class HelloController {
   @RequestMapping(value = "/hello", method = RequestMethod.GET)
   public String printHello(ModelMap model) {
      model.addAttribute("message", "Hello Spring MVC Framework!");
      return "hello";
   }
}
value 屬性指示將處理程式方法對映到的 URL,method 屬性定義用於處理 HTTP GET 請求的服務方法。關於上面定義的控制器的以下要點需要注意:
您將在服務方法內定義所需的業務邏輯。您可以根據需要在此方法內呼叫其他方法。
根據定義的業務邏輯,您將在此方法內建立模型。您可以使用 setter 設定不同的模型屬性,這些屬性將由檢視訪問以呈現最終結果。此示例建立一個具有其屬性“message”的模型。
定義的服務方法可以返回一個字串,其中包含將用於呈現模型的檢視的名稱。此示例返回“hello”作為邏輯檢視名稱。
建立 JSP 檢視
Spring MVC 支援許多不同表示技術的檢視型別。這些包括 - JSP、HTML、PDF、Excel 工作表、XML、Velocity 模板、XSLT、JSON、Atom 和 RSS 提要、JasperReports 等。但最常見的是我們使用用 JSTL 編寫的 JSP 模板。
讓我們在 /WEB-INF/hello/hello.jsp 中編寫一個簡單的hello 檢視:
<html>
   <head>
      <title>Hello Spring MVC</title>
   </head>

   <body>
      <h2>${message}</h2>
   </body>
</html>
這裡${message} 是我們在控制器中設定的屬性。您可以有多個屬性顯示在您的檢視中。
Spring Web MVC 框架示例
基於上述概念,讓我們檢查一些重要的示例,這些示例將幫助您構建您的 Spring Web 應用程式:
| 序號 | 示例和描述 |
|---|---|
| 1 | Spring MVC Hello World 示例
此示例將解釋如何編寫簡單的 Spring Web Hello World 應用程式。 |
| 2 | Spring MVC 表單處理示例
此示例將解釋如何使用 HTML 表單編寫 Spring Web 應用程式,以將資料提交到控制器並顯示處理後的結果。 |
| 3 | Spring 頁面重定向示例
瞭解如何在 Spring MVC 框架中使用頁面重定向功能。 |
| 4 | Spring 靜態頁面示例
瞭解如何在 Spring MVC 框架中訪問靜態頁面和動態頁面。 |
| 5 | Spring 異常處理示例
瞭解如何在 Spring MVC 框架中處理異常。 |
Spring - 使用 Log4J 進行日誌記錄
這是一個非常易於使用的 Spring 應用程式內的 Log4J 功能。以下示例將引導您完成簡單的步驟,以解釋 Log4J 和 Spring 之間簡單的整合。
我們假設您已經在您的機器上安裝了log4J。如果您沒有它,您可以從https://logging.apache.org/下載它,然後只需將壓縮檔案解壓縮到任何資料夾中。我們專案中只會使用log4j-x.y.z.jar。
接下來,讓我們準備一個可用的 Eclipse IDE,並採取以下步驟使用 Spring Web 框架開發基於動態表單的 Web 應用程式:
| 步驟 | 描述 |
|---|---|
| 1 | 建立一個名為SpringExample的專案,並在建立的專案中src資料夾下建立一個com.tutorialspoint包。 |
| 2 | 如Spring Hello World 示例章節中所述,使用新增外部 JAR選項新增所需的 Spring 庫。 |
| 3 | 使用新增外部 JAR 將 log4j 庫log4j-x.y.z.jar 也新增到您的專案中。 |
| 4 | 在com.tutorialspoint包下建立 Java 類HelloWorld和MainApp。 |
| 5 | 在src資料夾下建立 Bean 配置檔案Beans.xml。 |
| 6 | 在src 資料夾下建立 log4J 配置檔案log4j.properties。 |
| 7 | 最後一步是建立所有 Java 檔案和 Bean 配置檔案的內容,然後執行應用程式,如下所述。 |
以下是HelloWorld.java檔案的內容
package com.tutorialspoint;

public class HelloWorld {
   private String message;

   public void setMessage(String message){
      this.message  = message;
   }
   public void getMessage() {
      System.out.println("Your Message : " + message);
   }
}
以下是第二個檔案MainApp.java的內容
package com.tutorialspoint;

import org.springframework.context.ApplicationContext;
import org.springframework.context.support.ClassPathXmlApplicationContext;
import org.apache.log4j.Logger;

public class MainApp {
   static Logger log = Logger.getLogger(MainApp.class.getName());

   public static void main(String[] args) {
      ApplicationContext context = new ClassPathXmlApplicationContext("Beans.xml");
      log.info("Going to create HelloWord Obj");
      HelloWorld obj = (HelloWorld) context.getBean("helloWorld");
      obj.getMessage();

      log.info("Exiting the program");
   }
}
您可以以類似於我們生成資訊訊息的方式生成debug 和error 訊息。現在讓我們看看Beans.xml 檔案的內容
<?xml version = "1.0" encoding = "UTF-8"?>

<beans xmlns = "http://www.springframework.org/schema/beans"
   xmlns:xsi = "http://www.w3.org/2001/XMLSchema-instance"
   xsi:schemaLocation = "http://www.springframework.org/schema/beans
   http://www.springframework.org/schema/beans/spring-beans-3.0.xsd">

   <bean id = "helloWorld" class = "com.tutorialspoint.HelloWorld">
      <property name = "message" value = "Hello World!"/>
   </bean>

</beans>
以下是log4j.properties的內容,它定義了 Log4J 生成日誌訊息所需的標準規則
# Define the root logger with appender file
log4j.rootLogger = DEBUG, FILE

# Define the file appender
log4j.appender.FILE=org.apache.log4j.FileAppender
# Set the name of the file
log4j.appender.FILE.File=C:\\log.out

# Set the immediate flush to true (default)
log4j.appender.FILE.ImmediateFlush=true

# Set the threshold to debug mode
log4j.appender.FILE.Threshold=debug

# Set the append to false, overwrite
log4j.appender.FILE.Append=false

# Define the layout for file appender
log4j.appender.FILE.layout=org.apache.log4j.PatternLayout
log4j.appender.FILE.layout.conversionPattern=%m%n
建立原始碼和 bean 配置檔案後,讓我們執行應用程式。如果您的應用程式一切正常,這將在 Eclipse 控制檯中列印以下訊息:
Your Message : Hello World!
如果您檢查 C:\\ 驅動器,則應該找到您的日誌檔案log.out,其中包含各種日誌訊息,如下所示:
<!-- initialization log messages -->

Going to create HelloWord Obj
Returning cached instance of singleton bean 'helloWorld'
Exiting the program
Jakarta Commons Logging (JCL) API
或者,您可以使用Jakarta Commons Logging (JCL) API 在您的 Spring 應用程式中生成日誌。JCL 可以從https://jakarta.apache.org/commons/logging/下載。從這個包中,我們技術上只需要commons-logging-x.y.z.jar 檔案,它需要像您在上面的示例中放置log4j-x.y.z.jar 一樣放置在您的類路徑中。
要使用日誌記錄功能,您需要一個org.apache.commons.logging.Log 物件,然後您可以根據您的需求呼叫以下方法之一:
- fatal(Object message)
- error(Object message)
- warn(Object message)
- info(Object message)
- debug(Object message)
- trace(Object message)
以下是 MainApp.java 的替換,它使用了 JCL API
package com.tutorialspoint;

import org.springframework.context.ApplicationContext;
import org.springframework.context.support.ClassPathXmlApplicationContext;
import org.apache.commons.logging. Log;
import org.apache.commons.logging. LogFactory;

public class MainApp {
   static Log log = LogFactory.getLog(MainApp.class.getName());

   public static void main(String[] args) {
      ApplicationContext context = new ClassPathXmlApplicationContext("Beans.xml");
      log.info("Going to create HelloWord Obj");
      HelloWorld obj = (HelloWorld) context.getBean("helloWorld");
      obj.getMessage();

      log.info("Exiting the program");
   }
}
在編譯和執行程式之前,您必須確保已將 commons-logging-x.y.z.jar 檔案包含在您的專案中。
現在保持上述示例中其餘配置和內容不變,如果您編譯並執行您的應用程式,您將獲得與使用 Log4J API 獲得的結果類似的結果。