- Java RMI 有用資源
- Java RMI 快速指南
- Java RMI - 有用資源
- Java RMI - 討論
Java RMI 快速指南
Java RMI - 簡介
RMI 代表 **遠端方法呼叫**。它是一種機制,允許駐留在一個系統(JVM)中的物件訪問/呼叫在另一個 JVM 上執行的物件。
RMI 用於構建分散式應用程式;它提供 Java 程式之間的遠端通訊。它在 **java.rmi** 包中提供。
RMI 應用程式的架構
在 RMI 應用程式中,我們編寫兩個程式,一個 **伺服器程式**(駐留在伺服器上)和一個 **客戶端程式**(駐留在客戶端上)。
在伺服器程式內部,建立了一個遠端物件,並使該物件的引用可供客戶端使用(使用登錄檔)。
客戶端程式請求伺服器上的遠端物件並嘗試呼叫其方法。
下圖顯示了 RMI 應用程式的架構。
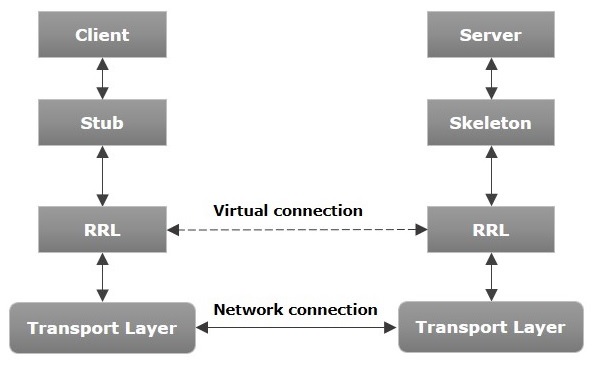
現在讓我們討論一下此架構的元件。
**傳輸層** - 此層連線客戶端和伺服器。它管理現有連線,並建立新連線。
**存根** - 存根是客戶端上遠端物件的表示(代理)。它駐留在客戶端系統中;它充當客戶端程式的閘道器。
**骨架** - 這是駐留在伺服器端的物件。**存根**與該骨架通訊以將請求傳遞給遠端物件。
**RRL(遠端引用層)** - 它是在客戶端對遠端物件進行引用時進行管理的層。
RMI 應用程式的工作原理
以下幾點總結了 RMI 應用程式的工作原理 -
當客戶端對遠端物件進行呼叫時,存根會接收該呼叫,並最終將此請求傳遞給 RRL。
當客戶端 RRL 接收請求時,它會呼叫物件 **remoteRef** 的名為 **invoke()** 的方法。它將請求傳遞給伺服器端的 RRL。
伺服器端的 RRL 將請求傳遞給骨架(伺服器上的代理),骨架最終在伺服器上呼叫所需的物件。
結果將一直傳遞迴客戶端。
編組和反編組
每當客戶端呼叫遠端物件上接受引數的方法時,這些引數都會被打包到訊息中,然後透過網路傳送。這些引數可以是基本型別或物件。對於基本型別,引數會組合在一起,並附加一個標頭。如果引數是物件,則會對其進行序列化。此過程稱為 **編組**。
在伺服器端,打包的引數會被解包,然後呼叫所需的方法。此過程稱為 **反編組**。
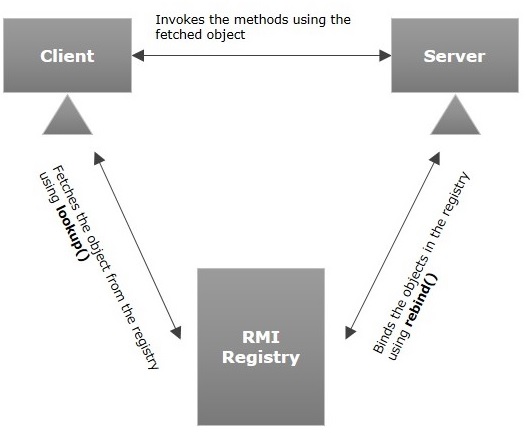
RMI 登錄檔
RMI 登錄檔是一個名稱空間,所有伺服器物件都放置在其中。伺服器每次建立物件時,都會使用 **bind()** 或 **reBind()** 方法將此物件註冊到 RMI 登錄檔中。這些是使用稱為 **繫結名稱** 的唯一名稱註冊的。
要呼叫遠端物件,客戶端需要該物件的引用。此時,客戶端使用其繫結名稱(使用 **lookup()** 方法)從登錄檔中獲取物件。
下圖說明了整個過程 -
RMI 的目標
以下是 RMI 的目標 -
- 最大程度地降低應用程式的複雜性。
- 保留型別安全性。
- 分散式垃圾回收。
- 最大程度地減少使用本地物件和遠端物件之間的差異。
Java RMI 應用程式
要編寫 RMI Java 應用程式,您需要按照以下步驟操作 -
- 定義遠端介面
- 開發實現類(遠端物件)
- 開發伺服器程式
- 開發客戶端程式
- 編譯應用程式
- 執行應用程式
定義遠端介面
遠端介面提供了特定遠端物件的所有方法的描述。客戶端與此遠端介面通訊。
要建立遠端介面 -
建立一個擴充套件預定義介面 **Remote** 的介面,該介面屬於該包。
在此介面中宣告客戶端可以呼叫的所有業務方法。
由於遠端呼叫期間存在網路問題的可能性,因此可能會發生名為 **RemoteException** 的異常;丟擲它。
以下是一個遠端介面的示例。在這裡,我們定義了一個名為 **Hello** 的介面,它有一個名為 **printMsg()** 的方法。
import java.rmi.Remote;
import java.rmi.RemoteException;

// Creating Remote interface for our application
public interface Hello extends Remote {
   void printMsg() throws RemoteException;
}
開發實現類(遠端物件)
我們需要實現前面步驟中建立的遠端介面。(我們可以單獨編寫一個實現類,或者可以直接讓伺服器程式實現此介面。)
要開發實現類 -
- 實現上一步中建立的介面。
- 為遠端介面的所有抽象方法提供實現。
以下是一個實現類。在這裡,我們建立了一個名為 **ImplExample** 的類並實現了上一步中建立的 **Hello** 介面,併為該方法提供了 **主體**,該主體列印一條訊息。
// Implementing the remote interface
public class ImplExample implements Hello {

   // Implementing the interface method
   public void printMsg() {
      System.out.println("This is an example RMI program");
   }
}
開發伺服器程式
RMI 伺服器程式應實現遠端介面或擴充套件實現類。在這裡,我們應該建立一個遠端物件並將其繫結到 **RMI 登錄檔**。
要開發伺服器程式 -
從您想要呼叫遠端物件的位置建立一個客戶端類。
**建立遠端物件**,方法是例項化實現類,如下所示。
使用名為 **UnicastRemoteObject** 的類的 **exportObject()** 方法匯出遠端物件,該類屬於 **java.rmi.server** 包。
使用 **java.rmi.registry** 包中名為 **LocateRegistry** 類的 **getRegistry()** 方法獲取 RMI 登錄檔。
使用名為 **Registry** 類的 **bind()** 方法將建立的遠端物件繫結到登錄檔。為此方法傳遞表示繫結名稱和匯出的物件的字串作為引數。
以下是一個 RMI 伺服器程式的示例。
import java.rmi.registry.Registry;
import java.rmi.registry.LocateRegistry;
import java.rmi.RemoteException;
import java.rmi.server.UnicastRemoteObject;

public class Server extends ImplExample {
   public Server() {}
   public static void main(String args[]) {
      try {
         // Instantiating the implementation class
         ImplExample obj = new ImplExample();

         // Exporting the object of implementation class
         // (here we are exporting the remote object to the stub)
         Hello stub = (Hello) UnicastRemoteObject.exportObject(obj, 0);

         // Binding the remote object (stub) in the registry
         Registry registry = LocateRegistry.getRegistry();

         registry.bind("Hello", stub);
         System.err.println("Server ready");
      } catch (Exception e) {
         System.err.println("Server exception: " + e.toString());
         e.printStackTrace();
      }
   }
}
開發客戶端程式
在其中編寫一個客戶端程式,獲取遠端物件並使用此物件呼叫所需的方法。
要開發客戶端程式 -
從您打算呼叫遠端物件的位置建立一個客戶端類。
使用 **java.rmi.registry** 包中名為 **LocateRegistry** 類的 **getRegistry()** 方法獲取 RMI 登錄檔。
使用 **java.rmi.registry** 包中名為 **Registry** 類的 **lookup()** 方法從登錄檔中獲取物件。
為此方法,您需要傳遞一個表示繫結名稱的字串值作為引數。這將返回遠端物件。
lookup() 返回型別為遠端的物件,將其向下轉換為 Hello 型別。
最後使用獲得的遠端物件呼叫所需的方法。
以下是一個 RMI 客戶端程式的示例。
import java.rmi.registry.LocateRegistry;
import java.rmi.registry.Registry;

public class Client {
   private Client() {}
   public static void main(String[] args) {
      try {
         // Getting the registry
         Registry registry = LocateRegistry.getRegistry(null);

         // Looking up the registry for the remote object
         Hello stub = (Hello) registry.lookup("Hello");

         // Calling the remote method using the obtained object
         stub.printMsg();

         // System.out.println("Remote method invoked");
      } catch (Exception e) {
         System.err.println("Client exception: " + e.toString());
         e.printStackTrace();
      }
   }
}
編譯應用程式
要編譯應用程式 -
- 編譯遠端介面。
- 編譯實現類。
- 編譯伺服器程式。
- 編譯客戶端程式。
或者,
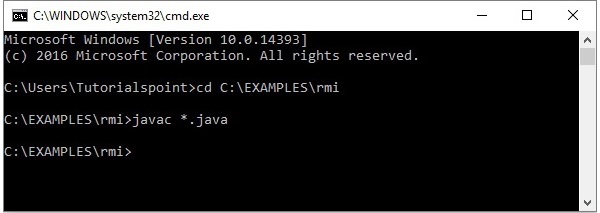
開啟儲存所有程式的資料夾,並編譯所有 Java 檔案,如下所示。
Javac *.java
執行應用程式
**步驟 1** - 使用以下命令啟動 **rmi** 登錄檔。
start rmiregistry
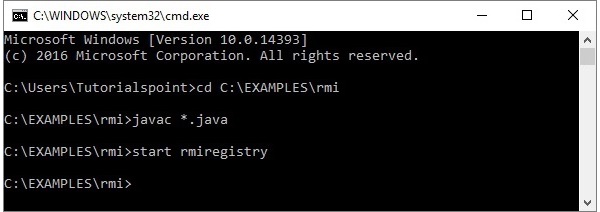
這將在一個單獨的視窗中啟動一個 **rmi** 登錄檔,如下所示。

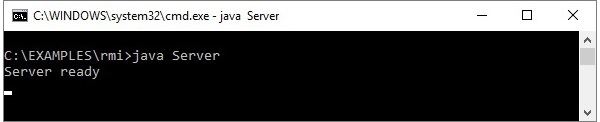
**步驟 2** - 執行伺服器類檔案,如下所示。
Java Server
**步驟 3** - 執行客戶端類檔案,如下所示。
java Client

**驗證** - 只要您啟動客戶端,您就會在伺服器中看到以下輸出。

Java RMI - GUI 應用程式
在上一章中,我們建立了一個示例 RMI 應用程式。在本章中,我們將解釋如何建立一個 RMI 應用程式,其中客戶端呼叫一個顯示 GUI 視窗(JavaFX)的方法。
定義遠端介面
在這裡,我們定義了一個名為 **Hello** 的遠端介面,其中包含一個名為 **animation()** 的方法。
import java.rmi.Remote;
import java.rmi.RemoteException;

// Creating Remote interface for our application
public interface Hello extends Remote {
   void animation() throws RemoteException;
}
開發實現類
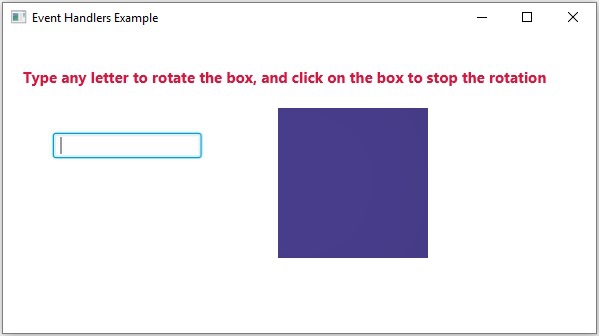
在此應用程式的實現類(遠端物件)中,我們嘗試使用 JavaFX 建立一個顯示 GUI 內容的視窗。
import javafx.animation.RotateTransition;
import javafx.application.Application;
import javafx.event.EventHandler;

import javafx.scene.Group;
import javafx.scene.PerspectiveCamera;
import javafx.scene.Scene;
import javafx.scene.control.TextField;
import javafx.scene.input.KeyEvent;
import javafx.scene.paint.Color;
import javafx.scene.paint.PhongMaterial;

import javafx.scene.shape.Box;
import javafx.scene.text.Font;
import javafx.scene.text.FontWeight;
import javafx.scene.text.Text;
import javafx.scene.transform.Rotate;

import javafx.stage.Stage;
import javafx.util.Duration;

// Implementing the remote interface
public class FxSample extends Application implements Hello {
   @Override
   public void start(Stage stage) {
      // Drawing a Box
      Box box = new Box();

      // Setting the properties of the Box
      box.setWidth(150.0);
      box.setHeight(150.0);
      box.setDepth(100.0);

      // Setting the position of the box
      box.setTranslateX(350);
      box.setTranslateY(150);
      box.setTranslateZ(50);

      // Setting the text
      Text text = new Text(
         "Type any letter to rotate the box, and click on the box to stop the rotation");

      // Setting the font of the text
      text.setFont(Font.font(null, FontWeight.BOLD, 15));

      // Setting the color of the text
      text.setFill(Color.CRIMSON);

      // Setting the position of the text
      text.setX(20);
      text.setY(50);

      // Setting the material of the box
      PhongMaterial material = new PhongMaterial();
      material.setDiffuseColor(Color.DARKSLATEBLUE);

      // Setting the diffuse color material to box
      box.setMaterial(material);

      // Setting the rotation animation to the box
      RotateTransition rotateTransition = new RotateTransition();

      // Setting the duration for the transition
      rotateTransition.setDuration(Duration.millis(1000));

      // Setting the node for the transition
      rotateTransition.setNode(box);

      // Setting the axis of the rotation
      rotateTransition.setAxis(Rotate.Y_AXIS);

      // Setting the angle of the rotation
      rotateTransition.setByAngle(360);

      // Setting the cycle count for the transition
      rotateTransition.setCycleCount(50);

      // Setting auto reverse value to false
      rotateTransition.setAutoReverse(false);

      // Creating a text filed
      TextField textField = new TextField();

      // Setting the position of the text field
      textField.setLayoutX(50);
      textField.setLayoutY(100);

      // Handling the key typed event
      EventHandler<KeyEvent> eventHandlerTextField = new EventHandler<KeyEvent>() {
         @Override
         public void handle(KeyEvent event) {
            // Playing the animation
            rotateTransition.play();
         }
      };

      // Adding an event handler to the text feld
      textField.addEventHandler(KeyEvent.KEY_TYPED, eventHandlerTextField);

      // Handling the mouse clicked event(on box)
      EventHandler<javafx.scene.input.MouseEvent> eventHandlerBox =
         new EventHandler<javafx.scene.input.MouseEvent>() {
         @Override
         public void handle(javafx.scene.input.MouseEvent e) {
            rotateTransition.stop();
         }
      };

      // Adding the event handler to the box
      box.addEventHandler(javafx.scene.input.MouseEvent.MOUSE_CLICKED, eventHandlerBox);

      // Creating a Group object
      Group root = new Group(box, textField, text);

      // Creating a scene object
      Scene scene = new Scene(root, 600, 300);

      // Setting camera
      PerspectiveCamera camera = new PerspectiveCamera(false);
      camera.setTranslateX(0);
      camera.setTranslateY(0);
      camera.setTranslateZ(0);
      scene.setCamera(camera);

      // Setting title to the Stage
      stage.setTitle("Event Handlers Example");

      // Adding scene to the stage
      stage.setScene(scene);

      // Displaying the contents of the stage
      stage.show();
   }

   // Implementing the interface method
   public void animation() {
      launch();
   }
}
伺服器程式
RMI 伺服器程式應實現遠端介面或擴充套件實現類。在這裡,我們應該建立一個遠端物件並將其繫結到 **RMI 登錄檔**。
以下是此應用程式的伺服器程式。在這裡,我們將擴充套件上面建立的類,建立一個遠端物件,並使用繫結名稱 **hello** 將其註冊到 RMI 登錄檔中。
import java.rmi.registry.Registry;
import java.rmi.registry.LocateRegistry;
import java.rmi.RemoteException;
import java.rmi.server.UnicastRemoteObject;

public class Server extends FxSample {
   public Server() {}
   public static void main(String args[]) {
      try {
         // Instantiating the implementation class
         FxSample obj = new FxSample();

         // Exporting the object of implementation class
         // (here we are exporting the remote object to the stub)
         Hello stub = (Hello) UnicastRemoteObject.exportObject(obj, 0);

         // Binding the remote object (stub) in the registry
         Registry registry = LocateRegistry.getRegistry();

         registry.bind("Hello", stub);
         System.err.println("Server ready");
      } catch (Exception e) {
         System.err.println("Server exception: " + e.toString());
         e.printStackTrace();
      }
   }
}
客戶端程式
以下是此應用程式的客戶端程式。在這裡,我們正在獲取遠端物件並呼叫其名為 **animation()** 的方法。
import java.rmi.registry.LocateRegistry;
import java.rmi.registry.Registry;

public class Client {
   private Client() {}
   public static void main(String[] args) {
      try {
         // Getting the registry
         Registry registry = LocateRegistry.getRegistry(null);

         // Looking up the registry for the remote object
         Hello stub = (Hello) registry.lookup("Hello");

         // Calling the remote method using the obtained object
         stub.animation();

         System.out.println("Remote method invoked");
      } catch (Exception e) {
         System.err.println("Client exception: " + e.toString());
         e.printStackTrace();
      }
   }
}
執行示例的步驟
以下是執行我們的 RMI 示例的步驟。
**步驟 1** - 開啟儲存所有程式的資料夾,並編譯所有 Java 檔案,如下所示。
Javac *.java
**步驟 2** - 使用以下命令啟動 **rmi** 登錄檔。
start rmiregistry
這將在一個單獨的視窗中啟動一個 **rmi** 登錄檔,如下所示。
**步驟 3** - 執行伺服器類檔案,如下所示。
Java Server
**步驟 4** - 執行客戶端類檔案,如下所示。
java Client

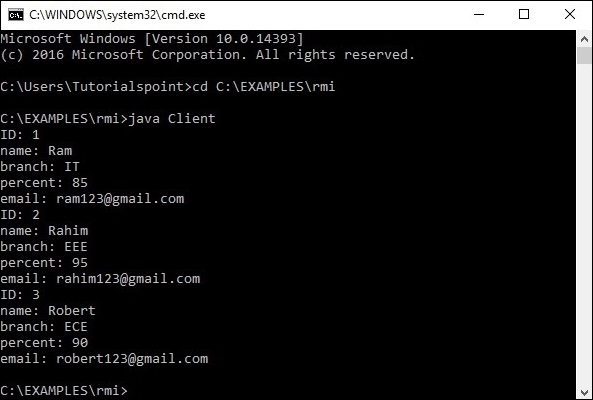
**驗證** - 只要您啟動客戶端,您就會在伺服器中看到以下輸出。
Java RMI - 資料庫應用程式
在上一章中,我們建立了一個示例 RMI 應用程式,其中客戶端呼叫一個顯示 GUI 視窗(JavaFX)的方法。
在本章中,我們將舉一個例子來了解客戶端程式如何檢索駐留在伺服器上的 MySQL 資料庫中表的記錄。
假設我們在資料庫 **details** 中有一個名為 **student_data** 的表,如下所示。
+----+--------+--------+------------+---------------------+
| ID | NAME   | BRANCH | PERCENTAGE | EMAIL               |
+----+--------+--------+------------+---------------------+
|  1 | Ram    | IT     |         85 | ram123@gmail.com    |
|  2 | Rahim  | EEE    |         95 | rahim123@gmail.com  |
|  3 | Robert | ECE    |         90 | robert123@gmail.com |
+----+--------+--------+------------+---------------------+
假設使用者的名稱為 **myuser**,其密碼為 **password**。
建立學生類
建立一個名為Student的類,幷包含如下所示的setter和getter方法。
public class Student implements java.io.Serializable {
   private int id, percent;
   private String name, branch, email;

   public int getId() {
      return id;
   }
   public String getName() {
      return name;
   }
   public String getBranch() {
      return branch;
   }
   public int getPercent() {
      return percent;
   }
   public String getEmail() {
      return email;
   }
   public void setID(int id) {
      this.id = id;
   }
   public void setName(String name) {
      this.name = name;
   }
   public void setBranch(String branch) {
      this.branch = branch;
   }
   public void setPercent(int percent) {
      this.percent = percent;
   }
   public void setEmail(String email) {
      this.email = email;
   }
}
定義遠端介面
定義遠端介面。在這裡,我們定義了一個名為Hello的遠端介面,其中包含一個名為getStudents()的方法。此方法返回一個列表,該列表包含Student類的物件。
import java.rmi.Remote;
import java.rmi.RemoteException;
import java.util.*;

// Creating Remote interface for our application
public interface Hello extends Remote {
   public List<Student> getStudents() throws Exception;
}
開發實現類
建立一個類並實現上面建立的介面。
在這裡,我們實現了遠端介面的getStudents()方法。當您呼叫此方法時,它會檢索名為student_data的表的記錄。使用其setter方法將這些值設定為Student類,將其新增到列表物件中並返回該列表。
import java.sql.*;
import java.util.*;

// Implementing the remote interface
public class ImplExample implements Hello {

   // Implementing the interface method
   public List<Student> getStudents() throws Exception {
      List<Student> list = new ArrayList<Student>();

      // JDBC driver name and database URL
      String JDBC_DRIVER = "com.mysql.jdbc.Driver";
      String DB_URL = "jdbc:mysql://:3306/details";

      // Database credentials
      String USER = "myuser";
      String PASS = "password";

      Connection conn = null;
      Statement stmt = null;

      //Register JDBC driver
      Class.forName("com.mysql.jdbc.Driver");

      //Open a connection
      System.out.println("Connecting to a selected database...");
      conn = DriverManager.getConnection(DB_URL, USER, PASS);
      System.out.println("Connected database successfully...");

      //Execute a query
      System.out.println("Creating statement...");

      stmt = conn.createStatement();
      String sql = "SELECT * FROM student_data";
      ResultSet rs = stmt.executeQuery(sql);

      //Extract data from result set
      while(rs.next()) {
         // Retrieve by column name
         int id  = rs.getInt("id");

         String name = rs.getString("name");
         String branch = rs.getString("branch");

         int percent = rs.getInt("percentage");
         String email = rs.getString("email");

         // Setting the values
         Student student = new Student();
         student.setID(id);
         student.setName(name);
         student.setBranch(branch);
         student.setPercent(percent);
         student.setEmail(email);
         list.add(student);
      }
      rs.close();
      return list;
   }
}
伺服器程式
RMI伺服器程式應實現遠端介面或擴充套件實現類。在這裡,我們應該建立一個遠端物件並將其繫結到RMI登錄檔。
以下是此應用程式的伺服器程式。在這裡,我們將擴充套件上面建立的類,建立一個遠端物件並將其註冊到RMI登錄檔,繫結名稱為hello。
import java.rmi.registry.Registry;
import java.rmi.registry.LocateRegistry;
import java.rmi.RemoteException;
import java.rmi.server.UnicastRemoteObject;

public class Server extends ImplExample {
   public Server() {}
   public static void main(String args[]) {
      try {
         // Instantiating the implementation class
         ImplExample obj = new ImplExample();

         // Exporting the object of implementation class (
            here we are exporting the remote object to the stub)
         Hello stub = (Hello) UnicastRemoteObject.exportObject(obj, 0);

         // Binding the remote object (stub) in the registry
         Registry registry = LocateRegistry.getRegistry();

         registry.bind("Hello", stub);
         System.err.println("Server ready");
      } catch (Exception e) {
         System.err.println("Server exception: " + e.toString());
         e.printStackTrace();
      }
   }
}
客戶端程式
以下是此應用程式的客戶端程式。在這裡,我們正在獲取遠端物件並呼叫名為getStudents()的方法。它從列表物件中檢索表的記錄並顯示它們。
import java.rmi.registry.LocateRegistry;
import java.rmi.registry.Registry;
import java.util.*;

public class Client {
   private Client() {}
   public static void main(String[] args)throws Exception {
      try {
         // Getting the registry
         Registry registry = LocateRegistry.getRegistry(null);

         // Looking up the registry for the remote object
         Hello stub = (Hello) registry.lookup("Hello");

         // Calling the remote method using the obtained object
         List<Student> list = (List)stub.getStudents();
         for (Student s:list)v {

            // System.out.println("bc "+s.getBranch());
            System.out.println("ID: " + s.getId());
            System.out.println("name: " + s.getName());
            System.out.println("branch: " + s.getBranch());
            System.out.println("percent: " + s.getPercent());
            System.out.println("email: " + s.getEmail());
         }
      // System.out.println(list);
      } catch (Exception e) {
         System.err.println("Client exception: " + e.toString());
         e.printStackTrace();
      }
   }
}
執行示例的步驟
以下是執行我們的 RMI 示例的步驟。
**步驟 1** - 開啟儲存所有程式的資料夾,並編譯所有 Java 檔案,如下所示。
Javac *.java
**步驟 2** - 使用以下命令啟動 **rmi** 登錄檔。
start rmiregistry
這將在一個單獨的視窗中啟動一個 **rmi** 登錄檔,如下所示。
**步驟 3** - 執行伺服器類檔案,如下所示。
Java Server
**步驟 4** - 執行客戶端類檔案,如下所示。
java Client