
 資料結構
資料結構 網路
網路 關係資料庫管理系統 (RDBMS)
 作業系統
作業系統 Java
Java iOS
iOS HTML
HTML CSS
CSS Android
 Python
 C 程式設計
 C++
C++ C#
C# MongoDB
 MySQL
MySQL Javascript
 PHP
PHP如何在 OpenCV Python 中對給定影像執行距離變換?
我們可以使用cv2.distanceTransform()方法執行距離變換。以下是此方法的語法。
語法
cv2.distanceTransform(src, distanceType, maskSize)
此方法接受以下引數:
src - 8 位,單通道(二值)源影像。
distanceType - 距離的型別。
maskSize - 距離變換掩碼的大小。
步驟
要對影像執行距離變換,我們可以按照以下步驟操作:
匯入所需的庫。在以下所有示例中,所需的 Python 庫是OpenCV。確保您已安裝它。
使用cv2.imread()讀取輸入影像。使用此方法讀取的 RGB 影像是 BGR 格式。可以選擇將讀取的 BGR 影像賦值給 img。
現在,使用cv2.cvtColor()函式將此 BGR 影像轉換為灰度影像。可以選擇將轉換後的灰度影像賦值給 gray。
現在對灰度影像應用閾值處理,將其轉換為二值影像。調整第二個引數 (threshValue) 以獲得更好的二值影像。
使用cv2.distanceTransform()對二值影像應用距離變換。它返回距離變換後的影像。將此影像歸一化到 [0,1] 範圍內。
顯示距離變換後的影像。
讓我們來看一些例子,以便更好地理解。
輸入影像
我們將在下面的示例中使用此影像作為輸入檔案。

示例
在此示例中,我們找到輸入影像的距離變換。我們將cv2.DIST_L2作為 distanceType,並將 maskSize 設定為 3。
# Load image in grayscale
import cv2
import numpy as np
import matplotlib.pyplot as plt

# Read the input image
img = cv2.imread('sketch.jpg')

# convert the image to grayscale
gray = cv2.cvtColor(img, cv2.COLOR_BGR2GRAY)

# apply thresholding to convert the grayscale image to a binary image
ret,thresh = cv2.threshold(gray,150,255,cv2.THRESH_BINARY)

# Apply distance transform on the binary image
dist = cv2.distanceTransform(thresh, cv2.DIST_L2, 3)

# Normalize the distance image for range = {0.0, 1.0}

# so we can visualize and threshold it
cv2.normalize(dist, dist, 0, 1.0, cv2.NORM_MINMAX)
cv2.imshow('Distance Transform Image', dist)
cv2.waitKey(0)
cv2.destroyAllWindows()
輸出
執行上面的 Python 程式後,它將生成以下輸出視窗:

示例
在此示例中,我們找到輸入影像的距離變換。我們應用五種不同型別的 distanceType 和 maskSize 為 3。
# import required libraries
import cv2
import matplotlib.pyplot as plt

# Read the input image
img = cv2.imread('sketch.jpg')

# convert the image to grayscale
gray = cv2.cvtColor(img, cv2.COLOR_BGR2GRAY)

# Apply thresholding to convert the grayscale image to a binary image
ret,thresh = cv2.threshold(gray,150,255,cv2.THRESH_BINARY)

# Apply distance transform on the binary image
dist_C = cv2.distanceTransform(thresh, cv2.DIST_C, 3)
dist_L1 = cv2.distanceTransform(thresh, cv2.DIST_L1, 3)
dist_L2 = cv2.distanceTransform(thresh, cv2.DIST_L2, 3)
dist_LP = cv2.distanceTransform(thresh, cv2.DIST_LABEL_PIXEL, 3)
dist_M = cv2.distanceTransform(thresh, cv2.DIST_MASK_3, 3)

# Normalize the distance image for range = {0.0, 1.0}

# so we can visualize and threshold it
cv2.normalize(dist_C, dist_C, 0, 1.0, cv2.NORM_MINMAX)
cv2.normalize(dist_L1, dist_L1, 0, 1.0, cv2.NORM_MINMAX)
cv2.normalize(dist_L2, dist_L2, 0, 1.0, cv2.NORM_MINMAX)
cv2.normalize(dist_LP, dist_LP, 0, 1.0, cv2.NORM_MINMAX)
cv2.normalize(dist_M, dist_M, 0, 1.0, cv2.NORM_MINMAX)

# visualize the distance images
plt.subplot(231),plt.imshow(dist_C, cmap = 'gray')
plt.title('DIST_C'), plt.xticks([]), plt.yticks([])
plt.subplot(232),plt.imshow(dist_L1, cmap = 'gray')
plt.title('DIST_L1'), plt.xticks([]), plt.yticks([])
plt.subplot(233),plt.imshow(dist_L2, cmap = 'gray')
plt.title('DIST_L2'), plt.xticks([]), plt.yticks([])
plt.subplot(234),plt.imshow(dist_LP, cmap = 'gray')
plt.title('DIST_LABEL_PIXEL'), plt.xticks([]), plt.yticks([])
plt.subplot(235),plt.imshow(dist_M, cmap = 'gray')
plt.title('DIST_MASK_3'), plt.xticks([]), plt.yticks([])
plt.show()
輸出
執行上面的 Python 程式後,它將生成以下輸出視窗,顯示應用不同 distanceType 後獲得的不同變換。
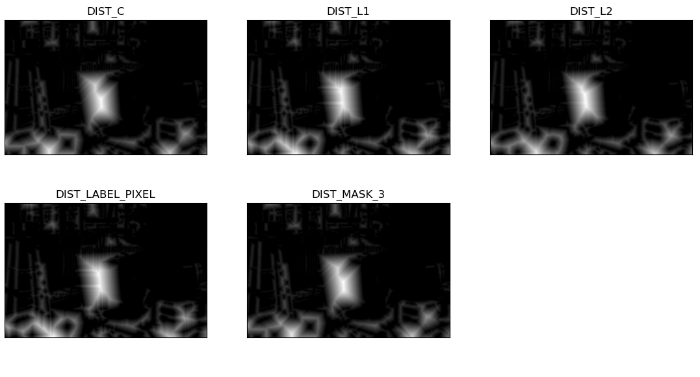
注意這五種distanceType之間的區別。

更新於:2022年12月2日
1K+ 次瀏覽

廣告