
 資料結構
資料結構 網路
網路 關係資料庫管理系統
 作業系統
作業系統 Java
Java iOS
iOS HTML
HTML CSS
CSS Android
 Python
 C 程式設計
 C++
C++ C#
C# MongoDB
 MySQL
MySQL Javascript
 PHP
PHP如何在 OpenCV Python 中對影像執行按位異或運算?
彩色影像(RGB)具有三個通道:紅色、藍色和綠色。影像表示為一個三維 NumPy 陣列。影像的畫素值使用 8 位無符號整數 (uint8) 儲存,範圍為“0 到 255”。
兩個影像的按位異或運算是在對應影像的這些畫素值的二進位制表示上執行的。
以下是執行兩個影像按位異或運算的語法:
cv2.bitwise_xor(img1, img2, mask=None)
這裡,img1 和 img2 是兩個輸入影像,mask 是一個掩碼操作。
步驟
要計算兩個影像之間的按位異或,您可以按照以下步驟操作:
匯入所需的庫 **OpenCV、Numpy** 和 **Matplotlib**。確保您已安裝它們。
import cv2
import numpy as np
import matplotlib as plt
使用 **cv2.imread()** 方法讀取影像。影像的寬度和高度必須相同。
img1 = cv2.imread('waterfall.jpg')
img2 = cv2.imread('work.jpg')
使用 **cv2.biwise_xor(img1, img2)** 對兩個影像進行按位異或運算。
xor_img = cv2.bitwise_xor(img1,img2)
顯示按位異或影像。
cv2.imshow('Bitwise XOR Image', xor_img)
cv2.waitKey(0)
cv2.destroyAllWindows()
我們將在下面的示例中使用以下影像作為 **輸入檔案**。


示例 1
在下面的 Python 程式中,我們對兩個彩色影像進行按位異或運算。
# import required libraries
import cv2

# Read two images. The size of both images must be the same.
img1 = cv2.imread('waterfall.jpg')
img2 = cv2.imread('work.jpg')

# compute bitwise XOR on both images
xor_img = cv2.bitwise_xor(img1,img2)

# display the computed bitwise XOR image
cv2.imshow('Bitwise XOR Image', xor_img)
cv2.waitKey(0)
cv2.destroyAllWindows()
輸出
執行此 Python 程式時,它將產生以下輸出:

示例 2
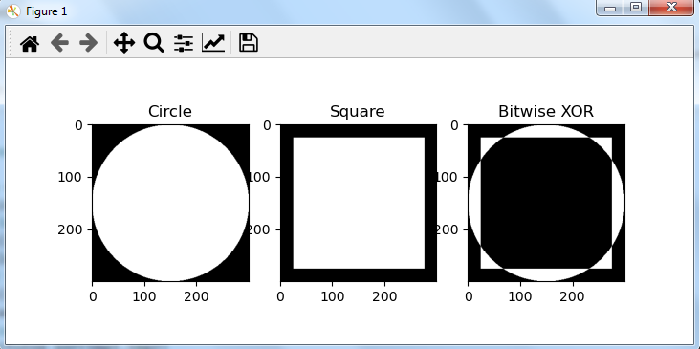
以下程式顯示了對兩個影像應用按位異或運算。我們建立了兩個影像,第一個是圓形,第二個是相同大小的正方形。
# import required libraries
import cv2
import numpy as np
import matplotlib.pyplot as plt

# define first image as a circle
img1 = np.zeros((300, 300), dtype = "uint8")
img1 = cv2.circle(img1, (150, 150), 150, 255, -1)

# define second image as a square
img2 = np.zeros((300,300), dtype="uint8")
img2 = cv2.rectangle(img2, (25, 25), (275, 275), 255, -1)

# perform bitwise XOR on img1 and img2
xor_img = cv2.bitwise_xor(img1,img2)

# Display the bitwise XOR output image
plt.subplot(131), plt.imshow(img1, 'gray'), plt.title("Circle")
plt.subplot(132), plt.imshow(img2,'gray'), plt.title("Square")
plt.subplot(133), plt.imshow(xor_img, 'gray'), plt.title("Bitwise XOR")

plt.show()
輸出
執行此 Python 程式時,它將產生以下輸出:

更新於: 2022-09-28
3K+ 次瀏覽

廣告