
- Flask 教程
- Flask - 首頁
- Flask - 概述
- Flask - 環境
- Flask - 應用
- Flask - 路由
- Flask - 變數規則
- Flask - URL構建
- Flask - HTTP方法
- Flask - 模板
- Flask - 靜態檔案
- Flask - 請求物件
- 將表單資料傳送到模板
- Flask - Cookie
- Flask - 會話
- Flask - 重定向和錯誤
- Flask - 訊息閃現
- Flask - 檔案上傳
- Flask - 擴充套件
- Flask - 郵件
- Flask - WTF
- Flask - SQLite
- Flask - SQLAlchemy
- Flask - Sijax
- Flask - 部署
- Flask - FastCGI
- Flask 有用資源
- Flask - 快速指南
- Flask - 有用資源
- Flask - 討論
Flask – SQLAlchemy
在 Flask Web 應用中使用原始 SQL 來對資料庫執行 CRUD 操作可能很繁瑣。相反,SQLAlchemy,一個 Python 工具包,是一個強大的物件關係對映器 (OR Mapper),它為應用程式開發者提供了 SQL 的全部功能和靈活性。Flask-SQLAlchemy 是 Flask 擴充套件,它為你的 Flask 應用程式添加了對 SQLAlchemy 的支援。
什麼是 ORM(物件關係對映)?
大多數程式語言平臺都是面向物件的。另一方面,RDBMS 伺服器中的資料儲存為表。物件關係對映是一種將物件引數對映到底層 RDBMS 表結構的技術。ORM API 提供了執行 CRUD 操作的方法,而無需編寫原始 SQL 語句。
在本節中,我們將學習 Flask-SQLAlchemy 的 ORM 技術,並構建一個小型 Web 應用程式。
步驟 1 - 安裝 Flask-SQLAlchemy 擴充套件。
pip install flask-sqlalchemy
步驟 2 - 你需要從該模組匯入 SQLAlchemy 類。
from flask_sqlalchemy import SQLAlchemy
步驟 3 - 現在建立一個 Flask 應用程式物件並設定要使用的資料庫的 URI。
app = Flask(__name__)
app.config['SQLALCHEMY_DATABASE_URI'] = 'sqlite:///students.sqlite3'
步驟 4 - 然後使用應用程式物件作為引數建立一個 SQLAlchemy 類的物件。此物件包含用於 ORM 操作的輔助函式。它還提供了一個父 Model 類,使用者定義的模型就是使用它宣告的。在下面的程式碼片段中,建立了一個students模型。
db = SQLAlchemy(app)
class students(db.Model):
   id = db.Column('student_id', db.Integer, primary_key = True)
   name = db.Column(db.String(100))
   city = db.Column(db.String(50))
   addr = db.Column(db.String(200))
   pin = db.Column(db.String(10))

def __init__(self, name, city, addr,pin):
   self.name = name
   self.city = city
   self.addr = addr
   self.pin = pin
步驟 5 - 要建立/使用 URI 中提到的資料庫,請執行create_all()方法。
db.create_all()
SQLAlchemy 的Session物件管理ORM物件的所有永續性操作。
以下會話方法執行 CRUD 操作:
db.session.add(模型物件) - 將記錄插入對映表
db.session.delete(模型物件) - 從表中刪除記錄
model.query.all() - 從表中檢索所有記錄(對應於 SELECT 查詢)。
你可以使用 filter 屬性將過濾器應用於檢索到的記錄集。例如,為了在 students 表中檢索 city = 'Hyderabad' 的記錄,請使用以下語句:
Students.query.filter_by(city = ’Hyderabad’).all()
有了這些背景知識,現在我們將為我們的應用程式提供檢視函式來新增學生資料。
應用程式的入口點是繫結到'/'URL 的show_all()函式。學生表的記錄集作為引數傳送到 HTML 模板。模板中的伺服器端程式碼以 HTML 表格形式呈現記錄。
@app.route('/')
def show_all():
   return render_template('show_all.html', students = students.query.all() )
模板('show_all.html')的 HTML 指令碼如下:
<!DOCTYPE html>
<html lang = "en">
   <head></head>
   <body>
      <h3>
         <a href = "{{ url_for('show_all') }}">Comments - Flask
            SQLAlchemy example</a>
      </h3>

      <hr/>
      {%- for message in get_flashed_messages() %}
         {{ message }}
      {%- endfor %}

      <h3>Students (<a href = "{{ url_for('new') }}">Add Student
         </a>)</h3>

      <table>
         <thead>
            <tr>
               <th>Name</th>
               <th>City</th>
               <th>Address</th>
               <th>Pin</th>
            </tr>
         </thead>

         <tbody>
            {% for student in students %}
               <tr>
                  <td>{{ student.name }}</td>
                  <td>{{ student.city }}</td>
                  <td>{{ student.addr }}</td>
                  <td>{{ student.pin }}</td>
               </tr>
            {% endfor %}
         </tbody>
      </table>
   </body>
</html>
上面頁面包含一個指向'/new' URL 對映new()函式的超連結。單擊後,它將開啟一個學生資訊表單。資料以POST方法釋出到相同的 URL。
new.html
<!DOCTYPE html>
<html>
   <body>
      <h3>Students - Flask SQLAlchemy example</h3>
      <hr/>

      {%- for category, message in get_flashed_messages(with_categories = true) %}
         <div class = "alert alert-danger">
            {{ message }}
         </div>
      {%- endfor %}

      <form action = "{{ request.path }}" method = "post">
         <label for = "name">Name</label><br>
         <input type = "text" name = "name" placeholder = "Name" /><br>
         <label for = "email">City</label><br>
         <input type = "text" name = "city" placeholder = "city" /><br>
         <label for = "addr">addr</label><br>
         <textarea name = "addr" placeholder = "addr"></textarea><br>
         <label for = "PIN">City</label><br>
         <input type = "text" name = "pin" placeholder = "pin" /><br>
         <input type = "submit" value = "Submit" />
      </form>
   </body>
</html>
當檢測到 http 方法為 POST 時,表單資料將新增到 students 表中,並且應用程式將返回到主頁,顯示已新增的資料。
@app.route('/new', methods = ['GET', 'POST'])
def new():
   if request.method == 'POST':
      if not request.form['name'] or not request.form['city'] or not request.form['addr']:
         flash('Please enter all the fields', 'error')
      else:
         student = students(request.form['name'], request.form['city'],
            request.form['addr'], request.form['pin'])

         db.session.add(student)
         db.session.commit()

         flash('Record was successfully added')
         return redirect(url_for('show_all'))
   return render_template('new.html')
以下是應用程式(app.py)的完整程式碼。
from flask import Flask, request, flash, url_for, redirect, render_template
from flask_sqlalchemy import SQLAlchemy

app = Flask(__name__)
app.config['SQLALCHEMY_DATABASE_URI'] = 'sqlite:///students.sqlite3'
app.config['SECRET_KEY'] = "random string"

db = SQLAlchemy(app)

class students(db.Model):
   id = db.Column('student_id', db.Integer, primary_key = True)
   name = db.Column(db.String(100))
   city = db.Column(db.String(50))
   addr = db.Column(db.String(200))
   pin = db.Column(db.String(10))

def __init__(self, name, city, addr,pin):
   self.name = name
   self.city = city
   self.addr = addr
   self.pin = pin

@app.route('/')
def show_all():
   return render_template('show_all.html', students = students.query.all() )

@app.route('/new', methods = ['GET', 'POST'])
def new():
   if request.method == 'POST':
      if not request.form['name'] or not request.form['city'] or not request.form['addr']:
         flash('Please enter all the fields', 'error')
      else:
         student = students(request.form['name'], request.form['city'],
            request.form['addr'], request.form['pin'])

         db.session.add(student)
         db.session.commit()
         flash('Record was successfully added')
         return redirect(url_for('show_all'))
   return render_template('new.html')

if __name__ == '__main__':
   db.create_all()
   app.run(debug = True)
從 Python shell 執行指令碼,並在瀏覽器中輸入https://:5000/。

單擊“新增學生”連結以開啟學生資訊表單。
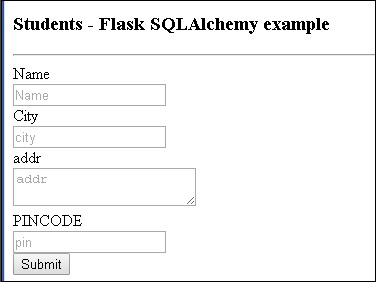
填寫表單並提交。主頁將重新出現,顯示提交的資料。
我們可以看到如下所示的輸出。
