- Espresso 測試框架教程
- Espresso 測試 - 首頁
- 介紹
- 設定說明
- 在Android Studio中執行測試
- JUnit概述
- 架構
- 檢視匹配器 (View Matchers)
- 自定義檢視匹配器 (Custom View Matchers)
- 檢視斷言 (View Assertions)
- 檢視操作 (View Actions)
- 測試AdapterView
- 測試WebView
- 測試非同步操作
- 測試Intent
- 測試多個應用程式的UI
- 測試錄製器 (Test Recorder)
- 測試UI效能
- 測試無障礙性 (Accessibility)
- Espresso 測試資源
- Espresso 測試 - 快速指南
- Espresso 測試 - 有用資源
- Espresso 測試 - 討論
Espresso 測試框架 - JUnit概述
本章我們將瞭解JUnit的基礎知識,這是一個由Java社群開發的流行單元測試框架,Espresso測試框架就是基於它構建的。
JUnit是Java應用程式單元測試的實際標準。儘管它流行於單元測試,但它也完全支援和提供儀表測試。Espresso測試庫擴充套件了必要的JUnit類以支援基於Android的儀表測試。
編寫簡單的單元測試
讓我們建立一個Java類,Computation (Computation.java),並編寫簡單的數學運算,Summation和Multiplication。然後,我們將使用JUnit編寫測試用例,並透過執行測試用例來檢查它。
啟動Android Studio。
開啟上一章中建立的HelloWorldApp。
在app/src/main/java/com/tutorialspoint/espressosamples/helloworldapp/中建立一個檔案,Computation.java,並編寫兩個函式 - Sum和Multiply,如下所示:
package com.tutorialspoint.espressosamples.helloworldapp;
public class Computation {
   public Computation() {}
   public int Sum(int a, int b) {
      return a + b;
   }
   public int Multiply(int a, int b) {
      return a * b;
   }
}
在app/src/test/java/com/tutorialspoint/espressosamples/helloworldapp中建立一個檔案,ComputationUnitTest.java,並編寫單元測試用例來測試Sum和Multiply功能,如下所示:
package com.tutorialspoint.espressosamples.helloworldapp;
import org.junit.Test;
import static org.junit.Assert.assertEquals;
public class ComputationUnitTest {
   @Test
   public void sum_isCorrect() {
      Computation computation = new Computation();
      assertEquals(4, computation.Sum(2,2));
   }
   @Test
   public void multiply_isCorrect() {
      Computation computation = new Computation();
      assertEquals(4, computation.Multiply(2,2));
   }
}
這裡,我們使用了兩個新術語 - @Test和assertEquals。一般來說,JUnit使用Java註解來識別類中的測試用例以及如何執行測試用例的資訊。@Test是一種這樣的Java註解,它指定特定函式是JUnit測試用例。assertEquals是一個函式,用於斷言第一個引數(預期值)和第二個引數(計算值)相等。JUnit為不同的測試場景提供許多斷言方法。
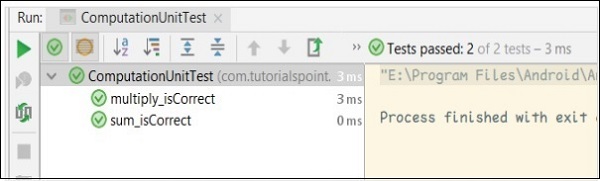
現在,透過右鍵單擊該類並呼叫“執行'ComputationUnitTest'”選項(如上一章所述),在Android Studio中執行ComputationUnitTest。這將執行單元測試用例並報告成功。
計算單元測試的結果如下所示:
註解
JUnit框架廣泛使用註解。一些重要的註解如下:
@Test
@Before
@After
@BeforeClass
@AfterClass
@Rule
@Test註解
@Test是JUnit框架中非常重要的註解。@Test用於區分普通方法和測試用例方法。一旦用@Test註解修飾了一個方法,那麼該方法就被認為是一個測試用例,並將由JUnit Runner執行。JUnit Runner是一個特殊的類,用於查詢和執行Java類中可用的JUnit測試用例。目前,我們使用Android Studio的內建選項來執行單元測試(這反過來又執行JUnit Runner)。示例程式碼如下:
package com.tutorialspoint.espressosamples.helloworldapp;
import org.junit.Test;
import static org.junit.Assert.assertEquals;

public class ComputationUnitTest {
   @Test
   public void multiply_isCorrect() {
      Computation computation = new Computation();
      assertEquals(4, computation.Multiply(2,2));
   }
}
@Before
@Before註解用於引用一個方法,該方法需要在執行特定測試類中可用的任何測試方法之前呼叫。例如,在我們的示例中,可以在單獨的方法中建立Computation物件並用@Before註解,以便它將在sum_isCorrect和multiply_isCorrect測試用例之前執行。完整程式碼如下:
package com.tutorialspoint.espressosamples.helloworldapp;
import org.junit.Before;
import org.junit.Test;
import static org.junit.Assert.assertEquals;

public class ComputationUnitTest {
   Computation computation = null;
   @Before
   public void CreateComputationObject() {
      this.computation = new Computation();
   }
   @Test
   public void sum_isCorrect() {
      assertEquals(4, this.computation.Sum(2,2));
   }
   @Test
   public void multiply_isCorrect() {
      assertEquals(4, this.computation.Multiply(2,2));
   }
}
@After
@After類似於@Before,但是用@After註解的方法將在每個測試用例執行後被呼叫或執行。示例程式碼如下:
package com.tutorialspoint.espressosamples.helloworldapp;
import org.junit.After;
import org.junit.Before;
import org.junit.Test;
import static org.junit.Assert.assertEquals;

public class ComputationUnitTest {
   Computation computation = null;
   @Before
   public void CreateComputationObject() {
      this.computation = new Computation();
   }
   @After
   public void DestroyComputationObject() {
      this.computation = null;
   }
   @Test
   public void sum_isCorrect() {
      assertEquals(4, this.computation.Sum(2,2));
   }
   @Test
   public void multiply_isCorrect() {
      assertEquals(4, this.computation.Multiply(2,2));
   }
}
@BeforeClass
@BeforeClass類似於@Before,但是用@BeforeClass註解的方法只會在執行特定類中的所有測試用例之前呼叫或執行一次。它對於建立資料庫連線物件等資源密集型物件很有用。這將減少執行一系列測試用例的時間。為了正常工作,此方法需要是靜態的。在我們的示例中,我們可以在執行所有測試用例之前建立一次計算物件,如下所示:
package com.tutorialspoint.espressosamples.helloworldapp;
import org.junit.BeforeClass;
import org.junit.Test;
import static org.junit.Assert.assertEquals;

public class ComputationUnitTest {
   private static Computation computation = null;
   @BeforeClass
   public static void CreateComputationObject() {
      computation = new Computation();
   }
   @Test
   public void sum_isCorrect() {
      assertEquals(4, computation.Sum(2,2));
   }
   @Test
   public void multiply_isCorrect() {
      assertEquals(4, computation.Multiply(2,2));
   }
}
@AfterClass
@AfterClass類似於@BeforeClass,但是用@AfterClass註解的方法只會在執行特定類中的所有測試用例之後呼叫或執行一次。此方法也需要是靜態的才能正常工作。示例程式碼如下:
package com.tutorialspoint.espressosamples.helloworldapp;
import org.junit.AfterClass;
import org.junit.BeforeClass;
import org.junit.Test;
import static org.junit.Assert.assertEquals;

public class ComputationUnitTest {
   private static Computation computation = null;
   @BeforeClass
   public static void CreateComputationObject() {
      computation = new Computation();
   }
   @AfterClass
   public static void DestroyComputationObject() {
      computation = null;
   }
   @Test
   public void sum_isCorrect() {
      assertEquals(4, computation.Sum(2,2));
   }
   @Test
   public void multiply_isCorrect() {
      assertEquals(4, computation.Multiply(2,2));
   }
}
@Rule
@Rule註解是JUnit的亮點之一。它用於向測試用例新增行為。我們只能註解TestRule型別的欄位。它實際上提供了@Before和@After註解提供的功能集,但以一種高效且可重用的方式。例如,我們可能需要一個臨時資料夾來在測試用例期間儲存一些資料。通常,我們需要在執行測試用例之前建立一個臨時資料夾(使用@Before或@BeforeClass註解),並在測試用例執行後銷燬它(使用@After或@AfterClass註解)。相反,我們可以使用JUnit框架提供的TemporaryFolder(TestRule型別)類為所有測試用例建立一個臨時資料夾,並且將在執行測試用例時刪除臨時資料夾。我們需要建立一個新的TemporaryFolder型別變數,並用@Rule註解,如下所示:
package com.tutorialspoint.espressosamples.helloworldapp;

import org.junit.AfterClass;
import org.junit.BeforeClass;
import org.junit.Rule;
import org.junit.Test;
import org.junit.rules.TemporaryFolder;
import java.io.File;
import java.io.IOException;
import static junit.framework.TestCase.assertTrue;
import static org.junit.Assert.assertEquals;

public class ComputationUnitTest {
   private static Computation computation = null;
   @Rule
   public TemporaryFolder folder = new TemporaryFolder();
   @Test
   public void file_isCreated() throws IOException {
      folder.newFolder("MyTestFolder");
      File testFile = folder.newFile("MyTestFile.txt");
      assertTrue(testFile.exists());
   }
   @BeforeClass
   public static void CreateComputationObject() {
      computation = new Computation();
   }
   @AfterClass
   public static void DestroyComputationObject() {
      computation = null;
   }
   @Test
   public void sum_isCorrect() {
      assertEquals(4, computation.Sum(2,2));
   }
   @Test
   public void multiply_isCorrect() {
      assertEquals(4, computation.Multiply(2,2));
   }
}
執行順序
在JUnit中,用不同註解註解的方法將按特定順序執行,如下所示:
@BeforeClass
@Rule
@Before
@Test
@After
@AfterClass
斷言
斷言是檢查測試用例的預期值是否與測試用例結果的實際值匹配的一種方式。JUnit為不同的場景提供斷言;下面列出了一些重要的斷言:
fail() - 顯式地使測試用例失敗。
assertTrue(boolean test_condition) - 檢查test_condition是否為真
assertFalse(boolean test_condition) - 檢查test_condition是否為假
assertEquals(expected, actual) - 檢查兩個值是否相等
assertNull(object) - 檢查物件是否為null
assertNotNull(object) - 檢查物件是否不為null
assertSame(expected, actual) - 檢查兩者是否引用同一個物件。
assertNotSame(expected, actual) - 檢查兩者是否引用不同的物件。