
 資料結構
資料結構 網路
網路 關係資料庫管理系統
 作業系統
作業系統 Java
Java iOS
iOS HTML
HTML CSS
CSS Android
 Python
 C語言程式設計
 C++
C++ C#
C# MongoDB
 MySQL
MySQL Javascript
 PHP
PHP使用Python的OpenCV繪製矩形並提取物件
OpenCV 是一個 Python 中的開源計算機視覺庫。它提供了許多函式來執行各種影像和影片處理操作。該庫使用 Numpy 模組將所有影片幀和影像表示為 ndarray 型別。它需要 numpy 庫,我們需要確保 numpy 模組也安裝在我們的 python 直譯器中。
在這篇文章中,我們將瞭解使用 python OpenCV 繪製矩形並提取物件的不同方法。
繪製矩形
為了在影像上繪製矩形,Python OpenCV 模組提供了一個名為 cv2.rectangle() 的方法。此方法將在影像上繪製矩形。以下是語法 -
cv.rectangle(img, pt1, pt2, color[, thickness[, lineType[, shift]]] )
引數
img:要繪製矩形的源影像。
pt1:一個元組,包含矩形一個頂點的 x 和 y 座標(矩形的左上角)。
pt2:一個元組,包含矩形另一個相對頂點的 x 和 y 座標(矩形的右下角)。
color:指定矩形的顏色。
thickness:這是一個可選引數。它指定矩形的線寬。預設線寬為 1。
x1,y1----------|
|		   |
| 		   |
| ------------x2,y2
因此,pt1 和 pt2 的座標分別為 (x1,y1) 和 (x2,y2)。
使用預定義尺寸
在這種方法中,我們將使用預定義的座標在影像上繪製矩形。這意味著我們將手動定義 pt1 和 pt2 的值。
示例
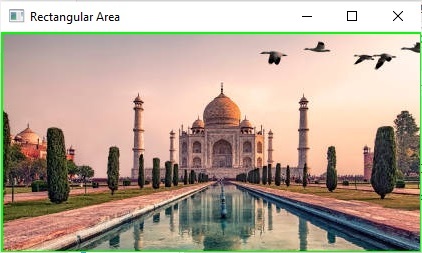
在本例中,我們將使用影像座標從矩形中繪製和提取物件。
import cv2
import numpy as np

# Load the image
img = cv2.imread("Images/Tajmahal.jpg")

# Define the dimensions and position of the rectangle using two points
top_left = (80, 80)
bottom_right = (500, 300)

# defining the colour and thickness of the rectangle
thickness = 2
color = (0, 255, 0) # Green color
shape = cv2.rectangle(img, top_left, bottom_right, color, thickness)

# Extracting objects from the rectangular area
rect_area = img[top_left[0]:bottom_right[1], top_left[1]:bottom_right[0]]

# Display the image with the drawn rectangle
cv2.imshow("Image with Rectangle", img)

# Display the extracted rectangular area
cv2.imshow("Rectangular Area", rect_area)

cv2.waitKey(0)
cv2.destroyAllWindows()
輸出

裁剪後的影像
使用滑鼠事件標誌
為了在影像上繪製矩形,這裡我們將使用以下滑鼠事件 -
cv2.EVENT_RBUTTONDOWN:表示右鍵被按下。
cv2.EVENT_LBUTTONUP:表示左鍵被釋放
此外,我們將使用 setMouseCallback() 函式為指定的視窗設定滑鼠事件處理程式
setMouseCallback() 函式
該函式用於指定哪個函式必須為特定視窗呼叫。換句話說,該函式為指定的視窗建立了一個滑鼠事件處理程式。
語法
cv2.setMouseCallback(winname, onMouse, userdata)
引數
Winname:特定視窗的名稱。
OnMouse:滑鼠事件的回撥函式。
Userdata:傳遞給回撥函式的可選引數。
此方法可以使用命令列介面執行。因此,這裡我們將使用 argparse 模組,因為它提供了一個方便的介面來處理命令列引數。
最初,我們將為 namedWindow() 方法設定一個滑鼠回撥函式,以讀取使用者繪製的矩形座標。並透過使用滑鼠點選事件,我們將識別 x 和 y 座標,然後使用 cv2.rectangle() 函式繪製矩形。
注意 - 要執行此程式碼,我們需要儲存程式檔案並將輸入影像儲存在同一位置,然後在命令提示符中執行以下命令。
Python program_file_name.py --image source_image_name.jpg
示例
讓我們舉一個繪製矩形以提取物件的例子。
import cv2
import argparse

point = []
crop = False

def shape_selection(event, x, y, flags, param):
   # grab references to the global variables
   global point, crop

   # Record the starting(x, y) coordinates when the left mouse button was clicked
   if event == cv2.EVENT_LBUTTONDOWN:
      point = [(x, y)]

   # check to see if the left mouse button was released
   elif event == cv2.EVENT_LBUTTONUP:
      # record the ending (x, y) coordinates
      point.append((x, y))

      # draw a rectangle
      cv2.rectangle(image, point[0], point[1], (0, 255, 0), 2)
      cv2.imshow("image", image)

# construct the argument parser and parse the arguments
ap = argparse.ArgumentParser()
ap.add_argument("-i", "--image", required = True, help ="Images/Dog.jpg")
args = vars(ap.parse_args())

# load the image
image = cv2.imread(args["image"])
clone = image.copy()
cv2.namedWindow("image")
# setting the mouse callback function
cv2.setMouseCallback("image", shape_selection)

# keep looping until the 'q' key is pressed
while True:
    # display the image and wait for a keypress
    cv2.imshow("image", image)
    key = cv2.waitKey(1) & 0xFF

    # press 'r' to reset window
    if key == ord("r"):
        image = clone.copy()

    # if the 'c' key is pressed, break from the loop
    elif key == ord("c"):
        break

if len(point) == 2:
    crop_img = clone[point[0][1]:point[1][1], point[0][0]:point[1][0]]
    cv2.imshow("crop_img", crop_img)
    cv2.waitKey(0)

    # close all open windows
cv2.destroyAllWindows()
開啟命令提示符並使用以下命令執行上述程式 -
python test.py --image image5.jpg
這將生成一個視窗,顯示輸入影像,您可以在其中選擇所需的物體,如下所示 -
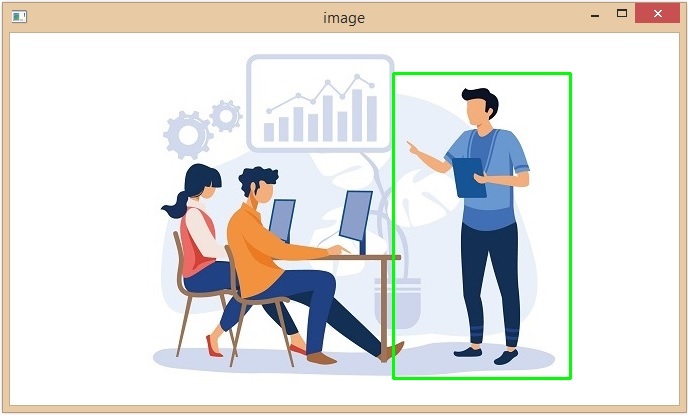
注意 - 選擇所需的影像區域後,按鍵盤上的 C 鍵進行裁剪。
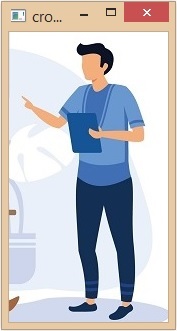
我們已成功繪製矩形並從影像中提取了所選物件。
834 次瀏覽
