- CodeIgniter 教程
- CodeIgniter - 首頁
- CodeIgniter - 概述
- CodeIgniter - 安裝 CodeIgniter
- CodeIgniter - 應用程式架構
- CodeIgniter - MVC 框架
- CodeIgniter - 基本概念
- CodeIgniter - 配置
- CodeIgniter - 使用資料庫
- CodeIgniter - 庫
- CodeIgniter - 錯誤處理
- CodeIgniter - 檔案上傳
- CodeIgniter - 傳送郵件
- CodeIgniter - 表單驗證
- CodeIgniter - 會話管理
- CodeIgniter - 快閃記憶體資料
- CodeIgniter - 臨時資料
- CodeIgniter - Cookie 管理
- CodeIgniter - 常用函式
- CodeIgniter - 頁面快取
- CodeIgniter - 頁面重定向
- CodeIgniter - 應用程式效能分析
- CodeIgniter - 效能基準測試
- CodeIgniter - 新增 JS 和 CSS
- CodeIgniter - 國際化
- CodeIgniter - 安全
- CodeIgniter 實用資源
- CodeIgniter - 快速指南
- CodeIgniter - 實用資源
- CodeIgniter - 討論
CodeIgniter - 檔案上傳
使用檔案上傳類,我們可以上傳檔案,我們還可以限制要上傳的檔案的型別和大小。按照給定示例中顯示的步驟,瞭解 CodeIgniter 中的檔案上傳過程。
示例
複製以下程式碼並存儲在 **application/view/Upload_form.php**。
<html>

   <head>
      <title>Upload Form</title>
   </head>

   <body>
      <?php echo $error;?>
      <?php echo form_open_multipart('upload/do_upload');?>

      <form action = "" method = "">
         <input type = "file" name = "userfile" size = "20" />
         <br /><br />
         <input type = "submit" value = "upload" />
      </form>

   </body>

</html>
複製下面給出的程式碼並存儲在 **application/view/Upload_success.php**
<html>

   <head>
      <title>Upload Form</title>
   </head>

   <body>
      <h3>Your file was successfully uploaded!</h3>

      <ul>
         <?phpforeach ($upload_data as $item => $value):?>
         <li><?php echo $item;?>: <?php echo $value;?></li>
         <?phpendforeach; ?>
      </ul>

      <p><?php echo anchor('upload', 'Upload Another File!'); ?></p>
   </body>

</html>
複製下面給出的程式碼並存儲在 **application/controllers/Upload.php**。在 CodeIgniter 根目錄(即在 application 資料夾的父目錄)下建立 “**uploads**” 資料夾。
<?php

   class Upload extends CI_Controller {

      public function __construct() {
         parent::__construct();
         $this->load->helper(array('form', 'url'));
      }

      public function index() {
         $this->load->view('upload_form', array('error' => ' ' ));
      }

      public function do_upload() {
         $config['upload_path']   = './uploads/';
         $config['allowed_types'] = 'gif|jpg|png';
         $config['max_size']      = 100;
         $config['max_width']     = 1024;
         $config['max_height']    = 768;
         $this->load->library('upload', $config);

         if ( ! $this->upload->do_upload('userfile')) {
            $error = array('error' => $this->upload->display_errors());
            $this->load->view('upload_form', $error);
         }

         else {
            $data = array('upload_data' => $this->upload->data());
            $this->load->view('upload_success', $data);
         }
      }
   }
?>
在 **application/config/routes.php** 中的路由檔案進行以下更改,並在檔案的最後新增以下行。
$route['upload'] = 'Upload';
現在讓我們透過在瀏覽器中訪問以下 URL 來執行此示例。將 yoursite.com 替換為你的 URL。
http://yoursite.com/index.php/upload
它將生成以下螢幕 -

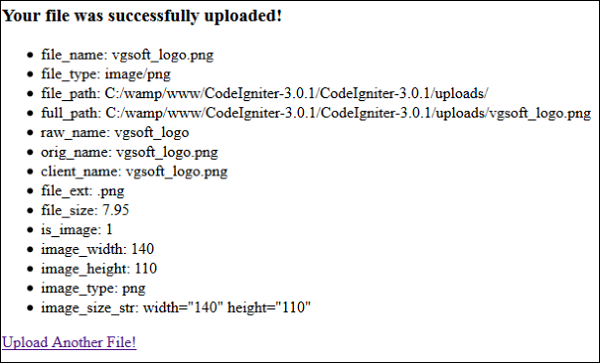
成功上傳檔案後,你將看到以下螢幕 -
廣告