- AJAX 教程
- AJAX - 首頁
- AJAX - 什麼是 AJAX?
- AJAX - 歷史
- AJAX - 動態網站與靜態網站
- AJAX - 技術
- AJAX - 操作
- AJAX - XMLHttpRequest
- AJAX - 傳送請求
- AJAX - 請求型別
- AJAX - 處理響應
- AJAX - 處理二進位制資料
- AJAX - 提交表單
- AJAX - 檔案上傳
- AJAX - FormData 物件
- AJAX - 傳送 POST 請求
- AJAX - 傳送 PUT 請求
- AJAX - 傳送 JSON 資料
- AJAX - 傳送資料物件
- AJAX - 監控進度
- AJAX - 狀態碼
- AJAX - 應用
- AJAX - 瀏覽器相容性
- AJAX - 示例
- AJAX - 瀏覽器支援
- AJAX - XMLHttpRequest
- AJAX - 資料庫操作
- AJAX - 安全性
- AJAX - 問題
- Fetch API 基礎
- Fetch API - 基礎
- Fetch API 與 XMLHttpRequest
- Fetch API - 瀏覽器相容性
- Fetch API - 頭部資訊
- Fetch API - 請求
- Fetch API - 響應
- Fetch API - 主體資料
- Fetch API - 憑據
- Fetch API - 傳送 GET 請求
- Fetch API - 傳送 POST 請求
- Fetch API - 傳送 PUT 請求
- Fetch API - 傳送 JSON 資料
- Fetch API - 傳送資料物件
- Fetch API - 自定義請求物件
- Fetch API - 上傳檔案
- Fetch API - 處理二進位制資料
- Fetch API - 狀態碼
- 流 API 基礎
- Stream API - 基礎
- Stream API - 可讀流
- Stream API - 可寫流
- Stream API - 變換流
- Stream API - 請求物件
- Stream API - 響應主體
- Stream API - 錯誤處理
- AJAX 有用資源
- AJAX - 快速指南
- AJAX - 有用資源
- AJAX - 討論
Fetch API - 請求
在 Fetch API 中,Request 介面用於建立資源請求。它是除了 fetch() 函式之外建立請求的另一種方法。它還提供了各種屬性和方法,我們可以將它們應用於請求。因此,首先,我們將學習 Request() 建構函式,然後學習如何傳送請求,以及 Request 介面提供的方法和屬性。
建構函式
要建立請求物件,我們可以使用 Request() 建構函式以及 new 關鍵字。此建構函式包含一個必填引數,即資源的 URL,另一個引數是可選的。
語法
const newRequest = new Request(resourceURL)
Or
const newRequest = new Request(resourceURL, optional)
Request() 建構函式具有以下引數:
resourceURL − 我們想要獲取的資源。其值可以是資源 URL 或 Request 物件。
Options − 提供請求附加設定和自定義選項的物件,如下所示:
method − 表示請求方法,例如 GET、POST、PUT 和 DELETE。
headers − 為請求設定頭部資訊。
body − 向請求新增資料。此引數不被 GET 或 HEAD 方法使用。
mode − 設定請求模式,例如 cors、same-origin、no-cors 或 navigate。預設情況下,mode 引數的值為 cors。
credentials − 它設定您要用於請求的憑據,例如 omit、same-origin 或 include。此引數的預設值為 same-origin。
cache − 設定您想要用於請求的快取模式。
redirect − 用於重定向模式,例如 follow、error 或 manual。預設情況下,引數設定為 follow 值。
referrer − 表示請求的引薦來源的字串,例如 client、URL 或 no-referrer。此引數的預設值為關於客戶端的資訊。
referrerPolicy − 用於設定引薦來源策略。
integrity − 用於設定給定請求的子資源完整性值。
keepalive − 用於檢查是否為多個請求/響應建立持久連線。
signal − 表示 AbortSignal 物件,用於與請求通訊或中止請求。
priority − 用於設定請求相對於其他請求的優先順序。此引數的可能值為
high − 將當前 fetch 請求的優先順序設定為高,相對於其他請求。
low − 將當前 fetch 請求的優先順序設定為低,相對於其他請求。
auto − 自動查詢當前 fetch 請求的優先順序。
傳送請求
要傳送請求,我們必須首先使用 Request 建構函式以及 header、body、method、resource URL 等附加引數建立 Request 物件。然後將此物件傳遞給 fetch() 函式以將請求傳送到伺服器。現在 fetch() 函式返回一個 promise,它將解析為 response 物件。如果我們遇到錯誤,則執行 catch 塊。
示例
在以下程式中,我們建立一個指令碼以使用 Request 物件傳送資料。為此,我們使用 Request() 建構函式以及以下引數建立請求物件:
URL − 表示資源 URL。
method − 在這裡我們使用 POST 方法,表示我們正在向伺服器傳送資料。
body − 包含我們想要傳送的資料。
header − 它表示資料是 JSON 資料。
現在我們將請求物件傳遞給 fetch() 函式以傳送請求並處理伺服器返回的響應,並在發生錯誤時處理錯誤。
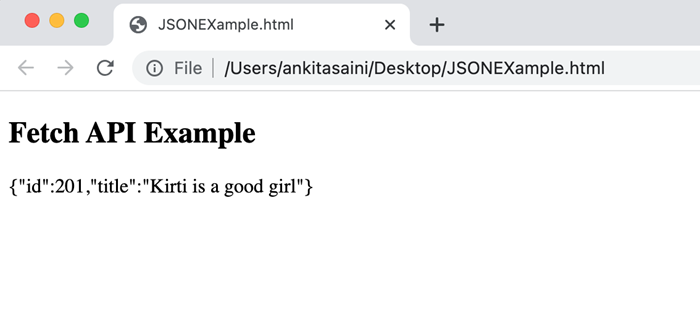
<!DOCTYPE html>
<html>
<body>
<script>
   // Creating request object
   const myRequest = new Request("https://jsonplaceholder.typicode.com/todos", {
      // Setting POST request
      method: "POST",

      // Add body which contains data
      body: JSON.stringify({
      id: 321,
      title: "Kirti is a good girl",
      }),

      // Setting header
      headers:{"Content-type": "application/json; charset=UTF-8"}
   });
   fetch(myRequest)

   // Handling response
   .then(response => response.json())
   .then(myData => {
      console.log("Data Sent Successfully");
      // Display output
      document.getElementById("sendData").innerHTML = JSON.stringify(myData);
   })

   // Handling error
   .catch(err=>{
      console.error("We get an error:", err);
   });
</script>
   <h2>Fetch API Example</h2>
   <div>
      <!-- Displaying retrieved data-->
      <p id="sendData"></p>
   </div>
</body>
</html>
輸出
例項屬性
Request 介面提供的屬性是隻讀屬性。因此,常用的屬性有:
| 序號 | 屬性及描述 |
|---|---|
| 1 | Request.url 此屬性包含給定請求的 URL。 |
| 2 | Request.body 此屬性包含給定請求的主體。 |
| 3 | Request.bodyUsed 此屬性用於指示請求中存在的主體是否已使用。其值為布林值。 |
| 4 | Request.destination 此屬性用於指示請求的目標。 |
| 5 | Request.method 此屬性包含請求方法,例如 GET、POST、PUT 和 DELETE。 |
| 6 | Request.headers 此屬性包含請求的頭部物件。 |
| 7 | Request.cache 此屬性包含給定請求的快取模式。 |
| 8 | Request.credentials 此屬性包含給定請求的憑據。 |
| 9 | Request.mode 此屬性包含給定請求的模式。 |
示例
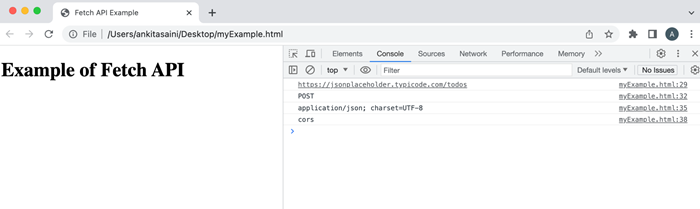
在以下程式中,我們使用 Request 介面提供的屬性(例如 url、method、headers 和 mode)。
<!DOCTYPE html>
<html>
<head>
   <title>Fetch API Example</title>
</head>
<body>
   <h1>Example of Fetch API</h1>
<script>
   // Creating request object
   const myRequest = new Request("https://jsonplaceholder.typicode.com/todos", {
      // Setting POST request
      method: "POST",

      // Add body which contains data
      body: JSON.stringify({
         id: 321,
         title: "Kirti is a good girl",
      }),
      // Setting header
      headers:{"Content-type": "application/json; charset=UTF-8"},
      mode: "cors"
   });
   // Display url of the request
   console.log(myRequest.url);

   // Display request method
   console.log(myRequest.method);

   // Display header of the request
   console.log(myRequest.headers.get('content-Type'));

   // Display mode of the request
   console.log(myRequest.mode);
</script>
</body>
</html>
輸出
方法
以下是 Request 介面常用的方法:
| 序號 | 方法及描述 |
|---|---|
| 1 | Request.arrayBuffer() 此方法用於解析一個 promise,該 promise 包含請求主體的 ArrayBuffer 表示形式。 |
| 2 | Request.blob() 此方法用於解析一個 promise,該 promise 包含請求主體的 Blob 表示形式。 |
| 3 | Request.clone() 此方法用於建立當前請求的副本。 |
| 4 | Request.json() 此方法用於將請求主體解析為 JSON 並解析一個 promise,其中包含解析結果。 |
| 5 | Request.text() 此方法用於解析一個 promise,該 promise 包含請求主體的文字表示形式。 |
| 6 | Request.formData() 此方法用於解析一個 promise,該 promise 包含請求主體的 formData 表示形式。 |
示例
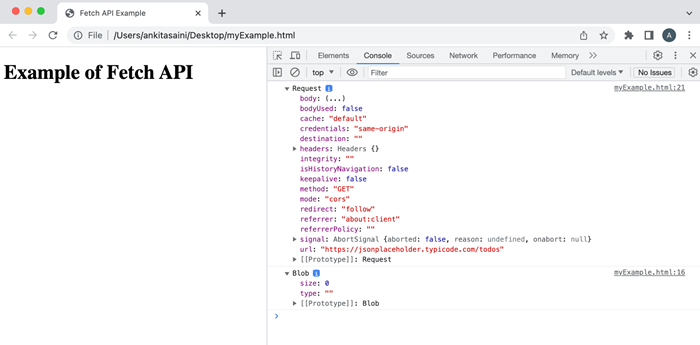
在以下程式中,我們使用 Request 介面提供的方法(例如 blob、clone 等)。
<!DOCTYPE html>
<html>
<head>
   <title>Fetch API Example</title>
</head>
<body>
   <h1>Example of Fetch API</h1>
<script>
   // Creating request object
   const myRequest = new Request("https://jsonplaceholder.typicode.com/todos");

   // Using blob() method
   myRequest.blob()
   .then(data =>{
      console.log(data)
   });

   // Creating a copy of the request using the clone() method
   const duplicate = myRequest.clone();
   console.log(duplicate);
</script>
</body>
</html>
輸出
結論
這就是 Fetch API 中 Request 介面的工作原理。它提供了各種構建和自定義請求的方法。或者我們可以說它提供了靈活性和對請求的更多控制。現在在下一篇文章中,我們將瞭解 Response 介面如何在 Fetch API 中使用。