- ZeroMQ 教程
- ZeroMQ - 首頁
- ZeroMQ - 概述
- ZeroMQ - 安裝
- ZeroMQ - 特性
- ZeroMQ 訊息傳遞
- ZeroMQ - 套接字型別
- ZeroMQ - 通訊模式
- ZeroMQ - 傳輸協議
- ZeroMQ - 訊息幀
- 擴充套件性和效能
- ZeroMQ - 負載均衡
- ZeroMQ - SMP
- ZeroMQ - 多執行緒
- ZeroMQ - 效能注意事項
- ZeroMQ 有用資源
- ZeroMQ - 有用資源
- ZeroMQ - 討論
ZeroMQ - 安裝設定
學習 ZeroMQ 的第一步是在您的系統上安裝核心 ZeroMQ 庫,並且根據您使用的程式語言,您需要安裝相應的語言繫結以在程式碼中與 ZeroMQ 進行互動。
例如,如果您使用 Python 語言,則需要安裝 **pyzmq**,它提供了 ZeroMQ 的 Python 繫結。
**ZeroMQ** 庫的安裝不依賴於作業系統。相反,它依賴於程式語言及其各自的繫結依賴項。因此,安裝步驟在不同的作業系統上通常是類似的。
如何在 Java 中設定 ZeroMQ?
以下說明將解釋如何在 Java 中安裝和設定 ZeroMQ 庫。要在 Java 中安裝和使用 ZeroMQ (ØMQ),您需要使用 ZeroMQ 的 Java 繫結。最常用的繫結是 **JeroMQ**,它是 ZeroMQ 的純 Java 實現。
以下是 Java 中安裝 ZeroMQ 的分步指南:
步驟 1:在 Java 中建立一個 Maven 專案
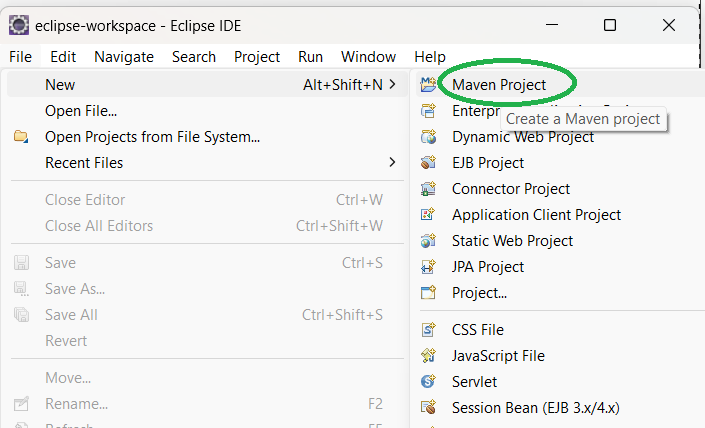
要在 Java 中建立一個 Maven 專案,請開啟您首選的 IDE(我們使用 Eclipse),點選左上角的 **檔案** 選單,並在顯示的列表中選擇 **Maven 專案**,如下面的圖片所示:
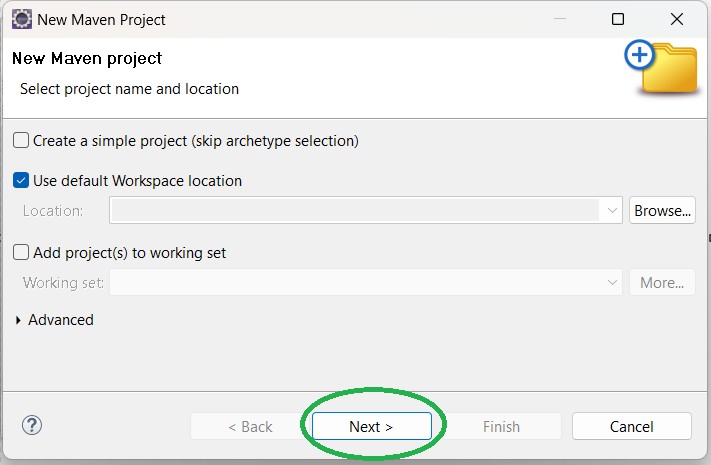
這將為您提供一個“新建 Maven 專案”視窗。在其中,點選 **下一步** 按鈕。
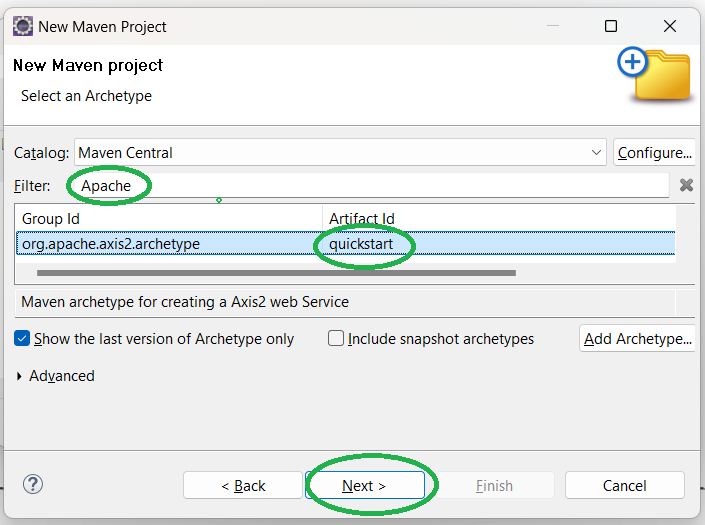
在下一個視窗中,在 **過濾器** 文字框中輸入“Apache”,選擇 **quickstart** 並點選 **下一步**。
然後,在 **GroupId** 文字框中輸入“com.zeromq”,在 **ArtifactId** 文字框中輸入“zeromq”,然後點選 **完成**(您可以為“GroupId”和“ArtifactId”選擇任何值)。
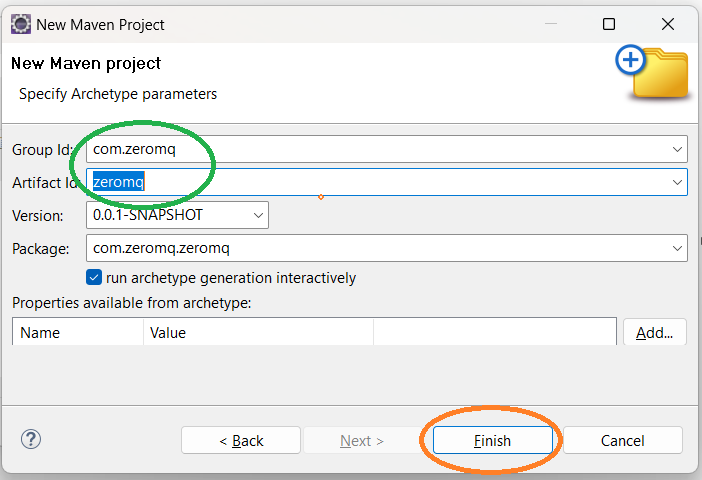
點選 **完成** 後,在您的終端中輸入 'y' 並按 Enter。
步驟 2:新增 ZeroMQ 依賴項
在 Java 專案中安裝 ZeroMQ 最簡單的方法是使用 JeroMQ,它可以作為專案中的依賴項包含。
如果您使用 Maven 或 Gradle(兩者都是 Java 開發工具)來管理您的專案,請將依賴項新增到您的 pom.xml 或 build.gradle 檔案中。
<dependency>
<groupId>org.zeromq</groupId>
<artifactId>jeromq</artifactId>
<version>0.5.3</version>
</dependency>

//for the latest SNAPSHOT -->
<dependency>
<groupId>org.zeromq</groupId>
<artifactId>jeromq</artifactId>
<version>0.6.0-SNAPSHOT</version>
</dependency>

//If you can't find the latest snapshot
<repositories>
<repository>
<id>sonatype-nexus-snapshots</id>
<url>https://oss.sonatype.org/content/repositories/snapshots</url>
<releases>
<enabled>false</enabled>
</releases>
<snapshots>
<enabled>true</enabled>
</snapshots>
</repository>
</repositories>
步驟 3:編寫您的第一個 Java ZeroMQ 程式
將 JeroMQ 包含到您的專案中後,您就可以開始使用它了。以下是 Java 中基本的 ZeroMQ 釋出者和訂閱者的示例:
釋出者
以下是“釋出者”的基本示例:
import org.zeromq.ZMQ;
import org.zeromq.ZMQ.Context;
import org.zeromq.ZMQ.Socket;

public class Publisher {
   public static void main(String[] args) {
      Context context = ZMQ.context(1);
      Socket socket = context.socket(ZMQ.PUB);
      socket.bind("tcp://*:5555");

      while (true) {
         socket.send("Hello, subscribers!".getBytes(), 0);
      }
   }
}
輸出
//it will simply send the message to the receiver
訂閱者
以下是“訂閱者”示例:
import org.zeromq.ZMQ;
import org.zeromq.ZMQ.Context;
import org.zeromq.ZMQ.Socket;
public class Subscriber {
   public static void main(String[] args) {
      Context context = ZMQ.context(1);
      Socket socket = context.socket(ZMQ.SUB);
      socket.connect("tcp://:5555");
      socket.subscribe("".getBytes()); // Subscribe to all messages

      while (true) {
         byte[] message = socket.recv(0);
         System.out.println("Received message: " + new String(message));
      }
   }
}
輸出
上述程式顯示了由“釋出者”傳送的所有接收到的訊息:
Received message: Hello, subscribers!
Received message: Hello, subscribers!
Received message: Hello, subscribers!
Received message: Hello, subscribers!
Received message: Hello, subscribers!
Received message: Hello, subscribers!
如何在 Python 中設定 ZeroMQ?
要下載並在 Python 中安裝 ZeroMQ,我們需要下載與 ZeroMQ 繫結的 Python 庫,即 **PyZMQ 庫**,它是一個快速且輕量級的訊息傳遞庫。
PyZMQ 可與任何合理的 Python 版本(應大於或等於 3.7)以及 PyPy 一起使用。PyZMQ 用於在沒有訊息代理的情況下進行訊息排隊。
步驟 1:安裝 PyZMQ
要安裝 PyZMQ,我們可以使用 **pip**,這是安裝 Python 包最常見的方法。以下是步驟:
開啟終端和命令提示符
- **在 Windows 上**,按 **Windows + R**,鍵入 **cmd**,然後按 Enter。
- **在 Mac 或 Linux 上**,開啟一個終端。
執行 pip install 命令
要安裝 PyZMQ,請在您的終端或命令提示符中執行以下命令:
pip install pyzmq
上述命令將下載並安裝 PyZMQ 和 ZeroMQ 庫。
Downloading pyzmq-26.2.0-cp312-cp312-win_amd64.whl.metadata (6.2 kB)
Downloading pyzmq-26.2.0-cp312-cp312-win_amd64.whl (637 kB)
   --------------------- 637.8/637.8 kB 5.8 MB/s eta 0:00:00
Installing collected packages: pyzmq
Successfully installed pyzmq-26.2.0

[notice] A new release of pip is available: 24.0 -> 24.2
[notice] To update, run: python.exe -m pip install --upgrade pip
步驟 2:驗證
要確認 PyZMQ 是否已正確安裝,請開啟 Python shell 並執行以下命令。如果它在沒有任何錯誤的情況下打印出已安裝的 ZeroMQ 和 PyZMQ 版本,則安裝成功。
>>> import zmq
>>> print(zmq.zmq_version())
4.3.5
>>> print(zmq.pyzmq_version())
26.2.0
>>>
步驟 3:編寫您的第一個 Python ZeroMQ 程式
由於我們已經安裝了 Python 訊息傳遞庫“PyZMQ”,因此我們可以使用 ZeroMQ 編寫 Python 程式。
釋出者
以下是“釋出者”的基本示例:
import zmq
import time

# Create a ZeroMQ context
context = zmq.Context()

# Create a PUB socket
socket = context.socket(zmq.PUB)
socket.bind("tcp://*:5555")

while True:
   # Send a message every second
   message = "Hello, ZeroMQ!"
   socket.send_string(message)
   print(f"Sent: {message}")
   time.sleep(1)
輸出
Sent: Hello, ZeroMQ!
Sent: Hello, ZeroMQ!
Sent: Hello, ZeroMQ!
Sent: Hello, ZeroMQ!
Sent: Hello, ZeroMQ!
訂閱者
以下是“訂閱者”示例:
import zmq

# Create a ZeroMQ context
context = zmq.Context()

# Create a SUB socket
socket = context.socket(zmq.SUB)
socket.connect("tcp://:5555")

# Subscribe to all messages (empty string as subscription)
socket.setsockopt_string(zmq.SUBSCRIBE, "")

while True:
   message = socket.recv_string()
   print(f"Received: {message}")
輸出
Received: Hello, ZeroMQ!
Received: Hello, ZeroMQ!
Received: Hello, ZeroMQ!
Received: Hello, ZeroMQ!
Received: Hello, ZeroMQ!