- Spring Boot & H2 教程
- Spring Boot & H2 - 首頁
- Spring Boot & H2 - 概述
- Spring Boot & H2 - 環境設定
- Spring Boot & H2 - 專案設定
- Spring Boot & H2 - REST APIs
- Spring Boot & H2 - H2 控制檯
- Spring Boot & H2 例子
- Spring Boot & H2 - 新增記錄
- Spring Boot & H2 - 獲取記錄
- Spring Boot & H2 - 獲取所有記錄
- Spring Boot & H2 - 更新記錄
- Spring Boot & H2 - 刪除記錄
- Spring Boot & H2 - 單元測試控制器
- Spring Boot & H2 - 單元測試服務
- Spring Boot & H2 - 單元測試倉庫
- Spring Boot & H2 有用資源
- Spring Boot & H2 快速指南
- Spring Boot & H2 - 有用資源
- Spring Boot & H2 - 討論
Spring Boot & H2 快速指南
Spring Boot & H2 - 概述
什麼是H2?
H2 資料庫是一個開源的、嵌入式的、記憶體中的關係資料庫管理系統。它是用 Java 編寫的,並提供客戶端/伺服器應用程式。它將資料儲存在系統記憶體中,而不是磁碟。程式關閉後,資料也會丟失。當我們不想持久化資料並對整體功能進行單元測試時,可以使用記憶體資料庫。其他一些流行的記憶體資料庫包括 HSQLDB 或 HyperSQL 資料庫和 Apache Derby。H2 是其他嵌入式資料庫中最流行的一個。
H2 資料庫的優勢
以下是 H2 提供的優勢列表:
無需配置 - Spring Boot 本身支援 H2,無需額外配置即可配置 H2 資料庫。
易於使用 - H2 資料庫非常易於使用。
輕量級且快速 - H2 資料庫非常輕量級,並且作為記憶體資料庫,速度非常快。
切換配置 - 使用配置檔案,您可以輕鬆地在生產級資料庫和記憶體資料庫之間切換。
支援標準 SQL 和 JDBC - H2 資料庫支援標準 SQL 的幾乎所有功能和 JDBC 的操作。
基於 Web 的控制檯 - H2 資料庫可以透過其基於 Web 的控制檯應用程式進行管理。
配置 H2 資料庫
將 H2 資料庫新增為 Maven 依賴項,僅此而已。
<dependency>
   <groupId>com.h2database</groupId>
   <artifactId>h2</artifactId>
   <scope>runtime</scope>
</dependency>
儘管 Spring Boot 會自動配置 H2 資料庫,但我們也可以透過在 application.properties 中指定它們來覆蓋預設配置,如下所示。
spring.datasource.url=jdbc:h2:mem:testdb
spring.datasource.driverClassName=org.h2.Driver
spring.datasource.username=sa
spring.datasource.password=
spring.jpa.database-platform=org.hibernate.dialect.H2Dialect
spring.h2.console.enabled=true
持久化 H2 資料
如果需要持久化儲存,請在 application.properties 中新增以下配置。
spring.datasource.url=jdbc:h2:file:/data/database
spring.datasource.url=jdbc:h2:C:/data/database
Spring Boot & H2 - 環境設定
本章將指導您如何準備開發環境以開始使用 Spring Framework。它還將教您如何在設定 Spring Framework 之前在您的機器上設定 JDK、Tomcat 和 Eclipse:
步驟 1 - 設定 Java 開發工具包 (JDK)
Java SE 可免費下載。要下載,點選此處,請下載與您的作業系統相容的版本。
按照說明下載 Java,然後執行.exe檔案以在您的機器上安裝 Java。在您的機器上安裝 Java 後,您需要設定環境變數以指向正確的安裝目錄。
為 Windows 2000/XP 設定路徑
假設您已將 Java 安裝在 c:\Program Files\java\jdk 目錄下:
右鍵單擊“我的電腦”,然後選擇“屬性”。
在“高階”選項卡下單擊“環境變數”按鈕。
現在,編輯“Path”變數,並將 Java 可執行檔案目錄的路徑新增到其末尾。例如,如果路徑當前設定為C:\Windows\System32,則按如下方式編輯它
C:\Windows\System32;c:\Program Files\java\jdk\bin
為 Windows 95/98/ME 設定路徑
假設您已將 Java 安裝在 c:\Program Files\java\jdk 目錄下:
編輯“C:\autoexec.bat”檔案,並在末尾新增以下行:
SET PATH=%PATH%;C:\Program Files\java\jdk\bin
為 Linux、UNIX、Solaris、FreeBSD 設定路徑
應將環境變數 PATH 設定為指向 Java 二進位制檔案已安裝的位置。如果您遇到問題,請參考您的 shell 文件。
例如,如果您使用 bash 作為您的 shell,那麼您將在.bashrc檔案的末尾新增以下行:
export PATH=/path/to/java:$PATH'
或者,如果您使用整合開發環境 (IDE),如 Borland JBuilder、Eclipse、IntelliJ IDEA 或 Sun ONE Studio,則您將必須編譯並執行一個簡單的程式以確認 IDE 知道您已將 Java 安裝在何處。否則,您必須按照 IDE 文件中給出的說明進行正確的設定。
步驟 2 - 設定 Eclipse IDE
本教程中的所有示例都是使用 Eclipse IDE 編寫的。因此,我們建議您應該在您的機器上安裝最新版本的 Eclipse。
要安裝 Eclipse IDE,請從www.eclipse.org/downloads下載最新的 Eclipse 二進位制檔案。下載安裝程式後,將二進位制分發版解壓縮到方便的位置。例如,在 Windows 上的 C:\eclipse 或 Linux/Unix 上的 /usr/local/eclipse,最後適當設定 PATH 變數。
可以透過在 Windows 機器上執行以下命令來啟動 Eclipse,或者您可以簡單地雙擊 eclipse.exe
%C:\eclipse\eclipse.exe
可以透過在 Unix (Solaris、Linux 等) 機器上執行以下命令來啟動 Eclipse:
$/usr/local/eclipse/eclipse
步驟 3 - 設定 m2eclipse
M2Eclipse 是一個 Eclipse 外掛,它非常有助於將 Apache Maven 整合到 Eclipse IDE 中。在本教程中,我們使用 Maven 來構建 Spring Boot 專案,並使用 m2eclipse 在 Eclipse 中執行示例。
使用 Eclipse IDE 中的“安裝新軟體”對話方塊安裝最新的 M2Eclipse 版本,並將其指向此 p2 儲存庫:https://download.eclipse.org/technology/m2e/releases/latest/
步驟 4 - 設定 Spring Boot 專案
現在,如果一切正常,您可以繼續設定您的 Spring Boot。以下是將 Spring Boot 專案下載並安裝到您的機器上的簡單步驟。
轉到 Spring Initializr 連結以建立 Spring Boot 專案,https://start.spring.io/。
選擇專案為Maven 專案。
選擇語言為Java。
選擇 Spring Boot 版本為2.5.3。
設定專案元資料 - Group 為com.tutorialspoint,Artifact 為springboot-h2,名稱為springboot-h2,描述為Spring Boot 和 H2 資料庫的演示專案,包名稱為com.tutorialspoint.springboot-h2。
選擇打包方式為Jar。
選擇 Java 為11。
新增依賴項為Spring Web、Spring Data JPA、H2 資料庫和 Spring Boot DevTools。
現在單擊“生成”按鈕以生成專案結構。

下載基於 Maven 的 Spring Boot 專案後,將 Maven 專案匯入 Eclipse,其餘的 Eclipse 將處理。它將下載 Maven 依賴項並構建專案,使其準備好進行進一步開發。
步驟 5 - 用於 REST API 測試的 POSTMAN
POSTMAN 是一個用於測試基於 REST 的 API 的有用工具。要安裝 POSTMAN,請從www.postman.com/downloads/下載最新的 POSTMAN 二進位制檔案。下載可安裝檔案後,請按照說明進行安裝和使用。
Spring Boot & H2 - 專案設定
正如上一章環境設定中所述,我們已將生成的 Spring Boot 專案匯入 Eclipse。現在讓我們在src/main/java資料夾中建立以下結構。

com.tutorialspoint.controller.EmployeeController - 一個基於 REST 的控制器,用於實現基於 REST 的 API。
com.tutorialspoint.entity.Employee - 一個表示資料庫中相應表的實體類。
com.tutorialspoint.repository.EmployeeRepository - 一個儲存庫介面,用於在資料庫上實現 CRUD 操作。
com.tutorialspoint.service.EmployeeService - 一個服務類,用於在儲存庫函式上實現業務操作。
com.tutorialspoint.springbooth2.SprintBootH2Application - 一個 Spring Boot 應用程式類。
SprintBootH2Application 類已存在。我們需要建立上述包和相關的類和介面,如下所示:
實體 - Entity.java
以下是 Employee 的預設程式碼。它表示一個 Employee 表,其中包含 id、name、age 和 email 列。
package com.tutorialspoint.entity;
import javax.persistence.Column;
import javax.persistence.Entity;
import javax.persistence.Id;
import javax.persistence.Table;
@Entity
@Table
public class Employee {
   @Id
   @Column
   private int id;
   @Column
   private String name;
   @Column
   private int age;
   @Column
   private String email;
   public int getId() {
      return id;
   }
   public void setId(int id) {
      this.id = id;
   }
   public String getName() {
      return name;
   }
   public void setName(String name) {
      this.name = name;
   }
   public int getAge() {
      return age;
   }
   public void setAge(int age) {
      this.age = age;
   }
   public String getEmail() {
      return email;
   }
   public void setEmail(String email) {
      this.email = email;
   }
}
儲存庫 - EmployeeRepository.java
以下是儲存庫的預設程式碼,用於在上述實體 Employee 上實現 CRUD 操作。
package com.tutorialspoint.repository;
import org.springframework.data.repository.CrudRepository;
import org.springframework.stereotype.Repository;
import com.tutorialspoint.entity.Employee;
@Repository
public interface EmployeeRepository extends CrudRepository<Employee, Integer>  {
}
服務 - EmployeeService.java
以下是服務的預設程式碼,用於在儲存庫函式上實現操作。
package com.tutorialspoint.service;
import java.util.ArrayList;
import java.util.List;
import org.springframework.beans.factory.annotation.Autowired;
import org.springframework.stereotype.Service;
import com.tutorialspoint.entity.Employee;
import com.tutorialspoint.repository.EmployeeRepository;
@Service
public class EmployeeService {
   @Autowired
   EmployeeRepository repository;
   public Employee getEmployeeById(int id) {
      return null;
   }
   public List<Employee> getAllEmployees(){
      return null;
   }
   public void saveOrUpdate(Employee employee) {
   }
   public void deleteEmployeeById(int id) {
   }
}
控制器 - EmployeeController.java
以下是控制器的預設程式碼,用於實現 REST API。
package com.tutorialspoint.controller;
import java.util.List;
import org.springframework.beans.factory.annotation.Autowired;
import org.springframework.web.bind.annotation.DeleteMapping;
import org.springframework.web.bind.annotation.GetMapping;
import org.springframework.web.bind.annotation.PathVariable;
import org.springframework.web.bind.annotation.PostMapping;
import org.springframework.web.bind.annotation.PutMapping;
import org.springframework.web.bind.annotation.RequestBody;
import org.springframework.web.bind.annotation.RequestMapping;
import org.springframework.web.bind.annotation.RestController;
import com.tutorialspoint.entity.Employee;
import com.tutorialspoint.service.EmployeeService;
@RestController
@RequestMapping(path = "/emp")
public class EmployeeController {
   @Autowired
   EmployeeService employeeService;
   @GetMapping("/employees")
   public List<Employee> getAllEmployees(){
      return null;
   }
   @GetMapping("/employee/{id}")
   public Employee getEmployee(@PathVariable("id") int id) {
      return null;;
   }
   @DeleteMapping("/employee/{id}")
   public void deleteEmployee(@PathVariable("id") int id) {
   }
   @PostMapping("/employee")
   public void addEmployee(@RequestBody Employee employee) {
   }
   @PutMapping("/employee")
   public void updateEmployee(@RequestBody Employee employee) {
   }
}
應用程式 - SprintBootH2Application.java
以下是應用程式的更新程式碼,用於使用上述類。
package com.tutorialspoint.sprintbooth2;
import org.springframework.boot.SpringApplication;
import org.springframework.boot.autoconfigure.SpringBootApplication;
import org.springframework.boot.autoconfigure.domain.EntityScan;
import org.springframework.context.annotation.ComponentScan;
import org.springframework.data.jpa.repository.config.EnableJpaRepositories;
@ComponentScan({"com.tutorialspoint.controller","com.tutorialspoint.service"})
@EntityScan("com.tutorialspoint.entity")
@EnableJpaRepositories("com.tutorialspoint.repository")
@SpringBootApplication
public class SprintBootH2Application {
   public static void main(String[] args) {
      SpringApplication.run(SprintBootH2Application.class, args);
   }
}
執行/除錯配置
在 Eclipse 中建立以下Maven 配置以使用目標spring-boot:run執行 Spring Boot 應用程式。此配置將有助於執行 REST API,我們可以使用 POSTMAN 對其進行測試。

Spring Boot & H2 - REST APIs
正如上一章應用程式設定中所述,我們已在 Spring Boot 專案中建立了所需的檔案。現在在 POSTMAN 中建立以下集合以測試 REST API。

GET 獲取所有員工 - 一個 GET 請求,用於返回所有員工。
POST 新增員工 - 一個 POST 請求,用於建立員工。
PUT 更新員工 - 一個 PUT 請求,用於更新現有員工。
GET 獲取員工 - 一個 GET 請求,用於獲取由其 ID 標識的員工。
DELETE 刪除員工 - 一個 DELETE 請求,用於刪除由其 ID 標識的員工。
獲取所有員工
在 POSTMAN 中設定以下引數。
HTTP 方法 - GET
URL - https://:8080/emp/employees
新增員工
在 POSTMAN 中設定以下引數。
HTTP 方法 - POST
URL - https://:8080/emp/employee
正文 - 員工 JSON
{
   "id": "1",
   "age": "35",
   "name": "Julie",
   "email": "julie@gmail.com"
}
更新員工
在 POSTMAN 中設定以下引數。
HTTP 方法 - PUT
URL - https://:8080/emp/employee
正文 - 員工 JSON
{
   "id": "1",
   "age": "35",
   "name": "Julie",
   "email": "julie.roberts@gmail.com"
}
獲取員工
在 POSTMAN 中設定以下引數。
HTTP 方法 - GET
URL - https://:8080/emp/employee/1 - 其中 1 是員工 ID
刪除員工
在 POSTMAN 中設定以下引數。
HTTP 方法 - DELETE
URL - https://:8080/emp/employee/1 - 其中 1 是員工 ID
Spring Boot & H2 - 控制檯
如同上一章節應用設定中所述,我們已經在Spring Boot專案中建立了必要的資料夾。現在讓我們更新位於src/main/resources目錄下的application.properties檔案和pom.xml檔案,以使用不同版本的maven-resources-plugin外掛。
application.properties
spring.datasource.url=jdbc:h2:mem:testdb
pom.xml
...
<build>
   <plugins>
      <plugin>
         <groupId>org.springframework.boot</groupId>
         <artifactId>spring-boot-maven-plugin</artifactId>
      </plugin>
      <plugin>
         <groupId>org.apache.maven.plugins</groupId>
         <artifactId>maven-resources-plugin</artifactId>
         <version>3.1.0</version>
      </plugin>
   </plugins>
</build>
...
執行應用
在Eclipse中,執行在應用設定期間準備好的員工應用(Employee Application)配置。
Eclipse控制檯將顯示類似的輸出。
[INFO] Scanning for projects...
[INFO]
[INFO] -----------------< com.tutorialspoint:sprint-boot-h2 >------------------
[INFO] Building sprint-boot-h2 0.0.1-SNAPSHOT
[INFO] --------------------------------[ jar ]---------------------------------
...
  .   ____          _            __ _ _
 /\\ / ___'_ __ _ _(_)_ __  __ _ \ \ \ \
( ( )\___ | '_ | '_| | '_ \/ _` | \ \ \ \
 \\/  ___)| |_)| | | | | || (_| |  ) ) ) )
  '  |____| .__|_| |_|_| |_\__, | / / / /
 =========|_|==============|___/=/_/_/_/
 :: Spring Boot ::                (v2.5.2)

...
2021-07-24 20:51:11.347  INFO 9760 --- [  restartedMain] o.s.b.w.embedded.tomcat.TomcatWebServer
: Tomcat initialized with port(s): 8080 (http)
...
2021-07-24 20:51:11.840  INFO 9760 --- [  restartedMain] o.s.b.a.h2.H2ConsoleAutoConfiguration
: H2 console available at '/h2-console'. Database available at 'jdbc:h2:mem:testdb'
...
2021-07-24 20:51:14.805  INFO 9760 --- [  restartedMain] o.s.b.w.embedded.tomcat.TomcatWebServer
: Tomcat started on port(s): 8080 (http) with context path ''
2021-07-24 20:51:14.823  INFO 9760 --- [  restartedMain] c.t.s.SprintBootH2Application
: Started SprintBootH2Application in 7.353 seconds (JVM running for 8.397)
伺服器啟動並執行後,在瀏覽器中開啟localhost:8080/h2-console,然後點選“測試連線”以驗證資料庫連線。

點選“連線”按鈕,將出現H2資料庫視窗,如下所示:

Spring Boot & H2 - 新增記錄
現在,讓我們更新到目前為止建立的專案,以準備一個完整的新增記錄API並進行測試。
更新服務
// Use repository.save() to persist Employee entity in database
public void saveOrUpdate(Employee employee) {
   repository.save(employee);
}
EmployeeService
package com.tutorialspoint.service;
import java.util.ArrayList;
import java.util.List;
import org.springframework.beans.factory.annotation.Autowired;
import org.springframework.stereotype.Service;
import com.tutorialspoint.entity.Employee;
import com.tutorialspoint.repository.EmployeeRepository;
@Service
public class EmployeeService {
   @Autowired
   EmployeeRepository repository;
   public Employee getEmployeeById(int id) {
      return null;
   }
   public List<Employee> getAllEmployees(){
      return null;
   }
   public void saveOrUpdate(Employee employee) {
      repository.save(employee);
   }
   public void deleteEmployeeById(int id) {
   }
}
更新控制器
// Use service.saveOrUpdate() to persist Employee entity in database
@PostMapping("/employee")
public void addEmployee(@RequestBody Employee employee) {
   employeeService.saveOrUpdate(employee);
}
EmployeeController
package com.tutorialspoint.controller;
import java.util.List;
import org.springframework.beans.factory.annotation.Autowired;
import org.springframework.web.bind.annotation.DeleteMapping;
import org.springframework.web.bind.annotation.GetMapping;
import org.springframework.web.bind.annotation.PathVariable;
import org.springframework.web.bind.annotation.PostMapping;
import org.springframework.web.bind.annotation.PutMapping;
import org.springframework.web.bind.annotation.RequestBody;
import org.springframework.web.bind.annotation.RequestMapping;
import org.springframework.web.bind.annotation.RestController;
import com.tutorialspoint.entity.Employee;
import com.tutorialspoint.service.EmployeeService;
@RestController
@RequestMapping(path = "/emp")
public class EmployeeController {
   @Autowired
   EmployeeService employeeService;
   @GetMapping("/employees")
   public List<Employee> getAllEmployees(){
      return null;
   }
   @GetMapping("/employee/{id}")
   public Employee getEmployee(@PathVariable("id") int id) {
      return null;;
   }
   @DeleteMapping("/employee/{id}")
   public void deleteEmployee(@PathVariable("id") int id) {
   }
   @PostMapping("/employee")
   public void addEmployee(@RequestBody Employee employee) {
      employeeService.saveOrUpdate(employee);
   }
   @PutMapping("/employee")
   public void updateEmployee(@RequestBody Employee employee) {
   }
}
執行應用
在Eclipse中,執行在應用設定期間準備好的員工應用(Employee Application)配置。
Eclipse控制檯將顯示類似的輸出。
[INFO] Scanning for projects...
...
2021-07-24 20:51:14.823  INFO 9760 --- [  restartedMain] c.t.s.SprintBootH2Application
: Started SprintBootH2Application in 7.353 seconds (JVM running for 8.397)
伺服器啟動並執行後,使用Postman發出POST請求:
在 POSTMAN 中設定以下引數。
HTTP 方法 - POST
URL - https://:8080/emp/employee
正文 - 員工 JSON
{
   "id": "1",
   "age": "35",
   "name": "Julie",
   "email": "julie@gmail.com"
}
點選“傳送”按鈕,並檢查響應狀態是否為OK。現在開啟H2控制檯,使用以下查詢驗證插入的記錄:
Select * from Employee;
它應該顯示以下結果:
ID    AGE    EMAIL              NAME
1     35   julie@gmail.com      Julie
Spring Boot & H2 - 獲取記錄
現在,讓我們更新到目前為止建立的專案,以準備一個完整的獲取記錄API並進行測試。
更新服務
// Use repository.findById() to get Employee entity by Id
public Employee getEmployeeById(int id) {
   return repository.findById(id).get();
}
EmployeeService
package com.tutorialspoint.service;
import java.util.ArrayList;
import java.util.List;
import org.springframework.beans.factory.annotation.Autowired;
import org.springframework.stereotype.Service;
import com.tutorialspoint.entity.Employee;
import com.tutorialspoint.repository.EmployeeRepository;
@Service
public class EmployeeService {
   @Autowired
   EmployeeRepository repository;
   public Employee getEmployeeById(int id) {
      return repository.findById(id).get();
   }
   public List<Employee> getAllEmployees(){
      return null;
   }
   public void saveOrUpdate(Employee employee) {
      repository.save(employee);
   }
   public void deleteEmployeeById(int id) {
   }
}
更新控制器
// Use service.getEmployeeById() to get Employee entity from database
@GetMapping("/employee/{id}")
public Employee getEmployee(@PathVariable("id") int id) {
   return employeeService.getEmployeeById(id);
}
EmployeeController
package com.tutorialspoint.controller;
import java.util.List;
import org.springframework.beans.factory.annotation.Autowired;
import org.springframework.web.bind.annotation.DeleteMapping;
import org.springframework.web.bind.annotation.GetMapping;
import org.springframework.web.bind.annotation.PathVariable;
import org.springframework.web.bind.annotation.PostMapping;
import org.springframework.web.bind.annotation.PutMapping;
import org.springframework.web.bind.annotation.RequestBody;
import org.springframework.web.bind.annotation.RequestMapping;
import org.springframework.web.bind.annotation.RestController;
import com.tutorialspoint.entity.Employee;
import com.tutorialspoint.service.EmployeeService;
@RestController
@RequestMapping(path = "/emp")
public class EmployeeController {
   @Autowired
   EmployeeService employeeService;
   @GetMapping("/employees")
   public List<Employee> getAllEmployees(){
      return null;
   }
   @GetMapping("/employee/{id}")
   public Employee getEmployee(@PathVariable("id") int id) {
      return employeeService.getEmployeeById(id);
   }
   @DeleteMapping("/employee/{id}")
   public void deleteEmployee(@PathVariable("id") int id) {
   }
   @PostMapping("/employee")
   public void addEmployee(@RequestBody Employee employee) {
      employeeService.saveOrUpdate(employee);
   }
   @PutMapping("/employee")
   public void updateEmployee(@RequestBody Employee employee) {
   }
}
執行應用
在Eclipse中,執行在應用設定期間準備好的員工應用(Employee Application)配置。
Eclipse控制檯將顯示類似的輸出。
[INFO] Scanning for projects...
...
2021-07-24 20:51:14.823  INFO 9760 --- [  restartedMain] c.t.s.SprintBootH2Application
: Started SprintBootH2Application in 7.353 seconds (JVM running for 8.397)
伺服器啟動並執行後,使用Postman先發出POST請求新增一條記錄。
在 POSTMAN 中設定以下引數。
HTTP 方法 - POST
URL - https://:8080/emp/employee
正文 - 員工 JSON
{
   "id": "1",
   "age": "35",
   "name": "Julie",
   "email": "julie@gmail.com"
}
點選“傳送”按鈕,並檢查響應狀態是否為OK。現在發出GET請求獲取該記錄。
在 POSTMAN 中設定以下引數。
HTTP 方法 - GET
URL:https://:8080/emp/employee/1
點擊發送按鈕並驗證響應。
{
   "id": "1",
   "age": "35",
   "name": "Julie",
   "email": "julie@gmail.com"
}
Spring Boot & H2 - 獲取所有記錄
現在,讓我們更新到目前為止建立的專案,以準備一個完整的獲取所有記錄API並進行測試。
更新服務
// Use repository.findAll() to get all Employee records
public List<Employee> getAllEmployees(){
   List<Employee> employees = new ArrayList<Employee>();
   repository.findAll().forEach(employee -> employees.add(employee));
   return employees;
}
EmployeeService
package com.tutorialspoint.service;
import java.util.ArrayList;
import java.util.List;
import org.springframework.beans.factory.annotation.Autowired;
import org.springframework.stereotype.Service;
import com.tutorialspoint.entity.Employee;
import com.tutorialspoint.repository.EmployeeRepository;
@Service
public class EmployeeService {
   @Autowired
   EmployeeRepository repository;
   public Employee getEmployeeById(int id) {
      return repository.findById(id).get();
   }
   public List<Employee> getAllEmployees(){
      List<Employee> employees = new ArrayList<Employee>();
      repository.findAll().forEach(employee -> employees.add(employee));
      return employees;
   }
   public void saveOrUpdate(Employee employee) {
      repository.save(employee);
   }
   public void deleteEmployeeById(int id) {
   }
}
更新控制器
// Use service.getAllEmployees() to get a list of employees from database
@GetMapping("/employees")
public List<Employee> getAllEmployees(){
   return employeeService.getAllEmployees();
}
EmployeeController
package com.tutorialspoint.controller;
import java.util.List;
import org.springframework.beans.factory.annotation.Autowired;
import org.springframework.web.bind.annotation.DeleteMapping;
import org.springframework.web.bind.annotation.GetMapping;
import org.springframework.web.bind.annotation.PathVariable;
import org.springframework.web.bind.annotation.PostMapping;
import org.springframework.web.bind.annotation.PutMapping;
import org.springframework.web.bind.annotation.RequestBody;
import org.springframework.web.bind.annotation.RequestMapping;
import org.springframework.web.bind.annotation.RestController;
import com.tutorialspoint.entity.Employee;
import com.tutorialspoint.service.EmployeeService;
@RestController
@RequestMapping(path = "/emp")
public class EmployeeController {
   @Autowired
   EmployeeService employeeService;
   @GetMapping("/employees")
   public List<Employee> getAllEmployees(){
      return employeeService.getAllEmployees();
   }
   @GetMapping("/employee/{id}")
   public Employee getEmployee(@PathVariable("id") int id) {
      return employeeService.getEmployeeById(id);
   }
   @DeleteMapping("/employee/{id}")
   public void deleteEmployee(@PathVariable("id") int id) {
   }
   @PostMapping("/employee")
   public void addEmployee(@RequestBody Employee employee) {
      employeeService.saveOrUpdate(employee);
   }
   @PutMapping("/employee")
   public void updateEmployee(@RequestBody Employee employee) {
   }
}
執行應用
在Eclipse中,執行在應用設定期間準備好的員工應用(Employee Application)配置。
Eclipse控制檯將顯示類似的輸出。
[INFO] Scanning for projects...
...
2021-07-24 20:51:14.823  INFO 9760 --- [  restartedMain] c.t.s.SprintBootH2Application
: Started SprintBootH2Application in 7.353 seconds (JVM running for 8.397)
伺服器啟動並執行後,使用Postman先發出POST請求新增一條記錄。
在 POSTMAN 中設定以下引數。
HTTP 方法 - POST
URL - https://:8080/emp/employee
正文 - 員工 JSON
{
   "id": "1",
   "age": "35",
   "name": "Julie",
   "email": "julie@gmail.com"
}
點選“傳送”按鈕,並檢查響應狀態是否為OK。現在發出GET請求獲取所有記錄。
在 POSTMAN 中設定以下引數。
HTTP 方法 - GET
URL - https://:8080/emp/employees
點擊發送按鈕並驗證響應。
[{
   "id": "1",
   "age": "35",
   "name": "Julie",
   "email": "julie@gmail.com"
}]
Spring Boot & H2 - 更新記錄
現在,讓我們更新到目前為止建立的專案,以準備一個完整的更新記錄API並進行測試。
更新控制器
// Use service.saveOrUpdate() to update an employee record
@PutMapping("/employee")
public void updateEmployee(@RequestBody Employee employee) {
   employeeService.saveOrUpdate(employee);
}
EmployeeController
package com.tutorialspoint.controller;
import java.util.List;
import org.springframework.beans.factory.annotation.Autowired;
import org.springframework.web.bind.annotation.DeleteMapping;
import org.springframework.web.bind.annotation.GetMapping;
import org.springframework.web.bind.annotation.PathVariable;
import org.springframework.web.bind.annotation.PostMapping;
import org.springframework.web.bind.annotation.PutMapping;
import org.springframework.web.bind.annotation.RequestBody;
import org.springframework.web.bind.annotation.RequestMapping;
import org.springframework.web.bind.annotation.RestController;
import com.tutorialspoint.entity.Employee;
import com.tutorialspoint.service.EmployeeService;
@RestController
@RequestMapping(path = "/emp")
public class EmployeeController {
   @Autowired
   EmployeeService employeeService;
   @GetMapping("/employees")
   public List<Employee> getAllEmployees(){
      return employeeService.getAllEmployees();
   }
   @GetMapping("/employee/{id}")
   public Employee getEmployee(@PathVariable("id") int id) {
      return employeeService.getEmployeeById(id);
   }
   @DeleteMapping("/employee/{id}")
   public void deleteEmployee(@PathVariable("id") int id) {
      employeeService.deleteEmployeeById(id);
   }
   @PostMapping("/employee")
   public void addEmployee(@RequestBody Employee employee) {
      employeeService.saveOrUpdate(employee);
   }
   @PutMapping("/employee")
   public void updateEmployee(@RequestBody Employee employee) {
      employeeService.saveOrUpdate(employee);
   }
}
執行應用
在Eclipse中,執行在應用設定期間準備好的員工應用(Employee Application)配置。
Eclipse控制檯將顯示類似的輸出。
[INFO] Scanning for projects...
...
2021-07-24 20:51:14.823  INFO 9760 --- [  restartedMain] c.t.s.SprintBootH2Application
: Started SprintBootH2Application in 7.353 seconds (JVM running for 8.397)
伺服器啟動並執行後,使用Postman先發出POST請求新增一條記錄。
在 POSTMAN 中設定以下引數。
HTTP 方法 - POST
URL - https://:8080/emp/employee
正文 - 員工 JSON
{
   "id": "1",
   "age": "35",
   "name": "Julie",
   "email": "julie@gmail.com"
}
點選“傳送”按鈕,並檢查響應狀態是否為OK。
現在發出PUT請求更新該記錄。
在 POSTMAN 中設定以下引數。
HTTP 方法 - PUT
URL - https://:8080/emp/employee
正文 - 員工 JSON
{
   "id": "1",
   "age": "35",
   "name": "Julie",
   "email": "julie.roberts@gmail.com"
}
點擊發送按鈕並驗證響應狀態是否為OK。
現在發出GET請求獲取所有記錄。
在 POSTMAN 中設定以下引數。
HTTP 方法 - GET
URL - https://:8080/emp/employees
點擊發送按鈕並驗證響應。
[{
   "id": "1",
   "age": "35",
   "name": "Julie",
   "email": "julie.roberts@gmail.com"
}]
Spring Boot & H2 - 刪除記錄
現在,讓我們更新到目前為止建立的專案,以準備一個完整的刪除記錄API並進行測試。
更新服務
// Use repository.deleteById() to delete an Employee record
public void deleteEmployeeById(int id) {
   repository.deleteById(id);
}
EmployeeService
package com.tutorialspoint.service;
import java.util.ArrayList;
import java.util.List;
import org.springframework.beans.factory.annotation.Autowired;
import org.springframework.stereotype.Service;
import com.tutorialspoint.entity.Employee;
import com.tutorialspoint.repository.EmployeeRepository;
@Service
public class EmployeeService {
   @Autowired
   EmployeeRepository repository;
   public Employee getEmployeeById(int id) {
      return repository.findById(id).get();
   }
   public List<Employee> getAllEmployees(){
      List<Employee> employees = new ArrayList<Employee>();
      repository.findAll().forEach(employee -> employees.add(employee));
      return employees;
   }
   public void saveOrUpdate(Employee employee) {
      repository.save(employee);
   }
   public void deleteEmployeeById(int id) {
      repository.deleteById(id);
   }
}
更新控制器
// Use service.deleteEmployeeById() to delete an employee by id
@DeleteMapping("/employee/{id}")
public void deleteEmployee(@PathVariable("id") int id) {
   employeeService.deleteEmployeeById(id);
}
EmployeeController
package com.tutorialspoint.controller;
import java.util.List;
import org.springframework.beans.factory.annotation.Autowired;
import org.springframework.web.bind.annotation.DeleteMapping;
import org.springframework.web.bind.annotation.GetMapping;
import org.springframework.web.bind.annotation.PathVariable;
import org.springframework.web.bind.annotation.PostMapping;
import org.springframework.web.bind.annotation.PutMapping;
import org.springframework.web.bind.annotation.RequestBody;
import org.springframework.web.bind.annotation.RequestMapping;
import org.springframework.web.bind.annotation.RestController;
import com.tutorialspoint.entity.Employee;
import com.tutorialspoint.service.EmployeeService;
@RestController
@RequestMapping(path = "/emp")
public class EmployeeController {
   @Autowired
   EmployeeService employeeService;
   @GetMapping("/employees")
   public List<Employee> getAllEmployees(){
      return employeeService.getAllEmployees();
   }
   @GetMapping("/employee/{id}")
   public Employee getEmployee(@PathVariable("id") int id) {
      return employeeService.getEmployeeById(id);
   }
   @DeleteMapping("/employee/{id}")
   public void deleteEmployee(@PathVariable("id") int id) {
      employeeService.deleteEmployeeById(id);
   }
   @PostMapping("/employee")
   public void addEmployee(@RequestBody Employee employee) {
      employeeService.saveOrUpdate(employee);
   }
   @PutMapping("/employee")
   public void updateEmployee(@RequestBody Employee employee) {
   }
}
執行應用
在Eclipse中,執行在應用設定期間準備好的員工應用(Employee Application)配置。
Eclipse控制檯將顯示類似的輸出。
[INFO] Scanning for projects...
...
2021-07-24 20:51:14.823  INFO 9760 --- [  restartedMain] c.t.s.SprintBootH2Application
: Started SprintBootH2Application in 7.353 seconds (JVM running for 8.397)
伺服器啟動並執行後,使用Postman先發出POST請求新增一條記錄。
在 POSTMAN 中設定以下引數。
HTTP 方法 - POST
URL - https://:8080/emp/employee
正文 - 員工 JSON
{
   "id": "1",
   "age": "35",
   "name": "Julie",
   "email": "julie@gmail.com"
}
點選“傳送”按鈕,並檢查響應狀態是否為OK。
現在發出DELETE請求刪除該記錄。
在 POSTMAN 中設定以下引數。
HTTP 方法 - DELETE
URL:https://:8080/emp/employee/1
點擊發送按鈕並驗證響應狀態是否為OK。
現在發出GET請求獲取所有記錄。
在 POSTMAN 中設定以下引數。
HTTP 方法 - GET
URL - https://:8080/emp/employees
點擊發送按鈕並驗證響應。
[]
Spring Boot & H2 - 單元測試控制器
如同上一章節,我們已經完成了我們的REST API。現在讓我們在src/main/test資料夾中建立以下結構。

com.tutorialspoint.controller.EmployeeControllerTest - 一個單元測試類,用於單元測試EmployeeController的所有方法。
com.tutorialspoint.repository.EmployeeRepositoryTest - 一個單元測試類,用於單元測試EmployeeRepository的所有方法。
com.tutorialspoint.service.EmployeeServiceTest - 一個單元測試類,用於單元測試EmployeeService的所有方法。
SprintBootH2ApplicationTests類已經存在。我們需要建立上述包和相關的類。
EmployeeControllerTest
要測試REST控制器,我們需要以下註解和類:
@ExtendWith(SpringExtension.class) - 使用SpringExtension類標記該類作為測試用例執行。
@SpringBootTest(classes = SprintBootH2Application.class) - 配置Spring Boot應用程式。
@AutoConfigureMockMvc - 自動配置MockMvc以模擬HTTP請求和響應。
@Autowired private MockMvc mvc; - 用於測試的MockMvc物件。
@MockBean private EmployeeController employeeController - 要測試的EmployeeController模擬物件。
以下是EmployeeControllerTest的完整程式碼。
package com.tutorialspoint.controller;
import static org.hamcrest.core.Is.is;
import static org.mockito.BDDMockito.given;
import static org.mockito.Mockito.doNothing;
import static org.springframework.http.MediaType.APPLICATION_JSON;
import static org.springframework.test.web.servlet.request.MockMvcRequestBuilders.get;
import static org.springframework.test.web.servlet.request.MockMvcRequestBuilders.delete;
import static org.springframework.test.web.servlet.request.MockMvcRequestBuilders.put;
import static org.springframework.test.web.servlet.request.MockMvcRequestBuilders.post;
import static org.springframework.test.web.servlet.result.MockMvcResultMatchers.jsonPath;
import static org.springframework.test.web.servlet.result.MockMvcResultMatchers.status;
import java.util.ArrayList;
import java.util.List;
import org.junit.jupiter.api.Test;
import org.junit.jupiter.api.extension.ExtendWith;
import org.springframework.beans.factory.annotation.Autowired;
import org.springframework.boot.test.autoconfigure.web.servlet.AutoConfigureMockMvc;
import org.springframework.boot.test.context.SpringBootTest;
import org.springframework.boot.test.mock.mockito.MockBean;
import org.springframework.test.context.junit.jupiter.SpringExtension;
import org.springframework.test.web.servlet.MockMvc;
import com.fasterxml.jackson.databind.ObjectMapper;
import com.tutorialspoint.entity.Employee;
import com.tutorialspoint.sprintbooth2.SprintBootH2Application;
@ExtendWith(SpringExtension.class)
@SpringBootTest(classes = SprintBootH2Application.class)
@AutoConfigureMockMvc
public class EmployeeControllerTest {
   @Autowired
   private MockMvc mvc;
   @MockBean
   private EmployeeController employeeController;
   @Test
   public void testGetAllEmployees() throws Exception {
      Employee employee = getEmployee();
      List<Employee> employees = new ArrayList<>();
      employees.add(employee);
      given(employeeController.getAllEmployees()).willReturn(employees);
      mvc.perform(get("/emp/employees/").contentType(APPLICATION_JSON)).andExpect(status().isOk())
         .andExpect(jsonPath("$[0].name", is(employee.getName())));
   }
   @Test
   public void testGetEmployee() throws Exception {
      Employee employee = getEmployee();
      given(employeeController.getEmployee(1)).willReturn(employee);
      mvc.perform(get("/emp/employee/" + employee.getId()).contentType(APPLICATION_JSON)).andExpect(status().isOk())
         .andExpect(jsonPath("name", is(employee.getName())));
   }
   @Test
   public void testDeleteEmployee() throws Exception {
      Employee employee = getEmployee();
      doNothing().when(employeeController).deleteEmployee(1);
      mvc.perform(delete("/emp/employee/" + employee.getId()).contentType(APPLICATION_JSON))
         .andExpect(status().isOk()).andReturn();
   }
   @Test
   public void testAddEmployee() throws Exception {
      Employee employee = getEmployee();
      doNothing().when(employeeController).addEmployee(employee);
      mvc.perform(post("/emp/employee/").content(asJson(employee)).contentType(APPLICATION_JSON))
         .andExpect(status().isOk()).andReturn();
   }
   @Test
   public void testUpdateEmployee() throws Exception {
      Employee employee = getEmployee();
      doNothing().when(employeeController).updateEmployee(employee);
      mvc.perform(put("/emp/employee/").content(asJson(employee)).contentType(APPLICATION_JSON))
         .andExpect(status().isOk()).andReturn();
   }
   private Employee getEmployee() {
      Employee employee = new Employee();
      employee.setId(1);
      employee.setName("Mahesh");
      employee.setAge(30);
      employee.setEmail("mahesh@test.com");
      return employee;
   }
   private static String asJson(final Object obj) {
      try {
         return new ObjectMapper().writeValueAsString(obj);
      } catch (Exception e) {
         throw new RuntimeException(e);
      }
   }
}
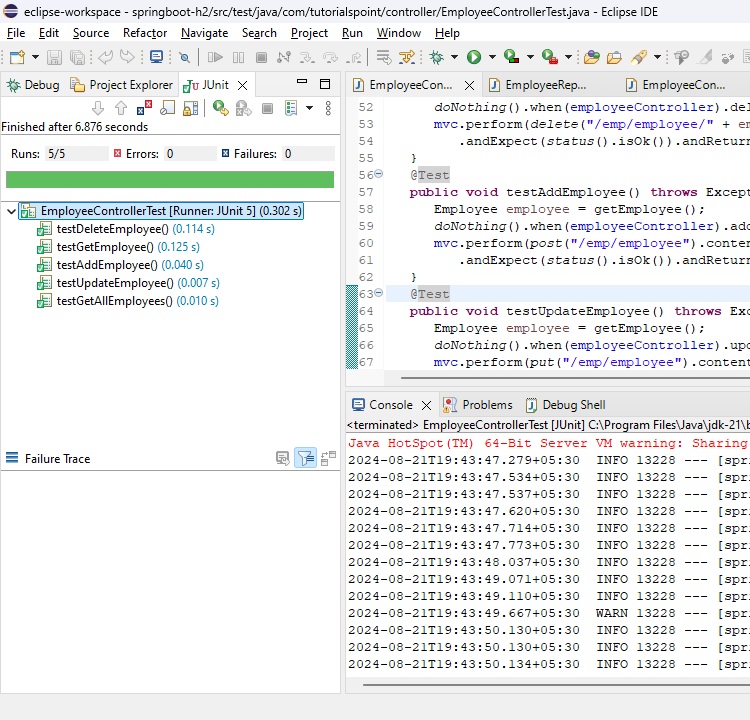
執行測試用例。
在Eclipse中右鍵單擊該檔案,然後選擇執行JUnit測試,並驗證結果。
Spring Boot & H2 - 單元測試服務
要測試服務,我們需要以下註解和類:
@ExtendWith(SpringExtension.class) - 使用SpringExtension類標記該類作為測試用例執行。
@SpringBootTest(classes = SprintBootH2Application.class) - 配置Spring Boot應用程式。
@MockBean private EmployeeService employeeService - 要測試的EmployeeService模擬物件。
以下是EmployeeServiceTest的完整程式碼。
package com.tutorialspoint.service;
import static org.junit.jupiter.api.Assertions.assertEquals;
import static org.junit.jupiter.api.Assertions.assertTrue;
import static org.mockito.BDDMockito.given;
import static org.mockito.Mockito.doNothing;
import java.util.ArrayList;
import java.util.List;
import org.junit.jupiter.api.Test;
import org.junit.jupiter.api.extension.ExtendWith;
import org.springframework.boot.test.context.SpringBootTest;
import org.springframework.boot.test.mock.mockito.MockBean;
import org.springframework.test.context.junit.jupiter.SpringExtension;
import com.tutorialspoint.entity.Employee;
import com.tutorialspoint.sprintbooth2.SprintBootH2Application;
@ExtendWith(SpringExtension.class)
@SpringBootTest(classes = SprintBootH2Application.class)
public class EmployeeServiceTest {
   @MockBean
   private EmployeeService employeeService;
   @Test
   public void testGetAllEmployees() throws Exception {
      Employee employee = getEmployee();
      List<Employee> employees = new ArrayList<>();
      employees.add(employee);
      given(employeeService.getAllEmployees()).willReturn(employees);
      List<Employee> result = employeeService.getAllEmployees();
      assertEquals(result.size(), 1);
   }
   @Test
   public void testGetEmployee() throws Exception {
      Employee employee = getEmployee();
      given(employeeService.getEmployeeById(1)).willReturn(employee);
      Employee result = employeeService.getEmployeeById(1);
      assertEquals(result.getId(), 1);
   }
   @Test
   public void testDeleteEmployee() throws Exception {
      doNothing().when(employeeService).deleteEmployeeById(1);
      employeeService.deleteEmployeeById(1);
      assertTrue(true);
   }
   @Test
   public void testSaveOrUpdateEmployee() throws Exception {
      Employee employee = getEmployee();
      doNothing().when(employeeService).saveOrUpdate(employee);
      employeeService.saveOrUpdate(employee);
      assertTrue(true);
   }
   private Employee getEmployee() {
      Employee employee = new Employee();
      employee.setId(1);
      employee.setName("Mahesh");
      employee.setAge(30);
      employee.setEmail("mahesh@test.com");
      return employee;
   }
}
執行測試用例。
在Eclipse中右鍵單擊該檔案,然後選擇執行JUnit測試,並驗證結果。

Spring Boot & H2 - 單元測試倉庫
要測試儲存庫,我們需要以下註解和類:
@ExtendWith(SpringExtension.class) - 使用SpringExtension類標記該類作為測試用例執行。
@SpringBootTest(classes = SprintBootH2Application.class) - 配置Spring Boot應用程式。
@Transactional - 標記儲存庫以使其能夠執行CRUD操作。
@Autowired private EmployeeRepository employeeRepository - 要測試的EmployeeRepository物件。
以下是EmployeeRepositoryTest的完整程式碼。
package com.tutorialspoint.repository;
import static org.junit.jupiter.api.Assertions.assertEquals;
import java.util.ArrayList;
import java.util.List;
import javax.transaction.Transactional;
import org.junit.jupiter.api.Test;
import org.junit.jupiter.api.extension.ExtendWith;
import org.springframework.beans.factory.annotation.Autowired;
import org.springframework.boot.test.context.SpringBootTest;
import org.springframework.test.context.junit.jupiter.SpringExtension;
import com.tutorialspoint.entity.Employee;
import com.tutorialspoint.sprintbooth2.SprintBootH2Application;
@ExtendWith(SpringExtension.class)
@Transactional
@SpringBootTest(classes = SprintBootH2Application.class)
public class EmployeeRepositoryTest {
   @Autowired
   private EmployeeRepository employeeRepository;
   @Test
   public void testFindById() {
      Employee employee = getEmployee();
      employeeRepository.save(employee);
      Employee result = employeeRepository.findById(employee.getId()).get();
      assertEquals(employee.getId(), result.getId());
   }
   @Test
   public void testFindAll() {
      Employee employee = getEmployee();
      employeeRepository.save(employee);
      List<Employee> result = new ArrayList<>();
      employeeRepository.findAll().forEach(e -> result.add(e));
      assertEquals(result.size(), 1);
   }
   @Test
   public void testSave() {
      Employee employee = getEmployee();
      employeeRepository.save(employee);
      Employee found = employeeRepository.findById(employee.getId()).get();
      assertEquals(employee.getId(), found.getId());
   }
   @Test
   public void testDeleteById() {
      Employee employee = getEmployee();
      employeeRepository.save(employee);
      employeeRepository.deleteById(employee.getId());
      List<Employee> result = new ArrayList<>();
      employeeRepository.findAll().forEach(e -> result.add(e));
      assertEquals(result.size(), 0);
   }
   private Employee getEmployee() {
      Employee employee = new Employee();
      employee.setId(1);
      employee.setName("Mahesh");
      employee.setAge(30);
      employee.setEmail("mahesh@test.com");
      return employee;
   }
}
執行測試用例。
在Eclipse中右鍵單擊該檔案,然後選擇執行JUnit測試,並驗證結果。
