- Spring Batch 教程
- Spring Batch - 首頁
- Spring Batch - 概述
- Spring Batch - 環境配置
- Spring Batch - 架構
- Spring Batch - 應用
- Spring Batch - 配置
- 讀取器、寫入器和處理器
- Spring Batch - 基礎應用
- Spring Batch - XML 到 MySQL
- Spring Batch - CSV 到 XML
- Spring Batch - MySQL 到 XML
- Spring Batch - MySQL 到平面檔案
- Spring Batch 有用資源
- Spring Batch - 快速指南
- Spring Batch - 有用資源
- Spring Batch - 討論
Spring Batch - XML 到 MySQL
本章節,我們將建立一個使用 XML 讀取器和 MySQL 寫入器的 Spring Batch 應用。
讀取器 - 應用中使用的讀取器是 StaxEventItemReader,用於讀取 XML 文件中的資料。
建立專案
建立一個新的 Maven 專案,具體步驟請參考 Spring Batch - 環境配置章節。
以下是本應用中使用的輸入 XML 文件。該文件包含資料記錄,這些記錄指定了諸如教程 ID、教程作者、教程標題、提交日期、教程圖示和教程描述之類的詳細資訊。
tutorial.xml
將此檔案建立在 Maven 專案的 src > main > resources 資料夾中。
<?xml version="1.0" encoding="UTF-8"?>
<tutorials>
   <tutorial>
      <tutorial_id>1001</tutorial_id>
      <tutorial_author>Sanjay</tutorial_author>
      <tutorial_title>Learn Java</tutorial_title>
      <submission_date>06-05-2007</submission_date>
      <tutorial_icon>https://tutorialspoint.tw/java/images/java-minilogo.jpg</tutorial_icon>
      <tutorial_description>Java is a high-level programming language originally
         developed by Sun Microsystems and released in 1995.
         Java runs on a variety of platforms.
         This tutorial gives a complete understanding of Java.');</tutorial_description>
   </tutorial>

   <tutorial>
      <tutorial_id>1002</tutorial_id>
      <tutorial_author>Abdul S</tutorial_author>
      <tutorial_title>Learn MySQL</tutorial_title>
      <submission_date>19-04-2007</submission_date>
      <tutorial_icon>https://tutorialspoint.tw/mysql/images/mysql-minilogo.jpg</tutorial_icon>
      <tutorial_description>MySQL is the most popular
         Open Source Relational SQL database management system.
         MySQL is one of the best RDBMS being used for developing web-based software applications.
         This tutorial will give you quick start with MySQL
         and make you comfortable with MySQL programming.</tutorial_description>
   </tutorial>

   <tutorial>
      <tutorial_id>1003</tutorial_id>
      <tutorial_author>Krishna Kasyap</tutorial_author>
      <tutorial_title>Learn JavaFX</tutorial_title>
      <submission_date>06-07-2017</submission_date>
      <tutorial_icon>https://tutorialspoint.tw/javafx/images/javafx-minilogo.jpg</tutorial_icon>
      <tutorial_description>JavaFX is a Java library used to build Rich Internet Applications.
         The applications developed using JavaFX can run on various devices
         such as Desktop Computers, Mobile Phones, TVs, Tablets, etc.
         This tutorial, discusses all the necessary elements of JavaFX that are required
         to develop effective Rich Internet Applications</tutorial_description>
   </tutorial>
</tutorials>
寫入器 - 應用中使用的寫入器是 JdbcBatchItemWriter,用於將資料寫入 MySQL 資料庫。假設我們已經在名為 "details" 的資料庫中建立了一個表。
CREATE TABLE details.TUTORIALS(
   tutorial_id int(10) NOT NULL,
   tutorial_author VARCHAR(20),
   tutorial_title VARCHAR(50),
   submission_date VARCHAR(20),
   tutorial_icon VARCHAR(200),
   tutorial_description VARCHAR(1000)
);
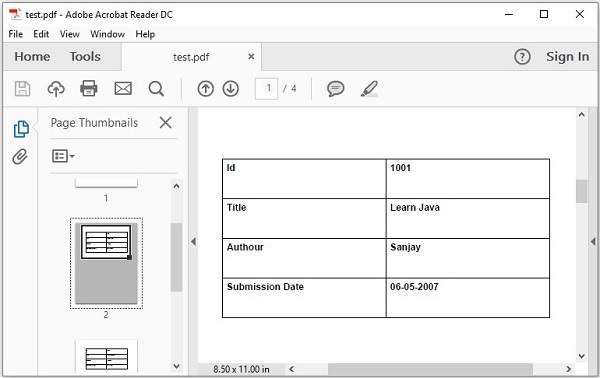
處理器 - 應用中使用的處理器是一個自定義處理器,它將每條記錄的資料寫入 PDF 文件。
在批處理過程中,如果讀取了 "n" 條記錄或資料元素,則對於每條記錄,它將讀取資料、處理資料並將資料寫入寫入器。為了處理資料,它依賴於傳遞的處理器。在本例中,在自定義處理器類中,我們編寫了載入特定 PDF 文件、建立新頁面以及以表格格式將資料項寫入 PDF 的程式碼。
最後,如果您執行此應用程式,它將讀取 XML 文件中的所有資料項,將它們儲存到 MySQL 資料庫中,並在給定的 PDF 文件中將其列印在各個頁面上。
pom.xml
以下是本 Maven 專案中使用的 pom.xml 檔案的內容。
<project xmlns = "http://maven.apache.org/POM/4.0.0"
   xmlns:xsi = "http://www.w3.org/2001/XMLSchema-instance"
   xsi:schemaLocation = "http://maven.apache.org/POM/4.0.0
   http://maven.apache.org/maven-v4_0_0.xsd">
   <modelVersion>4.0.0</modelVersion>
   <groupId>com.tutorialspoint</groupId>
   <artifactId>SpringBatchSample</artifactId>
   <packaging>jar</packaging>
   <version>1.0-SNAPSHOT</version>
   <name>SpringBatchExample</name>
   <url>http://maven.apache.org</url>

   <properties>
      <jdk.version>21</jdk.version>
      <spring.version>5.3.14</spring.version>
      <spring.batch.version>4.3.4</spring.batch.version>
      <mysql.driver.version>8.4.0</mysql.driver.version>
      <junit.version>4.11</junit.version>
      <pdf.version>2.0.32</pdf.version>
      <xstream.version>1.4.17</xstream.version>
   </properties>

   <dependencies>
      <!-- Spring Core -->
      <dependency>
         <groupId>org.springframework</groupId>
         <artifactId>spring-core</artifactId>
         <version>${spring.version}</version>
      </dependency>

      <!-- Spring jdbc, for database -->
      <dependency>
         <groupId>org.springframework</groupId>
         <artifactId>spring-jdbc</artifactId>
         <version>${spring.version}</version>
      </dependency>

      <!-- Spring XML to/back object -->
      <dependency>
         <groupId>org.springframework</groupId>
         <artifactId>spring-oxm</artifactId>
         <version>${spring.version}</version>
      </dependency>

      <!-- MySQL database driver -->
      <dependency>
         <groupId>com.mysql</groupId>
         <artifactId>mysql-connector-j</artifactId>
         <version>${mysql.driver.version}</version>
      </dependency>

      <!-- Spring Batch dependencies -->
      <dependency>
         <groupId>org.springframework.batch</groupId>
         <artifactId>spring-batch-core</artifactId>
         <version>${spring.batch.version}</version>
      </dependency>

      <dependency>
         <groupId>org.springframework.batch</groupId>
         <artifactId>spring-batch-infrastructure</artifactId>
         <version>${spring.batch.version}</version>
      </dependency>

      <!-- Spring Batch unit test -->
      <dependency>
         <groupId>org.springframework.batch</groupId>
         <artifactId>spring-batch-test</artifactId>
         <version>${spring.batch.version}</version>
      </dependency>

      <!-- Junit -->
      <dependency>
         <groupId>junit</groupId>
         <artifactId>junit</artifactId>
         <version>${junit.version}</version>
         <scope>test</scope>
      </dependency>

      <!-- pdfbox -->
      <dependency>
         <groupId>org.apache.pdfbox</groupId>
         <artifactId>pdfbox</artifactId>
         <version>${pdf.version}</version>
      </dependency>

      <!-- xstream -->
      <dependency>
         <groupId>com.thoughtworks.xstream</groupId>
         <artifactId>xstream</artifactId>
         <version>${xstream.version}</version>
      </dependency>

   </dependencies>

   <build>
      <finalName>spring-batch</finalName>
      <plugins>
         <plugin>
            <groupId>org.apache.maven.plugins</groupId>
            <artifactId>maven-eclipse-plugin</artifactId>
            <version>2.9</version>
            <configuration>
               <downloadSources>true</downloadSources>
               <downloadJavadocs>false</downloadJavadocs>
            </configuration>
         </plugin>

         <plugin>
            <groupId>org.apache.maven.plugins</groupId>
            <artifactId>maven-compiler-plugin</artifactId>
            <version>2.3.2</version>
            <configuration>
               <source>${jdk.version}</source>
               <target>${jdk.version}</target>
            </configuration>
         </plugin>
      </plugins>
   </build>
</project>
jobConfig.xml
以下是我們的 Spring Batch 示例應用程式的配置檔案。在此檔案中,我們將定義作業和步驟。此外,我們還定義了 ItemReader、ItemProcessor 和 ItemWriter 的 bean。(在這裡,我們將它們與各自的類關聯起來,併為所需的屬性傳遞值以對其進行配置。)
將此檔案建立在 Maven 專案的 src > main > resources 資料夾中。
<beans xmlns = "http://www.springframework.org/schema/beans"
   xmlns:batch = "http://www.springframework.org/schema/batch"
   xmlns:xsi = "http://www.w3.org/2001/XMLSchema-instance"
   xmlns:util = "http://www.springframework.org/schema/util"
   xsi:schemaLocation = "http://www.springframework.org/schema/batch

      http://www.springframework.org/schema/batch/spring-batch-2.2.xsd
      http://www.springframework.org/schema/beans
      http://www.springframework.org/schema/beans/spring-beans-3.2.xsd
      http://www.springframework.org/schema/util
      http://www.springframework.org/schema/util/spring-util-3.0.xsd ">

   <import resource = "context.xml" />

   <bean id = "itemProcessor" class = "CustomItemProcessor" />
   <batch:job id = "helloWorldJob">
      <batch:step id = "step1">
         <batch:tasklet>
            <batch:chunk reader = "xmlItemReader" writer = "mysqlItemWriter" processor = "itemProcessor" commit-interval="1">
            </batch:chunk>
         </batch:tasklet>
      </batch:step>
   </batch:job>

   <bean id = "xmlItemReader"
      class = "org.springframework.batch.item.xml.StaxEventItemReader">
      <property name = "fragmentRootElementName" value = "tutorial" />
      <property name = "resource" value = "classpath:tutorial.xml" />
      <property name = "unmarshaller" ref = "customUnMarshaller" />
   </bean>

   <bean id = "customUnMarshaller" class = "org.springframework.oxm.xstream.XStreamMarshaller">
      <property name = "aliases">
         <util:map id = "aliases">
            <entry key = "tutorial" value = "Tutorial" />
         </util:map>
      </property>
   </bean>
   <bean id = "mysqlItemWriter" class = "org.springframework.batch.item.database.JdbcBatchItemWriter">
      <property name = "dataSource" ref = "dataSource" />
      <property name = "sql">
         <value>
            <![CDATA[insert into details.tutorials (tutorial_id, tutorial_author, tutorial_title,
               submission_date, tutorial_icon, tutorial_description)
               values (:tutorial_id, :tutorial_author, :tutorial_title, :submission_date,
               :tutorial_icon, :tutorial_description);]]>
         </value>
      </property>

      <property name = "itemSqlParameterSourceProvider">
         <bean class = "org.springframework.batch.item.database.BeanPropertyItemSqlParameterSourceProvider" />
      </property>
   </bean>
</beans>
Context.xml
以下是 Spring Batch 應用程式的 context.xml 檔案。在此檔案中,我們將定義諸如作業儲存庫、作業啟動器和事務管理器之類的 bean。
將此檔案建立在 Maven 專案的 src > main > resources 資料夾中。
<beans xmlns = "http://www.springframework.org/schema/beans"
   xmlns:jdbc = "http://www.springframework.org/schema/jdbc"
   xmlns:xsi = "http://www.w3.org/2001/XMLSchema-instance"
   xsi:schemaLocation = "http://www.springframework.org/schema/beans
      http://www.springframework.org/schema/beans/spring-beans-3.2.xsd
      http://www.springframework.org/schema/jdbc
      http://www.springframework.org/schema/jdbc/spring-jdbc-3.2.xsd">

   <!-- stored job-meta in database -->
   <bean id = "jobRepository"
      class = "org.springframework.batch.core.repository.support.JobRepositoryFactoryBean">
      <property name = "dataSource" ref = "dataSource" />
      <property name = "transactionManager" ref = "transactionManager" />
      <property name = "databaseType" value = "mysql" />
   </bean>

   <bean id = "transactionManager"
   class = "org.springframework.batch.support.transaction.ResourcelessTransactionManager" />
   <bean id = "jobLauncher"
      class = "org.springframework.batch.core.launch.support.SimpleJobLauncher">
      <property name = "jobRepository" ref = "jobRepository" />
   </bean>

   <!-- connect to MySQL database -->
   <bean id = "dataSource"
      class = "org.springframework.jdbc.datasource.DriverManagerDataSource">
      <property name = "url" value = "jdbc:mysql://:3306/details" />
      <property name = "username" value = "myuser" />
      <property name = "password" value = "password" />
   </bean>

   <!-- create job-meta tables automatically -->
   <jdbc:initialize-database data-source = "dataSource">
      <jdbc:script location = "org/springframework/batch/core/schema-drop-mysql.sql"/>
      <jdbc:script location = "org/springframework/batch/core/schema-mysql.sql"/>
   </jdbc:initialize-database>
</beans>
CustomItemProcessor.java
以下是處理器類。在這個類中,我們編寫了應用程式處理的程式碼。在這裡,我們正在載入 PDF 文件,建立一個新頁面,建立一個表,並在表中為每條記錄插入以下值:教程 ID、教程名稱、作者、提交日期。
將此類建立在 Maven 專案的 src > main > java 資料夾中。
import java.io.File;
import java.io.IOException;

import org.apache.pdfbox.pdmodel.PDDocument;
import org.apache.pdfbox.pdmodel.PDPage;
import org.apache.pdfbox.pdmodel.PDPageContentStream;
import org.apache.pdfbox.pdmodel.font.PDType1Font;
import org.springframework.batch.item.ItemProcessor;

public class CustomItemProcessor implements ItemProcessor<Tutorial, Tutorial> {

   public static void drawTable(PDPage page, PDPageContentStream contentStream,
      float y, float margin, String[][] content) throws IOException {
      final int rows = content.length;
      final int cols = content[0].length;
      final float rowHeight = 50;
      final float tableWidth = page.getMediaBox().getWidth()-(2*margin);
      final float tableHeight = rowHeight * rows;
      final float colWidth = tableWidth/(float)cols;
      final float cellMargin=5f;

      // draw the rows
      float nexty = y ;
      for (int i = 0; i <= rows; i++) {
         contentStream.drawLine(margin,nexty,margin+tableWidth,nexty);
         nexty-= rowHeight;
      }

      //draw the columns
      float nextx = margin;
      for (int i = 0; i <= cols; i++) {
         contentStream.drawLine(nextx,y,nextx,y-tableHeight);
         nextx += colWidth;
      }

      // now add the text
      contentStream.setFont(PDType1Font.HELVETICA_BOLD,12);

      float textx = margin+cellMargin;
      float texty = y-15;
      for(int i = 0; i < content.length; i++){
         for(int j = 0 ; j < content[i].length; j++){
            String text = content[i][j];
            contentStream.beginText();
            contentStream.moveTextPositionByAmount(textx,texty);
            contentStream.drawString(text);
            contentStream.endText();
            textx += colWidth;
         }

         texty-=rowHeight;
         textx = margin+cellMargin;
      }
   }


   private void createPDFDocument() throws IOException {
      // Creating PDF document object
      PDDocument document = new PDDocument();

      // Saving the document
      document.save("E:/Examples/test.pdf");

      System.out.println("PDF created");

      // Closing the document
      document.close();
   }

   @Override
   public Tutorial process(Tutorial item) throws Exception {
      System.out.println("Processing..." + item);

      createPDFDocument();

      // Creating PDF document object
      PDDocument doc = PDDocument.load(new File("E:/Examples/test.pdf"));

      // Creating a blank page
      PDPage page = new PDPage();
      doc.addPage( page );
      PDPageContentStream contentStream =  new PDPageContentStream(doc, page);

      String[][] content = {{"Id",""+item.getTutorial_id()},
      {"Title", item.getTutorial_title()},
      {"Authour", item.getTutorial_author()},
      {"Submission Date", item.getSubmission_date()}} ;
      drawTable(page, contentStream, 700, 100, content);

      contentStream.close();
      doc.save("E:/Examples/test.pdf" );
      System.out.println("Hello");
      return item;
   }
}
TutorialFieldSetMapper.java
以下是 ReportFieldSetMapper 類,它將資料設定到 Tutorial 類。
將此類建立在 Maven 專案的 src > main > java 資料夾中。
import org.springframework.batch.item.file.mapping.FieldSetMapper;
import org.springframework.batch.item.file.transform.FieldSet;
import org.springframework.validation.BindException;

public class TutorialFieldSetMapper implements FieldSetMapper<Tutorial> {

   @Override
   public Tutorial mapFieldSet(FieldSet fieldSet) throws BindException {
      // instantiating the Tutorial class
      Tutorial tutorial = new Tutorial();

      // Setting the fields from XML
      tutorial.setTutorial_id(fieldSet.readInt(0));
      tutorial.setTutorial_title(fieldSet.readString(1));
      tutorial.setTutorial_author(fieldSet.readString(2));
      tutorial.setTutorial_icon(fieldSet.readString(3));
      tutorial.setTutorial_description(fieldSet.readString(4));
      return tutorial;
   }
}
Tutorial.java
以下是Tutorial 類。它是一個帶有setter和getter方法的簡單類。
將此類建立在 Maven 專案的 src > main > java 資料夾中。
public class Tutorial {
   private int tutorial_id;
   private String tutorial_author;
   private String tutorial_title;
   private String submission_date;
   private String tutorial_icon;
   private String tutorial_description;

   @Override
   public String toString() {
      return " [id=" + tutorial_id + ", author=" + tutorial_author
         + ", title=" + tutorial_title + ", date=" + submission_date + ", icon ="
         +tutorial_icon +", description = "+tutorial_description+"]";
   }

   public int getTutorial_id() {
      return tutorial_id;
   }

   public void setTutorial_id(int tutorial_id) {
      this.tutorial_id = tutorial_id;
   }

   public String getTutorial_author() {
      return tutorial_author;
   }

   public void setTutorial_author(String tutorial_author) {
      this.tutorial_author = tutorial_author;
   }

   public String getTutorial_title() {
      return tutorial_title;
   }

   public void setTutorial_title(String tutorial_title) {
      this.tutorial_title = tutorial_title;
   }

   public String getSubmission_date() {
      return submission_date;
   }

   public void setSubmission_date(String submission_date) {
      this.submission_date = submission_date;
   }

   public String getTutorial_icon() {
      return tutorial_icon;
   }

   public void setTutorial_icon(String tutorial_icon) {
      this.tutorial_icon = tutorial_icon;
   }

   public String getTutorial_description() {
      return tutorial_description;
   }

   public void setTutorial_description(String tutorial_description) {
      this.tutorial_description = tutorial_description;
   }
}
App.java
以下是啟動批處理過程的程式碼。在這個類中,我們將透過執行 JobLauncher 來啟動 Batch 應用程式。
將此類建立在 Maven 專案的 src > main > java 資料夾中。
import org.springframework.batch.core.Job;
import org.springframework.batch.core.JobExecution;
import org.springframework.batch.core.JobParameters;
import org.springframework.batch.core.launch.JobLauncher;
import org.springframework.context.ApplicationContext;
import org.springframework.context.support.ClassPathXmlApplicationContext;

public class App {
   public static void main(String[] args) throws Exception {
      String[] springConfig  = {    "jobConfig.xml" };

      // Creating the application context object
      ApplicationContext context = new ClassPathXmlApplicationContext(springConfig);

      // Creating the job launcher
      JobLauncher jobLauncher = (JobLauncher) context.getBean("jobLauncher");

      // Creating the job
      Job job = (Job) context.getBean("helloWorldJob");

      // create the pdf
      createPDFDocument();

      // Executing the JOB
      JobExecution execution = jobLauncher.run(job, new JobParameters());
      System.out.println("Exit Status : " + execution.getStatus());
   }

   private static void createPDFDocument() throws IOException {
      // Creating PDF document object
      PDDocument document = new PDDocument();

      // Saving the document
      document.save("E:/Examples/test.pdf");

      System.out.println("PDF created");

      // Closing the document
      document.close();
   }
}
輸出
在 Eclipse 中右鍵單擊專案,選擇執行方式 -> Maven 構建。將目標設定為 clean package 並執行專案。您將看到以下輸出。
[INFO] Scanning for projects...
[INFO]
[INFO] [1m----------------< [0;36mcom.tutorialspoint:SpringBatchSample[0;1m >----------------[m
[INFO] [1mBuilding SpringBatchExample 1.0-SNAPSHOT[m
[INFO]   from pom.xml
[INFO] [1m--------------------------------[ jar ]---------------------------------[m
[INFO]
[INFO] [1m--- [0;32mclean:3.2.0:clean[m [1m(default-clean)[m @ [36mSpringBatchSample[0;1m ---[m
[INFO] Deleting C:\Users\Tutorialspoint\eclipse-workspace\SpringBatchSample\target
[INFO]
[INFO] [1m--- [0;32mresources:3.3.1:resources[m [1m(default-resources)[m @ [36mSpringBatchSample[0;1m ---[m
[WARNING] Using platform encoding (UTF-8 actually) to copy filtered resources, i.e. build is platform dependent!
[INFO] Copying 3 resources from src\main\resources to target\classes
[INFO]
[INFO] [1m--- [0;32mcompiler:2.3.2:compile[m [1m(default-compile)[m @ [36mSpringBatchSample[0;1m ---[m
[WARNING] File encoding has not been set, using platform encoding UTF-8, i.e. build is platform dependent!
[INFO] Compiling 5 source files to C:\Users\Tutorialspoint\eclipse-workspace\SpringBatchSample\target\classes
[INFO]
[INFO] [1m--- [0;32mresources:3.3.1:testResources[m [1m(default-testResources)[m @ [36mSpringBatchSample[0;1m ---[m
[WARNING] Using platform encoding (UTF-8 actually) to copy filtered resources, i.e. build is platform dependent!
[INFO] Copying 0 resource from src\test\resources to target\test-classes
[INFO]
[INFO] [1m--- [0;32mcompiler:2.3.2:testCompile[m [1m(default-testCompile)[m @ [36mSpringBatchSample[0;1m ---[m
[INFO] Nothing to compile - all classes are up to date
[INFO]
[INFO] [1m--- [0;32msurefire:3.1.2:test[m [1m(default-test)[m @ [36mSpringBatchSample[0;1m ---[m
[INFO]
[INFO] [1m--- [0;32mjar:3.3.0:jar[m [1m(default-jar)[m @ [36mSpringBatchSample[0;1m ---[m
[INFO] Building jar: C:\Users\Tutorialspoint\eclipse-workspace\SpringBatchSample\target\spring-batch.jar
[INFO] [1m------------------------------------------------------------------------[m
[INFO] [1;32mBUILD SUCCESS[m
[INFO] [1m------------------------------------------------------------------------[m
[INFO] Total time:  3.495 s
[INFO] Finished at: 2024-07-31T12:14:52+05:30
[INFO] [1m------------------------------------------------------------------------[m
要檢查上述 SpringBatch 程式的輸出,請右鍵單擊 App.java 類並選擇執行方式 -> Java 應用程式。它將產生以下輸出:
Jul 31, 2024 12:16:16 PM org.springframework.batch.core.launch.support.SimpleJobLauncher afterPropertiesSet
INFO: No TaskExecutor has been set, defaulting to synchronous executor.
PDF created
Jul 31, 2024 12:16:19 PM org.springframework.batch.core.launch.support.SimpleJobLauncher$1 run
INFO: Job: [FlowJob: [name=helloWorldJob]] launched with the following parameters: [{}]
Jul 31, 2024 12:16:20 PM org.springframework.batch.core.job.SimpleStepHandler handleStep
INFO: Executing step: [step1]
Security framework of XStream not explicitly initialized, using predefined black list on your own risk.
Processing... [id=1001, author=Sanjay, title=Learn Java, date=06-05-2007, icon =https://tutorialspoint.tw/java/images/java-minilogo.jpg, description = Java is a high-level programming language originally
         developed by Sun Microsystems and released in 1995.
         Java runs on a variety of platforms.
         This tutorial gives a complete understanding of Java.');]
Processing... [id=1002, author=Abdul S, title=Learn MySQL, date=19-04-2007, icon =https://tutorialspoint.tw/mysql/images/mysql-minilogo.jpg, description = MySQL is the most popular
         Open Source Relational SQL database management system.
         MySQL is one of the best RDBMS being used for developing web-based software applications.
         This tutorial will give you quick start with MySQL
         and make you comfortable with MySQL programming.]
Processing... [id=1003, author=Krishna Kasyap, title=Learn JavaFX, date=06-07-2017, icon =https://tutorialspoint.tw/javafx/images/javafx-minilogo.jpg, description = JavaFX is a Java library used to build Rich Internet Applications.
         The applications developed using JavaFX can run on various devices
         such as Desktop Computers, Mobile Phones, TVs, Tablets, etc.
         This tutorial, discusses all the necessary elements of JavaFX that are required
         to develop effective Rich Internet Applications]
Jul 31, 2024 12:16:21 PM org.springframework.batch.core.step.AbstractStep execute
INFO: Step: [step1] executed in 1s232ms
Jul 31, 2024 12:16:21 PM org.springframework.batch.core.launch.support.SimpleJobLauncher$1 run
INFO: Job: [FlowJob: [name=helloWorldJob]] completed with the following parameters: [{}] and the following status: [COMPLETED] in 1s484ms
Exit Status : COMPLETED
如果您在資料庫中驗證 details.tutorial 表,它將顯示以下輸出:
| tutorial_id | tutorial_author | tutorial_title | submission_date | tutorial_icon | tutorial_description |
|---|---|---|---|---|---|
| 1001 | Sanjay | 學習 Java | 06-05-2007 | https://tutorialspoint.tw/java/images/java-mini-logo.jpg | Java 是一種高階程式語言,最初由 Sun Microsystems 開發並於 1995 年釋出。Java 執行在各種平臺上。本教程全面講解了 Java。 |
| 1002 | Abdul S | 學習 MySQL | 19-04-2007 | https://tutorialspoint.tw/mysql/images/mysql-minilogo.jpg | MySQL 是最流行的開源關係型 SQL 資料庫管理系統。MySQL 是用於開發基於 Web 的軟體應用程式的最佳 RDBMS 之一。本教程將快速入門 MySQL,並讓您熟悉 MySQL 程式設計。 |
| 1003 | 學習 JavaFX | Krishna Kasyap | 06-07-2017 | https://tutorialspoint.tw/javafx/images/javafx-minilogo.jpg | MySQL 是最流行的開源關係型 SQL 資料庫管理系統。MySQL 是用於開發基於 Web 的軟體應用程式的最佳 RDBMS 之一。本教程將快速入門 MySQL,並讓您熟悉 MySQL 程式設計。 |
這將生成一個 PDF,每頁顯示一條記錄,如下所示。