- Python Falcon 教程
- Python Falcon - 首頁
- Python Falcon - 簡介
- Python Falcon - 環境設定
- Python Falcon - WSGI vs ASGI
- Python Falcon - Hello World(WSGI)
- Python Falcon - Waitress
- Python Falcon - ASGI
- Python Falcon - Uvicorn
- Python Falcon - API 測試工具
- 請求 & 響應
- Python Falcon - 資源類
- Python Falcon - 應用類
- Python Falcon - 路由
- Falcon - 字尾響應器
- Python Falcon - Inspect 模組
- Python Falcon - Jinja2 模板
- Python Falcon - Cookie
- Python Falcon - 狀態碼
- Python Falcon - 錯誤處理
- Python Falcon - 鉤子
- Python Falcon - 中介軟體
- Python Falcon - CORS
- Python Falcon - WebSocket
- Python Falcon - Sqlalchemy 模型
- Python Falcon - 測試
- Python Falcon - 部署
- Python Falcon 有用資源
- Python Falcon - 快速指南
- Python Falcon - 有用資源
- Python Falcon - 討論
Python Falcon - SQLAlchemy 模型
為了演示 Falcon 的響應器函式(**on_post()**、**on_get()**、**on_put()** 和 **on_delete()**),我們已經在記憶體資料庫(以 Python 字典物件列表的形式)上執行了 **CRUD**(代表建立、讀取、更新和刪除)操作。相反,我們可以使用任何關係資料庫(例如 MySQL、Oracle 等)來執行儲存、檢索、更新和刪除操作。
我們不使用符合 **DB-API** 的資料庫驅動程式,而是使用 **SQLAlchemy** 作為 Python 程式碼和資料庫之間的介面(我們將使用 SQLite 資料庫,因為 Python 對其有內建支援)。SQLAlchemy 是一個流行的 SQL 工具包和 **物件關係對映器**。
物件關係對映是一種程式設計技術,用於在面向物件程式語言中轉換不相容型別系統之間的資料。通常,面嚮物件語言(如 Python)中使用的型別系統包含非標量型別。但是,大多數資料庫產品(如 Oracle、MySQL 等)中的資料型別都是原始型別,例如整數和字串。
在 ORM 系統中,每個類都對映到底層資料庫中的一個表。ORM 可以為您處理這些問題,而您則可以專注於系統邏輯的程式設計,而不是自己編寫繁瑣的資料庫介面程式碼。
為了使用 SQLALchemy,我們需要首先使用 PIP 安裝程式安裝該庫。
pip install sqlalchemy
SQLAlchemy 旨在與為特定資料庫構建的 DBAPI 實現一起使用。它使用方言系統與各種型別的 DBAPI 實現和資料庫進行通訊。所有方言都需要安裝相應的 DBAPI 驅動程式。
以下是被包含的方言:
Firebird
Microsoft SQL Server
MySQL
Oracle
PostgreSQL
SQLite
Sybase
資料庫引擎
由於我們將使用 SQLite 資料庫,因此我們需要為名為 **test.db** 的資料庫建立一個數據庫引擎。從 sqlalchemy 模組匯入 **create_engine()** 函式。
from sqlalchemy import create_engine
from sqlalchemy.dialects.sqlite import *
SQLALCHEMY_DATABASE_URL = "sqlite:///./test.db"
engine = create_engine(SQLALCHEMY_DATABASE_URL, connect_args =
{"check_same_thread": False})
為了與資料庫互動,我們需要獲取其控制代碼。會話物件是資料庫的控制代碼。Session 類使用 **sessionmaker()** 定義 – 一個可配置的會話工廠方法,繫結到引擎物件。
from sqlalchemy.orm import sessionmaker, Session
session = sessionmaker(autocommit=False, autoflush=False, bind=engine)
接下來,我們需要一個宣告性基類,它在宣告性系統中儲存類和對映表的目錄。
from sqlalchemy.ext.declarative import declarative_base
Base = declarative_base()
模型類
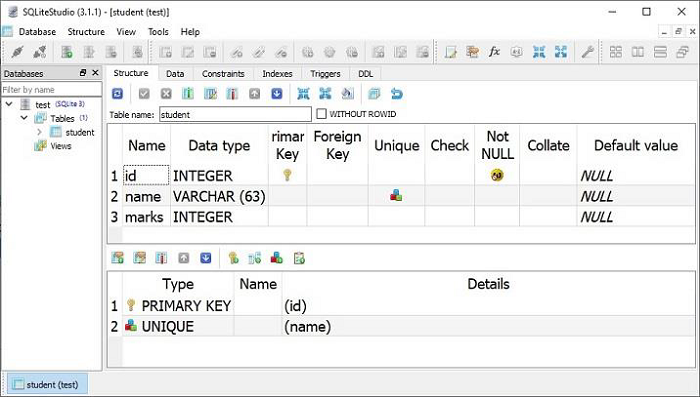
**Students**,Base 的子類,對映到資料庫中的 **students** 表。Books 類中的屬性對應於目標表中列的資料型別。請注意,id 屬性對應於 book 表中的主鍵。
class Students(Base):
   __tablename__ = 'student'
   id = Column(Integer, primary_key=True, nullable=False)
   name = Column(String(63), unique=True)
   marks = Column(Integer)
Base.metadata.create_all(bind=engine)
**create_all()** 方法在資料庫中建立相應的表。可以使用 SQLite 視覺化工具(例如 **SQLiteStudio**)進行確認。
現在我們需要宣告一個 **StudentResource** 類,其中定義了 HTTP 響應器方法以對 students 表執行 CRUD 操作。此類的物件與路由相關聯,如下面的程式碼片段所示:
import falcon
import json
from waitress import serve
class StudentResource:
   def on_get(self, req, resp):
      pass
   def on_post(self, req, resp):
      pass
   def on_put_student(self, req, resp, id):
      pass
   def on_delete_student(self, req, resp, id):
      pass
app = falcon.App()
app.add_route("/students", StudentResource())
app.add_route("/students/{id:int}", StudentResource(), suffix='student')
on_post()
其餘程式碼與記憶體中的 CRUD 操作類似,不同之處在於操作函式透過 SQLalchemy 介面與資料庫進行互動。
**on_post()** 響應器方法首先根據請求引數構造 Students 類的物件,並將其新增到 Students 模型中。由於此模型對映到資料庫中的 students 表,因此會新增相應的行。**on_post()** 方法如下:
def on_post(self, req, resp):
   data = json.load(req.bounded_stream)
   student=Students(id=data['id'], name=data['name'], marks=data['marks'])
   session.add(student)
   session.commit()
   resp.text = "Student added successfully."
   resp.status = falcon.HTTP_OK
   resp.content_type = falcon.MEDIA_TEXT
如前所述,當收到 POST 請求時,將呼叫 **on_post()** 響應器。我們將使用 Postman 應用傳遞 POST 請求。
啟動 Postman,選擇 POST 方法,並將值(id=1、name="Manan" 和 marks=760)作為主體引數傳遞。請求成功處理,並且一行新增到 **students** 表中。
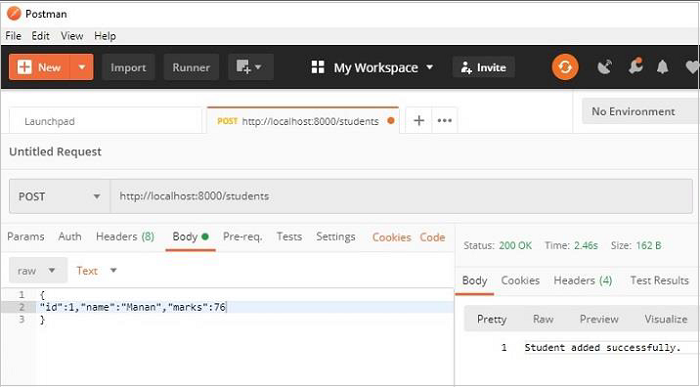
繼續傳送多個 POST 請求以新增記錄。
on_get()
此響應器旨在檢索 **Students** 模型中的所有物件。**Session** 物件上的 **query()** 方法檢索物件。
rows = session.query(Students).all()
由於 Falcon 響應器的預設響應為 JSON 格式,因此我們必須將上述查詢的結果轉換為 **dict** 物件列表。
data=[]
for row in rows:
   data.append({"id":row.id, "name":row.name, "marks":row.marks})
在 **StudentResource** 類中,讓我們新增執行此操作併發送其 JSON 響應的 **on_get()** 方法,如下所示:
def on_get(self, req, resp):
   rows = session.query(Students).all()
   data=[]
   for row in rows:
      data.append({"id":row.id, "name":row.name, "marks":row.marks})
      resp.text = json.dumps(data)
      resp.status = falcon.HTTP_OK
      resp.content_type = falcon.MEDIA_JSON
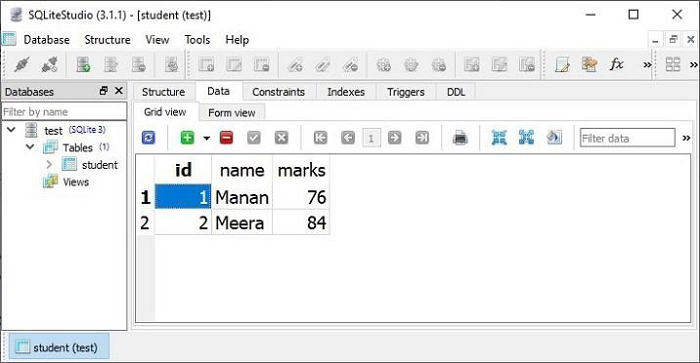
可以在 Postman 應用中測試 **GET** 請求操作。** /students** URL 將導致顯示 JSON 響應,其中顯示 students 模型中所有物件的的資料。
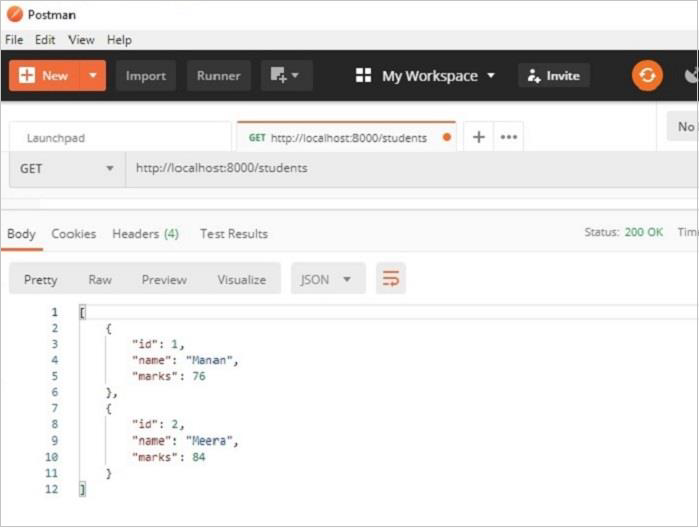
Postman 應用結果窗格中顯示的兩條記錄也可以在 **SQLiteStudio** 的資料檢視中進行驗證。
on_put()
**on_put()** 響應器執行 UPDATE 操作。它響應 URL ** /students/id**。要從 Students 模型中獲取具有給定 id 的物件,我們將過濾器應用於查詢結果,並使用從客戶端接收到的資料更新其屬性的值。
student = session.query(Students).filter(Students.id == id).first()
**on_put()** 方法的程式碼如下:
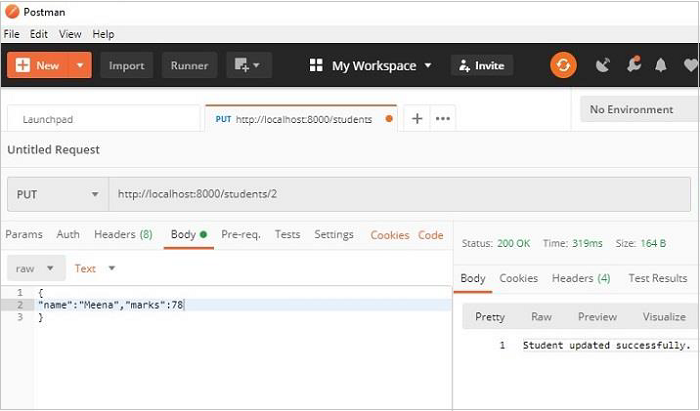
def on_put_student(self, req, resp, id):
   student = session.query(Students).filter(Students.id == id).first()
   data = json.load(req.bounded_stream)
   student.name=data['name']
   student.marks=data['marks']
   session.commit()
   resp.text = "Student updated successfully."
   resp.status = falcon.HTTP_OK
   resp.content_type = falcon.MEDIA_TEXT
讓我們使用 Postman 更新 Students 模型中 **id=2** 的物件,並更改名稱和分數。請注意,這些值作為主體引數傳遞。
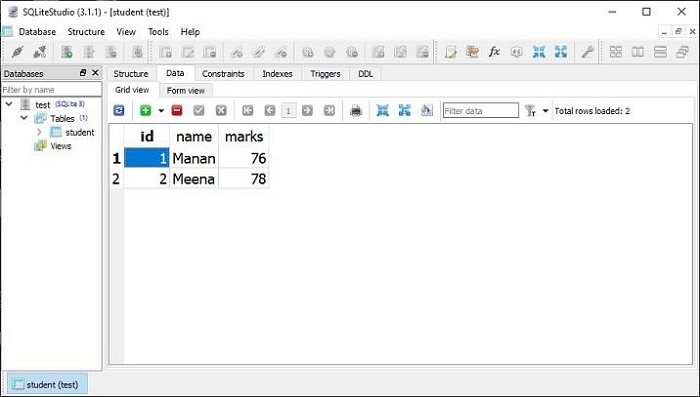
**SQLiteStudio** 中的資料檢視顯示修改已生效。
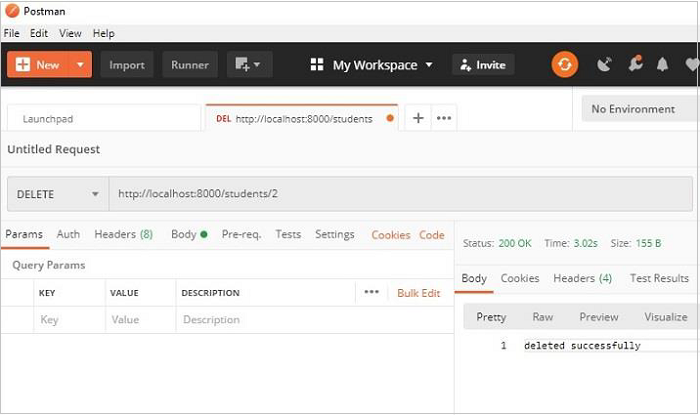
on_delete()
最後,DELETE 操作很容易。我們需要獲取給定 **id** 的物件並呼叫 **delete()** 方法。
def on_delete_student(self, req, resp, id):
   try:
      session.query(Students).filter(Students.id == id).delete()
      session.commit()
   except Exception as e:
      raise Exception(e)
      resp.text = "deleted successfully"
      resp.status = falcon.HTTP_OK
      resp.content_type = falcon.MEDIA_TEXT
作為 **on_delete()** 響應器的測試,讓我們使用 Postman 刪除 id=2 的物件,如下所示: