- Next.js 教程
- Next.js - 首頁
- Next.js - 概述
- Next.js - 環境搭建
- Next.js 特性
- Next.js - 頁面
- Next.js - 靜態檔案服務
- Next.js - 元資料
- Next.js - CSS 支援
- Next.js - 全域性 CSS 支援
- Next.js - 預渲染
- Next.js 路由
- Next.js - 路由
- Next.js - 動態 API 路由
- Next.js - 命令式路由
- Next.js - 淺路由
- Next.js API 路由
- Next.js - API 路由
- Next.js - API 中介軟體
- Next.js - 響應助手
- Next.js 其他
- Next.js - TypeScript
- Next.js - 環境變數
- Next.js - 部署
- Next.js - 命令列介面 (CLI)
- Next.js 有用資源
- Next.js 快速指南
- Next.js - 有用資源
- Next.js - 討論
Next.js 快速指南
Next.js - 概述
Next.js 是一個基於 React 的框架,具有伺服器端渲染功能。它非常快速且對 SEO 友好。
使用 Next.js,您可以輕鬆建立強大的基於 React 的應用程式並對其進行測試。以下是 Next.js 的主要功能。
熱程式碼過載 - Next.js 伺服器檢測修改後的檔案並自動重新載入它們。
自動路由 - 無需配置任何 URL 路由。檔案需要放在 pages 資料夾中。所有 URL 將對映到檔案系統。可以進行自定義。
元件特定樣式 - styled-jsx 提供對全域性和元件特定樣式的支援。
伺服器端渲染 - React 元件在伺服器上預渲染,因此在客戶端載入速度更快。
Node 生態系統 - Next.js 基於 React,與 Node 生態系統很好地融合。
自動程式碼分割 - Next.js 使用其所需的庫渲染頁面。Next.js 不會建立一個大型 JavaScript 檔案,而是建立多個資源。載入頁面時,只會載入所需的 JavaScript 頁面。
預取 - Next.js 提供 Link 元件,用於連結多個元件,並支援預取屬性以在後臺預取頁面資源。
動態元件 - Next.js 允許動態匯入 JavaScript 模組和 React 元件。
匯出靜態站點 - Next.js 允許從您的 Web 應用程式匯出完整的靜態站點。
內建 TypeScript 支援 - Next.js 使用 TypeScript 編寫,並提供出色的 TypeScript 支援。
Next.js - 環境搭建
由於 Next.js 是一個基於 React 的框架,我們使用 Node 環境。現在請確保您的系統上已安裝Node.js 和 npm。您可以使用以下命令安裝 Next.js:
npm install next react react-dom
Next.js 成功安裝後,您可以看到以下輸出:
+ react@16.13.1
+ react-dom@16.13.1
+ next@9.4.4
added 831 packages from 323 contributors and audited 834 packages in 172.989s
現在,讓我們建立一個 node package.json:
npm init
建立 package.json 時選擇預設值:
This utility will walk you through creating a package.json file.
It only covers the most common items, and tries to guess sensible defaults.

See `npm help json` for definitive documentation on these fields
and exactly what they do.

Use `npm install <pkg>` afterwards to install a package and
save it as a dependency in the package.json file.

Press ^C at any time to quit.
package name: (nextjs)
version: (1.0.0)
description:
entry point: (index.js)
test command:
git repository:
keywords:
author:
license: (ISC)
About to write to \Node\nextjs\package.json:
{
   "name": "nextjs",
   "version": "1.0.0",
   "description": "",
   "main": "index.js",
   "dependencies": {
      "next": "^9.4.4",
      "react": "^16.13.1",
      "react-dom": "^16.13.1"
   },
   "devDependencies": {},
   "scripts": {
      "test": "echo \"Error: no test specified\" && exit 1"
   },
   "author": "",
   "license": "ISC"
}
Is this OK? (yes)
現在更新 package.json 的 scripts 部分以包含 Next.js 命令。
{
   "name": "nextjs",
   "version": "1.0.0",
   "description": "",
   "main": "index.js",
   "dependencies": {
      "next": "^9.4.4",
      "react": "^16.13.1",
      "react-dom": "^16.13.1"
   },
   "devDependencies": {},
   "scripts": {
      "test": "echo \"Error: no test specified\" && exit 1",
      "dev": "next",
      "build": "next build",
      "start": "next start"
   },
   "author": "",
   "license": "ISC"
}
建立 pages 目錄。
在 nextjs 資料夾內建立一個 pages 資料夾,並建立一個包含以下內容的 index.js 檔案。
function HomePage() {
   return <div>Welcome to Next.js!</div>
}

export default HomePage
啟動 Next.js 伺服器
執行以下命令啟動伺服器:
npm run dev
> nextjs@1.0.0 dev \Node\nextjs
> next

ready - started server on https://:3000
event - compiled successfully
event - build page: /
wait  - compiling...
event - compiled successfully
event - build page: /next/dist/pages/_error
wait  - compiling...
event - compiled successfully
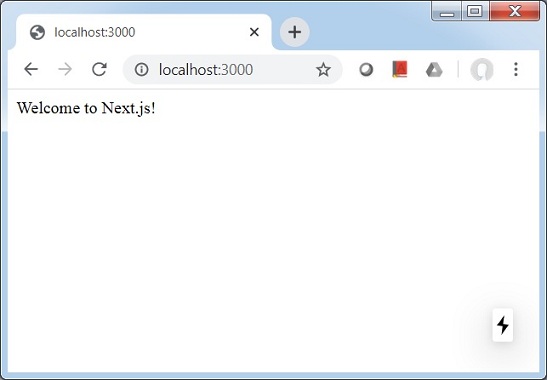
驗證輸出
在瀏覽器中開啟 localhost:3000,您將看到以下輸出。
Next.js - 頁面
在 Next.js 中,我們可以建立頁面並使用檔案系統路由功能在它們之間導航。我們將使用Link元件進行頁面間的客戶端導航。
在 Next.js 中,頁面是一個 React 元件,並從 pages 目錄匯出。每個頁面都與其檔名相關的路由相關聯。例如
pages/index.js 連結到 '/' 路由。
pages/posts/first.js 連結到 '/posts/first' 路由,以此類推。
讓我們更新在環境搭建章節中建立的 nextjs 專案。
建立 post 目錄並在其中建立 first.js 檔案,內容如下:
export default function FirstPost() {
   return <h1>My First Post</h1>
}
新增 Link 支援以返回主頁。更新 first.js 如下:
import Link from 'next/link'

export default function FirstPost() {
   return (
      <>
         <h1>My First Post</h1>
         <h2>
            <Link href="/">
               <a>Home</a>
            </Link>
         </h2>
      </>
   )
}
新增 Link 支援到主頁以導航到第一個頁面。更新 index.js 如下:
import Link from 'next/link'

function HomePage() {
   return (
      <>
         <div>Welcome to Next.js!</div>
         <Link href="/posts/first"><a>First Post</a></Link>
      </>
   )
}

export default HomePage
啟動 Next.js 伺服器
執行以下命令啟動伺服器:
npm run dev
> nextjs@1.0.0 dev \Node\nextjs
> next

ready - started server on https://:3000
event - compiled successfully
event - build page: /
wait  - compiling...
event - compiled successfully
event - build page: /next/dist/pages/_error
wait  - compiling...
event - compiled successfully
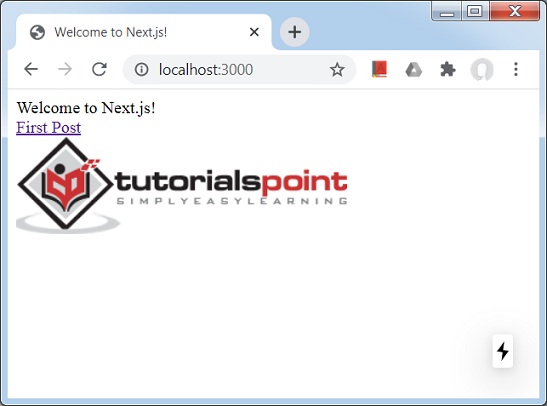
驗證輸出
在瀏覽器中開啟 localhost:3000,您將看到以下輸出。

點選“First”連結,您將看到以下輸出。

Next.js - 靜態檔案服務
在 Next.js 中,我們可以透過將靜態頁面(如影像)放在頂級目錄public中來輕鬆地提供服務。我們可以像在pages目錄中的頁面一樣引用這些檔案。
在 Next.js 中,頁面是一個 React 元件,並從 pages 目錄匯出。每個頁面都與其檔名相關的路由相關聯。
讓我們更新在頁面章節中使用的 nextjs 專案。
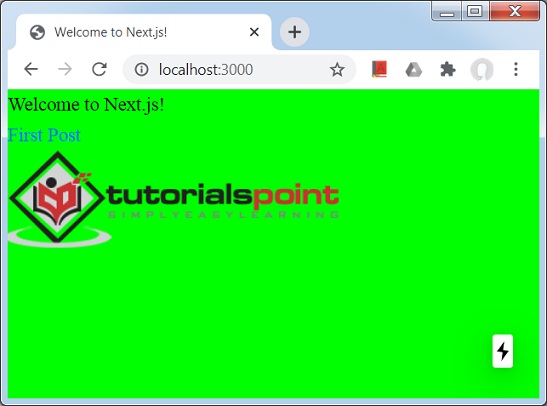
建立 public 目錄並將任何影像放在其中。我們使用了 logo.png,TutorialsPoint 徽標影像。
更新 first.js 如下:
import Link from 'next/link'

export default function FirstPost() {
   return (
      <>
         <h1>My First Post</h1>
         <h2>
            <Link href="/">
               <a>Home</a>
            </Link>
         </h2>
         <br/">
         <img src="/logo.png" alt="TutorialsPoint Logo" />
      </>
   )
}
在這裡,我們在 index.js 檔案中添加了對 logo.png 的引用。
啟動 Next.js 伺服器
執行以下命令啟動伺服器:
npm run dev
> nextjs@1.0.0 dev \Node\nextjs
> next

ready - started server on https://:3000
event - compiled successfully
event - build page: /
wait  - compiling...
event - compiled successfully
event - build page: /next/dist/pages/_error
wait  - compiling...
event - compiled successfully
驗證輸出
在瀏覽器中開啟 localhost:3000,您將看到以下輸出。
public 目錄在 SEO 目的方面也很有用。它可用於 robot.txt、Google 站點驗證或 Web 應用程式中的任何其他靜態資源。
Next.js - 元資料
在 Next.js 中,我們可以使用內建的<Head> React 元件輕鬆修改每個 React 頁面的 head 部分。
讓我們更新在頁面章節中使用的 nextjs 專案。
更新 index.js 如下:
import Link from 'next/link'
import Head from 'next/head'

function HomePage() {
   return (
      <>
         <Head>
            <title>Welcome to Next.js!</title>
         </Head>
         <div>Welcome to Next.js!</div>
         <Link href="/posts/first"><a>First Post</a></Link>
         <br/>
         <img src="/logo.png" alt="TutorialsPoint Logo" />
      </>
   )
}

export default HomePage
更新 first.js 如下:
import Link from 'next/link'
import Head from 'next/head'

export default function FirstPost() {
   return (
      <>
      <Head>
         <title>My First Post</title>
      </Head>
      <h1>My First Post</h1>
      <h2>
         <Link href="/">
            <a>Home</a>
         </Link>
      </h2>
      </>
   )
}
在這裡,我們在 index.js 檔案中添加了對 logo.png 的引用。
啟動 Next.js 伺服器
執行以下命令啟動伺服器:
npm run dev
> nextjs@1.0.0 dev \Node\nextjs
> next

ready - started server on https://:3000
event - compiled successfully
event - build page: /
wait  - compiling...
event - compiled successfully
event - build page: /next/dist/pages/_error
wait  - compiling...
event - compiled successfully
驗證輸出
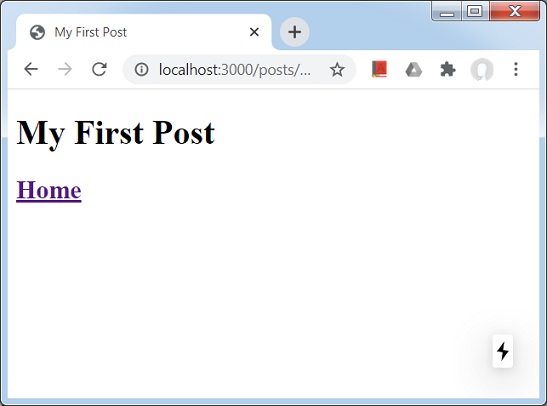
在瀏覽器中開啟 localhost:3000,您將看到以下輸出。
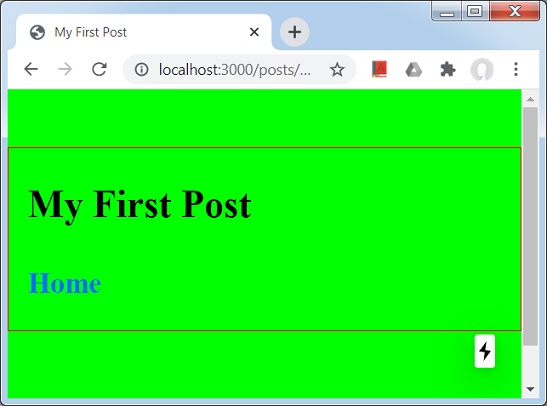
點選“First Page”連結並驗證“First Post”頁面的標題也已更改。
Next.js - CSS 支援
在 Next.js 中,我們可以使用名為 styled-jsx 的內建 css-in-js 庫。它允許在 React 元件中編寫 CSS,這些樣式將作用域到元件。
在此示例中,我們將建立一個 Container 物件,它將用於透過包含它們來設定其他元件的樣式。
讓我們更新在元資料章節中使用的 nextjs 專案。
首先在根級別建立一個 Components 目錄,並新增一個名為 container.module.css 的檔案,內容如下:
.container {
   max-width: 36rem;
   padding: 0 1rem;
   margin: 3rem auto 6rem;
   border: 1px solid red;
}
在 Components 目錄中建立 container.js 檔案
import styles from './container.module.css'

function Container({ children }) {
   return <div className={styles.container}>{children}</div>
}

export default Container
現在在 first.js 中使用 Container 元件。
import Link from 'next/link'
import Head from 'next/head'
import Container from '../../components/container'

export default function FirstPost() {
   return (
      <>
         <Container>
            <Head>
               <title>My First Post</title>
            </Head>
            <h1>My First Post</h1>
            <h2>
            <Link href="/">
               <a>Home</a>
            </Link>
            </h2>
         </Container>
      </>
   )
}
啟動 Next.js 伺服器
執行以下命令啟動伺服器:
npm run dev
> nextjs@1.0.0 dev \Node\nextjs
> next

ready - started server on https://:3000
event - compiled successfully
event - build page: /
wait  - compiling...
event - compiled successfully
event - build page: /next/dist/pages/_error
wait  - compiling...
event - compiled successfully
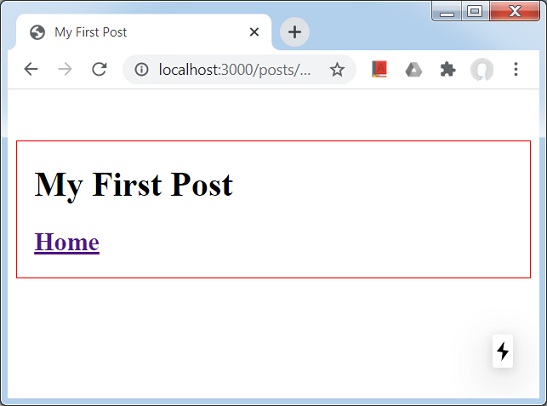
驗證輸出
在瀏覽器中開啟 localhost:3000 並轉到第一篇文章,您將看到以下輸出。
Next.js - 全域性 CSS 支援
在 Next.js 中,讓我們建立將應用於所有頁面的全域性樣式。
在此示例中,我們將建立一個 styles.css 檔案,該檔案將使用 _app.js 元件應用於所有元件。
讓我們更新在CSS 支援章節中使用的 nextjs 專案。
首先在根級別建立一個 styles 目錄,並新增一個名為 styles.css 的檔案,內容如下:
html,
body {
   padding: 0;
   margin: 0;
   line-height: 1.6;
   font-size: 18px;
   background-color: lime;
}

* {
   box-sizing: border-box;
}

a {
   color: #0070f3;
   text-decoration: none;
}

a:hover {
   text-decoration: underline;
}

img {
   max-width: 100%;
   display: block;
}
在 pages 目錄中建立 _app.js 檔案
import '../styles/styles.css'

export default function App({ Component, pageProps }) {
   return <Component {...pageProps} />
}
啟動 Next.js 伺服器
執行以下命令啟動伺服器:
npm run dev
> nextjs@1.0.0 dev \Node\nextjs
> next

ready - started server on https://:3000
event - compiled successfully
event - build page: /
wait  - compiling...
event - compiled successfully
event - build page: /next/dist/pages/_error
wait  - compiling...
event - compiled successfully
驗證輸出
在瀏覽器中開啟 localhost:3000,您將看到以下輸出。
點選“First post”連結。
Next.js - 預渲染
在 Next.js 中,我們知道它會生成稱為預渲染的頁面的 HTML。Next.JS 支援兩種型別的預渲染。
靜態生成 - 此方法在構建時生成 HTML 頁面。此預渲染的 HTML 將在每個請求中傳送。此方法適用於營銷網站、部落格、電子商務產品列表網站、幫助文件網站。
伺服器端生成 - 此方法在每次請求時生成 HTML 頁面。當 HTML 頁面內容可能隨每個請求而變化時,此方法適用。
每頁預渲染
Next.JS 允許為每個頁面設定預渲染方法,其中大多數頁面遵循靜態生成,其他頁面將使用伺服器端渲染。
無資料的靜態生成
可以在沒有資料的情況下進行靜態生成,在這種情況下,HTML 頁面將準備好,無需預取資料然後開始渲染。資料可以在以後或按請求獲取。此技術有助於在資料需要時間到達時向用戶顯示使用者介面而無需任何資料。
帶資料的靜態生成
可以在有資料的情況下進行靜態生成,在這種情況下,在獲取資料之前,HTML 頁面將不會準備好,因為 HTML 可能依賴於資料。每個元件都有一個特殊的getStaticProps方法,可用於獲取資料並將資料作為頁面的 props 傳遞,以便頁面可以根據傳遞的 props 進行渲染。
getStaticProps() 函式在生產環境中構建時執行,在開發模式下為每個請求執行。
讓我們建立一個示例來演示這一點。
在此示例中,我們將建立更新 index.js 和 first.js 頁面以進行伺服器命中以獲取資料。
讓我們更新在全域性 CSS 支援章節中使用的 nextjs 專案。
更新 pages 目錄中的 index.js 檔案以使用 getServerSideProps() 方法。此方法將為每個請求呼叫。
import Link from 'next/link'
import Head from 'next/head'

function HomePage(props) {
   return (
      <>
         <Head>
            <title>Welcome to Next.js!</title>
         </Head>
         <div>Welcome to Next.js!</div>
         <Link href="/posts/first"><a>First Post</a></Link>
         <br/>
         <div>Next stars: {props.stars}</div>
         <img src="/logo.png" alt="TutorialsPoint Logo" />
      </>
   )
}

export async function getServerSideProps(context) {
   const res = await fetch('https://api.github.com/repos/vercel/next.js')
   const json = await res.json()
   return {
      props: { stars: json.stargazers_count }
   }
}

export default HomePage
更新 pages 目錄中的 first.js 檔案以使用 getStaticProps() 方法。此方法將只調用一次。
import Link from 'next/link'
import Head from 'next/head'
import Container from '../../components/container'

export default function FirstPost(props) {
   return (
      <>
         <Container>
            <Head>
               <title>My First Post</title>
            </Head>
            <h1>My First Post</h1>
            <h2>
               <Link href="/">
                  <a>Home</a>
               </Link>
               <div>Next stars: {props.stars}</div>
            </h2>
         </Container>
      </>
   )
}

export async function getStaticProps() {
   const res = await fetch('https://api.github.com/repos/vercel/next.js')
   const json = await res.json()
   return {
      props: { stars: json.stargazers_count }
   }
}
啟動 Next.js 伺服器
執行以下命令啟動伺服器:
npm run dev
> nextjs@1.0.0 dev \Node\nextjs
> next

ready - started server on https://:3000
event - compiled successfully
event - build page: /
wait  - compiling...
event - compiled successfully
event - build page: /next/dist/pages/_error
wait  - compiling...
event - compiled successfully
驗證輸出
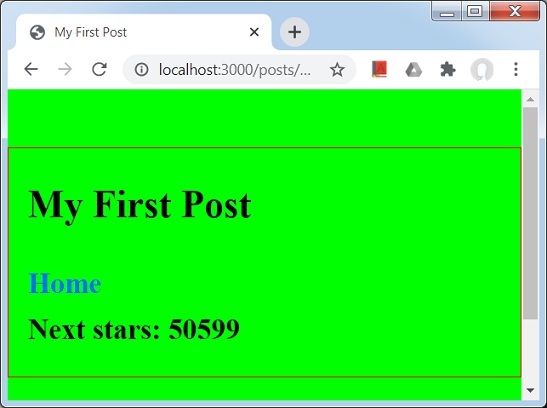
在瀏覽器中開啟 localhost:3000,您將看到以下輸出。

點選“First post”連結。
Next.js - 路由
Next.js 使用基於檔案系統的路由器。每當我們將任何頁面新增到pages目錄時,它都會透過 URL 自動可用。以下是此路由器的規則。
索引路由 - 存在於資料夾中的 index.js 檔案對映到目錄的根目錄。例如:
pages/index.js 對映到 '/'.
pages/posts/index.js 對映到 '/posts'.
巢狀路由 - pages 目錄中的任何巢狀資料夾結構都會自動生成路由 URL。例如:
pages/settings/dashboard/about.js 對映到 '/settings/dashboard/about'.
pages/posts/first.js 對映到 '/posts/first'.
動態路由 - 我們也可以使用命名引數來匹配 URL。為此使用方括號。例如:
pages/posts/[id].js 對映到 '/posts/:id',我們可以使用類似 '/posts/1' 的 URL。
pages/[user]/settings.js 對映到 '/posts/:user/settings',我們可以使用類似 '/abc/settings' 的 URL。
pages/posts/[...all].js 對映到 '/posts/*',我們可以使用任何 URL,例如 '/posts/2020/jun/'.
頁面連結
Next.JS 允許使用 Link React 元件在客戶端連結頁面。它具有以下屬性:
href - pages 目錄中頁面的名稱。例如/posts/first,它指的是 pages/posts 目錄中存在的 first.js。
讓我們建立一個示例來演示這一點。
在此示例中,我們將更新 index.js 和 first.js 頁面以進行伺服器命中以獲取資料。
讓我們更新在全域性 CSS 支援章節中使用的 nextjs 專案。
按如下所示更新 pages 目錄中的 index.js 檔案。
import Link from 'next/link'
import Head from 'next/head'

function HomePage(props) {
   return (
      <>
         <Head>
            <title>Welcome to Next.js!</title>
         </Head>
         <div>Welcome to Next.js!</div>
         <Link href="/posts/first">> <a>First Post</a></Link>
         <br/>
         <div>Next stars: {props.stars}</div>
         <img src="/logo.png" alt="TutorialsPoint Logo" />
      </>
   )
}

export async function getServerSideProps(context) {
   const res = await fetch('https://api.github.com/repos/vercel/next.js')
   const json = await res.json()
   return {
      props: { stars: json.stargazers_count }
   }
}

export default HomePage
啟動 Next.js 伺服器
執行以下命令啟動伺服器:
npm run dev
> nextjs@1.0.0 dev \Node\nextjs
> next

ready - started server on https://:3000
event - compiled successfully
event - build page: /
wait  - compiling...
event - compiled successfully
event - build page: /next/dist/pages/_error
wait  - compiling...
event - compiled successfully
驗證輸出
在瀏覽器中開啟 localhost:3000,您將看到以下輸出。
點選“First post”連結。
Next.js - 動態路由
在 Next.js 中,我們可以動態建立路由。在此示例中,我們將動態建立頁面及其路由。
步驟 1. 定義 [id].js 檔案 - [id].js 代表動態頁面,其中 id 將是相對路徑。在 pages/post 目錄中定義此檔案。
步驟 2. 定義 lib/posts.js - posts.js 代表 id 和內容。lib 目錄需要在根目錄中建立。
[id].js
使用 getStaticPaths() 方法更新 [id].js 檔案,該方法設定路徑,並使用 getStaticProps() 方法根據 id 獲取內容。
import Link from 'next/link'
import Head from 'next/head'
import Container from '../../components/container'

import { getAllPostIds, getPostData } from '../../lib/posts'

export default function Post({ postData }) {
   return (
      <Container>
         {postData.id}
         <br />
         {postData.title}
         <br />
         {postData.date}
      </Container>
   )
}
export async function getStaticPaths() {
   const paths = getAllPostIds()
   return {
      paths,
      fallback: false
   }
}

export async function getStaticProps({ params }) {
   const postData = getPostData(params.id)
      return {
      props: {
         postData
      }
   }
}
posts.js
posts.js 包含 getAllPostIds() 以獲取 id 和 getPostData() 以獲取相應的內容。
export function getPostData(id) {
   const postOne = {
      title: 'One',
      id: 1,
      date: '7/12/2020'
   }

   const postTwo = {
      title: 'Two',
      id: 2,
      date: '7/12/2020'
   }
   if(id == 'one'){
      return postOne;
   }else if(id == 'two'){
      return postTwo;
   }
}

export function getAllPostIds() {
   return [{
      params: {
         id: 'one'
      }
   },
   {
      params: {
         id: 'two'
      }
   }
];
}
啟動 Next.js 伺服器
執行以下命令啟動伺服器:
npm run dev
> nextjs@1.0.0 dev \Node\nextjs
> next

ready - started server on https://:3000
event - compiled successfully
event - build page: /
wait  - compiling...
event - compiled successfully
event - build page: /next/dist/pages/_error
wait  - compiling...
event - compiled successfully
驗證輸出
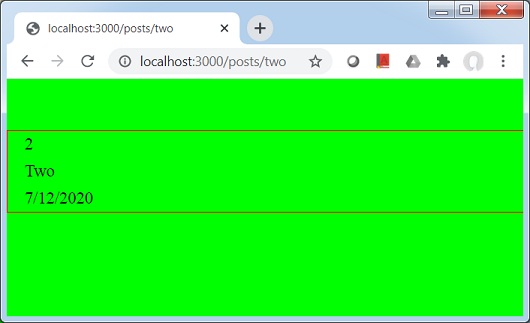
在瀏覽器中開啟 localhost:3000/posts/one,您將看到以下輸出。

在瀏覽器中開啟 localhost:3000/posts/two,你將看到以下輸出。
Next.js - 命令式路由
在 Next.js 中,到目前為止,我們使用 Link React 元件在頁面之間導航。 還有一個程式設計方式可以使用 Router 元件實現相同的功能。 通常 Router 元件與 html 標籤一起使用。
按如下所示更新 pages 目錄中的 index.js 檔案。
import Router from 'next/router'
import Head from 'next/head'

function HomePage(props) {
   return (
      <>
         <Head>
            <title>Welcome to Next.js!</title>
         </Head>
         <div>Welcome to Next.js!</div>
         <span onClick={() => Router.push('/posts/one')}>First Post</span>
         <br/>
         <div>Next stars: {props.stars}</div>
         <img src="/logo.png" alt="TutorialsPoint Logo" />
      </>
   )
}

export async function getServerSideProps(context) {
   const res = await fetch('https://api.github.com/repos/vercel/next.js')
   const json = await res.json()
   return {
      props: { stars: json.stargazers_count }
   }
}

export default HomePage
啟動 Next.js 伺服器
執行以下命令啟動伺服器:
npm run dev
> nextjs@1.0.0 dev \Node\nextjs
> next

ready - started server on https://:3000
event - compiled successfully
event - build page: /
wait  - compiling...
event - compiled successfully
event - build page: /next/dist/pages/_error
wait  - compiling...
event - compiled successfully
驗證輸出
在瀏覽器中開啟 localhost:3000,您將看到以下輸出。

點選“第一篇文章”,它不是連結,但可以點選。
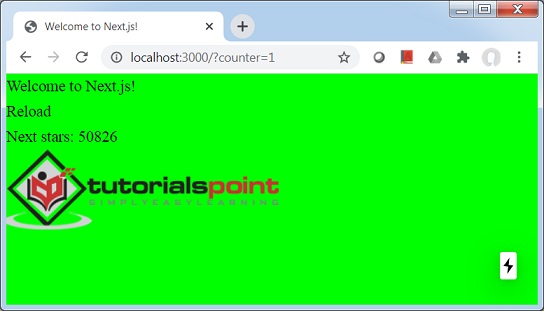
Next.js - 淺路由
在 Next.js 中,淺路由是指導航到同一頁面,但不呼叫 getServerSideProps、getStaticProps 和 getInitialProps 方法。
要進行淺路由,我們使用 Router 並將 shallow 標誌設定為 true。 請參見下面的示例。
按如下所示更新 pages 目錄中的 index.js 檔案。
import Router from 'next/router'
import Head from 'next/head'

function HomePage(props) {
   return (
      <>
         <Head>
            <title>Welcome to Next.js!</title>
         </Head>
         <div>Welcome to Next.js!</div>
         <span onClick={() => Router.push('/?counter=1', undefined, { shallow: true })}>Reload</span>
         <br/>
         <div>Next stars: {props.stars}</div>
         <img src="/logo.png" alt="TutorialsPoint Logo" />
      </>
   )
}

export async function getServerSideProps(context) {
   const res = await fetch('https://api.github.com/repos/vercel/next.js')
   const json = await res.json()
   return {
      props: { stars: json.stargazers_count }
   }
}

export default HomePage
啟動 Next.js 伺服器
執行以下命令啟動伺服器:
npm run dev
> nextjs@1.0.0 dev \Node\nextjs
> next

ready - started server on https://:3000
event - compiled successfully
event - build page: /
wait  - compiling...
event - compiled successfully
event - build page: /next/dist/pages/_error
wait  - compiling...
event - compiled successfully
驗證輸出
在瀏覽器中開啟 localhost:3000,然後點選“重新載入”連結,你將看到以下輸出。
Next.js - API 路由
API 路由是一種使用 Next.js 建立 REST API 的方法。 Next.js 將 **pages/api** 資料夾中的任何檔案對映為 API 端點。 API 函式示例:
export default (req, res) => {
   ...
}
以下是一些需要考慮的重要事項。
**req** - req 是 http.IncomingMessage 的一個例項,用於從請求中獲取資料。
**res** - res 是 http.ServerResponse 的一個例項,用於傳送資料作為響應。
讓我們建立一個示例來演示這一點。
在這個例子中,我們將在 **pages/api** 目錄中建立一個 user.js 檔案。
讓我們更新在全域性 CSS 支援章節中使用的 nextjs 專案。
在 pages/api 目錄中建立 user.js 檔案,內容如下。
export default (req, res) => {
   res.statusCode = 200
   res.setHeader('Content-Type', 'application/json')
   res.end(JSON.stringify({ name: 'Robert' }))
}
啟動 Next.js 伺服器
執行以下命令啟動伺服器:
npm run dev

> nextjs@1.0.0 dev D:\Node\nextjs
> next

ready - started server on https://:3000
info  - Loaded env from D:\Node\nextjs\.env.local
event - compiled successfully
event - build page: /api/user
wait  - compiling...
event - compiled successfully
event - build page: /next/dist/pages/_error
wait  - compiling...
event - compiled successfully
驗證輸出
在瀏覽器中開啟 localhost:3000/api/user,你將看到以下輸出。
{"name":"Robert"}
Next.js - API 中介軟體
Next.JS 中的 API 路由具有內建中介軟體,有助於解析傳入的請求。
以下是中介軟體
**req.cookies** - cookies 物件包含請求傳送的 Cookie。 預設值為 {}。
**req.query** - query 物件包含查詢字串。 預設值為 {}。
**req.body** - query 物件包含使用“content-type”解析的請求體。 預設值為 null。
讓我們建立一個示例來演示這一點。
在這個例子中,我們將更新 **pages/api** 目錄中的 user.js 檔案。
讓我們更新在 API 路由 章節中使用的 Next.js 專案。
在 pages/api 目錄中建立 user.js 檔案,內容如下。
export default (req, res) => {
   res.statusCode = 200
   res.setHeader('Content-Type', 'application/json')
   res.end(JSON.stringify({ query: req.query }))
}
啟動 Next.js 伺服器
執行以下命令啟動伺服器:
npm run dev

> nextjs@1.0.0 dev D:\Node\nextjs
> next

ready - started server on https://:3000
info  - Loaded env from D:\Node\nextjs\.env.local
event - compiled successfully
event - build page: /api/user
wait  - compiling...
event - compiled successfully
event - build page: /next/dist/pages/_error
wait  - compiling...
event - compiled successfully
驗證輸出
在瀏覽器中開啟 https://:3000/api/user?counter=1,你將看到以下輸出。
{"query":{"counter":"1"}}
Next.js - 響應助手
**res** 物件具有類似 express.js 的輔助方法,可以簡化建立服務的開發。
以下是響應輔助方法
**res.status(code)** - 此方法設定響應的狀態。 傳遞的程式碼必須是有效的 HTTP 狀態碼。
**req.json(json)** - 此方法返回 JSON 響應。 傳遞的 json 必須是有效的 JSON 物件。
**req.send(body)** - 此方法傳送 HTTP 響應。 響應可以是字串、物件或 Buffer。
讓我們建立一個示例來演示這一點。
在這個例子中,我們將更新 **pages/api** 目錄中的 user.js 檔案。
讓我們更新在 API 路由 章節中使用的 Next.js 專案。
在 pages/api 目錄中建立 user.js 檔案,內容如下。
export default (req, res) => {
   res.status(200).json({ name: 'Robert' });
}
啟動 Next.js 伺服器
執行以下命令啟動伺服器:
npm run dev

> nextjs@1.0.0 dev D:\Node\nextjs
> next

ready - started server on https://:3000
info  - Loaded env from D:\Node\nextjs\.env.local
event - compiled successfully
event - build page: /api/user
wait  - compiling...
event - compiled successfully
event - build page: /next/dist/pages/_error
wait  - compiling...
event - compiled successfully
驗證輸出
在瀏覽器中開啟 https://:3000/api/user,你將看到以下輸出。
{ name: 'Robert' }
Next.js - TypeScript 支援
Next.js 對 TypeScript 提供了極好的支援。以下是啟用專案中 TypeScript 的幾個步驟。
建立 tsconfig.json
在根目錄中建立 tsconfig.json。 我們最初將其保持為空。 現在啟動伺服器。
Next.JS 將檢測 tsconfig.json 並顯示以下控制檯訊息。
npm run dev

> nextjs@1.0.0 dev D:\Node\nextjs
> next

ready - started server on https://:3000
It looks like you're trying to use TypeScript but do not have the required package(s) installed.

Please install typescript, @types/react, and @types/node by running:

        npm install --save-dev typescript @types/react @types/node

If you are not trying to use TypeScript, please remove the tsconfig.json file from your package root (and any TypeScript files).
...
安裝 TypeScript
執行 npm install 命令來安裝 TypeScript 和相關的庫。
npm install --save-dev typescript @types/react @types/node
...

+ @types/node@14.0.23
+ @types/react@16.9.43
+ typescript@3.9.6
added 5 packages from 72 contributors and audited 839 packages in 27.538s
...
啟動 Next.js 伺服器
執行以下命令啟動伺服器:
npm run dev

> nextjs@1.0.0 dev D:\Node\nextjs
> next

ready - started server on https://:3000
We detected TypeScript in your project and created a tsconfig.json file for you.


Your tsconfig.json has been populated with default values.

event - compiled successfully
wait  - compiling...
event - compiled successfully
開啟 tsconfig.json
NextJS 伺服器已修改 tsconfig.json。
{
   "compilerOptions": {
      "target": "es5",
      "lib": [
         "dom",
         "dom.iterable",
         "esnext"
      ],
      "allowJs": true,
      "skipLibCheck": true,
      "strict": false,
      "forceConsistentCasingInFileNames": true,
      "noEmit": true,
      "esModuleInterop": true,
      "module": "esnext",
      "moduleResolution": "node",
      "resolveJsonModule": true,
      "isolatedModules": true,
      "jsx": "preserve"
   },
   "exclude": [
      "node_modules"
   ],
   "include": [
      "next-env.d.ts",
      "**/*.ts",
      "**/*.tsx"
   ]
}
建立 hello.ts
在 pages/api 目錄中建立 hello.ts,它將充當我們的 REST 服務。
import { NextApiRequest, NextApiResponse } from 'next'

export default (_: NextApiRequest, res: NextApiResponse) => {
   res.status(200).json({ text: 'Welcome to TutorialsPoint' })
}
啟動 Next.js 伺服器
執行以下命令啟動伺服器:
npm run dev
> nextjs@1.0.0 dev \Node\nextjs
> next

ready - started server on https://:3000
event - compiled successfully
event - build page: /
wait  - compiling...
event - compiled successfully
event - build page: /next/dist/pages/_error
wait  - compiling...
event - compiled successfully
驗證輸出
在瀏覽器中開啟 localhost:3000/api/hello,你將看到以下輸出。
{"text":"Welcome to TutorialsPoint"}
Next.js - 環境變數
Next.js 支援在 Node 中釋出環境變數,我們可以用它來連線伺服器、資料庫等。為此,我們需要在根目錄中建立一個 .env.local 檔案。我們也可以建立 .env.production。
建立 .env.local
在根目錄中建立 .env.local 檔案,內容如下。
DB_HOST=localhost
DB_USER=tutorialspoint
DB_PASS=nextjs
建立 env.js
在 pages/posts 目錄中建立一個名為 env.js 的頁面,我們將在其中使用 process.env 使用環境變數。
import Head from 'next/head'
import Container from '../../components/container'

export default function FirstPost(props) {
   return (
      <>
         <Container>
            <Head>
               <title>Environment Variables</title>
            </Head>
            <h1>Database Credentials</h1>
               <p>Host: {props.host}</p>
               <p>Username: {props.username}</p>
               <p>Password: {props.password}</p>
         </Container>
      </>
   )
}

export async function getStaticProps() {
   // Connect to Database using DB properties
   return {
      props: {
         host: process.env.DB_HOST,
         username: process.env.DB_USER,
         password: process.env.DB_PASS
      }
   }
}
現在啟動伺服器。
Next.JS 將檢測 .env.local 並顯示以下控制檯訊息。
npm run dev

> nextjs@1.0.0 dev D:\Node\nextjs
> next

ready - started server on https://:3000
info  - Loaded env from D:\Node\nextjs\.env.local
event - compiled successfully
wait  - compiling...
event - compiled successfully
event - build page: /posts/env
wait  - compiling...
event - compiled successfully
驗證輸出
在瀏覽器中開啟 localhost:3000/posts/env,你將看到以下輸出。
Next.js - 部署
到目前為止,我們已經開發並運行了開發模式下的示例 NEXT.JS 應用程式,現在我們將使用以下步驟在本地進行生產就緒部署。
**npm run build** - 構建生產就緒的、高度最佳化的構建。
**npm run start** - 啟動伺服器。
與開發模式相比,生產就緒的構建缺少源對映和熱程式碼過載,因為這些功能主要用於除錯。
準備構建
執行以下命令以準備生產就緒的構建:
npm run build

> nextjs@1.0.0 build \Node\nextjs
> next build

info  - Loaded env from \Node\nextjs\.env.local
Creating an optimized production build

Compiled successfully.

Automatically optimizing pages

Page                                                           Size     First Load JS
+ ? /                                                          2.25 kB        60.3 kB
+   /_app                                                      288 B          58.1 kB
+        /404                                                       3.25 kB   61.3 kB
+ ? /api/user
+ ? /posts/[id]                                                312 B          61.6 kB
+   + /posts/one
+   + /posts/two
+ ? /posts/env                                                 2.71 kB        60.8 kB
+ ? /posts/first                                               374 B          61.7 kB
+ First Load JS shared by all                                  58.1 kB
  + static/pages/_app.js                                       288 B
  + chunks/3458401054237127135bcd3ee8eb2a19d67af299.a1a019.js  10.5 kB
  + chunks/framework.c6faae.js                                 40 kB
  + runtime/main.60464f.js                                     6.54 kB
  + runtime/webpack.c21266.js                                  746 B
  + css/9706b5b8ed8e82c0fba0.css                               175 B

?  (Server)  server-side renders at runtime (uses getInitialProps or getServerSideProps)
          (Static)  automatically rendered as static HTML (uses no initial props)
?  (SSG)     automatically generated as static HTML + JSON (uses getStaticProps)
啟動伺服器
執行以下命令啟動生產伺服器:
npm run start

> nextjs@1.0.0 start \Node\nextjs
> next start

info  - Loaded env from \Node\nextjs\.env.local
ready - started server on https://:3000
驗證輸出
在瀏覽器中開啟 localhost:3000/api/user,你將看到以下輸出。
{"name":"Robert"}
Next.js - 命令列介面 (CLI)
NEXT.JS 提供了一個 CLI 來啟動、構建和匯出應用程式。可以使用從 npm 5.2 開始提供的 npx 來呼叫它。
CLI 幫助
要獲取 CLI 命令列表及其幫助資訊,請鍵入以下命令。
npx next -h
   Usage
      $ next <command>

   Available commands
      build, start, export, dev, telemetry

   Options
      --version, -v   Version number
      --help, -h      Displays this message

   For more information run a command with the --help flag
      $ next build --help
構建生產就緒的構建
鍵入以下命令。
npx next build
info  - Loaded env from D:\Node\nextjs\.env.local
Creating an optimized production build

Compiled successfully.

Automatically optimizing pages

Page                                                           Size     First Load JS
+ ? /                                                          2.25 kB        60.3 kB
+   /_app                                                      288 B          58.1 kB
+        /404                                                       3.25 kB   61.3 kB
+ ? /api/user
+ ? /posts/[id]                                                312 B          61.6 kB
+   + /posts/one
+   + /posts/two
+ ? /posts/env                                                 2.71 kB        60.8 kB
+ ? /posts/first                                               374 B          61.7 kB
+ First Load JS shared by all                                  58.1 kB
  + static/pages/_app.js                                       288 B
  + chunks/ab55cb957ceed242a750c37a082143fb9d2f0cdf.a1a019.js  10.5 kB
  + chunks/framework.c6faae.js                                 40 kB
  + runtime/main.60464f.js                                     6.54 kB
  + runtime/webpack.c21266.js                                  746 B
  + css/9706b5b8ed8e82c0fba0.css                               175 B

?  (Server)  server-side renders at runtime (uses getInitialProps or getServerSideProps)
          (Static)  automatically rendered as static HTML (uses no initial props)
?  (SSG)     automatically generated as static HTML + JSON (uses getStaticProps)
構建並啟動開發伺服器
鍵入以下命令。
npx next dev

ready - started server on https://:3000
info  - Loaded env from D:\Node\nextjs\.env.local
event - compiled successfully
啟動生產伺服器
鍵入以下命令。
npx next start

info  - Loaded env from \Node\nextjs\.env.local
ready - started server on https://:3000