- JasperReports 教程
- JasperReports - 首頁
- JasperReports - 快速入門
- JasperReports - 環境設定
- JasperReports - 生命週期
- JasperReports - 設計
- JasperReports - 編譯設計
- JasperReports - 填充
- JasperReports - 檢視和列印
- JasperReports - 匯出
- JasperReports - 引數
- JasperReports - 資料來源
- JasperReports - 欄位
- JasperReports - 表示式
- JasperReports - 變數
- JasperReports - 節
- JasperReports - 分組
- JasperReports - 字型
- JasperReports - Unicode支援
- JasperReports - 樣式
- JasperReports - 指令碼
- JasperReports - 建立子報表
- JasperReports - 建立圖表
- JasperReports - 交叉表
- JasperReports - 國際化
- JasperReports 資源
- JasperReports - 快速指南
- JasperReports - 有用資源
- JasperReports - 討論
Jasper報表 - 檢視和列印報表
報表填充過程的輸出(JasperPrint 物件)可以使用內建的檢視器元件進行檢視,也可以列印,或者匯出到更流行的文件格式,例如PDF、HTML、RTF、XLS、ODT、CSV或XML。本章將討論Jasper文件的檢視和列印,下一章(即'匯出報表')將討論匯出。
檢視報表
JasperReport提供了一個內建的檢視器,用於以其原始格式檢視生成的報表。它是一個基於Swing的元件,其他Java應用程式可以整合此元件,而無需將文件匯出到其他格式即可進行檢視或列印。net.sf.jasperreports.view.JRViewer類表示此可視元件。此類也可以根據應用程式需要透過子類化進行自定義。
JasperReports還有一個Swing應用程式,它使用可視元件來檢視報表。此應用程式有助於以與生成*.jrprint相同的格式檢視報表。此Swing應用程式在net.sf.jasperreports.view.JasperViewer類中實現。要使用此類檢視報表,我們需要將其包裝到ANT目標中。
檢視生成的報表
以下示例演示瞭如何使用JasperViewer類檢視報表:
讓我們編寫一個報表模板。JRXML檔案(C:\tools\jasperreports-5.0.1\test\jasper_report_template.jrxml)的內容如下所示:
<?xml version = "1.0" encoding = "UTF-8"?>
<!DOCTYPE jasperReport PUBLIC "//JasperReports//DTD Report Design//EN"
   "http://jasperreports.sourceforge.net/dtds/jasperreport.dtd">

<jasperReport xmlns = "http://jasperreports.sourceforge.net/jasperreports"
   xmlns:xsi = "http://www.w3.org/2001/XMLSchema-instance"
   xsi:schemaLocation = "http://jasperreports.sourceforge.net/jasperreports
   http://jasperreports.sourceforge.net/xsd/jasperreport.xsd"
   name = "jasper_report_template" language = "groovy" pageWidth = "595"
   pageHeight = "842" columnWidth = "555" leftMargin = "20" rightMargin = "20"
   topMargin = "20" bottomMargin = "20">

   <queryString>
      <![CDATA[]]>
   </queryString>

   <field name = "country" class = "java.lang.String">
      <fieldDescription><![CDATA[country]]></fieldDescription>
   </field>

   <field name = "name" class = "java.lang.String">
      <fieldDescription><![CDATA[name]]></fieldDescription>
   </field>

   <columnHeader>
      <band height = "23">

         <staticText>
            <reportElement mode = "Opaque" x = "0" y = "3"
               width = "535" height = "15" backcolor = "#70A9A9" />

            <box>
               <bottomPen lineWidth = "1.0" lineColor = "#CCCCCC" />
            </box>

            <textElement />
            <text><![CDATA[]]> </text>
         </staticText>

         <staticText>
            <reportElement x = "414" y = "3" width = "121" height = "15" />

            <textElement textAlignment = "Center" verticalAlignment = "Middle">
               <font isBold = "true" />
            </textElement>
            <text><![CDATA[Country]]></text>
         </staticText>

         <staticText>
            <reportElement x = "0" y = "3" width = "136" height = "15" />

            <textElement textAlignment = "Center" verticalAlignment = "Middle">
               <font isBold = "true" />
            </textElement>
            <text><![CDATA[Name]]></text>
         </staticText>

      </band>
   </columnHeader>

   <detail>
      <band height = "16">

         <staticText>
            <reportElement mode = "Opaque" x = "0" y = "0"
               width = "535" height = "14" backcolor = "#E5ECF9" />

            <box>
               <bottomPen lineWidth = "0.25" lineColor = "#CCCCCC" />
            </box>

            <textElement />
            <text><![CDATA[]]> </text>
         </staticText>

         <textField>
            <reportElement x = "414" y = "0" width = "121" height = "15" />

            <textElement textAlignment = "Center" verticalAlignment = "Middle">
               <font size = "9" />
            </textElement>

            <textFieldExpression class = "java.lang.String">
               <![CDATA[$F{country}]]>
            </textFieldExpression>
         </textField>

         <textField>
            <reportElement x = "0" y = "0" width = "136" height = "15" />
            <textElement textAlignment = "Center" verticalAlignment = "Middle" />

            <textFieldExpression class = "java.lang.String">
               <![CDATA[$F{name}]]>
            </textFieldExpression>
         </textField>

      </band>
   </detail>

</jasperReport>
接下來,讓我們將Java資料物件(Java Bean)的集合傳遞給JasperReports引擎,以填充此已編譯的報表。
編寫一個POJO DataBean.java,它表示資料物件(Java Bean)。此類定義了兩個String物件,即'name'和'country'。將其儲存到目錄C:\tools\jasperreports-5.0.1\test\src\com\tutorialspoint。
package com.tutorialspoint;

public class DataBean {
   private String name;
   private String country;

   public String getName() {
      return name;
   }

   public void setName(String name) {
      this.name = name;
   }

   public String getCountry() {
      return country;
   }

   public void setCountry(String country) {
      this.country = country;
   }
}
編寫一個類DataBeanList.java,它具有生成Java Bean物件集合的業務邏輯。這將進一步傳遞給JasperReports引擎以生成報表。在這裡,我們向列表中添加了4個DataBean物件。將其儲存到目錄C:\tools\jasperreports-5.0.1\test\src\com\tutorialspoint。
package com.tutorialspoint;

import java.util.ArrayList;

public class DataBeanList {
   public ArrayList<DataBean> getDataBeanList() {
      ArrayList<DataBean> dataBeanList = new ArrayList<DataBean>();

      dataBeanList.add(produce("Manisha", "India"));
      dataBeanList.add(produce("Dennis Ritchie", "USA"));
      dataBeanList.add(produce("V.Anand", "India"));
      dataBeanList.add(produce("Shrinath", "California"));

      return dataBeanList;
   }

   /**
    * This method returns a DataBean object,
    * with name and country set in it.
    */
   private DataBean produce(String name, String country) {
      DataBean dataBean = new DataBean();
      dataBean.setName(name);
      dataBean.setCountry(country);

      return dataBean;
   }
}
編寫一個主類檔案JasperReportFill.java,它從類(DataBeanList)獲取Java Bean集合,並將其傳遞給JasperReports引擎以填充報表模板。將其儲存到目錄C:\tools\jasperreports-5.0.1\test\src\com\tutorialspoint。
package com.tutorialspoint;

import java.util.ArrayList;
import java.util.HashMap;
import java.util.Map;

import net.sf.jasperreports.engine.JRException;
import net.sf.jasperreports.engine.JasperFillManager;
import net.sf.jasperreports.engine.data.JRBeanCollectionDataSource;

public class JasperReportFill {
   @SuppressWarnings("unchecked")
   public static void main(String[] args) {
      String sourceFileName =
         "c://tools/jasperreports-5.0.1/test/jasper_report_template.jasper";
      DataBeanList DataBeanList = new DataBeanList();
      ArrayList<DataBean> dataList = DataBeanList.getDataBeanList();

      JRBeanCollectionDataSource beanColDataSource = new
         JRBeanCollectionDataSource(dataList);

      Map parameters = new HashMap();
      try {
         JasperFillManager.fillReportToFile(
            sourceFileName, parameters, beanColDataSource);
      } catch (JRException e) {
         e.printStackTrace();
      }
   }
}
讓我們向build.xml檔案編寫一個目標viewFillReport。build.xml檔案如下所示:
匯入檔案-baseBuild.xml是從章節環境設定中選擇的,應將其放置在與build.xml相同的目錄中。
<?xml version = "1.0" encoding = "UTF-8"?>
<project name = "JasperReportTest" default = "viewFillReport" basedir = ".">
   <import file = "baseBuild.xml"/>

   <target name = "viewFillReport" depends = "compile,compilereportdesing,run"
      description = "Launches the report viewer
      to preview the report stored in the .JRprint file.">

      <java classname = "net.sf.jasperreports.view.JasperViewer" fork = "true">
         <arg value = "-F${file.name}.JRprint" />
         <classpath refid = "classpath" />
      </java>
   </target>

   <target name = "compilereportdesing" description = "Compiles the JXML file and
      produces the .jasper file.">

      <taskdef name = "jrc"
         classname = "net.sf.jasperreports.ant.JRAntCompileTask">
         <classpath refid = "classpath" />
      </taskdef>

      <jrc destdir = ".">
         <src>
            <fileset dir = ".">
               <include name = "*.jrxml" />
            </fileset>
         </src>
         <classpath refid = "classpath" />
      </jrc>

   </target>

</project>
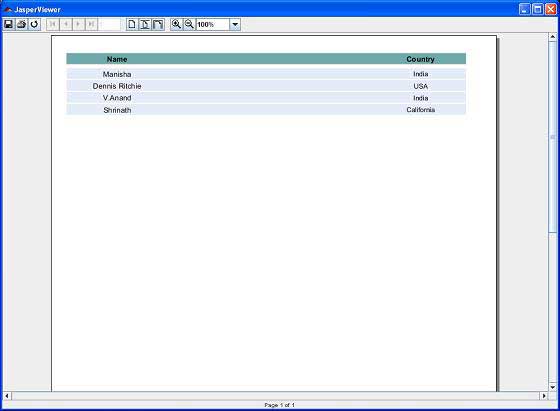
接下來,讓我們開啟命令列視窗並轉到放置build.xml的目錄。最後,執行命令ant -Dmain-class=com.tutorialspoint.JasperReportFill(viewFillReport是預設目標)。結果,我們將看到如下螢幕所示的JasperViewer視窗:
列印報表
我們可以使用net.sf.jasperreports.engine.JasperPrintManager類列印JasperReports庫生成的文件(以其專有格式,即JasperPrint物件)。這是一個依賴於Java 2列印API的facade類。在將JasperReport文件匯出到其他格式(如HTML或PDF)後,我們也可以列印文件。
列印生成的報表
以下程式碼演示了報表的列印。讓我們更新現有的類JasperReportFill。我們將使用JasperPrintManager.printReport()方法。此方法將原始檔名(此處我們傳遞.jrprint檔案,我們在之前的步驟中使用方法JasperFillManager.fillReportToFile()生成)作為第一個引數。第二個引數是顯示標準列印對話方塊的布林值(此處我們將其設定為true)。
package com.tutorialspoint;

import java.util.ArrayList;
import java.util.HashMap;
import java.util.Map;

import net.sf.jasperreports.engine.JRException;
import net.sf.jasperreports.engine.JasperFillManager;
import net.sf.jasperreports.engine.JasperPrintManager;
import net.sf.jasperreports.engine.data.JRBeanCollectionDataSource;

public class JasperReportFill {
   @SuppressWarnings("unchecked")
   public static void main(String[] args) {
      String sourceFileName = "c://tools/jasperreports-5.0.1/" +
         "test/jasper_report_template.jasper";
      String printFileName = null;
      DataBeanList DataBeanList = new DataBeanList();
      ArrayList<DataBean> dataList = DataBeanList.getDataBeanList();

      JRBeanCollectionDataSource beanColDataSource = new
         JRBeanCollectionDataSource(dataList);

      Map parameters = new HashMap();
      try {
    	   printFileName = JasperFillManager.fillReportToFile(
            sourceFileName, parameters, beanColDataSource);
         if(printFileName != null){
            JasperPrintManager.printReport( printFileName, true);
         }
      } catch (JRException e) {
         e.printStackTrace();
      }
   }
}
現在,讓我們將此檔案儲存到目錄C:\tools\jasperreports-5.0.1\test\src\com\tutorialspoint。我們將使用ANT編譯和執行此檔案。build.xml的內容如下所示:
<?xml version = "1.0" encoding = "UTF-8"?>
<project name = "JasperReportTest" default = "executereport" basedir = ".">
   <import file = "baseBuild.xml"/>

   <target name = "executereport" depends = "compile,compilereportdesing,run">
      <echo message = "Im here"/>
   </target>

   <target name = "compilereportdesing" description = "Compiles the JXML file and
      produces the .jasper file.">

      <taskdef name = "jrc"
         classname = "net.sf.jasperreports.ant.JRAntCompileTask">
         <classpath refid = "classpath" />
      </taskdef>

      <jrc destdir = ".">
         <src>
            <fileset dir = ".">
               <include name = "*.jrxml" />
            </fileset>
         </src>
         <classpath refid = "classpath" />
      </jrc>

   </target>

</project>
接下來,讓我們開啟命令提示符並轉到放置build.xml的目錄。最後,執行命令ant -Dmain-class=com.tutorialspoint.JasperReportPrint。結果,將出現一個列印對話方塊。單擊確定列印文件。