- JasmineJS 教程
- JasmineJS - 首頁
- JasmineJS - 概述
- JasmineJS - 環境搭建
- JasmineJS - 書寫測試用例及執行
- JasmineJS - BDD 架構
- JasmineJS - 測試的構建塊
- JasmineJS - 斷言
- JasmineJS - 跳過塊
- JasmineJS - 等值檢查
- JasmineJS - 布林值檢查
- JasmineJS - 順序檢查
- JasmineJS - 空值檢查
- JasmineJS - 不等值檢查
- JasmineJS - 非數值檢查
- JasmineJS - 異常檢查
- JasmineJS - beforeEach()
- JasmineJS - afterEach()
- JasmineJS - 間諜 (Spies)
- JasmineJS 有用資源
- JasmineJS 快速指南
- JasmineJS - 有用資源
- JasmineJS - 討論
JasmineJS 快速指南
JasmineJS - 概述
Jasmine 是一個開源的 JavaScript 框架,能夠測試任何型別的 JavaScript 應用程式。Jasmine 遵循行為驅動開發 (BDD) 流程,以確保每一行 JavaScript 語句都經過了正確的單元測試。透過遵循 BDD 流程,Jasmine 提供了一個簡潔的語法來測試整個應用程式的最小單元,而不是將其作為一個整體進行測試。
為什麼要使用 Jasmine?
以下是使用 Jasmine 相對於其他可用的 JavaScript 測試框架的優勢:
Jasmine 不依賴於任何其他 JavaScript 框架。
Jasmine 不需要任何 DOM。
Jasmine 中使用的所有語法都簡潔明瞭。
Jasmine 深受 Rspec、JS Spec 和 Jspec 的影響。
Jasmine 是一個開源框架,並且可以輕鬆獲得不同的版本,例如獨立版本、Ruby gem、Node.js 等。
如何使用 Jasmine?
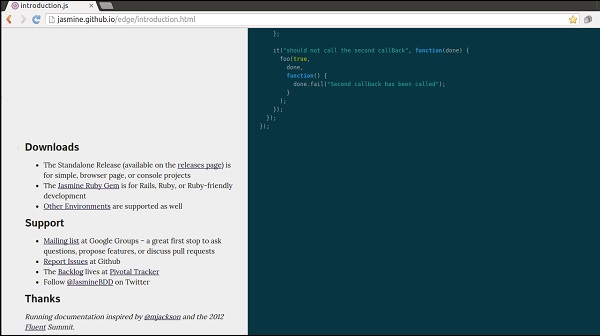
Jasmine 非常容易在任何型別的開發方法中實現。您只需要從官方網站 https://jasmine.github.io/ 下載獨立庫檔案,並將其應用到您的應用程式中。
詳細的環境設定將在下一章“環境設定”中介紹。成功下載並解壓 zip 檔案後,您將在該 zip 檔案中找到以下子資料夾。

JasmineJS - 環境搭建
在本章中,我們將討論如何逐步設定基於 Jasmine 的 BDD 測試應用程式。
步驟 1 - 前往 Jasmine 官方網站 https://jasmine.github.io/

步驟 2 - 點選任意版本連結。最好使用最新的“Edge”版本。您將被重定向到所選版本的首頁。

步驟 3 - 前往主頁的“下載”部分,然後點選獨立版本釋出頁面。
步驟 4 - 重定向到 Github 釋出頁面後,從那裡下載 Zip 檔案。

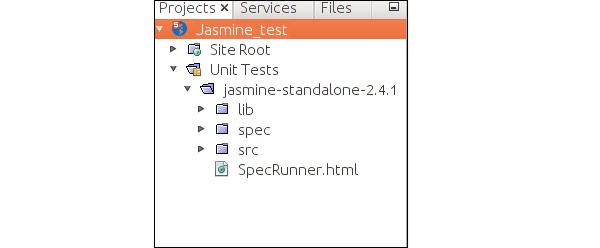
步驟 5 - 解壓下載的 jasmine-standalone-2.4.1 資料夾。您將看到以下資料夾結構。

步驟 6 - 現在在您喜歡的 IDE 中建立一個 Web 應用程式專案,並將這些下載的庫檔案新增到應用程式中。這裡我們使用了 NetBeans IDE。新增 Jasmine 框架後,應用程式的目錄結構如下所示。
我們的環境設定已完成。現在我們的應用程式已準備好由 Jasmine 框架進行測試。
JasmineJS - 書寫測試用例及執行
在本章中,我們將建立一個Hello World 應用程式,它將測試我們的“helloworld.js”檔案。在開發 Hello World 應用程式之前,請返回上一章,確保您的環境已準備好使用 Jasmine 進行測試。
步驟 1 - 在您的 IDE 中建立一個 Web 應用程式
這裡我們使用 NetBeans 8.1 在 Jasmine 中開發我們的 Hello World 應用程式。在 NetBeans 中,轉到檔案 → 新建專案 → Html5/JS 應用程式並建立一個專案。建立專案後,專案目錄應如下圖所示。我們將專案命名為Jasmine_Demo。

步驟 2 - 將 Jasmine 庫檔案包含到應用程式中
建立演示專案後,您需要做的就是將 Jasmine 庫的解壓資料夾包含到建立的應用程式的“單元測試”資料夾中。將所有庫檔案新增到我們的應用程式資料夾後,專案的結構將如下圖所示。

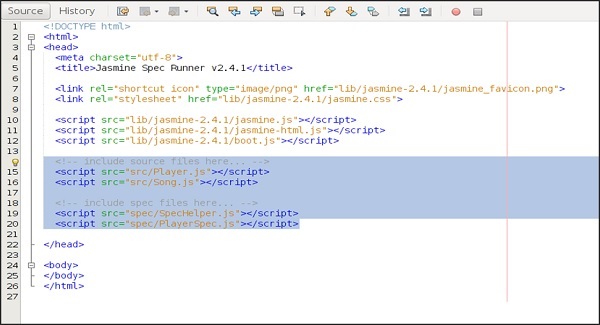
spec 和 src 資料夾下的檔案是 Jasmine 團隊提供的演示檔案。刪除這些檔案,因為我們將建立我們自己的測試檔案和測試用例。刪除這些 JavaScript 檔案時,我們需要刪除在我們的輸出 html 檔案(即SpecRunner.html)中對這些檔案的引用。
以下是 SpecRunner.html 檔案的螢幕截圖,其中將刪除spec和src中不同 JavaScript 檔案的引用。
步驟 3 - 建立一個 JavaScript 檔案
在此步驟中,我們將在src資料夾下建立一個名為helloworld.js的 JavaScript 檔案。我們將透過 Jasmine 測試此檔案。建立 JavaScript 檔案後,將以下程式碼新增到檔案中。
/*
* This is the JavaScript file that need to be tested through jasmine
* Below is the helloworld function that will return 'Hello World'
*
*/

var helloworld = function() {
   return 'Hello World';
};
步驟 4 - 建立一個測試用例
在此步驟中,我們將建立另一個 JavaScript 檔案,其中包含上述 JavaScript 檔案的測試用例。繼續並在“Spec”資料夾下建立一個 JavaScript 檔案,並將其命名為“HelloWorldsSpec.js”。將以下程式碼新增到此js檔案中。
/*
* This is the file which will call our java script file that need to be tested.
* Each describe block is equivalent to one test case
*
*/

describe("Hello World", function() {

   it("should Return Hello world",function() {
      expect(helloworld()).toEqual('Hello World');
   });

});
步驟 5 - 新增對輸出檔案的引用
我們成功建立了我們自己的待測試檔案和相應的測試用例。我們將它們儲存在兩個不同的資料夾中。在此步驟中,我們將修改“SpecRunner.html”以包含這兩個新建立檔案的引用。
<!DOCTYPE html>

<html>
   <head>
      <meta charset = "utf-8">

      <title>Jasmine Spec Runner v2.4.1</title>

      <link rel = "shortcut icon" type = "image/png" href =
      "lib/jasmine2.4.1/jasmine_favicon.png">
      <link rel = "stylesheet" href = "lib/jasmine-2.4.1/jasmine.css">

      <script src = "lib/jasmine-2.4.1/jasmine.js"></script>
      <script src = "lib/jasmine-2.4.1/jasmine-html.js"></script>
      <script src = "lib/jasmine-2.4.1/boot.js"></script>

      <!--Lines to be deleted
      <script src = "src/Player.js"></script>
      <script src = "src/Song.js"></script>
      <script src = "spec/SpecHelper.js"></script>
      <script src = "spec/PlayerSpec.js"></script> -->

      <!--adding the reference of our newly created file --->

      <script src = "src/helloworld.js"></script>
      <script src = "spec/HelloWorldsSpec.js"></script>
   </head>

   <body>
   </body>

</html>
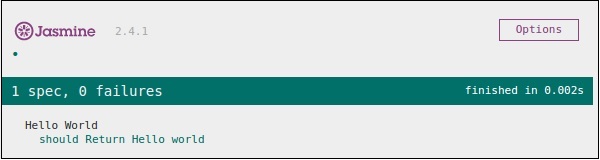
步驟 6 - 透過執行 SpecRunner.html 來執行
這是我們應用程式開發的最後一步。在您喜歡的任何瀏覽器中執行 SpecRunner.html。結果將顯示以下螢幕截圖。綠色螢幕表示成功,紅色螢幕表示測試用例失敗。
步驟 7 - 理解失敗案例
到目前為止,我們已經看到了 Hello World 應用程式的成功測試用例。現在讓我們看看如果出現問題並且測試失敗會怎樣。要實現失敗案例,我們需要編寫失敗測試用例。為此,我們將使用以下程式碼修改helloworld.js檔案。
var helloworld = function () {
   return '';
};

// we are not returning any string whereas in the spec file
//we are expecting a // string as “Hello World”
以上程式碼肯定會失敗,因為我們的規範檔案沒有從helloworld()獲得預期的字串輸出。specRunner.html檔案的以下螢幕截圖顯示有一個錯誤及其紅色指示器。

JasmineJS - BDD 架構
Jasmine 遵循行為驅動開發 (BDD) 框架。在學習 Jasmine 的工作原理之前,讓我們瞭解什麼是 BDD 框架。
下圖描述了 BDD 框架的不同階段。

步驟 1 - 開始
在此階段,我們將為 Jasmine 應用程式準備環境。
步驟 2 - 編寫失敗的測試
在此步驟中,我們將編寫我們的第一個測試用例。很明顯,此測試將失敗,因為沒有要測試的檔案或函式。
步驟 3 - 編寫程式碼使其透過
在此階段,我們將準備需要測試的 JavaScript 檔案或函式。此階段至關重要,因為我們需要確保在早期階段準備的所有測試用例都將成功。
步驟 4 - 重構
重構是 BDD 模型中非常重要的階段,我們需要為該特定應用程式或函式準備儘可能多的測試用例。
步驟 5 - 停止
如果一切順利,那麼您的應用程式必須已準備就緒並啟動。因此,我們可以將此步驟視為 BDD 應用程式的結束。
示例
我們現在已經瞭解了 BDD 框架的工作原理。讓我們看看 Jasmine 如何在 JavaScript 測試中遵循此 BDD 框架。
如螢幕截圖所示,我們需要使用 Jasmine 框架測試 Abc.js。SpecRunner.html 是輸出檔案,它將Spec.js(測試用例檔案)、Abc.js(待測試檔案)和 LIB 作為輸入,執行 spec 檔案中存在的所有測試用例並將結果呈現到瀏覽器中。

Lib - 這些是內建的 JavaScript 檔案,有助於測試專案中使用的不同函式和其他 JavaScript 檔案。
Spec.js(測試用例檔案) - 此 JavaScript 檔案包含測試任何 JavaScript 函式或檔案所需的所有測試用例。在 BDD 方法中,我們將首先編寫測試,因此這是需要首先更新的檔案。當然,這會失敗,因為我們的專案中不存在可以測試的檔案或函式。此檔案可以無限次重構,直到所有功能都經過測試。
Abc.js(待測試檔案) - 此檔案包含將使用 Spec.js 和 Lib 檔案進行單元測試的功能。
SpecRunner.html - SpecRunner.html 是一個普通的 html 檔案,它將在嵌入式 JavaScript 程式碼的幫助下呈現單元測試的輸出。
JasmineJS - 測試的構建塊
在本章中,我們將討論 Jasmine 的測試構建塊。
套件塊
Jasmine 是一個用於 JavaScript 的測試框架。套件是 Jasmine 框架的基本構建塊。為特定檔案或函式編寫的類似型別測試用例的集合稱為一個套件。它包含另外兩個塊,一個是“Describe()”,另一個是“It()”。
一個套件塊只能有兩個引數,一個是“該套件的名稱”,另一個是“函式宣告”,它實際上會呼叫我們要測試的單元功能。
在下面的示例中,我們將建立一個套件,該套件將對add.js檔案中的 add 函式進行單元測試。在此示例中,我們的 JS 檔名為“calculator.js”,它將透過 Jasmine 進行測試,相應的 Jasmine 規範檔案為“CalCulatorSpec.js”。
Calculator.js
window.Calculator = {

   currentVal:0,
   varAfterEachExmaple:0,

   add:function (num1) {
      this.currentVal += num1;
      return this.currentVal;
   },

   addAny:function () {
      var sum = this.currentVal;

      for(var i = 0; i < arguments.length; i++) {
         sum += arguments[i];
      }

      this.currentVal = sum;
      Return  this.currentVal;
   },
};
CalCulatorSpec.js
describe("calculator",function() {

   //test case: 1
   it("Should retain the current value of all time", function () {
      expect(Calculator.currentVal).toBeDefined();
      expect(Calculator.currentVal).toEqual(0);
   });

   //test case: 2
   it("should add numbers",function() {
      expect(Calculator.add(5)).toEqual(5);
      expect(Calculator.add(5)).toEqual(10);
   });

   //test case :3
   it("Should add any number of numbers",function () {
      expect(Calculator.addAny(1,2,3)).toEqual(6);
   });
});
在上面的函式中,我們聲明瞭兩個函式。函式add將新增作為引數傳遞給該函式的兩個數字,另一個函式addAny應新增作為引數傳遞的任何數字。
建立此檔案後,我們需要在“SpecRunner.html”的 head 部分中新增此檔案。成功編譯後,這將生成以下輸出結果。

巢狀套件塊
套件塊(Suite block)可以包含許多套件塊在另一個套件塊內。以下示例將向您展示如何在另一個套件塊內建立不同的套件塊。我們將建立兩個 JavaScript 檔案,一個名為“NestedSpec.js”,另一個名為“nested.js”。
NestedSpec.js
describe("nested",function() {

   // Starting of first suite block
   // First block

   describe("Retaining values ",function () {

      //test case:1
      it ("Should retain the current value of all time", function () {
         expect(nested.currentVal).toBeDefined();
         expect(nested.currentVal).toEqual(0);
      });
   }); //end of the suite block

   //second suite block
   describe("Adding single number ",function () {

      //test case:2
      it("should add numbers",function() {
         expect(nested.add(5)).toEqual(5);
         expect(nested.add(5)).toEqual(10);
      });
   }); //end of the suite block

   //third suite block
   describe("Adding Different Numbers",function () {

      //test case:3
      it("Should add any number of numbers",function() {
         expect(nested.addAny(1,2,3)).toEqual(6);
      });
   }); //end of the suite block
});
Nested.js
window.nested = {

   currentVal: 0,

   add:function (num1) {
      this.currentVal += num1;
      return this.currentVal;
   },

   addAny:function () {
      Var sum = this.currentVal;

      for(var i = 0;i < arguments.length; i++) {
         sum += arguments[i];
      }

      this.currentVal = sum;
      return this.currentVal;
   }
};
在將此檔案新增到 head 部分後,執行specRunner.html檔案,以上程式碼將生成以下輸出。

Describe 塊
如前所述,describe 塊是 Suite 塊的一部分。與 Suite 塊一樣,它包含兩個引數,一個是“describe 塊的名稱”,另一個是“函式宣告”。在我們接下來的示例中,我們將學習許多 describe 塊以瞭解 Jasmine 套件塊的工作流程。以下是一個完整的 describe 塊示例。
describe("Adding single number ",function () {

   it("should add numbers",function() {
      expect(nested.add(5)).toEqual(5);
      expect(nested.add(5)).toEqual(10);
   });
}
IT 塊
就像我們已經介紹的 describe 塊一樣,我們也介紹了 IT 塊。它位於 describe 塊內。這個塊實際上包含每個單元測試用例。在以下程式碼中,在一個 describe 塊內包含幾段IT塊。
describe("Adding single number ",function () {

   // test case : 1
   it("should add numbers",function() {
      expect(nested.add(5)).toEqual(5);
      expect(nested.add(5)).toEqual(10);
   });

   //test case : 2
   it("should add numbers",function() {
      expect(nested.addAny(1,2,3)).toEqual(6);
   });
}
Expect 塊
Jasmine 的Expect允許您編寫對所需函式或 JavaScript 檔案的期望。它位於IT塊內。一個 IT 塊可以包含多個 Expect 塊。
以下是 Expect 塊的示例。此 expect 塊提供各種方法來單元測試您的 JavaScript 函式或 JavaScript 檔案。每個 Expect 塊也稱為匹配器。匹配器有兩種型別,一種是內建匹配器,另一種是使用者自定義匹配器。
describe("Adding single number ",function () {

   // test case : 1
   it("should add numbers",function() {
      expect(nested.add(5)).toEqual(5);
      expect(nested.add(5)).toEqual(10);
   });

   //test case : 2
   it("should add numbers",function() {
      expect(nested.addAny(1,2,3)).toEqual(6);
   });
}
在接下來的章節中,我們將討論 Expect 塊中各種內建方法的多種用途。
JasmineJS - 斷言
Jasmine 是一個測試框架,因此它始終旨在將 JavaScript 檔案或函式的結果與預期結果進行比較。匹配器在 Jasmine 框架中的工作方式類似。
匹配器是 JavaScript 函式,它在實際輸出和預期輸出之間進行布林比較。匹配器有兩種型別:內建匹配器和自定義匹配器。
內建匹配器
Jasmine 框架中內建的匹配器稱為內建匹配器。使用者可以隱式地輕鬆使用它。
以下示例顯示了內建匹配器如何在 Jasmine 框架中工作。我們在上一章中已經使用了一些匹配器。
describe("Adding single number ", function () {

   //example of toEqual() matcher
   it("should add numbers",function() {
      expect(nested.add(5)).toEqual(5);
      expect(nested.add(5)).toEqual(10);
   });

   it("should add numbers",function() {
      expect(nested.addAny(1,2,3)).toEqual(6);
   });
}
在此示例中,toEqual() 是內建匹配器,它將比較add()和addAny()方法的結果與傳遞給toEqual()匹配器的引數。
自定義匹配器
Jasmine 內建系統庫中不存在的匹配器稱為自定義匹配器。需要顯式定義自定義匹配器。在以下示例中,我們將看到自定義匹配器如何工作。
describe('This custom matcher example', function() {

   beforeEach(function() {
      // We should add custom matched in beforeEach() function.
      jasmine.addMatchers ({
         validateAge: function() {
            Return {
               compare: function(actual,expected) {
                  var result = {};
                  result.pass = (actual > = 13 && actual < = 19);
                  result.message = 'sorry u are not a teen ';
                  return result;
               }
            };
         }
      });
   });

   it('Lets see whether u are teen or not', function() {
      var myAge = 14;
      expect(myAge).validateAge();
   });

   it('Lets see whether u are teen or not ', function() {
      var yourAge = 18;
      expect(yourAge).validateAge();
   });
});
在上面的示例中,validateAge()充當匹配器,它實際上正在根據某個範圍驗證您的年齡。在此示例中,validateAge() 充當自定義匹配器。將此 JS 檔案新增到SpecRunner.html並執行它。它將生成以下輸出。

JasmineJS - 跳過塊
Jasmine 還允許開發人員跳過一個或多個測試用例。這些技術可以應用於規範級別或套件級別。根據應用級別,此塊可以分別稱為跳過規範和跳過套件。
在以下示例中,我們將學習如何使用“x”字元跳過特定的規範或套件。
跳過規範
我們將在it語句之前使用“x”修改之前的示例。
describe('This custom matcher example ', function() {

   beforeEach(function() {
      // We should add custom matched in beforeEach() function.

      jasmine.addMatchers({
         validateAge: function() {
            return {
               compare: function(actual,expected) {
                 var result = {};
                 result.pass = (actual > = 13 && actual < = 19);
                 result.message = 'sorry u are not a teen ';
                 return result;
               }
            };
         }
      });
   });

   it('Lets see whether u are teen or not', function() {
      var myAge = 14;
      expect(myAge).validateAge();
   });

   xit('Lets see whether u are teen or not ', function() {
      //Skipping this Spec
      var yourAge = 18;
   });
});
如果我們執行此 JavaScript 程式碼,我們將在瀏覽器中獲得以下輸出結果。Jasmine 本身將使用“xit”通知使用者特定的it塊已暫時停用。

跳過套件
同樣,我們可以停用 describe 塊以實現跳過套件技術。在以下示例中,我們將學習跳過套件塊的過程。
xdescribe('This custom matcher example ', function() {

   //Skipping the entire describe  block
   beforeEach(function() {

      // We should add custom matched in beforeEach() function.
      jasmine.addMatchers({
         validateAge: function() {
            return {
               compare: function(actual,expected) {
                 var result = {};
                 result.pass = (actual >=13 && actual<=19);
                 result.message ='sorry u are not a teen ';
                 return result;
               }
            };
         }
      });
   });

   it('Lets see whether u are teen or not', function() {
      var myAge = 14;
      expect(myAge).validateAge();
   });

   it('Lets see whether u are teen or not ', function() {
      var yourAge = 18;
      expect(yourAge).validateAge();
   });
});
以上程式碼將生成以下螢幕截圖作為輸出。

正如我們在訊息欄中看到的那樣,它顯示了兩個處於掛起狀態的規範塊,這意味著這兩個規範塊已使用“x”字元停用。在接下來的章節中,我們將討論不同型別的 Jasmine 測試場景。
JasmineJS - 等值檢查
Jasmine 提供了大量方法,可以幫助我們檢查任何 JavaScript 函式和檔案的相等性。以下是檢查相等條件的一些示例。
ToEqual()
ToEqual()是 Jasmine 內建庫中最簡單的匹配器。它只是匹配給此方法作為引數的操作結果是否與它的結果匹配。
以下示例將幫助您瞭解此匹配器的工作原理。我們有兩個要測試的檔案,一個名為“expectexam.js”,另一個我們需要測試的檔名為“expectSpec.js”。
Expectexam.js
window.expectexam = {
   currentVal: 0,
};
ExpectSpec.js
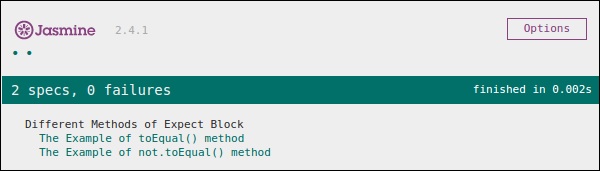
describe("Different Methods of Expect Block",function () {

   it("The Example of toEqual() method",function () {
      //this will check whether the value of the variable
      // currentVal is equal to 0 or not.
      expect(expectexam.currentVal).toEqual(0);
   });
});
成功執行後,這些程式碼段將產生以下輸出。請記住,您需要按照前面示例中的說明,將這些檔案新增到specRunner.html檔案的 header 部分。

not.toEqual()
not.toEqual()的工作方式與 toEqual() 正好相反。當我們需要檢查值是否與任何函式的輸出不匹配時,使用not.toEqual()。
我們將修改上述示例以顯示其工作原理。
ExpectSpec.js
describe("Different Methods of Expect Block",function () {

   it("The Example of toEqual() method",function () {
      expect(expectexam.currentVal).toEqual(0);
   });

   it("The Example of not.toEqual() method",function () {
      //negation  testing expect(expectexam.currentVal).not.toEqual(5);
   });
});
Expectexam.js
window.expectexam = {
   currentVal: 0,
};
在第二個 expect 塊中,我們正在檢查currentVal的值是否等於 5,因為 currentVal 的值為零,因此我們的測試透過併為我們提供綠色輸出。
ToBe()
toBe()匹配器的工作方式與 toEqual() 類似,但它們在技術上彼此不同。toBe() 匹配器與物件的型別匹配,而toEqual()與結果的等效性匹配。
以下示例將幫助您瞭解 toBe() 匹配器的工作原理。此匹配器完全等效於 JavaScript 的“===”運算子,而 toEqual() 類似於 JavaScript 的“==”運算子。
ExpectSpec.js
describe("Different Methods of Expect Block",function () {

   it("The Example of toBe() method",function () {
      expect(expectexam.name).toBe(expectexam.name1);
   });
});
Expectexam.js
window.expectexam = {
   currentVal: 0,
   name:"tutorialspoint",
   name1:tutorialspoint
};
我們將稍微修改我們的expectexam JavaScript 檔案。我們添加了兩個新變數,name和name1。請查詢這兩個新增的變數之間的區別——一個是字串型別,另一個不是字串型別。
以下螢幕截圖是我們的測試結果,其中紅色叉號表示這兩個值不相等,而預期它們相等。因此,我們的測試失敗。

讓我們將兩個變數name和name1都轉換為字串型別變數,並再次執行相同的SpecRunner.html。現在檢查輸出。它將證明 toBe() 不僅與變數的等效性匹配,而且還與變數的資料型別或物件型別匹配。
not.toBe()
如前所述,not 只是 toBe() 方法的否定。當預期結果與函式或 JavaScript 檔案的實際輸出匹配時,它會失敗。
以下是一個簡單的示例,將幫助您瞭解 not.toBe() 匹配器的工作原理。
describe("Different Methods of Expect Block",function () {
   it("The Example of not.toBe() method",function () {
      expect(true).not.toBe(false);
   });
});
在這裡,Jasmine 將嘗試將 true 與 false 匹配。由於 true 不能與 false 相同,因此此測試用例將有效並透過。

JasmineJS - 布林值檢查
除了相等性檢查之外,Jasmine 還提供一些方法來檢查布林條件。以下是幫助我們檢查布林條件的方法。
ToBeTruthy()
此布林匹配器用於 Jasmine 中檢查結果是否等於 true 或 false。
以下示例將幫助我們瞭解 toBeTruthy() 函式的工作原理。
ExpectSpec.js
describe("Different Methods of Expect Block",function () {
   it("The Example of toBeTruthy() method",function () {
      expect(expectexam.exampleoftrueFalse(5)).toBeTruthy();
   });
});
Expectexam.js
window.expectexam = {
   exampleoftrueFalse: function (num) {
      if(num < 10)
         return true;
      else
         return false;
   },
};
由於我們傳遞的數字 5 小於 10,因此此測試用例將透過併為我們提供以下輸出。

如果我們傳遞一個大於 10 的數字,則此綠色測試將變為紅色。在第二個螢幕截圖中,您可以看到,在傳遞某個大於 10 的值時,預期的測試用例失敗並生成紅色輸出,指出“Expected false to be truthy”。

toBeFalsy()
toBeFalsy() 的工作方式與 toBeTruthy() 方法相同。它將輸出與 false 匹配,而 toBeTruthy 將輸出與 true 匹配。以下示例將幫助您瞭解 toBeFalsy() 的基本工作原理。
ExpectSpec.js
describe("Different Methods of Expect Block",function() {
   it("The Example of toBeTruthy() method",function () {
      expect(expectexam.exampleoftrueFalse(15)).toBeFalsy();
   });
});
Expectexam.js
window.expectexam = {
   exampleoftrueFalse: function (num) {
      if(num < 10)
         Return true;
      else
         return false;
   },
};
上面的程式碼將透過 Jasmine 測試用例,因為我們傳遞的值大於 10,並且預期輸出為 false。因此,瀏覽器將向我們顯示綠色標誌,這意味著它已透過。
JasmineJS - 順序檢查
Jasmine 還提供不同的方法來提供 JS 輸出的順序性。以下示例顯示如何使用 Jasmine 實現順序檢查。
ToContain()
toContain()匹配器使我們可以檢查任何元素是否是同一陣列或其他順序物件的一部分。以下示例將幫助我們瞭解 Jasmine toContain() 方法的工作方法。讓我們將以下程式碼新增到前面建立的customerMatcherSpec.js檔案中。
describe("Different Methods of Expect Block",function () {
   it("The  Example of toContain() method",function () {
      expect([1,2, 3, 4]).toContain(3);
   });
});
在上面的示例中,我們正在檢查 3 是否存在於該陣列中。我們得到一個綠色輸出,因為 3 存在於陣列中。

在上面的示例中,讓我們將 3 的值更改為 15 並再次執行規範。我們將獲得以下紅色螢幕,因為 15 不屬於我們作為該函式引數傳遞的陣列。

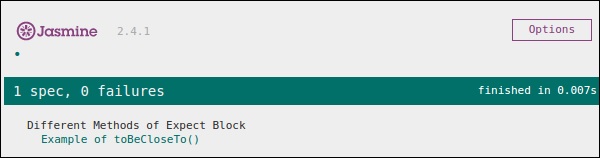
ToBeCloseTo()
toBeCloseTo()匹配器匹配實際值是否接近預期值。在以下示例中,我們將修改customerMatcherSpec.js檔案,看看它實際上是如何工作的。
describe("Different Methods of Expect Block", function () {
   it("Example of toBeCloseTo()", function () {
      expect(12.34).toBeCloseTo(12.3, 1);
   });
});
在上面的 Describe 塊中,我們正在檢查實際結果“12.3”是否更接近預期輸出“12.34”。由於這滿足我們的要求,我們將獲得以下綠色螢幕截圖作為我們的輸出。此方法的第二個引數是要比較的小數位數。
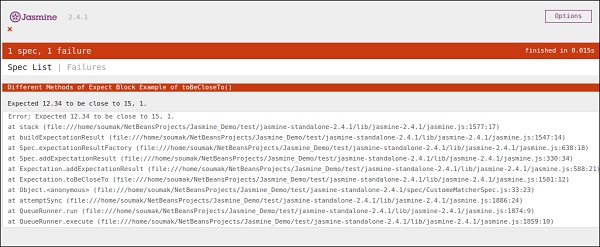
在上面的程式碼中,讓我們將預期值修改為 15 並執行SpecRunner.html。
describe("Different Methods of Expect Block",function () {
   it("Example of  toBeCloseTo()", function () {
      expect(12.34).toBeCloseTo(15, 1);
   });
});
在這種情況下,15 與 15 完全不接近,因此它將生成錯誤並顯示紅色螢幕截圖作為錯誤。
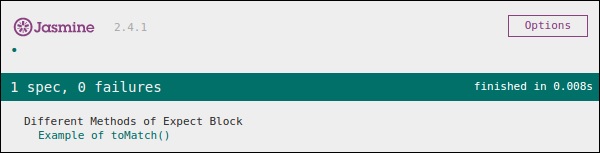
ToMatch()
ToMatch()匹配器適用於字串型別變數。它有助於查詢特定字串是否存在於預期輸出中。以下是我們的customerMatcherSpec.js的樣子。
describe("Different Methods of Expect Block",function () {
   it("Example of toMatch()", function () {
      expect("Jasmine tutorial in tutorials.com").toMatch(/com/);
   });
});
這段程式碼將測試“com”是否存在於給定的預期字串中。由於com存在於字串中,它將生成綠色螢幕截圖並透過測試條件。
現在讓我們將輸出更改為其他不在預期值中的字串。然後我們的customerMatcherSpec.js將如下所示。
describe("Different Methods  of Expect Block",function () {
   it("Example of toMatch()", function () {
      expect("Jasmine tutorial in tutorials.com").toMatch(/XYZ/);
   });
});
上面的程式碼將在預期值中查詢字串“XYZ”。由於它不存在於預期字串中,它將丟擲錯誤,並且輸出螢幕將相應地變為紅色。

JasmineJS - 空值檢查
Jasmine 提供了多種方法來檢查實際輸出是否為 Null、已定義或未定義。在本章中,我們將學習如何實現不同的 Jasmine 方法來檢查上述場景。
ToBedefined()
此匹配器用於檢查程式碼中任何變數是否已預定義。讓我們根據此示例修改我們的customerMatcherSpec.js檔案。
currentVal = 0;

describe("Different Methods  of Expect Block",function () {
   it("Example of  toBeDefined", function () {
      expect(currentVal).toBeDefined();
   });
});
在上面的程式碼中,toBeDefined() 將檢查變數currentVal是否在系統中定義。由於currentVal 最初定義為 0,因此此測試將透過並生成綠色螢幕截圖作為輸出。

同樣在上面的示例中,讓我們刪除第一行(我們實際定義“currentVal”的地方)並再次執行。然後我們將看到一個紅色螢幕,這意味著測試實際上失敗了,因為我們期望一個未定義的值被定義。以下螢幕截圖將是輸出檔案。

ToBeUndefined()
此匹配器有助於檢查任何變數是否以前未定義,基本上它與之前的匹配器 toBeDefined 的作用相反。在下面的示例中,我們將學習如何使用此匹配器。讓我們用以下條目修改我們的規範檔案,即customerMatcher.js檔案。
describe("Different Methods of Expect Block",function () {
   it("Example of toBeUndefine()", function () {
      var undefineValue;
      expect(undefineValue).toBeUndefined();
   });
});
在上一節中,我們將驗證我們的變數“undefineValue”是否實際上未定義。將此檔案新增到 SpecRunner 後,我們將收到綠色螢幕截圖作為輸出,這告訴我們此值實際上以前未定義。

讓我們再次使用一些預定義的值定義變數,看看它是否會丟擲錯誤。新的customerMatcher.js如下所示。
describe("Different Methods of Expect Block",function () {
   it("Example oftoBeUndefine()", function () {
      var undefineValue = 0;
      expect(undefineValue).toBeUndefined();
   });
});
上面的程式碼段將丟擲錯誤並生成紅色螢幕截圖,因為我們已經將“undefineValue”的值定義為“0”並期望它未定義。執行SpecRunner.html檔案時將生成以下螢幕截圖。

toBeNull()
顧名思義,此匹配器有助於檢查空值。讓我們再次使用以下程式碼段修改我們的customerMatcherSpec.js檔案。
describe("Different Methods of Expect Block",function () {
   var value = null;

   it("Example of toBeNull()", function () {
      expect(value).toBeNull();
   });
});
在上面的程式碼中,我們提到一個變數”value”,並且我們明確地將此值設定為 null。在 expect 塊中,toBeNull() 匹配器將檢查此值並相應地給出結果。以下是上述程式碼在 SpecRunner.html 檔案的幫助下執行時的輸出。

現在讓我們嘗試提供一些除 null 之外的已定義值進行測試。請相應地修改customerMatcher.js檔案。
describe("Different Methods of Expect Block",function () {
   var value = "TutorialsPoint";

   it("Example of  toBeNull()", function () {
      expect(value).toBeNull();
   });
});
在上面的示例中,我們已將變數值修改為“TutorialsPoint”,它不是空值。因此,此測試將失敗併產生紅色螢幕截圖作為輸出。

JasmineJS - 不等值檢查
到目前為止,我們已經討論了 Jasmine 中的不同方法,這些方法可以幫助我們根據我們的需求測試不同的場景。在本章中,我們將學習不同的匹配器,這些匹配器將幫助我們檢查 JS 檔案中的不等式條件。以下是為此目的使用的匹配器。
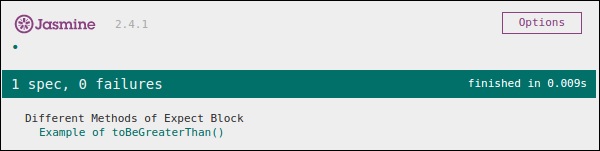
ToBeGreaterThan()
顧名思義,此匹配器有助於檢查大於條件。讓我們使用以下程式碼段修改我們的customerMatcher.js。
describe("Different Methods of Expect Block",function () {
   var exp = 8;

   it("Example of  toBeGreaterThan()", function () {
      expect(exp).toBeGreaterThan(5);
   });
});
在上面的程式碼段中,我們期望變數“exp”的值大於 5。現在,由於變數“exp”的值為“8”,大於“5”,因此這段程式碼將生成綠色螢幕截圖。
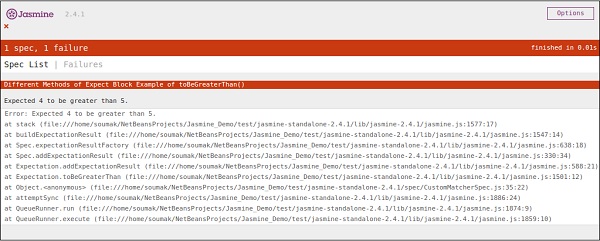
現在讓我們再次將變數的值修改為“4”並使此測試失敗。為此,我們需要使用以下程式碼段修改js檔案。
describe("Different Methods of Expect Block",function () {
   var exp = 4;

   it ("Example of toBeGreaterThan()", function () {
      expect(exp).toBeGreaterThan(5);
   });
});
這段程式碼將失敗,因為值 4 不能大於 5。因此,它將產生以下輸出。
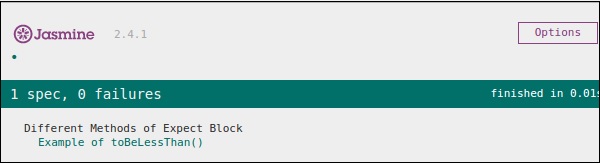
ToBeLessThan()
此匹配器有助於檢查測試場景的小於條件。它的行為與 toBeGreaterThan() 匹配器完全相反。現在讓我們看看此匹配器是如何工作的。讓我們相應地修改customerMatcher.js檔案。
describe("Different Methodsof Expect Block",function () {
   var exp = 4;

   it("Example of toBeLessThan()", function() {
      expect(exp).toBeLessThan(5);
   });
});
與前面的示例一樣,我們有一個值為“4”的變數。在這段程式碼中,我們正在檢查此變數的值是否小於 5。這段程式碼將生成以下輸出。
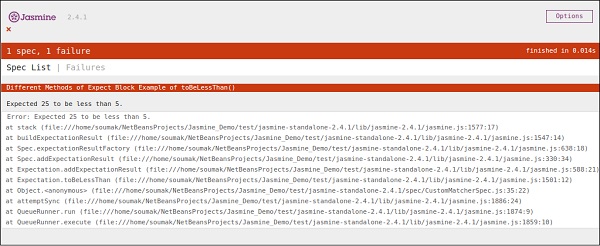
現在要使其失敗,我們需要為變數 exp 分配一些更大的數字。讓我們這樣做並測試應用程式。我們將為exp分配 25 作為值,這肯定會丟擲錯誤並在紅色中產生以下螢幕截圖。
JasmineJS - 非數值檢查
Jasmine 提供了一個特殊的匹配器來檢查這種特殊的測試場景,即toBeNaN()。
讓我們使用以下程式碼修改我們的customerMatcher.js。
describe("Different Methods of Expect Block",function () {
   it("Example of toBeNaN()", function () {
      expect(0 / 0).toBeNaN();
   });
});
在這裡,我們想測試“0/0”的值是什麼,這是無法確定的。因此,這段程式碼將生成以下綠色螢幕截圖。

現在讓我們再次使用以下邏輯修改程式碼,我們將一個變數exp賦值為 25,並期望結果不是用 5 除以它得到的數字。
describe("Different Methods of Expect Block",function () {
   var exp = 25;

   it("Example of toBeNaN()", function () {
      expect(exp/5).toBeNaN();
   });
});
這段程式碼將產生以下輸出。

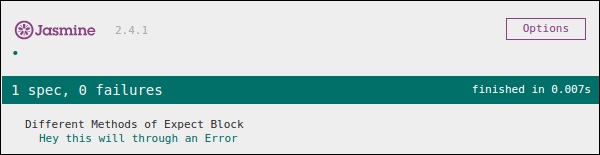
JasmineJS - 異常檢查
除了不同的計算匹配器外,Jasmine 還提供了一些有用的匹配器來檢查程式的異常。讓我們用以下程式碼集修改我們的 JavaScript。
var throwMeAnError = function() {
   throw new Error();
};

describe("Different Methods of Expect Block", function() {
   var exp = 25;

   it ("Hey this will throw an Error ", function() {
      expect(throwMeAnError).toThrow();
   });
});
在上面的示例中,我們建立了一個方法,該方法故意從該方法丟擲異常,並且在 expect 塊中,我們期望捕獲錯誤。如果一切順利,則這段程式碼將產生以下輸出。
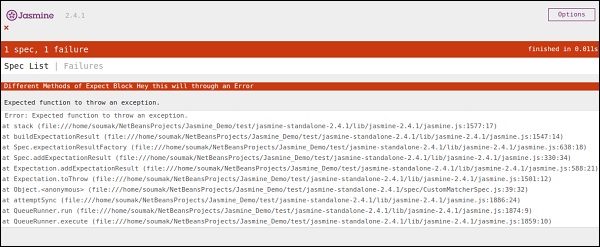
現在,為了使此測試用例失敗,我們需要省略throwMeAnError函式中的 throw 語句。以下是將產生紅色螢幕截圖作為輸出的程式碼,因為程式碼不滿足我們的要求。
var throwMeAnError = function() {
   //throw new Error();
};

describe("Different Methods of Expect Block",function() {
   var exp = 25;

   it("Hey this will throw an Error ", function() {
      expect(throwMeAnError).toThrow();
   });
});
如您所見,我們已經註釋掉了我們的方法丟擲異常的那一行。以下是上述程式碼在成功執行 SpecRunner.html 後的輸出。
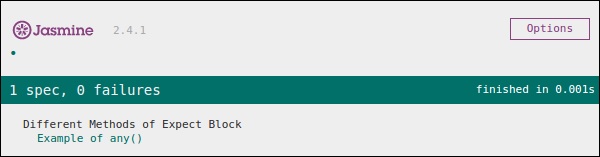
Jasmine.Any()
Any 是一個特殊的匹配器,當我們不確定輸出時使用。在下面的示例中,我們將學習它的工作原理。讓我們用以下程式碼段修改customerMatcher.js。
var addAny = function() {
   var sum = this.currentVal;

   for (var i = 0; i < arguments.length; i++) {
      sum += arguments[i];
   }

   this.currentVal = sum;
   return this.currentVal;
}

describe("Different Methods of Expect Block",function () {

   it("Example of any()", function() {
      expect(addAny(9,9)).toEqual(jasmine.any(Number));
   });
});
在這裡,我們聲明瞭一個函式,它將給我們提供作為引數提供的數字的總和。在 expect 塊中,我們期望結果可以是任何東西,但它應該是一個數字。
由於 9 和 9 相加後的結果 18 是一個數字,因此此測試將透過,並且它將生成以下綠色螢幕截圖作為輸出。
現在讓我們根據以下程式碼段更改程式碼,其中我們期望一個字串型別變數作為函式AddAny()的輸出。
var addAny = function() {
   var sum = this.currentVal;

   for(var i = 0; i < arguments.length; i++) {
      sum += arguments[i];
   }

   this.currentVal = sum;
   return this.currentVal;
}

describe("Different Methodsof Expect Block",function () {
   it("Example of any()", function () {
      expect(addAny(9,9)).toEqual(jasmine.any(String));
   });
});
以下是上述程式碼的輸出。

JasmineJS - beforeEach()
Jasmine 的另一個值得注意的功能是 beforeEach 和 afterEach 函式。使用這兩個功能,我們可以在每個規範執行之前和之後執行一些程式碼段。此功能對於在應用程式中執行公共程式碼非常有用。讓我們建立一個如下所示的規範檔案。
var currentVal = 0;

beforeEach(function() {
   currentVal = 5;
});

describe("Different Methods of Expect Block",function() {
   it("after each function ", function() {
      expect(currentVal).toEqual(5);
   });
});
在這裡,儘管我們一開始將一個變數宣告為“0”,但我們期望此值在預期塊中應等於 5。上面的程式碼將生成以下輸出。
在上面的程式碼中,將在執行 expect 塊之前將 5 分配給變數currentVal。因此,它會生成一個沒有錯誤的綠色螢幕截圖。
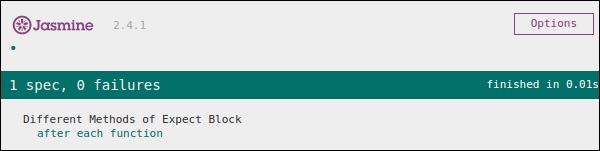
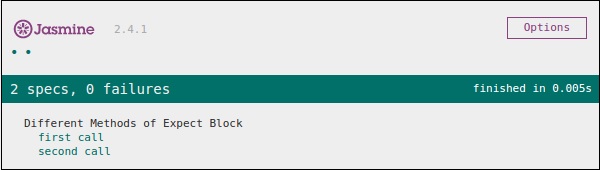
JasmineJS - afterEach()
與 beforeEach() 一樣,afterEach() 的工作方式完全相同。它在 spec 塊執行後執行。讓我們使用以下程式碼修改前面的示例。
var currentVal = 0;

afterEach(function() {
   currentVal = 5;
});

describe("Different Methods of Expect Block",function() {
   it("first call ", function() {
      expect(currentVal).toEqual(0);
   });

   it("second call ",  function() {
      expect(currentVal).toEqual(5);
   });
});
在上面的示例中,在執行第一個 spec 塊時,currentVal的值為 0。因此,它將透過測試用例,但在執行第一個 it 塊後,Jasmine 編譯運行了 afterEach() 塊,這使得 currentVal 的值變為 5。因此,它也滿足第二種情況併產生綠色螢幕截圖作為輸出。
JasmineJS - 間諜 (Spies)
Jasmine spy 是另一個功能,它的作用與其名稱完全相同。它允許您監視應用程式函式呼叫。Jasmine 中有兩種間諜技術。第一種方法可以使用spyOn()實現,第二種方法可以使用createSpy()實現。在本章中,我們將進一步瞭解這兩種方法。
spyOn()
spyOn() 內置於 Jasmine 庫中,允許您監視一段確定的程式碼。讓我們建立一個新的規範檔案“spyJasmineSpec.js”和另一個名為“spyJasmine.js”的js檔案。以下是這兩個檔案的條目。
SpyJasmine.js
var Person = function() {};

Person.prototype.sayHelloWorld = function(dict) {
   return dict.hello() + " " + dict.world();
};

var Dictionary = function() {};

Dictionary.prototype.hello = function() {
   return "hello";
};

Dictionary.prototype.world = function() {
   return "world";
};
SpyJasmineSpec.js
describe("Example Of jasmine Spy using spyOn()", function() {

   it('uses the dictionary to say "hello world"', function() {
      var dictionary = new Dictionary;
      var person = new Person;

      spyOn(dictionary, "hello");  // replace hello function with a spy
      spyOn(dictionary, "world");  // replace world function with another spy

      person.sayHelloWorld(dictionary);
      expect(dictionary.hello).toHaveBeenCalled();
      // not possible without first spy

      expect(dictionary.world).toHaveBeenCalled();
      // not possible withoutsecond spy
   });
});
在上面的程式碼段中,我們希望 person 物件說“Hello world”,但我們也希望 person 物件應該諮詢 dictionary 物件以給我們提供文字“Hello world”。
請檢視規範檔案,您可以在其中看到我們使用了 spyOn() 函式,該函式實際上模擬了hello和world函式的功能。因此,我們實際上並沒有呼叫該函式,而是模擬了函式呼叫。這就是 Spies 的特點。上面的程式碼段將產生以下輸出。

createSpy()
獲得間諜功能的另一種方法是使用 createSpy()。讓我們使用以下程式碼修改我們的兩個js檔案。
SpyJasmine.js
var Person = function() {};

Person.prototype.sayHelloWorld = function(dict) {
   return dict.hello() + " " + dict.world();
};

var Dictionary = function() {};

Dictionary.prototype.hello = function() {
   return "hello";
};

Dictionary.prototype.world = function() {
   return "world";
};
SpyJasmineSpec.js
describe("Example Of jasmine Spy using Create Spy", function() {

   it("can have a spy function", function() {
      var person = new Person();
      person.getName11 = jasmine.createSpy("Name spy");
      person.getName11();
      expect(person.getName11).toHaveBeenCalled();
   });
});
請檢視規範檔案,我們正在呼叫Person物件的getName11()。儘管此函式不存在於spy Jasmine.js中的 person 物件中,但我們沒有收到任何錯誤,因此輸出為綠色且為正。在此示例中,createSpy() 方法實際上模擬了 getName11() 的功能。
上面的程式碼將生成以下輸出。
