
 資料結構
資料結構 網路
網路 關係型資料庫管理系統 (RDBMS)
 作業系統
作業系統 Java
Java iOS
iOS HTML
HTML CSS
CSS Android
 Python
 C 程式設計
 C++
C++ C#
C# MongoDB
 MySQL
MySQL Javascript
 PHP
PHP在 MATLAB 中增加和減少影像亮度
在影像中,亮度是由我們的眼睛根據影像不同區域反射的光量來解釋的一個屬性。亮度與影像中的光強度有關,即如果影像光線充足,則看起來更亮。如果影像光線較弱,則看起來更暗。
因此,亮度會影響影像的視覺質量。但是,我們有各種工具,如 MATLAB,可以調整影像的亮度並增強其視覺質量。
在數字影像中,亮度由影像的畫素值控制。因此,如果我們想要調整影像的亮度,我們需要更改影像不同顏色通道的畫素值。
如果我們必須增加影像的亮度,我們需要增加影像畫素的強度值。
另一方面,如果我們需要降低影像的亮度,我們需要降低影像畫素的強度值。
MATLAB 是一個強大的數字影像處理工具。它提供了多種方法來有效地增加和減少影像的亮度。閱讀本文以瞭解使用 MATLAB 增加和減少影像亮度的方法。
透過縮放畫素值
在 MATLAB 中,縮放畫素值是增加和減少影像亮度的最簡單方法。
在這種方法中,我們定義一個縮放因子來調整影像畫素的強度值。
下面解釋了使用縮放畫素值方法增加和減少影像亮度所涉及的步驟:
步驟 1 - 使用“imread”函式讀取輸入影像。
步驟 2 - 指定一個縮放因子來更改影像的亮度。
步驟 3 - 將輸入影像與縮放因子相乘以調整影像的亮度。
步驟 4 - 將畫素值剪輯到有效範圍,即 [0, 255]。
步驟 5 - 將修改後的影像轉換為適當的格式,並使用“imshow”函式顯示。
示例
現在讓我們瞭解使用 MATLAB 更改影像亮度的這五個步驟的實現。
% MATLAB code to change brightness of image using scaling factor
% Read the input image
img = imread('https://tutorialspoint.tw/assets/questions/media/14304-1687425236.jpg');
% Specify a scaling factor
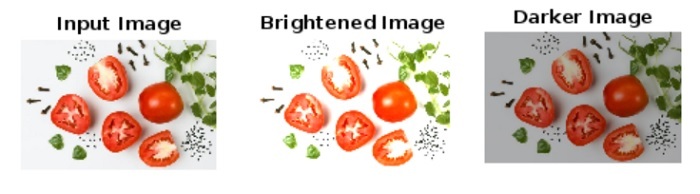
S1 = 1.5; % Increase brightness
S2 = 0.7; % Decrease brightness
% Scale the input image to adjust the brightness
brightened_img = img * S1;
darker_img = img * S2;
% Adjust pixel values to the valid range
brightened_img = max(0, min(brightened_img, 255));
darker_img = max(0, min(darker_img, 255));
% Convert to uint8 format to display
brightened_img = uint8(brightened_img);
darker_img = uint8(darker_img);
% Display the input, brightened, and darker images
figure;
subplot(1, 3, 1);
imshow(img);
title('Input Image');
subplot(1, 3, 2);
imshow(brightened_img);
title('Brightened Image');
subplot(1, 3, 3);
imshow(darker_img);
title('Darker Image');
輸出
使用我們的輸入影像,我們得到了以下輸出:
透過加減常數
在這種方法中,我們分別向給定影像新增和減去一個常數值以增加和減少影像的亮度。
這是在 MATLAB 中更改影像亮度的一種直接方法。
下面解釋了透過向影像新增和減去常數來增加和減少影像亮度的分步過程:
步驟 1 - 使用“imread”函式讀取輸入影像。
步驟 2 - 向輸入影像新增常數“X”以增加其亮度。或者從輸入影像中減去常數“X”以降低其亮度。
步驟 3 - 將生成的影像轉換為合適的格式,如“uint8”進行顯示。
步驟 4 - 使用“imshow”函式顯示調整後的影像。
示例
讓我們透過 MATLAB 中的一個示例程式來了解這種方法。
% MATLAB code to change brightness of image by adding and subtracting a constant
% Read the input image
img = imread('https://tutorialspoint.tw/assets/questions/media/14304-1687425269.jpg');
% Adjust the brightness of the image
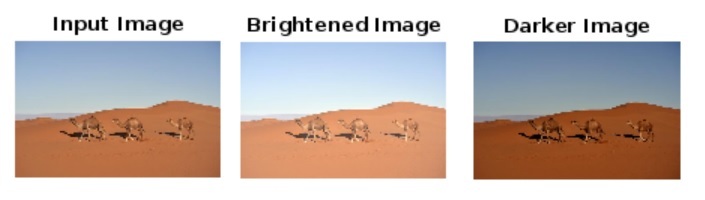
brightened_img = img + 40; % Increase brightness
darker_img = img - 40; % Decrease brightness
% Convert to uint8 format to display
brightened_img = uint8(brightened_img);
darker_img = uint8(darker_img);
% Display the input, brightened, and darker images
figure;
subplot(1, 3, 1);
imshow(img);
title('Input Image');
subplot(1, 3, 2);
imshow(brightened_img);
title('Brightened Image');
subplot(1, 3, 3);
imshow(darker_img);
title('Darker Image');
輸出
使用我們的輸入影像,我們得到了以下輸出:
使用伽馬校正
在 MATLAB 中,還有另一種增加和減少影像亮度的方法,稱為“伽馬校正”。此方法使用冪律變換更改影像畫素的強度值。
下面描述了使用伽馬校正方法增加和減少影像亮度的分步過程:
步驟 1 - 使用“imread”函式讀取輸入影像。
步驟 2 - 定義一個伽馬因子來更改影像的亮度。
步驟 3 - 使用指定的伽馬因子和“imadjust”函式調整影像的亮度。
步驟 4 - 使用“imshow”函式顯示亮度調整後的影像。
示例
以下示例演示了此方法在增加和減少影像亮度方面的實際實現。
% MATLAB code to change brightness of image using gamma correction
% Read the input image
img = imread('https://tutorialspoint.tw/assets/questions/media/14304-1687425323.jpg');

% Define a gamma factor to adjust the brightness
g1 = 0.4;		% Increase brightness
g2 = 1.7;		% Decrease brightness

% Adjust the brightness of the image
brightened_img  = imadjust(img, [], [], g1);
darker_img  = imadjust(img, [], [], g2);

% Display the input, brightened, and darker images
figure;
subplot(1, 3, 1);
imshow(img);
title('Input Image');

subplot(1, 3, 2);
imshow(brightened_img);
title('Brightened Image');

subplot(1, 3, 3);
imshow(darker_img);
title('Darker Image');
輸出
使用此輸入影像,我們得到了以下輸出:

結論
總之,影像中的亮度是與影像中光強度相關的屬性。如果影像光線充足,則認為它更亮。如果光線較弱,則稱其為較暗。因此,增加和減少影像的亮度分別使其更亮和更暗。
MATLAB 提供了多種有效的方法來增加和減少影像的亮度。在本教程中,我解釋了所有常用方法,以使用 MATLAB 調整影像的亮度。

443 次檢視
