
 資料結構
資料結構 網路
網路 關係資料庫管理系統(RDBMS)
 作業系統
作業系統 Java
Java iOS
iOS HTML
HTML CSS
CSS Android
 Python
 C語言程式設計
 C++
C++ C#
C# MongoDB
 MySQL
MySQL Javascript
 PHP
PHP如何在Android共享首選項中使用apply()方法及示例?
在深入瞭解共享首選項的apply()方法之前,我們應該瞭解Android中的共享首選項是什麼。使用共享首選項,我們可以以鍵值對的形式儲存或檢索值。共享首選項中共有五種不同的方法,如下所示:
Edit() - 用於編輯共享首選項的值
commit() - 將共享首選項的值提交到xml檔案
apply() - 將編輯器中的更改提交回共享首選項。
remove(String key) - 使用鍵從共享首選項中刪除鍵值對。
Put() - 將鍵值對新增到共享首選項xml。
共享首選項的示例語法如下所示:
final SharedPreferences sharedPreferences=getSharedPreferences("USER",MODE_PRIVATE);在上述語法中,我們建立了一個名為USER.xml的共享首選項檔案,並且它是私有模式,這意味著其他應用程式無法訪問此共享首選項。
在共享首選項中使用Apply方法:
apply() 將立即寫入記憶體儲存,並安排非同步寫入永續性儲存。
下面的示例演示瞭如何在Android共享首選項中使用apply()方法及示例。
步驟1 - 在Android Studio中建立一個新專案,轉到檔案 ⇒ 新建專案,並填寫所有必需的詳細資訊以建立新專案。
步驟2 - 將以下程式碼新增到res/layout/activity_main.xml。
<?xml version="1.0" encoding="utf-8"?>
<android.support.constraint.ConstraintLayout xmlns:android="http://schemas.android.com/apk/res/android"
   xmlns:app="http://schemas.android.com/apk/res-auto"
   xmlns:tools="http://schemas.android.com/tools"
   android:layout_width="match_parent"
   android:layout_height="match_parent"
   android:orientation="vertical"
   tools:context=".MainActivity"
   tools:layout_editor_absoluteY="81dp">

   <EditText
      android:id="@+id/name"
      android:layout_width="match_parent"
      android:layout_height="60dp"
      android:layout_marginTop="8dp"
      android:autofillHints=""
      android:hint="NAME"
      app:layout_constraintTop_toTopOf="parent"
      tools:layout_editor_absoluteX="0dp" />

   <EditText
      android:id="@+id/address"
      android:layout_width="match_parent"
      android:layout_height="wrap_content"
      android:layout_marginTop="84dp"
      android:hint="Phone Number"
      android:importantForAutofill="no"
      android:inputType=""
      app:layout_constraintTop_toTopOf="@+id/name"
      tools:layout_editor_absoluteX="16dp"
      tools:targetApi="o" />

   <Button
      android:id="@+id/button"
      android:layout_width="108dp"
      android:layout_height="wrap_content"
      android:layout_marginStart="8dp"
      android:layout_marginLeft="8dp"
      android:layout_marginTop="120dp"
      android:layout_marginEnd="8dp"
      android:layout_marginRight="8dp"
      android:gravity="center_horizontal"
      android:text="Save"
      app:layout_constraintEnd_toEndOf="parent"
      app:layout_constraintHorizontal_bias="0.503"
      app:layout_constraintStart_toStartOf="parent"
      app:layout_constraintTop_toTopOf="@+id/address" />

   <Button
      android:id="@+id/read"
      android:layout_width="wrap_content"
      android:layout_height="wrap_content"
      android:layout_marginStart="8dp"
      android:layout_marginLeft="8dp"
      android:layout_marginTop="88dp"
      android:layout_marginEnd="8dp"
      android:layout_marginRight="8dp"
      android:gravity="center_horizontal"
      android:text="read"
      app:layout_constraintEnd_toEndOf="parent"
      app:layout_constraintStart_toStartOf="parent"
      app:layout_constraintTop_toBottomOf="@+id/button" />

   <TextView
      android:id="@+id/result"
      android:layout_width="wrap_content"
      android:layout_height="0dp"
      android:layout_marginStart="8dp"
      android:layout_marginLeft="8dp"
      android:layout_marginTop="184dp"
      android:layout_marginEnd="8dp"
      android:layout_marginRight="8dp"
      android:text="result"
      app:layout_constraintEnd_toEndOf="parent"
      app:layout_constraintStart_toStartOf="parent"
      app:layout_constraintTop_toBottomOf="@+id/button" />
</android.support.constraint.ConstraintLayout>
在上面的xml中,它包含兩個用於姓名和地址的EditText,當用戶點選儲存按鈕時,它將值儲存在共享首選項中;當用戶點選讀取按鈕時,它將從共享首選項中讀取值。
步驟3 - 將以下程式碼新增到src/MainActivity.java
package package com.example.andy.myapplication;
import android.content.SharedPreferences;
import android.support.v7.app.AppCompatActivity;
import android.os.Bundle;
import android.view.View;
import android.widget.Button;
import android.widget.EditText;
import android.widget.TextView;
import android.widget.Toast;
public class MainActivity extends AppCompatActivity {
   @Override
   protected void onCreate(Bundle savedInstanceState) {
      super.onCreate(savedInstanceState);
      setContentView(R.layout.activity_main);
      final SharedPreferences sharedPreferences=getSharedPreferences("USER",MODE_PRIVATE);
      final EditText name=findViewById(R.id.name);
      final EditText address=findViewById(R.id.address);
      final TextView result=findViewById(R.id.result);
      Button save=findViewById(R.id.button);
      Button read=findViewById(R.id.read);
      read.setOnClickListener(new View.OnClickListener() {
         @Override
         public void onClick(View v) {
            result.setText("Name is "+sharedPreferences.getString("Name","No name")+" Address "+   sharedPreferences.getString("Address","No Address"));
         }
      });
      save.setOnClickListener(new View.OnClickListener() {
         @Override
         public void onClick(View v) {
            if(name.getText().toString().isEmpty() && address.getText().toString().isEmpty()){
               Toast.makeText(MainActivity.this,"Plz Enter all the data",Toast.LENGTH_LONG).show();
            }else{
               String nameData=name.getText().toString().trim();
               String addressData=address.getText().toString().trim();
               SharedPreferences.Editor editor=sharedPreferences.edit();
               editor.putString("Name",nameData);
               editor.putString("Address",addressData);
               editor.apply();
            }
         }
      });
   }
}
步驟4 - 無需更改manifest.xml。讓我們嘗試執行您的應用程式。我假設您已將您的實際Android移動裝置連線到您的計算機。要從Android Studio執行應用程式,請開啟您的專案活動檔案之一,然後單擊執行 ![]() 工具欄中的圖示。選擇您的移動裝置作為選項,然後檢查您的移動裝置,它將顯示您的預設螢幕:
工具欄中的圖示。選擇您的移動裝置作為選項,然後檢查您的移動裝置,它將顯示您的預設螢幕:
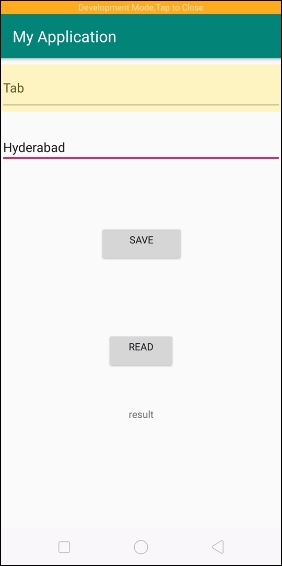
在上面的示例中,我們添加了姓名和地址,然後單擊儲存按鈕。
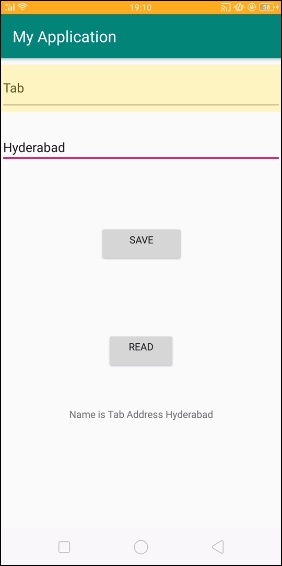
在上面的示例中,我們單擊了讀取按鈕。它會將文字新增到TextView。
點選 這裡 下載專案程式碼

414 次瀏覽
