
 資料結構
資料結構 網路
網路 關係資料庫管理系統 (RDBMS)
 作業系統
作業系統 Java
Java iOS
iOS HTML
HTML CSS
CSS Android
 Python
 C 程式設計
 C++
C++ C#
C# MongoDB
 MySQL
MySQL Javascript
 PHP
PHP如何在 Android 中將 HashMap 儲存到 Shared Preferences?
此示例演示瞭如何在 Android 中將 HashMap 儲存到 Shared Preferences。
步驟 1 − 在 Android Studio 中建立一個新專案,轉到檔案 ⇒ 新建專案,並填寫所有必需的詳細資訊以建立新專案。
步驟 2 − 將以下程式碼新增到 res/layout/activity_main.xml。
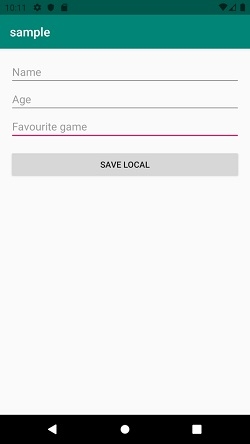
<?xml version="1.0" encoding="utf-8"?>
<LinearLayout xmlns:android="http://schemas.android.com/apk/res/android"
   android:id="@+id/rlMain"
   android:layout_width="match_parent"
   android:layout_height="match_parent"
   android:layout_margin="16dp"
   android:orientation="vertical">
   <EditText
      android:id="@+id/etName"
      android:layout_width="match_parent"
      android:layout_height="wrap_content"
      android:hint="Name"
      android:inputType="text" />
   <EditText
      android:id="@+id/etAge"
      android:layout_width="match_parent"
      android:layout_height="wrap_content"
      android:hint="Age"
      android:inputType="number" />
   <EditText
      android:id="@+id/etGame"
      android:layout_width="match_parent"
      android:layout_height="wrap_content"
      android:hint="Favourite game"
      android:inputType="text" />
   <Button
      android:layout_width="match_parent"
      android:layout_height="wrap_content"
      android:layout_marginTop="16dp"
      android:onClick="saveLocal"
      android:text="save local" />
</LinearLayout>
步驟 3 − 將以下程式碼新增到 src/MainActivity.java
package app.com.sample;
import android.content.Context;
import android.content.SharedPreferences;
import android.os.Bundle;
import android.view.View;
import android.widget.EditText;
import android.widget.Toast;
import androidx.appcompat.app.AppCompatActivity;
import org.json.JSONObject;
import java.util.HashMap;
import java.util.Iterator;
import java.util.Map;
import java.util.Objects;
public class MainActivity extends AppCompatActivity {
   final String mapKey = "map";
   EditText etName, etAge, etGame;
   @Override
   protected void onCreate(Bundle savedInstanceState) {
      super.onCreate(savedInstanceState);
      setContentView(R.layout.activity_main);
      etName = findViewById(R.id.etName);
      etAge = findViewById(R.id.etAge);
      etGame = findViewById(R.id.etGame);
      Map<String, Object> outputMap = loadMap();
      if (outputMap.containsKey("name"))
      etName.setText(Objects.requireNonNull(outputMap.get("name")).toString());
      if (outputMap.containsKey("age"))
         etAge.setText(Objects.requireNonNull(outputMap.get("age")).toString());
      if (outputMap.containsKey("game"))
         etGame.setText(Objects.requireNonNull(outputMap.get("game")).toString());
   }
   public void saveLocal(View view) {
      String name = etName.getText().toString().trim();
      String age = etAge.getText().toString().trim();
      String game = etGame.getText().toString().trim();
      if (name.isEmpty()) {
         etName.setError("*required");
         etName.requestFocus();
      } else if (age.isEmpty()) {
         etAge.setError("*required");
         etAge.requestFocus();
      } else if (game.isEmpty()) {
         etGame.setError("*required");
         etGame.requestFocus();
      } else {
         Map<String, Object> inputMap = new HashMap<>();
         inputMap.put("name", name);
         inputMap.put("age", age);
         inputMap.put("game", game);
         saveMap(inputMap);
         Toast.makeText(getApplicationContext(), "Saved Locally!", Toast.LENGTH_SHORT).show();
      }
   }
   private void saveMap(Map<String, Object> inputMap) {
      SharedPreferences pSharedPref = getApplicationContext().getSharedPreferences("MyVariables",
         Context.MODE_PRIVATE);
      if (pSharedPref != null) {
         JSONObject jsonObject = new JSONObject(inputMap);
         String jsonString = jsonObject.toString();
         SharedPreferences.Editor editor = pSharedPref.edit();
         editor.remove(mapKey).apply();
         editor.putString(mapKey, jsonString);
         editor.commit();
      }
   }
   private Map<String, Object> loadMap() {
      Map<String, Object> outputMap = new HashMap<>();
      SharedPreferences pSharedPref = getApplicationContext().getSharedPreferences("MyVariables",
         Context.MODE_PRIVATE);
      try {
         if (pSharedPref != null) {
            String jsonString = pSharedPref.getString(mapKey, (new JSONObject()).toString());
            JSONObject jsonObject = new JSONObject(jsonString);
            Iterator<String> keysItr = jsonObject.keys();
            while (keysItr.hasNext()) {
               String key = keysItr.next();
               outputMap.put(key, jsonObject.get(key));
            }
         }
      } catch (Exception e) {
         e.printStackTrace();
      }
      return outputMap;
   }
}
步驟 4 − 將以下程式碼新增到 androidManifest.xml
<?xml version="1.0" encoding="utf-8"?>
<manifest xmlns:android="http://schemas.android.com/apk/res/android"
   package="app.com.sample">
   <application
      android:allowBackup="true"
      android:icon="@mipmap/ic_launcher"
      android:label="@string/app_name"
      android:roundIcon="@mipmap/ic_launcher_round"
      android:supportsRtl="true"
      android:theme="@style/AppTheme">
      <activity android:name=".MainActivity">
         <intent-filter>
            <action android:name="android.intent.action.MAIN" />
            <category android:name="android.intent.category.LAUNCHER" />
         </intent-filter>
      </activity>
   </application>
</manifest>
讓我們嘗試執行您的應用程式。我假設您已將您的實際 Android 移動裝置連線到您的計算機。要從 Android Studio 執行應用程式,請開啟您的一個專案活動檔案,然後單擊執行 ![]() 工具欄中的圖示。選擇您的移動裝置作為選項,然後檢查您的移動裝置,它將顯示您的預設螢幕 –
工具欄中的圖示。選擇您的移動裝置作為選項,然後檢查您的移動裝置,它將顯示您的預設螢幕 –
點選 這裡 下載專案程式碼。

更新於:2020年7月3日
1K+ 次瀏覽

廣告