
 資料結構
資料結構 網路
網路 RDBMS
RDBMS 作業系統
作業系統 Java
Java iOS
iOS HTML
HTML CSS
CSS Android
 Python
 C 程式設計
 C++
C++ C#
C# MongoDB
 MySQL
MySQL Javascript
 PHP
PHP如何在 OpenCV Python 中在影像上繪製帶箭頭的線?
OpenCV 提供了函式 cv2.arrowedLine() 用於在影像上繪製帶箭頭的線。此函式採用不同的引數來繪製線條。請參閱下面的語法。
cv2.arrowedLine(img, start, end, color, thickness, line_type, shift, tip_length)
img − 要在其上繪製線條的輸入影像。
Start − 線的起始座標,格式為 (寬度,高度)。
End − 線的結束座標,格式為 (寬度,高度)。
Color − 線的顏色。對於 BGR 格式的紅色,我們傳遞 (0, 0, 255)
Thickness − 線的畫素厚度。
line_type − 線的型別。
shift − 小數位數。
tip_length − 箭頭尖端相對於箭頭長度的長度。
輸出− 它返回在其中繪製了線條的影像。
步驟
按照以下步驟在影像上繪製帶箭頭的線:
匯入所需的庫。在所有以下 Python 示例中,所需的 Python 庫是 OpenCV。確保您已安裝它。
import cv2
使用 cv2.imread() 讀取輸入影像。
image = cv2.imread('cabinet.jpg')
使用 cv2.arrowedLine() 在影像上繪製帶箭頭的線,並傳遞所需的引數。
cv2.arrowedLine(image, (50, 100), (300, 450), (0,0,255), 3, 5, 0, 0.1)
顯示繪製了帶箭頭的線的影像。
cv2.imshow("ArrowedLine",image)
cv2.waitKey(0)
cv2.destroyAllWindows()
讓我們看一些示例,以便清楚地瞭解它是如何完成的。
示例 1
在此程式中,我們使用以下線條屬性在影像上繪製一條紅線:
起點 = (50, 100),
終點 = (300, 450),
顏色 = (0,0,255),
厚度= 3,
線型 = 5,
shift = 0,以及
箭頭長度 = 0.1
# import required libraries
import cv2

# read the input image
image=cv2.imread('cabinet.jpg')

# Draw the arrowed line passing the arguments
cv2.arrowedLine(image, (50, 100), (300, 450), (0,0,255), 3, 5, 0, 0.1)

cv2.imshow("ArrowedLine",image)
cv2.waitKey(0)
cv2.destroyAllWindows()
輸出
執行以上程式時,將產生以下輸出:

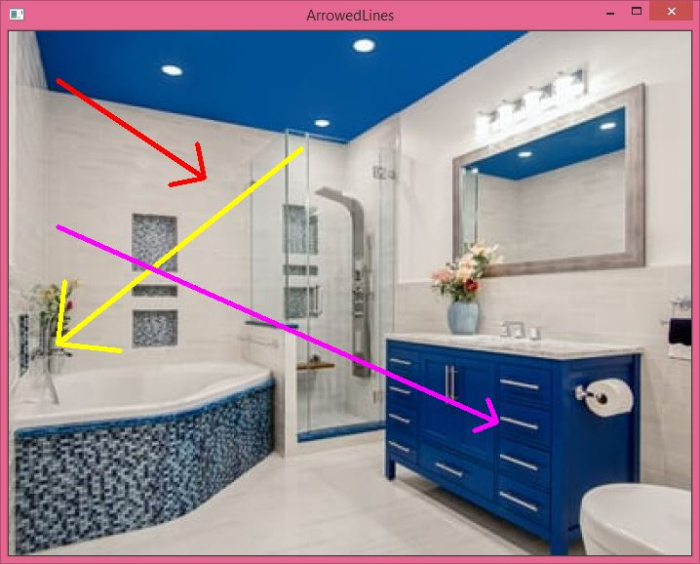
示例 2
在此程式中,我們使用不同的線條屬性繪製三條不同的線:
import cv2
image=cv2.imread('cabinet.jpg')

cv2.arrowedLine(image, (50, 50), (200, 150), (0,0,255), 3, 7, 0, 0.2)
cv2.arrowedLine(image, (300, 120), (50, 320), (0,255,255), 3, 7, 0, 0.2)
cv2.arrowedLine(image, (50, 200), (500, 400), (255,0,255), 3, 7, 0, 0.05)

cv2.imshow("ArrowedLines",image)
cv2.waitKey(0)
cv2.destroyAllWindows()
輸出
執行後,它將生成以下輸出視窗:

更新於: 2022-09-27
2K+ 次瀏覽

廣告