
 資料結構
資料結構 網路
網路 關係資料庫管理系統 (RDBMS)
 作業系統
作業系統 Java
Java iOS
iOS HTML
HTML CSS
CSS Android
 Python
 C語言程式設計
 C++
C++ C#
C# MongoDB
 MySQL
MySQL Javascript
 PHP
PHP如何在MATLAB App中建立GUI按鈕?
在MATLAB App環境中,我們可以在沒有良好編碼知識的情況下開發GUI(圖形使用者介面)應用程式。因此,MATLAB應用程式構建允許我們建立專業應用程式,無需編寫程式碼,只需拖放即可。
在本文中,我們將討論如何在MATLAB應用程式中建立GUI按鈕。下面解釋了在MATLAB應用程式中建立GUI按鈕的分步過程。
在MATLAB App中建立GUI按鈕的步驟
我們可以按照以下步驟在MATLAB應用程式中建立GUI按鈕
步驟(1)– 開啟MATLAB命令視窗。
步驟(2)– 啟動MATLAB App Designer。
在MATLAB中開啟App Designer有以下兩種方法:
在MATLAB命令視窗中鍵入“appdesigner”命令並按Enter鍵。
單擊APPS選項卡下的“設計應用程式”選項。
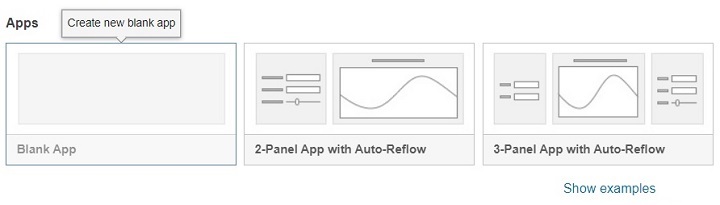
步驟(3)– 在App Designer視窗中,選擇“新建”以建立一個新應用程式。這將提供一個空白畫布來設計GUI應用程式。
步驟(4)– 從App Designer視窗左側顯示的工具箱中拖放一個“按鈕”。
步驟(5)– 根據您的需要自定義按鈕。為此,請使用App Designer視窗右側的元件瀏覽器來更改按鈕的屬性。
步驟(6)– 透過為按鈕建立回撥函式使其具有功能。為此,右鍵單擊按鈕。然後,在上下文選單中單擊“回撥”選項。然後,單擊“新增ButtonPushedFcn回撥”。這將在MATLAB編輯器中開啟一個新的命令視窗,用於編寫按鈕的回撥函式。
步驟(7)– 在此函式內編寫您希望在單擊按鈕時執行的MATLAB程式碼。
步驟(8)– 最後,透過單擊App Designer中的“儲存”選項儲存應用程式。
步驟(9)– 單擊App Designer中的“執行”選項以執行應用程式。此應用程式視窗將包含該按鈕。
這就是我們如何使用MATLAB App Designer在我們的MATLAB應用程式中建立GUI按鈕。
現在,讓我們來看一個例子,在MATLAB應用程式中建立一個GUI按鈕,以便在單擊時將兩個數字相乘。
在MATLAB App中建立GUI按鈕以相乘兩個數字
下面解釋了在MATLAB應用程式中建立GUI按鈕以在單擊時相乘兩個數字的分步過程
步驟(1)− 開啟MATLAB並在APPS選項卡中啟動MATLAB App Designer。

步驟(2)− 建立一個新的空白應用程式。
步驟(3)− 從元件庫中拖放所需的元件。在這個例子中,我們需要以下元件:
三個數值編輯欄位:兩個用於輸入兩個數字,一個用於獲取乘積。
一個按鈕:執行乘法。
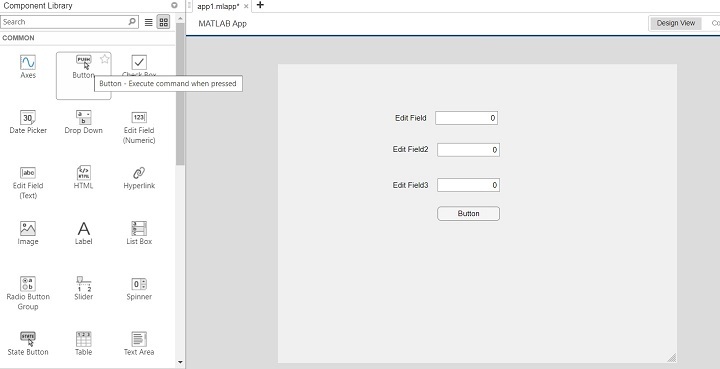
步驟(4)− 自定義元件,例如向欄位和按鈕新增所需的標籤。

步驟(5)− 向按鈕添加回調函式。為此,右鍵單擊按鈕,然後單擊“回撥”,然後單擊“新增ButtonPushedFcn回撥”。將在MATLAB編輯器中開啟一個新選項卡來編寫程式碼。

步驟(6)− 編寫指定按鈕功能的MATLAB程式碼。
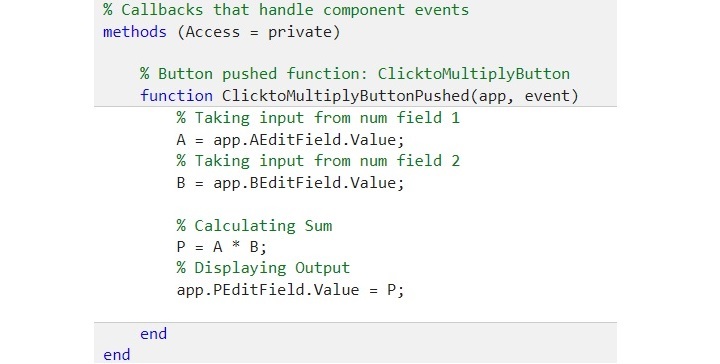
對於此示例,我們將編寫以下程式碼(此處應插入實際程式碼示例)
% Callbacks that handle component events
    methods (Access = private)

        % Button pushed function: ClicktoMultiplyButton
        function ClicktoMultiplyButtonPushed(app, event)
            % Taking input from num field 1
            A = app.AEditField.Value;
            % Taking input from num field 2
            B = app.BEditField.Value;

            % Calculating Sum
            P = A * B;
            % Displaying Output
            app.PEditField.Value = P;

        end
    end
步驟(7)− 單擊App Designer中的“儲存”按鈕以儲存應用程式。

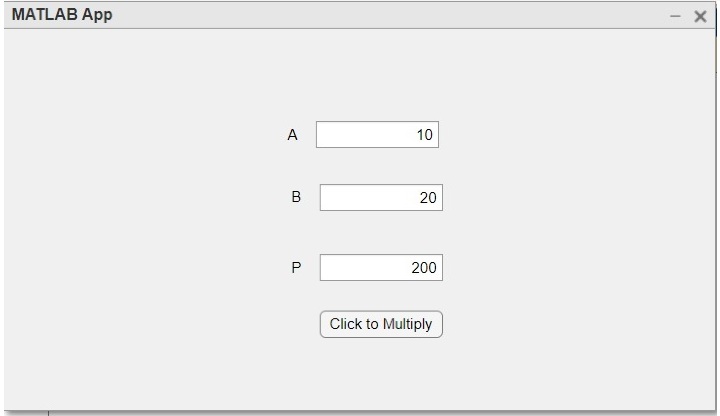
步驟(8)− 單擊“執行”按鈕以執行應用程式。

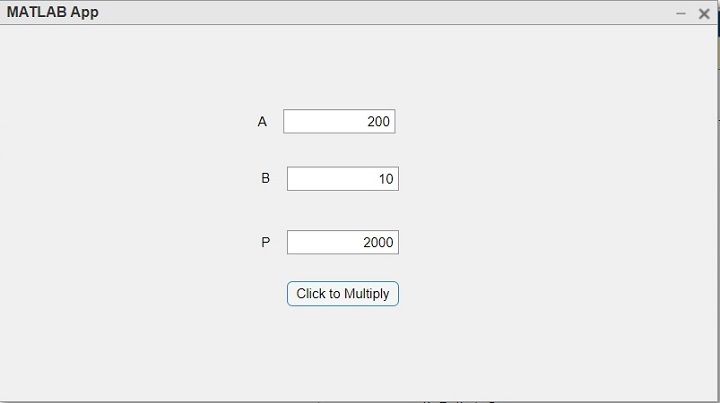
步驟(9)− 輸入引數並單擊“單擊以相乘”按鈕以執行按鈕的功能。
這樣,我們可以使用MATLAB App Designer輕鬆地在MATLAB App中建立GUI按鈕。
按鈕的MATLAB程式碼
以下是上述GUI按鈕應用程式的完整MATLAB程式碼。(此處應插入實際程式碼)
示例
classdef product < matlab.apps.AppBase

    % Properties that correspond to app components
    properties (Access = public)
        UIFigure               matlab.ui.Figure
        ClicktoMultiplyButton  matlab.ui.control.Button
        PEditField             matlab.ui.control.NumericEditField
        PEditFieldLabel        matlab.ui.control.Label
        BEditField             matlab.ui.control.NumericEditField
        BEditFieldLabel        matlab.ui.control.Label
        AEditField             matlab.ui.control.NumericEditField
        AEditFieldLabel        matlab.ui.control.Label
    end

    % Callbacks that handle component events
    methods (Access = private)

        % Button pushed function: ClicktoMultiplyButton
        function ClicktoMultiplyButtonPushed(app, event)
            % Taking input from num field 1
            A = app.AEditField.Value;
            % Taking input from num field 2
            B = app.BEditField.Value;

            % Calculating Sum
            P = A * B;
            % Displaying Output
            app.PEditField.Value = P;

        end
    end

    % Component initialization
    methods (Access = private)

        % Create UIFigure and components
        function createComponents(app)

            % Create UIFigure and hide until all components are created
            app.UIFigure = uifigure('Visible', 'off');
            app.UIFigure.Position = [100 100 640 480];
            app.UIFigure.Name = 'MATLAB App';

            % Create AEditFieldLabel
            app.AEditFieldLabel = uilabel(app.UIFigure);
            app.AEditFieldLabel.HorizontalAlignment = 'right';
            app.AEditFieldLabel.Position = [214 384 25 22];
            app.AEditFieldLabel.Text = 'A';

            % Create AEditField
            app.AEditField = uieditfield(app.UIFigure, 'numeric');
            app.AEditField.Position = [254 384 100 22];

            % Create BEditFieldLabel
            app.BEditFieldLabel = uilabel(app.UIFigure);
            app.BEditFieldLabel.HorizontalAlignment = 'right';
            app.BEditFieldLabel.Position = [217 333 25 22];
            app.BEditFieldLabel.Text = 'B';

            % Create BEditField
            app.BEditField = uieditfield(app.UIFigure, 'numeric');
            app.BEditField.Position = [257 333 100 22];

            % Create PEditFieldLabel
            app.PEditFieldLabel = uilabel(app.UIFigure);
            app.PEditFieldLabel.HorizontalAlignment = 'right';
            app.PEditFieldLabel.Position = [217 276 25 22];
            app.PEditFieldLabel.Text = 'P';

            % Create PEditField
            app.PEditField = uieditfield(app.UIFigure, 'numeric');
            app.PEditField.Position = [257 276 100 22];

            % Create ClicktoMultiplyButton
            app.ClicktoMultiplyButton = uibutton(app.UIFigure, 'push');
            app.ClicktoMultiplyButton.ButtonPushedFcn = createCallbackFcn(app, @ClicktoMultiplyButtonPushed, true);
            app.ClicktoMultiplyButton.Position = [257 230 100 22];
            app.ClicktoMultiplyButton.Text = 'Click to Multiply';

            % Show the figure after all components are created
            app.UIFigure.Visible = 'on';
        end
    end

    % App creation and deletion
    methods (Access = public)

        % Construct app
        function app = product

            % Create UIFigure and components
            createComponents(app)

            % Register the app with App Designer
            registerApp(app, app.UIFigure)

            if nargout == 0
                clear app
            end
        end

        % Code that executes before app deletion
        function delete(app)

            % Delete UIFigure when app is deleted
            delete(app.UIFigure)
        end
    end
end
輸出
結論
因此,這就是關於在MATLAB應用程式中建立GUI按鈕的全部內容。在本文中,我們解釋了在MATLAB應用程式中建立GUI按鈕的步驟。此外,我們還藉助一個示例進行了說明,在該示例中,我們建立了一個按鈕來在MATLAB應用程式中相乘兩個數字。

瀏覽量:215
