
 資料結構
資料結構 網路
網路 關係資料庫管理系統 (RDBMS)
 作業系統
作業系統 Java
Java iOS
iOS HTML
HTML CSS
CSS Android
 Python
 C語言程式設計
 C++
C++ C#
C# MongoDB
 MySQL
MySQL Javascript
 PHP
PHP如何以程式設計方式建立按鈕?
在本文中,您將學習如何在 Swift 語言中以程式設計方式建立按鈕。在 iOS 中,有不同的方法可以以程式設計方式建立按鈕物件。讓我們透過示例來探索其中的一些方法。
我們將看到以下建立按鈕的方法:
步驟 1 - 在此步驟中,我們將建立一個按鈕物件,並在需要時對其進行自定義。
步驟 2 - 在此步驟中,我們將使用 lazy 關鍵字建立一個按鈕物件。
步驟 3 - 在此步驟中,我們將建立一個按鈕物件,稍後再設定其框架。
建立按鈕並稍後自定義
以下是如何使用 Swift 在 iOS 中以程式設計方式建立按鈕的示例:
示例
import UIKit
class TestController: UIViewController {
   private let loginButton = UIButton()
   override func viewDidLoad() {
      super.viewDidLoad()
      initialSetup()
   }
   private func initialSetup() {
      // basic setup
      view.backgroundColor = .white
      navigationItem.title = "UIButton"

      // login button customization
      loginButton.setTitle("Login", for: .normal)
      loginButton.setTitleColor(.white, for: .normal)
      loginButton.layer.cornerRadius = 10
      loginButton.layer.masksToBounds = true
      loginButton.backgroundColor = .darkGray
      loginButton.titleLabel?.font = UIFont.systemFont(ofSize: 18, weight: .semibold)
      loginButton.addTarget(self, action: #selector(handleLoginButtonTapped), for: .touchUpInside)

      // adding the constraints to login button
      view.addSubview(loginButton)
      loginButton.translatesAutoresizingMaskIntoConstraints = false
      loginButton.centerYAnchor.constraint(equalTo: view.centerYAnchor).isActive = true
      loginButton.centerXAnchor.constraint(equalTo: view.centerXAnchor).isActive = true
      loginButton.heightAnchor.constraint(equalToConstant: 50).isActive = true
      loginButton.widthAnchor.constraint(equalToConstant: 280).isActive = true
   }
   @objc private func handleLoginButtonTapped() {
      print("login button tapped...")
   }
}
輸出
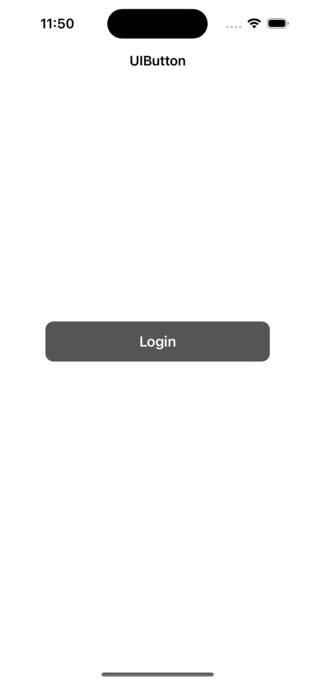
在上述步驟中,在控制器中建立了一個名為 loginButton 的按鈕物件。按鈕的標題設定為“登入”,標題顏色設定為白色。該按鈕還具有目標-動作對,以便當點選按鈕時,將呼叫“handleLoginButtonTapped”函式。最後,該按鈕被新增為當前檢視的子檢視。
您將看到,我們最初建立了一個按鈕物件。之後,我們將在 viewDidLoad() 方法中自定義按鈕。最後,使用一些必要的約束將其新增到父檢視。
使用 lazy 關鍵字建立按鈕
以下是如何使用 UIKit 中的 lazy 關鍵字在 iOS 中以程式設計方式建立按鈕的示例:
示例
import UIKit
class TestController: UIViewController {
   private lazy var loginButton: UIButton = {
      let button = UIButton()
      button.setTitle("Login", for: .normal)
      button.setTitleColor(.white, for: .normal)
      button.layer.cornerRadius = 10
      button.layer.masksToBounds = true
      button.backgroundColor = .darkGray
      button.titleLabel?.font = UIFont.systemFont(ofSize: 18, weight: .semibold)
      button.addTarget(self, action: #selector(handleLoginButtonTapped), for: .touchUpInside)
      button.translatesAutoresizingMaskIntoConstraints = false
      return button
   }()
   override func viewDidLoad() {
      super.viewDidLoad()
      initialSetup()
   }
   private func initialSetup() {
      // basic setup
      view.backgroundColor = .white
      navigationItem.title = "UIButton"

      // adding the constraints to login button
      view.addSubview(loginButton)
      loginButton.centerYAnchor.constraint(equalTo: view.centerYAnchor).isActive = true
      loginButton.centerXAnchor.constraint(equalTo: view.centerXAnchor).isActive = true
      loginButton.heightAnchor.constraint(equalToConstant: 50).isActive = true
      loginButton.widthAnchor.constraint(equalToConstant: 280).isActive = true
   }
   @objc private func handleLoginButtonTapped() {
      print("login button tapped...")
   }
}
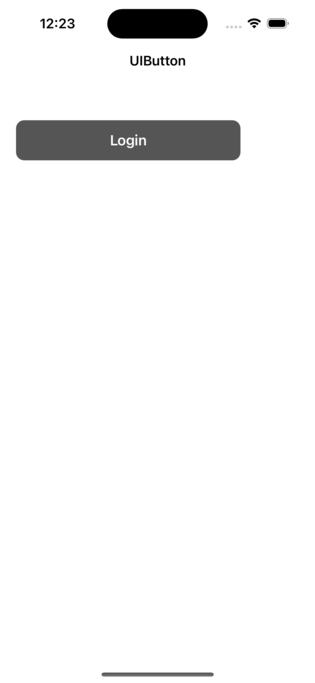
輸出

在上述步驟中,使用 lazy 關鍵字在控制器中建立了一個名為 loginButton 的按鈕物件。按鈕的標題設定為“登入”,標題顏色設定為白色。該按鈕還具有目標-動作對,以便當點選按鈕時,將呼叫“handleLoginButtonTapped”函式。最後,該按鈕被新增為當前檢視的子檢視。
請注意,使用 lazy 關鍵字,您無需在按鈕宣告中將其新增為子檢視,您可以在需要時隨時新增。
使用框架建立按鈕
以下是如何使用 Swift 在 iOS 中以程式設計方式建立按鈕的示例:
示例
import UIKit
class TestController: UIViewController {
   private let loginButton = UIButton(type: .system)
   override func viewDidLoad() {
      super.viewDidLoad()
      initialSetup()
   }
   private func initialSetup() {
      // basic setup
      view.backgroundColor = .white
      navigationItem.title = "UIButton"

      // login button customization
      loginButton.frame = CGRect(x: 20, y: 150, width: 280, height: 50)
      loginButton.setTitle("Login", for: .normal)
      loginButton.setTitleColor(.white, for: .normal)
      loginButton.layer.cornerRadius = 10
      loginButton.layer.masksToBounds = true
      loginButton.backgroundColor = .darkGray
      loginButton.titleLabel?.font = UIFont.systemFont(ofSize: 18, weight: .semibold)
      loginButton.addTarget(self, action: #selector(handleLoginButtonTapped), for: .touchUpInside)

      view.addSubview(loginButton)
   }
   @objc private func handleLoginButtonTapped() {
      print("login button tapped...")
   }
}
輸出
您可以根據需要更改 x、y、寬度和高度,也可以根據您的要求更改按鈕標題和操作。
結論
您可以透過多種方式以程式設計方式建立按鈕。您可以建立一個按鈕物件,並在需要時在程式碼中對其進行自定義。此外,可以使用 lazy 關鍵字建立按鈕物件。UIButton 類提供了在程式碼中稍後設定框架的靈活性。您可以在上面的示例中看到如何設定按鈕的框架。
使用 lazy 關鍵字是最推薦的方法。您可以在單個塊中建立一個按鈕物件並新增任何自定義項。此外,您還可以在同一個塊中新增目標。

1K+ 次瀏覽
