
 資料結構
資料結構 網路
網路 關係資料庫管理系統 (RDBMS)
 作業系統
作業系統 Java
Java iOS
iOS HTML
HTML CSS
CSS Android
 Python
 C 程式設計
 C++
C++ C#
C# MongoDB
 MySQL
MySQL Javascript
 PHP
PHP解釋 React Native 中 SafeViewArea 的重要性?
SafeViewArea 元件旨在將您的內容顯示在裝置的安全邊界內。它負責新增填充,並確保不會用導航欄、工具欄、標籤欄等覆蓋您的內容。此元件僅適用於 iOS 裝置,以下是一個可執行的示例。
讓我們透過一個示例來了解使用 SafeAreaView 的優勢。
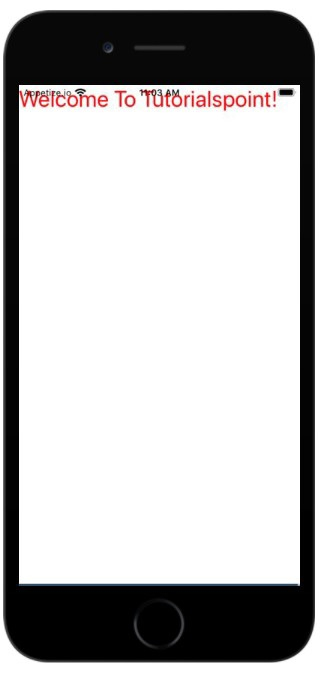
考慮以下使用 View 元件顯示文字“歡迎來到 Tutorialspoint!”的示例。
示例
在 View 元件內顯示文字“歡迎來到 Tutorialspoint!”
View 元件上使用了 style flex: 1。文字元件包裝在 View 元件內,並顯示文字“歡迎來到 Tutorialspoint!”。如果檢視輸出,預設情況下文字會在狀態列上渲染。
import React from 'react';
import { StyleSheet, Text, View } from 'react-native';
const App = () => {
   return (
      <View style={styles.container}>
         <Text style={{ color:'red', fontSize:'30'}}>Welcome To Tutorialspoint!</Text>
            </View>
      );
   }
   const styles = StyleSheet.create({
      container: {
         flex: 1
      },
   });
export default App;
輸出
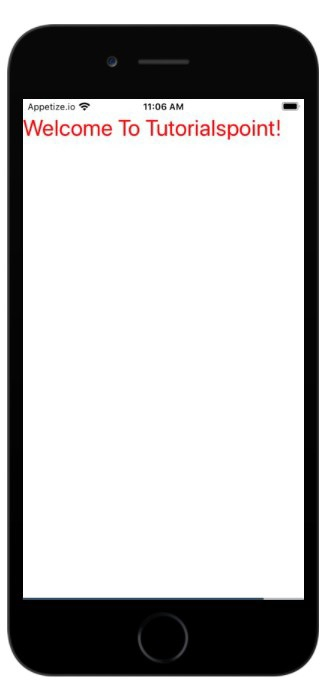
現在讓我們看看在 iOS 中使用 SafeAreaView 的相同示例。
示例:SafeAreaView 的工作原理
在下面的示例中,我們用 SafeAreaView 替換了 View 元件。
要使用 SafeViewArea,您必須按如下方式匯入它:
import { SafeAreaView } from 'react-native';現在,如果您檢視輸出,您將看到 Text 元件添加了填充,並且現在它不會與狀態列重疊。
import React from 'react';
import { StyleSheet, Text, SafeAreaView } from 'react-native';
const App = () => {
   return (
      <SafeAreaView style={styles.container}>
         <Text style={{ color:'red', fontSize:'30'}}>Welcome To Tutorialspoint!</Text>
            </SafeAreaView>
      );
   }
   const styles = StyleSheet.create({
   container: {
      flex: 1
   },
});
export default App;
輸出

更新於:2021年7月1日
238 次瀏覽

廣告