
 資料結構
資料結構 網路
網路 關係資料庫管理系統 (RDBMS)
 作業系統
作業系統 Java
Java iOS
iOS HTML
HTML CSS
CSS Android
 Python
 C語言程式設計
 C++
C++ C#
C# MongoDB
 MySQL
MySQL Javascript
 PHP
PHP如何在React Native中使用Flexbox?
Flexbox是一個一維佈局系統,用於在React Native中排列和對齊專案,類似於它在Web上的CSS中的使用方法,但有一些預設差異。它旨在幫助我們建立在不同螢幕尺寸上看起來都很好的佈局。
在React Native中使用Flexbox就像在一個架子上排列物品一樣,將書籍、圖片和其他物品放置在不同的位置和方向。這使我們能夠建立響應式、靈活的佈局,以適應不同的螢幕尺寸和方向。
在本教程中,我們將學習在React Native中使用Flexbox的基礎知識。
使用Flexbox進行React Native佈局
為了獲得所需的佈局,我們通常在React Native中結合使用flexDirection、alignItems和justifyContent。
flexDirection
flexDirection屬性用於指定佈局的主軸。預設情況下,該值為“column”。
以下是flexDirection的可能選項:
row − 水平排列專案,從左到右
row-reverse − 水平排列專案,從右到左
column − 垂直排列專案,從上到下
column-reverse − 垂直排列專案,從下到上
justifyContent
justifyContent屬性控制專案在容器主軸上的分佈方式。預設情況下,該值為“flex-start”。
以下是justifyContent的可能選項:
flex-start − 將專案對齊到容器的起始位置。
flex-end − 將專案對齊到容器的結束位置。
center − 將專案居中於容器內。
space-between − 均勻分佈專案,第一個專案位於容器的起始位置,最後一個專案位於結束位置。
space-around − 均勻分佈專案,專案周圍留有相等的空間。
space-evenly − 均勻分佈專案,專案周圍以及容器的起始和結束位置留有相等的空間。
alignItems
alignItems屬性用於沿佈局的主軸對齊專案。當flexDirection設定為“row”時,alignItems控制專案的水平對齊方式;當flexDirection設定為“column”時,alignItems控制專案的垂直對齊方式。
alignItems的可能值為:
flex-start − 專案對齊到容器的起始位置。
flex-end − 專案對齊到容器的結束位置。
center − 專案居中於容器內。
stretch − 專案拉伸以填充容器。
baseline − 基於基線對齊專案。
其他屬性
除了常用的flex屬性外,還有其他屬性,例如:
flex − 此屬性決定元件相對於其同級元件的增長程度。值越高,它將佔據更多空間。“flex: 1”將使元件擴充套件以填充可用空間。
flex-wrap − 此屬性設定如果容器中沒有足夠的空間,則flex專案是否應換行。可用值為nowrap、wrap和wrap-reverse。
flex-shrink − 此屬性設定當容器太小時專案收縮的能力。預設值為1。
flex-grow − 此屬性設定當容器中有額外空間時專案增長的能力。預設值為0。
align-self − 此屬性設定單個專案沿容器交叉軸的對齊方式。可用值為auto、flex-start、flex-end、center、stretch和baseline。
order − 此屬性設定flex容器中專案的順序。預設值為0。
示例
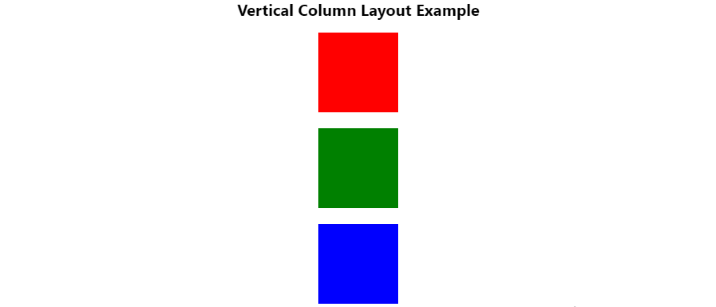
在下面的示例中,我們使用React Native中的Flexbox建立一個垂直列布局。
該應用顯示三個不同顏色的盒子,這些盒子垂直排列在一個容器中。我們使用“flexDirection”屬性將佈局方向設定為“column”,並使用“justifyContent”屬性在盒子之間均勻地分配可用空間。最後,“alignItems”屬性用於將盒子居中於容器內。
總的來說,此示例演示了Flexbox在React Native中的強大功能和靈活性。
import React from "react";
import { View, Text } from "react-native";
const VerticalColumnLayoutExample = () => {
   return (
      <>
         <Text
            style={{
               fontSize: 20,
               fontWeight: "bold",
               textAlign: "center",
               marginBottom: "1rem"
            }}
         >
            Vertical Column Layout Example
         </Text>
         <View
            style={{
               flexDirection: "column",
               justifyContent: "space-between",
               alignItems: "center",
               height: 340
            }}
         >
            <View style={{ width: 100, height: 100, backgroundColor: "red" }} />
            <View style={{ width: 100, height: 100, backgroundColor: "green" }} />
            <View style={{ width: 100, height: 100, backgroundColor: "blue" }} />
         </View>
      </>
   );
};
export default VerticalColumnLayoutExample;
輸出
示例
在下面的示例中,我們使用React Native中的Flexbox建立一個水平行佈局。
它建立一個具有三個子檢視的檢視,這些子檢視使用“flexDirection”、“justifyContent”和“alignItems”屬性對齊。子檢視也具有背景顏色,以便於視覺區分。此示例展示瞭如何使用這些屬性在React Native中建立不同的佈局。
import React from 'react';
import { View, StyleSheet ,Text} from 'react-native';

const App = () => {
   return (
      <>
         <Text style={{ fontSize: 20, fontWeight: 'bold', textAlign: "center", marginBottom: "0.5rem" }}> Horizontal Row Layout Example</Text>
         <View style={styles.container}>
            <View style={styles.box1}></View>
            <View style={styles.box2}></View>
            <View style={styles.box3}></View>
         </View>
      </>
   );
};

const styles = StyleSheet.create({
   container: {
      flex: 1,
      flexDirection: 'row',
      justifyContent: 'space-evenly',
      alignItems: 'center',
      backgroundColor: 'lightgray',
   },
   box1: {
      width: 100,
      height: 100,
      backgroundColor: 'red',
   },
   box2: {
      width: 100,
      height: 100,
      backgroundColor: 'blue',
   },
   box3: {
      width: 100,
      height: 100,
      backgroundColor: 'green',
   },
});
export default App;
輸出

在本教程中,我們學習瞭如何在React Native中使用Flexbox建立佈局。我們討論了Flexbox的主要屬性,例如flexDirection、justifyContent和alignItems,這些屬性可用於控制容器中元件的佈局。我們看到了如何在React Native中使用Flexbox建立垂直列布局和水平行佈局。
最終,Flexbox是React Native開發人員建立現代且引人入勝的使用者介面(提供良好的使用者體驗)的必備技能。

2K+ 瀏覽量
