- 物聯網ESP32教程
- 首頁
- 物聯網簡要概述
- ESP32介紹
- 在Arduino IDE中安裝ESP32開發板
- 設定RTOS用於雙核和多執行緒操作
- ESP32與MPU6050介面
- ESP32與模擬感測器介面
- ESP32引數設定
- ESP32 SPIFFS儲存(晶片自帶的迷你SD卡)
- ESP32與OLED顯示屏介面
- ESP32上的WiFi
- 使用HTTP透過WiFi傳輸資料
- 使用HTTPS透過WiFi傳輸資料
- 使用MQTT透過WiFi傳輸資料
- 透過藍牙傳輸資料
- 使用NTP客戶端獲取當前時間
- 執行ESP32韌體的(OTA)更新
- ESP32的應用
- 您作為開發人員的下一步
- ESP32物聯網實用資源
- 快速指南
- 實用資源
- 討論
使用HTTP透過WiFi傳輸資料
HTTP(超文字傳輸協議)是最常見的通訊形式之一,使用ESP32,我們可以使用HTTP請求與任何Web伺服器互動。讓我們在本節中瞭解如何操作。
關於HTTP請求的簡要說明
HTTP請求發生在客戶端和伺服器之間。顧名思義,伺服器根據請求向客戶端“提供”資訊。Web伺服器通常提供網頁。例如,當您在網際網路瀏覽器中輸入https://www.linkedin.com/login時,您的PC或筆記型電腦充當客戶端,並向託管linkedin.com的伺服器請求與/login地址對應的頁面。您將收到一個HTML頁面作為返回,然後由您的瀏覽器顯示。
HTTP遵循請求-響應模型,這意味著通訊始終由客戶端發起。伺服器不能無緣無故地與任何客戶端對話,也不能與任何客戶端啟動通訊。通訊必須始終由客戶端以請求的形式發起,伺服器只能響應該請求。伺服器的響應包含狀態程式碼(記得404嗎?這是一個狀態程式碼),以及(如果適用)請求的內容。所有狀態程式碼的列表可以在這裡找到 這裡。
那麼,伺服器如何識別HTTP請求呢?透過請求的結構。HTTP請求遵循一個固定的結構,該結構包含三個部分
請求行後跟回車換行符(CRLF = \r\n)
零個或多個標題行,後跟CRLF和一個空行,再次後跟CRLF
可選正文
典型的HTTP請求如下所示
POST / HTTP/1.1         //Request line, containing request method (POST in this case)
Host: www.example.com   //Headers
                        //Empty line between headers
key1=value1&key2=value2   //Body
伺服器響應如下所示:
HTTP/1.1 200 OK                     //Response line; 200 is the status code
Date: Mon, 23 May 2005 22:38:34 GMT //Headers
Content-Type: text/html; charset=UTF-8
Content-Length: 155
Last-Modified: Wed, 08 Jan 2003 23:11:55 GMT
Server: Apache/1.3.3.7 (Unix) (Red-Hat/Linux)
ETag: "3f80f−1b6−3e1cb03b"
Accept-Ranges: bytes
Connection: close
                                    //Empty line between headers and body
<html>
  <head>
    <title>An Example Page</title>
  </head>
  <body>
    <p>Hello World, this is a very simple HTML document.</p>
  </body>
</html>
事實上,TutorialsPoint本身上有一個關於HTTP請求結構的非常好的教程。它還向您介紹了各種請求方法(GET、POST、PUT等)。在本節中,我們將關注GET和POST方法。
GET請求將所有引數都以請求URL中鍵值對的形式包含在內。例如,如果使用GET而不是POST傳送上面的相同示例請求,它將如下所示:
GET /test/demo_form.php?key1=value1&key2=value2 HTTP/1.1   //Request line
Host: www.example.com                                     //Headers
                                                          //No need for a body
POST請求(正如您現在可能已經猜到的那樣)將引數包含在正文中,而不是URL中。GET和POST之間還有其他一些區別,您可以在這裡閱讀。但關鍵是,您將使用POST與伺服器共享敏感資訊,例如密碼。
程式碼演練
在本節中,我們將從頭開始編寫我們的HTTP請求。有一些庫(如httpClient)專門用於處理ESP32 HTTP請求,這些庫負責構建HTTP請求,但我們將自己構建請求。這給我們帶來了更大的靈活性。在本教程中,我們將限制使用ESP32客戶端模式。ESP32也可以使用HTTP伺服器模式,但這留給您去探索。
我們將使用httpbin.org作為我們的伺服器。它基本上是為測試您的HTTP請求而構建的。您可以使用此伺服器測試GET、POST和各種其他方法。參見 這裡。
程式碼可以在 GitHub 上找到
我們首先包含WiFi庫。
#include <WiFi.h>
接下來,我們將定義一些常量。對於HTTP,使用的埠是80。這是標準的。類似地,我們對HTTPS使用443,對FTP使用21,對DNS使用53,等等。這些是保留的埠號。
const char* ssid = "YOUR_SSID";
const char* password = "YOUR_PASSWORD";

const char* server = "httpbin.org";
const int port = 80;
最後,我們建立我們的WiFiClient物件。
WiFiClient client
在setup中,我們只需使用提供的憑據以station模式連線到WiFi。
void setup() {
   Serial.begin(115200);
   WiFi.mode(WIFI_STA);          //The WiFi is in station mode. The other is the softAP mode
   WiFi.begin(ssid, password);
   while (WiFi.status() != WL_CONNECTED) {
      delay(500);
      Serial.print(".");
   }
   Serial.println("");  Serial.print("WiFi connected to: "); Serial.println(ssid);  Serial.println("IP address: ");  Serial.println(WiFi.localIP());
   delay(2000);
}
loop在這裡變得很重要。HTTP請求就在那裡執行。我們首先讀取ESP32的晶片ID。我們將把它作為引數與我們的姓名一起傳送給伺服器。我們將使用這些引數構建HTTP請求的主體。
void loop() {
   int  conn;
   int chip_id = ESP.getEfuseMac();;
   Serial.printf("  Flash Chip id = %08X\t", chip_id);
   Serial.println();
   Serial.println();
   String body = "ChipId=" + String(chip_id) + "&SentBy=" + "your_name";
   int body_len = body.length();
注意SentBy欄位之前的&。&在HTTP請求中用作不同鍵值對的分隔符。接下來,我們連線到伺服器。
Serial.println(".....");
Serial.println(); Serial.print("For sending parameters, connecting to ");      Serial.println(server);
conn = client.connect(server, port);
POST請求
如果我們的連線成功,client.connect()將返回1。我們在發出請求之前檢查這一點。
if (conn == 1)  {
   Serial.println(); Serial.print("Sending Parameters...");
   //Request
   client.println("POST /post HTTP/1.1");
   //Headers
   client.print("Host: "); client.println(server);
   client.println("Content-Type: application/x−www−form−urlencoded");
   client.print("Content-Length: "); client.println(body_len);
   client.println("Connection: Close");
   client.println();
   //Body
   client.println(body);
   client.println();

   //Wait for server response
   while (client.available() == 0);

   //Print Server Response
   while (client.available()) {
      char c = client.read();
      Serial.write(c);
   }
} else {
   client.stop();
   Serial.println("Connection Failed");
}
如您所見,我們使用client.print()或client.println()傳送我們的請求行。請求、標頭和正文透過註釋清楚地表明。在請求行中,POST /post HTTP/1.1等效於POST http://httpbin.org/post HTTP/1.1。由於我們已經在client.connect(server,port)中提到了伺服器,因此/post指的是伺服器/post URL。
特別是對於POST請求,Content-Length標頭非常重要。如果沒有它,許多伺服器會假設內容長度為0,這意味著沒有正文。Content-Type已保留為application/x−www−form−urlencoded,因為我們的正文表示表單資料。在典型的表單提交中,您將擁有像Name、Address等鍵以及相應的值。您可以擁有其他幾種內容型別。有關完整列表,請參閱 這裡。
Connection: Close標頭告訴伺服器在處理請求後關閉連線。如果您希望在請求處理後保持連線,則可以替代地傳送Connection: Keep-Alive。
這些只是我們可以包含的一些標頭。HTTP標頭的完整列表可以在 這裡 找到。
現在,httpbin.org/post URL通常只是回顯我們的正文。一個示例響應如下所示:
HTTP/1.1 200 OK
Date: Sat, 21 Nov 2020 16:25:47 GMT
Content−Type: application/json
Content−Length: 402
Connection: close
Server: gunicorn/19.9.0
Access−Control−Allow−Origin: *
Access−Control−Allow−Credentials: true
{
   "args": {},
   "data": "",
   "files": {},
   "form": {
      "ChipId": "1780326616",
      "SentBy": "Yash"
   },
   "headers": {
      "Content−Length": "34",
      "Content−Type": "application/x−www−form−urlencoded",
      "Host": "httpbin.org",
      "X-Amzn−Trace−Id": "Root=1−5fb93f8b−574bfb57002c108a1d7958bb"
   },
   "json": null,
   "origin": "183.87.63.113",
   "url": "http://httpbin.org/post"
}
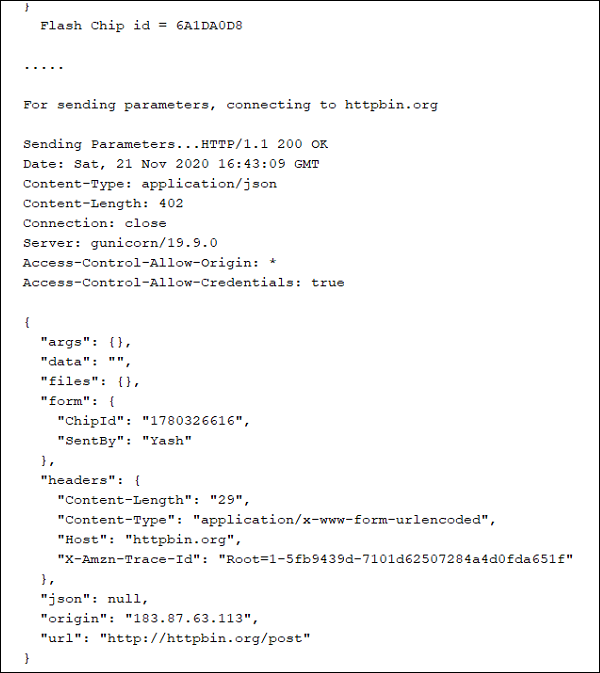
如您所見,“form”欄位中回顯了POST正文的內容。您應該在序列埠監視器上看到類似於上面的內容。另請注意URL欄位。它清楚地表明請求行中的/post地址被解釋為http://httpbin.org/post。
最後,我們將等待5秒鐘,然後結束迴圈,從而再次發出請求。
  delay(5000);
}
GET請求
此時,您可能想知道,將此POST請求轉換為GET請求需要進行哪些更改。實際上,這很簡單。首先,您將呼叫/get地址而不是/post。然後,您將在問號(?)後將正文的內容附加到URL。最後,您將方法替換為GET。此外,不再需要Content-Length和Content−Type標頭,因為您的正文為空。因此,您的請求塊將如下所示:
if (conn == 1) {
   String path = String("/get") + String("?") +body;
   Serial.println(); Serial.print("Sending Parameters...");
   //Request
   client.println("GET "+path+" HTTP/1.1");
   //Headers
   client.print("Host: "); client.println(server);
   client.println("Connection: Close");
   client.println();
   //No Body

   //Wait for server response
   while (client.available() == 0);

   //Print Server Response
   while (client.available()) {
      char c = client.read();
      Serial.write(c);
   }
} else {
   client.stop();
   Serial.println("Connection Failed");
}
相應的響應將如下所示:
HTTP/1.1 200 OK
Date: Tue, 17 Nov 2020 18:05:34 GMT
Content-Type: application/json
Content-Length: 497
Connection: close
Server: gunicorn/19.9.0
Access-Control−Allow−Origin: *
Access-Control-Allow-Credentials: true

{
   "args": {
      "ChipID": "3F:A0:A1:77:0D:84",
      "SentBy": "Yash"
   },
   "headers": {
      "Accept": "*/*",
      "Accept-Encoding": "deflate, gzip",
      "Host": "httpbin.org",
      "User-Agent": "Mozilla/5.0 (Windows NT 10.0; Win64; x64) AppleWebKit/537.36 (KHTML, like Gecko) Chrome/86.0.4240.198 Safari/537.36",
      "X−Amzn−Trace−Id": "Root=1−5fb410ee−3630963b0b7980c959c34038"
   },
   "origin": "206.189.180.4",
   "url": "https://httpbin.org/get?ChipID=3F:A0:A1:77:0D:84&SentBy=Yash"
}
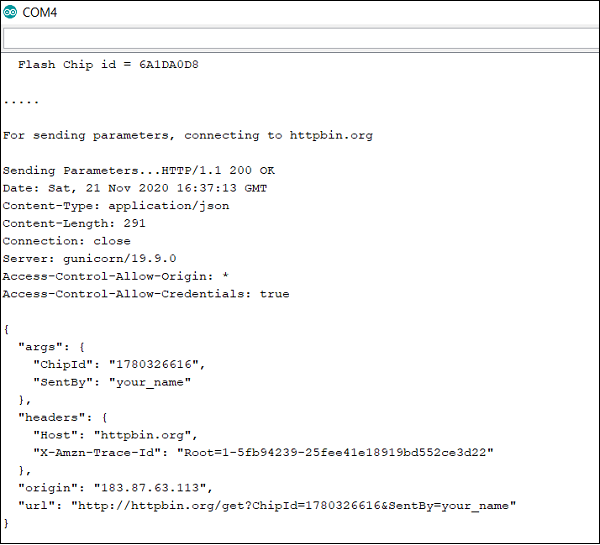
如您所見,傳送到伺服器的引數現在返回在args欄位中,因為它們作為URL中的引數傳送。
恭喜!!您已成功使用ESP32傳送HTTP請求。