- 物聯網ESP32教程
- 主頁
- 物聯網簡要概述
- ESP32介紹
- 在Arduino IDE中安裝ESP32開發板
- 設定RTOS以進行雙核和多執行緒操作
- ESP32與MPU6050介面
- ESP32與模擬感測器介面
- ESP32引數設定
- ESP32 SPIFFS儲存(晶片內部的迷你SD卡)
- ESP32與OLED顯示屏介面
- ESP32上的WiFi
- 使用HTTP透過WiFi傳輸資料
- 使用HTTPS透過WiFi傳輸資料
- 使用MQTT透過WiFi傳輸資料
- 透過藍牙傳輸資料
- 使用NTP客戶端獲取當前時間
- 執行ESP32韌體的(OTA)更新
- ESP32的應用
- 開發人員的後續步驟
- 物聯網ESP32實用資源
- 快速指南
- 實用資源
- 討論
從NTP伺服器獲取當前時間
在物聯網裝置中,時間戳成為裝置和伺服器之間交換的資料包的重要屬性。因此,始終在裝置上擁有正確的時間是必要的。一種方法是使用與ESP32連線的RTC(即時時鐘)。您甚至可以使用ESP32的內部RTC。一旦給定參考時間,它就可以正確輸出未來的時間戳。但是您將如何獲取參考時間呢?一種方法是在程式設計ESP32時硬編碼當前時間。但這並不是一個簡潔的方法。其次,RTC容易漂移,定期向其提供參考時間戳是一個好主意。在本章中,我們將瞭解如何從NTP伺服器獲取當前時間,將其一次性饋送到ESP32的內部RTC,並列印未來的時間戳。
關於NTP的簡要說明
NTP代表網路時間協議。它是一種用於計算機系統之間時鐘同步的協議。通俗地說,有一個伺服器位於某個地方,它精確地維護時間。每當客戶端向NTP伺服器請求當前時間時,它都會發送精確到100毫秒的時間。您可以在此處閱讀更多關於NTP的資訊。對於ESP32,有一個內建的time庫來處理與NTP伺服器的所有通訊。讓我們在下面的程式碼演練中探索該庫的使用。
程式碼演練
我們將使用一個內建示例進行此演練。它可以在檔案 -> 示例 -> ESP32 -> 時間 -> SimpleTime中找到。它也可以在GitHub上找到。
我們首先包含WiFi和時間庫。
#include <WiFi.h>
#include "time.h"
接下來,我們定義一些全域性變數。將WiFi SSID和密碼替換為您WiFi的相應值。接下來,我們定義了NTP伺服器的URL。gmtOffset_sec指的是您的時區與GMT或密切相關的UTC的秒數偏移。例如,在印度,時區比UTC提前5小時30分鐘,gmtOffset_sec將為(5+0.5)*3600 = 19800。
daylightOffset_sec與實行夏令時的國家相關。在其他國家,可以簡單地將其設定為0。
const char* ssid       = "YOUR_SSID";
const char* password   = "YOUR_PASS";

const char* ntpServer = "pool.ntp.org";
const long  gmtOffset_sec = 3600;
const int   daylightOffset_sec = 3600;
接下來,您可以看到一個函式printLocalTime()。它只是從內部RTC獲取本地時間並將其列印到序列埠。
void printLocalTime()
{
   struct tm timeinfo;
   if(!getLocalTime(&timeinfo)){
      Serial.println("Failed to obtain time");
      return;
   }
   Serial.println(&timeinfo, "%A, %B %d %Y %H:%M:%S");
}
您可能在這裡有三個問題:
- struct tm在哪裡定義?
- getLocalTime()函式在哪裡定義?
- %A、%B等格式化程式是什麼?
struct tm在我們在頂部包含的time.h檔案中定義。事實上,時間庫不是ESP32特有的庫。它是一個與ESP32相容的AVR庫。您可以在此處找到原始碼。如果您檢視time.h檔案,您將看到struct tm。
struct tm {
   int8_t   tm_sec; /**< seconds after the minute - [ 0 to 59 ] */
   int8_t   tm_min; /**< minutes after the hour - [ 0 to 59 ] */
   int8_t   tm_hour; /**< hours since midnight - [ 0 to 23 ] */
   int8_t   tm_mday; /**< day of the month - [ 1 to 31 ] */
   int8_t   tm_wday; /**< days since Sunday - [ 0 to 6 ] */
   int8_t   tm_mon; /**< months since January - [ 0 to 11 ] */
   int16_t  tm_year; /**< years since 1900 */
   int16_t  tm_yday; /**< days since January 1 - [ 0 to 365 ] */
   int16_t  tm_isdst; /**< Daylight Saving Time flag */
};
現在,getLocalTime函式是ESP32特有的。它在esp32-hal-time.c檔案中定義。它是ESP32的Arduino核心的一部分,不需要在Arduino中單獨包含。您可以在此處檢視原始碼。
現在,格式化程式的含義如下:
/*
   %a Abbreviated weekday name
   %A Full weekday name
   %b Abbreviated month name
   %B Full month name
   %c Date and time representation for your locale
   %d Day of month as a decimal number (01−31)
   %H Hour in 24-hour format (00−23)
   %I Hour in 12-hour format (01−12)
   %j Day of year as decimal number (001−366)
   %m Month as decimal number (01−12)
   %M Minute as decimal number (00−59)
   %p Current locale's A.M./P.M. indicator for 12−hour clock
   %S Second as decimal number (00−59)
   %U Week of year as decimal number,  Sunday as first day of week (00−51)
   %w Weekday as decimal number (0−6; Sunday is 0)
   %W Week of year as decimal number, Monday as first day of week (00−51)
   %x Date representation for current locale
   %X Time representation for current locale
   %y Year without century, as decimal number (00−99)
   %Y Year with century, as decimal number
   %z %Z Time-zone name or abbreviation, (no characters if time zone is unknown)
   %% Percent sign
   You can include text literals (such as spaces and colons) to make a neater display or for padding between adjoining columns.
   You can suppress the display of leading zeroes  by using the "#" character  (%#d, %#H, %#I, %#j, %#m, %#M, %#S, %#U, %#w, %#W, %#y, %#Y)
*/
因此,使用我們的%A、%B %d %Y %H:%M:%S格式方案,我們可以預期輸出類似於以下內容:星期日,2020年11月15日14:51:30。
現在,讓我們來看setup和loop。在setup中,我們初始化Serial,使用我們的WiFi連線到網際網路,並使用configTime()函式配置ESP32的內部RTC。正如您所看到的,該函式接受三個引數:gmtOffset、daylightOffset和ntpServer。它將從ntpServer獲取UTC時間,在本地應用gmtOffset和daylightOffset,並返回輸出時間。此函式與getLocalTime一樣,在esp32-hal-time.c檔案中定義。正如您從檔案中看到的,TCP/IP協議用於從NTP伺服器獲取時間。
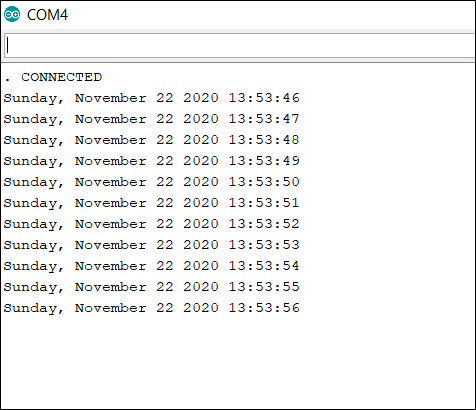
一旦我們從NTP伺服器獲得時間並將其饋送到ESP32的內部RTC,我們就不再需要WiFi了。因此,我們斷開WiFi連線,並在迴圈中每秒保持列印時間。您可以在序列埠監視器上看到時間每列印一次就會增加一秒。這是因為ESP32的內部RTC在獲得參考時間後會維護時間。
void setup()
{
   Serial.begin(115200);

   //connect to WiFi
   Serial.printf("Connecting to %s ", ssid);
   WiFi.begin(ssid, password);
   while (WiFi.status() != WL_CONNECTED) {
      delay(500);
      Serial.print(".");
   }
   Serial.println(" CONNECTED");

   //init and get the time
   configTime(gmtOffset_sec, daylightOffset_sec, ntpServer);
   printLocalTime();

   //disconnect WiFi as it's no longer needed
   WiFi.disconnect(true);
   WiFi.mode(WIFI_OFF);
}
void loop() {
  delay(1000);
  printLocalTime();
}
序列埠監視器輸出將如下所示:
就是這樣。您已經學習瞭如何從NTP伺服器獲取正確的時間並配置ESP32的內部RTC。現在,在您傳送到伺服器的任何資料包中,您可以新增時間戳。