- Cucumber 教程
- Cucumber - 首頁
- Cucumber - 概述
- Cucumber - 環境配置
- Cucumber - Gherkin 語法
- Cucumber - 特性 (Features)
- Cucumber - 場景 (Scenarios)
- Cucumber - 註解
- Cucumber - 場景大綱 (Scenario Outline)
- Cucumber - 標籤 (Tags)
- Cucumber - 資料表
- Cucumber - 註釋
- Cucumber - Hooks (鉤子函式)
- Cucumber - 命令列選項
- Cucumber - JUnit 執行器
- Cucumber - 報告
- Cucumber - 除錯
- Cucumber - Java測試
- Cucumber - Ruby 測試
- Cucumber 有用資源
- Cucumber - 快速指南
- Cucumber - 有用資源
- Cucumber - 討論
Cucumber - Java測試
使用 Java 執行 Cucumber 測試的步驟如下。
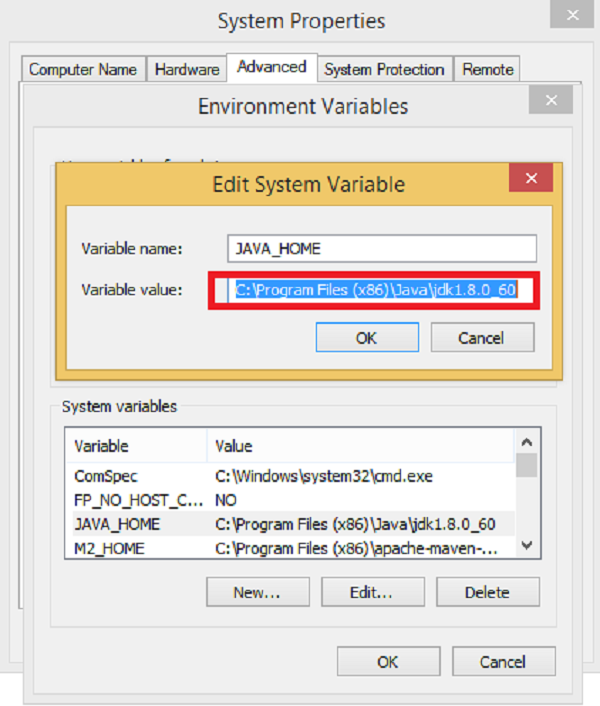
步驟 1 - 安裝 Java -
從以下連結下載 JDK 和 JRE:
http://www.oracle.com/technetwork/java/javase/downloads/index.html
接受許可協議。
安裝 JDK 和 JRE。
設定環境變數,如下圖所示。
步驟 2 - 安裝 Eclipse IDE -
確保您的機器上已安裝 JAVA。
從 https://eclipse.org/downloads/ 下載 Eclipse
解壓縮並安裝 Eclipse。
步驟 3 - 安裝 Maven -
下載 Maven - https://maven.apache.org/download.cgi
解壓縮檔案並記住位置。
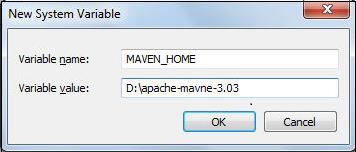
建立環境變數 MAVEN_HOME,如下圖所示。
編輯 Path 變數幷包含 Maven。
從 Eclipse 下載 Maven 外掛
開啟 Eclipse。
轉到 幫助 → Eclipse Marketplace → 搜尋 maven → Maven Integration for Eclipse → 安裝
步驟 4 - 使用 Maven 配置 Cucumber。
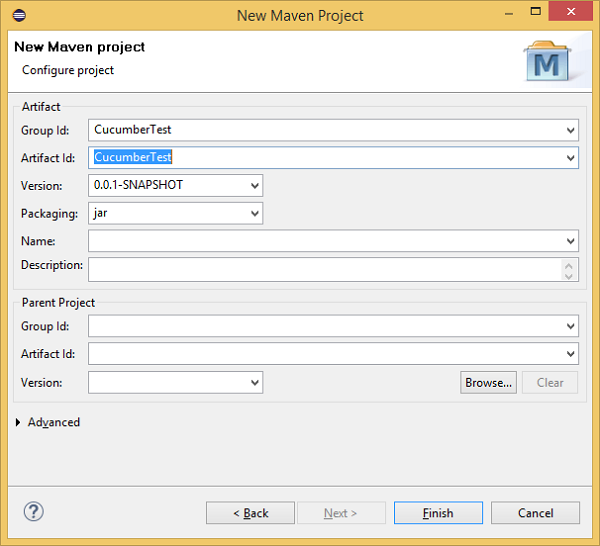
建立一個 Maven 專案。
轉到 檔案 → 新建 → 其它 → Maven → Maven 專案 → 下一步。
提供 Group Id(Group Id 用於在所有專案中唯一標識您的專案)。
提供 Artifact Id(Artifact Id 是 jar 檔案的名稱,不包含版本號。您可以選擇任何小寫名稱)。
單擊完成。
步驟 5 - 開啟 pom.xml -
轉到 Eclipse 左側的包資源管理器。
展開專案 CucumberTest。
找到 pom.xml 檔案。
右鍵單擊並選擇“使用文字編輯器開啟”選項。
步驟 6 - 新增 Selenium 的依賴項 - 這將指示 Maven 從中央儲存庫下載 Selenium jar 檔案到本地儲存庫。
在專案標籤內,開啟處於編輯模式的 pom.xml,建立依賴項標籤(<dependencies></dependencies>)。
在 dependencies 標籤內,建立 dependency 標籤(<dependency></dependency>)。
在 dependency 標籤內提供以下資訊。
<dependency>
   <groupId>org.seleniumhq.selenium</groupId>
   <artifactId>selenium-java</artifactId>
   <version>2.47.1</version>
</dependency>
步驟 7 - 新增 Cucumber-Java 的依賴項 - 這將指示 Maven 從中央儲存庫下載 Cucumber 檔案到本地儲存庫。
建立另一個 dependency 標籤。
在 dependency 標籤內提供以下資訊。
<dependency>
   <groupId>info.cukes</groupId>
   <artifactId>cucumber-java</artifactId>
   <version>1.0.2</version>
   <scope>test</scope>
</dependency>
步驟 8 - 新增 Cucumber-JUnit 的依賴項 - 這將指示 Maven 從中央儲存庫下載 Cucumber JUnit 檔案到本地儲存庫。
建立另一個 dependency 標籤。
在 dependency 標籤內提供以下資訊。
<dependency>
   <groupId>info.cukes</groupId>
   <artifactId>cucumber-junit</artifactId>
   <version>1.0.2</version>
   <scope>test</scope>
</dependency>
步驟 9 - 新增 JUnit 的依賴項 - 這將指示 Maven 從中央儲存庫下載 JUnit 檔案到本地儲存庫。
建立另一個 dependency 標籤。
在 dependency 標籤內提供以下資訊。
<dependency>
   <groupId>junit</groupId>
   <artifactId>junit</artifactId>
   <version>4.10</version>
   <scope>test</scope>
</dependency>
步驟 10 - 驗證二進位制檔案。
成功編輯 pom.xml 後,儲存它。
轉到 專案 → 清理 - 這將需要幾分鐘。
您將能夠看到 Maven 儲存庫。
步驟 11 - 在 src/test/java 下建立一個名為 cucumberJava 的包。
步驟 12 - 建立特性檔案
選擇並右鍵單擊包大綱。
單擊“新建”檔案。
為檔案命名,例如 cucumberJava.feature。
在檔案中寫入以下文字並儲存。
特性: CucumberJava
場景: 登入功能存在
給定我已開啟瀏覽器
當開啟 Facebook 網站時
則登入按鈕應該存在
步驟 13 - 建立步驟定義檔案 -
選擇並右鍵單擊包大綱。
單擊“新建”檔案。
為檔案命名,例如 annotation.java。
在檔案中寫入以下文字並儲存。
package CucumberJava;

import org.openqa.selenium.By;
import org.openqa.selenium.WebDriver;
import org.openqa.selenium.firefox.FirefoxDriver;

import cucumber.annotation.en.Given;
import cucumber.annotation.en.Then;
import cucumber.annotation.en.When;

public class cucumberJava {
   WebDriver driver = null;

   @Given("^I have open the browser$")
   public void openBrowser() {
      driver = new FirefoxDriver();
   }

   @When("^I open Facebook website$")
   public void goToFacebook() {
      driver.navigate().to("https://#/");
   }

   @Then("^Login button should exits$")
   public void loginButton() {
      if(driver.findElement(By.id("u_0_v")).isEnabled()) {
         System.out.println("Test 1 Pass");
      } else {
         System.out.println("Test 1 Fail");
      }
      driver.close();
   }
}
步驟 14 - 建立執行器類檔案。
選擇並右鍵單擊包大綱。
單擊“新建”檔案。
將檔名命名為 runTest.java。
在檔案中寫入以下文字並儲存。
package cucumberJava;

import org.junit.runner.RunWith;
import cucumber.junit.Cucumber;

@RunWith(Cucumber.class)
@Cucumber.Options(format = {"pretty", "html:target/cucumber"})

public class runTest { }
步驟 15 - 使用以下選項執行測試 -
從包資源管理器中選擇 runTest.java 檔案。
右鍵單擊並選擇“以...方式執行”選項。
選擇 JUnit 測試。
執行後,您將觀察到以下情況 -
將開啟一個 Firefox 瀏覽器例項。
它將在瀏覽器上開啟 Facebook 登入頁面。
它將檢測登入按鈕。
瀏覽器將關閉。
在 JUnit 視窗中,您將看到一個帶有綠色勾號的場景,表示測試執行成功。