- Apache Tapestry 教程
- Apache Tapestry - 首頁
- Apache Tapestry - 概述
- Apache Tapestry - 架構
- Apache Tapestry - 安裝
- Apache Tapestry - 快速入門
- Apache Tapestry - 專案佈局
- 約定優於配置
- Apache Tapestry - 註解
- 頁面和元件
- Apache Tapestry - 模板
- Apache Tapestry - 元件
- 內建元件
- 表單和驗證元件
- Apache Tapestry - Ajax 元件
- Apache Tapestry - Hibernate
- Apache Tapestry - 儲存
- 高階功能
- Apache Tapestry 有用資源
- Apache Tapestry 快速指南
- Apache Tapestry - 有用資源
- Apache Tapestry - 討論
Apache Tapestry 快速指南
Apache Tapestry - 概述
Apache Tapestry 是一個用 Java 編寫的開源 Web 框架。它是一個基於元件的 Web 框架。Tapestry 元件是 Java 類。它們既不繼承自框架特定的基類,也不實現介面,它們只是普通的 POJO(普通舊 Java 物件)。
Tapestry 使用的 Java 的重要特性是註解。Tapestry 網頁是透過使用一個或多個元件構建的,每個元件都有一個基於 XML 的模板和用許多 Tapestry 註解裝飾的元件類。Tapestry 可以建立任何東西,從小型單頁 Web 應用程式到包含數百個頁面的大型應用程式。
Tapestry 的優勢
Tapestry 提供的一些優勢包括:
- 高度可擴充套件的 Web 應用程式。
- 自適應 API。
- 快速且成熟的框架。
- 持久狀態儲存管理。
- 內建控制反轉。
Tapestry 的特性
Tapestry 具有以下特性:
- 即時類過載
- 清晰詳細的異常報告
- 靜態結構,動態行為。
- 廣泛使用普通舊 Java 物件 (POJO)
- 少寫程式碼,多交付。
為什麼選擇 Tapestry?
Java 已經有很多 Web 框架,例如 JSP、Struts 等,那麼為什麼還需要另一個框架呢?如今的大多數 Java Web 框架都很複雜,學習曲線陡峭。它們過時了,並且每次更新都需要編譯、測試和部署週期。
另一方面,Tapestry 透過提供即時類過載,為 Web 應用程式程式設計提供了一種現代方法。雖然其他框架引入了許多介面、抽象類和基類,但 Tapestry 只引入了一小部分註解,並且仍然能夠編寫具有豐富的 AJAX 支援的大型應用程式。
Apache Tapestry - 架構
Tapestry 儘可能地使用 Java 的現有特性。例如,所有 Tapestry 頁面都只是 POJO。它不強制使用任何自定義介面或基類來編寫應用程式。相反,它使用註解(擴充套件 Java 類功能的輕量級選項)來提供功能。它基於經過實戰檢驗的Java Servlet API,並實現為 Servlet 過濾器。它為 Web 應用程式帶來了新的維度,並且程式設計非常簡單、靈活、易懂和健壯。
工作流程
讓我們討論一下請求 Tapestry 頁面時發生的一系列操作。

步驟 1 - Java Servlet 接收頁面請求。此 Java Servlet 以這樣一種方式配置,即傳入請求將轉發到 Tapestry。配置在web.xml中完成,如下程式所示。Filter 和 Filter Mapping 標籤將所有請求重定向到Tapestry Filter。
<!DOCTYPE web-app PUBLIC "-//Sun Microsystems, Inc.//DTD Web Application 2.3//EN"
   "http://java.sun.com/dtd/web-app_2_3.dtd">
<web-app>
   <display-name>My Tapestry Application</display-name>
   <context-param>
      <param-name>tapestry.app-package</param-name>
      <param-value>org.example.myapp</param-value>
   </context-param>
   <filter>
      <filter-name>app</filter-name>
      <filter-class>org.apache.tapestry5.TapestryFilter</filter-class>
   </filter>
   <filter-mapping>
      <filter-name>app</filter-name>
      <url-pattern>/*</url-pattern>
   </filter-mapping>
</web-app>
步驟 2 - Tapestry Filter 透過其Service()方法呼叫HttpServletRequestHandler服務。
步驟 3 - HttpServletRequestHandler 將請求和響應儲存在RequestGlobals中。它還將請求和響應包裝為 Request 和 Response 物件,並將其傳送到 RequestHandler。
步驟 4 - RequestHandler 是 Servlet API 的HttpServletRequest之上的抽象。Tapestry 的一些突出特性是在RequestHandler部分完成的。可以透過在 RequestHandler 中編寫過濾器來擴充套件 Tapestry 的特性。RequestHandler 提供了幾個內建過濾器,包括:
CheckForUpdates Filter - 負責即時類過載。此過濾器檢查 Java 類是否有更改,並在必要時更新應用程式。
Localization Filter - 識別使用者的地理位置,併為應用程式提供本地化支援。
StaticFiles Filter - 識別靜態請求並中止程序。一旦程序中止,Java Servlet 就會接管並處理請求。
Error Filter - 捕獲未捕獲的異常並顯示異常報告頁面。
RequestHandler 還修改並存儲 RequestQlobals 中的請求和響應,並呼叫 MasterDispatcher 服務。
步驟 5 - MasterDispatcher 負責透過按特定順序呼叫多個排程程式來呈現頁面。MasterDispatcher 呼叫的四個主要排程程式如下:
RootPath Dispatcher - 它識別請求的根路徑“/”,並將其呈現為起始頁面。
Asset Dispatcher - 它透過檢查 url 模式 /assets/ 來識別資產(Java 資產)請求,並將請求的資產作為位元組流傳送。
PageRender Dispatcher - Tapestry 的大部分操作都在 PageRender Dispatcher 和下一個排程程式 Component Dispatcher 中完成。此排程程式識別該請求的特定頁面及其啟用上下文(額外資訊)。然後它呈現該特定頁面並將其傳送到客戶端。例如,如果請求 url 為 /product/12123434,則排程程式將檢查是否存在名為 product/12123434 的類。如果找到,它會呼叫 product/12123434 類,生成響應並將其傳送到客戶端。如果沒有找到,它會檢查 product 類。如果找到,它會呼叫 product 類並附帶額外資訊 121234434,生成響應並將其傳送到客戶端。此額外資訊稱為啟用上下文。如果沒有找到任何類,它只會將請求轉發到 Component Dispatcher。
Component Dispatcher - Component Dispatcher 將頁面的 URL 與模式匹配 – /<class_name>/<component_id>:<event_type>/<activation_context>。例如,/product/grid:sort/asc 表示 product 類、grid 元件、sort 事件型別和 asc 啟用上下文。此處,event_type 是可選的,如果未提供,則將觸發預設事件型別 action。通常,元件排程程式的響應是向客戶端傳送重定向。大多數情況下,重定向將在下一個請求中匹配 PageRender Dispatcher,並將正確的響應傳送到客戶端。
Apache Tapestry - 安裝
在本章中,我們將討論如何在我們的機器上安裝 Tapestry。
先決條件
Tapestry 唯一依賴的是核心 Java。Tapestry 是獨立開發的,沒有使用任何第三方庫/框架。即使 Tapestry 使用的 IoC 庫也是從頭開始開發的。用 Tapestry 編寫的 Web 應用程式本身就可以從控制檯構建和部署。
我們可以使用Maven、Eclipse和Jetty來改善開發體驗。Maven 提供快速啟動應用程式模板以及在 Jetty(Java 事實上的開發伺服器)中託管應用程式的選項。Eclipse 提供了廣泛的專案管理功能,並且與 Maven 整合良好。
理想的 Tapestry 應用程式開發需要以下內容:
- Java 1.6 或更高版本
- Apache Maven
- Eclipse IDE
- Jetty 伺服器
驗證 Maven 安裝
希望您已經在您的機器上安裝了 Maven。要驗證 Maven 安裝,請鍵入以下命令:
mvn --version
您可能會看到如下所示的響應:
Apache Maven 3.3.9 (bb52d8502b132ec0a5a3f4c09453c07478323dc5; 2015-1110T22:11:47+05:30)
Maven home: /Users/workspace/maven/apache-maven-3.3.9
Java version: 1.8.0_92, vendor: Oracle Corporation
Java home: /Library/Java/JavaVirtualMachines/jdk1.8.0_92.jdk/Contents/Home/jre
Default locale: en_US, platform encoding: UTF-8
OS name: "mac os x", version: "10.11.4", arch: "x86_64", family: "mac"
如果未安裝 Maven,請訪問Maven網站下載並安裝最新版本的 Maven。
下載 Tapestry
Tapestry 的最新版本是 5.4,可以從Tapestry網站下載。下載二進位制包就足夠了。如果我們使用 Maven 快速入門模板,則無需單獨下載 Tapestry。Maven 會自動下載必要的 Tapestry Jar 檔案並配置應用程式。我們將在下一章討論如何使用 Maven 建立基本的 Tapestry 應用程式。
Apache Tapestry - 快速入門
安裝 Tapestry 後,讓我們使用 Maven 建立一個新的初始專案,如下所示:
$ mvn archetype:generate -DarchetypeCatalog=http://tapestry.apache.org
您可能會看到如下所示的響應:
[INFO] Scanning for projects...
[INFO]
[INFO] ---------------------------------------------------------------------------------
[INFO] Building Maven Stub Project (No POM) 1
[INFO] ---------------------------------------------------------------------------------
[INFO]
[INFO] >>> maven-archetype-plugin:2.4:generate (default-cli) >
generatesources @ standalone-pom >>>
[INFO]
[INFO] <<< maven-archetype-plugin:2.4:generate (default-cli)
< generatesources @ standalone-pom <<<
[INFO]
[INFO] --- maven-archetype-plugin:2.4:generate (default-cli) @ standalone-pom ---
[INFO] Generating project in Interactive mode
[INFO] No archetype defined. Using maven-archetype-quickstart
(org.apache.maven.archetypes:maven-archetype-quickstart:1.0)
在 Maven 完成所有操作後,選擇原型以建立Tapestry 5 快速入門專案,如下所示:
選擇原型 -
https://tapestry.apache.org → org.apache.tapestry:quickstart(Tapestry 5 快速入門專案)
https://tapestry.apache.org → org.apache.tapestry:tapestry-archetype(Tapestry 4.1.6 原型)
選擇一個數字或應用過濾器(格式:[groupId:]artifactId,區分大小寫包含)::1
現在您將收到如下所示的響應:
Choose org.apache.tapestry:quickstart version:
1: 5.0.19
2: 5.1.0.5
3: 5.2.6
4: 5.3.7
5: 5.4.1
提取快速入門版本號,如下所示:
Choose a number: 5: 5
此處,快速入門專案為選項 5“5.4.1”獲取版本。現在,Tapestry 原型會依次詢問以下資訊:
5.1 groupId - 定義屬性“groupId”的值::com.example
5.2 artifactId - 定義屬性“artifactId”的值::Myapp
5.3 version - 定義屬性“version”的值:1.0-SNAPSHOT:
5.4 package name - 定義屬性“package”的值:com.example::com.example.Myapp
現在您的螢幕會向您請求確認:
確認屬性配置 -
groupId - com.example
artifactId - Myapp
version - 1.0-SNAPSHOT
package - com.example.Myapp
驗證所有屬性,並使用以下所示的選項確認更改:
Y: : Y
您將看到如下所示的螢幕。
[INFO] ---------------------------------------------------------------------------------
[INFO] Using following parameters for creating project from Archetype: quickstart:5.4.1
[INFO] ---------------------------------------------------------------------------------
[INFO] Parameter: groupId, Value: com.example
[INFO] Parameter: artifactId, Value: Myapp
[INFO] Parameter: version, Value: 1.0-SNAPSHOT
[INFO] Parameter: package, Value: com.example.Myapp
[INFO] Parameter: packageInPathFormat, Value: com/example/Myapp
[INFO] Parameter: package, Value: com.example.Myapp
[INFO] Parameter: version, Value: 1.0-SNAPSHOT
[INFO] Parameter: groupId, Value: com.example
[INFO] Parameter: artifactId, Value: Myapp
[WARNING] Don't override file /Users/workspace/tapestry/Myapp/src/test/java
[WARNING] Don't override file /Users/workspace/tapestry/Myapp/src/main/webapp
[WARNING] Don't override file /Users/workspace/tapestry/Myapp/src/main/resources/com/
example/Myapp
[WARNING] Don't override file /Users/workspace/tapestry/Myapp/src/test/resource
[WARNING] Don't override file /Users/workspace/tapestry/Myapp/src/test/conf
[WARNING] Don't override file /Users/workspace/tapestry/Myapp/src/site
[INFO] project created from Archetype in dir: /Users/workspace/tapestry/Myapp
[INFO] ---------------------------------------------------------------------------------
[INFO] BUILD SUCCESS
[INFO] ---------------------------------------------------------------------------------
[INFO] Total time: 11:28 min
[INFO] Finished at: 2016-09-14T00:47:23+05:30
[INFO] Final Memory: 14M/142M
[INFO] ---------------------------------------------------------------------------------
此處,您已成功構建了 Tapestry 快速入門專案。使用以下命令移動到新建立的Myapp目錄的位置,並開始編碼。
cd Myapp
執行應用程式
要執行骨架專案,請使用以下命令。
mvn jetty:run -Dtapestry.execution-mode=development
您將看到如下螢幕,
[INFO] Scanning for projects...
[INFO]
[INFO] ---------------------------------------------------------------------------------
[INFO] Building Myapp Tapestry 5 Application 1.0-SNAPSHOT
[INFO] ---------------------------------------------------------------------------------
........
........
........
Application 'app' (version 1.0-SNAPSHOT-DEV) startup time: 346 ms to build IoC
Registry, 1,246 ms overall.
 ______                  __             ____
/_  __/__ ____  ___ ___ / /_______ __  / __/
 / / / _ `/ _ \/ -_|_-</ __/ __/ // / /__ \
/_/  \_,_/ .__/\__/___/\__/_/  \_, / /____/
        /_/                   /___/  5.4.1 (development mode)
[INFO] Started SelectChannelConnector@0.0.0.0:8080
[INFO] Started Jetty Server
目前,我們已經在 Tapestry 中建立了一個基本的快速入門專案。要在 Web 瀏覽器中檢視正在執行的應用程式,只需在位址列中鍵入以下 URL 並按 Enter 鍵:
https://:8080/myapp
此處,myapp是應用程式的名稱,開發模式下應用程式的預設埠為 8080。
使用 Eclipse
在上一章中,我們討論瞭如何在 CLI 中建立 Tapestry 快速入門應用程式。本章說明如何在Eclipse IDE中建立骨架應用程式。
讓我們使用 Maven 原型建立骨架應用程式。要配置新的應用程式,您可以按照以下步驟操作。
步驟 1:開啟 Eclipse IDE
開啟您的 Eclipse 並選擇 File → New → Project… → 選項,如下面的螢幕截圖所示。

現在,選擇 Maven → Maven project 選項。
注意 - 如果 Maven 未配置,則配置並建立一個專案。
選擇 Maven 專案後,單擊 Next,然後再次單擊 Next 按鈕。

之後,您將看到一個螢幕,您應該在其中選擇配置選項。配置完成後,您將看到以下螢幕。

步驟 2:目錄配置
完成第一步後,您應該單擊新增遠端目錄。然後新增以下更改,如下面的螢幕截圖所示。

現在,Apache Tapestry 目錄已新增。然後,選擇過濾器選項 org.apache.tapestry quickstart 5.4.1,如下所示。

然後單擊 Next,將出現以下螢幕。

步驟 3:配置 GroupId、ArtifactId、版本和包
將以下更改新增到 Tapestry 目錄配置中。

然後單擊 Finish 按鈕,現在我們建立了第一個骨架應用程式。第一次使用 Maven 時,專案建立可能需要一段時間,因為 Maven 會下載 Maven、Jetty 和 Tapestry 的許多 JAR 依賴項。Maven 完成後,您將在 Package Explorer 檢視中看到一個新目錄 MyFirstApplication。
步驟 4:使用 Jetty 伺服器執行應用程式
您可以使用 Maven 直接執行 Jetty。在 Package Explorer 檢視中右鍵單擊 MyFirstApplication 專案,然後選擇 Run As → Maven Build…,您將看到如下所示的螢幕。

在配置對話方塊中,將 goals 選項輸入為“jetty:run”,然後單擊 Run 按鈕。

Jetty 初始化後,您將在控制檯中看到以下螢幕。

步驟 5:在 Web 瀏覽器中執行
鍵入以下 URL 以在 Web 瀏覽器中執行應用程式 -
https://loclhost:8080/MyFirstApplication

步驟 6:停止 Jetty 伺服器
要停止 Jetty 伺服器,請單擊控制檯中的紅色方塊圖示,如下所示。

Apache Tapestry - 專案佈局
這是由Maven Quickstart CLI建立的原始碼的佈局。此外,這也是標準 Tapestry 應用程式的建議佈局。
├── build.gradle
├── gradle
│   └── wrapper
│       ├── gradle-wrapper.jar
│       └── gradle-wrapper.properties
├── gradlew
├── gradlew.bat
├── pom.xml
├── src
│   ├── main
│   │   ├── java
│   │   │   └── com
│   │   │       └── example
│   │   │           └── MyFirstApplication
│   │   │               ├── components
│   │   │               ├── data
│   │   │               ├── entities
│   │   │               ├── pages
│   │   │               └── services
│   │   ├── resources
│   │   │   ├── com
│   │   │   │   └── example
│   │   │   │       └── MyFirstApplication
│   │   │   │           ├── components
│   │   │   │           ├── logback.xml
│   │   │   │           └── pages
│   │   │   │               └── Index.properties
│   │   │   ├── hibernate.cfg.xml
│   │   │   └── log4j.properties
│   │   └── webapp
│   │       ├── favicon.ico
│   │       ├── images
│   │       │   └── tapestry.png
│   │       ├── mybootstrap
│   │       │   ├── css
│   │       │   │   ├── bootstrap.css
│   │       │   │   └── bootstrap-theme.css
│   │       │   ├── fonts
│                   ├── glyphicons-halflings-regular.eot
│   │       │   │   ├── glyphicons-halflings-regular.svg
│   │       │   │   ├── glyphicons-halflings-regular.ttf
│   │       │   │   ├── glyphicons-halflings-regular.woff
│   │       │   │   └── glyphicons-halflings-regular.woff2
│   │       │   └── js
│   │       └── WEB-INF
│   │           ├── app.properties
│   │           └── web.xml
│   ├── site
│   │   ├── apt
│   │   │   └── index.apt
│   │   └── site.xml
│   └── test
│       ├── conf
│       │   ├── testng.xml
│       │   └── webdefault.xml
│       ├── java
│       │   └── PLACEHOLDER
│       └── resources
│           └── PLACEHOLDER
└── target
   ├── classes
   │   ├── com
   │   │   └── example
   │   │       └── MyFirstApplication
   │   │           ├── components
   │   │           ├── data
   │   │           ├── entities
   │   │           ├── logback.xml
   │   │           ├── pages
   │   │           │   └── Index.properties
   │   │           └── services
   │   ├── hibernate.cfg.xml
   │   └── log4j.properties
   ├── m2e-wtp
   │   └── web-resources
   │       └── META-INF
   │           ├── MANIFEST.MF
   │           └── maven
   │               └── com.example
   │                   └──MyFirstApplication
   │                     ├── pom.properties
   │                       └── pom.xml
   ├── test-classes
   │   └── PLACEHOLDER
   └── work
      ├── jsp
      ├── sampleapp.properties
      └── sampleapp.script
預設佈局類似於WAR 內部檔案格式。使用 WAR 格式有助於在不打包和部署的情況下執行應用程式。此佈局只是一個建議,但如果應用程式在部署時打包成正確的 WAR 格式,則可以以任何格式進行排列。
原始碼可以分為以下四個主要部分。
Java 程式碼 - 所有 Java 原始碼都放置在/src/main/java資料夾下。Tapestry 頁面類放置在“Pages”資料夾下,Tapestry 元件類放置在 components 資料夾下。Tapestry 服務類放置在 services 資料夾下。
類路徑資源 - 在 Tapestry 中,大多數類都有關聯的資源(XML 模板、JavaScript 檔案等)。這些資源放置在/src/main/resources資料夾下。Tapestry 頁面類在其關聯的資源位於“Pages”資料夾下,Tapestry 元件類在其關聯的資源位於 Components 資料夾下。這些資源被打包到 WAR 的WEB-INF/classes資料夾中。
上下文資源 - 它們是 Web 應用程式的靜態資源,如影像、樣式表和 JavaScript 庫/ 模組。它們通常放置在 /src/main/webapp資料夾下,被稱為上下文資源。此外,Web 應用程式描述檔案(Java Servlet),web.xml 放置在上下文資源的WEB-INF資料夾下。
測試程式碼 - 這些是用於測試應用程式的可選檔案,放置在src/test/java和src/test/Resources 資料夾下。它們不會打包到 WAR 中。
約定優於配置
Apache Tapestry 在程式設計的各個方面都遵循約定優於配置。框架的每個功能都具有合理的預設約定。
例如,正如我們在專案佈局章節中學到的,所有頁面都需要放置在/src/main/java/«package_path»/pages/資料夾下才能被視為 Tapestry 頁面。
換句話說,無需將特定的 Java 類配置為 Tapestry 頁面。將其放置在預定義的位置就足夠了。在某些情況下,遵循 Tapestry 的預設約定很奇怪。
例如,Tapestry 元件可以有一個方法setupRender,該方法將在渲染階段開始時觸發。開發人員可能希望使用他們自己的有見地的名稱,例如initializeValue。在這種情況下,Tapestry 提供註釋來覆蓋約定,如下面的程式碼塊所示。
void setupRender() {
   // initialize component
}
@SetupRender
void initializeValue() {
   // initialize component
}
這兩種程式設計方式在 Tapestry 中都是有效的。簡而言之,Tapestry 的預設配置非常少。只有Apache Tapestry 過濾器(Java Servlet 過濾器)需要在“Web.xml”中配置才能使應用程式正常工作。
Tapestry 提供了另一種配置應用程式的方式,稱為AppModule.java。
Apache Tapestry - 註解
註釋是 Tapestry 利用來簡化 Web 應用程式開發的一個非常重要的特性。Tapestry 提供了許多自定義註釋。它有用於類、方法和成員欄位的註釋。如上一節所述,註釋也可用於覆蓋功能的預設約定。Tapestry 註釋分為四大類,如下所示。
元件註釋
用於 Pages、Components 和 Mixins 類。一些有用的註釋包括 -
@Property - 它適用於欄位。用於將欄位轉換為 Tapestry 屬性。
@Parameter - 它適用於欄位。用於將欄位指定為元件的引數。
@Environmental - 它適用於欄位。用於在不同元件之間共享私有欄位。
@import - 它適用於類和欄位。用於包含 Assets、CSS 和 JavaScript。
@Path - 與 @Inject 註釋一起使用,根據路徑注入 Asset。
@Log - 它適用於類和欄位。用於除錯目的。可用於發出元件的事件資訊,如事件開始、事件結束等。
IoC 註釋
用於將物件注入 IoC 容器。一些有用的註釋包括 -
@Inject - 它適用於欄位。用於標記應注入 IoC 容器的引數。它標記應注入元件的欄位。
@Value - 它適用於欄位。與 @inject 註釋一起使用,用於注入字面量值而不是服務(這是 @Inject 註釋的預設行為)。
用於資料持有類的註釋
它用於在類(通常是模型或資料持有類)中為高階元件指定特定於元件的資訊,例如
Grid(用於建立高階表格資料,如報表、相簿等),
BeanEditForm(用於建立高階表單)
Hibernate(用於高階資料庫訪問)等。
這些註釋被聚合並打包到一個單獨的 jar 中,沒有任何 tapestry 依賴項。一些註釋包括 -
@DataType - 用於指定欄位的資料型別。Tapestry 元件可以使用此資訊在表示層建立設計或標記。
@Validate - 用於指定欄位的驗證規則。
這些分離使 Tapestry 應用程式能夠使用多層設計。
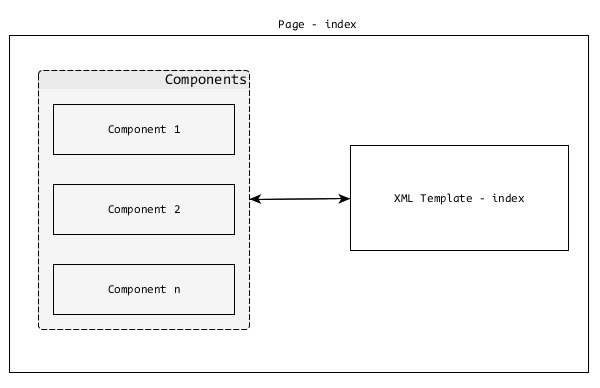
Apache Tapestry - 頁面和元件
Tapestry 應用程式僅僅是 Tapestry 頁面的集合。它們協同工作以形成一個定義良好的 Web 應用程式。每個頁面都將有一個相應的 XML 模板和零個、一個或多個元件。頁面和元件是相同的,只是頁面是根元件,通常由應用程式開發人員建立。
元件是根 Pagecomponent 的子元件。Tapestry 具有許多內建元件,並且可以選擇建立自定義元件。
頁面
如前所述,頁面是 Tapestry 應用程式的構建塊。頁面是普通的 POJO,放置在 - /src/main/java/«package_path»/pages/資料夾下。每個頁面都將有一個相應的XML 模板,其預設位置為 - /src/main/resources/«package_name»/pages/。
您可以在此處看到頁面和模板的路徑結構相似,只是模板位於資原始檔夾中。
例如,Tapestry 應用程式中具有包名稱 - com.example.MyFirstApplication的使用者註冊頁面將具有以下頁面和模板檔案 -
Java 類 -
/src/main/java/com/example/MyFirstApplication/pages/index.java
XML 模板 -
/src/main/resources/com/example/MyFirstApplication/pages/index.tml
讓我們建立一個簡單的Hello World頁面。首先,我們需要在 - /src/main/java/com/example/MyFirstApplication/pages/HelloWorld.java”處建立一個Java 類。
package com.example.MyFirstApplication.pages;
public class HelloWorld {
}
然後,在 -
“/src/main/resources/com/example/MyFirstApplication/pages/helloworld.html”處建立一個 XML 模板。
<html xmlns:t = "http://tapestry.apache.org/schema/tapestry_5_4.xsd">
   <head>
      <title>Hello World Page</title>
   </head>
   <body>
      <h1>Hello World</h1>
   </body>
</html>
現在,可以透過https://:8080/myapp/helloworld訪問此頁面。這是一個簡單的 Tapestry 頁面。Tapestry 提供了更多功能來開發動態網頁,我們將在後面的章節中討論。
Apache Tapestry - 模板
讓我們在本節中考慮 Tapestry XML 模板。XML 模板是一個格式良好的 XML 文件。頁面的表示(使用者介面)層是 XML 模板。除了以下專案外,XML 模板還具有正常的 HTML 標記 -
- Tapestry 名稱空間
- 擴充套件
- 元素
- 元件
讓我們現在詳細討論它們。
Tapestry 名稱空間
Tapestry 名稱空間只不過是 XML 名稱空間。名稱空間應在模板的根元素中定義。它用於在模板中包含 Tapestry 元件和相關元件資訊。最常用的名稱空間如下 -
xmlns:t = “https://tapestry.apache.org/schema/tapestry_5_4.xsd” - 用於識別 Tapestry 的元素、元件和屬性。
xmlns:p = “tapestry:parameter” - 用於將任意程式碼塊傳遞給元件。
Tapestry 名稱空間示例如下 -
<html xmlns:t = "https://tapestry.apache.org/schema/tapestry_5_3.xsd"
   xmlns:p = "tapestry:parameter">

   <head>
      <title>Hello World Page</title>
   </head>
   <body>
      <h1>Hello World</h1>
      <t:eventlink page = "Index">refresh page</t:eventlink>
   </body>
</html>
擴充套件
擴充套件是在渲染頁面的階段動態更改 XML 模板的一種簡單有效的方法。擴充套件使用 ${<name>} 語法。在 XML 模板中有許多選項可以表達擴充套件。讓我們看看一些最常用的選項 -
屬性擴充套件
它對映在相應頁面類中定義的屬性。它遵循 Java Bean 規範在 Java 類中定義屬性。它更進一步,忽略屬性名稱的大小寫。讓我們使用屬性擴充套件更改“Hello World”示例。以下程式碼塊是修改後的頁面類。
package com.example.MyFirstApplication.pages;
public class HelloWorld {
   // Java Bean Property
   public String getName {
      return "World!";
   }
}
然後,更改相應的 XML 模板,如下所示。
<html xmlns:t = "http://tapestry.apache.org/schema/tapestry_5_4.xsd">
   <head>
      <title>Hello World Page</title>
   </head>
   <body>
      <!-- expansion -->
      <h1>Hello ${name}</h1>
   </body>
</html>
在這裡,我們在頁面類中將name定義為Java Bean 屬性,並在 XML 模板中使用擴充套件${name}動態處理它。
訊息擴充套件
每個 Page 類可能擁有或不擁有一個關聯的屬性檔案 – 資原始檔夾中的«page_name».properties。屬性檔案是純文字檔案,每行包含一個鍵/值對(訊息)。讓我們為 HelloWorld 頁面建立一個屬性檔案,位於 –
“/src/main/resources/com/example/MyFirstApplication/pages/helloworld.properties” 並新增“Greeting”訊息。
Greeting = Hello
Greeting 訊息可以在 XML 模板中使用 ${message:greeting}
<html xmlns:t = "http://tapestry.apache.org/schema/tapestry_5_4.xsd">
   <head>
      <title>Hello World Page</title>
   </head>
   <body>
      <!-- expansion -->
      <h1>${message:greeting} ${name}</h1>
   </body>
</html>
元素
Tapestry 有一套小的元素可以在 XML 模板中使用。元素是在 Tapestry 名稱空間下定義的預定義標籤 -
https://tapestry.apache.org/schema/tapestry_5_4.xsd
每個元素都是為特定目的建立的。可用的 Tapestry 元素如下 -
<t:body>
當兩個元件巢狀時,父元件的模板可能需要包裝子元件的模板。<t:body> 元素在這種情況下很有用。<t:body> 的用途之一是在模板佈局中。
通常,Web 應用程式的使用者介面將具有公共頁首、頁尾、選單等。這些公共專案在 XML 模板中定義,稱為模板佈局或佈局元件。在 Tapestry 中,它需要由應用程式開發人員建立。佈局元件只是另一個元件,放置在元件資料夾下,該資料夾具有以下路徑 – src/main/«java|resources»/«package_name»/components。
讓我們建立一個名為 MyCustomLayout 的簡單佈局元件。MyCustomLayout 的程式碼如下 -
<!DOCTYPE html>
<html xmlns:t = "http://tapestry.apache.org/schema/tapestry_5_4.xsd">
   <head>
      <meta charset = "UTF-8" />
      <title>${title}</title>
   </head>
   <body>
      <div>Sample Web Application</div>
      <h1>${title}</h1>
      <t:body/>

      <div>(C) 2016 TutorialsPoint.</div>
   </body>
</html>
package com.example.MyFirstApplication.components;

import org.apache.tapestry5.*;
import org.apache.tapestry5.annotations.*;
import org.apache.tapestry5.BindingConstants;

public class MyCustomLayout {
   @Property
   @Parameter(required = true, defaultPrefix = BindingConstants.LITERAL)
      private String title;
}
在 MyCustomLayout 元件類中,我們聲明瞭一個標題欄位,並透過使用註解將其設定為必填。現在,更改 HelloWorld.html 模板以使用我們的自定義佈局,如下面的程式碼塊所示。
<html>
   t:type = "mycustomlayout" title = "Hello World Test page"
      xmlns:t = "http://tapestry.apache.org/schema/tapestry_5_4.xsd">
   <h1>${message:greeting} ${name}</h1>
</html>
我們可以在這裡看到 XML 模板沒有 head 和 body 標籤。Tapestry 將從佈局元件中收集這些詳細資訊,並且佈局元件的 <t:body> 將被 HelloWorld 模板替換。一旦所有操作都完成,Tapestry 將發出類似於下面指定的標記 -
<!DOCTYPE html>
<html>
   <head>
      <meta charset = "UTF-8" />
      <title>Hello World Test Page</title>
   </head>
   <body>
      <div>Sample Web Application</div>
      <h1>Hello World Test Page</h1>
      <h1>Hello World!</h1>
      <div>(C) 2016 TutorialsPoint.</div>
   </body>
</html>
佈局可以巢狀。例如,我們可以透過包含管理功能來擴充套件我們的自定義佈局,並將其用於如下所示的管理部分。
<html t:type = "MyCommonLayout"
   xmlns:t = "http://tapestry.apache.org/schema/tapestry_5_4.xsd">

   <div><!-- Admin related items --><div>
   <t:body/>

</html>
<t:container>
<t:container> 是頂級元素,包含 Tapestry 名稱空間。這用於指定元件的動態部分。
例如,網格元件可能需要一個模板來識別如何在 HTML 表格中呈現其行 - tr(和列 td)。
<t:container xmlns:t = "http://tapestry.apache.org/schema/tapestry_5_4.xsd">
   <td>${name}</td>
   <td>${age}</td>
</t:container>
<t:block>
<t:block> 是模板中動態部分的佔位符。通常,block 元素不進行渲染。只有在模板中定義的元件使用 block 元素。元件將動態地將資料注入到 block 元素中並進行渲染。其中一個流行的用例是 AJAX。
block 元素提供了要渲染的動態資料的精確位置和標記。每個 block 元素都應該有一個對應的 Java 屬性。只有這樣才能動態渲染它。block 元素的 id 應該遵循 Java 變數識別符號規則。下面提供了部分示例。
@Inject
private Block block;
<html t:type = "mycustomlayout" title = "block example"
   xmlns:t = "https://tapestry.apache.org/schema/tapestry_5_4.xsd"
   xmlns:p = "tapestry:parameter">
<h1>${title}</h1>
<!--
   ...
   ...
-->
<t:block t:id = "block">
   <h2>Highly dynamic section</h2>
   I'v been updated through AJAX call
   The current time is: <strong>${currentTime}</strong>
</t:block>
<!--
   ...
   ...
-->
</html>
<t:content>
<t:content> 元素用於指定模板的實際內容。通常,所有標記都被視為模板的一部分。如果指定了 <t:content>,則只有其中的標記將被考慮。此功能供設計人員在沒有佈局元件的情況下設計頁面使用。
<t:remove>
<t:remove> 恰好與 content 元素相反。remove 元素內的標記不被視為模板的一部分。它可以用於伺服器端註釋和設計目的。
資產
資產是靜態資原始檔,例如樣式表、影像和 JavaScript 檔案。通常,資產放置在 Web 應用程式根目錄 /src/main/webapp 中。
<head>
   <link href = "/css/site.css" rel = "stylesheet" type = "text/css"/>
Tapestry 還將儲存在 Java 類路徑 中的檔案視為資產。Tapestry 提供了高階選項,可以透過擴充套件選項將資產包含到模板中。
Context - 獲取 Web 上下文中可用資產的選項。
<img src = "${context:image/tapestry_banner.gif}" alt = "Banner"/>
asset - 元件通常將其自己的資產與 Java 類一起儲存在 jar 檔案中。從 Tapestry 5.4 開始,在類路徑中儲存資產的標準路徑是 META-INF/assets。對於庫,儲存資產的標準路徑是 META-INF/assets/«library_name»/。asset: 也可以呼叫 context: 擴充套件來獲取來自 Web 上下文的資產。
<img src = "${asset:context:image/tapestry_banner.gif}" alt = "Banner"/>
可以使用 Inject 和 Path 註解將資產注入 Tapestry 頁面或元件中。Path 註解的引數是資產的相對路徑。
@Inject
@Path("images/edit.png")
private Asset icon;
Path 引數還可以包含在 AppModule.java 部分中定義的 Tapestry 符號。
例如,我們可以定義一個符號 skin.root,其值為 context:skins/basic,並按如下所示使用它 -
@Inject
@Path("${skin.root}/style.css")
private Asset style;
本地化
透過 Tapestry 包含資源提供了額外的功能。其中一項功能是“本地化”。Tapestry 將檢查當前語言環境幷包含適當的資源。
例如,如果當前語言環境設定為 de,則將包含 edit_de.png 而不是 edit.png。
CSS
Tapestry 具有內建的樣式表支援。Tapestry 將 tapestry.css 作為核心 Javascript 堆疊的一部分注入。從 Tapestry 5.4 開始,Tapestry 還包括 bootstrap css 框架。我們可以使用普通的連結標籤包含我們自己的樣式表。在這種情況下,樣式表應該位於 Web 根目錄 – /src/main/webapp/ 中。
<head>
   <link href = "/css/site.css" rel = "stylesheet" type = "text/css"/>
Tapestry 提供了高階選項,可以透過前面討論的擴充套件選項將樣式表包含到模板中。
<head>
   <link href = "${context:css/site.css}" rel = "stylesheet" type = "text/css"/>
Tapestry 還提供 Import 註解,可以直接將樣式表包含到 Java 類中。
@Import(stylesheet="context:css/site.css")
public class MyCommonLayout {
}
Tapestry 提供了許多透過 AppModule.java 管理樣式表的選項。一些重要的選項是 -
可以刪除 Tapestry 預設樣式表。
@Contribute(MarkupRenderer.class)

public static void
deactiveDefaultCSS(OrderedConfiguration<MarkupRendererFilter> configuration) {
   configuration.override("InjectDefaultStyleheet", null);
}
還可以透過覆蓋其路徑來停用 Bootstrap。
configuration.add(SymbolConstants.BOOTSTRAP_ROOT, "classpath:/METAINF/assets");
啟用資產(CSS 和 JavaScript)的動態最小化。我們還需要包含 tapestry-webresources 依賴項(在 pom.xml 中)。
@Contribute(SymbolProvider.class)
@ApplicationDefaults

public static void contributeApplicationDefaults(
   MappedConfiguration<String, String> configuration) {

   configuration.add(SymbolConstants.MINIFICATION_ENABLED, "true");
}

<dependency>
   <groupId>org.apache.tapestry</groupId>
   <artifactId>tapestry-webresources</artifactId>
   <version>5.4</version>
</dependency>
客戶端 JavaScript
當前一代的 Web 應用程式嚴重依賴 JavaScript 來提供豐富的客戶端體驗。Tapestry 認識到這一點併為 JavaScript 提供一流的支援。JavaScript 支援深深地融入 Tapestry 中,並在程式設計的每個階段都可用。
早些時候,Tapestry 僅支援 Prototype 和 Scriptaculous。但是,從 5.4 版本開始,Tapestry 完全重寫了 JavaScript 層,使其儘可能通用,併為 JQuery(JavaScript 事實上的庫)提供一流的支援。此外,Tapestry 鼓勵基於模組的 JavaScript 程式設計,並支援 RequireJS,這是 AMD(非同步模組定義 - JavaScript 規範,用於以非同步方式支援模組及其依賴項)的流行客戶端實現。
位置
JavaScript 檔案是 Tapestry 應用程式的資產。根據資產規則,JavaScript 檔案要麼放置在 Web 上下文中 /sr/main/webapp/,要麼放置在 jar 檔案中的 META-INF/assets/ 位置。
連結 JavaScript 檔案
在 XML 模板中連結 JavaScript 檔案的最簡單方法是直接使用 script 標籤,即 - <script language = "javascript" src = "relative/path/to/js"></script>。但是,Tapestry 不推薦這些方法。Tapestry 提供了幾種選項,可以直接在頁面/元件本身中連結 JavaScript 檔案。其中一些如下所示。
@import 註解 - @import 註解提供了使用上下文表達式連結多個 JavaScript 庫的選項。它可以應用於 Page 類及其方法。如果應用於 Page 類,則它適用於其所有方法。如果應用於 Page 的方法,則它僅適用於該方法,然後 Tapestry 僅在呼叫該方法時連結 JavaScript 庫。
@Import(library = {"context:js/jquery.js","context:js/myeffects.js"})

public class MyComponent {
   // ...
}
JavaScriptSupport 介面 - JavaScriptSupport 是 Tapestry 定義的介面,它有一個方法 importJavaScriptLibrary 用於匯入 JavaScript 檔案。JavScriptSupport 物件可以透過簡單地宣告並使用 @Environmental 註解進行註釋輕鬆建立。
@Inject @Path("context:/js/myeffects.js")
private Asset myEffects;

@Environmental
private JavaScriptSupport javaScriptSupport;
void setupRender() {
   javaScriptSupport.importJavaScriptLibrary(myEffects);
}
JavScriptSupport 只能使用 @Environmental 註解注入到元件中。對於服務,我們需要使用 @Inject 註解或將其作為服務建構函式方法中的引數新增。
@Inject
private JavaScriptSupport javaScriptSupport;
public MyServiceImpl(JavaScriptSupport support) {
   // ...
}
addScript 方法 - 這類似於 JavaScriptSupport 介面,不同之處在於它使用 addScript 方法,並且程式碼直接新增到頁面底部的輸出中。
void afterRender() {
   javaScriptSupport.addScript(
      "$('%s').observe('click', hideMe());", container.getClientId());
}
JavaScript 堆疊
Tapestry 允許將一組 JavaScript 檔案和相關的樣式表組合並用作一個實體。目前,Tapestry 包括基於 Prototype 和基於 JQuery 的堆疊。
開發人員可以透過實現 JavaScriptStack 介面並在 AppModule.java 中註冊它來開發自己的堆疊。註冊後,可以使用 @import 註解匯入堆疊。
@Contribute(JavaScriptStackSource.class)
public static void addMyStack(
   MappedConfiguration<String, JavaScriptStack> configuration) {

   configuration.addInstance("MyStack", myStack.class);
}

@Import(stack = "MyStack")
public class myPage {
}
Apache Tapestry - 元件
如前所述,元件和頁面是相同的,除了頁面是根元件幷包含一個或多個子元件。元件始終駐留在頁面內部,並執行頁面幾乎所有動態功能。
Tapestry 元件呈現從簡單的 HTML 連結到具有 互動式 AJAX 的複雜網格功能。元件還可以包含另一個元件。Tapestry 元件包含以下專案 -
元件類 - 元件的主要 Java 類。
XML 模板 - XML 模板類似於頁面模板。元件類呈現模板作為最終輸出。某些元件可能沒有模板。在這種情況下,輸出將由元件類本身使用 MarkupWriter 類生成。
主體 - 在頁面模板內指定的元件可能具有自定義標記,稱為“元件主體”。如果元件模板具有 <body /> 元素,則 <body /> 元素將被元件的主體替換。這類似於前面 XML 模板部分中討論的佈局。
渲染 - 渲染是一個將 XML 模板和元件的主體轉換為元件實際輸出的過程。
引數 - 用於在元件和頁面之間建立通訊,從而在它們之間傳遞資料。
事件 - 將功能從元件委託給其容器/父級(頁面或另一個元件)。它廣泛用於頁面導航目的。
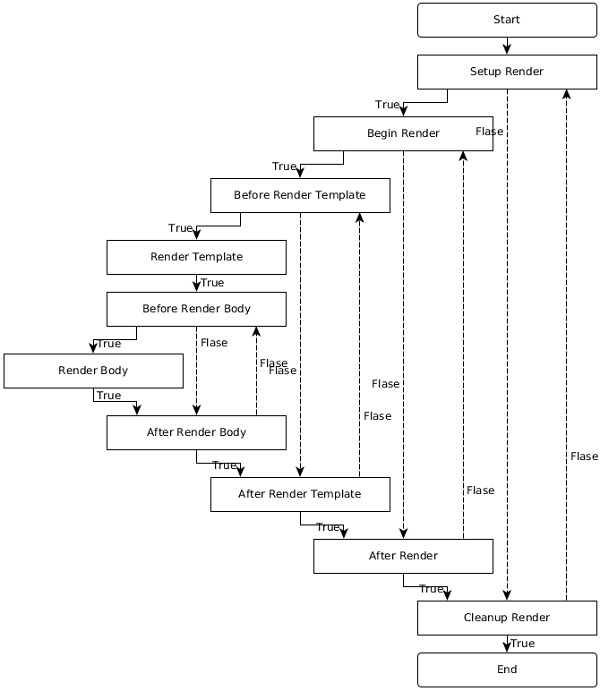
渲染
元件的渲染是在一系列預定義的階段中完成的。元件系統中的每個階段都應該有一個相應的約定或註解在元件類中定義的方法。
// Using annotaion
@SetupRender
void initializeValues() {
   // initialize values
}

// using convention
boolean afterRender() {
   // do logic
   return true;
}
階段、其方法名稱及其註解列在下面。
| 註解 | 預設方法名稱 |
|---|---|
| @SetupRender | setupRender() |
| @BeginRender | beginRender() |
| @BeforeRenderTemplate | beforeRenderTemplate() |
| @BeforeRenderBody | beforeRenderBody() |
| @AfterRenderBody | afterRenderBody() |
| @AfterRenderTemplate | afterRenderTemplate() |
| @AfterRender | afterRender() |
| @CleanupRender | cleanupRender() |
每個階段都有特定的目的,它們如下 -
SetupRender
SetupRender 啟動渲染過程。它通常設定元件的引數。
BeginRender
BeginRender 開始渲染元件。它通常渲染元件的開始/起始標籤。
BeforeRenderTemplate
BeforeRenderTemplate 用於裝飾 XML 模板,在模板周圍新增特殊標記。它還提供跳過模板渲染的選項。
BeforeRenderBody
BeforeRenderTemplate 提供跳過元件的主體元素渲染的選項。
AfterRenderBody
AfterRenderBody 將在元件的主體渲染後被呼叫。
AfterRenderTemplate
AfterRenderTemplate 將在元件的模板渲染後被呼叫。
AfterRender
AfterRender 是 BeginRender 的對應項,通常渲染結束標籤。
CleanupRender
CleanupRender 是 SetupRender 的對應項。它釋放/處置渲染過程中建立的所有物件。
渲染階段的流程並不僅僅是向前。它根據階段的返回值在階段之間來回切換。
例如,如果 SetupRender 方法返回 false,則渲染跳轉到 CleanupRender 階段,反之亦然。要清楚瞭解不同階段之間的流程,請檢視下面給出的圖中的流程。
簡單元件
讓我們建立一個簡單的元件 Hello,其輸出訊息為“Hello, Tapestry”。以下是 Hello 元件及其模板的程式碼。
package com.example.MyFirstApplication.components;
public class Hello {
}
<html
   xmlns:t = "https://tapestry.apache.org/schema/tapestry_5_4.xsd"
   xmlns:p = "tapestry:parameter">

   <div>
      <p>Hello, Tapestry (from component).</p>
   </div>

</html>
Hello 元件可以在頁面模板中呼叫,如下所示:
<html title = "Hello component test page"
   xmlns:t = "https://tapestry.apache.org/schema/tapestry_5_4.xsd"
   xmlns:p = "tapestry:parameter">
<t:hello />
</html>
類似地,元件可以使用 MarkupWriter 而不是模板來呈現相同的輸出,如下所示。
package com.example.MyFirstApplication.components;

import org.apache.tapestry5.MarkupWriter;
import org.apache.tapestry5.annotations.BeginRender;

public class Hello {
   @BeginRender
   void renderMessage(MarkupWriter writer) {
      writer.write("<p>Hello, Tapestry (from component)</p>");
   }
}
讓我們更改元件模板幷包含 <body /> 元素,如下面的程式碼塊所示。
<html>
   xmlns:t = "https://tapestry.apache.org/schema/tapestry_5_4.xsd"
   xmlns:p = "tapestry:parameter">

   <div>
      <t:body />
   </div>
</html>
現在,頁面模板可以在元件標記中包含 body,如下所示。
<html title = "Hello component test page"
   xmlns:t = "https://tapestry.apache.org/schema/tapestry_5_4.xsd"
   xmlns:p = "tapestry:parameter">

   <t:hello>
      <p>Hello, Tapestry (from page).</p>
   </t:hello>
</html>
輸出如下所示:
<html>
   <div>
      <p>Hello, Tapestry (from page).</p>
   </div>
</html>
引數
這些引數的主要目的是在元件的欄位和頁面的屬性/資源之間建立連線。使用引數,元件及其對應的頁面之間進行通訊並相互傳遞資料。這稱為雙向資料繫結。
例如,用於在使用者管理頁面中表示年齡的文字框元件透過引數獲取其初始值(在資料庫中可用)。同樣,在使用者更新年齡並提交後,元件將透過相同的引數傳送回更新後的年齡。
要在元件類中建立新引數,請宣告一個欄位並指定@Parameter註解。此 @Parameter 具有兩個可選引數,它們是:
required - 將引數設為必填。如果未提供,Tapestry 將引發異常。
value - 指定引數的預設值。
引數應在頁面模板中指定為元件標籤的屬性。屬性的值應使用我們在前面章節中討論的繫結表示式/擴充套件來指定。我們之前學到的一些擴充套件包括:
屬性擴充套件 (prop:«val») - 從頁面類的屬性中獲取資料。
訊息擴充套件 (message:«val») - 從 index.properties 檔案中定義的鍵獲取資料。
上下文擴充套件 (context:«val») - 從 Web 上下文資料夾 /src/main/webapp 獲取資料。
資產擴充套件 (asset:«val») - 從 jar 檔案中嵌入的資源獲取資料,/META-INF/assets。
符號擴充套件 (symbol:«val») - 從 AppModule.java 檔案中定義的符號獲取資料。
Tapestry 還有許多其他有用的擴充套件,其中一些如下所示:
文字擴充套件 (literal:«val») - 一個文字字串。
變數擴充套件 (var:«val») - 允許讀取或更新元件的渲染變數。
驗證擴充套件 (validate:«val») - 用於指定物件驗證規則的特殊字串。例如,validate:required, minLength = 5。
翻譯 (translate:«val») - 用於在輸入驗證中指定 Translator 類(將客戶端表示轉換為伺服器端表示)。
塊 (block:«val») - 模板中塊元素的 ID。
元件 (component:«val») - 模板中另一個元件的 ID。
除了屬性擴充套件和變數擴充套件之外,以上所有擴充套件都是隻讀的。它們由元件用於與頁面交換資料。在使用擴充套件作為屬性值時,${...}不應使用。而應該只使用不帶美元符號和括號符號的擴充套件。
使用引數的元件
讓我們透過修改 Hello 元件來建立一個新的元件 HelloWithParameter,透過在元件類中新增name引數並相應地更改元件模板和頁面模板來動態渲染訊息。
建立一個新的元件類HelloWithParameter.java。
新增一個私有欄位並使用@Parameter註解命名它。使用 required 引數使其成為必填項。
@Parameter(required = true)
private String name;
新增一個私有欄位 result,並使用@Propery註解。result 屬性將在元件模板中使用。元件模板無法訪問使用@Parameter註解的欄位,只能訪問使用@Property註解的欄位。元件模板中可用的變數稱為渲染變數。
@Property
 private String result;
新增一個 RenderBody 方法,並將 name 引數的值複製到 result 屬性。
@BeginRender
void initializeValues() {
   result = name;
}
新增一個新的元件模板HelloWithParamter.tml,並使用 result 屬性渲染訊息。
<div> Hello, ${result} </div>
在測試頁面(testhello.java)中新增一個新屬性 Username。
public String getUsername() {
   return "User1";
}
在頁面模板中使用新建立的元件,並在HelloWithParameter元件的 name 引數中設定 Username 屬性。
<t:helloWithParameter name = "username" />
完整的列表如下所示:
package com.example.MyFirstApplication.components;

import org.apache.tapestry5.annotations.*;
public class HelloWithParameter {
   @Parameter(required = true)
   private String name;

   @Property
   private String result;

   @BeginRender
   void initializeValues() {
      result = name;
   }
}
<html
   xmlns:t = "https://tapestry.apache.org/schema/tapestry_5_4.xsd"
   xmlns:p = "tapestry:parameter">

   <div> Hello, ${result} </div>

</html>
package com.example.MyFirstApplication.pages;

import org.apache.tapestry5.annotations.*;
public class TestHello {
   public String getUsername() {
      return "User1";
   }
}
<html title = "Hello component test page"
   xmlns:t = "https://tapestry.apache.org/schema/tapestry_5_4.xsd"
   xmlns:p = "tapestry:parameter">
   <t:helloWithParameter name = "username" />

</html>
結果如下所示:
<div> Hello, User1 </div>
高階引數
在前面的章節中,我們分析瞭如何在自定義元件中建立和使用簡單引數。高階引數也可以包含完整的標記。在這種情況下,標記應在元件標籤內指定,例如頁面模板中的子部分。內建的 if 元件具有成功和失敗條件的標記。成功標記指定為元件標籤的主體,失敗標記使用elseparameter指定。
讓我們看看如何使用if元件。if 元件有兩個引數:
test - 基於簡單屬性的引數。
Else - 用於指定備用標記的高階引數,如果條件失敗。
Tapestry 將使用以下邏輯檢查 test 屬性的值並返回 true 或 false。這稱為型別強制轉換,一種將一種型別的物件轉換為具有相同內容的另一種型別的方法。
如果資料型別是String,“True”表示非空白且不是文字字串“False”(不區分大小寫)。
如果資料型別是Number,則非零表示 True。
如果資料型別是Collection,則非空表示 True。
如果資料型別是Object,則為 True(只要它不為空)。
如果條件透過,則元件渲染其主體;否則,它渲染 else 引數的主體。
完整的列表如下所示:
package com.example.MyFirstApplication.pages;
public class TestIf {
   public String getUser() {
      return "User1";
   }
}
<html title = "If Test Page"
   xmlns:t = "http://tapestry.apache.org/schema/tapestry_5_4.xsd"
   xmlns:p = "tapestry:parameter">

   <body>
      <h1>Welcome!</h1>
      <t:if test = "user">
         Welcome back, ${user}
         <p:else>
            Please <t:pagelink page = "login">Login</t:pagelink>
         </p:else>
      </t:if>
   </body>

</html>
元件事件/頁面導航
Tapestry 應用程式是頁面集合,它們相互互動。到目前為止,我們已經學習瞭如何在不進行任何通訊的情況下建立各個頁面。元件事件的主要目的是使用伺服器端事件提供頁面之間(以及頁面內)的互動。大多陣列件事件源自客戶端事件。
例如,當用戶在頁面中點選連結時,Tapestry 將呼叫相同的頁面本身並帶有目標資訊,而不是呼叫目標頁面並引發伺服器端事件。Tapestry 頁面將捕獲事件,處理目標資訊並在伺服器端重定向到目標頁面。
Tapestry 遵循Post/Redirect/Get (RPG) 設計模式進行頁面導航。在 RPG 中,當用戶透過提交表單執行 POST 請求時,伺服器將處理釋出的資料,但不會直接返回響應。相反,它將對另一個頁面執行客戶端重定向,該頁面將輸出結果。RPG 模式用於防止透過瀏覽器後退按鈕、瀏覽器重新整理按鈕等重複提交表單,Tapestry 透過提供以下兩種型別的請求來提供 RPG 模式。
元件事件請求 - 此型別的請求針對頁面中的特定元件並在元件內引發事件。此請求僅執行重定向,不輸出響應。
渲染請求 - 這些型別的請求針對頁面並將響應流回客戶端。
要了解元件事件和頁面導航,我們需要了解 Tapestry 請求的 URL 模式。兩種型別的請求的 URL 模式如下所示:
元件事件請求 -
/<<page_name_with_path>>.<<component_id|event_id>>/<<context_information>>
渲染請求 -
/<<page_name_with_path>>/<<context_information>>
一些 URL 模式的示例如下所示:
可以透過https://«domain»/«app»/index請求索引頁面。
如果索引頁面位於子資料夾 admin 下,則可以透過https://«domain»/«app»/admin/index請求它。
如果使用者點選索引頁面中id 為 test的ActionLink 元件,則 URL 將為https://«domain»/«app»/index.test。
事件
預設情況下,Tapestry 為所有請求引發OnPassivate和OnActivate事件。對於元件事件請求型別,Tapestry 會根據元件引發一個或多個其他事件。ActionLink 元件引發 Action 事件,而 Form 元件引發多個事件,例如Validate、Success等。
可以使用相應的的方法處理器在頁面類中處理事件。方法處理器是透過方法命名約定或@OnEvent註解建立的。方法命名約定的格式為On«EventName»From«ComponentId»。
id 為 test的 ActionLink 元件的動作事件可以透過以下兩種方法之一進行處理:
void OnActionFromTest() {
}
@OnEvent(component = "test", name = "action")
void CustomFunctionName() {
}
如果方法名稱沒有任何特定元件,則將為所有具有匹配事件的元件呼叫該方法。
void OnAction() {
}
OnPassivate 和 OnActivate 事件
OnPassivate 用於為 OnActivate 事件處理器提供上下文資訊。通常,Tapestry 提供上下文資訊,它可以用作 OnActivate 事件處理程式中的引數。
例如,如果上下文資訊是 int 型別的 3,則可以呼叫 OnActivate 事件,如下所示:
void OnActivate(int id) {
}
在某些情況下,上下文資訊可能不可用。在這種情況下,我們可以透過 OnPassivate 事件處理器為 OnActivate 事件處理器提供上下文資訊。OnPassivate 事件處理器的返回型別應用作 OnActivate 事件處理程式的引數。
int OnPassivate() {
   int id = 3;
   return id;
}
void OnActivate(int id) {
}
事件處理程式返回值
Tapestry 根據事件處理程式的返回值發出頁面重定向。事件處理程式應返回以下值之一。
空響應 - 返回空值。Tapestry 將構造當前頁面的 URL 並將其傳送到客戶端作為重定向。
public Object onAction() {
   return null;
}
字串響應 - 返回字串值。Tapestry 將構造與該值匹配的頁面的 URL 並將其傳送到客戶端作為重定向。
public String onAction() {
   return "Index";
}
類響應 - 返回頁面類。Tapestry 將構造返回的頁面類的 URL 並將其傳送到客戶端作為重定向。
public Object onAction() {
   return Index.class
}
頁面響應 - 返回使用 @InjectPage 註解的欄位。Tapestry 將構造注入頁面的 URL 並將其傳送到客戶端作為重定向。
@InjectPage
private Index index;

public Object onAction(){
   return index;
}
HttpError - 返回 HTTPError 物件。Tapestry 將發出客戶端 HTTP 錯誤。
public Object onAction(){
   return new HttpError(302, "The Error message);
}
連結響應 - 直接返回連結例項。Tapestry 將從 Link 物件構造 URL 並將其傳送到客戶端作為重定向。
流響應 - 返回StreamResponse物件。Tapestry 將直接將流作為響應傳送到客戶端瀏覽器。它用於直接生成報告和影像並將其傳送到客戶端。
URL 響應 - 返回java.net.URL物件。Tapestry 將從物件獲取相應的 URL 並將其傳送到客戶端作為重定向。
物件響應 - 返回除上述指定值之外的任何值。Tapestry 將引發錯誤。
事件上下文
通常,事件處理程式可以使用引數獲取上下文資訊。例如,如果上下文資訊是 int 型別的 3,則事件處理程式將是:
Object onActionFromTest(int id) {
}
Tapestry 正確處理上下文資訊並透過引數將其提供給方法。有時,由於程式設計的複雜性,Tapestry 可能無法正確處理它。那時,我們可以獲取完整的上下文資訊並自行處理。
Object onActionFromEdit(EventContext context) {
   if (context.getCount() > 0) {
      this.selectedId = context.get(0);
   } else {
      alertManager.warn("Please select a document.");
      return null;
   }
}
Apache Tapestry - 內建元件
本章介紹了 Tapestry 具有適當示例的內建元件。Tapestry 支援 65 多個內建元件。您還可以建立自定義元件。讓我們詳細介紹一些值得注意的元件。
如果元件
if 元件用於有條件地渲染一個程式碼塊。條件由一個測試引數檢查。
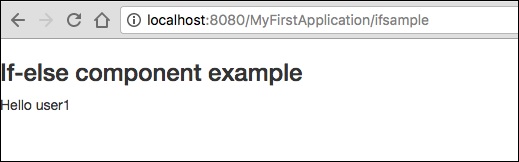
建立一個名為 IfSample.java 的頁面,如下所示:
package com.example.MyFirstApplication.pages;

public class Ifsample {
   public String getUser() {
      return "user1";
   }
}
現在,建立一個對應的模板檔案,如下所示:
<html t:type = "newlayout" title = "About MyFirstApplication"
   xmlns:t = "http://tapestry.apache.org/schema/tapestry_5_4.xsd"
   xmlns:p = "tapestry:parameter">

   <h3>If-else component example </h3>
   <t:if test = "user">
      Hello ${user}
      <p:else>
         <h4> You are not a Tapestry user </h4>
      </p:else>
   </t:if>
</html>
請求頁面將渲染如下所示的結果。
結果 − https://:8080/MyFirstApplication/ifsample
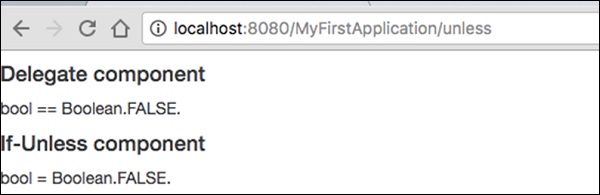
Unless 和 Delegate 元件
unless 元件 正好與上面討論的 if 元件相反。而 delegate 元件 本身不做任何渲染。相反,它通常將標記委託給塊元素。Unless 和 if 元件可以使用 delegate 和 block 有條件地交換動態內容。
建立一個名為 Unless.java 的頁面,如下所示。
package com.example.MyFirstApplication.pages;

import org.apache.tapestry5.Block;
import org.apache.tapestry5.annotations.Property;
import org.apache.tapestry5.ioc.annotations.Inject;
import org.apache.tapestry5.PersistenceConstants;
import org.apache.tapestry5.annotations.Persist;

public class Unless {
   @Property
   @Persist(PersistenceConstants.FLASH)
   private String value;
   @Property
   private Boolean bool;
   @Inject
   Block t, f, n;

   public Block getCase() {
      if (bool == Boolean.TRUE ) {
         return t;
      } else {
         return f;
      }
   }
}
現在,建立一個對應的模板檔案,如下所示:
<html t:type = "newlayout" title = "About MyFirstApplication"
   xmlns:t = "http://tapestry.apache.org/schema/tapestry_5_4.xsd"
   xmlns:p = "tapestry:parameter">

   <h4> Delegate component </h4>
   <div class = "div1">
      <t:delegate to = "case"/>
   </div>
   <h4> If-Unless component </h4>

   <div class = "div1">
      <t:if test = "bool">
         <t:delegate to = "block:t"/>
      </t:if>
      <t:unless test = "bool">
         <t:delegate to = "block:notT"/>
      </t:unless>
   </div>

   <t:block id = "t">
      bool == Boolean.TRUE.
   </t:block>

   <t:block id = "notT">
      bool = Boolean.FALSE.
   </t:block>

   <t:block id = "f">
      bool == Boolean.FALSE.
   </t:block>
</html>
請求頁面將渲染如下所示的結果。
結果 − https://:8080/MyFirstApplication/unless
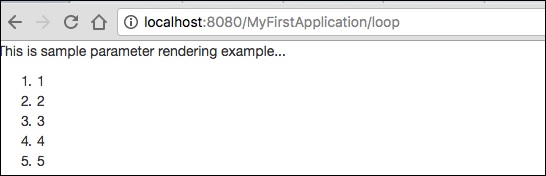
迴圈元件
迴圈元件是迴圈遍歷集合項併為每個值/迭代渲染主體的一個基本元件。
建立一個如下所示的迴圈頁面:
Loop.java
package com.example.MyFirstApplication.pages;

import org.apache.tapestry5.annotations.Property;
public class Loop {
   @Property
   private int i;
}
然後,建立相應的模板 Loop.tml
Loop.tml
<html t:type = "newlayout" title = "About MyFirstApplication"
   xmlns:t = "http://tapestry.apache.org/schema/tapestry_5_4.xsd"
   xmlns:p = "tapestry:parameter">

   <p>This is sample parameter rendering example...</p>
   <ol>
      <li t:type = "loop" source = "1..5" value = "var:i">${var:i}</li>
   </ol>
</html>
Loop 元件具有以下兩個引數:
source − 集合源。1…5 是一個屬性擴充套件,用於建立一個指定範圍的陣列。
var − 渲染變數。用於在模板的主體中渲染當前值。
請求頁面將渲染如下所示的結果:
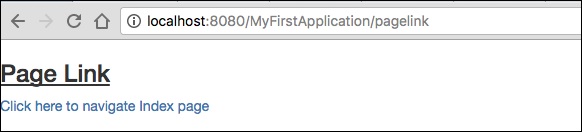
PageLink 元件
PageLink 元件用於在一個頁面之間連結頁面。建立一個如下所示的 PageLink 測試頁面:PageLink.java。
package com.example.MyFirstApplication.pages;
   public class PageLink {
}
然後,建立一個對應的模板檔案,如下所示:
PageLink.tml
<html t:type = "newlayout" title = "About MyFirstApplication"
   xmlns:t = "http://tapestry.apache.org/schema/tapestry_5_4.xsd"
   xmlns:p = "tapestry:parameter">

   <body>
      <h3><u>Page Link</u> </h3>
      <div class = "page">
         <t:pagelink page = "Index">Click here to navigate Index page</t:pagelink>
         <br/>
      </div>
   </body>

</html>
PageLink 元件有一個 page 引數,該引數應引用目標 Tapestry 頁面。
結果 − https://:8080/myFirstApplication/pagelink
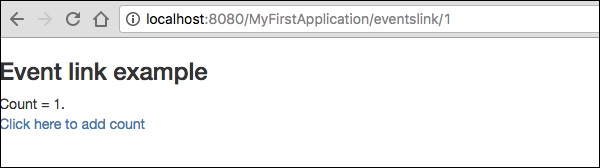
EventLink 元件
EventLink 元件透過 URL 傳送事件名稱和相應的引數。建立一個如下所示的 EventsLink 頁面類。
EventsLink.java
package com.example.MyFirstApplication.pages;

import org.apache.tapestry5.annotations.Property;
public class EventsLink {
   @Property
   private int x;
   void onActivate(int count) {
      this.x = x;
   }
   int onPassivate() {
      return x;
   }
   void onAdd(int value) {
      x += value;
   }
}
然後,建立一個對應的“EventsLink”模板檔案,如下所示:
EventsLink.tml
<html t:type = "newlayout" title = "About MyFirstApplication"
   xmlns:t = "http://tapestry.apache.org/schema/tapestry_5_4.xsd"
   xmlns:p = "tapestry:parameter">

   <h3> Event link example </h3>
   AddedCount = ${x}. <br/>
   <t:eventlink t:event = "add" t:context = "literal:1">
      Click here to add count
   </t:eventlink><br/>
</html>
EventLink 具有以下兩個引數:
Event − 要在 EventLink 元件中觸發的事件的名稱。預設情況下,它指向元件的 id。
Context − 這是一個可選引數。它定義了連結的上下文。
結果 − https://:8080/myFirstApplication/EventsLink
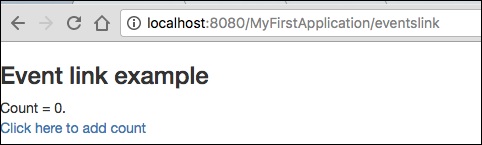
單擊計數值後,頁面將在 URL 中顯示事件名稱,如下面的輸出螢幕截圖所示。
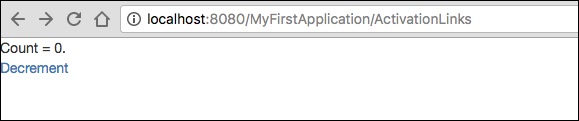
ActionLink 元件
ActionLink 元件類似於 EventLink 元件,但它只發送目標元件 id。預設事件名稱為 action。
建立一個名為“ActivationLinks.java”的頁面,如下所示,
ActivationLinks.java
package com.example.MyFirstApplication.pages;

import org.apache.tapestry5.annotations.Property;
public class ActivationLinks {
   @Property
   private int x;
   void onActivate(int count) {
      this.x = x;
   }
   int onPassivate() {
      return x;
   }
   void onActionFromsub(int value) {
      x -= value;
   }
}
現在,建立一個對應的模板檔案,如下所示:
ActivationLinks.tml
<html t:type = "Newlayout" title = "About MyFirstApplication"
   xmlns:t = "http://tapestry.apache.org/schema/tapestry_5_4.xsd"
   xmlns:p = "tapestry:parameter">

   <div class = "div1">
      Count = ${count}. <br/>
      <t:actionlink t:id = "sub" t:context = "literal:1">
         Decrement
      </t:actionlink><br/>
   </div>

</html>
在這裡,當單擊 ActionLink 元件時,將呼叫 OnActionFromSub 方法。
結果 − https://:8080/myFirstApplication/ActivationsLink
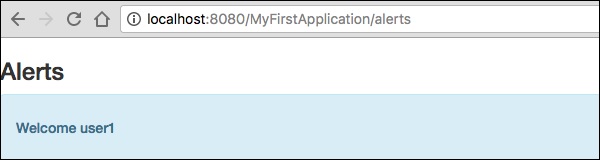
Alert 元件
警報對話方塊主要用於向用戶發出警告訊息。例如,如果輸入欄位需要一些必填文字,但使用者未提供任何輸入,則作為驗證的一部分,您可以使用警報框發出警告訊息。
建立一個名為“Alerts”的頁面,如下面的程式所示。
Alerts.java
package com.example.MyFirstApplication.pages;

public class Alerts {
   public String getUser() {
      return "user1";
   }
}
然後,建立一個對應的模板檔案,如下所示:
Alerts.tml
<html t:type = "Newlayout" title = "About MyFirstApplication"
   xmlns:t = "http://tapestry.apache.org/schema/tapestry_5_4.xsd"
   xmlns:p = "tapestry:parameter">

   <h3>Alerts</h3>
   <div class = "alert alert-info">
      <h5> Welcome ${user} </h5>
   </div>

</html>
Alert 有三個嚴重級別,它們是:
- 資訊
- 警告
- 錯誤
以上模板是使用資訊警報建立的。它定義為 alert-info。您可以根據需要建立其他嚴重級別。
請求頁面將產生以下結果:
https://:8080/myFirstApplication/Alerts
表單和驗證元件
Form 元件 用於在 Tapestry 頁面中建立用於使用者輸入的表單。表單可以包含文字欄位、日期欄位、複選框欄位、選擇選項、提交按鈕等。
本章詳細介紹了一些值得注意的表單元件。
Checkbox 元件
Checkbox 元件用於在兩個互斥選項之間進行選擇。使用 Checkbox 建立一個頁面,如下所示:
Checkbox.java
package com.example.MyFirstApplication.pages;

import org.apache.tapestry5.annotations.Property;

public class Checkbox {
   @Property
   private boolean check1;

   @Property
   private boolean check2;
}
現在,建立一個對應的模板 Checkbox.tml,如下所示:
<html t:type = "newlayout" title = "About MyFirstApplication"
   xmlns:t = "http://tapestry.apache.org/schema/tapestry_5_4.xsd"
   xmlns:p = "tapestry:parameter">

   <h3> checkbox component</h3>
   <t:form>
      <t:checkbox t:id = "check1"/> I have a bike <br/>
      <t:checkbox t:id = "check2"/> I have a car
   </t:form>

</html>
這裡,複選框引數 id 與相應的布林值匹配。
結果 − 請求頁面後,https://:8080/myFirstApplication/checkbox 將產生以下結果。

TextField 元件
TextField 元件允許使用者編輯一行文字。建立一個名為 Text 的頁面,如下所示。
Text.java
package com.example.MyFirstApplication.pages;

import org.apache.tapestry5.annotations.Property;
import org.apache.tapestry5.corelib.components.TextField;public class Text {
   @Property
   private String fname;
   @Property
   private String lname;
}
然後,建立一個對應的模板,如下所示 – Text.tml
<html t:type = "newlayout" title = "About MyFirstApplication"
   xmlns:t = "http://tapestry.apache.org/schema/tapestry_5_4.xsd"
   xmlns:p = "tapestry:parameter">
   <p> Form application </p>

   <body>
      <h3> Text field created from Tapestry component </h3>
      <t:form>
         <table>
            <tr>
               <td>
                  Firstname: </td> <td><t:textfield t:id = "fname" />
               </td>
               <td>Lastname: </td> <td> <t:textfield t:id = "lname" /> </td>
            </tr>
         </table>
      </t:form>
   </body>

</html>
這裡,Text 頁面包含一個名為 fname 和 lname 的屬性。元件 id 由屬性訪問。
請求頁面將產生以下結果:
https://:8080/myFirstApplication/Text

PasswordField 元件
PasswordField 是一個專門用於密碼的文字欄位條目。建立一個名為 Password 的頁面,如下所示:
Password.java
package com.example.MyFirstApplication.pages;

import org.apache.tapestry5.annotations.Property;
import org.apache.tapestry5.corelib.components.PasswordField;

public class Password {
   @Property
   private String pwd;
}
現在,建立一個對應的模板檔案,如下所示:
Password.tml
<html t:type = "newlayout" title = "About MyFirstApplication"
   xmlns:t = "http://tapestry.apache.org/schema/tapestry_5_4.xsd"
   xmlns:p = "tapestry:parameter">
   <p> Form application </p>
   <h3> Password field created from Tapestry component </h3>

   <t:form>
      <table>
         <tr>
            <td> Password: </td>
            <td><t:passwordfield t:id = "pwd"/> </td>
         </tr>
      </table>
   </t:form>

</html>
這裡,PasswordField 元件具有引數 id,它指向屬性 pwd。請求頁面將產生以下結果:
https://:8080/myFirstApplication/Password

TextArea 元件
TextArea 元件是一個多行輸入文字控制元件。建立一個名為 TxtArea 的頁面,如下所示。
TxtArea.java
package com.example.MyFirstApplication.pages;

import org.apache.tapestry5.annotations.Property;
import org.apache.tapestry5.corelib.components.TextArea;

public class TxtArea {
   @Property
   private String str;
}
然後,建立一個對應的模板檔案,如下所示。
TxtArea.tml
<html t:type = "newlayout" title = "About MyFirstApplication"
   xmlns:t = "http://tapestry.apache.org/schema/tapestry_5_4.xsd"
   xmlns:p = "tapestry:parameter">
   <h3>TextArea component </h3>

   <t:form>
      <table>
         <tr>
            <td><t:textarea t:id = "str"/>
            </td>
         </tr>
      </table>
   </t:form>

</html>
這裡,TextArea 元件引數 id 指向屬性“str”。請求頁面將產生以下結果:
https://:8080/myFirstApplication/TxtArea**

Select 元件
Select 元件包含一個下拉列表。建立一個名為 SelectOption 的頁面,如下所示。
SelectOption.java
package com.example.MyFirstApplication.pages;

import org.apache.tapestry5.annotations.Property;
import org.apache.tapestry5.corelib.components.Select;

public class SelectOption {
   @Property
   private String color0;

   @Property

   private Color1 color1;
   public enum Color1 {
      YELLOW, RED, GREEN, BLUE, ORANGE
   }
}
然後,建立一個對應的模板,如下所示:
SelectOption.tml
<html t:type = "newlayout" title = "About MyFirstApplication"
   xmlns:t = "http://tapestry.apache.org/schema/tapestry_5_4.xsd"
   xmlns:p = "tapestry:parameter">
   <p> Form application </p>
   <h3> select component </h3>

   <t:form>
      <table>
         <tr>
            <td> Select your color here: </td>
            <td> <select t:type = "select" t:id = "color1"></select></td>
         </tr>
      </table>
   </t:form>

</html>
這裡,Select 元件有兩個引數:
Type − 屬性的型別是一個列舉。
Id − Id 指向 Tapestry 屬性“color1”。
請求頁面將產生以下結果:
https://:8080/myFirstApplication/SelectOption

RadioGroup 元件
RadioGroup 元件為 Radio 元件提供一個容器組。Radio 和 RadioGroup 元件協同工作以更新物件的屬性。此元件應圍繞其他 Radio 元件。建立一個名為“Radiobutton.java”的新頁面,如下所示:
Radiobutton.java
package com.example.MyFirstApplication.pages;

import org.apache.tapestry5.PersistenceConstants;
import org.apache.tapestry5.annotations.Persist;
import org.apache.tapestry5.annotations.Property;

public class Radiobutton {
   @Property
   @Persist(PersistenceConstants.FLASH)
   private String value;
}
然後,建立一個對應的模板檔案,如下所示:
Radiobutton.tml
<html t:type = "Newlayout" title = "About MyFirstApplication"
   xmlns:t = "http://tapestry.apache.org/schema/tapestry_5_4.xsd"
   xmlns:p = "tapestry:parameter">
   <h3>RadioGroup component </h3>

   <t:form>
      <t:radiogroup t:id = "value">
         <t:radio t:id = "radioT" value = "literal:T" label = "Male" />
         <t:label for = "radioT"/>
         <t:radio t:id = "radioF" value = "literal:F" label = "Female"/>
         <t:label for = "radioF"/>
      </t:radiogroup>
   </t:form>

</html>
這裡,RadioGroup 元件 id 與屬性“value”繫結。請求頁面將產生以下結果。
https://:8080/myFirstApplication/Radiobutton

Submit 元件
當用戶單擊提交按鈕時,表單將傳送到標籤的 action 設定中指定的地址。建立一個名為 SubmitComponent 的頁面,如下所示。
package com.example.MyFirstApplication.pages;
import org.apache.tapestry5.annotations.InjectPage;

public class SubmitComponent {
   @InjectPage
   private Index page1;
   Object onSuccess() {
      return page1;
   }
}
現在,建立一個對應的模板檔案,如下所示。
SubmitComponent.tml
<html t:type = "newlayout" title = "About MyFirstApplication"
   xmlns:t = "http://tapestry.apache.org/schema/tapestry_5_4.xsd"
   xmlns:p = "tapestry:parameter">
   <h3>Tapestry Submit component </h3>

   <body>
      <t:form>
         <t:submit t:id = "submit1" value = "Click to go Index"/>
      </t:form>
   </body>

</html>
這裡,Submit 元件將值提交到 Index 頁面。請求頁面將產生以下結果:
https://:8080/myFirstApplication/SubmitComponent

表單驗證
表單驗證通常在客戶端輸入所有必要資料並提交表單後在伺服器端發生。如果客戶端輸入的資料不正確或丟失,伺服器將必須將所有資料傳送回客戶端,並請求使用正確的資訊重新提交表單。
讓我們考慮以下簡單示例來了解驗證過程。
建立一個名為 Validate 的頁面,如下所示。
Validate.java
package com.example.MyFirstApplication.pages;

import org.apache.tapestry5.annotations.Property;
import org.apache.tapestry5.PersistenceConstants;
import org.apache.tapestry5.annotations.Persist;

public class Validate {
   @Property
   @Persist(PersistenceConstants.FLASH)
   private String firstName;

   @Property
   @Persist(PersistenceConstants.FLASH)
   private String lastName;
}
現在,建立一個對應的模板檔案,如下所示。
Validate.tml
<html t:type = "newlayout" title = "About MyFirstApplication"
   xmlns:t = "http://tapestry.apache.org/schema/tapestry_5_4.xsd"
   xmlns:p = "tapestry:parameter">

   <t:form>
      <table>
         <tr>
            <td><t:label for = "firstName"/>:</td>
            <td><input t:type = "TextField" t:id = "firstName"
            t:validate = "required, maxlength = 7" size = "10"/></td>
         </tr>
         <tr>
            <td><t:label for = "lastName"/>:</td>
            <td><input t:type = "TextField" t:id = "lastName"
            t:validate = "required, maxLength = 5" size = "10"/></td>
         </tr>
      </table>
      <t:submit t:id = "sub" value =" Form validation"/>
   </t:form>

</html>
表單驗證具有以下重要引數:
Max − 定義最大值,例如 = «最大值,20»。
MaxDate − 定義最大日期,例如 = «最大日期,2013/09/06»。類似地,您也可以分配 MinDate。
MaxLength − 最大長度,例如 = «最大長度,80»。
Min − 最小值。
MinLength − 最小長度,例如 = «最小長度,2»。
Email − 電子郵件驗證,使用標準電子郵件正則表示式 ^\w[._\w]*\w@\w[-._\w]*\w\.\w2,6$ 或無。
請求頁面將產生以下結果:
https://:8080/myFirstApplication/Validate

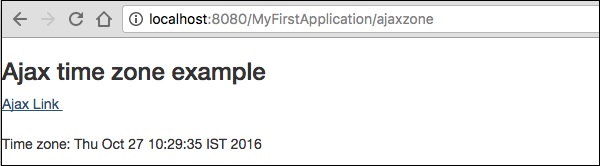
Apache Tapestry - Ajax 元件
AJAX 代表 非同步 JavaScript 和 XML。這是一種利用 XML、JSON、HTML、CSS 和 JavaScript 建立更好、更快、更具互動性的 Web 應用程式的技術。AJAX 允許您非同步傳送和接收資料,而無需重新載入網頁,因此速度很快。
Zone 元件
Zone 元件用於提供內容(標記)以及內容本身的位置。Zone 元件的主體由 Tapestry 內部用於生成內容。生成動態內容後,Tapestry 會將其傳送到客戶端,在正確的位置重新渲染資料,觸發並動畫化 HTML 以吸引使用者的注意力。
此 Zone 元件與 EventLink 元件一起使用。EventLink 具有使用 t:zone 屬性將其繫結到特定區域的選項。配置 EventLink 中的區域後,單擊 EventLink 將觸發區域更新。此外,EventLink 事件(refreshZone)可用於控制動態資料的生成。
一個簡單的 AJAX 示例如下所示:
AjaxZone.tml
<html t:type = "Newlayout" title = "About MyFirstApplication"
   xmlns:t = "http://tapestry.apache.org/schema/tapestry_5_4.xsd"
   xmlns:p = "tapestry:parameter">

   <body>
      <h1>Ajax time zone example</h1>
      <div class = "div1">
         <a t:type = "eventlink" t:event = "refreshZone" href = "#"
            t:zone = "timeZone">Ajax Link </a><br/><br/>
         <t:zone t:id = "timeZone" id = "timeZone">Time zone: ${serverTime}</t:zone>
      </div>
   </body>

</html>
AjaxZone.java
package com.example.MyFirstApplication.pages;

import java.util.Date;
import org.apache.tapestry5.annotations.InjectComponent;
import org.apache.tapestry5.corelib.components.Zone;
import org.apache.tapestry5.ioc.annotations.Inject;
import org.apache.tapestry5.services.Request;

public class AjaxZone {
   @Inject
   private Request request;

   @InjectComponent
   private Zone timeZone;

   void onRefreshPage() {
   }

   Object onRefreshZone() {
      return request.isXHR() ? timeZone.getBody() : null;
   }

   public Date getServerTime() {
      return new Date();
   }
}
結果將顯示在:https://:8080/MyFirstApplication/AjaxZone
Apache Tapestry - Hibernate
在本章中,我們將討論 BeanEditForm 和 Grid 元件 與 Hibernate 的整合。Hibernate 透過 hibernate 模組整合到 Tapestry 中。要啟用 hibernate 模組,請在 pom.xml 檔案中新增 tapestry-hibernate 依賴項以及可選的 hsqldb。現在,透過位於資原始檔夾根目錄下的 hibernate.cfg.xml 檔案配置 hibernate。
pom.xml(部分)
<dependency>
   <groupId>org.apache.tapestry</groupId>
   <artifactId>tapestry-hibernate</artifactId>
   <version>${tapestry-release-version}</version>
</dependency>

<dependency>
   <groupId>org.hsqldb</groupId>
   <artifactId>hsqldb</artifactId>
   <version>2.3.2</version>
</dependency>
Hibernate.cfg.xml
<!DOCTYPE hibernate-configuration PUBLIC
   "-//Hibernate/Hibernate Configuration DTD 3.0//EN"
   "http://hibernate.sourceforge.net/hibernate-configuration-3.0.dtd">

<hibernate-configuration>
   <session-factory>
      <property name = "hibernate.connection.driver_class">
         org.hsqldb.jdbcDriver
      </property>
      <property name = "hibernate.connection.url">
         jdbc:hsqldb:./target/work/sampleapp;shutdown = true
      </property>
      <property name = "hibernate.dialect">
         org.hibernate.dialect.HSQLDialect
      </property>

      <property name = "hibernate.connection.username">sa</property>
      <property name = "hibernate.connection.password"></property>
      <property name = "hbm2ddl.auto">update</property>
      <property name = "hibernate.show_sql">true</property>
      <property name = "hibernate.format_sql">true</property>
   </session-factory>
</hibernate-configuration>
讓我們看看如何使用 BeanEditForm 元件建立 員工新增頁面,以及如何使用 Grid 元件建立 員工列表頁面。持久層由 Hibernate 模組處理。
建立一個員工類,並使用 @Entity 註解對其進行裝飾。然後,為相關欄位新增驗證註解,以及與 hibernate 相關的註解 @Id 和 @GeneratedValue 用於 id 欄位。此外,將性別建立為列舉型別。
Employee.java
package com.example.MyFirstApplication.entities;

import javax.persistence.Entity;
import javax.persistence.GeneratedValue;
import javax.persistence.GenerationType;
import javax.persistence.Id;
import org.apache.tapestry5.beaneditor.NonVisual;
import org.apache.tapestry5.beaneditor.Validate;

@Entity
public class Employee {
   @Id
   @GeneratedValue(strategy = GenerationType.IDENTITY)
   @NonVisual
   public Long id;

   @Validate("required")
   public String firstName;

   @Validate("required")
   public String lastName;

   @Validate("required")
   public String userName;

   @Validate("required")
   public String password;

   @Validate("required")
   public String email;
   public String phone;

   @Validate("required")
   public String Street;

   @Validate("required")
   public String city;

   @Validate("required")
   public String state;

   @Validate("required,regexp=^\\d{5}(-\\d{4})?$")
   public String zip;
}
Gender.java (enum)
package com.example.MyFirstApplication.data;

public enum Gender {
   Male, Female
}
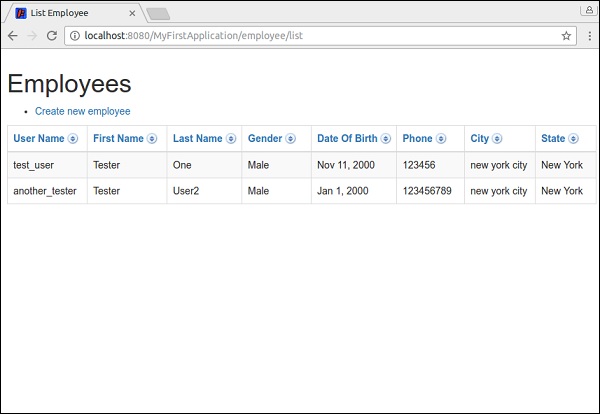
在 pages 下面的新資料夾 employee 中建立員工列表頁面 ListEmployee.java,並在 /src/main/resources/pages/employee 資料夾中建立相應的模板檔案 ListEmployee.tml。Tapestry 透過刪除重複資料為子資料夾提供了簡短的 URL。
例如,ListEmployee 頁面可以透過普通 URL(/employee/listemployee)和簡短 URL(/employee/list)訪問。
使用 @Inject 註解將 Hibernate 會話注入到列表頁面中。在列表頁面中定義一個屬性 getEmployees,並使用注入的會話物件使用員工填充它。完成員工類的程式碼,如下所示。
ListEmployee.java
package com.example.MyFirstApplication.pages.employee;

import java.util.List;
import org.apache.tapestry5.annotations.Import;
import org.apache.tapestry5.ioc.annotations.Inject;
import org.hibernate.Session;
import com.example.MyFirstApplication.entities.Employee;
import org.apache.tapestry5.annotations.Import;
@Import(stylesheet="context:mybootstrap/css/bootstrap.css")

public class ListEmployee {
   @Inject
   private Session session;

   public List<Employee> getEmployees() {
      return session.createCriteria(Employee.class).list();
   }
}
為 ListEmployee 類建立模板檔案。模板將有兩個主要元件,它們是:
PageLink − 建立員工連結頁面。
Grid − 用於渲染員工詳細資訊。grid 元件具有 sources 屬性以注入員工列表,並具有 include 屬性以包含要渲染的欄位。
ListEmployee.tml(列出所有員工)
<html t:type = "simplelayout" title = "List Employee"
   xmlns:t = "http://tapestry.apache.org/schema/tapestry_5_4.xsd">
   <h1>Employees</h1>

   <ul>
      <li><t:pagelink page = "employee/create">Create new employee</t:pagelink></li>
   </ul>
   <t:grid source = "employees"
      include = "userName,firstName,lastName,gender,dateOfBirth,phone,city,state"/>
</html>
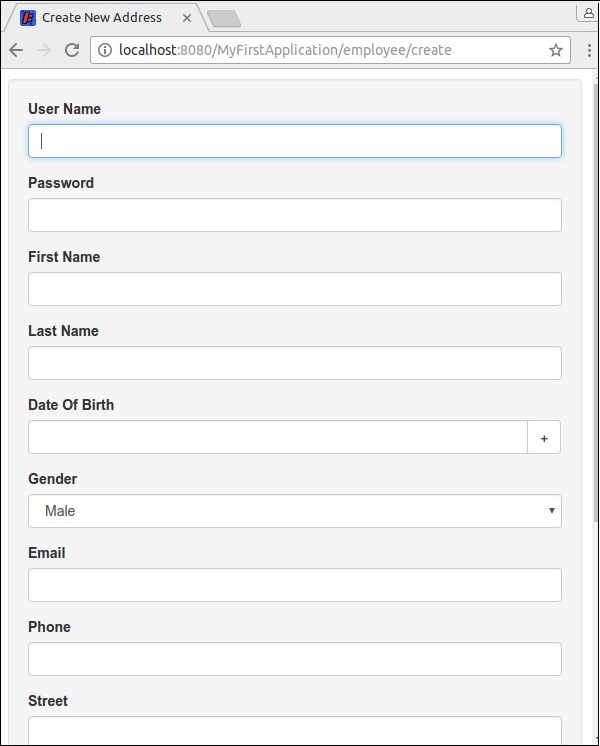
建立員工建立模板檔案幷包含 BeanEditForm 元件。該元件具有以下屬性:
object − 包含源。
reorder − 定義要呈現的欄位的順序。
submitlabel − 表單提交按鈕的訊息
完整的程式碼如下所示:
<html t:type = "simplelayout" title = "Create New Address"
   xmlns:t = "http://tapestry.apache.org/schema/tapestry_5_4.xsd">
   <t:beaneditform
      object = "employee"
      submitlabel = "message:submit-label"
      reorder = "userName,password,firstName,lastName,
      dateOfBirth,gender,email,phone,s treet,city,state,zip" />
</html>
建立員工建立類幷包含會話、員工屬性、列表頁面(導航連結)並定義元件的OnSuccess事件(更新資料的位置)。會話資料使用Hibernate會話持久化到資料庫中。
完整的程式碼如下所示:
package com.example.MyFirstApplication.pages.employee;

import com.example.MyFirstApplication.entities.Employee;
import com.example.MyFirstApplication.pages.employee.ListEmployee;
import org.apache.tapestry5.annotations.InjectPage;
import org.apache.tapestry5.annotations.Property;
import org.apache.tapestry5.hibernate.annotations.CommitAfter;
import org.apache.tapestry5.ioc.annotations.Inject;
import org.hibernate.Session;

public class CreateEmployee {
   @Property
   private Employee employee;
   @Inject
   private Session session;
   @InjectPage
   private ListEmployee listPage;
   @CommitAfter
   Object onSuccess() {
      session.persist(employee);
      return listPage;
   }
}
新增CreateEmployee.properties檔案幷包含在表單驗證中使用的訊息。完整的程式碼如下所示:
zip-regexp=^\\d{5}(-\\d{4})?$
zip-regexp-message = Zip Codes are five or nine digits. Example: 02134 or 901251655.
submit-label = Create Employee
下面顯示了員工建立頁面和列表頁面的螢幕截圖:
Apache Tapestry - 儲存
每個Web應用程式都應該有一些方法來儲存某些使用者資料,例如使用者物件、使用者偏好等。例如,在購物車應用程式中,使用者的選定商品/產品應儲存在臨時儲存區(購物車)中,直到使用者選擇購買這些商品。我們可以將商品儲存在資料庫中,但這將過於昂貴,因為並非所有使用者都會購買選定的商品。因此,我們需要一個臨時的安排來儲存/持久化這些商品。Apache Tapestry提供兩種持久化資料的方法,它們是:
- 持久化頁面資料
- 會話儲存
兩者都有其自身的優點和侷限性。我們將在以下部分中進行檢查。
持久化頁面資料
持久化頁面資料是一個簡單的概念,用於在請求之間持久化單個頁面中的資料,也稱為頁面級持久化。它可以使用@Persist註解來完成。
@Persist
public int age;
一旦某個欄位用@Persist進行註解,該欄位的值將在請求之間持久化,如果在請求期間更改了該值,則下次訪問時將反映出來。Apache Tapestry提供了五種型別的策略來實現@Persist概念。它們如下所示:
會話策略 − 使用會話持久化資料,這是預設策略。
快閃記憶體策略 − 也使用會話持久化資料,但它是一個非常短暫的策略。資料僅在下一個請求中可用。
@Persist(PersistenceConstants.FLASH)
private int age;
客戶端策略 − 將資料持久化到客戶端,例如URL查詢字串、表單中的隱藏欄位等。
@Persist(PersistenceConstants.FLASH)
private int age;
Hibernate實體策略 − 使用Hibernate模組作為實體持久化資料。實體將儲存在Hibernate中,其引用(Java類名及其主鍵)將作為令牌儲存在HttpSession中。實體將透過使用HttpSession中可用的令牌來恢復。
@Persist(HibernatePersistenceConstants.ENTITY)
private Category category;
JPA實體策略 − 使用JPA模組持久化資料。它只能儲存實體。
@Persist(JpaPersistenceConstants.ENTITY)
private User user;
會話儲存
會話儲存是一個高階概念,用於儲存需要跨頁面可用(例如多頁面嚮導中的資料、已登入的使用者詳細資訊等)的資料。會話儲存提供兩個選項,一個用於儲存複雜物件,另一個用於儲存簡單值
會話儲存物件 − 用於儲存複雜物件。
會話屬性 − 用於儲存簡單值。
會話儲存物件(SSO)
可以使用@SessionStore註解建立SSO。SSO將使用物件的型別儲存物件。例如,購物車物件將使用購物車類名作為令牌儲存。因此,任何複雜物件都可以在應用程式中儲存一次(每個使用者一個)。
public class MySSOPage {
   @SessionState
   private ShoppingCart cart;
}
SSO是一個專門的儲存,應該僅用於儲存複雜/特殊物件。簡單資料型別也可以使用SSO儲存,但是儲存像String這樣的簡單資料型別只會使應用程式儲存一個“String”值。在應用程式中使用單個“String”值是不可能的。您可以使用簡單資料型別,因為Apache Tapestry提供了會話屬性。
會話屬性
會話屬性允許按名稱而不是型別儲存資料。
public class MyPage {
   @SessionAttribute
   private String loggedInUsername;
}
預設情況下,會話屬性使用欄位名稱在會話中引用資料。我們可以透過註解引數更改引用名稱,如下所示:
public class MyPage {
   @SessionAttribute("loggedInUserName")
   private String userName;
}
使用名稱作為會話引用的主要問題之一是,我們可能會意外地在多個類/頁面中使用相同的名稱。在這種情況下,儲存的資料可能會意外更改。為了解決此問題,最好將名稱與類/頁面名稱和包名稱一起使用,例如com.myapp.pages.register.email,其中com.myapp.pages是包名稱,register是頁面/類名稱,最後email是變數(要儲存)名稱。
Apache Tapestry - 高階功能
在本章中,我們將詳細討論Apache Tapestry的一些高階功能。
控制反轉
Tapestry提供內建的控制反轉庫。Tapestry與IoC深度整合,並將其用於所有功能。Tapestry IoC配置基於Java本身,而不是像許多其他IoC容器那樣基於XML。基於Tapestry IoC的模組打包到JAR檔案中,只需將其放入類路徑中即可,無需任何配置。Tapestry IoC的使用基於輕量級,這意味著:
兩個或三個方法的小介面。
兩個或三個引數的小方法。
透過事件進行匿名通訊,而不是顯式方法呼叫。
模組
模組是擴充套件Tapestry應用程式功能的一種方式。Tapestry既有內建模組,也有大量第三方模組。Hibernate是Tapestry提供的熱門且非常有用的模組之一。它還具有集成了JMX、JPA、Spring Framework、JSR 303 Bean Validation、JSON等模組。一些值得注意的第三方模組是:
- Tapestry-Cayenne
- Tapestry5-googleanalytics
- Tapestry 5 團隊 - Tapestry5-HighCharts
- Tapestry 5 團隊 - Tapestry5-jqPlot
- Tapestry 5 團隊 - Tapestry5-Jquery
- Tapestry 5 團隊 - Tapestry5-Jquery-mobile
- Tapestry 5 團隊 - Tapestry5-Portlet
執行時異常
Tapestry最好的功能之一是詳細的錯誤報告。Tapestry透過提供最先進的異常報告來幫助開發人員。Tapestry異常報告是包含詳細資訊的簡單HTML。任何人都可以輕鬆理解報告。Tapestry以HTML顯示錯誤,並以純文字格式儲存異常,其中包含發生異常的日期和時間。這將有助於開發人員在生產環境中檢查異常。開發人員可以確信可以修復任何問題,例如損壞的模板、意外的空值、不匹配的請求等。
即時類和模板重新載入
修改模板和類時,Tapestry將自動重新載入它們。此功能使應用程式更改能夠立即反映出來,而無需經歷構建和測試周期。此外,此功能極大地提高了應用程式開發的生產力。
假設應用程式的根包是org.example.myfirstapp。然後,將掃描以下路徑中的類以進行重新載入。
- org.example.myfirstapp.pages
- org.example.myfirstapp.components
- org.example.myfirstapp.mixins
- org.example.myfirstapp.base
- org.example.myfirstapp.services
可以透過在AppModule.java中將生產模式設定為true來停用即時類重新載入。
configuration.add(SymbolicConstants.PRODUCTION_MODE,”false”);
單元測試
單元測試是一種測試單個頁面和元件的技術。Tapestry提供了輕鬆單元測試頁面和元件的選項。
測試頁面:Tapestry提供了一個名為PageTester的類來測試應用程式。它充當瀏覽器和servlet容器。它在伺服器端本身渲染頁面,無需瀏覽器,並且可以檢查結果文件的正確渲染。考慮一個簡單的頁面Hello,它渲染hello,並且hello文字包含在id為hello_id的html元素內。要測試此功能,我們可以使用PageTester,如下所示:
public class PageTest extends Assert {
   @Test
   public void test1() {
      Sring appPackage = "org.example.myfirstapp"; // package name
      String appName = "App1"; // app name
      PageTester tester = new PageTester(appPackage, appName, "src/main/webapp");
      Document doc = tester.renderPage("Hello");
      assertEquals(doc.getElementById("hello_id").getChildText(), "hello");
   }
}
除了渲染頁面之外,PageTester還提供包含上下文資訊、表單提交、連結導航等的選項。
整合測試
整合測試有助於將應用程式作為一個模組進行測試,而不是像單元測試那樣檢查各個頁面。在整合測試中,可以將多個模組作為一個單元一起測試。Tapestry提供了一個名為Tapestry Test Utilities的小型庫來執行整合測試。該庫與Selenium測試工具整合以執行測試。該庫提供了一個基類SeleniumTestCase,它啟動並管理Selenium伺服器、Selenium客戶端和Jetty例項。
整合測試的一個示例如下所示:
import org.apache.tapestry5.test.SeleniumTestCase;
import org.testng.annotations.Test;

public class IntegrationTest extends SeleniumTestCase {
   @Test
   public void persist_entities() {
      open("/persistitem");
      assertEquals(getText("//span[@id='name']").length(), 0);
      clickAndWait("link = create item");
      assertText("//span[@id = 'name']", "name");
   }
}
開發儀表盤
開發儀表盤是用於識別/解決應用程式中問題的預設頁面。可以透過URLhttps://:8080/myfirstapp/core/t5dashboard訪問儀表盤。儀表盤顯示應用程式中可用的所有頁面、服務和元件庫。
響應壓縮
Tapestry使用GZIP壓縮自動壓縮響應並將其流式傳輸到客戶端。此功能將減少網路流量並有助於更快地交付頁面。可以使用AppModule.java中的符號tapestry.min-gzip-size配置壓縮。預設值為100位元組。一旦響應的大小超過100位元組,Tapestry將壓縮響應。
安全性
Tapestry提供了許多選項來保護應用程式免受Web應用程式中已知的安全漏洞的攻擊。其中一些選項如下所示:
HTTPS − 可以使用@Secure註解Tapestry頁面,使其成為安全頁面,並且只能透過https協議訪問。
頁面訪問控制 − 控制僅允許特定使用者訪問頁面。
白名單頁面 − 可以使用@WhitelistAccessOnly註解Tapestry頁面,使其只能透過localhost訪問。
資產安全 − 在Tapestry下,只能訪問某些型別的檔案。其他檔案只有在提供檔案的MD5雜湊時才能訪問。
序列化物件日期 − Tapestry將HMAC整合到序列化的Java物件資料中,並將其傳送到客戶端以避免訊息篡改。
跨站點請求偽造 − Tapestry提供了一個名為tapestry-csrf-protection的第三方模組來防止任何CSRF攻擊。
安全框架整合 − Tapestry不會鎖定到單個身份驗證/授權實現。Tapestry可以與任何流行的身份驗證框架整合。
日誌記錄
Tapestry為日誌記錄提供了廣泛的支援,日誌記錄是在應用程式執行時自動記錄其進度。Tapestry使用事實上的Java日誌記錄庫SLF4J。@Log註解可以在任何元件方法中使用,以發出方法的入口和出口以及可能的異常。此外,Tapestry提供的日誌記錄器物件可以使用@Inject註解注入到任何元件中,如下所示:
public class MyPage {
   @Inject
   private Logger logger;

   // . . .

   void onSuccessFromForm() {
      logger.info("Changes saved successfully");
   }

   @Log
   void onValidateFromForm() {
      // logic
   }
}
最後,我們現在可以說Apache Tapestry提供了構建簡潔、可擴充套件、可維護、健壯且支援Ajax的應用程式的最佳方法。Tapestry可以與任何第三方Java應用程式整合。它還可以幫助建立大型Web應用程式,因為它非常簡單快捷。