Apache CXF 與 WSDL 優先
您開發的 CXF-POJO 應用程式導致客戶端和伺服器之間存在非常緊密的耦合。直接訪問服務介面也可能帶來嚴重的安全威脅。因此,通常需要在客戶端和伺服器之間進行解耦,這可以透過使用 WSDL(Web 服務描述語言)來實現。
我們使用基於 XML 的 WSDL 文件編寫 Web 服務介面。我們將使用一個工具將此 WSDL 對映到 Apache CXF 介面,然後由我們的客戶端和伺服器應用程式實現和使用這些介面。為了提供解耦,從 WSDL 開始是一種首選方式。為此,您需要首先學習一門新語言 - WSDL。編寫 WSDL 需要謹慎的方法,如果您在開始使用它之前能夠對其有所瞭解,將會更好。
在本課中,我們將首先在 WSDL 文件中定義 Web 服務介面。我們將學習如何使用 CXF 從 WSDL 建立伺服器和客戶端應用程式。我們將使應用程式保持簡單,以保持對 CXF 用法的關注。建立伺服器應用程式後,我們將使用內建的 CXF 類將其釋出到所需的 URL。
首先,讓我們描述我們將要使用的 WSDL。
HelloWorld 的 WSDL
我們將要實現的 Web 服務將有一個名為 **greetings** 的單個 Web 方法,它接受一個包含使用者名稱的 **string** 引數,並在將問候訊息附加到使用者名稱後,將字串訊息返回給呼叫方。完整的 wsdl 如下所示 -
//Hello.wsdl
<?xml version = "1.0" encoding = "UTF-8"?>
<wsdl:definitions xmlns:soap = "http://schemas.xmlsoap.org/wsdl/soap/"
   xmlns:tns = "http://helloworld.tutorialspoint.com/"
   xmlns:wsdl = "http://schemas.xmlsoap.org/wsdl/"
   xmlns:xsd = "http://www.w3.org/2001/XMLSchema"
   name = "HelloWorld"
   targetNamespace = "http://helloworld.tutorialspoint.com/">
   <wsdl:types>
      <xsd:schema attributeFormDefault = "unqualified"
         elementFormDefault = "qualified"
         targetNamespace = "http://helloworld.tutorialspoint.com/">
         <xsd:element name = "greetings" type = "tns:greetings"/>
         <xsd:complexType name = "greetings">
            <xsd:sequence>
               <xsd:element minOccurs = "0" name = "arg0" type = "xsd:string"/>
            </xsd:sequence>
         </xsd:complexType>
         <xsd:element name = "greetingsResponse"
         type = "tns:greetingsResponse"/>
         <xsd:complexType name = "greetingsResponse">
            <xsd:sequence>
               <xsd:element minOccurs = "0" name = "return" type = "xsd:string"/>
            </xsd:sequence>
         </xsd:complexType>
      </xsd:schema>
   </wsdl:types>
   <wsdl:message name = "greetings">
      <wsdl:part element = "tns:greetings" name = "parameters"> </wsdl:part>
   </wsdl:message>
   <wsdl:message name = "greetingsResponse">
      <wsdl:part element = "tns:greetingsResponse" name = "parameters"> </wsdl:part>
   </wsdl:message>
   <wsdl:portType name = "HelloWorldPortType">
      <wsdl:operation name = "greetings">
         <wsdl:input message = "tns:greetings" name = "greetings">  </wsdl:input>
         <wsdl:output message = "tns:greetingsResponse" name = "greetingsResponse">
         </wsdl:output>
      </wsdl:operation>
   </wsdl:portType>
   <wsdl:binding name = "HelloWorldSoapBinding" type = "tns:HelloWorldPortType">
      <soap:binding style = "document"
      transport = "http://schemas.xmlsoap.org/soap/http"/>
      <wsdl:operation name = "greetings">
         <soap:operation soapAction = "" style = "document"/>
         <wsdl:input name = "greetings"></wsdl:input>
         <wsdl:output name = "greetingsResponse">
            <soap:body use = "literal"/>
         </wsdl:output>
         </wsdl:operation>
   </wsdl:binding>
   <wsdl:service name = "HelloWorldService">
      <wsdl:port binding = "tns:HelloWorldSoapBinding" name = "HelloWorldPort">
         <soap:address location = "https://:9090/HelloServerPort"/>
      </wsdl:port>
   </wsdl:service>
</wsdl:definitions>
請注意,編寫語法正確的 wsdl 一直是開發人員面臨的挑戰;有許多工具和線上編輯器可用於建立 wsdl。這些編輯器會詢問您要實現的訊息名稱以及您希望在訊息中傳遞的引數以及您希望客戶端應用程式接收的返回訊息型別。如果您瞭解 wsdl 語法,則可以手動編寫整個文件或使用其中一個編輯器建立自己的文件。
在上面的 wsdl 中,我們定義了一個名為 **greetings** 的單個訊息。該訊息傳遞給名為 **HelloWorldService** 的服務,該服務正在 **https://:9090/HelloServerPort** 上執行。
有了這些,我們現在將繼續進行伺服器開發。在開發伺服器之前,我們需要為我們的 Web 服務生成 Apache CXF 介面。這需要從給定的 wsdl 完成。為此,您使用一個名為 **wsdl2java** 的工具。
wsdl2java 外掛
由於我們將使用 maven 構建專案,因此您需要將以下外掛新增到 **pom.xml** 檔案中。
<plugins>
   <plugin>
      <groupId>org.apache.cxf</groupId>
      <artifactId>cxf-codegen-plugin</artifactId>
      <version>3.3.0</version>
      <executions>
         <execution>
            <id>generate-sources</id>
            <phase>generate-sources</phase>
            <configuration>
               <wsdlOptions>
                  <wsdlOption>
                     <wsdl>src/main/resources/hello.wsdl</wsdl>
                     <faultSerialVersionUID> 1 </faultSerialVersionUID>
                  </wsdlOption>
               </wsdlOptions>
            </configuration>
            <goals>
               <goal>wsdl2java</goal>
            </goals>
         </execution>
      </executions>
   </plugin>
</plugins>
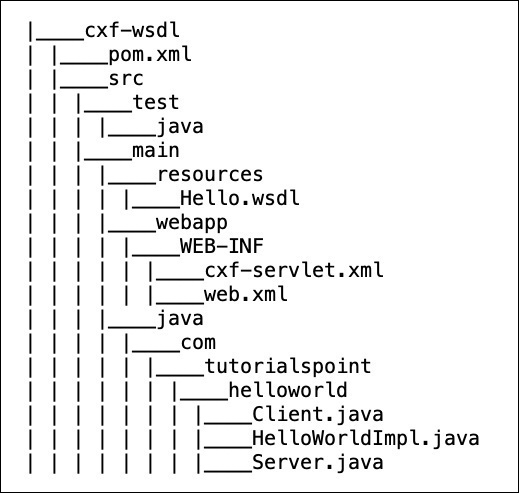
請注意,我們將 wsdl 檔案的位置指定為 **src/main/resources/Hello.wsdl**。您需要確保為您的專案建立了適當的目錄結構並將前面顯示的 **hello.wsdl** 檔案新增到指定的資料夾中。
**wsdl2java** 外掛將編譯此 wsdl 並在預定義的資料夾中建立 Apache CXF 類。為了方便您參考,這裡顯示了完整的專案結構。
現在,您可以使用 **wsdl2java** 生成的類建立伺服器了。wsdl2java 建立的類如下圖所示 -
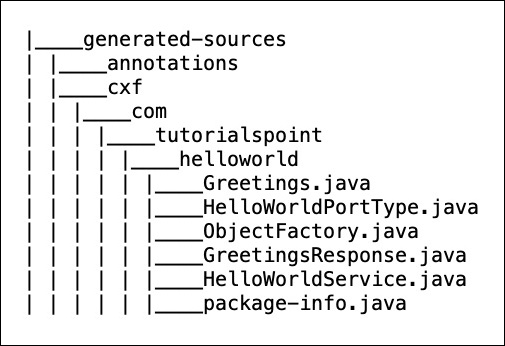
生成的 Service 介面
在生成的類列表中,您一定注意到了其中一個類是 Apache CXF 介面 - 這是 **HelloWorldPortType.java**。在您的程式碼編輯器中檢查此檔案。為了方便您參考,這裡顯示了檔案內容 -
//HelloWorldPortType.java
package com.tutorialspoint.helloworld;
import javax.jws.WebMethod;
import javax.jws.WebParam;
import javax.jws.WebResult;
import javax.jws.WebService;
import javax.xml.bind.annotation.XmlSeeAlso;
import javax.xml.ws.RequestWrapper;
import javax.xml.ws.ResponseWrapper;
/**
* This class was generated by Apache CXF 3.3.0
* 2019-02-11T12:05:55.220+05:30
* Generated source version: 3.3.0
*
*/

@WebService(targetNamespace = "http://helloworld.tutorialspoint.com/",
   name = "HelloWorldPortType")
@XmlSeeAlso({ObjectFactory.class})
public interface HelloWorldPortType {
   @WebMethod
   @RequestWrapper(localName = "greetings", targetNamespace =
      "http://helloworld.tutorialspoint.com/", className =
      "com.tutorialspoint.helloworld.Greetings")
      @ResponseWrapper(localName = "greetingsResponse", targetNamespace =
         "http://helloworld.tutorialspoint.com/", className =
         "com.tutorialspoint.helloworld.GreetingsResponse")
   @WebResult(name = "return", targetNamespace =
      "http://helloworld.tutorialspoint.com/")
   public java.lang.String greetings(
      @WebParam(name = "arg0", targetNamespace =
      "http://helloworld.tutorialspoint.com/")
      java.lang.String arg0
   );
}
請注意,該介面包含一個名為 **greetings** 的方法。這是我們 wsdl 中的一種訊息型別。**wsdl2java** 工具已將此方法新增到生成的介面中。現在,您可以理解,您在 wsdl 中編寫的任何訊息,都將在介面中生成對應的方法。
現在,您的任務將是實現所有這些方法,這些方法對應於您在 wsdl 中定義的各種訊息。請注意,在前面 Apache CXF-First 的示例中,我們從 Web 服務的 Apache CXF 介面開始。在這種情況下,Apache CXF 介面是從 wsdl 建立的。
實現 Service 介面
服務介面的實現非常簡單。完整的實現如下所示 -
//HelloWorldImpl.java
package com.tutorialspoint.helloworld;
public class HelloWorldImpl implements HelloWorldPortType {
   @Override
   public String greetings(String name) {
      return ("hi " + name);
   }
}
程式碼實現了名為 **greetings** 的唯一介面方法。該方法採用一個 **string** 型別的引數,在其前面加上“hi”訊息,並將結果字串返回給呼叫方。
接下來,我們將編寫伺服器應用程式。
開發伺服器
開發伺服器應用程式同樣非常簡單。在這裡,我們將使用 CXF 提供的 **Endpoint** 類來發布我們的服務。這是在以下兩行程式碼中完成的 -
HelloWorldPortType implementor = new HelloWorldImpl();
   Endpoint.publish("https://:9090/HelloServerPort",
      implementor,
      new LoggingFeature());
首先,我們建立服務實現類 **HelloWorldImpl** 的物件。然後,我們將此引用作為第二個引數傳遞給 **publish** 方法。第一個引數是釋出服務的目標地址 - 客戶端將使用此 URL 訪問服務。伺服器應用程式的完整原始碼如下所示 -
//Server.java
package com.tutorialspoint.helloworld;
import javax.xml.ws.Endpoint;
import org.apache.cxf.ext.logging.LoggingFeature;
public class Server {
   public static void main(String[] args) throws Exception {
      HelloWorldPortType implementor = new HelloWorldImpl();
      Endpoint.publish("https://:9090/HelloServerPort",
         implementor,
         new LoggingFeature());
      System.out.println("Server ready...");
      Thread.sleep(5 * 60 * 1000);
      System.out.println("Server exiting");
      System.exit(0);
   }
}
要構建此伺服器類,您需要在 **pom.xml** 中新增一個構建配置檔案。如下所示 -
<profile>
   <id>server</id>
   <build>
      <defaultGoal>test</defaultGoal>
      <plugins>
         <plugin>
            <groupId>org.codehaus.mojo</groupId>
            <artifactId>exec-maven-plugin</artifactId>
            <version>1.6.0</version>
            <executions>
               <execution>
                  <phase>test</phase>
                  <goals>
                     <goal>java</goal>
                  </goals>
                  <configuration>
                     <mainClass>
                        com.tutorialspoint.helloworld.Server
                     </mainClass>
                  </configuration>
               </execution>
            </executions>
         </plugin>
      </plugins>
   </build>
   <dependencies>
      <dependency>
         <groupId>org.apache.cxf</groupId>
         <artifactId>cxf-rt-transports-http-jetty</artifactId>
         <version>3.3.0</version>
      </dependency>
   </dependencies>
</profile>
請注意,配置中指定了 **Server** 類的完全限定名稱。此外,dependency 標籤指定我們將使用嵌入式 jetty web 伺服器來部署我們的伺服器應用程式。
部署伺服器
最後,要部署伺服器應用程式,您需要在 pom.xml 中進行另一個修改,以將您的應用程式設定為 Web 應用程式。您需要新增到 **pom.xml** 中的程式碼如下所示 -
<defaultGoal>install</defaultGoal>
<pluginManagement>
   <plugins>
      <plugin>
         <artifactId>maven-war-plugin</artifactId>
         <version>3.2.2</version>
         <configuration>
            <webXml>src/main/webapp/WEB-INF/web.xml</webXml>
            <webResources>
               <resource>
                  <directory>src/main/resources</directory>
                  <targetPath>WEB-INF</targetPath>
                  <includes>
                     <include>*.wsdl</include>
                  </includes>
               </resource>
            </webResources>
         </configuration>
      </plugin>
   </plugins>
</pluginManagement>
在部署應用程式之前,您需要向專案中新增兩個檔案。如下面的螢幕截圖所示 -
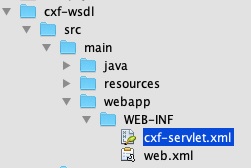
這些檔案是 CXF 標準檔案,定義了 **CXFServlet** 的對映。為了方便您快速參考,這裡顯示了 **web.xml** 檔案中的程式碼 -
//cxf-servlet.xml
<web-app xmlns = "http://java.sun.com/xml/ns/javaee"
   xmlns:xsi = "http://www.w3.org/2001/XMLSchema-instance" version="2.5"
   xsi:schemaLocation = "http://java.sun.com/xml/ns/javaee
   http://java.sun.com/xml/ns/javaee/web-app_2_5.xsd">
   <display-name>cxf</display-name>
   <servlet>
      <description>Apache CXF Endpoint</description>
      <display-name>cxf</display-name>
      <servlet-name>cxf</servlet-name>
      <servlet-class>
         org.apache.cxf.transport.servlet.CXFServlet
      </servlet-class>
      <load-on-startup>1</load-on-startup>
   </servlet>
   <servlet-mapping>
      <servlet-name>cxf</servlet-name>
      <url-pattern>/services/*</url-pattern>
   </servlet-mapping>
   <session-config>
      <session-timeout>60</session-timeout>
   </session-config>
</web-app>
在 **cxf-servlet.xml** 中,您聲明瞭服務端點屬性。這在下面的程式碼片段中顯示 -
<beans ...>
   <jaxws:endpoint xmlns:helloworld = "https://tutorialspoint.tw/"
      id="helloHTTP"
      address = "https://:9090/HelloServerPort"
      serviceName = "helloworld:HelloServiceService"
      endpointName = "helloworld:HelloServicePort">
   </jaxws:endpoint>
</beans>
在這裡,我們定義了服務端點的 id、服務可用的地址、服務名稱和端點名稱。現在,您瞭解了服務如何被 CXF servlet 路由和處理。
最終的 pom.xml
**pom.xml** 包含更多依賴項。與其描述所有依賴項,不如在下面包含 pom.xml 的最終版本 -
<?xml version="1.0" encoding = "UTF-8"?>
<project xmlns = "http://maven.apache.org/POM/4.0.0"
   xmlns:xsi = "http://www.w3.org/2001/XMLSchema-instance"
   xsi:schemaLocation = "http://maven.apache.org/POM/4.0.0 http://maven.apache.org/xsd/maven-4.0.0.xsd">
   <modelVersion>4.0.0</modelVersion>
   <groupId>com.tutorialspoint</groupId>
   <artifactId>cxf-wsdl</artifactId>
   <version>1.0</version>
   <packaging>jar</packaging>
   <properties>
      <project.build.sourceEncoding>UTF-8</project.build.sourceEncoding>
      <maven.compiler.source>1.8</maven.compiler.source>
      <maven.compiler.target>1.8</maven.compiler.target>
   </properties>
   <build>
      <defaultGoal>install</defaultGoal>
      <pluginManagement>
         <plugins>
            <plugin>
               <artifactId>maven-war-plugin</artifactId>
               <version>3.2.2</version>
               <configuration>
                  <webXml>src/main/webapp/WEB-INF/web.xml</webXml>
                  <webResources>
                     <resource>
                        <directory>src/main/resources</directory>
                        <targetPath>WEB-INF</targetPath>
                        <includes>
                           <include>*.wsdl</include>
                        </includes>
                     </resource>
                  </webResources>
               </configuration>
            </plugin>
         </plugins>
      </pluginManagement>
      <plugins>
         <plugin>
            <groupId>org.apache.cxf</groupId>
            <artifactId>cxf-codegen-plugin</artifactId>
            <version>3.3.0</version>
            <executions>
               <execution>
                  <id>generate-sources</id>
                  <phase>generate-sources</phase>
                  <configuration>
                     <wsdlOptions>
                        <wsdlOption>
                           <wsdl>src/main/resources/Hello.wsdl</wsdl>
                           <faultSerialVersionUID>1</faultSerialVersionUID>
                        </wsdlOption>
                     </wsdlOptions>
                  </configuration>
                  <goals>
                     <goal>wsdl2java</goal>
                  </goals>
               </execution>
            </executions>
         </plugin>
      </plugins>
   </build>
   <profiles>
      <profile>
         <id>server</id>
         <build>
            <defaultGoal>test</defaultGoal>
            <plugins>
               <plugin>
                  <groupId>org.codehaus.mojo</groupId>
                  <artifactId>exec-maven-plugin</artifactId>
                  <version>1.6.0</version>
                  <executions>
                     <execution>
                        <phase>test</phase>
                        <goals>
                           <goal>java</goal>
                        </goals>
                        <configuration>
                           <mainClass>
                              com.tutorialspoint.helloworld.Server
                           </mainClass>
                        </configuration>
                     </execution>
                  </executions>
               </plugin>
            </plugins>
         </build>
         <dependencies>
            <dependency>
               <groupId>org.apache.cxf</groupId>
               <artifactId>cxf-rt-transports-http-jetty</artifactId>
               <version>3.3.0</version>
            </dependency>
         </dependencies>
      </profile>
      <profile>
         <id>client</id>
         <build>
            <defaultGoal>test</defaultGoal>
            <plugins>
               <plugin>
                  <groupId>org.codehaus.mojo</groupId>
                  <artifactId>exec-maven-plugin</artifactId>
                  <executions>
                     <execution>
                        <phase>test</phase>
                        <goals>
                           <goal>java</goal>
                        </goals>
                        <configuration>
                           <mainClass>
                              com.tutorialspoint.helloworld.Client
                           </mainClass>
                        </configuration>
                     </execution>
                  </executions>
               </plugin>
            </plugins>
         </build>
      </profile>
   </profiles>
   <dependencies>
      <dependency>
         <groupId>org.apache.cxf</groupId>
         <artifactId>cxf-rt-frontend-jaxws</artifactId>
         <version>3.3.0</version>
      </dependency>

      <dependency>
         <groupId>org.apache.cxf</groupId>
         <artifactId>cxf-rt-transports-http</artifactId>
         <version>3.3.0</version>
      </dependency>

      <dependency>
         <groupId>org.apache.cxf</groupId>
         <artifactId>cxf-rt-management</artifactId>
         <version>3.3.0</version>
      </dependency>

      <dependency>
         <groupId>org.apache.cxf</groupId>
         <artifactId>cxf-rt-features-metrics</artifactId>
         <version>3.3.0</version>
      </dependency>

      <dependency>
         <groupId>org.apache.cxf.xjc-utils</groupId>
         <artifactId>cxf-xjc-runtime</artifactId>
         <version>3.3.0</version>
      </dependency>

      <dependency>
         <groupId>org.apache.cxf</groupId>
         <artifactId>cxf-rt-features-logging</artifactId>
         <version>3.3.0</version>
      </dependency>

     <dependency>
         <groupId>org.codehaus.mojo</groupId>
         <artifactId>exec-maven-plugin</artifactId>
         <version>1.6.0</version>
      </dependency>

      <dependency>
         <groupId>org.slf4j</groupId>
         <artifactId>slf4j-api</artifactId>
         <version>1.8.0-beta2</version>
      </dependency>

      <dependency>
         <groupId>org.apache.cxf</groupId>
         <artifactId>cxf-rt-transports-http-jetty</artifactId>
         <version>3.3.0</version>
      </dependency>
   </dependencies>
</project>
請注意,它還包括一個用於構建客戶端的配置檔案,我們將在後面的部分中學習。
執行 HelloWorld 服務
現在,您可以執行 Web 應用程式了。在命令視窗中,使用以下命令執行構建指令碼。
mvn clean install
這將從您的 wsdl 生成相應的 Apache CXF 類、編譯您的 Apache CXF 類、將伺服器部署到嵌入式 jetty 伺服器上並執行您的應用程式。
您將在控制檯上看到以下訊息 -
INFO: Setting the server's publish address to be
https://:9090/HelloServerPort
Server ready...
與之前一樣,您可以透過在瀏覽器中開啟伺服器 URL 來測試伺服器。

由於我們沒有指定任何操作,因此我們的應用程式僅將錯誤訊息返回到瀏覽器。現在,嘗試將 **?wsdl** 新增到您的 URL 中,您將看到以下輸出 -
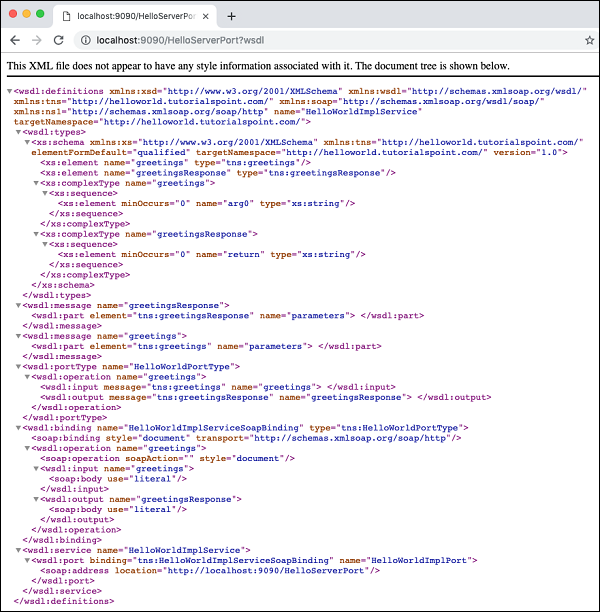
因此,我們的伺服器應用程式按預期執行。您可以使用前面介紹的 SOAP 客戶端(如 **Postman**)進一步測試您的服務。
本教程的下一部分是編寫使用我們服務的客戶端。
開發客戶端
在 CXF 應用程式中編寫客戶端與編寫伺服器一樣重要。以下是客戶端的完整程式碼,它實際上只包含三行,其餘行只是將服務資訊列印給使用者。
//Client.java
package com.tutorialspoint.helloworld;
public class Client {
   public static void main(String[] args) throws Exception {
      //Create the service client with its default wsdlurl
      HelloWorldService helloServiceService = new HelloWorldService();
      System.out.println("service: " +
         helloServiceService.getServiceName());
      System.out.println("wsdl location: " +
         helloServiceService.getWSDLDocumentLocation());
      HelloWorldPortType helloService =
         helloServiceService.getHelloWorldPort();
      System.out.println(helloService.greetings
      (System.getProperty("user.name")));
   }
}
在這裡,我們簡單地建立服務 **HelloWorldService** 的例項,透過呼叫 **getHelloWorldPort** 方法獲取其埠,然後將我們的 **greetings** 訊息傳遞給它。執行客戶端,您將看到以下輸出 -
service: {http://helloworld.tutorialspoint.com/}HelloWorldService
wsdl location: file:/Users/drsarang/Desktop/tutorialpoint/cxf-
wsdl/src/main/resources/Hello.wsdl
hi drsarang
到目前為止,您已經學習瞭如何在 CXF 中使用 Apache CXF-First 和 WSDL-First 架構。在 Apache CXF-First 方法中,您使用 POJO 和 CXF 庫中的 **ServerFactoryBean** 類來建立伺服器。要建立客戶端,您使用了 CXF 庫中的 **ClientProxyFactoryBean** 類。在 WSDL-First 方法中,您使用 **Endpoint** 類在所需的 URL 和指定的實現者處釋出服務。您現在可以擴充套件這些技術來整合不同的協議和傳輸。