Apache CXF 與 POJO
在本節中,您將學習如何開發一個簡單的 Web 應用程式,該應用程式向用戶傳送問候訊息。Web 服務專案使用WSDL 模型。CXF 允許您透過提供一個簡單的前端將 Apache CXF API 對映到底層 WSDL 來隱藏此 WSDL 模型。
在這個最簡單的專案中,Web 服務的介面將直接暴露給客戶端,客戶端將使用原生的 Apache CXF API 來呼叫 Web 服務。
首先,我們將建立一個 Web 服務。每個服務都有一個暴露給客戶端的介面。我們可以將此介面編寫為簡單的 Apache CXF 介面或 WSDL 文件。在這種 Apache CXF-First 方法中,我們將透過 Apache CXF 介面公開我們的服務。
開發 Web 服務
我們將在 Web 上建立的服務將有一個名為greetings的單個 Web 方法。該方法採用string型別的引數,我們將在其中傳送使用者的姓名。該服務將向呼叫方傳送一條問候訊息,其中包含接收到的使用者名稱。
Web 服務介面
為了公開我們的 Web 服務的介面,我們將建立一個 Apache CXF 介面,如下所示:
//HelloWorld.java
package com.tutorialspoint.cxf.pojo;
public interface HelloWorld {
   String greetings(String text);
}
該介面只有一個名為greetings的方法。伺服器將實現此介面。在我們的簡單應用程式中,此介面直接暴露給客戶端。通常,在 Web 服務應用程式中,您使用 WSDL 來描述 Web 服務介面。在這個簡單的應用程式中,我們將向客戶端開發人員提供此直接介面。然後,客戶端將在伺服器物件上呼叫greetings訊息。所以首先讓我們建立 Web 服務。
Web 服務實現
HelloWorld介面在HelloWorldImpl Apache CXF 類中實現,如下所示:
//HelloWorldImpl.java
package com.tutorialspoint.cxf.pojo;
public class HelloWorldImpl implements HelloWorld {
   @Override
   public String greetings(String text) {
      return "Hi " + text;
   }
}
greetings方法接收一個string型別的引數,將其追加到問候訊息中,並將結果字串返回給呼叫方。
接下來,我們編寫伺服器應用程式來託管HelloWorld服務。
建立伺服器
伺服器應用程式由兩部分組成:
第一部分為我們的 Web 服務建立一個工廠,並且
第二部分編寫一個main方法來例項化它。
伺服器使用 CXF 庫提供的ServerFactoryBean類將我們的HelloWorld介面暴露給遠端客戶端。因此,我們首先例項化ServerFactoryBean類,然後設定其各種屬性:
ServerFactoryBean factory = new ServerFactoryBean();
我們透過在factory物件上呼叫setServiceClass方法來設定要呼叫的服務類:
factory.setServiceClass(HelloWorld.class);
我們透過呼叫工廠的setAddress方法來設定呼叫我們服務的 URL。請注意,服務將在此 URL 上釋出。
factory.setAddress("https://:5000/Hello");
在這種情況下,服務部署在嵌入式伺服器上,並將偵聽埠 5000。您可以選擇任何您選擇的埠號。
在建立工廠之前,您需要告訴工廠我們的服務實現類。這是透過在factory物件上呼叫setServiceBean方法來完成的,如下所示:
factory.setServiceBean(new HelloWorldImpl());
服務 bean 設定為我們服務實現類的例項。最後,我們透過呼叫其create方法建立工廠:
factory.create();
現在,由於我們已經開發了執行 Web 服務的工廠,接下來我們將編寫一個main方法來例項化它並使其執行一段時間。
現在,編寫一個main方法來例項化HelloServer類,如下所示:
public static void main(String[] args) throws Exception {
   new HelloServer();
   System.out.println("Listening on port 5000 ...");
}
一旦例項化,HelloServer類將無限期執行。對於生產部署,您肯定希望伺服器永遠執行。在當前情況下,我們將以如下方式在預定時間後終止伺服器:
Thread.sleep(5 * 60 * 1000);
System.out.println("Server exiting ...");
System.exit(0);
HelloServer類的完整程式碼如下所示:
//HelloServer.java
//HelloServer.java
package com.tutorialspoint.cxf.pojo;
import org.apache.cxf.frontend.ServerFactoryBean;
public class HelloServer {
   protected HelloServer() throws Exception {
      ServerFactoryBean factory = new ServerFactoryBean();
      factory.setServiceClass(HelloWorld.class);
      factory.setAddress("https://:5000/Hello");
      factory.setServiceBean(new HelloWorldImpl());
      factory.create();
   }
   public static void main(String[] args) throws Exception {
      new HelloServer();
      System.out.println("Listening on port 5000 ...");
      Thread.sleep(5 * 60 * 1000);
      System.out.println("Server exiting ...");
      System.exit(0);
   }
}
我們建立的伺服器應用程式使用 CXF 庫中的ServerFactoryBean類。我們現在必須將這些庫包含在我們的專案中才能成功編譯HelloServer類。我們將使用Maven來設定專案依賴項。
設定 Maven 專案
要建立 Maven 專案,請在命令列視窗中鍵入以下命令。請注意,我們已在 Mac 機器上對此進行了測試。對於 Windows 和 Linux 安裝,說明可能在某些地方有所不同。
mvn archetype:generate
當系統提示輸入屬性時,輸入以下值:
Define value for property 'groupId': : com.tutorialspoint
Define value for property 'artifactId': : cxf-pojo
Define value for property 'version': 1.0-SNAPSHOT: : 1.0
Define value for property 'package': com.tutorialspoint: : com.tutorialspoint.cxf.pojo
Maven 命令完成後,您將在當前資料夾中找到建立的相應資料夾結構以及 pom.xml 檔案。
生成的目錄結構如下所示:

您將在pom.xml中新增 CXF 依賴項,並將上述建立的 Apache CXF 檔案複製到 maven 建立的結構的相應資料夾中。為了方便您參考,我們在下面給出了我們在機器上建立的專案的 pom.xml 檔案。
<?xml version = "1.0" encoding = "UTF-8"?>
<project xmlns = "http://maven.apache.org/POM/4.0.0" xmlns:xsi = "http://www.w3.org/2001/XMLSchema-instance" xsi:schemaLocation = "http://maven.apache.org/POM/4.0.0 http://maven.apache.org/xsd/maven-4.0.0.xsd">
   <modelVersion>4.0.0</modelVersion>
   <groupId>com.tutorialspoint</groupId>
   <artifactId>cxf-pojo</artifactId>
   <version>1.0</version>
   <packaging>jar</packaging>

   <profiles>
      <profile>
         <id>server</id>
         <build>
            <defaultGoal>test</defaultGoal>
            <plugins>
               <plugin>
                  <groupId>org.codehaus.mojo</groupId>
                  <artifactId>exec-maven-plugin</artifactId>
                  <executions>
                     <execution>
                        <phase>test</phase>
                        <goals>
                           <goal>java</goal>
                        </goals>
                        <configuration>
                           <mainClass>
                              com.tutorialspoint.cxf.pojo.HelloServer
                           </mainClass>
                        </configuration>
                     </execution>
                  </executions>
               </plugin>
            </plugins>
         </build>
      </profile>

      <profile>
         <id>client</id>
         <build>
            <defaultGoal>test</defaultGoal>
            <plugins>
               <plugin>
                  <groupId>org.codehaus.mojo</groupId>
                  <artifactId>exec-maven-plugin</artifactId>
                  <executions>
                     <execution>
                        <phase>test</phase>
                        <goals>
                           <goal>java</goal>
                        </goals>
                        <configuration>
                           <mainClass>
                           com.tutorialspoint.cxf.pojo.HelloClient
                           </mainClass>
                        </configuration>
                     </execution>
                  </executions>
               </plugin>
            </plugins>
         </build>
      </profile>
   </profiles>

   <dependencies>
      <dependency>
         <groupId>org.apache.cxf</groupId>
         <artifactId>cxf-rt-features-logging</artifactId>
         <version>3.3.0</version>
         <type>jar</type>
      </dependency>
      <dependency>
         <groupId>org.apache.cxf</groupId>
         <artifactId>cxf-rt-frontend-simple</artifactId>
         <version>3.3.0</version>
         <type>jar</type>
      </dependency>
      <dependency>
         <groupId>org.apache.cxf</groupId>
         <artifactId>cxf-rt-transports-http</artifactId>
         <version>3.3.0</version>
      </dependency>
      <dependency>
         <groupId>org.apache.cxf</groupId>
         <artifactId>cxf-rt-frontend-jaxws</artifactId>
         <version>3.3.0</version>
      </dependency>
      <!-- Jetty is needed if you're using the CXFServlet -->
      <dependency>
         <groupId>org.apache.cxf</groupId>
         <artifactId>cxf-rt-transports-http-jetty</artifactId>
         <version>3.3.0</version>
      </dependency>
   </dependencies>
   <properties>
      <project.build.sourceEncoding>UTF-8</project.build.sourceEncoding>
      <maven.compiler.source>1.8</maven.compiler.source>
      <maven.compiler.target>1.8</maven.compiler.target>
   </properties>
</project>
上面的 pom.xml 可能包含與本專案無關的其他依賴項,但對於本教程中的下一個專案是必需的。無論如何,包含其他依賴項本身並無害處。
專案資料夾結構
將伺服器和客戶端 Apache CXF 檔案放置到我的機器上的專案資料夾結構後,如下所示,供您快速參考:

執行伺服器
要構建專案,請在命令列視窗中使用以下命令:
mvn clean install
您可以使用以下命令啟動伺服器:
mvn -Pserver
這將啟動伺服器,您將在控制檯上看到以下提示:
INFO: Creating Service {http://pojo.cxf.tutorialspoint.com/}HelloWorld from class com.tutorialspoint.cxf.pojo.HelloWorld
INFO: Setting the server's publish address to be https://:5000/Hello
Listening on port 5000 ...
現在,在瀏覽器視窗中指定我們已釋出服務的 URL。您將看到以下輸出:
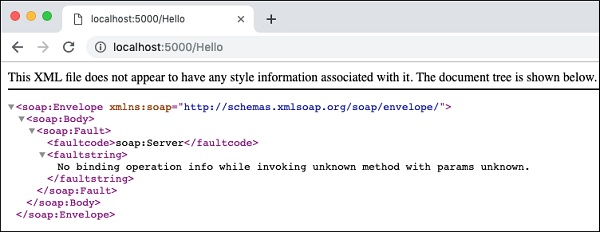
這確認我們的服務正在本地主機上的指定埠上執行。由於我們在呼叫中未指定greetings訊息,因此 SOAP 錯誤訊息將返回到瀏覽器。
您可以使用您選擇的 SOAP 客戶端進一步測試您的 Web 服務。在這裡,我們使用了Postman來測試我們的伺服器。
輸出如下所示:

請注意,SOAP 請求是手動編碼的。釋出請求後,伺服器傳送了SOAP 響應訊息,這在螢幕截圖的底部部分可見。
由此,您可以瞭解到 CXF 在維護請求和響應都使用 SOAP 協議的同時,為您提供了一個統一的檢視來檢視當今世界存在的各種 Web 技術。這極大地簡化了 Web 應用程式的開發。
我們的下一個任務是建立一個客戶端,它將使用您建立的 Web 服務。
建立客戶端
在伺服器應用程式中,HelloWorld是公開我們 Web 服務的介面。Web 服務本身僅向客戶端提供簡單的問候訊息。通常,Web 服務介面使用 WSDL(Web 服務描述語言)公開到外部世界。在這個簡單的應用程式中,我們將透過直接公開服務介面(即HelloWorld.class)來向客戶端公開我們的 Web 服務。
為此,CXF 提供了一個名為ClientProxyFactoryBean的工廠類,該類允許我們將所需的介面附加到建立的工廠例項。
首先,我們如下建立工廠 bean 例項:
ClientProxyFactoryBean factory = new ClientProxyFactoryBean();
我們在工廠 bean 例項上呼叫setAddress方法來設定可以呼叫我們 Web 服務的 URL。在我們的例子中,我們將使用我們在前面步驟中建立伺服器時使用的 URL:
factory.setAddress("https://:5000/Hello");
接下來,我們在factory例項上呼叫create方法,將我們的服務介面HelloWorld.class附加到它。
HelloWorld helloServer = factory.create(HelloWorld.class);
最後,我們呼叫greetings方法來呼叫遠端 Web 服務。
System.out.println(helloServer.greetings(System.getProperty("user.name")));
這將在您的控制檯上列印一條問候訊息。
客戶端應用程式的完整原始碼如下所示:
//HelloClient.java
package com.tutorialspoint.cxf.pojo;
import org.apache.cxf.frontend.ClientProxyFactoryBean;
public class HelloClient {
   public static void main(String[] args) throws Exception {
      ClientProxyFactoryBean factory = new ClientProxyFactoryBean();
      factory.setAddress("https://:5000/Hello");
      HelloWorld helloServer = factory.create(HelloWorld.class);
      System.out.println(helloServer.greetings(System.getProperty("user.name")));
   }
}
執行客戶端
確保伺服器仍在您的機器上執行。如果它已超時,請使用以下命令重新啟動伺服器:
mvn -Pserver
您將在控制檯上看到以下訊息:
Listening on port 5000 ...
現在,在伺服器超時(我們已將其設定為 5 分鐘)之前,開啟另一個命令列視窗並使用以下命令啟動客戶端:
mvn -Pclient
您將在命令列上看到類似以下的訊息:
Hi tutorialspoint
請注意,tutorialspoint是我們的使用者名稱。您將收到帶有您自己姓名的問候語。
在下一章中,我們將學習如何在 JAX-WS(Apache CXF 用於 XML Web 服務的 API)專案中使用 CXF。