
 資料結構
資料結構 網路
網路 關係資料庫管理系統 (RDBMS)
 作業系統
作業系統 Java
Java iOS
iOS HTML
HTML CSS
CSS Android
 Python
 C語言程式設計
 C++
C++ C#
C# MongoDB
 MySQL
MySQL Javascript
 PHP
PHPAndroid垂直滾動檢視
引言
Android 提供各種 UI 元件,我們可以使用這些元件在 Android 應用程式中建立不同的 UI 元件,例如影像檢視、文字檢視等等。在這些 UI 元件中,垂直滾動檢視是一個強大的 UI 元件,用於建立動態和互動式應用程式。垂直滾動檢視是一個檢視組,用於在一個檢視中顯示大量資料。它允許使用者垂直滾動瀏覽專案列表,並能夠與列表中的各個專案進行互動。在本文中,我們將瞭解如何在 Android 中實現垂直滾動檢視。
實現
我們將建立一個簡單的應用程式,在這個應用程式中,我們將建立一個滾動檢視,並在其中顯示一個文字檢視,用於顯示應用程式的標題。之後,我們將在這個滾動檢視中建立多個文字檢視,以顯示應用程式中的不同程式語言。現在讓我們轉向 Android Studio 建立一個新專案。
步驟 1:在 Android Studio 中建立一個新專案
導航到 Android Studio,如下面的螢幕所示。在下面的螢幕中,單擊“新建專案”以建立一個新的 Android Studio 專案。
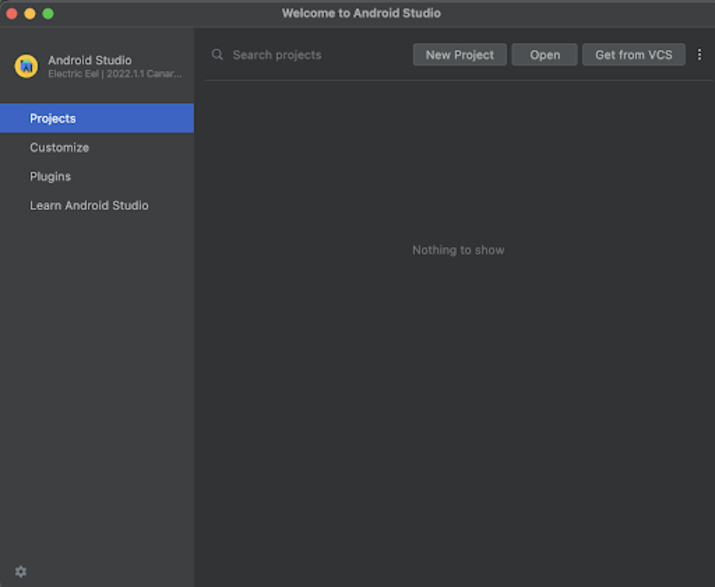
單擊“新建專案”後,您將看到下面的螢幕。
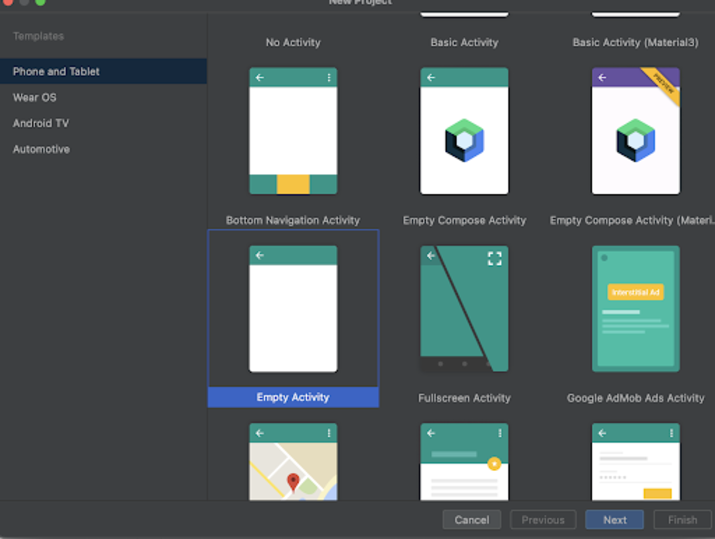
在這個螢幕中,我們只需選擇“空活動”,然後單擊“下一步”。單擊“下一步”後,您將看到下面的螢幕。
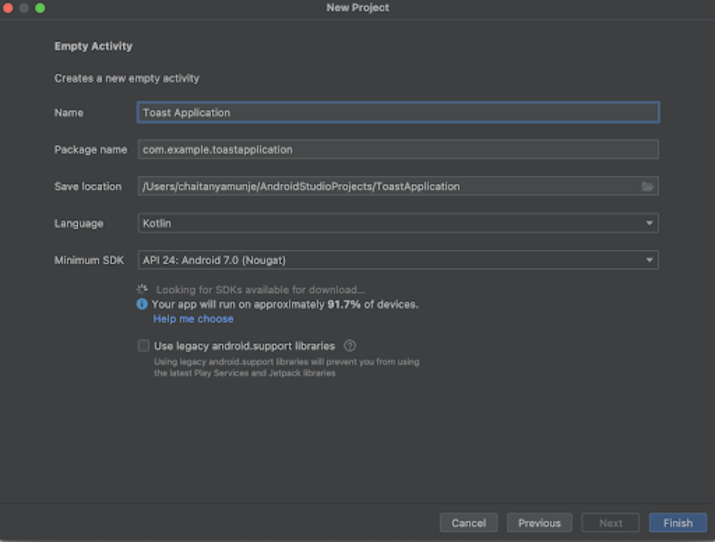
在這個螢幕中,我們只需指定專案名稱。然後包名將自動生成。
注意 - 確保選擇 Kotlin 作為語言。
指定所有詳細資訊後,單擊“完成”以建立一個新的 Android Studio 專案。
專案建立完成後,我們將看到開啟的兩個檔案,即 activity_main.xml 和 MainActivity.kt 檔案。
步驟 2:使用 activity_main.xml
導航到 activity_main.xml。如果此檔案不可見,則開啟此檔案。在左側窗格中,導航到 app>res>layout>activity_main.xml 以開啟此檔案。開啟此檔案後,將以下程式碼新增到其中。程式碼中添加了註釋以便詳細瞭解。
<?xml version="1.0" encoding="utf-8"?>
<ScrollView xmlns:android="http://schemas.android.com/apk/res/android"
   xmlns:app="http://schemas.android.com/apk/res-auto"
   xmlns:tools="http://schemas.android.com/tools"
   android:layout_width="match_parent"
   android:layout_height="match_parent">
   <RelativeLayout
       android:layout_width="match_parent"
       android:layout_height="wrap_content">
       <!-- text view to displaying heading of application -->
       <TextView
           android:id="@+id/idTVHeading"
           android:layout_width="match_parent"
           android:layout_height="wrap_content"
           android:layout_marginTop="150dp"
           android:padding="8dp"
           android:text="Vertical ScrollView in Android"
           android:textAlignment="center"
           android:textColor="@color/black"
           android:textSize="20sp"
           android:textStyle="bold" />
       <!-- on below line creating a text view for displaying the programming language -->
       <TextView
           android:id="@+id/idTVLng1"
           android:layout_width="match_parent"
           android:layout_height="wrap_content"
           android:layout_below="@id/idTVHeading"
           android:layout_centerHorizontal="true"
           android:layout_margin="20dp"
           android:padding="4dp"
           android:text="Java"
           android:textAlignment="center"
           android:textColor="@color/black"
           android:textSize="18sp" />
       <!-- on below line creating a text view for displaying the programming language -->
       <TextView
           android:id="@+id/idTVLng2"
           android:layout_width="match_parent"
           android:layout_height="wrap_content"
           android:layout_below="@id/idTVLng1"
           android:layout_centerHorizontal="true"
           android:layout_margin="20dp"
           android:padding="4dp"
           android:text="C++"
           android:textAlignment="center"
           android:textColor="@color/black"
           android:textSize="18sp" />
       <!-- on below line creating a text view for displaying the programming language -->
       <TextView
           android:id="@+id/idTVLng3"
           android:layout_width="match_parent"
           android:layout_height="wrap_content"
           android:layout_below="@id/idTVLng2"
           android:layout_centerHorizontal="true"
           android:layout_margin="20dp"
           android:padding="4dp"
           android:text="C"
           android:textAlignment="center"
           android:textColor="@color/black"
           android:textSize="18sp" />
       <!-- on below line creating a text view for displaying the programming language -->
       <TextView
           android:id="@+id/idTVLng4"
           android:layout_width="match_parent"
           android:layout_height="wrap_content"
           android:layout_below="@id/idTVLng3"
           android:layout_centerHorizontal="true"
           android:layout_margin="20dp"
           android:padding="4dp"
           android:text="Kotlin"
           android:textAlignment="center"
           android:textColor="@color/black"
           android:textSize="18sp" />
       <!-- on below line creating a text view for displaying the programming language -->
       <TextView
           android:id="@+id/idTVLng5"
           android:layout_width="match_parent"
           android:layout_height="wrap_content"
           android:layout_below="@id/idTVLng4"
           android:layout_centerHorizontal="true"
           android:layout_margin="20dp"
           android:padding="4dp"
           android:text="Xml"
           android:textAlignment="center"
           android:textColor="@color/black"
           android:textSize="18sp" />
       <!-- on below line creating a text view for displaying the programming language -->
       <TextView
           android:id="@+id/idTVLng6"
           android:layout_width="match_parent"
           android:layout_height="wrap_content"
           android:layout_below="@id/idTVLng5"
           android:layout_centerHorizontal="true"
           android:layout_margin="20dp"
           android:padding="4dp"
           android:text="C#"
           android:textAlignment="center"
           android:textColor="@color/black"
           android:textSize="18sp" />
       <!-- on below line creating a text view for displaying the programming language -->
       <TextView
           android:id="@+id/idTVLng7"
           android:layout_width="match_parent"
           android:layout_height="wrap_content"
           android:layout_below="@id/idTVLng6"
           android:layout_centerHorizontal="true"
           android:layout_margin="20dp"
           android:padding="4dp"
           android:text="Dart"
           android:textAlignment="center"
           android:textColor="@color/black"
           android:textSize="18sp" />
       <!-- on below line creating a text view for displaying the programming language -->
       <TextView
           android:id="@+id/idTVLng8"
           android:layout_width="match_parent"
           android:layout_height="wrap_content"
           android:layout_below="@id/idTVLng7"
           android:layout_centerHorizontal="true"
           android:layout_margin="20dp"
           android:padding="4dp"
           android:text="PHP"
           android:textAlignment="center"
           android:textColor="@color/black"
           android:textSize="18sp" />
       <!-- on below line creating a text view for displaying the programming language -->
       <TextView
           android:id="@+id/idTVLng9"
           android:layout_width="match_parent"
           android:layout_height="wrap_content"
           android:layout_below="@id/idTVLng8"
           android:layout_centerHorizontal="true"
           android:layout_margin="20dp"
           android:padding="4dp"
           android:text="Python"
           android:textAlignment="center"
           android:textColor="@color/black"
           android:textSize="18sp" />
       <!-- on below line creating a text view for displaying the programming language -->
       <TextView
           android:id="@+id/idTVLng10"
           android:layout_width="match_parent"
           android:layout_height="wrap_content"
           android:layout_below="@id/idTVLng9"
           android:layout_centerHorizontal="true"
           android:layout_margin="20dp"
           android:padding="4dp"
           android:text="Swift"
           android:textAlignment="center"
           android:textColor="@color/black"
           android:textSize="18sp" />
   </RelativeLayout>
</ScrollView>
說明 - 在上面的程式碼中,我們正在建立一個 ScrollView 作為根佈局。在這個滾動檢視中,我們正在建立一個相對佈局。在這個相對佈局中,我們首先建立一個文字檢視,用於顯示應用程式的標題。之後,我們為不同的程式語言建立多個文字檢視。然後,我們新增相對佈局的結束標籤,最後新增滾動檢視的結束標籤。
新增上述程式碼後,只需執行您的應用程式即可檢視應用程式的輸出。
注意 - 確保已連線到您的真實裝置或模擬器。
輸出
結論
在本文中,我們瞭解了什麼是垂直滾動檢視以及如何在 Android 應用程式中實現它。

511 次檢視
