- Swift 教程
- Swift - 首頁
- Swift - 概述
- Swift - 環境
- Swift - 基本語法
- Swift - 變數
- Swift - 常量
- Swift - 字面量
- Swift - 註釋
- Swift 運算子
- Swift - 運算子
- Swift - 算術運算子
- Swift - 比較運算子
- Swift - 邏輯運算子
- Swift - 賦值運算子
- Swift - 位運算子
- Swift - 其他運算子
- Swift 高階運算子
- Swift - 運算子過載
- Swift - 算術溢位運算子
- Swift - 恆等運算子
- Swift - 範圍運算子
- Swift 資料型別
- Swift - 資料型別
- Swift - 整數
- Swift - 浮點數
- Swift - Double
- Swift - 布林值
- Swift - 字串
- Swift - 字元
- Swift - 類型別名
- Swift - 可選型別
- Swift - 元組
- Swift - 斷言和前提條件
- Swift 控制流
- Swift - 決策控制
- Swift - if 語句
- Swift - if...else if...else 語句
- Swift - if-else 語句
- Swift - 巢狀 if 語句
- Swift - switch 語句
- Swift - 迴圈
- Swift - for in 迴圈
- Swift - while 迴圈
- Swift - repeat...while 迴圈
- Swift - continue 語句
- Swift - break 語句
- Swift - fall through 語句
- Swift 集合
- Swift - 陣列
- Swift - 集合
- Swift - 字典
- Swift 函式
- Swift - 函式
- Swift - 巢狀函式
- Swift - 函式過載
- Swift - 遞迴
- Swift - 高階函式
- Swift 閉包
- Swift - 閉包
- Swift - 逃逸和非逃逸閉包
- Swift - 自動閉包
- Swift 面向物件程式設計
- Swift - 列舉
- Swift - 結構體
- Swift - 類
- Swift - 屬性
- Swift - 方法
- Swift - 下標
- Swift - 繼承
- Swift - 重寫
- Swift - 初始化
- Swift - 析構
- Swift 高階
- Swift - ARC 概述
- Swift - 可選鏈
- Swift - 錯誤處理
- Swift - 併發
- Swift - 型別轉換
- Swift - 巢狀型別
- Swift - 擴充套件
- Swift - 協議
- Swift - 泛型
- Swift - 訪問控制
- Swift - 函式與方法
- Swift - SwiftyJSON
- Swift - 單例類
- Swift 隨機數
- Swift 不透明型別和裝箱型別
- Swift 有用資源
- Swift - 線上編譯
- Swift 快速指南
- Swift - 有用資源
- Swift - 討論
Swift 快速指南
Swift - 概述
Swift 4 是一種由 Apple Inc 開發的新程式語言,用於 iOS 和 OS X 開發。Swift 4 採用了 C 和 Objective-C 的優點,而沒有 C 相容性的限制。
Swift 4 利用安全的程式設計模式。
Swift 4 提供了現代的程式設計功能。
Swift 4 提供了類似 Objective-C 的語法。
Swift 4 是一種編寫 iOS 和 OS X 應用程式的絕佳方式。
Swift 4 提供了對現有 Cocoa 框架的無縫訪問。
Swift 4 將語言的過程部分和麵向物件部分統一起來。
Swift 4 不需要單獨的庫匯入來支援諸如輸入/輸出或字串處理之類功能。
Swift 4 使用與 Mac OS 和 iOS 上現有的 Obj-C 系統相同的執行時,這使得 Swift 4 程式能夠在許多現有的 iOS 6 和 OS X 10.8 平臺上執行。
Swift 4 帶有遊樂場功能,Swift 4 程式設計師可以在其中編寫程式碼並立即執行它以檢視結果。
Swift 的第一個公開版本於 2010 年釋出。Chris Lattner 花了近 14 年時間才開發出第一個正式版本,後來它得到了許多其他貢獻者的支援。Swift 4 已包含在 Xcode 6 測試版中。
Swift 設計師從各種其他流行語言中汲取靈感,例如 Objective-C、Rust、Haskell、Ruby、Python、C# 和 CLU。
Swift - 環境
本地環境設定
Swift 4 提供了一個遊樂場平臺用於學習目的,我們將設定相同的平臺。您需要 xCode 軟體才能在遊樂場中開始 Swift 4 編碼。一旦您熟悉了 Swift 4 的概念,就可以使用 xCode IDE 進行 iOS/OS x 應用程式開發。
首先,我們假設您已經在 Apple Developer 網站上擁有一個帳戶。登入後,訪問以下連結:Apple 開發者下載
這將列出許多可用的軟體,如下所示:
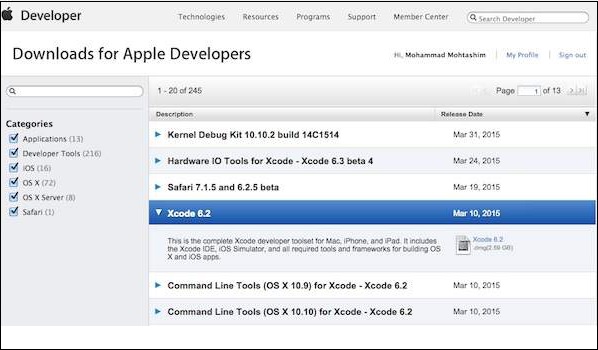
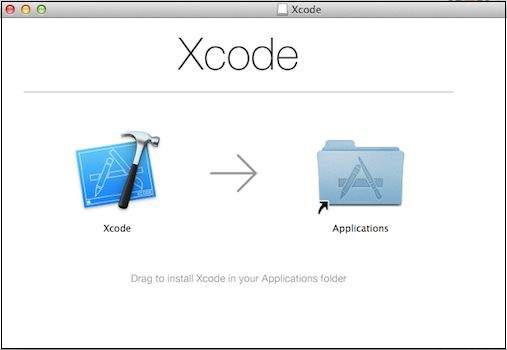
現在選擇 xCode 並透過單擊磁碟映像旁邊的連結下載它。下載 dmg 檔案後,只需雙擊它並按照給定的說明進行安裝即可。最後,按照給定的說明將 xCode 圖示拖放到應用程式資料夾中。
現在您已在您的機器上安裝了 xCode。接下來,從應用程式資料夾中開啟 Xcode,並在接受條款和條件後繼續。如果一切正常,您將看到以下螢幕:

選擇“使用遊樂場開始”選項,併為遊樂場輸入一個名稱,然後選擇 iOS 作為平臺。最後,您將獲得以下游樂場視窗:
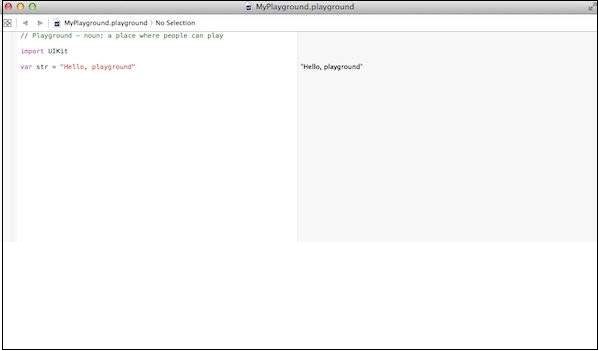
以下是從預設的 Swift 4 遊樂場視窗獲取的程式碼。
import UIKit
var str = "Hello, playground"
如果您為 OS X 程式建立相同的程式,則它將包含 import Cocoa,程式將如下所示:
import Cocoa
var str = "Hello, playground"
當上述程式載入時,它應該在遊樂場結果區域(右側)顯示以下結果。
Hello, playground
恭喜,您已準備好 Swift 4 程式設計環境,您可以繼續使用您的學習工具“教程點”。
Swift - 基本語法
在設定環境時,我們已經看到了 Swift 4 程式的一部分。讓我們再次從以下為 OS X 遊樂場建立的“Hello, World!”程式開始,其中包含import Cocoa,如下所示:
/* My first program in Swift 4 */
var myString = "Hello, World!"

print(myString)
如果您為 iOS 遊樂場建立相同的程式,則它將包含import UIKit,程式將如下所示:
import UIKit
var myString = "Hello, World!"
print(myString)
當我們使用合適的遊樂場執行上述程式時,我們將得到以下結果:
Hello, World!
現在讓我們看看 Swift 4 程式的基本結構,這樣您就可以輕鬆理解 Swift 4 程式語言的基本構建塊。
Swift 4 中的匯入
您可以使用import語句將任何 Objective-C 框架(或 C 庫)直接匯入到您的 Swift 4 程式中。例如,上面的import cocoa語句使構成所有 OS X 開發層的 Cocoa 庫、API 和執行時在 Swift 4 中可用。
Cocoa 是用 Objective-C 實現的,Objective-C 是 C 的超集,因此可以輕鬆地將 C 甚至 C++ 混合到您的 Swift 4 應用程式中。
Swift 4 中的標記
Swift 4 程式由各種標記組成,標記可以是關鍵字、識別符號、常量、字串文字或符號。例如,以下 Swift 4 語句由三個標記組成:
print("test!")
The individual tokens are:
print("test!")
註釋
註釋就像 Swift 4 程式中的幫助文字。編譯器會忽略它們。多行註釋以/*開頭,以字元*/結尾,如下所示:
/* My first program in Swift 4 */
多行註釋可以在 Swift 4 中巢狀。以下是 Swift 4 中的有效註釋:
/* My first program in Swift 4 is Hello, World!
/* Where as second program is Hello, Swift 4! */ */
單行註釋以//開頭。
// My first program in Swift 4
分號
Swift 4 不要求您在程式碼中每個語句後都輸入分號(;),儘管它是可選的;如果您使用分號,則編譯器不會報錯。
但是,如果您在同一行中使用多個語句,則需要使用分號作為分隔符,否則編譯器將引發語法錯誤。您可以將上述 Hello, World! 程式編寫如下:
/* My first program in Swift 4 */
var myString = "Hello, World!"; print(myString)
識別符號
Swift 4 識別符號是用於識別變數、函式或任何其他使用者定義項的名稱。識別符號以字母 A 到 Z 或 a 到 z 或下劃線 _ 開頭,後跟零個或多個字母、下劃線和數字(0 到 9)。
Swift 4 不允許在識別符號中使用特殊字元,例如 @、$ 和 %。Swift 4 是一種區分大小寫的程式語言。因此,Manpower 和 manpower 在 Swift 4 中是兩個不同的識別符號。以下是一些可接受的識別符號示例:
Azad        zara   abc   move_name   a_123
myname50    _temp  j     a23b9       retVal
要使用保留字作為識別符號,您需要在它前後加上反引號(`)。例如,class不是有效的識別符號,但`class`是有效的。
關鍵字
以下關鍵字在 Swift 4 中是保留的。這些保留字不能用作常量或變數或任何其他識別符號名稱,除非它們用反引號轉義:
用於宣告的關鍵字
| 類 | deinit | 列舉 | 擴充套件 |
| Func | 匯入 | 初始化 | 內部 |
| Let | 運算子 | 私有 | 協議 |
| 公共 | 靜態 | 結構體 | 下標 |
| 類型別名 | var |
用於語句的關鍵字
| 中斷 | 案例 | 繼續 | 預設 |
| 做 | 其他 | 貫穿 | 為了 |
| 如果 | 在 | 返回 | 開關 |
| 哪裡 | 當 |
用於表示式和型別的關鍵字
| 作為 | dynamicType | 錯誤的 | 是 |
| 無效 | 自己 | 自我 | 超級 |
| 真的 | 列名 | 檔案 | 函式 |
| 行號 |
特定上下文中使用的關鍵詞
| 結合性 | 便利性 | 動態 | didSet |
| 最終 | 獲取 | 中綴 | inout |
| 延遲 | 左 | 可變 | 無 |
| 不可變 | 可選 | 重寫 | 字尾 |
| 優先順序 | 字首 | 協議 | 必需 |
| 右 | 設定 | 型別 | 非擁有 |
| 弱引用 | willSet |
空白符
僅包含空白符(可能還有註釋)的行稱為空行,Swift 4 編譯器會完全忽略它。
在 Swift 4 中,空白符指的是空格、製表符、換行符和註釋。空白符將語句的不同部分分隔開來,使編譯器能夠識別語句中一個元素(例如 int)的結束位置和下一個元素的開始位置。因此,在以下語句中:
var age
必須在var和age之間至少有一個空白字元(通常是空格),才能使編譯器能夠區分它們。另一方面,在以下語句中:
int fruit = apples + oranges //get the total fruits
在 fruit 和 = 之間,或者在 = 和 apples 之間,不需要空白字元,儘管您可以為了更好的可讀性而新增一些空格。
運算子兩側的空格應相等,例如:
int fruit = apples +oranges    //is a wrong statement
int fruit = apples + oranges   //is a Correct statement
字面量
字面量是整數、浮點數或字串型別值的源程式碼表示形式。以下是字面量的示例:
92               // Integer literal
4.24159          // Floating-point literal
"Hello, World!"  // String literal
Swift 中的列印
要在 Swift 中列印任何內容,我們使用“print”關鍵字。
Print 有三個不同的屬性。
專案 – 要列印的專案
分隔符 – 專案之間的分隔符
終止符 – 行應以哪個值結尾,讓我們看一個示例和語法。
print("Items to print", separator: "Value " , terminator: "Value")
// E.g. of print statement.

print("Value one")
// prints "Value one \n" Adds, \n as terminator and " " as separator by
default.

print("Value one","Value two", separator: " Next Value" , terminator: " End")
//prints "Value one Next Value Value two End"
在上面的程式碼中,第一個 print 語句預設新增 \n(換行符)作為終止符,而在第二個 print 語句中,我們使用了“End”作為終止符,因此它將列印“End”而不是 \n。
我們可以根據需要提供自定義的分隔符和終止符。
Swift - 資料型別
在任何程式語言中進行程式設計時,都需要使用不同型別的變數來儲存資訊。變數只不過是保留的記憶體位置,用於儲存值。這意味著當您建立變數時,會在記憶體中保留一些空間。
您可能希望儲存各種資料型別的資訊,例如字串、字元、寬字元、整數、浮點數、布林值等。根據變數的資料型別,作業系統會分配記憶體並確定可以在保留的記憶體中儲存什麼。
內建資料型別
Swift 4 為程式設計師提供了豐富的內建資料型別和使用者自定義資料型別。在宣告變數時,以下基本資料型別最常用:
Int 或 UInt – 用於表示整數。更具體地說,您可以使用 Int32、Int64 定義 32 位或 64 位有符號整數,而使用 UInt32 或 UInt64 定義 32 位或 64 位無符號整數變數。例如,42 和 -23。
Float – 用於表示 32 位浮點數和小數點較小的數字。例如,3.14159、0.1 和 -273.158。
Double – 用於表示 64 位浮點數,並在浮點值必須非常大的情況下使用。例如,3.14159、0.1 和 -273.158。
Bool – 表示布林值,其值為真或假。
String – 字元的有序集合。例如,“Hello, World!”
Character – 單字元字串字面量。例如,“C”
Optional – 表示可以儲存值或不儲存值的變數。
元組 – 用於將多個值組合到單個複合值中。
這裡列出了與整數型別相關的一些重要要點:
在 32 位平臺上,Int 與 Int32 大小相同。
在 64 位平臺上,Int 與 Int64 大小相同。
在 32 位平臺上,UInt 與 UInt32 大小相同。
在 64 位平臺上,UInt 與 UInt64 大小相同。
Int8、Int16、Int32、Int64 可用於表示 8 位、16 位、32 位和 64 位的有符號整數。
UInt8、UInt16、UInt32 和 UInt64 可用於表示 8 位、16 位、32 位和 64 位的無符號整數。
邊界值
下表顯示了變數型別、儲存值所需的記憶體大小以及可以在此類變數中儲存的最大值和最小值。
| 型別 | 典型位寬 | 典型範圍 |
|---|---|---|
| Int8 | 1 位元組 | -127 到 127 |
| UInt8 | 1 位元組 | 0 到 255 |
| Int32 | 4 位元組 | -2147483648 到 2147483647 |
| UInt32 | 4 位元組 | 0 到 4294967295 |
| Int64 | 8 位元組 | -9223372036854775808 到 9223372036854775807 |
| UInt64 | 8 位元組 | 0 到 18446744073709551615 |
| Float | 4 位元組 | 1.2E-38 到 3.4E+38(約 6 位數字) |
| Double | 8 位元組 | 2.3E-308 到 1.7E+308(約 15 位數字) |
類型別名
您可以使用typealias為現有型別建立新名稱。以下是使用 typealias 定義新型別的簡單語法:
typealias newname = type
例如,以下行指示編譯器Feet是Int的另一個名稱:
typealias Feet = Int
現在,以下宣告是完全合法的,並且建立了一個名為 distance 的整數變數:
typealias Feet = Int
var distance: Feet = 100
print(distance)
當我們使用遊樂場執行上述程式時,會得到以下結果。
100
型別安全
Swift 4 是一種型別安全的語言,這意味著如果程式碼的一部分期望一個字串,則您不能錯誤地傳遞一個整數。
由於 Swift 4 是型別安全的,因此它在編譯程式碼時會執行型別檢查,並將任何不匹配的型別標記為錯誤。
var varA = 42
varA = "This is hello"
print(varA)
當我們編譯上述程式時,會產生以下編譯時錯誤。
main.swift:2:8: error: cannot assign value of type 'String' to type 'Int'
varA = "This is hello"
型別推斷
型別推斷使編譯器能夠在編譯程式碼時自動推斷特定表示式的型別,只需檢查您提供的值即可。Swift 4 使用型別推斷來確定適當的型別,如下所示。
// varA is inferred to be of type Int
var varA = 42
print(varA)

// varB is inferred to be of type Double
var varB = 3.14159
print(varB)

// varC is also inferred to be of type Double
var varC = 3 + 0.14159
print(varC)
當我們使用遊樂場執行上述程式時,會得到以下結果:
42
3.14159
3.14159
Swift - 變數
變數為我們提供了程式可以操作的命名儲存。Swift 4 中的每個變數都具有特定的型別,該型別決定了變數記憶體的大小和佈局;可以在該記憶體中儲存的值範圍;以及可以應用於變數的操作集。
Swift 4 支援以下基本型別的變數:
Int 或 UInt – 用於表示整數。更具體地說,您可以使用 Int32、Int64 定義 32 位或 64 位有符號整數,而使用 UInt32 或 UInt64 定義 32 位或 64 位無符號整數變數。例如,42 和 -23。
Float – 用於表示 32 位浮點數。它用於儲存小數點較小的數字。例如,3.14159、0.1 和 -273.158。
Double – 用於表示 64 位浮點數,並在浮點值必須非常大的情況下使用。例如 3.14159、0.1 和 -273.158。
Bool – 表示布林值,其值為真或假。
String – 字元的有序集合。例如,“Hello, World!”
Character – 單字元字串字面量。例如,“C”
Swift 4 還允許定義各種其他型別的變數,我們將在後續章節中介紹,例如Optional、Array、Dictionaries、Structures和Classes。
下一節將介紹如何在 Swift 4 程式設計中宣告和使用各種型別的變數。
變數宣告
變數宣告告訴編譯器在哪裡以及如何建立變數的儲存空間。在使用變數之前,必須使用var關鍵字宣告它們,如下所示:
var variableName = <initial value>
以下示例顯示瞭如何在 Swift 4 中宣告變數:
var varA = 42
print(varA)
當我們使用遊樂場執行上述程式時,會得到以下結果:
42
型別註釋
在宣告變數時,您可以提供型別註釋,以明確變數可以儲存的值的型別。以下是語法:
var variableName:<data type> = <optional initial value>
以下示例顯示瞭如何在 Swift 4 中使用註釋宣告變數。這裡需要注意的是,如果我們不使用型別註釋,那麼必須為變數提供初始值,否則我們只需使用型別註釋宣告變數即可。
var varA = 42
print(varA)

var varB:Float

varB = 3.14159
print(varB)
當我們使用遊樂場執行上述程式時,會得到以下結果:
42
3.1415901184082
變數命名
變數名稱可以由字母、數字和下劃線字元組成。它必須以字母或下劃線開頭。大小寫字母是不同的,因為 Swift 4 是一種區分大小寫的程式語言。
您可以使用簡單字元或 Unicode 字元為變數命名。以下示例顯示瞭如何命名變數:
var _var = "Hello, Swift 4!"
print(_var)

var 你好 = "你好世界"
print(你好)
當我們使用遊樂場執行上述程式時,會得到以下結果。
Hello, Swift 4!
你好世界
列印變數
您可以使用 print 函式列印常量或變數的當前值。您可以透過將名稱括在括號中並在開頭加上反斜槓來內插變數值:以下是有效的示例:
var varA = "Godzilla"
var varB = 1000.00

print("Value of \(varA) is more than \(varB) millions")
當我們使用遊樂場執行上述程式時,會得到以下結果。
Value of Godzilla is more than 1000.0 millions
Swift - 可選型別
Swift 4 還引入了可選型別,它處理值的缺失。可選型別表示“存在一個值,並且它等於 x”或“根本不存在值”。
可選型別本身就是一種型別,實際上是 Swift 4 的新的超級列舉之一。它有兩個可能的值,None和Some(T),其中T是在 Swift 4 中可用的正確資料型別的關聯值。
這是一個可選整數宣告:
var perhapsInt: Int?
這是一個可選字串宣告:
var perhapsStr: String?
上述宣告等同於顯式地將其初始化為nil,這意味著沒有值:
var perhapsStr: String? = nil
讓我們以以下示例來了解可選型別如何在 Swift 4 中工作:
var myString:String? = nil

if myString != nil {
   print(myString)
} else {
   print("myString has nil value")
}
當我們使用遊樂場執行上述程式時,會得到以下結果:
myString has nil value
可選型別類似於在 Objective-C 中使用指標的nil,但它們適用於任何型別,而不僅僅是類。
強制解包
如果您將變數定義為可選型別,則要獲取該變數的值,您必須對其進行解包。這僅僅意味著在變數的末尾加上感嘆號。
讓我們來看一個簡單的例子:
var myString:String?

myString = "Hello, Swift 4!"

if myString != nil {
   print(myString)
} else {
   print("myString has nil value")
}
當我們使用遊樂場執行上述程式時,會得到以下結果:
Optional("Hello, Swift 4!")
現在讓我們應用解包來獲取變數的正確值:
var myString:String?

myString = "Hello, Swift 4!"

if myString != nil {
   print( myString! )
} else {
   print("myString has nil value")
}
當我們使用遊樂場執行上述程式時,會得到以下結果。
Hello, Swift 4!
自動解包
您可以使用感嘆號而不是問號來宣告可選變數。此類可選變數將自動解包,您無需在變數末尾再使用任何感嘆號即可獲取分配的值。讓我們來看一個簡單的例子:
var myString:String!
myString = "Hello, Swift 4!"

if myString != nil {
   print(myString)
} else {
   print("myString has nil value")
}
當我們使用遊樂場執行上述程式時,會得到以下結果:
Hello, Swift 4!
可選繫結
使用可選繫結來確定可選型別是否包含值,如果包含,則將其值作為臨時常量或變數提供。
if 語句的一個可選繫結如下所示:
if let constantName = someOptional {
   statements
}
讓我們來看一個簡單的例子來理解可選繫結的用法:
var myString:String?
myString = "Hello, Swift 4!"

if let yourString = myString {
   print("Your string has - \(yourString)")
} else {
   print("Your string does not have a value")
}
當我們使用遊樂場執行上述程式時,會得到以下結果:
Your string has - Hello, Swift 4!
Swift - 元組
Swift 4 還引入了元組型別,用於將多個值組合成一個複合值。
元組中的值可以是任何型別,並且不需要是相同的型別。
例如,("Tutorials Point", 123) 是一個包含兩個值的元組,一個為字串型別,另一個為整數型別。這是一個合法的命令。
let ImplementationError = (501, "Not implemented") 是伺服器上某些內容未實現時的錯誤,它返回兩個值:錯誤程式碼和描述。
您可以根據需要從任意數量的值和任意數量的不同資料型別建立元組。
以下是元組宣告的語法:
var TupleName = (Value1, value2,… any number of values)
這是一個元組宣告:
var error501 = (501, “Not implemented”)
您可以使用從 0 開始的索引號訪問元組的值。
以下是如何訪問元組值的示例:
print(“The code is\(error501.0)”)
print(“The definition of error is\(error501.1)”)
您可以在宣告時命名元組的變數,並且可以使用其名稱來呼叫它們。
var error501 = (errorCode: 501, description: “Not Implemented”)
print(error501.errorCode)   // prints 501.
元組有助於從函式中返回多個值。例如,一個 Web 應用程式可能會返回型別為 ("String", Int) 的元組,以顯示載入是否成功。
透過在元組中返回不同的值,我們可以根據不同的元組型別做出決策。
注意 - 元組適用於臨時值,不適合複雜資料。
Swift - 常量
常量是指程式在其執行過程中可能不會更改的固定值。常量可以是任何基本資料型別,例如整數常量、浮點常量、字元常量或字串字面量。還有列舉常量。
常量與普通變數一樣,只是在定義後其值不能被修改。
常量宣告
在使用常量之前,必須使用let關鍵字宣告它們,如下所示:
let constantName = <initial value>
以下是一個簡單的示例,演示如何在 Swift 4 中宣告常量:
let constA = 42
print(constA)
當我們使用遊樂場執行上述程式時,會得到以下結果:
42
型別註釋
您可以在宣告常量時提供型別註解,以明確常量可以儲存的值的型別。以下是語法:
var constantName:<data type> = <optional initial value>
以下示例演示瞭如何在 Swift 4 中使用註解宣告常量。這裡需要注意的是,在建立常量時必須提供初始值:
let constA = 42
print(constA)

let constB:Float = 3.14159
print(constB)
當我們使用遊樂場執行上述程式時,會得到以下結果。
42
3.1415901184082
命名常量
常量的名稱可以由字母、數字和下劃線字元組成。它必須以字母或下劃線開頭。大小寫字母是不同的,因為 Swift 4 是一種區分大小寫的程式語言。
您可以使用簡單字元或 Unicode 字元來命名變數。以下是有效的示例:
let _const = "Hello, Swift 4!"
print(_const)

let 你好 = "你好世界"
print(你好)
當我們使用遊樂場執行上述程式時,會得到以下結果:
Hello, Swift 4!
你好世界
列印常量
您可以使用print函式列印常量或變數的當前值。您可以透過將名稱括在括號中並使用反斜槓轉義開頭括號來內插變數值:以下是有效的示例:
let constA = "Godzilla"
let constB = 1000.00

print("Value of \(constA) is more than \(constB) millions")
當我們使用遊樂場執行上述程式時,會得到以下結果:
Value of Godzilla is more than 1000.0 millions
Swift - 字面量
字面量是整數、浮點數或字串型別值的源程式碼表示形式。以下是字面量的示例:
42                // Integer literal
3.14159           // Floating-point literal
"Hello, world!"   // String literal
整數字面量
整數字面量可以是十進位制、二進位制、八進位制或十六進位制常量。二進位制字面量以 0b 開頭,八進位制字面量以 0o 開頭,十六進位制字面量以 0x 開頭,十進位制則沒有字首。
以下是一些整數字面量的示例:
let decimalInteger = 17         // 17 in decimal notation
let binaryInteger = 0b10001     // 17 in binary notation
let octalInteger = 0o21         // 17 in octal notation
let hexadecimalInteger = 0x11   // 17 in hexadecimal notation
浮點數字面量
浮點數字面量包含整數部分、小數點、小數部分和指數部分。您可以以十進位制形式或十六進位制形式表示浮點數字面量。
十進位制浮點數字面量由一系列十進位制數字組成,後跟小數部分、十進位制指數或兩者兼而有之。
十六進位制浮點數字面量由 0x 字首、可選的十六進位制小數部分和十六進位制指陣列成。
以下是一些浮點數字面量的示例:
let decimalDouble = 12.1875
let exponentDouble = 1.21875e1
let hexadecimalDouble = 0xC.3p0
字串字面量
字串字面量是由雙引號括起來的一系列字元,格式如下:
"characters"
字串字面量不能包含未轉義的雙引號 (")、未轉義的反斜槓 (\)、回車符或換行符。可以使用以下轉義序列在字串字面量中包含特殊字元:
| 轉義序列 | 含義 |
|---|---|
| \0 | 空字元 |
| \\ | \character |
| \b | 退格 |
| \f | 換頁 |
| \n | 換行 |
| \r | 回車 |
| \t | 水平製表符 |
| \v | 垂直製表符 |
| \' | 單引號 |
| \" | 雙引號 |
| \000 | 1 到 3 位的八進位制數 |
| \xhh... | 一個或多個數字的十六進位制數 |
以下示例演示瞭如何使用一些字串字面量:
let stringL = "Hello\tWorld\n\nHello\'Swift 4\'"
print(stringL)
當我們使用遊樂場執行上述程式時,會得到以下結果:
Hello World

Hello'Swift 4'
布林字面量
有三個布林字面量,它們是標準 Swift 4 關鍵字的一部分:
true 值表示真。
false 值表示假。
nil 值表示沒有值。
Swift - 運算子
運算子是告訴編譯器執行特定數學或邏輯操作的符號。Objective-C 擁有豐富的內建運算子,並提供以下型別的運算子:
- 算術運算子
- 比較運算子
- 邏輯運算子
- 位運算子
- 賦值運算子
- 範圍運算子
- 其他運算子
本教程將逐一解釋算術、關係、邏輯、位、賦值和其他運算子。
算術運算子
下表顯示了 Swift 4 語言支援的所有算術運算子。假設變數A為 10,變數B為 20,則:
| 運算子 | 描述 | 示例 |
|---|---|---|
| + | 將兩個運算元相加 | A + B 將得到 30 |
| − | 從第一個運算元中減去第二個運算元 | A − B 將得到 -10 |
| * | 將兩個運算元相乘 | A * B 將得到 200 |
| / | 將分子除以分母 | B / A 將得到 2 |
| % | 模運算子和整數/浮點數除法後的餘數 | B % A 將得到 0 |
比較運算子
下表顯示了 Swift 4 語言支援的所有關係運算符。假設變數A為 10,變數B為 20,則:
| 運算子 | 描述 | 示例 |
|---|---|---|
| == | 檢查兩個運算元的值是否相等;如果相等,則條件為真。 | (A == B) 為假。 |
| != | 檢查兩個運算元的值是否不相等;如果不相等,則條件為真。 | (A != B) 為真。 |
| > | 檢查左運算元的值是否大於右運算元的值;如果大於,則條件為真。 | (A > B) 為假。 |
| < | 檢查左運算元的值是否小於右運算元的值;如果小於,則條件為真。 | (A < B) 為真。 |
| >= | 檢查左運算元的值是否大於或等於右運算元的值;如果大於或等於,則條件為真。 | (A >= B) 為假。 |
| <= | 檢查左運算元的值是否小於或等於右運算元的值;如果小於或等於,則條件為真。 | (A <= B) 為真。 |
邏輯運算子
下表顯示了 Swift 4 語言支援的所有邏輯運算子。假設變數A為 1,變數B為 0,則:
| 運算子 | 描述 | 示例 |
|---|---|---|
| && | 稱為邏輯與運算子。如果兩個運算元均非零,則條件為真。 | (A && B) 為假。 |
| || | 稱為邏輯或運算子。如果兩個運算元中的任何一個非零,則條件為真。 | (A || B) 為真。 |
| ! | 稱為邏輯非運算子。用於反轉其運算元的邏輯狀態。如果條件為真,則邏輯非運算子將使其為假。 | !(A && B) 為真。 |
位運算子
位運算子作用於位並執行逐位操作。&、| 和 ^ 的真值表如下:
| p | q | p&q | p|q | p^q |
|---|---|---|---|---|
| 0 | 0 | 0 | 0 | 0 |
| 0 | 1 | 0 | 1 | 1 |
| 1 | 1 | 1 | 1 | 0 |
| 1 | 0 | 0 | 1 | 1 |
Assume A = 60; and B = 13;

In binary format, they will be as follows:

A = 0011 1100

B = 0000 1101

-----------------

A & B = 0000 1100

A|B = 0011 1101

A^B = 0011 0001

~A = 1100 0011
Swift 4 語言支援的位運算子列在下表中。假設變數A為 60,變數B為 13,則 7−
| 運算子 | 描述 | 示例 |
|---|---|---|
| & | 二進位制與運算子將位複製到結果中,如果它存在於兩個運算元中。 | (A & B) 將得到 12,即 0000 1100 |
| | | 二進位制或運算子將位複製,如果它存在於任何一個運算元中。 | (A | B) 將得到 61,即 0011 1101 |
| ^ | 二進位制異或運算子將位複製,如果它在一個運算元中設定,但在兩個運算元中都不設定。 | (A ^ B) 將得到 49,即 0011 0001 |
| ~ | 二進位制一補碼運算子是一元運算子,其作用是“翻轉”位。 | (~A ) 將得到 -61,在 2 的補碼形式中為 1100 0011。 |
| << | 二進位制左移運算子。左運算元的值向左移動由右運算元指定的位數。 | (A << 2 將得到 240,即 1111 0000 |
| >> | 二進位制右移運算子。左運算元的值向右移動由右運算元指定的位數。 | A >> 2 將得到 15,即 0000 1111 |
賦值運算子
Swift 4 支援以下賦值運算子:
| 運算子 | 描述 | 示例 |
|---|---|---|
| = | 簡單賦值運算子,將右側運算元的值賦給左側運算元 | C = A + B 將 A + B 的值賦給 C |
| += | 加並賦值運算子,它將右側運算元加到左側運算元上並將結果賦給左側運算元 | C += A 等價於 C = C + A |
| -= | 減並賦值運算子,它從左側運算元中減去右側運算元並將結果賦給左側運算元 | C -= A 等價於 C = C - A |
| *= | 乘並賦值運算子,它將右側運算元乘以左側運算元並將結果賦給左側運算元 | C *= A 等價於 C = C * A |
| /= | 除並賦值運算子,它將左側運算元除以右側運算元並將結果賦給左側運算元 | C /= A 等價於 C = C / A |
| %= | 模並賦值運算子,它使用兩個運算元取模並將結果賦給左側運算元 | C %= A 等價於 C = C % A |
| <<= | 左移並賦值運算子 | C <<= 2 與 C = C << 2 相同 |
| >>= | 右移並賦值運算子 | C >>= 2 與 C = C >> 2 相同 |
| &= | 按位與並賦值運算子 | C &= 2 與 C = C & 2 相同 |
| ^= | 按位異或並賦值運算子 | C ^= 2 與 C = C ^ 2 相同 |
| |= | 按位或並賦值運算子 | C |= 2 與 C = C | 2 相同 |
範圍運算子
Swift 4 包含兩個範圍運算子,它們是表示值範圍的快捷方式。下表解釋了這兩個運算子。
| 運算子 | 描述 | 示例 |
|---|---|---|
| 閉合範圍 | (a...b) 定義一個從 a 到 b 的範圍,包括值 a 和 b。 | 1...5 給出 1、2、3、4 和 5 |
| 半開範圍 | (a..< b) 定義一個從 a 到 b 的範圍,但不包括 b。 | 1..< 5 給出 1、2、3 和 4 |
| 單側範圍 |
a… ,定義一個從 a 到元素結尾的範圍 …a ,定義一個從開始到 a 的範圍 |
1… 給出 1、2、3… 元素的結尾 …2 給 1,2 的開頭… |
其他運算子
Swift 4 支援其他一些重要的運算子,包括範圍和 ? :,這些運算子將在下表中解釋。
| 運算子 | 描述 | 示例 |
|---|---|---|
| 一元減號 | 可以使用字首 - 切換數值符號。 | -3 或 -4 |
| 一元加號 | 返回其操作的值,沒有任何更改。 | +6 給出 6 |
| 三元條件運算子 | Condition ? X : Y | 如果 Condition 為真 ? 則值為 X : 否則值為 Y |
運算子優先順序
運算子優先順序決定表示式中項的組合方式。這會影響表示式的計算方式。某些運算子比其他運算子具有更高的優先順序;例如,乘法運算子的優先順序高於加法運算子。
例如,x = 7 + 3 * 2;在這裡,x 被賦值為 13,而不是 20,因為運算子 * 的優先順序高於 +,所以它首先與 3*2 相乘,然後加到 7 中。
這裡,優先順序最高的運算子出現在表格的頂部,優先順序最低的出現在底部。在表示式中,優先順序較高的運算子將首先被計算。
| 運算子 | 描述 | 示例 |
|---|---|---|
| 主表示式運算子 | () [] . expr++ expr-- | 從左到右 |
| 一元運算子 |
* & + - ! ~ ++expr --expr * / % + - >> << < > <= >= == != |
從右到左 |
| 二元運算子 |
& ^ | && || |
從左到右 |
| 三元運算子 | ?: | 從右到左 |
| 賦值運算子 | = += -= *= /= %= >>= <<= &=^= |= | 從右到左 |
| 逗號 | , | 從左到右 |
Swift - 決策控制
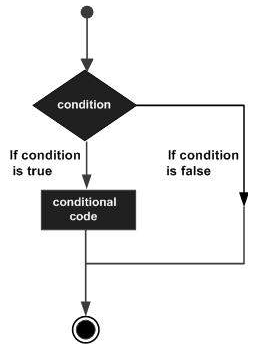
決策結構要求程式設計師指定一個或多個條件供程式評估或測試,以及如果條件確定為true則要執行的語句,以及可選地,如果條件確定為false則要執行的其他語句。
以下是大多數程式語言中典型的決策結構的一般形式:
Swift 4 提供以下型別的決策語句。點選以下連結檢視其詳細資訊。
| 序號 | 語句 & 描述 |
|---|---|
| 1 | if 語句
if 語句由一個布林表示式後跟一個或多個語句組成。 |
| 2 | if...else 語句
if 語句後面可以跟一個可選的 else 語句,當布林表示式為假時執行。 |
| 3 | if...else if...else 語句
if 語句後面可以跟一個可選的 else if...else 語句,這對於使用單個 if...else if 語句測試各種條件非常有用。 |
| 4 | 巢狀 if 語句
可以在另一個 if 或 else if 語句中使用一個 if 或 else if 語句。 |
| 5 | switch 語句
switch 語句允許測試變數是否與值列表相等。 |
?:運算子
我們在上一章中介紹了條件運算子 ? :,它可以用來替換if...else語句。它具有以下一般形式:
Exp1 ? Exp2 : Exp3;
其中 Exp1、Exp2 和 Exp3 是表示式。注意冒號的使用和放置。
?表示式的值是這樣確定的:計算 Exp1。如果為真,則計算 Exp2 並將其成為整個?表示式的值。如果 Exp1 為假,則計算 Exp3 並將其值成為表示式的值。
Swift - 迴圈
可能存在需要多次執行程式碼塊的情況。通常,語句按順序執行:函式中的第一個語句首先執行,然後是第二個語句,依此類推。
程式語言提供各種控制結構,允許更復雜的執行路徑。
迴圈語句允許我們多次執行語句或語句組。以下是大多數程式語言中迴圈語句的一般形式:

Swift 4 程式語言提供以下幾種迴圈來處理迴圈需求。點選以下連結檢視其詳細資訊。
| 序號 | 迴圈型別 & 描述 |
|---|---|
| 1 | for-in
此迴圈對範圍、序列、集合或級數中的每個專案執行一組語句。 |
| 2 | while 迴圈
在給定條件為真時重複執行語句或語句組。它在執行迴圈體之前測試條件。 |
| 3 | repeat...while 迴圈
類似於 while 語句,只是它在迴圈體結束時測試條件。 |
迴圈控制語句
迴圈控制語句更改其正常順序的執行。當執行離開作用域時,在該作用域中建立的所有自動物件都會被銷燬。
Swift 4 支援以下控制語句。點選以下連結檢視其詳細資訊。
| 序號 | 控制語句 & 描述 |
|---|---|
| 1 | continue 語句
此語句告訴迴圈停止其正在執行的操作,並從迴圈的下一次迭代的開頭重新開始。 |
| 2 | break 語句
終止迴圈語句並將執行轉移到迴圈後緊跟的語句。 |
| 3 | fallthrough 語句
fallthrough 語句模擬 Swift 4 switch 對 C 樣式 switch 的行為。 |
Swift - 字串
Swift 4 中的字串是有序字元集合,例如“Hello, World!”,它們由 Swift 4 資料型別String表示,而String又表示Character型別值的集合。
建立字串
您可以使用字串文字或建立 String 類的例項來建立字串,如下所示:
// String creation using String literal
var stringA = "Hello, Swift 4!"
print( stringA )

// String creation using String instance
var stringB = String("Hello, Swift 4!")
print( stringB )

//Multiple line string

let stringC = """
Hey this is a
example of multiple Line
string by tutorialsPoint

"""
print(stringC)
當上述程式碼編譯並執行時,會產生以下結果
Hello, Swift 4!
Hello, Swift 4!
Hey this is a
example of multiple Line
string by tutorialsPoint
空字串
您可以使用空字串文字或建立 String 類例項來建立空字串,如下所示。您還可以使用布林屬性isEmpty檢查字串是否為空。
// Empty string creation using String literal
var stringA = ""

if stringA.isEmpty {
   print( "stringA is empty" )
} else {
   print( "stringA is not empty" )
}

// Empty string creation using String instance
let stringB = String()

if stringB.isEmpty {
   print( "stringB is empty" )
} else {
   print( "stringB is not empty" )
}
當上述程式碼編譯並執行時,會產生以下結果:
stringA is empty
stringB is empty
字串常量
您可以透過將其分配給變數來指定您的字串是否可以修改(或變異),或者透過使用let關鍵字將其分配給常量來使其成為常量,如下所示:
// stringA can be modified
var stringA = "Hello, Swift 4!"
stringA + = "--Readers--"
print( stringA )

// stringB can not be modified
let stringB = String("Hello, Swift 4!")
stringB + = "--Readers--"
print( stringB )
當上述程式碼編譯並執行時,會產生以下結果:
Playground execution failed: error: <EXPR>:10:1: error: 'String' is not
convertible to '@lvalue UInt8'
stringB + = "--Readers--"
字串插值
字串插值是一種透過在字串文字中包含其值來從常量、變數、文字和表示式的混合構建新的 String 值的方法。
您插入字串文字中的每個專案(變數或常量)都用括號括起來,前面加上反斜槓。這是一個簡單的例子:
var varA = 20
let constA = 100
var varC:Float = 20.0

var stringA = "\(varA) times \(constA) is equal to \(varC * 100)"
print( stringA )
當上述程式碼編譯並執行時,會產生以下結果:
20 times 100 is equal to 2000.0
字串連線
您可以使用 + 運算子連線兩個字串或一個字串和一個字元,或兩個字元。這是一個簡單的例子:
let constA = "Hello,"
let constB = "World!"

var stringA = constA + constB
print( stringA )
當上述程式碼編譯並執行時,會產生以下結果:
Hello,World!
字串長度
Swift 4 字串沒有length屬性,但您可以使用全域性 count() 函式計算字串中的字元數。這是一個簡單的例子:
var varA = "Hello, Swift 4!"

print( "\(varA), length is \((varA.count))" )
當上述程式碼編譯並執行時,會產生以下結果:
Hello, Swift 4!, length is 15
字串比較
您可以使用 == 運算子比較兩個字串變數或常量。這是一個簡單的例子:
var varA = "Hello, Swift 4!"
var varB = "Hello, World!"

if varA == varB {
   print( "\(varA) and \(varB) are equal" )
} else {
   print( "\(varA) and \(varB) are not equal" )
}
當上述程式碼編譯並執行時,會產生以下結果:
Hello, Swift 4! and Hello, World! are not equal
字串迭代
字串在 swift 4 中再次是值的集合,因此我們可以使用迴圈遍歷字串。
for chars in "ThisString" {
   print(chars, terminator: " ")
}
當上述程式碼編譯並執行時,會產生以下結果:
T h i s S t r i n g
Unicode 字串
您可以透過遍歷其 utf8 和 utf16 屬性來訪問字串的 UTF-8 和 UTF-16 表示形式,如下例所示:
var unicodeString = "Dog???"

print("UTF-8 Codes: ")
for code in unicodeString.utf8 {
   print("\(code) ")
}

print("\n")

print("UTF-16 Codes: ")
for code in unicodeString.utf16 {
   print("\(code) ")
}
當上述程式碼編譯並執行時,會產生以下結果:
UTF-8 Codes:
68
111
103
63
63
63


UTF-16 Codes:
68
111
103
63
63
63
字串函式 & 運算子
Swift 4 支援與字串相關的各種方法和運算子:
| 序號 | 函式/運算子 & 目的 |
|---|---|
| 1 | isEmpty 一個布林值,用於確定字串是否為空。 |
| 2 | hasPrefix(prefix: String) 函式用於檢查給定引數字串是否作為字串的字首存在。 |
| 3 | hasSuffix(suffix: String) 函式用於檢查給定引數字串是否作為字串的字尾存在。 |
| 4 | toInt() 函式用於將數字字串值轉換為整數。 |
| 5 | count() 全域性函式,用於計算字串中的字元數。 |
| 6 | utf8 屬性用於返回字串的 UTF-8 表示形式。 |
| 7 | utf16 屬性用於返回字串的 UTF-16 表示形式。 |
| 8 | unicodeScalars 屬性用於返回字串的 Unicode 標量表示形式。 |
| 9 | + 運算子用於連線兩個字串,或一個字串和一個字元,或兩個字元。 |
| 10 | += 運算子用於將字串或字元附加到現有字串。 |
| 11 | == 運算子用於確定兩個字串是否相等。 |
| 12 | < 運算子用於執行詞法比較以確定一個字串是否小於另一個字串。 |
| 13 | startIndex 獲取字串起始索引處的值。 |
| 14 | endIndex 獲取字串結束索引處的值。 |
| 15 | Indices 逐個訪問索引。即字串的所有字元。 |
| 16 | insert("Value", at: position) 在指定位置插入值。 |
| 17 |
remove(at: position) removeSubrange(range) 在指定位置刪除值,或從字串中刪除一系列值。 |
| 18 | reversed() 返回字串的反轉。 |
Swift - 字元
Swift 中的字元是單個字元的字串文字,由資料型別Character定址。請檢視以下示例。它使用了兩個 Character 常量:
let char1: Character = "A"
let char2: Character = "B"

print("Value of char1 \(char1)")
print("Value of char2 \(char2)")
當上述程式碼編譯並執行時,會產生以下結果:
Value of char1 A
Value of char2 B
如果您嘗試在 Character 型別變數或常量中儲存多個字元,則 Swift 4 將不允許這樣做。嘗試在 Swift 4 Playground 中鍵入以下示例,您甚至會在編譯前收到錯誤。
// Following is wrong in Swift 4
let char: Character = "AB"

print("Value of char \(char)")
空字元變數
無法建立具有空值的空字元變數或常量。以下語法是不可能的:
// Following is wrong in Swift 4
let char1: Character = ""
var char2: Character = ""

print("Value of char1 \(char1)")
print("Value of char2 \(char2)")
從字串中訪問字元
如在討論 Swift 4 的字串時所述,String 以指定的順序表示 Character 值的集合。因此,我們可以透過使用for-in迴圈迭代給定字串來訪問各個字元:
for ch in "Hello" {
   print(ch)
}
當上述程式碼編譯並執行時,會產生以下結果:
H
e
l
l
o
連線字串和字元
以下示例演示瞭如何將 Swift 4 的 Character 與 Swift 4 的 String 連線起來。
var varA:String = "Hello "
let varB:Character = "G"

varA.append( varB )

print("Value of varC = \(varA)")
當上述程式碼編譯並執行時,會產生以下結果:
Value of varC = Hello G
Swift - 陣列
Swift 4 陣列用於儲存相同型別值的排序列表。Swift 4 進行嚴格的檢查,不允許您即使錯誤地輸入錯誤型別的陣列。
如果您將建立的陣列分配給變數,則它始終是可變的,這意味著您可以透過新增、刪除或更改其專案來更改它;但是,如果您將陣列分配給常量,則該陣列是不可變的,其大小和內容無法更改。
建立陣列
您可以使用以下初始化程式語法建立特定型別的空陣列:
var someArray = [SomeType]()
以下是建立給定大小 a* 的陣列並使用值對其進行初始化的語法:
var someArray = [SomeType](count: NumbeOfElements, repeatedValue: InitialValue)
您可以使用以下語句建立一個包含 3 個元素且初始值為零的空 **Int** 型別陣列:
var someInts = [Int](count: 3, repeatedValue: 0)
以下是如何建立包含三個元素的陣列併為該陣列分配三個值的另一個示例:
var someInts:[Int] = [10, 20, 30]
訪問陣列
您可以使用 **下標** 語法從陣列中檢索值,在陣列名稱後立即使用方括號傳遞要檢索的值的索引,如下所示:
var someVar = someArray[index]
這裡,**索引** 從 0 開始,這意味著第一個元素可以使用索引 0 訪問,第二個元素可以使用索引 1 訪問,依此類推。以下示例演示如何建立、初始化和訪問陣列:
var someInts = [Int](count: 3, repeatedValue: 10)

var someVar = someInts[0]
print( "Value of first element is \(someVar)" )
print( "Value of second element is \(someInts[1])" )
print( "Value of third element is \(someInts[2])" )
當上述程式碼編譯並執行時,會產生以下結果:
Value of first element is 10
Value of second element is 10
Value of third element is 10
修改陣列
您可以使用 **append()** 方法或加法賦值運算子(+=)在陣列末尾新增新專案。請檢視以下示例。在這裡,我們首先建立一個空陣列,然後向同一個陣列中新增新元素:
var someInts = [Int]()

someInts.append(20)
someInts.append(30)
someInts += [40]

var someVar = someInts[0]

print( "Value of first element is \(someVar)" )
print( "Value of second element is \(someInts[1])" )
print( "Value of third element is \(someInts[2])" )
當上述程式碼編譯並執行時,會產生以下結果:
Value of first element is 20
Value of second element is 30
Value of third element is 40
您可以透過在給定索引處分配新值來修改陣列的現有元素,如以下示例所示:
var someInts = [Int]()

someInts.append(20)
someInts.append(30)
someInts += [40]

// Modify last element
someInts[2] = 50

var someVar = someInts[0]

print( "Value of first element is \(someVar)" )
print( "Value of second element is \(someInts[1])" )
print( "Value of third element is \(someInts[2])" )
當上述程式碼編譯並執行時,會產生以下結果:
Value of first element is 20
Value of second element is 30
Value of third element is 50
遍歷陣列
您可以使用 **for-in** 迴圈遍歷陣列中的所有值,如以下示例所示:
var someStrs = [String]()

someStrs.append("Apple")
someStrs.append("Amazon")
someStrs += ["Google"]
for item in someStrs {
   print(item)
}
當上述程式碼編譯並執行時,會產生以下結果:
Apple
Amazon
Google
您可以使用 **enumerate()** 函式,該函式返回專案的索引及其值,如下面的示例所示:
var someStrs = [String]()

someStrs.append("Apple")
someStrs.append("Amazon")
someStrs += ["Google"]

for (index, item) in someStrs.enumerated() {
   print("Value at index = \(index) is \(item)")
}
當上述程式碼編譯並執行時,會產生以下結果:
Value at index = 0 is Apple
Value at index = 1 is Amazon
Value at index = 2 is Google
新增兩個陣列
您可以使用加法運算子(+)來新增兩個相同型別的陣列,這將生成一個新陣列,其中包含來自這兩個陣列的值的組合,如下所示:
var intsA = [Int](count:2, repeatedValue: 2)
var intsB = [Int](count:3, repeatedValue: 1)

var intsC = intsA + intsB
for item in intsC {
   print(item)
}
當上述程式碼編譯並執行時,會產生以下結果:
2
2
1
1
1
count 屬性
您可以使用陣列的只讀 **count** 屬性來查詢陣列中的專案數量,如下所示:
var intsA = [Int](count:2, repeatedValue: 2)
var intsB = [Int](count:3, repeatedValue: 1)

var intsC = intsA + intsB

print("Total items in intsA = \(intsA.count)")
print("Total items in intsB = \(intsB.count)")
print("Total items in intsC = \(intsC.count)")
當上述程式碼編譯並執行時,會產生以下結果:
Total items in intsA = 2
Total items in intsB = 3
Total items in intsC = 5
empty 屬性
您可以使用陣列的只讀 **empty** 屬性來確定陣列是否為空,如下所示:
var intsA = [Int](count:2, repeatedValue: 2)
var intsB = [Int](count:3, repeatedValue: 1)
var intsC = [Int]()

print("intsA.isEmpty = \(intsA.isEmpty)")
print("intsB.isEmpty = \(intsB.isEmpty)")
print("intsC.isEmpty = \(intsC.isEmpty)")
當上述程式碼編譯並執行時,會產生以下結果:
intsA.isEmpty = false
intsB.isEmpty = false
intsC.isEmpty = true
Swift - 集合
Swift 4 中的 **集合** 用於儲存相同型別但沒有像陣列那樣具有確定順序的唯一值。
如果元素的順序不是問題,或者您想確保沒有重複值,則可以使用集合而不是陣列。(集合只允許唯一值。)
要儲存在集合中,型別必須是可雜湊的。雜湊值是一個 Int 值,對於相等的 objects 來說是相等的。例如,如果 x == y,則 **x.hashvalue == y.hashvalue**。
預設情況下,所有基本的 Swift 值都是可雜湊型別,可以用作集合值。
建立集合
您可以使用以下初始化程式語法建立特定型別的空集合:
var someSet = Set<Character>() //Character can be replaced by data type of set.
訪問和修改集合
您可以使用其方法和屬性來訪問或修改集合:
"count" 方法可用於顯示集合中元素的數量。
someSet.count // prints the number of elements
"insert" 方法可用於在集合中插入值。
someSet.insert("c") // adds the element to Set.
類似地,isEmpty 可用於檢查集合是否為空。
someSet.isEmpty // returns true or false depending on the set Elements.
"remove" 方法可用於刪除集合中的值。
someSet.remove("c") // removes a element , removeAll() can be used to remove all elements
"contains" 方法可用於檢查集合中是否存在值。
someSet.contains("c") // to check if set contains this value.
遍歷集合
您可以使用 for-in 迴圈遍歷集合:
for items in someSet {
   print(someSet)
}

//Swift sets are not in an ordered way, to iterate over a set in ordered way use

for items in someSet.sorted() {
   print(someSet)
}
執行集合操作
您可以在 Swift 集合上執行基本的集合操作。
以下是執行集合操作的方法:
- 交集
- 並集
- 減法
let evens: Set = [10,12,14,16,18]
let odds: Set = [5,7,9,11,13]
let primes = [2,3,5,7]
odds.union(evens).sorted()
// [5,7,9,10,11,12,13,14,16,18]
odds.intersection(evens).sorted()
//[]
odds.subtracting(primes).sorted()
//[9, 11, 13]
Swift - 字典
Swift 4 中的 **字典** 用於儲存相同型別的值的無序列表。Swift 4 進行了嚴格的檢查,即使不小心,也不會允許您在字典中輸入錯誤的型別。
Swift 4 字典使用稱為 **鍵** 的唯一識別符號來儲存值,稍後可以透過相同的鍵引用和查詢該值。與陣列中的專案不同,**字典** 中的專案沒有指定的順序。當您需要根據識別符號查詢值時,可以使用 **字典**。
字典鍵可以是整數或字串,沒有限制,但它在字典中必須是唯一的。
如果您將建立的字典分配給變數,則它始終是可變的,這意味著您可以透過新增、刪除或更改其專案來更改它。但是,如果您將字典分配給常量,則該字典是不可變的,其大小和內容無法更改。
建立字典
您可以使用以下初始化程式語法建立特定型別的空字典:
var someDict = [KeyType: ValueType]()
您可以使用以下簡單語法建立鍵為 Int 型別且關聯值為字串的空字典:
var someDict = [Int: String]()
這是一個根據給定值集建立字典的示例:
var someDict:[Int:String] = [1:"One", 2:"Two", 3:"Three"]
基於序列的初始化
Swift 4 允許您從陣列(鍵值對)建立字典。
var cities = [“Delhi”,”Bangalore”,”Hyderabad”]
您可以使用以下簡單語法建立鍵為 Int 型別且關聯值為字串的空字典:
var Distance = [2000,10, 620]
這是一個根據給定值集建立字典的示例:
let cityDistanceDict = Dictionary(uniqueKeysWithValues: zip(cities, Distance))
以上程式碼行將建立一個字典,其中 Cities 為鍵,Distance 為值:
過濾
Swift 4 允許您從字典中過濾值。
var closeCities = cityDistanceDict.filter { $0.value < 1000 }
如果我們執行以上程式碼,我們的 closeCities 字典將是。
["Bangalore" : 10 , "Hyderabad" : 620]
字典分組
Swift 4 允許您建立字典值的組。
var cities = ["Delhi","Bangalore","Hyderabad","Dehradun","Bihar"]
您可以使用以下簡單語法根據第一個字母對字典的值進行分組。
var GroupedCities = Dictionary(grouping: cities ) { $0.first! }
以上程式碼的結果將是
["D" :["Delhi","Dehradun"], "B" : ["Bengaluru","Bihar"], "H" : ["Hyderabad"]]
訪問字典
您可以使用下標語法從字典中檢索值,在字典名稱後立即使用方括號傳遞要檢索的值的鍵,如下所示:
var someVar = someDict[key]
讓我們檢查以下示例以建立、初始化和訪問字典中的值:
var someDict:[Int:String] = [1:"One", 2:"Two", 3:"Three"]
var someVar = someDict[1]

print( "Value of key = 1 is \(someVar)" )
print( "Value of key = 2 is \(someDict[2])" )
print( "Value of key = 3 is \(someDict[3])" )
當上述程式碼編譯並執行時,會產生以下結果:
Value of key = 1 is Optional("One")
Value of key = 2 is Optional("Two")
Value of key = 3 is Optional("Three")
修改字典
您可以使用 **updateValue(forKey:)** 方法將現有值新增到字典的給定鍵。此方法返回字典值型別的可選值。這是一個簡單的示例:
var someDict:[Int:String] = [1:"One", 2:"Two", 3:"Three"]
var oldVal = someDict.updateValue("New value of one", forKey: 1)
var someVar = someDict[1]

print( "Old value of key = 1 is \(oldVal)" )
print( "Value of key = 1 is \(someVar)" )
print( "Value of key = 2 is \(someDict[2])" )
print( "Value of key = 3 is \(someDict[3])" )
當上述程式碼編譯並執行時,會產生以下結果:
Old value of key = 1 is Optional("One")
Value of key = 1 is Optional("New value of one")
Value of key = 2 is Optional("Two")
Value of key = 3 is Optional("Three")
您可以透過在給定鍵處分配新值來修改字典的現有元素,如以下示例所示:
var someDict:[Int:String] = [1:"One", 2:"Two", 3:"Three"]
var oldVal = someDict[1]
someDict[1] = "New value of one"
var someVar = someDict[1]

print( "Old value of key = 1 is \(oldVal)" )
print( "Value of key = 1 is \(someVar)" )
print( "Value of key = 2 is \(someDict[2])" )
print( "Value of key = 3 is \(someDict[3])" )
當上述程式碼編譯並執行時,會產生以下結果:
Old value of key = 1 is Optional("One")
Value of key = 1 is Optional("New value of one")
Value of key = 2 is Optional("Two")
Value of key = 3 is Optional("Three")
刪除鍵值對
您可以使用 **removeValueForKey()** 方法從字典中刪除鍵值對。如果存在,此方法將刪除鍵值對並返回刪除的值,或者如果不存在值,則返回 nil。這是一個簡單的示例:
var someDict:[Int:String] = [1:"One", 2:"Two", 3:"Three"]
var removedValue = someDict.removeValue(forKey: 2)

print( "Value of key = 1 is \(someDict[1])" )
print( "Value of key = 2 is \(someDict[2])" )
print( "Value of key = 3 is \(someDict[3])" )
當上述程式碼編譯並執行時,會產生以下結果:
Value of key = 1 is Optional("One")
Value of key = 2 is nil
Value of key = 3 is Optional("Three")
您還可以使用下標語法透過為該鍵分配 **nil** 值來從字典中刪除鍵值對。這是一個簡單的示例:
var someDict:[Int:String] = [1:"One", 2:"Two", 3:"Three"]

someDict[2] = nil

print( "Value of key = 1 is \(someDict[1])" )
print( "Value of key = 2 is \(someDict[2])" )
print( "Value of key = 3 is \(someDict[3])" )
當上述程式碼編譯並執行時,會產生以下結果:
Value of key = 1 is Optional("One")
Value of key = 2 is nil
Value of key = 3 is Optional("Three")
遍歷字典
您可以使用 **for-in** 迴圈遍歷字典中所有鍵值對,如以下示例所示:
var someDict:[Int:String] = [1:"One", 2:"Two", 3:"Three"]

for (index, keyValue) in someDict.enumerated() {
   print("Dictionary key \(index) - Dictionary value \(keyValue)")
}
當上述程式碼編譯並執行時,會產生以下結果:
Dictionary key 2 - Dictionary value Two
Dictionary key 3 - Dictionary value Three
Dictionary key 1 - Dictionary value One
您可以使用 **enumerate()** 函式,該函式返回專案的索引及其(鍵,值)對,如下面的示例所示:
var someDict:[Int:String] = [1:"One", 2:"Two", 3:"Three"]
for (key, value) in someDict.enumerated() {
   print("Dictionary key \(key) - Dictionary value \(value)")
}
當上述程式碼編譯並執行時,會產生以下結果:
Dictionary key 0 - Dictionary value (key: 2, value: "Two")
Dictionary key 1 - Dictionary value (key: 3, value: "Three")
Dictionary key 2 - Dictionary value (key: 1, value: "One")
轉換為陣列
您可以從給定字典中提取鍵值對列表,為鍵和值分別構建單獨的陣列。這是一個示例:
var someDict:[Int:String] = [1:"One", 2:"Two", 3:"Three"]

let dictKeys = [Int](someDict.keys)
let dictValues = [String](someDict.values)

print("Print Dictionary Keys")

for (key) in dictKeys {
   print("\(key)")
}
print("Print Dictionary Values")

for (value) in dictValues {
   print("\(value)")
}
當上述程式碼編譯並執行時,會產生以下結果:
Print Dictionary Keys
2
3
1
Print Dictionary Values
Two
Three
One
count 屬性
您可以使用字典的只讀 **count** 屬性來查詢字典中的專案數量,如下所示:
var someDict1:[Int:String] = [1:"One", 2:"Two", 3:"Three"]
var someDict2:[Int:String] = [4:"Four", 5:"Five"]

print("Total items in someDict1 = \(someDict1.count)")
print("Total items in someDict2 = \(someDict2.count)")
當上述程式碼編譯並執行時,會產生以下結果:
Total items in someDict1 = 3
Total items in someDict2 = 2
empty 屬性
您可以使用字典的只讀 **empty** 屬性來確定字典是否為空,如下所示:
var someDict1:[Int:String] = [1:"One", 2:"Two", 3:"Three"]
var someDict2:[Int:String] = [4:"Four", 5:"Five"]
var someDict3:[Int:String] = [Int:String]()

print("someDict1 = \(someDict1.isEmpty)")
print("someDict2 = \(someDict2.isEmpty)")
print("someDict3 = \(someDict3.isEmpty)")
當上述程式碼編譯並執行時,會產生以下結果:
someDict1 = false
someDict2 = false
someDict3 = true
Swift - 函式
函式是一組組織在一起執行特定任務的語句。Swift 4 函式可以像簡單的 C 函式一樣簡單,也可以像 Objective C 語言函式一樣複雜。它允許我們在函式呼叫中傳遞區域性和全域性引數值。
**函式宣告** - 告訴編譯器函式的名稱、返回型別和引數。
**函式定義** - 它提供函式的實際主體。
Swift 4 函式包含引數型別及其返回型別。
函式定義
在 Swift 4 中,函式由“func”關鍵字定義。當新定義函式時,它可以將一個或多個值作為輸入“引數”傳遞給函式,它將在主體中處理函式並將值作為輸出“返回型別”傳遞迴函式。
每個函式都有一個函式名,描述了函式執行的任務。要使用函式,您需要“呼叫”該函式及其名稱,並傳遞與函式引數型別匹配的輸入值(稱為引數)。函式引數也稱為“元組”。
函式引數必須始終以與函式引數列表相同的順序提供,返回值後跟 →。
語法
func funcname(Parameters) -> returntype {
   Statement1
   Statement2
   ---
   Statement N
   return parameters
}
請檢視以下程式碼。學生的姓名宣告為在函式“student”中宣告的字串資料型別,當呼叫函式時,它將返回學生的姓名。
func student(name: String) -> String {
   return name
}

print(student(name: "First Program"))
print(student(name: "About Functions"))
當我們使用遊樂場執行上述程式時,會得到以下結果:
First Program
About Functions
呼叫函式
假設我們定義了一個名為“display”的函式來考慮例如顯示數字,一個名為“display”的函式首先初始化為引數“no1”,它持有整數資料型別。然後將引數“no1”分配給引數“a”,此後“a”將指向相同的整數資料型別。現在引數“a”被返回到函式。這裡 display() 函式將持有整數值並在每次呼叫函式時返回整數值。
func display(no1: Int) -> Int {
   let a = no1
   return a
}

print(display(no1: 100))
print(display(no1: 200))
當我們使用 playground 執行以上程式時,我們將得到以下結果:
100
200
引數和返回值
Swift 4 提供了靈活的函式引數及其從簡單到複雜值的返回值。與 C 和 Objective C 類似,Swift 4 中的函式也可以採用多種形式。
帶引數的函式
透過將引數值傳遞給函式主體來訪問函式。我們可以將單個到多個引數值作為元組傳遞到函式內部。
func mult(no1: Int, no2: Int) -> Int {
   return no1*no2
}

print(mult(no1: 2, no2: 20))
print(mult(no1: 3, no2: 15))
print(mult(no1: 4, no2: 30))
當我們使用 playground 執行以上程式時,我們將得到以下結果:
40
45
120
無引數的函式
我們也可以擁有沒有任何引數的函式。
語法
func funcname() -> datatype {
   return datatype
}
以下是一個沒有引數的函式示例:
func votersname() -> String {
   return "Alice"
}
print(votersname())
當我們使用遊樂場執行上述程式時,會得到以下結果:
Alice
帶返回值的函式
函式也用於返回字串、整數和浮點數資料型別的值作為返回值。為了找到給定陣列中最大和最小的數字,聲明瞭一個名為“ls”的函式,並使用大的和小的整數資料型別。
初始化一個數組以儲存整數值。然後處理陣列,讀取並比較陣列中每個值與其前一個值。當值小於前一個值時,將其儲存在“small”引數中,否則將其儲存在“large”引數中,並透過呼叫函式返回這些值。
func ls(array: [Int]) -> (large: Int, small: Int) {
   var lar = array[0]
   var sma = array[0]

   for i in array[1..<array.count] {
      if i < sma {
         sma = i
      } else if i > lar {
         lar = i
      }
   }
   return (lar, sma)
}

let num = ls(array: [40,12,-5,78,98])
print("Largest number is: \(num.large) and smallest number is: \(num.small)")
當我們使用遊樂場執行上述程式時,會得到以下結果:
Largest number is: 98 and smallest number is: -5
無返回值的函式
某些函式可能在函式內部宣告引數,但沒有任何返回值。以下程式將a和b宣告為sum()函式的引數。在函式本身內部,透過呼叫函式呼叫sum()傳遞引數a和b的值,並列印其值,從而消除了返回值。
func sum(a: Int, b: Int) {
   let a = a + b
   let b = a - b
   print(a, b)
}

sum(a: 20, b: 10)
sum(a: 40, b: 10)
sum(a: 24, b: 6)
當我們使用遊樂場執行上述程式時,會得到以下結果:
30 20
50 40
30 24
具有可選返回值型別的函式
Swift 4引入了“可選”功能,透過引入安全措施來解決問題。例如,假設我們正在宣告函式值的返回值型別為整數,但如果函式返回字串值或空值會發生什麼?在這種情況下,編譯器將返回錯誤值。“可選”是為了解決這些問題而引入的。
可選函式將採用兩種形式:“值”和“nil”。我們將使用關鍵保留字元“?”來提及“可選”,以檢查元組是否返回一個值或一個空值。
func minMax(array: [Int]) -> (min: Int, max: Int)? {
   if array.isEmpty { return nil }
   var currentMin = array[0]
   var currentMax = array[0]

   for value in array[1..<array.count] {
      if value < currentMin {
         currentMin = value
      } else if value > currentMax {
         currentMax = value
      }
   }
   return (currentMin, currentMax)
}

if let bounds = minMax(array: [8, -6, 2, 109, 3, 71]) {
   print("min is \(bounds.min) and max is \(bounds.max)")
}
當我們在遊樂場中執行上述程式時,將得到以下結果:
min is -6 and max is 109
“可選”用於檢查“nil”或垃圾值,從而在除錯中消耗大量時間,並使程式碼對使用者高效且易讀。
函式區域性引數名與外部引數名
區域性引數名
區域性引數名僅在函式內部訪問。
func sample(number: Int) {
   print(number)
}
這裡,func sample引數編號被宣告為內部變數,因為它由函式sample()在內部訪問。這裡“number”被宣告為區域性變數,但對變數的引用是在函式外部使用以下語句進行的:
func sample(number: Int) {
   print(number)
}

sample(number: 1)
sample(number: 2)
sample(number: 3)
當我們使用遊樂場執行上述程式時,會得到以下結果:
1
2
3
外部引數名
外部引數名允許我們為函式引數命名,以使它們的用途更清晰。例如,您可以在下面命名兩個函式引數,然後如下呼叫該函式:
func pow(firstArg a: Int, secondArg b: Int) -> Int {
   var res = a
   for _ in 1..<b {
      res = res * a
   }
   print(res)
   return res
}

pow(firstArg:5, secondArg:3)
當我們使用遊樂場執行上述程式時,會得到以下結果:
125
可變引數
當我們想定義具有多個引數的函式時,我們可以將成員宣告為“可變”引數。引數可以透過引數名稱後的(···)指定為可變引數。
func vari<N>(members: N...){
   for i in members {
      print(i)
   }
}

vari(members: 4,3,5)
vari(members: 4.5, 3.1, 5.6)
vari(members: "Swift 4", "Enumerations", "Closures")
當我們使用遊樂場執行上述程式時,會得到以下結果:
4
3
5
4.5
3.1
5.6
Swift 4
Enumerations
Closures
常量、變數和I/O引數
函式預設將引數視為“常量”,而使用者也可以將引數宣告為變數。我們已經討論過“let”關鍵字用於宣告常量引數,而變數引數則使用“var”關鍵字定義。
Swift 4中的I/O引數提供了一種功能,即使在函式呼叫後修改了引數值,也可以保留這些引數值。在函式引數定義的開頭,宣告“inout”關鍵字以保留成員值。
它派生關鍵字“inout”,因為其值被“傳入”函式,其值由函式體訪問和修改,並“傳出”函式以修改原始引數。
變數僅作為輸入輸出引數的引數傳遞,因為其值僅在函式內部和外部修改。因此,無需將字串和文字宣告為輸入輸出引數。變數名前的“&”表示我們將引數傳遞給輸入輸出引數。
func temp(a1: inout Int, b1: inout Int) {
   let t = a1
   a1 = b1
   b1 = t
}

var no = 2
var co = 10
temp(a1: &no, b1: &co)
print("Swapped values are \(no), \(co)")
當我們使用遊樂場執行上述程式時,會得到以下結果:
Swapped values are 10, 2
函式型別及其用法
每個函式都遵循特定的函式,透過考慮輸入引數並輸出期望的結果。
func inputs(no1: Int, no2: Int) -> Int {
   return no1/no2
}
以下是一個示例:
func inputs(no1: Int, no2: Int) -> Int {
   return no1/no2
}

print(inputs(no1: 20, no2: 10))
print(inputs(no1: 36, no2: 6))
當我們使用遊樂場執行上述程式時,會得到以下結果:
2
6
這裡,函式用兩個引數no1和no2初始化為整數資料型別,其返回值型別也宣告為“int”。
Func inputstr(name: String) -> String {
   return name
}
這裡,函式被宣告為string資料型別。
函式也可以具有void資料型別,並且此類函式不會返回任何內容。
func inputstr() {
   print("Swift 4 Functions")
   print("Types and its Usage")
}
inputstr()
當我們使用遊樂場執行上述程式時,會得到以下結果:
Swift 4 Functions
Types and its Usage
上述函式被宣告為一個無引數且無返回值的void函式。
使用函式型別
函式首先傳遞整數、浮點數或字串型別引數,然後將其作為常量或變數傳遞給函式,如下所示。
var addition: (Int, Int) -> Int = sum
這裡sum是一個具有“a”和“b”整數變數的函式名,現在將其宣告為函式名addition的變數。此後,addition和sum函式都具有相同數量的引數,宣告為整數資料型別,並將整數返回值作為引用。
func sum(a: Int, b: Int) -> Int {
   return a + b
}
var addition: (Int, Int) -> Int = sum
print("Result: \(addition(40, 89))")
當我們使用遊樂場執行上述程式時,會得到以下結果:
Result: 129
函式型別作為引數型別和返回值型別
我們還可以將函式本身作為引數型別傳遞給另一個函式。
func sum(a: Int, b: Int) -> Int {
   return a + b
}
var addition: (Int, Int) -> Int = sum
print("Result: \(addition(40, 89))")

func another(addition: (Int, Int) -> Int, a: Int, b: Int) {
   print("Result: \(addition(a, b))")
}
another(sum, 10, 20)
當我們使用遊樂場執行上述程式時,會得到以下結果:
Result: 129
Result: 30
巢狀函式
巢狀函式提供了透過呼叫內部函式來呼叫外部函式的功能。
func calcDecrement(forDecrement total: Int) -> () -> Int {
   var overallDecrement = 0
   func decrementer() -> Int {
      overallDecrement -= total
      return overallDecrement
   }
   return decrementer
}

let decrem = calcDecrement(forDecrement: 30)
print(decrem())
當我們使用遊樂場執行上述程式時,會得到以下結果:
-30
Swift - 閉包
Swift 4中的閉包類似於自包含函式,這些函式被組織成塊,並且可以在任何地方呼叫,就像C和Objective C語言一樣。在函式內部定義的常量和變數引用被捕獲並存儲在閉包中。函式被視為閉包的特例,它採用以下三種形式:
| 全域性函式 | 巢狀函式 | 閉包表示式 |
|---|---|---|
| 有名。不捕獲任何值 | 有名。捕獲來自封閉函式的值 | 未命名的閉包捕獲來自相鄰塊的值 |
Swift 4語言中的閉包表示式遵循簡潔、最佳化和輕量級語法風格,其中包括。
- 從上下文中推斷引數和返回值型別。
- 從單表示式閉包中隱式返回。
- 簡寫引數名稱和
- 尾隨閉包語法
語法
以下是一個定義接受引數並返回資料型別的閉包的通用語法:
{
   (parameters) −> return type in
   statements
}
以下是一個簡單的示例:
let studname = { print("Welcome to Swift Closures") }
studname()
當我們使用遊樂場執行上述程式時,會得到以下結果:
Welcome to Swift Closures
以下閉包接受兩個引數並返回一個Bool值:
{
   (Int, Int) −> Bool in
   Statement1
   Statement 2
   ---
   Statement n
}
以下是一個簡單的示例:
let divide = {
   (val1: Int, val2: Int) -> Int in
   return val1 / val2
}

let result = divide(200, 20)
print (result)
當我們使用遊樂場執行上述程式時,會得到以下結果:
10
閉包中的表示式
巢狀函式提供了一種命名和定義程式碼塊的便捷方法。而不是表示整個函式宣告和名稱,構造用於表示較短的函式。透過閉包表示式實現了用清晰簡潔的語句和集中的語法表示函式。
升序程式
字串排序是透過Swift 4的關鍵保留函式“sorted”實現的,該函式已在標準庫中可用。該函式將按升序對給定的字串進行排序,並將元素儲存在一個新陣列中,該陣列具有與舊陣列中提到的相同的大小和資料型別。舊陣列保持不變。
在sorted函式內部表示兩個引數:
表示為陣列的已知型別的值。
陣列內容(Int,Int)並返回一個布林值(Bool),如果陣列已正確排序,它將返回true值,否則將返回false。
編寫一個帶有輸入字串的普通函式並將其傳遞給sorted函式,以使字串按排序到新陣列中,如下所示:
func ascend(s1: String, s2: String) -> Bool {
   return s1 > s2
}

let stringcmp = ascend(s1: "Swift 4", s2: "great")
print (stringcmp)
當我們在遊樂場中執行上述程式時,將得到以下結果:
true
要為冰淇淋排序的初始陣列給出為“Swift 4”和“great”。用於排序陣列的函式被宣告為字串資料型別,其返回值型別被提及為布林型。兩個字串都被比較並按升序排序並存儲在一個新陣列中。如果排序成功執行,則函式將返回true值,否則將返回false。
閉包表示式語法使用:
- 常量引數,
- 變數引數,以及
- 輸入輸出引數。
閉包表示式不支援預設值。可變引數和元組也可以用作引數型別和返回值型別。
let sum = {
   (no1: Int, no2: Int) -> Int in
   return no1 + no2
}

let digits = sum(10, 20)
print(digits)
當我們使用遊樂場執行上述程式時,會得到以下結果:
30
函式語句中提到的引數和返回值型別宣告也可以透過使用“in”關鍵字的內聯閉包表示式函式表示。一旦聲明瞭引數和返回值型別,“in”關鍵字用於表示閉包的主體。
單表示式隱式返回
這裡,sorted函式的第二個引數的函式型別清楚地表明閉包必須返回一個Bool值。因為閉包的主體包含一個返回Bool值的單一表達式(s1 > s2),所以沒有歧義,並且可以省略return關鍵字。
要在表示式閉包中返回單個表示式語句,在宣告部分省略“return”關鍵字。
var count:[Int] = [5, 10, -6, 75, 20]
let descending = count.sorted(by: { n1, n2 in n1 > n2 })
let ascending = count.sorted(by: { n1, n2 in n1 < n2 })

print(descending)
print(ascending)
當我們使用遊樂場執行上述程式時,會得到以下結果:
[75, 20, 10, 5, -6]
[-6, 5, 10, 20, 75]
語句本身清楚地定義了當字串1大於字串2時返回true,否則返回false,因此這裡省略了return語句。
已知型別閉包
考慮兩個數字的加法。我們知道加法將返回整數資料型別。因此,已知型別閉包宣告為:
let sub = {
   (no1: Int, no2: Int) -> Int in
   return no1 - no2
}

let digits = sub(10, 20)
print(digits)
當我們使用遊樂場執行上述程式時,會得到以下結果:
-10
將簡寫引數名稱宣告為閉包
Swift 4自動為內聯閉包提供簡寫引數名稱,可以使用這些名稱透過名稱$0、$1、$2等來引用閉包引數的值。
var shorthand: (String, String) -> String
shorthand = { $1 }
print(shorthand("100", "200"))
這裡,$0和$1分別指代閉包的第一個和第二個String引數。
當我們使用遊樂場執行上述程式時,會得到以下結果:
200
Swift 4便於使用者透過表示$0、$1、$2 --- $n來表示內聯閉包作為簡寫引數名稱。
當我們在閉包表示式內部表示簡寫引數名稱時,閉包引數列表在定義部分被省略。根據函式型別,將派生簡寫引數名稱。由於簡寫引數是在表示式主體中定義的,因此省略了“in”關鍵字。
閉包作為運算子函式
Swift 4提供了一種簡單的方法來訪問成員,只需提供閉包作為運算子函式即可。在前面的示例中,關鍵字“Bool”用於返回字串相等時返回“true”,否則返回“false”。
表示式透過閉包中的運算子函式變得更加簡單,如下所示:
let numb = [98, -20, -30, 42, 18, 35]
var sortedNumbers = numb.sorted ({
   (left: Int, right: Int) -> Bool in
   return left < right
})

let asc = numb.sorted(<)
print(asc)
當我們使用遊樂場執行上述程式時,會得到以下結果:
[-30, -20, 18, 35, 42, 98]
閉包作為尾隨閉包
將函式的最終引數傳遞給閉包表示式是透過“尾隨閉包”的幫助來宣告的。它寫在函式()外部,並帶有{}。當無法在一行中內聯編寫函式時,需要使用它。
reversed = sorted(names) { $0 > $1}
其中{$0 > $1}表示為在(names)外部宣告的尾隨閉包。
import Foundation
var letters = ["North", "East", "West", "South"]

let twoletters = letters.map({
   (state: String) -> String in
   return state.substringToIndex(advance(state.startIndex, 2)).uppercaseString
})

let stletters = letters.map() {
   $0.substringToIndex(advance($0.startIndex, 2)).uppercaseString
}
print(stletters)
當我們使用遊樂場執行上述程式時,會得到以下結果:
[NO, EA, WE, SO]
捕獲值和引用型別
在Swift 4中,捕獲常量和變數值是藉助閉包完成的。它進一步引用和修改閉包主體中這些常量和變數的值,即使變數不再存在。
捕獲常量和變數值是透過使用巢狀函式在其他函式的主體中編寫函式來實現的。
巢狀函式捕獲:
- 外部函式引數。
- 捕獲在外部函式內定義的常量和變數。
在Swift 4中,當在函式內部宣告常量或變數時,閉包也會自動建立對該變數的引用。它還提供了一種在同一個閉包中引用多個變數的功能,如下所示:
let decrem = calcDecrement(forDecrement: 18)
decrem()
這裡oneDecrement和Decrement變數都將指向同一個記憶體塊作為閉包引用。
func calcDecrement(forDecrement total: Int) -> () -> Int {
   var overallDecrement = 100
   func decrementer() -> Int {
      overallDecrement -= total
      print(overallDecrement)
      return overallDecrement
   }
   return decrementer
}

let decrem = calcDecrement(forDecrement: 18)
decrem()
decrem()
decrem()
當我們使用遊樂場執行上述程式時,會得到以下結果:
82
64
46
每次呼叫外部函式calcDecrement時,它都會呼叫decrementer()函式並將值減去18,並藉助外部函式calcDecrement返回結果。這裡calcDecrement充當閉包。
即使函式 `decrementer()` 沒有引數,閉包預設也會透過捕獲其現有值來引用變數 `overallDecrement` 和 `total`。指定變數的值副本與新的 `decrementer()` 函式一起儲存。Swift 4 透過在變數未使用時分配和釋放記憶體空間來處理記憶體管理函式。
Swift - 列舉
列舉是一種使用者定義的資料型別,它包含一組相關的值。關鍵字 **enum** 用於定義列舉資料型別。
列舉功能
Swift 4 中的列舉也類似於 C 和 Objective C 的結構。
它在類中宣告,其值可以透過該類的例項訪問。
初始成員值使用列舉初始化器定義。
透過確保標準協議功能來擴充套件其功能。
語法
列舉以 `enum` 關鍵字引入,並將它們的整個定義放在一對大括號內 -
enum enumname {
   // enumeration values are described here
}
例如,您可以為一週中的日期定義一個列舉,如下所示 -
enum DaysofaWeek {
   case Sunday
   case Monday
   ---
   case Saturday
}
示例
enum names {
   case Swift
   case Closures
}

var lang = names.Closures
lang = .Closures

switch lang {
   case .Swift:
      print("Welcome to Swift")
   case .Closures:
      print("Welcome to Closures")
   default:
      print("Introduction")
}
當我們使用遊樂場執行上述程式時,會得到以下結果:
Welcome to Closures
Swift 4 列舉不會像 C 和 Objective C 一樣為其成員分配預設值。相反,成員由其列舉名稱顯式定義。列舉名稱應以大寫字母開頭(例如:`enum DaysofaWeek`)。
var weekDay = DaysofaWeek.Sunday
這裡,列舉名稱 `DaysofaWeek` 被分配給變數 `weekday.Sunday`。它通知編譯器,屬於 `Sunday` 的資料型別將被分配給該特定類的後續列舉成員。一旦定義了列舉成員資料型別,就可以透過傳遞值和進一步計算來訪問這些成員。
帶有 Switch 語句的列舉
Swift 4 的 `Switch` 語句也遵循多路選擇。根據指定的條件,每次只訪問一個變數。`switch` 語句中的 `default` 情況用於捕獲未指定的案例。
enum Climate {
   case India
   case America
   case Africa
   case Australia
}

var season = Climate.America
season = .America
switch season {
   case .India:
      print("Climate is Hot")
   case .America:
      print("Climate is Cold")
   case .Africa:
      print("Climate is Moderate")
   case .Australia:
      print("Climate is Rainy")

}
當我們使用遊樂場執行上述程式時,會得到以下結果:
Climate is Cold
程式首先將 `Climate` 定義為列舉名稱。然後宣告其成員(如 `India`、`America`、`Africa` 和 `Australia`)屬於類 `Climate`。現在,成員 `America` 被分配給一個 `Season` 變數。此外,`Switch` 情況將檢視對應於 `.America` 的值,並將分支到該特定語句。輸出將顯示為“Climate is Cold”。同樣,所有成員都可以透過 `switch` 語句訪問。當條件不滿足時,它預設列印“Climate is not predictable”。
列舉可以進一步分類為關聯值和原始值。
關聯值和原始值的區別
| 關聯值 | 原始值 |
| 不同的資料型別 | 相同的資料型別 |
| 例如:`enum {10,0.8,"Hello"}` | 例如:`enum {10,35,50}` |
| 基於常量或變數建立值 | 預填充的值 |
| 每次宣告時都可能變化 | 成員的值相同 |
帶有關聯值的列舉
enum Student {
   case Name(String)
   case Mark(Int,Int,Int)
}

var studDetails = Student.Name("Swift 4")
var studMarks = Student.Mark(98,97,95)

switch studMarks {
   case .Name(let studName):
      print("Student name is: \(studName).")
   case .Mark(let Mark1, let Mark2, let Mark3):
      print("Student Marks are: \(Mark1),\(Mark2),\(Mark3).")
}
當我們使用遊樂場執行上述程式時,會得到以下結果:
Student Marks are: 98,97,95.
例如,要訪問學生的姓名和三門科目獲得的分數,列舉名稱宣告為 `student`,列舉類中存在的成員是屬於字串資料型別的 `name`,分數表示為資料型別為整數的 `mark1`、`mark2` 和 `mark3`。要訪問學生的姓名或他們獲得的分數
var studDetails = Student.Name("Swift")
var studMarks = Student.Mark(98,97,95)
現在,`switch` 情況將列印學生姓名(如果執行該情況塊),否則將列印學生獲得的分數。如果這兩個條件都失敗,則將執行預設塊。
帶有原始值的列舉
原始值可以是字串、字元或任何整數或浮點數型別。每個原始值在其列舉宣告中必須是唯一的。當將整數用於原始值時,如果某些列舉成員未指定值,則它們會自動遞增。
enum Month: Int {
   case January = 1, February, March, April, May, June, July, August,
      September, October, November, December
}

let yearMonth = Month.May.rawValue
print("Value of the Month is: \(yearMonth).")
當我們使用遊樂場執行上述程式時,會得到以下結果:
Value of the Month is: 5.
Swift - 結構體
Swift 4 提供了一個靈活的構建塊,用於利用結構作為構造。透過使用這些結構,可以定義構造方法和屬性。
與 C 和 Objective C 不同
結構不需要實現檔案和介面。
結構允許我們建立一個單個檔案,並自動將其介面擴充套件到其他塊。
在結構中,變數值被複制並在後續程式碼中透過返回舊值的副本傳遞,以便無法更改這些值。
語法
Structures are defined with a 'Struct' Keyword.
struct nameStruct {
   Definition 1
   Definition 2
   ---
   Definition N
}
結構的定義
例如,假設我們必須訪問包含三門科目分數的學生記錄並找出三門科目的總分。這裡 `markStruct` 用於初始化一個結構,其中三個分數的資料型別為 `Int`。
struct MarkStruct {
   var mark1: Int
   var mark2: Int
   var mark3: Int
}
訪問結構及其屬性
結構的成員透過其結構名稱訪問。結構的例項由 `let` 關鍵字初始化。
struct studentMarks {
   var mark1 = 100
   var mark2 = 200
   var mark3 = 300
}

let marks = studentMarks()
print("Mark1 is \(marks.mark1)")
print("Mark2 is \(marks.mark2)")
print("Mark3 is \(marks.mark3)")
當我們使用遊樂場執行上述程式時,會得到以下結果:
Mark1 is 100
Mark2 is 200
Mark3 is 300
學生分數透過結構名稱 `studentMarks` 訪問。結構成員初始化為 `mark1`、`mark2`、`mark3`,其值為整數型別。然後將結構 `studentMarks()` 傳遞給帶有 `let` 關鍵字的 `marks`。此後,`marks` 將包含結構成員值。現在,透過使用 `.` 和其初始化名稱訪問結構成員值來列印這些值。
struct MarksStruct {
   var mark: Int

   init(mark: Int) {
      self.mark = mark
   }
}

var aStruct = MarksStruct(mark: 98)
var bStruct = aStruct     // aStruct and bStruct are two structs with the same value!
bStruct.mark = 97

print(aStruct.mark)      // 98
print(bStruct.mark)      // 97
當我們使用遊樂場執行上述程式時,會得到以下結果:
98
97
結構的最佳使用實踐
Swift 4 語言提供了將結構定義為自定義資料型別以構建函式塊的功能。結構的例項按其值傳遞到定義的塊中以進行進一步操作。
需要結構的原因
封裝簡單資料值。
透過“值”而不是“引用”複製封裝的資料及其關聯屬性。
結構到“複製”和“引用”。
Swift 4 中的結構透過其值而不是透過其引用傳遞其成員。
struct markStruct {
   var mark1: Int
   var mark2: Int
   var mark3: Int

   init(mark1: Int, mark2: Int, mark3: Int) {
      self.mark1 = mark1
      self.mark2 = mark2
      self.mark3 = mark3
   }
}

var marks = markStruct(mark1: 98, mark2: 96, mark3:100)
print(marks.mark1)
print(marks.mark2)
print(marks.mark3)
當我們使用遊樂場執行上述程式時,會得到以下結果:
98
96
100
另一個例子
struct markStruct {
   var mark1: Int
   var mark2: Int
   var mark3: Int

   init(mark1: Int, mark2: Int, mark3: Int) {
      self.mark1 = mark1
      self.mark2 = mark2
      self.mark3 = mark3
   }
}

var fail = markStruct(mark1: 34, mark2: 42, mark3: 13)

print(fail.mark1)
print(fail.mark2)
print(fail.mark3)
當我們使用遊樂場執行上述程式時,會得到以下結果:
34
42
13
首先定義結構 `markStruct` 及其成員 `mark1`、`mark2` 和 `mark3`。現在,成員類的變數被初始化為儲存整數值。然後使用 `self` 關鍵字建立結構成員的副本。一旦建立了結構成員的副本,將帶有引數 `marks` 的結構塊傳遞給 `marks` 變數,該變數現在將儲存學生的分數。然後分數列印為 98、96、100。下一步,對於相同的結構成員,另一個名為 `fail` 的例項用於指向具有不同分數的相同結構成員。然後結果現在列印為 34、42、13。這清楚地解釋了結構將擁有成員變數的副本,然後將成員傳遞到其即將到來的函式塊。
Swift - 類
Swift 4 中的類是靈活構造的構建塊。類似於常量、變數和函式,使用者可以定義類屬性和方法。Swift 4 為我們提供了這樣的功能:在宣告類時,使用者無需建立介面或實現檔案。Swift 4 允許我們將類建立為單個檔案,並且一旦類初始化,將預設建立外部介面。
擁有類的益處
繼承將一個類的屬性獲取到另一個類
型別轉換使使用者能夠在執行時檢查類型別
析構器負責釋放記憶體資源
引用計數允許類例項具有多個引用
類和結構的共同特徵
- 屬性定義為儲存值
- 下標定義為提供對值的訪問
- 方法初始化以改進功能
- 初始狀態由初始化器定義
- 功能擴充套件到預設值之外
- 確認協議功能標準
語法
Class classname {
   Definition 1
   Definition 2
   ---
   Definition N
}
類定義
class student {
   var studname: String
   var mark: Int
   var mark2: Int
}
建立例項的語法
let studrecord = student()
示例
class MarksStruct {
   var mark: Int
   init(mark: Int) {
      self.mark = mark
   }
}

class studentMarks {
   var mark = 300
}

let marks = studentMarks()
print("Mark is \(marks.mark)")
當我們使用遊樂場執行上述程式時,會得到以下結果:
Mark is 300
作為引用型別訪問類屬性
類屬性可以透過 `.` 語法訪問。屬性名稱在例項名稱後面用 `.` 分隔。
class MarksStruct {
   var mark: Int
   init(mark: Int) {
      self.mark = mark
   }
}

class studentMarks {
   var mark1 = 300
   var mark2 = 400
   var mark3 = 900
}

let marks = studentMarks()
print("Mark1 is \(marks.mark1)")
print("Mark2 is \(marks.mark2)")
print("Mark3 is \(marks.mark3)")
當我們使用遊樂場執行上述程式時,會得到以下結果:
Mark1 is 300
Mark2 is 400
Mark3 is 900
類恆等運算子
Swift 4 中的類指的是多個指向單個例項的常量和變數。要了解指向特定類例項的常量和變數,可以使用恆等運算子。類例項始終透過引用傳遞。在類中,`NSString`、`NSArray` 和 `NSDictionary` 例項始終被分配並作為對現有例項的引用傳遞,而不是作為副本。
| 相同運算子 | 不相同運算子 |
|---|---|
| 使用的運算子為 (===) | 使用的運算子為 (!==) |
| 當兩個常量或變數指向同一個例項時返回 `true` | 當兩個常量或變數指向不同的例項時返回 `true` |
class SampleClass: Equatable {
   let myProperty: String
   init(s: String) {
      myProperty = s
   }
}

func ==(lhs: SampleClass, rhs: SampleClass) -> Bool {
   return lhs.myProperty == rhs.myProperty
}

let spClass1 = SampleClass(s: "Hello")
let spClass2 = SampleClass(s: "Hello")

spClass1 === spClass2 // false
print("\(spClass1)")

spClass1 !== spClass2 // true
print("\(spClass2)")
當我們使用遊樂場執行上述程式時,會得到以下結果:
main.SampleClass
main.SampleClass
Swift - 屬性
Swift 4 語言為類、列舉或結構提供屬性來關聯值。屬性可以進一步分類為儲存屬性和計算屬性。
儲存屬性和計算屬性的區別
| 儲存屬性 | 計算屬性 |
|---|---|
| 將常量和變數值儲存為例項 | 計算值而不是儲存值 |
| 由類和結構提供 | 由類、列舉和結構提供 |
儲存屬性和計算屬性都與例項型別相關聯。當屬性與其型別值相關聯時,則將其定義為“型別屬性”。儲存屬性和計算屬性通常與特定型別的例項相關聯。但是,屬性也可以與型別本身相關聯。此類屬性稱為型別屬性。屬性觀察器也用於
- 觀察儲存屬性的值
- 觀察從超類派生的繼承子類的屬性
儲存屬性
Swift 4 引入了儲存屬性的概念來儲存常量和變數的例項。常量的儲存屬性由 `let` 關鍵字定義,變數的儲存屬性由 `var` 關鍵字定義。
- 在定義期間,儲存屬性提供“預設值”
- 在初始化期間,使用者可以初始化和修改初始值
struct Number {
   var digits: Int
   let pi = 3.1415
}

var n = Number(digits: 12345)
n.digits = 67

print("\(n.digits)")
print("\(n.pi)")
當我們使用遊樂場執行上述程式時,會得到以下結果:
67
3.1415
考慮上面程式碼中的以下行 -
let pi = 3.1415
這裡,變數 `pi` 初始化為具有例項 `pi = 3.1415` 的儲存屬性值。因此,無論何時引用該例項,它都將僅儲存值 3.1415。
另一種擁有儲存屬性的方法是將其作為常量結構。因此,結構的整個例項將被視為“常量的儲存屬性”。
struct Number {
   var digits: Int
   let numbers = 3.1415
}

var n = Number(digits: 12345)
n.digits = 67

print("\(n.digits)")
print("\(n.numbers)")
n.numbers = 8.7
當我們使用遊樂場執行上述程式時,會得到以下結果:
error: cannot assign to 'numbers' in 'n'
n.numbers = 8.7
它不會將 `number` 重新初始化為 8.7,而是會返回一條錯誤訊息,指示 `number` 被宣告為常量。
延遲儲存屬性
Swift 4 提供了一個靈活的屬性,稱為“延遲儲存屬性”,它不會在變數第一次初始化時計算初始值。`lazy` 修飾符用於變數宣告之前,以將其作為延遲儲存屬性。
延遲屬性用於 -
- 延遲物件建立。
- 當屬性依賴於類的其他部分時,這些部分尚不清楚
class sample {
   lazy var no = number()    // `var` declaration is required.
}

class number {
   var name = "Swift 4"
}

var firstsample = sample()
print(firstsample.no.name)
當我們使用遊樂場執行上述程式時,會得到以下結果:
Swift 4
例項變數
在 Objective C 中,儲存屬性還具有例項變數作為備份目的,以儲存在儲存屬性中宣告的值。
Swift 4 將這兩個概念整合到單個“儲存屬性”宣告中。而不是具有相應的例項變數和備份值,“儲存屬性”包含在單個位置定義的有關變數屬性的所有整合資訊,這些資訊由變數名稱、資料型別和記憶體管理功能定義。
計算屬性
計算屬性不是儲存值,而是提供 getter 和可選 setter 以間接檢索和設定其他屬性和值。
class sample {
   var no1 = 0.0, no2 = 0.0
   var length = 300.0, breadth = 150.0

   var middle: (Double, Double) {
      get {
         return (length / 2, breadth / 2)
      }

      set(axis){
         no1 = axis.0 - (length / 2)
         no2 = axis.1 - (breadth / 2)
      }
   }
}

var result = sample()
print(result.middle)
result.middle = (0.0, 10.0)

print(result.no1)
print(result.no2)
當我們使用遊樂場執行上述程式時,會得到以下結果:
(150.0, 75.0)
-150.0
-65.0
當計算屬性將新值保留為未定義時,將為該特定變數設定預設值。
計算屬性作為只讀屬性
計算屬性中的只讀屬性定義為具有 getter 但沒有 setter 的屬性。它始終用於返回值。變數透過 `.` 語法進一步訪問,但不能設定為另一個值。
class film {
   var head = ""
   var duration = 0.0
   var metaInfo: [String:String] {
      return [
         "head": self.head,
         "duration":"\(self.duration)"
      ]
   }
}

var movie = film()
movie.head = "Swift 4 Properties"
movie.duration = 3.09

print(movie.metaInfo["head"]!)
print(movie.metaInfo["duration"]!)
當我們使用遊樂場執行上述程式時,會得到以下結果:
Swift 4 Properties
3.09
計算屬性作為屬性觀察器
在 Swift 4 中,要觀察和響應屬性值,可以使用屬性觀察器。每次設定屬性值時都會呼叫屬性觀察器。除了延遲儲存屬性外,我們還可以透過方法“覆蓋”向“繼承”屬性新增屬性觀察器。
屬性觀察器可以透過以下任一方式定義
在儲存值之前 - `willset`
在儲存新值之後 - `didset`
當在初始化器中設定屬性時,不會呼叫 `willset` 和 `didset` 觀察器。
class Samplepgm {
   var counter: Int = 0 {
      willSet(newTotal){
         print("Total Counter is: \(newTotal)")
      }

      didSet {
         if counter > oldValue {
            print("Newly Added Counter \(counter - oldValue)")
         }
      }
   }
}

let NewCounter = Samplepgm()
NewCounter.counter = 100
NewCounter.counter = 800
當我們使用遊樂場執行上述程式時,會得到以下結果:
Total Counter is: 100
Newly Added Counter 100
Total Counter is: 800
Newly Added Counter 700
區域性變數和全域性變數
宣告區域性變數和全域性變數用於計算和觀察屬性。
| 區域性變數 | 全域性變數 |
|---|---|
| 在函式、方法或閉包上下文中定義的變數。 | 在函式、方法、閉包或型別上下文之外定義的變數。 |
| 用於儲存和檢索值。 | 用於儲存和檢索值。 |
| 儲存屬性用於獲取和設定值。 | 儲存屬性用於獲取和設定值。 |
| 計算屬性也用於此目的。 | 計算屬性也用於此目的。 |
型別屬性
屬性在型別定義部分用花括號 {} 定義,變數的作用域也在之前定義。對於值型別的型別屬性定義,使用“static”關鍵字;對於類型別,使用“class”關鍵字。
語法
struct Structname {
   static var storedTypeProperty = " "
   static var computedTypeProperty: Int {
      // return an Int value here
   }
}

enum Enumname {
   static var storedTypeProperty = " "
   static var computedTypeProperty: Int {
      // return an Int value here
   }
}

class Classname {
   class var computedTypeProperty: Int {
      // return an Int value here
   }
}
查詢和設定屬性
就像例項屬性一樣,型別屬性可以透過“.”語法進行查詢和設定,只是作用於型別本身,而不是指向例項。
struct StudMarks {
   static let markCount = 97
   static var totalCount = 0

   var InternalMarks: Int = 0 {
      didSet {
         if InternalMarks > StudMarks.markCount {
            InternalMarks = StudMarks.markCount
         }
         if InternalMarks > StudMarks.totalCount {
            StudMarks.totalCount = InternalMarks
         }
      }
   }
}

var stud1Mark1 = StudMarks()
var stud1Mark2 = StudMarks()

stud1Mark1.InternalMarks = 98
print(stud1Mark1.InternalMarks)

stud1Mark2.InternalMarks = 87
print(stud1Mark2.InternalMarks)
當我們使用遊樂場執行上述程式時,會得到以下結果:
97
87
Swift - 方法
在 Swift 4 語言中,與特定型別關聯的函式稱為方法。在 Objective C 中,類用於定義方法,而 Swift 4 語言允許使用者為類、結構體和列舉靈活地定義方法。
例項方法
在 Swift 4 語言中,可以透過例項方法訪問類、結構體和列舉的例項。
例項方法提供功能
- 訪問和修改例項屬性
- 與例項需求相關的功能
例項方法可以寫在 {} 花括號內。它隱式地訪問型別例項的方法和屬性。當呼叫型別的特定例項時,它將訪問該特定例項。
語法
func funcname(Parameters) -> returntype {
   Statement1
   Statement2
   ---
   Statement N
   return parameters
}
示例
class calculations {
   let a: Int
   let b: Int
   let res: Int

   init(a: Int, b: Int) {
      self.a = a
      self.b = b
      res = a + b
   }

   func tot(c: Int) -> Int {
      return res - c
   }

   func result() {
      print("Result is: \(tot(c: 20))")
      print("Result is: \(tot(c: 50))")
   }
}
let pri = calculations(a: 600, b: 300)
pri.result()
當我們使用遊樂場執行上述程式時,會得到以下結果:
Result is: 880
Result is: 850
類計算定義了兩個例項方法:
- 定義 init() 用於將兩個數字 a 和 b 相加並將結果儲存在結果 'res' 中
- tot() 用於從傳遞的 'c' 值中減去 'res'
最後,呼叫帶有 a 和 b 值的計算方法以列印結果。例項方法透過“.”點語法訪問。
區域性引數名和外部引數名
Swift 4 函式描述了其變數的區域性和全域性宣告。類似地,Swift 4 方法的命名約定也類似於 Objective C。但是,函式和方法的區域性引數名和全域性引數名宣告的特性不同。Swift 4 中的第一個引數由介詞名稱(如“with”、“for”和“by”)引用,以便於訪問命名約定。
Swift 4 透過將第一個引數名宣告為區域性引數名,並將其餘引數名宣告為全域性引數名,從而在方法中提供了靈活性。這裡,Swift 4 方法將 'no1' 宣告為區域性引數名。'no2' 用於全域性宣告,並在整個程式中訪問。
class division {
   var count: Int = 0
   func incrementBy(no1: Int, no2: Int) {
      count = no1 / no2
      print(count)
   }
}

let counter = division()
counter.incrementBy(no1: 1800, no2: 3)
counter.incrementBy(no1: 1600, no2: 5)
counter.incrementBy(no1: 11000, no2: 3)
當我們使用遊樂場執行上述程式時,會得到以下結果:
600
320
3666
帶 # 和 _ 符號的外部引數名
即使 Swift 4 方法為區域性宣告提供了第一個引數名,使用者也可以將引數名從區域性宣告修改為全域性宣告。這可以透過在第一個引數名前加“#”符號來完成。這樣做,可以在整個模組中全域性訪問第一個引數。
當用戶需要使用外部名稱訪問後續引數名時,可以使用“_”符號覆蓋方法名。
class multiplication {
   var count: Int = 0
   func incrementBy(no1: Int, no2: Int) {
      count = no1 * no2
      print(count)
   }
}

let counter = multiplication()

counter.incrementBy(no1: 800, no2: 3)
counter.incrementBy(no1: 100, no2: 5)
counter.incrementBy(no1: 15000, no2: 3)
當我們使用遊樂場執行上述程式時,會得到以下結果:
2400
500
45000
方法中的 Self 屬性
對於所有定義的型別例項,方法都有一個稱為“self”的隱式屬性。“Self”屬性用於引用當前例項及其定義的方法。
class calculations {
   let a: Int
   let b: Int
   let res: Int

   init(a: Int, b: Int) {
      self.a = a
      self.b = b
      res = a + b
      print("Inside Self Block: \(res)")
   }

   func tot(c: Int) -> Int {
      return res - c
   }

   func result() {
      print("Result is: \(tot(c: 20))")
      print("Result is: \(tot(c: 50))")
   }
}

let pri = calculations(a: 600, b: 300)
let sum = calculations(a: 1200, b: 300)

pri.result()
sum.result()
當我們使用遊樂場執行上述程式時,會得到以下結果:
Inside Self Block: 900
Inside Self Block: 1500
Result is: 880
Result is: 850
Result is: 1480
Result is: 1450
從例項方法修改值型別
在 Swift 4 語言中,結構體和列舉屬於值型別,其例項方法無法更改它們。但是,Swift 4 語言提供了透過“mutating”行為修改值型別的靈活性。“mutate”將在例項方法中進行任何更改,並在方法執行後返回到原始形式。此外,透過“self”屬性為其隱式函式建立新例項,並在其執行後替換現有方法。
struct area {
   var length = 1
   var breadth = 1

   func area() -> Int {
      return length * breadth
   }
   mutating func scaleBy(res: Int) {
      length *= res
      breadth *= res
      print(length)
      print(breadth)
   }
}

var val = area(length: 3, breadth: 5)
val.scaleBy(res: 3)
val.scaleBy(res: 30)
val.scaleBy(res: 300)
當我們使用遊樂場執行上述程式時,會得到以下結果:
9
15
270
450
81000
135000
可變方法的 Self 屬性
可變方法與“self”屬性結合,將新例項分配給定義的方法。
struct area {
   var length = 1
   var breadth = 1
   func area() -> Int {
      return length * breadth
   }
   mutating func scaleBy(res: Int) {
      self.length *= res
      self.breadth *= res
      print(length)
      print(breadth)
   }
}

var val = area(length: 3, breadth: 5)
val.scaleBy(res: 13)
當我們在 playground 中執行上述程式時,會得到以下結果:
39
65
型別方法
當呼叫方法的特定例項時,稱為例項方法;當方法呼叫方法的特定型別時,稱為“型別方法”。類的型別方法由“func”關鍵字定義,結構體和列舉的型別方法在“func”關鍵字之前使用“static”關鍵字定義。
型別方法透過“.”語法呼叫和訪問,其中呼叫整個方法而不是呼叫特定例項。
class Math {
   class func abs(number: Int) -> Int {
      if number < 0 {
         return (-number)
      } else {
         return number
      }
   }
}

struct absno {
   static func abs(number: Int) -> Int {
      if number < 0 {
         return (-number)
      } else {
         return number
      }
   }
}

let no = Math.abs(number: -35)
let num = absno.abs(number: -5)

print(no)
print(num)
當我們在 playground 中執行上述程式時,會得到以下結果:
35
5
Swift - 下標
在類、結構體和列舉中,訪問集合、序列和列表的元素成員是透過下標實現的。這些下標用於在索引的幫助下儲存和檢索值。陣列元素透過 someArray[index] 訪問,字典例項中的後續成員元素可以透過 someDicitonary[key] 訪問。
對於單個型別,下標的範圍可以從單個到多個宣告。我們可以使用適當的下標來過載傳遞給下標的索引值的型別。根據使用者對輸入資料型別宣告的要求,下標的範圍也從一維到多維。
下標宣告語法及其用法
讓我們回顧一下計算屬性。下標也遵循與計算屬性相同的語法。對於查詢型別例項,下標寫在方括號內,後面跟著例項名稱。下標語法遵循與“例項方法”和“計算屬性”語法相同的語法結構。“subscript”關鍵字用於定義下標,使用者可以指定一個或多個引數及其返回型別。下標可以具有讀寫或只讀屬性,例項透過“getter”和“setter”屬性儲存和檢索,就像計算屬性一樣。
語法
subscript(index: Int) −> Int {
   get {
      // used for subscript value declarations
   }
   set(newValue) {
      // definitions are written here
   }
}
示例 1
struct subexample {
   let decrementer: Int
   subscript(index: Int) -> Int {
      return decrementer / index
   }
}
let division = subexample(decrementer: 100)

print("The number is divisible by \(division[9]) times")
print("The number is divisible by \(division[2]) times")
print("The number is divisible by \(division[3]) times")
print("The number is divisible by \(division[5]) times")
print("The number is divisible by \(division[7]) times")
當我們使用遊樂場執行上述程式時,會得到以下結果:
The number is divisible by 11 times The number is divisible by 50 times The number is divisible by 33 times The number is divisible by 20 times The number is divisible by 14 times
示例 2
class daysofaweek {
private var days = ["Sunday", "Monday", "Tuesday", "Wednesday",
"Thursday", "Friday", "saturday"]
subscript(index: Int) -> String {
get {
return days[index]
}
set(newValue) {
self.days[index] = newValue
}
}
}
var p = daysofaweek()
print(p[0])
print(p[1])
print(p[2])
print(p[3])
當我們使用遊樂場執行上述程式時,會得到以下結果:
Sunday Monday Tuesday Wednesday
下標中的選項
下標接受一個到多個輸入引數,這些輸入引數也屬於任何資料型別。它們還可以使用變數和可變引數。下標不能提供預設引數值或使用任何輸入輸出引數。
定義多個下標稱為“下標過載”,其中類或結構體可以根據需要提供多個下標定義。這些多個下標根據在下標括號內宣告的值的型別推斷。
struct Matrix {
let rows: Int, columns: Int
var print: [Double]
init(rows: Int, columns: Int) {
self.rows = rows
self.columns = columns
print = Array(count: rows * columns, repeatedValue: 0.0)
}
subscript(row: Int, column: Int) -> Double {
get {
return print[(row * columns) + column]
}
set {
print[(row * columns) + column] = newValue
}
}
}
var mat = Matrix(rows: 3, columns: 3)
mat[0,0] = 1.0
mat[0,1] = 2.0
mat[1,0] = 3.0
mat[1,1] = 5.0
print("\(mat[0,0])")
當我們使用遊樂場執行上述程式時,會得到以下結果:
1.0
Swift 4 下標支援為適當的資料型別宣告單個引數到多個引數。程式將“Matrix”結構宣告為一個 2 * 2 維陣列矩陣,以儲存“Double”資料型別。Matrix 引數使用整數資料型別輸入以宣告行和列。
透過將行數和列數傳遞給初始化器,可以建立 Matrix 的新例項,如下所示。
var mat = Matrix(rows: 3, columns: 3)
可以透過將行值和列值輸入到下標中(用逗號分隔)來定義 Matrix 值,如下所示。
mat[0,0] = 1.0 mat[0,1] = 2.0 mat[1,0] = 3.0 mat[1,1] = 5.0
Swift - 繼承
能夠採用多種形式的能力定義為繼承。通常,一個類可以從另一個類繼承方法、屬性和功能。類可以進一步分類為子類和超類。
子類 - 當一個類從另一個類繼承屬性、方法和函式時,稱為子類
超類 - 包含屬性、方法和函式以供其他類從中繼承的類稱為超類
Swift 4 類包含超類,它呼叫並訪問方法、屬性、函式和覆蓋方法。此外,屬性觀察器也用於新增屬性和修改儲存或計算屬性方法。
基類
不從另一個類繼承方法、屬性或函式的類稱為“基類”。
class StudDetails {
var stname: String!
var mark1: Int!
var mark2: Int!
var mark3: Int!
init(stname: String, mark1: Int, mark2: Int, mark3: Int) {
self.stname = stname
self.mark1 = mark1
self.mark2 = mark2
self.mark3 = mark3
}
}
let stname = "Swift 4"
let mark1 = 98
let mark2 = 89
let mark3 = 76
print(stname)
print(mark1)
print(mark2)
print(mark3)
當我們使用遊樂場執行上述程式時,會得到以下結果:
Swift 4 98 89 76
此處將類名 StudDetails 的類定義為基類,用於包含學生姓名和三個科目成績(mark1、mark2 和 mark3)。“let”關鍵字用於初始化基類值,基類值在 playground 中透過“print”函式顯示。
子類
基於現有類建立新類的行為定義為“子類”。子類繼承其基類的屬性、方法和函式。要定義子類,在基類名前使用“:”
class StudDetails {
var mark1: Int;
var mark2: Int;
init(stm1:Int, results stm2:Int) {
mark1 = stm1;
mark2 = stm2;
}
func print() {
print("Mark1:\(mark1), Mark2:\(mark2)")
}
}
class display : StudDetails {
init() {
super.init(stm1: 93, results: 89)
}
}
let marksobtained = display()
marksobtained.print()
當我們使用遊樂場執行上述程式時,會得到以下結果:
Mark1:93, Mark2:89
類“StudDetails”被定義為超類,其中聲明瞭學生成績,子類“display”用於從其超類繼承成績。子類定義學生成績並呼叫 print() 方法顯示學生成績。
重寫
訪問超類的例項、型別方法、例項、型別屬性和下標,子類提供了重寫概念。“override”關鍵字用於重寫超類中宣告的方法。
訪問超類的方法、屬性和下標
“super”關鍵字用作字首以訪問超類中宣告的方法、屬性和下標
| 重寫 | 訪問方法、屬性和下標 |
| 方法 | super.somemethod() |
| 屬性 | super.someProperty() |
| 下標 | super[someIndex] |
方法重寫
繼承的例項和型別方法可以透過“override”關鍵字重寫為我們在子類中定義的方法。這裡在子類中重寫了 print() 以訪問超類 print() 中提到的型別屬性。此外,還建立了 cricket() 超類的新例項“cricinstance”。
class cricket {
func print() {
print("Welcome to Swift 4 Super Class")
}
}
class tennis: cricket {
override func print() {
print("Welcome to Swift 4 Sub Class")
}
}
let cricinstance = cricket()
cricinstance.print()
let tennisinstance = tennis()
tennisinstance.print()
當我們使用遊樂場執行上述程式時,會得到以下結果:
Welcome to Swift Super Class Welcome to Swift Sub Class
屬性重寫
您可以重寫繼承的例項或類屬性,以提供您自己的自定義 getter 和 setter,或新增屬性觀察器以使重寫屬效能夠觀察底層屬性值何時更改。
重寫屬性 Getter 和 Setter
Swift 4 允許使用者提供自定義 getter 和 setter 來重寫繼承的屬性,無論它是儲存屬性還是計算屬性。子類不知道繼承的屬性名稱和型別。因此,使用者必須在子類中指定在超類中指定的重寫屬性的名稱和型別。
這可以透過兩種方式完成:
當為重寫屬性定義 setter 時,使用者也必須定義 getter。
當我們不想修改繼承的屬性 getter 時,我們可以簡單地透過語法“super.someProperty”將繼承的值傳遞給超類。
class Circle {
var radius = 12.5
var area: String {
return "of rectangle for \(radius) "
}
}
class Rectangle: Circle {
var print = 7
override var area: String {
return super.area + " is now overridden as \(print)"
}
}
let rect = Rectangle()
rect.radius = 25.0
rect.print = 3
print("Radius \(rect.area)")
當我們使用遊樂場執行上述程式時,會得到以下結果:
Radius of rectangle for 25.0 is now overridden as 3
重寫屬性觀察器
當需要為繼承的屬性新增新屬性時,Swift 4 中引入了“屬性重寫”的概念。這會在繼承的屬性值更改時通知使用者。但是,重寫不適用於繼承的常量儲存屬性和繼承的只讀計算屬性。
class Circle {
var radius = 12.5
var area: String {
return "of rectangle for \(radius) "
}
}
class Rectangle: Circle {
var print = 7
override var area: String {
return super.area + " is now overridden as \(print)"
}
}
let rect = Rectangle()
rect.radius = 25.0
rect.print = 3
print("Radius \(rect.area)")
class Square: Rectangle {
override var radius: Double {
didSet {
print = Int(radius/5.0)+1
}
}
}
let sq = Square()
sq.radius = 100.0
print("Radius \(sq.area)")
當我們使用遊樂場執行上述程式時,會得到以下結果:
Radius of rectangle for 25.0 is now overridden as 3 Radius of rectangle for 100.0 is now overridden as 21
最終屬性以防止重寫
當用戶不需要其他人訪問超類的方法、屬性或下標時,Swift 4 引入了“final”屬性以防止重寫。一旦聲明瞭“final”屬性,下標將不允許重寫超類的方法、屬性及其下標。超類中沒有提供“final”屬性。當宣告“final”屬性時,使用者被限制建立進一步的子類。
final class Circle {
final var radius = 12.5
var area: String {
return "of rectangle for \(radius) "
}
}
class Rectangle: Circle {
var print = 7
override var area: String {
return super.area + " is now overridden as \(print)"
}
}
let rect = Rectangle()
rect.radius = 25.0
rect.print = 3
print("Radius \(rect.area)")
class Square: Rectangle {
override var radius: Double {
didSet {
print = Int(radius/5.0)+1
}
}
}
let sq = Square()
sq.radius = 100.0
print("Radius \(sq.area)")
當我們使用遊樂場執行上述程式時,會得到以下結果:
<stdin>:14:18: error: var overrides a 'final' var
override var area: String {
^
<stdin>:7:9: note: overridden declaration is here
var area: String {
^
<stdin>:12:11: error: inheritance from a final class 'Circle'
class Rectangle: Circle {
^
<stdin>:25:14: error: var overrides a 'final' var
override var radius: Double {
^
<stdin>:6:14: note: overridden declaration is here
final var radius = 12.5
由於超類被宣告為“final”,其資料型別也被宣告為“final”,因此程式不允許進一步建立子類,並且會丟擲錯誤。
Swift - 初始化
類、結構體和列舉一旦在 Swift 4 中宣告,就會初始化以準備類的例項。為儲存屬性初始化初始值,並且對於新例項,也會初始化值以繼續執行。建立初始化函式的關鍵字由“init()”方法執行。Swift 4 初始化器與 Objective-C 不同,它不返回值。其功能是在其處理之前檢查新建立例項的初始化。Swift 4 還為在例項被釋放後執行記憶體管理操作提供了“反初始化”過程。
初始化器對儲存屬性的作用
儲存屬性必須在處理例項之前初始化其類和結構的例項。儲存屬性使用初始化器分配和初始化值,從而消除了呼叫屬性觀察器的需要。初始化器用於儲存屬性
建立初始值。
在屬性定義內分配預設屬性值。
要初始化特定資料型別的例項,使用 'init()'。在 init() 函式內部不傳遞任何引數。
語法
init() {
//New Instance initialization goes here
}
示例
struct rectangle {
var length: Double
var breadth: Double
init() {
length = 6
breadth = 12
}
}
var area = rectangle()
print("area of rectangle is \(area.length*area.breadth)")
當我們使用遊樂場執行上述程式時,會得到以下結果:
area of rectangle is 72.0
這裡,結構 'rectangle' 初始化為成員 length 和 breadth 作為 'Double' 資料型別。Init() 方法用於初始化新建立的成員 length 和 double 的值。透過呼叫 rectangle 函式計算並返回矩形的面積。
預設設定屬性值
Swift 4 語言提供 Init() 函式來初始化儲存屬性值。此外,使用者還可以選擇在宣告類或結構成員時預設初始化屬性值。當屬性在整個程式中僅取相同的值時,我們可以在宣告部分宣告它,而不是在 init() 中初始化它。預設設定屬性值使使用者能夠在為類或結構定義繼承時使用。
struct rectangle {
var length = 6
var breadth = 12
}
var area = rectangle()
print("area of rectangle is \(area.length*area.breadth)")
當我們使用遊樂場執行上述程式時,會得到以下結果:
area of rectangle is 72
這裡,而不是在 init() 中宣告 length 和 breadth,而是在宣告中初始化值。
引數初始化
在 Swift 4 語言中,使用者可以使用 init() 在初始化器的定義中初始化引數。
struct Rectangle {
var length: Double
var breadth: Double
var area: Double
init(fromLength length: Double, fromBreadth breadth: Double) {
self.length = length
self.breadth = breadth
area = length * breadth
}
init(fromLeng leng: Double, fromBread bread: Double) {
self.length = leng
self.breadth = bread
area = leng * bread
}
}
let ar = Rectangle(fromLength: 6, fromBreadth: 12)
print("area is: \(ar.area)")
let are = Rectangle(fromLeng: 36, fromBread: 12)
print("area is: \(are.area)")
當我們使用遊樂場執行上述程式時,會得到以下結果:
area is: 72.0 area is: 432.0
區域性和外部引數
初始化引數與函式和方法引數類似,都具有區域性和全域性引數名稱。區域性引數宣告用於在初始化體內部訪問,外部引數宣告用於呼叫初始化器。Swift 4 初始化器與函式和方法初始化器不同,它們不識別哪個初始化器用於呼叫哪些函式。
為了克服這個問題,Swift 4 為 init() 中的每個引數都引入了自動外部名稱。此自動外部名稱等效於每個初始化引數之前編寫的區域性名稱。
struct Days {
let sunday, monday, tuesday: Int
init(sunday: Int, monday: Int, tuesday: Int) {
self.sunday = sunday
self.monday = monday
self.tuesday = tuesday
}
init(daysofaweek: Int) {
sunday = daysofaweek
monday = daysofaweek
tuesday = daysofaweek
}
}
let week = Days(sunday: 1, monday: 2, tuesday: 3)
print("Days of a Week is: \(week.sunday)")
print("Days of a Week is: \(week.monday)")
print("Days of a Week is: \(week.tuesday)")
let weekdays = Days(daysofaweek: 4)
print("Days of a Week is: \(weekdays.sunday)")
print("Days of a Week is: \(weekdays.monday)")
print("Days of a Week is: \(weekdays.tuesday)")
當我們使用遊樂場執行上述程式時,會得到以下結果:
Days of a Week is: 1 Days of a Week is: 2 Days of a Week is: 3 Days of a Week is: 4 Days of a Week is: 4 Days of a Week is: 4
沒有外部名稱的引數
當初始化器不需要外部名稱時,使用下劃線 '_' 來覆蓋預設行為。
struct Rectangle {
var length: Double
init(frombreadth breadth: Double) {
length = breadth * 10
}
init(frombre bre: Double) {
length = bre * 30
}
init(_ area: Double) {
length = area
}
}
let rectarea = Rectangle(180.0)
print("area is: \(rectarea.length)")
let rearea = Rectangle(370.0)
print("area is: \(rearea.length)")
let recarea = Rectangle(110.0)
print("area is: \(recarea.length)")
當我們使用遊樂場執行上述程式時,會得到以下結果:
area is: 180.0 area is: 370.0 area is: 110.0
可選屬性型別
當儲存屬性在某些例項中不返回值時,該屬性將宣告為“可選”型別,表示該特定型別沒有返回值。當儲存屬性宣告為“可選”時,它會在初始化期間自動將值初始化為“nil”。
struct Rectangle {
var length: Double?
init(frombreadth breadth: Double) {
length = breadth * 10
}
init(frombre bre: Double) {
length = bre * 30
}
init(_ area: Double) {
length = area
}
}
let rectarea = Rectangle(180.0)
print("area is: \(rectarea.length)")
let rearea = Rectangle(370.0)
print("area is: \(rearea.length)")
let recarea = Rectangle(110.0)
print("area is: \(recarea.length)")
當我們使用遊樂場執行上述程式時,會得到以下結果:
area is: Optional(180.0) area is: Optional(370.0) area is: Optional(110.0)
在初始化期間修改常量屬性
初始化還允許使用者修改常量屬性的值。在初始化期間,類屬性允許其類例項被超類修改,而不是被子類修改。例如,在之前的程式中,'length' 在主類中宣告為'變數'。下面的程式變數'length'被修改為'常量'變數。
struct Rectangle {
let length: Double?
init(frombreadth breadth: Double) {
length = breadth * 10
}
init(frombre bre: Double) {
length = bre * 30
}
init(_ area: Double) {
length = area
}
}
let rectarea = Rectangle(180.0)
print("area is: \(rectarea.length)")
let rearea = Rectangle(370.0)
print("area is: \(rearea.length)")
let recarea = Rectangle(110.0)
print("area is: \(recarea.length)")
當我們使用遊樂場執行上述程式時,會得到以下結果:
area is: Optional(180.0) area is: Optional(370.0) area is: Optional(110.0)
預設初始化器
預設初始化器為其所有宣告的基本類或結構的屬性提供具有預設值的新例項。
class defaultexample {
var studname: String?
var stmark = 98
var pass = true
}
var result = defaultexample()
print("result is: \(result.studname)")
print("result is: \(result.stmark)")
print("result is: \(result.pass)")
當我們使用遊樂場執行上面的程式時,我們得到以下結果。−
result is: nil result is: 98 result is: true
以上程式定義的類名為'defaultexample'。三個成員函式預設初始化為'studname?'以儲存'nil'值,'stmark'為98,'pass'為布林值'true'。同樣,類中的成員值可以在處理類成員型別之前作為預設值初始化。
結構型別的逐一成員初始化器
當用戶未提供自定義初始化器時,Swift 4 中的結構型別將自動接收“逐一成員初始化器”。其主要功能是使用預設的逐一成員初始化器初始化新的結構例項,然後將新例項屬性按名稱傳遞給逐一成員初始化器。
struct Rectangle {
var length = 100.0, breadth = 200.0
}
let area = Rectangle(length: 24.0, breadth: 32.0)
print("Area of rectangle is: \(area.length)")
print("Area of rectangle is: \(area.breadth)")
當我們使用遊樂場執行上述程式時,會得到以下結果:
Area of rectangle is: 24.0 Area of rectangle is: 32.0
在初始化期間,結構預設初始化其成員函式,其中“length”為“100.0”,“breadth”為“200.0”。但這些值在處理變數 length 和 breadth 為 24.0 和 32.0 時被覆蓋。
值型別的初始化器委託
初始化器委託定義為從其他初始化器呼叫初始化器。其主要功能是作為可重用性,避免在多個初始化器之間重複程式碼。
struct Stmark {
var mark1 = 0.0, mark2 = 0.0
}
struct stdb {
var m1 = 0.0, m2 = 0.0
}
struct block {
var average = stdb()
var result = Stmark()
init() {}
init(average: stdb, result: Stmark) {
self.average = average
self.result = result
}
init(avg: stdb, result: Stmark) {
let tot = avg.m1 - (result.mark1 / 2)
let tot1 = avg.m2 - (result.mark2 / 2)
self.init(average: stdb(m1: tot, m2: tot1), result: result)
}
}
let set1 = block()
print("student result is: \(set1.average.m1, set1.average.m2)
\(set1.result.mark1, set1.result.mark2)")
let set2 = block(average: stdb(m1: 2.0, m2: 2.0),
result: Stmark(mark1: 5.0, mark2: 5.0))
print("student result is: \(set2.average.m1, set2.average.m2)
\(set2.result.mark1, set2.result.mark2)")
let set3 = block(avg: stdb(m1: 4.0, m2: 4.0),
result: Stmark(mark1: 3.0, mark2: 3.0))
print("student result is: \(set3.average.m1, set3.average.m2)
\(set3.result.mark1, set3.result.mark2)")
當我們使用遊樂場執行上述程式時,會得到以下結果:
(0.0,0.0) (0.0,0.0) (2.0,2.0) 5.0,5.0) (2.5,2.5) (3.0,3.0)
初始化器委託規則
| 值型別 | 類型別 |
|---|---|
| 值型別(如結構和列舉)不支援繼承。引用其他初始化器是透過 self.init 完成的 | 支援繼承。檢查所有儲存屬性值是否已初始化 |
類繼承和初始化
類型別有兩種型別的初始化器來檢查定義的儲存屬性是否接收初始值,即指定初始化器和便利初始化器。
指定初始化器和便利初始化器
| 指定初始化器 | 便利初始化器 |
|---|---|
| 被視為類的主要初始化器 | 被視為類的支援初始化器 |
| 所有類屬性都已初始化,併為進一步初始化呼叫了相應的超類初始化器 | 便利初始化器呼叫指定初始化器以針對特定用例或輸入值型別建立類例項 |
| 每個類至少定義一個指定初始化器。 | 當類不需要初始化器時,無需強制定義便利初始化器。 |
| Init(parameters) { statements } | convenience init(parameters) { statements } |
指定初始化器程式
class mainClass {
var no1 : Int // local storage
init(no1 : Int) {
self.no1 = no1 // initialization
}
}
class subClass : mainClass {
var no2 : Int // new subclass storage
init(no1 : Int, no2 : Int) {
self.no2 = no2 // initialization
super.init(no1:no1) // redirect to superclass
}
}
let res = mainClass(no1: 10)
let print = subClass(no1: 10, no2: 20)
print("res is: \(res.no1)")
print("res is: \(print.no1)")
print("res is: \(print.no2)")
當我們使用遊樂場執行上述程式時,會得到以下結果:
res is: 10 res is: 10 res is: 20
便利初始化器程式
class mainClass {
var no1 : Int // local storage
init(no1 : Int) {
self.no1 = no1 // initialization
}
}
class subClass : mainClass {
var no2 : Int
init(no1 : Int, no2 : Int) {
self.no2 = no2
super.init(no1:no1)
}
// Requires only one parameter for convenient method
override convenience init(no1: Int) {
self.init(no1:no1, no2:0)
}
}
let res = mainClass(no1: 20)
let print = subClass(no1: 30, no2: 50)
print("res is: \(res.no1)")
print("res is: \(print.no1)")
print("res is: \(print.no2)")
當我們使用遊樂場執行上述程式時,會得到以下結果:
res is: 20 res is: 30 res is: 50
初始化器繼承和覆蓋
Swift 4 預設不允許其子類繼承其超類初始化器以用於其成員型別。繼承僅在某種程度上適用於超類初始化器,這將在自動初始化器繼承中討論。
當用戶需要在超類中定義初始化器時,必須由使用者將帶有初始化器的子類定義為自定義實現。當子類必須對超類進行覆蓋時,必須宣告“override”關鍵字。
class sides {
var corners = 4
var description: String {
return "\(corners) sides"
}
}
let rectangle = sides()
print("Rectangle: \(rectangle.description)")
class pentagon: sides {
override init() {
super.init()
corners = 5
}
}
let bicycle = pentagon()
print("Pentagon: \(bicycle.description)")
當我們使用遊樂場執行上述程式時,會得到以下結果:
Rectangle: 4 sides Pentagon: 5 sides
指定和便利初始化器的實際應用
class Planet {
var name: String
init(name: String) {
self.name = name
}
convenience init() {
self.init(name: "[No Planets]")
}
}
let plName = Planet(name: "Mercury")
print("Planet name is: \(plName.name)")
let noplName = Planet()
print("No Planets like that: \(noplName.name)")
class planets: Planet {
var count: Int
init(name: String, count: Int) {
self.count = count
super.init(name: name)
}
override convenience init(name: String) {
self.init(name: name, count: 1)
}
}
當我們使用遊樂場執行上述程式時,會得到以下結果:
Planet name is: Mercury No Planets like that: [No Planets]
可失敗初始化器
在定義類、結構或列舉值時,必須通知使用者是否存在任何初始化器失敗。由於以下原因,變數的初始化有時會失敗:−
- 無效的引數值。
- 缺少所需的外部源。
- 阻止初始化成功的條件。
為了捕獲初始化方法丟擲的異常,Swift 4 生成一個靈活的初始化器,稱為“可失敗初始化器”,以通知使用者在初始化結構、類或列舉成員時是否有任何內容未被注意到。捕獲可失敗初始化器的關鍵字是“init?”。此外,可失敗和不可失敗初始化器不能使用相同的引數型別和名稱定義。
struct studrecord {
let stname: String
init?(stname: String) {
if stname.isEmpty {return nil }
self.stname = stname
}
}
let stmark = studrecord(stname: "Swing")
if let name = stmark {
print("Student name is specified")
}
let blankname = studrecord(stname: "")
if blankname == nil {
print("Student name is left blank")
}
當我們使用遊樂場執行上述程式時,會得到以下結果:
Student name is specified Student name is left blank
列舉的可失敗初始化器
Swift 4 語言提供了對列舉使用可失敗初始化器的靈活性,以便在列舉成員未初始化值時通知使用者。
enum functions {
case a, b, c, d
init?(funct: String) {
switch funct {
case "one":
self = .a
case "two":
self = .b
case "three":
self = .c
case "four":
self = .d
default:
return nil
}
}
}
let result = functions(funct: "two")
if result != nil {
print("With In Block Two")
}
let badresult = functions(funct: "five")
if badresult == nil {
print("Block Does Not Exist")
}
當我們使用遊樂場執行上述程式時,會得到以下結果:
With In Block Two Block Does Not Exist
類的可失敗初始化器
當使用列舉和結構宣告可失敗初始化器時,它會在其實現中的任何情況下發出初始化失敗警報。但是,類中的可失敗初始化器僅在將儲存屬性設定為初始值後才會發出失敗警報。
class studrecord {
let studname: String!
init?(studname: String) {
self.studname = studname
if studname.isEmpty { return nil }
}
}
if let stname = studrecord(studname: "Failable Initializers") {
print("Module is \(stname.studname)")
}
當我們使用遊樂場執行上述程式時,會得到以下結果:
Module is Optional("Failable Initializers")
覆蓋可失敗初始化器
就像初始化器一樣,使用者還可以在子類中覆蓋超類的可失敗初始化器。超類的可失敗初始化器也可以在子類中使用不可失敗初始化器覆蓋。
當使用不可失敗的子類初始化器覆蓋可失敗的超類初始化器時,子類初始化器不能委託給超類初始化器。
不可失敗初始化器永遠不能委託給可失敗初始化器。
下面給出的程式描述了可失敗和不可失敗初始化器。
class Planet {
var name: String
init(name: String) {
self.name = name
}
convenience init() {
self.init(name: "[No Planets]")
}
}
let plName = Planet(name: "Mercury")
print("Planet name is: \(plName.name)")
let noplName = Planet()
print("No Planets like that: \(noplName.name)")
class planets: Planet {
var count: Int
init(name: String, count: Int) {
self.count = count
super.init(name: name)
}
override convenience init(name: String) {
self.init(name: name, count: 1)
}
}
當我們使用遊樂場執行上述程式時,會得到以下結果:
Planet name is: Mercury No Planets like that: [No Planets]
init! 可失敗初始化器
Swift 4 提供“init?”來定義可選例項可失敗初始化器。要定義特定型別的隱式展開可選例項,“init!”被指定。
struct studrecord {
let stname: String
init!(stname: String) {
if stname.isEmpty {return nil }
self.stname = stname
}
}
let stmark = studrecord(stname: "Swing")
if let name = stmark {
print("Student name is specified")
}
let blankname = studrecord(stname: "")
if blankname == nil {
print("Student name is left blank")
}
當我們使用遊樂場執行上述程式時,會得到以下結果:
Student name is specified Student name is left blank
必需初始化器
要宣告初始化器的每個子類,“required”關鍵字需要在 init() 函式之前定義。
class classA {
required init() {
var a = 10
print(a)
}
}
class classB: classA {
required init() {
var b = 30
print(b)
}
}
let res = classA()
let print = classB()
當我們使用遊樂場執行上述程式時,會得到以下結果:
10 30 10
Swift - 析構
在類例項需要被釋放之前,必須呼叫“析構器”來釋放記憶體空間。關鍵字“deinit”用於釋放系統資源佔用的記憶體空間。析構僅在類型別上可用。
釋放記憶體空間的析構
Swift 4 在不再需要例項時自動釋放例項以釋放資源。Swift 4 透過自動引用計數 (ARC) 處理例項的記憶體管理,如自動引用計數中所述。通常,當您的例項被釋放時,您不需要執行手動清理。但是,當您使用自己的資源時,您可能需要自己執行一些額外的清理。例如,如果您建立一個自定義類來開啟檔案並向其中寫入一些資料,您可能需要在類例項被釋放之前關閉該檔案。
var counter = 0; // for reference counting
class baseclass {
init() {
counter++;
}
deinit {
counter--;
}
}
var print: baseclass? = baseclass()
print(counter)
print = nil
print(counter)
當我們使用遊樂場執行上述程式時,會得到以下結果:
1 0
當省略 print = nil 語句時,計數器的值保持不變,因為它沒有被析構。
var counter = 0; // for reference counting
class baseclass {
init() {
counter++;
}
deinit {
counter--;
}
}
var print: baseclass? = baseclass()
print(counter)
print(counter)
當我們使用遊樂場執行上述程式時,會得到以下結果:
1 1
Swift - ARC 概述
記憶體管理功能及其用法在 Swift 4 語言中透過自動引用計數 (ARC) 處理。ARC 用於初始化和釋放系統資源,從而在不再需要例項時釋放類例項使用的記憶體空間。ARC 跟蹤程式碼例項之間關係的資訊,以有效地管理記憶體資源。
ARC 的功能
每次透過 init() 建立新的類例項時,ARC 都會分配一塊記憶體來儲存資訊。
有關例項型別及其值的資訊儲存在記憶體中。
當不再需要類例項時,它會透過 deinit() 自動釋放記憶體空間,以便進一步儲存和檢索類例項。
ARC 跟蹤當前引用的類例項屬性、常量和變數,以便僅對未使用的例項應用 deinit()。
ARC 對那些類例項屬性、常量和變數保持“強引用”,以在類例項當前正在使用時限制釋放。
ARC 程式
class StudDetails {
var stname: String!
var mark: Int!
init(stname: String, mark: Int) {
self.stname = stname
self.mark = mark
}
deinit {
print("Deinitialized \(self.stname)")
print("Deinitialized \(self.mark)")
}
}
let stname = "Swift 4"
let mark = 98
print(stname)
print(mark)
當我們使用遊樂場執行上述程式時,會得到以下結果:
Swift 4 98
ARC 強引用迴圈類例項
class studmarks {
let name: String
var stud: student?
init (name: String) {
print("Initializing: \(name)")
self.name = name
}
deinit {
print("Deallocating: \(self.name)")
}
}
class student {
let name: String
var strname: studmarks?
init (name: String) {
print("Initializing: \(name)")
self.name = name
}
deinit {
print("Deallocating: \(self.name)")
}
}
var shiba: studmarks?
var mari: student?
shiba = studmarks(name: "Swift 4")
mari = student(name: "ARC")
shiba!.stud = mari
mari!.strname = shiba
當我們使用遊樂場執行上述程式時,會得到以下結果:
Initializing: Swift 4 Initializing: ARC
ARC 弱引用和無主引用
類型別屬性有兩種方法可以解決強引用迴圈:−
- 弱引用
- 無主引用
這些引用用於使一個例項能夠在引用迴圈中引用其他例項。然後,例項可以引用每個例項,而不必關心強引用迴圈。當用戶知道某個例項可能返回“nil”值時,我們可以使用弱引用指向它。當例項要返回某些內容而不是 nil 時,則使用無主引用宣告它。
弱引用程式
class module {
let name: String
init(name: String) { self.name = name }
var sub: submodule?
deinit { print("\(name) Is The Main Module") }
}
class submodule {
let number: Int
init(number: Int) { self.number = number }
weak var topic: module?
deinit { print("Sub Module with its topic number is \(number)") }
}
var toc: module?
var list: submodule?
toc = module(name: "ARC")
list = submodule(number: 4)
toc!.sub = list
list!.topic = toc
toc = nil
list = nil
當我們使用遊樂場執行上述程式時,會得到以下結果:
ARC Is The Main Module Sub Module with its topic number is 4
無主引用程式
class student {
let name: String
var section: marks?
init(name: String) {
self.name = name
}
deinit { print("\(name)") }
}
class marks {
let marks: Int
unowned let stname: student
init(marks: Int, stname: student) {
self.marks = marks
self.stname = stname
}
deinit { print("Marks Obtained by the student is \(marks)") }
}
var module: student?
module = student(name: "ARC")
module!.section = marks(marks: 98, stname: module!)
module = nil
當我們使用遊樂場執行上述程式時,會得到以下結果:
ARC Marks Obtained by the student is 98
閉包的強引用迴圈
當我們將閉包賦值給類的例項屬性,並且閉包體捕獲了特定的例項時,可能會發生強引用迴圈。對閉包的強引用由 'self.someProperty' 或 'self.someMethod()' 定義。強引用迴圈被用作閉包的引用型別。
class HTMLElement {
let samplename: String
let text: String?
lazy var asHTML: () -> String = {
if let text = self.text {
return "<\(self.samplename)>\(text)</\(self.samplename)>"
} else {
return "<\(self.samplename) />"
}
}
init(samplename: String, text: String? = nil) {
self.samplename = samplename
self.text = text
}
deinit {
print("\(samplename) is being deinitialized")
}
}
var paragraph: HTMLElement? = HTMLElement(samplename: "p", text: "Welcome to Closure SRC")
print(paragraph!.asHTML())
當我們使用遊樂場執行上述程式時,會得到以下結果:
<p>Welcome to Closure SRC</p>
弱引用和無主引用
當閉包和例項相互引用時,使用者可以在閉包中將捕獲定義為無主引用。然後,它將不允許使用者同時釋放例項。當例項有時返回 'nil' 值時,使用弱例項定義閉包。
class HTMLElement {
let module: String
let text: String?
lazy var asHTML: () -> String = {
[unowned self] in
if let text = self.text {
return "<\(self.module)>\(text)</\(self.module)>"
} else {
return "<\(self.module) />"
}
}
init(module: String, text: String? = nil) {
self.module = module
self.text = text
}
deinit {
print("\(module) the deinit()")
}
}
var paragraph: HTMLElement? = HTMLElement(module: "Inside", text: "ARC Weak References")
print(paragraph!.asHTML())
paragraph = nil
當我們使用遊樂場執行上述程式時,會得到以下結果:
<Inside>ARC Weak References</Inside> Inside the deinit()
Swift - 可選鏈
查詢、呼叫可選值可能為 'nil' 的屬性、下標和方法的過程稱為可選鏈。可選鏈返回兩個值:
如果可選值包含 'value',則呼叫其相關的屬性、方法和下標將返回相應的值。
如果可選值包含 'nil' 值,則其所有相關的屬性、方法和下標都將返回 nil。
由於多個對方法、屬性和下標的查詢被組合在一起,因此一個鏈的失敗將影響整個鏈,並導致 'nil' 值。
可選鏈作為強制展開的替代方案
當可選值返回某些值時,在可選值後使用 '?' 指定可選鏈來呼叫屬性、方法或下標。
| 可選鏈 '?' | 訪問方法、屬性和下標可選鏈 '!' 用於強制展開 |
| ? 放在可選值後面以呼叫屬性、方法或下標 | ! 放在可選值後面以呼叫屬性、方法或下標來強制展開值 |
| 當可選值為 'nil' 時,優雅地失敗。 | 當可選值為 'nil' 時,強制展開會觸發執行時錯誤。 |
使用 '!' 的可選鏈程式
class ElectionPoll {
var candidate: Pollbooth?
}
lass Pollbooth {
var name = "MP"
}
let cand = ElectionPoll()
let candname = cand.candidate!.name
當我們使用遊樂場執行上述程式時,會得到以下結果:
fatal error: unexpectedly found nil while unwrapping an Optional value 0 Swift 4 0x0000000103410b68 llvm::sys::PrintStackTrace(__sFILE*) + 40 1 Swift 4 0x0000000103411054 SignalHandler(int) + 452 2 libsystem_platform.dylib 0x00007fff9176af1a _sigtramp + 26 3 libsystem_platform.dylib 0x000000000000000b _sigtramp + 1854492939 4 libsystem_platform.dylib 0x00000001074a0214 _sigtramp + 1976783636 5 Swift 4 0x0000000102a85c39 llvm::JIT::runFunction(llvm::Function*, std::__1::vector > const&) + 329 6 Swift 4 0x0000000102d320b3 llvm::ExecutionEngine::runFunctionAsMain(llvm::Function*, std::__1::vector<std::__1::basic_string, std::__1::allocator >, std::__1::allocator<std::__1::basic_string, std::__1::allocator > > > const&, char const* const*) + 1523 7 Swift 4 0x000000010296e6ba Swift 4::RunImmediately(Swift 4::CompilerInstance&, std::__1::vector<std::__1::basic_string, std::__1::allocator >, std::__1::allocator<std::__1::basic_string, std::__1::allocator > > > const&, Swift 4::IRGenOptions&, Swift 4::SILOptions const&) + 1066 8 Swift 4 0x000000010275764b frontend_main(llvm::ArrayRef, char const*, void*) + 5275 9 Swift 4 0x0000000102754a6d main + 1677 10 libdyld.dylib 0x00007fff8bb9e5c9 start + 1 11 libdyld.dylib 0x000000000000000c start + 1950751300 Stack dump: 0. Program arguments: /Applications/Xcode.app/Contents/Developer/Toolchains/XcodeDefault.xctoolchain/ usr/bin/Swift 4 -frontend -interpret - -target x86_64-apple-darwin14.0.0 - target-cpu core2 -sdk /Applications/Xcode.app/Contents/Developer/Platforms/MacOSX.platform/Developer/ SDKs/MacOSX10.10.sdk -module-name main /bin/sh: line 47: 15672 Done cat <<'SWIFT 4' import Foundation </std::__1::basic_string</std::__1::basic_string</std::__1::basic_string</std:: __1::basic_string
上面的程式宣告 'election poll' 作為類名,幷包含 'candidate' 作為成員函式。子類宣告為 'poll booth','name' 作為其成員函式,初始化為 'MP'。對父類的呼叫透過建立帶可選 '!' 的例項 'cand' 來初始化。由於在基類中沒有宣告值,因此儲存 'nil' 值,從而透過強制展開過程返回致命錯誤。
使用 '?' 的可選鏈程式
class ElectionPoll {
var candidate: Pollbooth?
}
class Pollbooth {
var name = "MP"
}
let cand = ElectionPoll()
if let candname = cand.candidate?.name {
print("Candidate name is \(candname)")
} else {
print("Candidate name cannot be retreived")
}
當我們使用遊樂場執行上述程式時,會得到以下結果:
Candidate name cannot be retreived
上面的程式宣告 'election poll' 作為類名,幷包含 'candidate' 作為成員函式。子類宣告為 'poll booth','name' 作為其成員函式,初始化為 'MP'。對父類的呼叫透過建立帶可選 '?' 的例項 'cand' 來初始化。由於在基類中沒有宣告值,因此儲存 'nil' 值,並由 else 處理程式塊在控制檯中列印。
為可選鏈和屬性訪問定義模型類
Swift 4 語言還提供了可選鏈的概念,以宣告多個子類作為模型類。此概念對於定義複雜的模型以及訪問屬性、方法和下標子屬性非常有用。
class rectangle {
var print: circle?
}
class circle {
var area = [radius]()
var cprint: Int {
return area.count
}
subscript(i: Int) -> radius {
get {
return area[i]
}
set {
area[i] = newValue
}
}
func circleprint() {
print("The number of rooms is \(cprint)")
}
var rectarea: circumference?
}
class radius {
let radiusname: String
init(radiusname: String) { self.radiusname = radiusname }
}
class circumference {
var circumName: String?
var circumNumber: String?
var street: String?
func buildingIdentifier() -> String? {
if circumName != nil {
return circumName
} else if circumNumber != nil {
return circumNumber
} else {
return nil
}
}
}
let rectname = rectangle()
if let rectarea = rectname.print?.cprint {
print("Area of rectangle is \(rectarea)")
} else {
print("Rectangle Area is not specified")
}
當我們使用遊樂場執行上述程式時,會得到以下結果:
Rectangle Area is not specified
透過可選鏈呼叫方法
class rectangle {
var print: circle?
}
class circle {
var area = [radius]()
var cprint: Int {
return area.count
}
subscript(i: Int) -> radius {
get {
return area[i]
}
set {
area[i] = newValue
}
}
func circleprint() {
print("Area of Circle is: \(cprint)")
}
var rectarea: circumference?
}
class radius {
let radiusname: String
init(radiusname: String) { self.radiusname = radiusname }
}
class circumference {
var circumName: String?
var circumNumber: String?
var circumarea: String?
func buildingIdentifier() -> String? {
if circumName != nil {
return circumName
} else if circumNumber != nil {
return circumNumber
} else {
return nil
}
}
}
let circname = rectangle()
if circname.print?.circleprint() != nil {
print("Area of circle is specified)")
} else {
print("Area of circle is not specified")
}
當我們使用遊樂場執行上述程式時,會得到以下結果:
Area of circle is not specified
透過建立名為 'circname' 的例項來呼叫在 circle() 子類中宣告的函式 circleprint()。如果函式包含某些值,則該函式將返回值,否則它將透過檢查語句 'if circname.print?.circleprint() != nil' 返回一些使用者定義的列印訊息。
透過可選鏈訪問下標
可選鏈用於設定和檢索下標值,以驗證對該下標的呼叫是否返回值。在方括號之前放置 '?' 以訪問特定下標上的可選值。
程式 1
class rectangle {
var print: circle?
}
class circle {
var area = [radius]()
var cprint: Int {
return area.count
}
subscript(i: Int) -> radius {
get {
return area[i]
}
set {
area[i] = newValue
}
}
func circleprint() {
print("The number of rooms is \(cprint)")
}
var rectarea: circumference?
}
class radius {
let radiusname: String
init(radiusname: String) { self.radiusname = radiusname }
}
class circumference {
var circumName: String?
var circumNumber: String?
var circumarea: String?
func buildingIdentifier() -> String? {
if circumName != nil {
return circumName
} else if circumNumber != nil {
return circumNumber
} else {
return nil
}
}
}
let circname = rectangle()
if let radiusName = circname.print?[0].radiusname {
print("The first room name is \(radiusName).")
} else {
print("Radius is not specified.")
}
當我們使用遊樂場執行上述程式時,會得到以下結果:
Radius is not specified.
在上面的程式中,沒有指定成員函式 'radiusName' 的例項值。因此,對函式的程式呼叫將僅返回 else 部分,而要返回值,我們必須為特定成員函式定義值。
程式 2
class rectangle {
var print: circle?
}
class circle {
var area = [radius]()
var cprint: Int {
return area.count
}
subscript(i: Int) -> radius {
get {
return area[i]
}
set {
area[i] = newValue
}
}
func circleprint() {
print("The number of rooms is \(cprint)")
}
var rectarea: circumference?
}
class radius {
let radiusname: String
init(radiusname: String) { self.radiusname = radiusname }
}
class circumference {
var circumName: String?
var circumNumber: String?
var circumarea: String?
func buildingIdentifier() -> String? {
if circumName != nil {
return circumName
} else if circumNumber != nil {
return circumNumber
} else {
return nil
}
}
}
let circname = rectangle()
circname.print?[0] = radius(radiusname: "Diameter")
let printing = circle()
printing.area.append(radius(radiusname: "Units"))
printing.area.append(radius(radiusname: "Meter"))
circname.print = printing
if let radiusName = circname.print?[0].radiusname {
print("Radius is measured in \(radiusName).")
} else {
print("Radius is not specified.")
}
當我們使用遊樂場執行上述程式時,會得到以下結果:
Radius is measured in Units.
在上面的程式中,指定了成員函式 'radiusName' 的例項值。因此,對函式的程式呼叫現在將返回值。
訪問可選型別下標
class rectangle {
var print: circle?
}
class circle {
var area = [radius]()
var cprint: Int {
return area.count
}
subscript(i: Int) -> radius {
get {
return area[i]
}
set {
area[i] = newValue
}
}
func circleprint() {
print("The number of rooms is \(cprint)")
}
var rectarea: circumference?
}
class radius {
let radiusname: String
init(radiusname: String) { self.radiusname = radiusname }
}
class circumference {
var circumName: String?
var circumNumber: String?
var circumarea: String?
func buildingIdentifier() -> String? {
if circumName != nil {
return circumName
} else if circumNumber != nil {
return circumNumber
} else {
return nil
}
}
}
let circname = rectangle()
circname.print?[0] = radius(radiusname: "Diameter")
let printing = circle()
printing.area.append(radius(radiusname: "Units"))
printing.area.append(radius(radiusname: "Meter"))
circname.print = printing
var area = ["Radius": [35, 45, 78, 101], "Circle": [90, 45, 56]]
area["Radius"]?[1] = 78
area["Circle"]?[1]--
print(area["Radius"]?[0])
print(area["Radius"]?[1])
print(area["Radius"]?[2])
print(area["Radius"]?[3])
print(area["Circle"]?[0])
print(area["Circle"]?[1])
print(area["Circle"]?[2])
當我們使用遊樂場執行上述程式時,會得到以下結果:
Optional(35) Optional(78) Optional(78) Optional(101) Optional(90) Optional(44) Optional(56)
可以透過引用其下標值來訪問下標的可選值。它可以訪問為 subscript[0]、subscript[1] 等。'radius' 的預設下標值首先賦值為 [35, 45, 78, 101],'Circle' 的預設下標值賦值為 [90, 45, 56]]。然後,下標值更改為 Radius[0] 為 78,Circle[1] 為 45。
連結多個級別的鏈
多個子類也可以透過可選鏈與其父類的方法、屬性和下標連結。
可選的多個鏈可以連結:
如果檢索型別不是可選的,則可選鏈將返回一個可選值。例如,如果透過可選鏈檢索 String,它將返回 String? 值。
class rectangle {
var print: circle?
}
class circle {
var area = [radius]()
var cprint: Int {
return area.count
}
subscript(i: Int) -> radius {
get {
return area[i]
}
set {
area[i] = newValue
}
}
func circleprint() {
print("The number of rooms is \(cprint)")
}
var rectarea: circumference?
}
class radius {
let radiusname: String
init(radiusname: String) { self.radiusname = radiusname }
}
class circumference {
var circumName: String?
var circumNumber: String?
var circumarea: String?
func buildingIdentifier() -> String? {
if circumName != nil {
return circumName
} else if circumNumber != nil {
return circumNumber
} else {
return nil
}
}
}
let circname = rectangle()
if let radiusName = circname.print?[0].radiusname {
print("The first room name is \(radiusName).")
} else {
print("Radius is not specified.")
}
當我們使用遊樂場執行上述程式時,會得到以下結果:
Radius is not specified.
在上面的程式中,沒有指定成員函式 'radiusName' 的例項值。因此,對函式的程式呼叫將僅返回 else 部分,而要返回值,我們必須為特定成員函式定義值。
如果檢索型別已經是可選的,則可選鏈也將返回一個可選值。例如,如果透過可選鏈訪問 String?,它將返回 String? 值。
class rectangle {
var print: circle?
}
class circle {
var area = [radius]()
var cprint: Int {
return area.count
}
subscript(i: Int) -> radius {
get {
return area[i]
}
set {
area[i] = newValue
}
}
func circleprint() {
print("The number of rooms is \(cprint)")
}
var rectarea: circumference?
}
class radius {
let radiusname: String
init(radiusname: String) { self.radiusname = radiusname }
}
class circumference {
var circumName: String?
var circumNumber: String?
var circumarea: String?
func buildingIdentifier() -> String? {
if circumName != nil {
return circumName
} else if circumNumber != nil {
return circumNumber
} else {
return nil
}
}
}
let circname = rectangle()
circname.print?[0] = radius(radiusname: "Diameter")
let printing = circle()
printing.area.append(radius(radiusname: "Units"))
printing.area.append(radius(radiusname: "Meter"))
circname.print = printing
if let radiusName = circname.print?[0].radiusname {
print("Radius is measured in \(radiusName).")
} else {
print("Radius is not specified.")
}
當我們使用遊樂場執行上述程式時,會得到以下結果:
Radius is measured in Units.
在上面的程式中,指定了成員函式 'radiusName' 的例項值。因此,對函式的程式呼叫現在將返回值。
對具有可選返回值的方法進行鏈式呼叫
可選鏈用於訪問子類定義的方法。
class rectangle {
var print: circle?
}
class circle {
var area = [radius]()
var cprint: Int {
return area.count
}
subscript(i: Int) -> radius {
get {
return area[i]
}
set {
area[i] = newValue
}
}
func circleprint() {
print("Area of Circle is: \(cprint)")
}
var rectarea: circumference?
}
class radius {
let radiusname: String
init(radiusname: String) { self.radiusname = radiusname }
}
class circumference {
var circumName: String?
var circumNumber: String?
var circumarea: String?
func buildingIdentifier() -> String? {
if circumName != nil {
return circumName
} else if circumNumber != nil {
return circumNumber
} else {
return nil
}
}
}
let circname = rectangle()
if circname.print?.circleprint() != nil {
print("Area of circle is specified)")
} else {
print("Area of circle is not specified")
}
當我們使用遊樂場執行上述程式時,會得到以下結果:
Area of circle is not specified
Swift - 型別轉換
為了驗證例項的型別,Swift 4 語言中引入了“型別轉換”。它用於檢查例項型別是否屬於特定的父類或子類,或者它是否在其自己的層次結構中定義。
Swift 4 型別轉換提供了兩個運算子:'is' 用於檢查值的型別,'as' 用於將型別值轉換為不同的型別。型別轉換還檢查例項型別是否遵循特定的協議一致性標準。
定義類層次結構
型別轉換用於檢查例項的型別,以確定它是否屬於特定的類型別。此外,它檢查類及其子類的層次結構,以檢查和轉換這些例項,使其成為相同的層次結構。
class Subjects {
var physics: String
init(physics: String) {
self.physics = physics
}
}
class Chemistry: Subjects {
var equations: String
init(physics: String, equations: String) {
self.equations = equations
super.init(physics: physics)
}
}
class Maths: Subjects {
var formulae: String
init(physics: String, formulae: String) {
self.formulae = formulae
super.init(physics: physics)
}
}
let sa = [ Chemistry(physics: "solid physics", equations: "Hertz"),
Maths(physics: "Fluid Dynamics", formulae: "Giga Hertz")]
let samplechem = Chemistry(physics: "solid physics", equations: "Hertz")
print("Instance physics is: \(samplechem.physics)")
print("Instance equation is: \(samplechem.equations)")
let samplemaths = Maths(physics: "Fluid Dynamics", formulae: "Giga Hertz")
print("Instance physics is: \(samplemaths.physics)")
print("Instance formulae is: \(samplemaths.formulae)")
當我們使用遊樂場執行上述程式時,會得到以下結果:
Instance physics is: solid physics Instance equation is: Hertz Instance physics is: Fluid Dynamics Instance formulae is: Giga Hertz
型別檢查
型別檢查使用 'is' 運算子完成。'is' 型別檢查運算子檢查例項是否屬於特定的子類型別,如果屬於該例項則返回 'true',否則返回 'false'。
class Subjects {
var physics: String
init(physics: String) {
self.physics = physics
}
}
class Chemistry: Subjects {
var equations: String
init(physics: String, equations: String) {
self.equations = equations
super.init(physics: physics)
}
}
class Maths: Subjects {
var formulae: String
init(physics: String, formulae: String) {
self.formulae = formulae
super.init(physics: physics)
}
}
let sa = [
Chemistry(physics: "solid physics", equations: "Hertz"),
Maths(physics: "Fluid Dynamics", formulae: "Giga Hertz"),
Chemistry(physics: "Thermo physics", equations: "Decibels"),
Maths(physics: "Astro Physics", formulae: "MegaHertz"),
Maths(physics: "Differential Equations", formulae: "Cosine Series")]
let samplechem = Chemistry(physics: "solid physics", equations: "Hertz")
print("Instance physics is: \(samplechem.physics)")
print("Instance equation is: \(samplechem.equations)")
let samplemaths = Maths(physics: "Fluid Dynamics", formulae: "Giga Hertz")
print("Instance physics is: \(samplemaths.physics)")
print("Instance formulae is: \(samplemaths.formulae)")
var chemCount = 0
var mathsCount = 0
for item in sa {
if item is Chemistry {
++chemCount
} else if item is Maths {
++mathsCount
}
}
print("Subjects in chemistry contains \(chemCount) topics and maths contains \(mathsCount) topics")
當我們使用遊樂場執行上述程式時,會得到以下結果:
Instance physics is: solid physics Instance equation is: Hertz Instance physics is: Fluid Dynamics Instance formulae is: Giga Hertz Subjects in chemistry contains 2 topics and maths contains 3 topics
向下轉換
可以使用兩個運算子 (as? 和 as!) 對子類型別進行向下轉換。'as?' 在值返回 nil 時返回一個可選值。它用於檢查向下轉換是否成功。
'as!' 返回強制展開(如可選鏈中所述),當向下轉換返回 nil 值時。它用於在向下轉換失敗時觸發執行時錯誤。
class Subjects {
var physics: String
init(physics: String) {
self.physics = physics
}
}
class Chemistry: Subjects {
var equations: String
init(physics: String, equations: String) {
self.equations = equations
super.init(physics: physics)
}
}
class Maths: Subjects {
var formulae: String
init(physics: String, formulae: String) {
self.formulae = formulae
super.init(physics: physics)
}
}
let sa = [
Chemistry(physics: "solid physics", equations: "Hertz"),
Maths(physics: "Fluid Dynamics", formulae: "Giga Hertz"),
Chemistry(physics: "Thermo physics", equations: "Decibels"),
Maths(physics: "Astro Physics", formulae: "MegaHertz"),
Maths(physics: "Differential Equations", formulae: "Cosine Series")]
let samplechem = Chemistry(physics: "solid physics", equations: "Hertz")
print("Instance physics is: \(samplechem.physics)")
print("Instance equation is: \(samplechem.equations)")
let samplemaths = Maths(physics: "Fluid Dynamics", formulae: "Giga Hertz")
print("Instance physics is: \(samplemaths.physics)")
print("Instance formulae is: \(samplemaths.formulae)")
var chemCount = 0
var mathsCount = 0
for item in sa {
if let print = item as? Chemistry {
print("Chemistry topics are: '\(print.physics)', \(print.equations)")
} else if let example = item as? Maths {
print("Maths topics are: '\(example.physics)', \(example.formulae)")
}
}
當我們使用遊樂場執行上述程式時,會得到以下結果:
Instance physics is: solid physics Instance equation is: Hertz Instance physics is: Fluid Dynamics Instance formulae is: Giga Hertz Chemistry topics are: 'solid physics', Hertz Maths topics are: 'Fluid Dynamics', Giga Hertz Chemistry topics are: 'Thermo physics', Decibels Maths topics are: 'Astro Physics', MegaHertz Maths topics are: 'Differential Equations', Cosine Series
型別轉換:Any 和 AnyObject
關鍵字 'Any' 用於表示屬於任何型別的例項,包括函式型別。
class Subjects {
var physics: String
init(physics: String) {
self.physics = physics
}
}
class Chemistry: Subjects {
var equations: String
init(physics: String, equations: String) {
self.equations = equations
super.init(physics: physics)
}
}
class Maths: Subjects {
var formulae: String
init(physics: String, formulae: String) {
self.formulae = formulae
super.init(physics: physics)
}
}
let sa = [
Chemistry(physics: "solid physics", equations: "Hertz"),
Maths(physics: "Fluid Dynamics", formulae: "Giga Hertz"),
Chemistry(physics: "Thermo physics", equations: "Decibels"),
Maths(physics: "Astro Physics", formulae: "MegaHertz"),
Maths(physics: "Differential Equations", formulae: "Cosine Series")]
let samplechem = Chemistry(physics: "solid physics", equations: "Hertz")
print("Instance physics is: \(samplechem.physics)")
print("Instance equation is: \(samplechem.equations)")
let samplemaths = Maths(physics: "Fluid Dynamics", formulae: "Giga Hertz")
print("Instance physics is: \(samplemaths.physics)")
print("Instance formulae is: \(samplemaths.formulae)")
var chemCount = 0
var mathsCount = 0
for item in sa {
if let print = item as? Chemistry {
print("Chemistry topics are: '\(print.physics)', \(print.equations)")
} else if let example = item as? Maths {
print("Maths topics are: '\(example.physics)', \(example.formulae)")
}
}
var exampleany = [Any]()
exampleany.append(12)
exampleany.append(3.14159)
exampleany.append("Example for Any")
exampleany.append(Chemistry(physics: "solid physics", equations: "Hertz"))
for print in exampleany {
switch print {
case let someInt as Int:
print("Integer value is \(someInt)")
case let someDouble as Double where someDouble > 0:
print("Pi value is \(someDouble)")
case let someString as String:
print("\(someString)")
case let phy as Chemistry:
print("Topics '\(phy.physics)', \(phy.equations)")
default:
print("None")
}
}
當我們使用遊樂場執行上述程式時,會得到以下結果:
Instance physics is: solid physics Instance equation is: Hertz Instance physics is: Fluid Dynamics Instance formulae is: Giga Hertz Chemistry topics are: 'solid physics', Hertz Maths topics are: 'Fluid Dynamics', Giga Hertz Chemistry topics are: 'Thermo physics', Decibels Maths topics are: 'Astro Physics', MegaHertz Maths topics are: 'Differential Equations', Cosine Series Integer value is 12 Pi value is 3.14159 Example for Any Topics 'solid physics', Hertz
AnyObject
為了表示任何類型別的例項,使用 'AnyObject' 關鍵字。
class Subjects {
var physics: String
init(physics: String) {
self.physics = physics
}
}
class Chemistry: Subjects {
var equations: String
init(physics: String, equations: String) {
self.equations = equations
super.init(physics: physics)
}
}
class Maths: Subjects {
var formulae: String
init(physics: String, formulae: String) {
self.formulae = formulae
super.init(physics: physics)
}
}
let saprint: [AnyObject] = [Chemistry(physics: "solid physics", equations: "Hertz"),
Maths(physics: "Fluid Dynamics", formulae: "Giga Hertz"),
Chemistry(physics: "Thermo physics", equations: "Decibels"),
Maths(physics: "Astro Physics", formulae: "MegaHertz"),
Maths(physics: "Differential Equations", formulae: "Cosine Series")]
let samplechem = Chemistry(physics: "solid physics", equations: "Hertz")
print("Instance physics is: \(samplechem.physics)")
print("Instance equation is: \(samplechem.equations)")
let samplemaths = Maths(physics: "Fluid Dynamics", formulae: "Giga Hertz")
print("Instance physics is: \(samplemaths.physics)")
print("Instance formulae is: \(samplemaths.formulae)")
var chemCount = 0
var mathsCount = 0
for item in saprint {
if let print = item as? Chemistry {
print("Chemistry topics are: '\(print.physics)', \(print.equations)")
} else if let example = item as? Maths {
print("Maths topics are: '\(example.physics)', \(example.formulae)")
}
}
var exampleany = [Any]()
exampleany.append(12)
exampleany.append(3.14159)
exampleany.append("Example for Any")
exampleany.append(Chemistry(physics: "solid physics", equations: "Hertz"))
for print in exampleany {
switch print {
case let someInt as Int:
print("Integer value is \(someInt)")
case let someDouble as Double where someDouble > 0:
print("Pi value is \(someDouble)")
case let someString as String:
print("\(someString)")
case let phy as Chemistry:
print("Topics '\(phy.physics)', \(phy.equations)")
default:
print("None")
}
}
當我們使用遊樂場執行上述程式時,會得到以下結果:
Instance physics is: solid physics Instance equation is: Hertz Instance physics is: Fluid Dynamics Instance formulae is: Giga Hertz Chemistry topics are: 'solid physics', Hertz Maths topics are: 'Fluid Dynamics', Giga Hertz Chemistry topics are: 'Thermo physics', Decibels Maths topics are: 'Astro Physics', MegaHertz Maths topics are: 'Differential Equations', Cosine Series Integer value is 12 Pi value is 3.14159 Example for Any Topics 'solid physics', Hertz
Swift - 擴充套件
可以透過擴充套件來新增現有類、結構或列舉型別的功能。可以使用擴充套件新增型別功能,但無法使用擴充套件覆蓋功能。
Swift 擴充套件功能:
- 新增計算屬性和計算型別屬性
- 定義例項方法和型別方法。
- 提供新的初始化器。
- 定義下標
- 定義和使用新的巢狀型別
- 使現有型別符合協議
擴充套件使用關鍵字 'extension' 宣告。
語法
extension SomeType {
// new functionality can be added here
}
現有型別也可以透過擴充套件新增,使其成為協議標準,其語法類似於類或結構。
extension SomeType: SomeProtocol, AnotherProtocol {
// protocol requirements is described here
}
計算屬性
計算“例項”和“型別”屬性也可以透過擴充套件新增。
extension Int {
var add: Int {return self + 100 }
var sub: Int { return self - 10 }
var mul: Int { return self * 10 }
var div: Int { return self / 5 }
}
let addition = 3.add
print("Addition is \(addition)")
let subtraction = 120.sub
print("Subtraction is \(subtraction)")
let multiplication = 39.mul
print("Multiplication is \(multiplication)")
let division = 55.div
print("Division is \(division)")
let mix = 30.add + 34.sub
print("Mixed Type is \(mix)")
當我們使用遊樂場執行上述程式時,會得到以下結果:
Addition is 103 Subtraction is 110 Multiplication is 390 Division is 11 Mixed Type is 154
初始化器
Swift 4 提供了透過擴充套件向現有型別新增新初始化器的靈活性。使用者可以新增自己的自定義型別來擴充套件已定義的型別,並且還提供了其他初始化選項。擴充套件僅支援 init()。deinit() 不受擴充套件支援。
struct sum {
var num1 = 100, num2 = 200
}
struct diff {
var no1 = 200, no2 = 100
}
struct mult {
var a = sum()
var b = diff()
}
let calc = mult()
print ("Inside mult block \(calc.a.num1, calc.a.num2)")
print("Inside mult block \(calc.b.no1, calc.b.no2)")
let memcalc = mult(a: sum(num1: 300, num2: 500),b: diff(no1: 300, no2: 100))
print("Inside mult block \(memcalc.a.num1, memcalc.a.num2)")
print("Inside mult block \(memcalc.b.no1, memcalc.b.no2)")
extension mult {
init(x: sum, y: diff) {
let X = x.num1 + x.num2
let Y = y.no1 + y.no2
}
}
let a = sum(num1: 100, num2: 200)
print("Inside Sum Block:\( a.num1, a.num2)")
let b = diff(no1: 200, no2: 100)
print("Inside Diff Block: \(b.no1, b.no2)")
當我們使用遊樂場執行上述程式時,會得到以下結果:
Inside mult block (100, 200) Inside mult block (200, 100) Inside mult block (300, 500) Inside mult block (300, 100) Inside Sum Block:(100, 200) Inside Diff Block: (200, 100)
方法
可以使用擴充套件進一步向子類新增新的例項方法和型別方法。
extension Int {
func topics(summation: () -> ()) {
for _ in 0..<self {
summation()
}
}
}
4.topics(summation: {
print("Inside Extensions Block")
})
3.topics(summation: {
print("Inside Type Casting Block")
})
當我們使用遊樂場執行上述程式時,會得到以下結果:
Inside Extensions Block Inside Extensions Block Inside Extensions Block Inside Extensions Block Inside Type Casting Block Inside Type Casting Block Inside Type Casting Block
topics() 函式採用型別為 '(summation: () → ())' 的引數,以指示該函式不接受任何引數,並且不會返回任何值。為了多次呼叫該函式,初始化了 for 塊並初始化了對 topic() 方法的呼叫。
可變例項方法
當宣告為擴充套件時,例項方法也可以被修改。
修改 self 或其屬性的結構和列舉方法必須將例項方法標記為 mutating,就像來自原始實現的可變方法一樣。
extension Double {
mutating func square() {
let pi = 3.1415
self = pi * self * self
}
}
var Trial1 = 3.3
Trial1.square()
print("Area of circle is: \(Trial1)")
var Trial2 = 5.8
Trial2.square()
print("Area of circle is: \(Trial2)")
var Trial3 = 120.3
Trial3.square()
print("Area of circle is: \(Trial3)")
當我們使用遊樂場執行上述程式時,會得到以下結果:
Area of circle is: 34.210935 Area of circle is: 105.68006 Area of circle is: 45464.070735
下標
向已宣告的例項新增新的下標也可以透過擴充套件實現。
extension Int {
subscript(var multtable: Int) -> Int {
var no1 = 1
while multtable > 0 {
no1 *= 10
--multtable
}
return (self / no1) % 10
}
}
print(12[0])
print(7869[1])
print(786543[2])
當我們使用遊樂場執行上述程式時,會得到以下結果:
2 6 5
巢狀型別
類、結構和列舉例項的巢狀型別也可以透過擴充套件新增。
extension Int {
enum calc {
case add
case sub
case mult
case div
case anything
}
var print: calc {
switch self {
case 0:
return .add
case 1:
return .sub
case 2:
return .mult
case 3:
return .div
default:
return .anything
}
}
}
func result(numb: [Int]) {
for i in numb {
switch i.print {
case .add:
print(" 10 ")
case .sub:
print(" 20 ")
case .mult:
print(" 30 ")
case .div:
print(" 40 ")
default:
print(" 50 ")
}
}
}
result(numb: [0, 1, 2, 3, 4, 7])
當我們使用遊樂場執行上述程式時,會得到以下結果:
10 20 30 40 50 50
Swift - 協議
協議為方法、屬性和其他需求功能提供藍圖。它只是描述為方法或屬性的骨架,而不是實現。方法和屬性的實現可以透過定義類、函式和列舉來進一步完成。協議的一致性定義為方法或屬性滿足協議的要求。
語法
協議也遵循與類、結構和列舉類似的語法:
protocol SomeProtocol {
// protocol definition
}
協議在類、結構或列舉型別名稱之後宣告。單協議和多協議宣告也是可能的。如果定義了多個協議,則必須用逗號分隔。
struct SomeStructure: Protocol1, Protocol2 {
// structure definition
}
當必須為父類定義協議時,協議名稱應在父類名稱後面加上逗號。
class SomeClass: SomeSuperclass, Protocol1, Protocol2 {
// class definition
}
屬性和方法要求
協議用於指定特定類型別的屬性或例項屬性。它只指定型別或例項屬性本身,而不是指定它是儲存屬性還是計算屬性。此外,它用於指定屬性是“可獲取的”還是“可設定的”。
屬性要求由 'var' 關鍵字宣告為屬性變數。{get set} 用於在型別聲明後宣告可獲取和可設定的屬性。可獲取在型別聲明後的 {get} 屬性中提及。
protocol classa {
var marks: Int { get set }
var result: Bool { get }
func attendance() -> String
func markssecured() -> String
}
protocol classb: classa {
var present: Bool { get set }
var subject: String { get set }
var stname: String { get set }
}
class classc: classb {
var marks = 96
let result = true
var present = false
var subject = "Swift 4 Protocols"
var stname = "Protocols"
func attendance() -> String {
return "The \(stname) has secured 99% attendance"
}
func markssecured() -> String {
return "\(stname) has scored \(marks)"
}
}
let studdet = classc()
studdet.stname = "Swift 4"
studdet.marks = 98
studdet.markssecured()
print(studdet.marks)
print(studdet.result)
print(studdet.present)
print(studdet.subject)
print(studdet.stname)
當我們使用遊樂場執行上述程式時,會得到以下結果:
98 true false Swift 4 Protocols Swift 4
可變方法要求
protocol daysofaweek {
mutating func print()
}
enum days: daysofaweek {
case sun, mon, tue, wed, thurs, fri, sat
mutating func print() {
switch self {
case sun:
self = sun
print("Sunday")
case mon:
self = mon
print("Monday")
case tue:
self = tue
print("Tuesday")
case wed:
self = wed
print("Wednesday")
case mon:
self = thurs
print("Thursday")
case tue:
self = fri
print("Friday")
case sat:
self = sat
print("Saturday")
default:
print("NO Such Day")
}
}
}
var res = days.wed
res.print()
當我們使用遊樂場執行上述程式時,會得到以下結果:
Wednesday
初始化器要求
Swing 允許使用者初始化協議以遵循與普通初始化器類似的型別一致性。
語法
protocol SomeProtocol {
init(someParameter: Int)
}
例如
protocol tcpprotocol {
init(aprot: Int)
}
協議初始化器要求的類實現
指定或便利初始化器允許使用者初始化一個協議,以透過保留的 'required' 關鍵字使其符合其標準。
class SomeClass: SomeProtocol {
required init(someParameter: Int) {
// initializer implementation statements
}
}
protocol tcpprotocol {
init(aprot: Int)
}
class tcpClass: tcpprotocol {
required init(aprot: Int) {
}
}
透過 'required' 修飾符,在所有子類上都確保協議一致性,以進行顯式或繼承的實現。
當子類覆蓋其超類初始化要求時,由“override”修飾符關鍵字指定。
protocol tcpprotocol {
init(no1: Int)
}
class mainClass {
var no1: Int // local storage
init(no1: Int) {
self.no1 = no1 // initialization
}
}
class subClass: mainClass, tcpprotocol {
var no2: Int
init(no1: Int, no2 : Int) {
self.no2 = no2
super.init(no1:no1)
}
// Requires only one parameter for convenient method
required override convenience init(no1: Int) {
self.init(no1:no1, no2:0)
}
}
let res = mainClass(no1: 20)
let print = subClass(no1: 30, no2: 50)
print("res is: \(res.no1)")
print("res is: \(print.no1)")
print("res is: \(print.no2)")
當我們使用遊樂場執行上述程式時,會得到以下結果:
res is: 20 res is: 30 res is: 50
協議作為型別
協議不用於實現功能,而是用作函式、類、方法等的型別。
協議可以在以下方面用作型別:
函式、方法或初始化作為引數或返回型別
常量、變數或屬性
陣列、字典或其他容器中的項
protocol Generator {
typealias members
func next() -> members?
}
var items = [10,20,30].generate()
while let x = items.next() {
print(x)
}
for lists in map([1,2,3], {i in i*5}) {
print(lists)
}
print([100,200,300])
print(map([1,2,3], {i in i*10}))
當我們使用遊樂場執行上述程式時,會得到以下結果:
10 20 30 5 10 15 [100, 200, 300] [10, 20, 30]
使用擴充套件新增協議一致性
可以透過使用擴展采用現有的型別並使其符合新協議。可以使用擴充套件向現有型別新增新的屬性、方法和下標。
protocol AgeClasificationProtocol {
var age: Int { get }
func agetype() -> String
}
class Person {
let firstname: String
let lastname: String
var age: Int
init(firstname: String, lastname: String) {
self.firstname = firstname
self.lastname = lastname
self.age = 10
}
}
extension Person : AgeClasificationProtocol {
func fullname() -> String {
var c: String
c = firstname + " " + lastname
return c
}
func agetype() -> String {
switch age {
case 0...2:
return "Baby"
case 2...12:
return "Child"
case 13...19:
return "Teenager"
case let x where x > 65:
return "Elderly"
default:
return "Normal"
}
}
}
協議繼承
Swift 4 允許協議從其定義的屬性繼承屬性。這類似於類繼承,但可以選擇用逗號分隔多個繼承的協議。
protocol classa {
var no1: Int { get set }
func calc(sum: Int)
}
protocol result {
func print(target: classa)
}
class student2: result {
func print(target: classa) {
target.calc(sum: 1)
}
}
class classb: result {
func print(target: classa) {
target.calc(sum: 5)
}
}
class student: classa {
var no1: Int = 10
func calc(sum: Int) {
no1 -= sum
print("Student attempted \(sum) times to pass")
if no1 <= 0 {
print("Student is absent for exam")
}
}
}
class Player {
var stmark: result!
init(stmark: result) {
self.stmark = stmark
}
func print(target: classa) {
stmark.print(target: target)
}
}
var marks = Player(stmark: student2())
var marksec = student()
marks.print(target: marksec)
marks.print(target: marksec)
marks.print(target: marksec)
marks.stmark = classb()
marks.print(target: marksec)
marks.print(target: marksec)
marks.print(target: marksec)
當我們使用遊樂場執行上述程式時,會得到以下結果:
Student attempted 1 times to pass Student attempted 1 times to pass Student attempted 1 times to pass Student attempted 5 times to pass Student attempted 5 times to pass Student is absent for exam Student attempted 5 times to pass Student is absent for exam
僅限類協議
當定義協議並且使用者希望使用類定義協議時,應首先定義類,然後定義協議的繼承列表。
protocol tcpprotocol {
init(no1: Int)
}
class mainClass {
var no1: Int // local storage
init(no1: Int) {
self.no1 = no1 // initialization
}
}
class subClass: mainClass, tcpprotocol {
var no2: Int
init(no1: Int, no2 : Int) {
self.no2 = no2
super.init(no1:no1)
}
// Requires only one parameter for convenient method
required override convenience init(no1: Int) {
self.init(no1:no1, no2:0)
}
}
let res = mainClass(no1: 20)
let print = subClass(no1: 30, no2: 50)
print("res is: \(res.no1)")
print("res is: \(print.no1)")
print("res is: \(print.no2)")
當我們使用遊樂場執行上述程式時,會得到以下結果:
res is: 20 res is: 30 res is: 50
協議組合
Swift 4 允許使用協議組合同時呼叫多個協議。
語法
protocol<SomeProtocol, AnotherProtocol>
示例
protocol stname {
var name: String { get }
}
protocol stage {
var age: Int { get }
}
struct Person: stname, stage {
var name: String
var age: Int
}
func print(celebrator: stname & stage) {
print("\(celebrator.name) is \(celebrator.age) years old")
}
let studname = Person(name: "Priya", age: 21)
print(studname)
let stud = Person(name: "Rehan", age: 29)
print(stud)
let student = Person(name: "Roshan", age: 19)
print(student)
當我們使用遊樂場執行上述程式時,會得到以下結果:
Person(name: "Priya", age: 21) Person(name: "Rehan", age: 29) Person(name: "Roshan", age: 19)
檢查協議一致性
協議一致性透過“is”和“as”運算子進行測試,類似於型別轉換。
如果例項符合協議標準,“is”運算子返回 true,如果失敗則返回 false。
as?版本的向下轉換運算子返回協議型別的可選值,如果例項不符合該協議,則此值為 nil。
as版本的向下轉換運算子強制向下轉換為協議型別,如果向下轉換不成功,則會觸發執行時錯誤。
import Foundation
@objc protocol rectangle {
var area: Double { get }
}
@objc class Circle: rectangle {
let pi = 3.1415927
var radius: Double
var area: Double { return pi * radius * radius }
init(radius: Double) { self.radius = radius }
}
@objc class result: rectangle {
var area: Double
init(area: Double) { self.area = area }
}
class sides {
var rectsides: Int
init(rectsides: Int) { self.rectsides = rectsides }
}
let objects: [AnyObject] = [Circle(radius: 2.0),result(area:198),sides(rectsides: 4)]
for object in objects {
if let objectWithArea = object as? rectangle {
print("Area is \(objectWithArea.area)")
} else {
print("Rectangle area is not defined")
}
}
當我們使用遊樂場執行上述程式時,會得到以下結果:
Area is 12.5663708 Area is 198.0 Rectangle area is not defined
Swift - 泛型
Swift 4 語言提供“泛型”功能來編寫靈活且可重用的函式和型別。泛型用於避免重複並提供抽象。Swift 4 標準庫是用泛型程式碼構建的。Swift 4 的“陣列”和“字典”型別屬於泛型集合。藉助陣列和字典,可以定義陣列以儲存“Int”值和“String”值或任何其他型別。
func exchange(a: inout Int, b: inout Int) {
let temp = a
a = b
b = temp
}
var numb1 = 100
var numb2 = 200
print("Before Swapping values are: \(numb1) and \(numb2)")
exchange(a: &numb1, b: &numb2)
print("After Swapping values are: \(numb1) and \(numb2)")
當我們使用遊樂場執行上述程式時,會得到以下結果:
Before Swapping values are: 100 and 200 After Swapping values are: 200 and 100
泛型函式:型別引數
泛型函式可用於訪問任何資料型別,例如“Int”或“String”。
func exchange<T>(a: inout T, b: inout T) {
let temp = a
a = b
b = temp
}
var numb1 = 100
var numb2 = 200
print("Before Swapping Int values are: \(numb1) and \(numb2)")
exchange(a: &numb1, b: &numb2)
print("After Swapping Int values are: \(numb1) and \(numb2)")
var str1 = "Generics"
var str2 = "Functions"
print("Before Swapping String values are: \(str1) and \(str2)")
exchange(a: &str1, b: &str2)
print("After Swapping String values are: \(str1) and \(str2)")
當我們使用遊樂場執行上述程式時,會得到以下結果:
Before Swapping Int values are: 100 and 200 After Swapping Int values are: 200 and 100 Before Swapping String values are: Generics and Functions After Swapping String values are: Functions and Generics
函式 exchange() 用於交換值,如上述程式中所述,<T> 用作型別引數。第一次呼叫函式 exchange() 將返回“Int”值,第二次呼叫函式 exchange() 將返回“String”值。可以在尖括號內包含多個引數型別,並用逗號分隔。
型別引數被命名為使用者定義的,以瞭解其儲存的型別引數的目的。Swift 4 提供 <T> 作為泛型型別引數名稱。但是,像陣列和字典這樣的型別引數也可以命名為鍵、值,以識別它們屬於“字典”型別。
struct TOS<T> {
var items = [T]()
mutating func push(item: T) {
items.append(item)
}
mutating func pop() -> T {
return items.removeLast()
}
}
var tos = TOS<String>()
tos.push(item: "Swift 4")
print(tos.items)
tos.push(item: "Generics")
print(tos.items)
tos.push(item: "Type Parameters")
print(tos.items)
tos.push(item: "Naming Type Parameters")
print(tos.items)
let deletetos = tos.pop()
當我們使用遊樂場執行上述程式時,會得到以下結果:
[Swift 4] [Swift 4, Generics] [Swift 4, Generics, Type Parameters] [Swift 4, Generics, Type Parameters, Naming Type Parameters]
擴充套件泛型型別
擴充套件 stack 屬性以瞭解專案的頂部是否包含“extension”關鍵字。
struct TOS<T> {
var items = [T]()
mutating func push(item: T) {
items.append(item)
}
mutating func pop() -> T {
return items.removeLast()
}
}
var tos = TOS<String>()
tos.push(item: "Swift 4")
print(tos.items)
tos.push(item: "Generics")
print(tos.items)
tos.push(item: "Type Parameters")
print(tos.items)
tos.push(item: "Naming Type Parameters")
print(tos.items)
extension TOS {
var first: T? {
return items.isEmpty ? nil : items[items.count - 1]
}
}
if let first = tos.first {
print("The top item on the stack is \(first).")
}
當我們使用遊樂場執行上述程式時,會得到以下結果:
["Swift 4"] ["Swift 4", "Generics"] ["Swift 4", "Generics", "Type Parameters"] ["Swift 4", "Generics", "Type Parameters", "Naming Type Parameters"] The top item on the stack is Naming Type Parameters.
型別約束
Swift 4 語言允許“型別約束”指定型別引數是否繼承自特定類,或確保協議一致性標準。
func exchange<T>(a: inout T, b: inout T) {
let temp = a
a = b
b = temp
}
var numb1 = 100
var numb2 = 200
print("Before Swapping Int values are: \(numb1) and \(numb2)")
exchange(a: &numb1, b: &numb2)
print("After Swapping Int values are: \(numb1) and \(numb2)")
var str1 = "Generics"
var str2 = "Functions"
print("Before Swapping String values are: \(str1) and \(str2)")
exchange(a: &str1, b: &str2)
print("After Swapping String values are: \(str1) and \(str2)")
當我們使用遊樂場執行上述程式時,會得到以下結果:
Before Swapping Int values are: 100 and 200 After Swapping Int values are: 200 and 100 Before Swapping String values are: Generics and Functions After Swapping String values are: Functions and Generics
關聯型別
Swift 4 允許在協議定義中透過關鍵字“associatedtype”宣告關聯型別。
protocol Container {
associatedtype ItemType
mutating func append(item: ItemType)
var count: Int { get }
subscript(i: Int) -> ItemType { get }
}
struct TOS<T>: Container {
// original Stack<T> implementation
var items = [T]()
mutating func push(item: T) {
items.append(item)
}
mutating func pop() -> T {
return items.removeLast()
}
// conformance to the Container protocol
mutating func append(item: T) {
self.push(item: item)
}
var count: Int {
return items.count
}
subscript(i: Int) -> T {
return items[i]
}
}
var tos = TOS<String>()
tos.push(item: "Swift 4")
print(tos.items)
tos.push(item: "Generics")
print(tos.items)
tos.push(item: "Type Parameters")
print(tos.items)
tos.push(item: "Naming Type Parameters")
print(tos.items)
當我們使用遊樂場執行上述程式時,會得到以下結果:
[Swift 4] [Swift 4, Generics] [Swift 4, Generics, Type Parameters] [Swift 4, Generics, Type Parameters, Naming Type Parameters]
where 子句
型別約束使使用者能夠定義與泛型函式或型別關聯的型別引數的要求。為了定義關聯型別的要求,“where”子句被宣告為型別引數列表的一部分。“where”關鍵字緊跟在型別引數列表之後,然後是關聯型別的約束、型別和關聯型別之間的相等關係。
protocol Container {
associatedtype ItemType
mutating func append(item: ItemType)
var count: Int { get }
subscript(i: Int) -> ItemType { get }
}
struct Stack<T>: Container {
// original Stack<T> implementation
var items = [T]()
mutating func push(item: T) {
items.append(item)
}
mutating func pop() -> T {
return items.removeLast()
}
// conformance to the Container protocol
mutating func append(item: T) {
self.push(item: item)
}
var count: Int {
return items.count
}
subscript(i: Int) -> T {
return items[i]
}
}
func allItemsMatch<
C1: Container, C2: Container
where C1.ItemType == C2.ItemType, C1.ItemType: Equatable>
(someContainer: C1, anotherContainer: C2) -> Bool {
// check that both containers contain the same number of items
if someContainer.count != anotherContainer.count {
return false
}
// check each pair of items to see if they are equivalent
for i in 0..<someContainer.count {
if someContainer[i] != anotherContainer[i] {
return false
}
}
// all items match, so return true
return true
}
var tos = Stack<String>()
tos.push(item: "Swift 4")
print(tos.items)
tos.push(item: "Generics")
print(tos.items)
tos.push(item: "Where Clause")
print(tos.items)
var eos = ["Swift 4", "Generics", "Where Clause"]
print(eos)
當我們使用遊樂場執行上述程式時,會得到以下結果:
[Swift 4] [Swift 4, Generics] [Swift 4, Generics, Where Clause] [Swift 4, Generics, Where Clause]
Swift - 訪問控制
透過訪問控制來限制對程式碼塊、模組和抽象的訪問。類、結構和列舉可以透過訪問控制機制根據其屬性、方法、初始化程式和下標進行訪問。協議中的常量、變數和函式受到限制,並允許透過訪問控制全域性和本地訪問。應用於屬性、型別和函式的訪問控制可以稱為“實體”。
訪問控制模型基於模組和原始檔。
模組定義為程式碼分發的單個單元,可以使用關鍵字“import”匯入。原始檔定義為模組中的單個原始碼檔案,以訪問多個型別和函式。
Swift 4 語言提供了三種不同的訪問級別。它們是 Public、Internal 和 Private 訪問。
| 序號 | 訪問級別和定義 |
|---|---|
| 1 | Public 使實體能夠在來自其定義模組的任何原始檔中處理,以及來自匯入定義模組的其他模組的原始檔。 |
| 2 | Internal 使實體能夠在來自其定義模組的任何原始檔中使用,但不能在該模組之外的任何原始檔中使用。 |
| 3 | Private 將實體的使用限制在其自己的定義原始檔中。Private 訪問在隱藏特定程式碼功能的實現細節方面發揮作用。 |
語法
public class SomePublicClass {}
internal class SomeInternalClass {}
private class SomePrivateClass {}
public var somePublicVariable = 0
internal let someInternalConstant = 0
private func somePrivateFunction() {}
函式型別的訪問控制
某些函式可能在函式內部宣告引數,沒有任何返回值。以下程式將 a 和 b 宣告為 sum() 函式的引數。在函式本身內部,透過呼叫函式呼叫 sum() 並列印其值來傳遞引數 a 和 b 的值,從而消除返回值。要將函式的返回型別設為 private,請使用 private 修飾符宣告函式的整體訪問級別。
private func sum(a: Int, b: Int) {
let a = a + b
let b = a - b
print(a, b)
}
sum(a: 20, b: 10)
sum(a: 40, b: 10)
sum(a: 24, b: 6)
當我們使用遊樂場執行上述程式時,會得到以下結果:
30 20 50 40 30 24
列舉型別的訪問控制
public enum Student {
case Name(String)
case Mark(Int,Int,Int)
}
var studDetails = Student.Name("Swift 4")
var studMarks = Student.Mark(98,97,95)
switch studMarks {
case .Name(let studName):
print("Student name is: \(studName).")
case .Mark(let Mark1, let Mark2, let Mark3):
print("Student Marks are: \(Mark1),\(Mark2),\(Mark3).")
}
當我們使用遊樂場執行上述程式時,會得到以下結果:
Student Marks are: 98,97,95
Swift 4 語言中的列舉會自動為列舉的各個情況接收相同的訪問級別。例如,考慮訪問學生姓名和三門科目獲得的分數,列舉名稱宣告為 student,enum 類中存在的成員是屬於字串資料型別的 name,分數表示為資料型別 Integer 的 mark1、mark2 和 mark3。要訪問學生的姓名或他們獲得的分數。現在,switch case 將列印學生姓名(如果該 case 塊被執行),否則它將列印學生獲得的分數。如果兩個條件都失敗,則將執行 default 塊。
子類的訪問控制
Swift 4 允許使用者對可以在當前訪問上下文中訪問的任何類進行子類化。子類不能具有比其超類更高的訪問級別。使用者被限制編寫內部超類的公共子類。
public class cricket {
internal func printIt() {
print("Welcome to Swift 4 Super Class")
}
}
internal class tennis: cricket {
override internal func printIt() {
print("Welcome to Swift 4 Sub Class")
}
}
let cricinstance = cricket()
cricinstance.printIt()
let tennisinstance = tennis()
tennisinstance.printIt()
當我們使用遊樂場執行上述程式時,會得到以下結果:
Welcome to Swift Super Class Welcome to Swift Sub Class
常量、變數、屬性和下標的訪問控制
Swift 4 常量、變數或屬性不能定義為比其型別更公開。編寫具有私有型別的公共屬性是無效的。類似地,下標不能比其索引或返回型別更公開。
當常量、變數、屬性或下標使用私有型別時,常量、變數、屬性或下標也必須標記為 private:
private var privateInstance = SomePrivateClass()
getter 和 setter
常量、變數、屬性和下標的 getter 和 setter 自動接收與其所屬的常量、變數、屬性或下標相同的訪問級別。
class Samplepgm {
var counter: Int = 0{
willSet(newTotal) {
print("Total Counter is: \(newTotal)")
}
didSet {
if counter > oldValue {
print("Newly Added Counter \(counter - oldValue)")
}
}
}
}
let NewCounter = Samplepgm()
NewCounter.counter = 100
NewCounter.counter = 800
當我們使用遊樂場執行上述程式時,會得到以下結果:
Total Counter is: 100 Newly Added Counter 100 Total Counter is: 800 Newly Added Counter 700
初始化程式和預設初始化程式的訪問控制
自定義初始化程式可以分配小於或等於其初始化的型別的訪問級別。必需的初始化程式必須與其所屬的類具有相同的訪問級別。初始化程式引數的型別不能比初始化程式自己的訪問級別更私有。
要宣告初始化器的每個子類,“required”關鍵字需要在 init() 函式之前定義。
class classA {
required init() {
let a = 10
print(a)
}
}
class classB: classA {
required init() {
let b = 30
print(b)
}
}
let res = classA()
let print = classB()
當我們使用遊樂場執行上述程式時,會得到以下結果:
10 30 10
預設初始化程式與其初始化的型別具有相同的訪問級別,除非該型別定義為 public。當預設初始化程式定義為 public 時,它被認為是 internal。當用戶需要在另一個模組中使用無引數初始化程式初始化公共型別時,請在型別的定義中顯式提供公共無引數初始化程式。
協議的訪問控制
當我們定義一個新的協議來從現有的協議繼承功能時,兩者都必須宣告相同的訪問級別才能繼承彼此的屬性。Swift 4 訪問控制不允許使用者定義一個從“internal”協議繼承的“public”協議。
public protocol tcpprotocol {
init(no1: Int)
}
public class mainClass {
var no1: Int // local storage
init(no1: Int) {
self.no1 = no1 // initialization
}
}
class subClass: mainClass, tcpprotocol {
var no2: Int
init(no1: Int, no2 : Int) {
self.no2 = no2
super.init(no1:no1)
}
// Requires only one parameter for convenient method
required override convenience init(no1: Int) {
self.init(no1:no1, no2:0)
}
}
let res = mainClass(no1: 20)
let print = subClass(no1: 30, no2: 50)
print("res is: \(res.no1)")
print("res is: \(print.no1)")
print("res is: \(print.no2)")
當我們使用遊樂場執行上述程式時,會得到以下結果:
res is: 20 res is: 30 res is: 50
擴充套件的訪問控制
當用戶使用擴充套件來新增協議一致性時,Swift 4 不允許使用者為擴充套件提供顯式訪問級別修飾符。擴充套件中每個協議要求實現的預設訪問級別由其自己的協議訪問級別提供。
泛型的訪問控制
泛型允許使用者指定最小訪問級別以訪問其型別引數上的型別約束。
public struct TOS<T> {
var items = [T]()
mutating func push(item: T) {
items.append(item)
}
mutating func pop() -> T {
return items.removeLast()
}
}
var tos = TOS<String>()
tos.push(item: "Swift 4")
print(tos.items)
tos.push(item: "Generics")
print(tos.items)
tos.push(item: "Type Parameters")
print(tos.items)
tos.push(item: "Naming Type Parameters")
print(tos.items)
let deletetos = tos.pop()
當我們使用遊樂場執行上述程式時,會得到以下結果:
[Swift 4] [Swift 4, Generics] [Swift 4, Generics, Type Parameters] [Swift 4, Generics, Type Parameters, Naming Type Parameters]
類型別名的訪問控制
使用者可以定義類型別名來處理不同的訪問控制型別。使用者可以定義相同的訪問級別或不同的訪問級別。當類型別名為“private”時,其關聯成員可以宣告為“private、internal 或 public 型別”。當類型別名為 public 時,成員不能別名為“internal”或“private”名稱
為訪問控制目的,您定義的任何類型別名都被視為不同的型別。類型別名的訪問級別可以小於或等於其別名型別的訪問級別。例如,私有類型別名可以別名私有、內部或公共型別,但公共類型別名不能別名內部或私有型別。
public protocol Container {
associatedtype ItemType
mutating func append(item: ItemType)
var count: Int { get }
subscript(i: Int) -> ItemType { get }
}
struct Stack<T>: Container {
// original Stack<T> implementation
var items = [T]()
mutating func push(item: T) {
items.append(item)
}
mutating func pop() -> T {
return items.removeLast()
}
// conformance to the Container protocol
mutating func append(item: T) {
self.push(item: item)
}
var count: Int {
return items.count
}
subscript(i: Int) -> T {
return items[i]
}
}
func allItemsMatch<
C1: Container, C2: Container
where C1.ItemType == C2.ItemType, C1.ItemType: Equatable>
(someContainer: C1, anotherContainer: C2) -> Bool {
// check that both containers contain the same number of items
if someContainer.count != anotherContainer.count {
return false
}
// check each pair of items to see if they are equivalent
for i in 0..<someContainer.count {
if someContainer[i] != anotherContainer[i] {
return false
}
}
// all items match, so return true
return true
}
var tos = Stack<String>()
tos.push(item: "Swift 4")
print(tos.items)
tos.push(item: "Generics")
print(tos.items)
tos.push(item: "Where Clause")
print(tos.items)
var eos = ["Swift 4", "Generics", "Where Clause"]
print(eos)
當我們使用遊樂場執行上述程式時,會得到以下結果:
[Swift 4] [Swift 4, Generics] [Swift 4, Generics, Where Clause] [Swift 4, Generics, Where Clause]
Swift 編碼和解碼
Swift 4 引入了一個新的Codable協議,它允許您序列化和反序列化自定義資料型別,而無需編寫任何特殊程式碼,並且無需擔心丟失值型別。
struct Language: Codable {
var name: String
var version: Int
}
let swift = Language(name: "Swift", version: 4)
let java = Language(name: "java", version: 8)
let R = Language(name: "R", version: 3
請注意,Langauage 符合 Codable 協議。現在,我們將使用一行簡單的程式碼將其轉換為 Json 資料表示形式。
let encoder = JSONEncoder()
if let encoded = try? encoder.encode(java) {
//Perform some operations on this value.
}
Swift 將自動編碼資料型別中的所有值。
您可以使用 Decoder 函式解碼資料,例如
let decoder = JSONDecoder()
if let decoded = try? decoder.decode(Language.self, from: encoded) {
//Perform some operations on this value.
}
JSONEncoder 及其屬性列表對應物 PropertyListEncoder 具有許多用於自定義其工作方式的選項。