- Spring DI 教程
- Spring DI - 首頁
- Spring DI - 概述
- Spring DI - 環境設定
- Spring DI - IOC 容器
- Spring 依賴注入
- Spring DI - 建立專案
- 基於構造器的注入示例
- Spring DI - 基於構造器
- Spring DI - 內部 Bean 構造器
- Spring DI - 集合構造器
- Spring DI - 集合引用構造器
- Spring DI - Map 構造器
- Spring DI - Map 引用構造器
- 基於 Setter 的注入示例
- Spring DI - 基於 Setter
- Spring DI - 內部 Bean Setter
- Spring DI - 集合 Setter
- Spring DI - 集合引用 Setter
- Spring DI - Map Setter
- Spring DI - Map 引用 Setter
- 自動裝配示例
- Spring DI - 自動裝配
- Spring DI - 按名稱自動裝配
- Spring DI - 按型別自動裝配
- Spring DI - 構造器自動裝配
- 工廠方法
- Spring DI - 靜態工廠
- Spring DI - 非靜態工廠
- Spring DI 有用資源
- Spring DI - 快速指南
- Spring DI - 有用資源
- Spring DI - 討論
Spring 依賴注入 - 快速指南
Spring DI - 概述
Spring 是最流行的企業級 Java 應用開發框架。全球數百萬開發者使用 Spring 框架建立高效能、易於測試和可重用的程式碼。
Spring 框架是一個開源的 Java 平臺。它最初由 Rod Johnson 編寫,並於 2003 年 6 月在 Apache 2.0 許可下首次釋出。
Spring 提供 IOC 容器,與 EJB 容器相比,這些容器通常比較輕量級。這對於在記憶體和 CPU 資源有限的計算機上開發和部署應用程式非常有利。
依賴注入 (DI)
Spring 最為顯著的技術是依賴注入 (DI),它是控制反轉的一種形式。控制反轉 (IoC) 是一個通用概念,可以用多種不同的方式表達。依賴注入僅僅是控制反轉的一個具體示例。
在編寫複雜的 Java 應用程式時,應用程式類應儘可能獨立於其他 Java 類,以提高重用這些類的可能性,並在單元測試時獨立於其他類進行測試。依賴注入有助於將這些類粘合在一起,同時保持它們的獨立性。
依賴注入究竟是什麼?讓我們分別來看這兩個詞。這裡的“依賴”部分轉化為兩個類之間的關聯。例如,類 A 依賴於類 B。現在,讓我們來看第二部分,“注入”。這意味著類 B 將由 IoC 注入到類 A 中。
依賴注入可以透過向建構函式傳遞引數或透過構造後使用 setter 方法來實現。由於依賴注入是 Spring 框架的核心,我們將在單獨的章節中結合相關示例解釋此概念。
Spring DI - 環境設定
本章將指導您如何準備開發環境以開始使用 Spring 框架的工作。它還將教你如何在設定 Spring 框架之前在你的機器上設定 JDK、Maven 和 Eclipse:
設定 Java 開發工具包 (JDK)
您可以從 Oracle 的 Java 網站下載最新版本的 SDK:Java SE 下載。 您將在下載的檔案中找到安裝 JDK 的說明,請按照給定的說明安裝和配置設定。最後,設定 PATH 和 JAVA_HOME 環境變數以引用包含 java 和 javac 的目錄,通常分別為 java_install_dir/bin 和 java_install_dir。
如果您執行的是 Windows 並已將 JDK 安裝在 C:\jdk-11.0.11,則必須將以下行新增到 C:\autoexec.bat 檔案中。
set PATH=C:\jdk-11.0.11;%PATH%
set JAVA_HOME=C:\jdk-11.0.11
或者,在 Windows NT/2000/XP 上,您需要右鍵單擊“我的電腦”,選擇“屬性”→“高階”→“環境變數”。然後,您需要更新 PATH 值並單擊“確定”按鈕。
在 Unix(Solaris、Linux 等)上,如果 SDK 安裝在 /usr/local/jdk-11.0.11 中並且您使用的是 C shell,則必須將以下內容新增到 .cshrc 檔案中。
setenv PATH /usr/local/jdk-11.0.11/bin:$PATH
setenv JAVA_HOME /usr/local/jdk-11.0.11
或者,如果您使用整合開發環境 (IDE),例如 Borland JBuilder、Eclipse、IntelliJ IDEA 或 Sun ONE Studio,則需要編譯並執行一個簡單的程式以確認 IDE 知道您已安裝 Java 的位置。否則,您需要按照 IDE 文件中給出的說明進行正確的設定。
設定 Eclipse IDE
本教程中的所有示例均使用 Eclipse IDE 編寫。因此,我們建議您應該在您的機器上安裝最新版本的 Eclipse。
要安裝 Eclipse IDE,請從 www.eclipse.org/downloads 下載最新的 Eclipse 二進位制檔案。下載安裝程式後,將二進位制分發版解壓到方便的位置。例如,在 Windows 上為 C:\eclipse,在 Linux/Unix 上為 /usr/local/eclipse,最後適當地設定 PATH 變數。
可以透過在 Windows 機器上執行以下命令啟動 Eclipse,或者您可以簡單地雙擊 eclipse.exe
%C:\eclipse\eclipse.exe
可以透過在 Unix(Solaris、Linux 等)機器上執行以下命令啟動 Eclipse:
$/usr/local/eclipse/eclipse
成功啟動後,如果一切正常,則應顯示以下結果:
設定 Maven
在本教程中,我們使用 maven 來執行和構建基於 spring 的示例。請按照 Maven - 環境設定 安裝 maven。
Spring DI - IoC 容器
Spring 容器是 Spring 框架的核心。容器將建立物件,將它們連線在一起,配置它們,並管理它們從建立到銷燬的整個生命週期。Spring 容器使用 DI 來管理構成應用程式的元件。這些物件稱為 Spring Bean,我們將在下一章中討論。
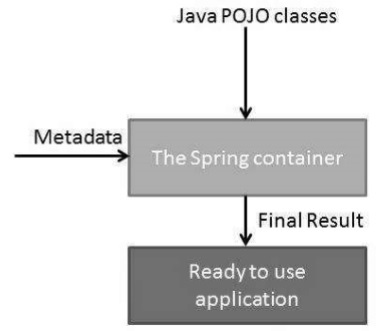
容器透過讀取提供的配置元資料來獲取有關要例項化、配置和組裝哪些物件的指令。配置元資料可以用 XML、Java 註解或 Java 程式碼表示。下圖顯示了 Spring 工作方式的高階檢視。Spring IoC 容器使用 Java POJO 類和配置元資料來生成完全配置且可執行的系統或應用程式。
Spring 提供以下兩種不同型別的容器。
| 序號 | 容器和描述 |
|---|---|
| 1 |
這是最簡單的容器,提供對 DI 的基本支援,並由 org.springframework.beans.factory.BeanFactory 介面定義。BeanFactory 和相關的介面(例如 BeanFactoryAware、InitializingBean、DisposableBean)仍然存在於 Spring 中,目的是為了與大量與 Spring 整合的第三方框架向後相容。 |
| 2 |
此容器添加了更多特定於企業的功能,例如能夠從屬性檔案解析文字訊息和能夠將應用程式事件釋出給感興趣的事件偵聽器。此容器由 org.springframework.context.ApplicationContext 介面定義。 |
ApplicationContext 容器包含 BeanFactory 容器的所有功能,因此通常建議使用它而不是 BeanFactory。對於像移動裝置或基於 applet 的應用程式這樣的輕量級應用程式,如果資料量和速度很重要,仍然可以使用 BeanFactory。
Spring DI - BeanFactory 容器
這是最簡單的容器,提供對 DI 的基本支援,並由 org.springframework.beans.factory.BeanFactory 介面定義。BeanFactory 和相關的介面(例如 BeanFactoryAware、InitializingBean、DisposableBean)仍然存在於 Spring 中,目的是為了與大量與 Spring 整合的第三方框架向後相容。
有很多 BeanFactory 介面的實現可以直接從 Spring 中獲得。最常用的 BeanFactory 實現是 **XmlBeanFactory** 類。此容器從 XML 檔案讀取配置元資料,並使用它來建立完全配置的系統或應用程式。
在資源有限(如移動裝置或基於 applet 的應用程式)的情況下,通常首選 BeanFactory。因此,除非您有充分的理由,否則請使用 ApplicationContext。
示例
讓我們更新在 Spring DI - 建立專案 一章中建立的專案。我們新增以下檔案:
HelloWorld.java - 一個依賴類。
MainApp.java - 用於執行和測試的主應用程式。
以下是 HelloWorld.java 檔案的內容:
package com.tutorialspoint;

public class HelloWorld {
   private String message;
   public void setMessage(String message){
      this.message  = message;
   }
   public void getMessage(){
      System.out.println("Your Message : " + message);
   }
}
以下是第二個檔案 MainApp.java 的內容:
package com.tutorialspoint;

import org.springframework.beans.factory.InitializingBean;
import org.springframework.beans.factory.xml.XmlBeanFactory;
import org.springframework.core.io.ClassPathResource;

public class MainApp {
   public static void main(String[] args) {
      XmlBeanFactory factory = new XmlBeanFactory (new ClassPathResource("Beans.xml"));
      HelloWorld obj = (HelloWorld) factory.getBean("helloWorld");
      obj.getMessage();
   }
}
關於主程式,應注意以下兩點:
第一步是建立一個工廠物件,我們使用框架 APIXmlBeanFactory() 建立工廠 bean,並使用ClassPathResource() API 載入 CLASSPATH 中可用的 bean 配置檔案。XmlBeanFactory() API 負責建立和初始化配置檔案中提到的所有物件(即 bean)。
第二步是使用建立的 bean 工廠物件的 getBean() 方法獲取所需的 bean。此方法使用 bean ID 返回一個泛型物件,最終可以將其強制轉換為實際物件。獲得物件後,您可以使用此物件呼叫任何類方法。
以下是 bean 配置檔案 Beans.xml 的內容:
<?xml version = "1.0" encoding = "UTF-8"?>

<beans xmlns = "http://www.springframework.org/schema/beans"
   xmlns:xsi = "http://www.w3.org/2001/XMLSchema-instance"
   xsi:schemaLocation = "http://www.springframework.org/schema/beans
   http://www.springframework.org/schema/beans/spring-beans-3.0.xsd">

   <bean id = "helloWorld" class = "com.tutorialspoint.HelloWorld">
      <property name = "message" value = "Hello World!"/>
   </bean>
</beans>
輸出
建立原始檔和 bean 配置檔案後,讓我們執行應用程式。如果應用程式一切正常,它將列印以下訊息:
Your Message : Hello World!
Spring DI - ApplicationContext 容器
ApplicationContext 是 Spring 的高階容器。與 BeanFactory 類似,它可以載入 bean 定義、將 bean 連線在一起以及根據請求分配 bean。此外,它還添加了更多特定於企業的功能,例如能夠從屬性檔案解析文字訊息和能夠將應用程式事件釋出給感興趣的事件偵聽器。此容器由 org.springframework.context.ApplicationContext 介面定義。
ApplicationContext 包含 BeanFactory 的所有功能,通常建議使用它而不是 BeanFactory。對於像移動裝置或基於 applet 的應用程式這樣的輕量級應用程式,仍然可以使用 BeanFactory。
最常用的 ApplicationContext 實現是:
FileSystemXmlApplicationContext - 此容器從 XML 檔案載入 bean 的定義。這裡需要向建構函式提供 XML bean 配置檔案的完整路徑。
ClassPathXmlApplicationContext - 此容器從 XML 檔案載入 bean 的定義。這裡不需要提供 XML 檔案的完整路徑,但需要正確設定 CLASSPATH,因為此容器將在 CLASSPATH 中查詢 bean 配置 XML 檔案。
WebXmlApplicationContext - 此容器從 Web 應用程式中載入包含所有 bean 定義的 XML 檔案。
示例
讓我們更新在 Spring DI - 建立專案 一章中建立的專案。我們新增以下檔案:
HelloWorld.java - 一個依賴類。
MainApp.java - 用於執行和測試的主應用程式。
以下是 HelloWorld.java 檔案的內容:
package com.tutorialspoint;
public class HelloWorld {
   private String message;
   public void setMessage(String message){
      this.message  = message;
   }
   public void getMessage(){
      System.out.println("Your Message : " + message);
   }
}
以下是第二個檔案 MainApp.java 的內容:
package com.tutorialspoint;

import org.springframework.context.ApplicationContext;
import org.springframework.context.support.FileSystemXmlApplicationContext;

public class MainApp {
   public static void main(String[] args) {
      ApplicationContext context = new FileSystemXmlApplicationContext
         ("C:/Users/ZARA/workspace/HelloSpring/src/Beans.xml");

      HelloWorld obj = (HelloWorld) context.getBean("helloWorld");
      obj.getMessage();
   }
}
關於主程式,應注意以下兩點:
第一步是建立工廠物件,我們使用框架API **FileSystemXmlApplicationContext** 從給定路徑載入bean配置後建立工廠bean。**FileSystemXmlApplicationContext()** API負責建立和初始化XML bean配置檔案中提到的所有物件,即bean。
第二步是使用已建立上下文的**getBean()**方法獲取所需的bean。此方法使用bean ID返回一個泛型物件,最終可以將其轉換為實際物件。獲得物件後,可以使用此物件呼叫任何類方法。
以下是 bean 配置檔案 Beans.xml 的內容:
<?xml version = "1.0" encoding = "UTF-8"?>

<beans xmlns = "http://www.springframework.org/schema/beans"
   xmlns:xsi = "http://www.w3.org/2001/XMLSchema-instance"
   xsi:schemaLocation = "http://www.springframework.org/schema/beans
   http://www.springframework.org/schema/beans/spring-beans-3.0.xsd">

   <bean id = "helloWorld" class = "com.tutorialspoint.HelloWorld">
      <property name = "message" value = "Hello World!"/>
   </bean>
</beans>
輸出
建立原始檔和bean配置檔案後,讓我們執行應用程式。如果應用程式一切正常,它將列印以下訊息:
Your Message : Hello World!
Spring DI - 建立專案
使用eclipse,選擇**檔案** → **新建** → **Maven專案**。選中**建立一個簡單的專案(跳過原型選擇)**並單擊下一步。
輸入如下所示的詳細資訊:
**groupId** − com.tutorialspoint
**artifactId** − springdi
**version** − 0.0.1-SNAPSHOT
**name** − springdi
**description** − Spring依賴注入專案
單擊“完成”按鈕,將建立一個新專案。
pom.xml
使用Spring Core依賴項更新pom.xml。以下是pom.xml的完整內容:
<project xmlns="http://maven.apache.org/POM/4.0.0" xmlns:xsi="http://www.w3.org/2001/XMLSchema-instance"
   xsi:schemaLocation="http://maven.apache.org/POM/4.0.0 https://maven.apache.org/xsd/maven-4.0.0.xsd">
   <modelVersion>4.0.0</modelVersion>
   <groupId>com.tutorialspoint</groupId>
   <artifactId>springdi</artifactId>
   <version>0.0.1-SNAPSHOT</version>
   <name>springdi</name>
   <description>Spring Dependency Injection Project</description>
   <properties>
      <org.springframework.version>5.3.9</org.springframework.version>
      <project.build.sourceEncoding>UTF-8</project.build.sourceEncoding>
      <java.version>1.8</java.version>
   </properties>
   <dependencies>
      <dependency>
         <groupId>org.springframework</groupId>
         <artifactId>spring-context</artifactId>
         <version>${org.springframework.version}</version>
         <scope>compile</scope>
      </dependency>
   </dependencies>
   <build>
      <plugins>
         <plugin>
            <groupId>org.apache.maven.plugins</groupId>
            <artifactId>maven-compiler-plugin</artifactId>
            <version>3.1</version>
            <configuration>
               <source>${java.version}</source>
               <target>${java.version}</target>
            </configuration>
         </plugin>
      </plugins>
   </build>
</project>
applicationcontext.xml
在**src → main → resources**中建立applicationcontext.xml,內容如下。
applicationcontext.xml
<?xml version="1.0" encoding="UTF-8"?>
<beans xmlns="http://www.springframework.org/schema/beans"
   xmlns:xsi="http://www.w3.org/2001/XMLSchema-instance"
   xsi:schemaLocation="http://www.springframework.org/schema/beans
   http://www.springframework.org/schema/beans/spring-beans-3.0.xsd">
</beans>
Spring DI - 基於建構函式的注入
當容器呼叫具有多個引數的類建構函式時,每個引數代表對其他類的依賴關係,從而實現基於建構函式的DI。
示例
以下示例顯示了一個TextEditor類,它只能透過建構函式注入進行依賴注入。
讓我們更新在 Spring DI - 建立專案 一章中建立的專案。我們新增以下檔案:
**TextEditor.java** − 包含SpellChecker作為依賴項的類。
**SpellChecker.java** − 一個依賴類。
MainApp.java - 用於執行和測試的主應用程式。
以下是**TextEditor.java**檔案的內容:
package com.tutorialspoint;

public class TextEditor {
   private SpellChecker spellChecker;

   public TextEditor(SpellChecker spellChecker) {
      System.out.println("Inside TextEditor constructor." );
      this.spellChecker = spellChecker;
   }
   public void spellCheck() {
      spellChecker.checkSpelling();
   }
}
以下是另一個依賴類檔案**SpellChecker.java**的內容:
package com.tutorialspoint;
public class SpellChecker {
   public SpellChecker(){
      System.out.println("Inside SpellChecker constructor." );
   }
   public void checkSpelling() {
      System.out.println("Inside checkSpelling." );
   }
}
以下是**MainApp.java**檔案的內容。
package com.tutorialspoint;

import org.springframework.context.ApplicationContext;
import org.springframework.context.support.ClassPathXmlApplicationContext;

public class MainApp {
   public static void main(String[] args) {
      ApplicationContext context = new ClassPathXmlApplicationContext("applicationcontext.xml");

      TextEditor te = (TextEditor) context.getBean("textEditor");
      te.spellCheck();
   }
}
以下是配置檔案**applicationcontext.xml**,其中包含基於建構函式的注入配置:
<?xml version = "1.0" encoding = "UTF-8"?>

<beans xmlns = "http://www.springframework.org/schema/beans"
   xmlns:xsi = "http://www.w3.org/2001/XMLSchema-instance"
   xsi:schemaLocation = "http://www.springframework.org/schema/beans
   http://www.springframework.org/schema/beans/spring-beans-3.0.xsd">

   <!-- Definition for textEditor bean -->
   <bean id = "textEditor" class = "com.tutorialspoint.TextEditor">
      <constructor-arg ref = "spellChecker"/>
   </bean>

   <!-- Definition for spellChecker bean -->
   <bean id = "spellChecker" class = "com.tutorialspoint.SpellChecker"></bean>
</beans>
輸出
建立原始檔和bean配置檔案後,讓我們執行應用程式。如果應用程式一切正常,它將列印以下訊息:
Inside SpellChecker constructor.
Inside TextEditor constructor.
Inside checkSpelling.
Spring DI - 注入內部Bean建構函式
如您所知,Java內部類是在其他類的範圍內定義的,同樣,**內部bean**是在另一個bean的範圍內定義的bean。因此,`
<?xml version = "1.0" encoding = "UTF-8"?>

<beans xmlns = "http://www.springframework.org/schema/beans"
   xmlns:xsi = "http://www.w3.org/2001/XMLSchema-instance"
   xsi:schemaLocation = "http://www.springframework.org/schema/beans
   http://www.springframework.org/schema/beans/spring-beans-3.0.xsd">

   <bean id = "outerBean" class = "...">
      <constructor-arg name = "target">
         <bean id = "innerBean" class = "..."/>
      </constructor-arg>
   </bean>

</beans>
示例
以下示例顯示了一個TextEditor類,它只能使用基於建構函式的注入進行依賴注入。
讓我們更新在 Spring DI - 建立專案 一章中建立的專案。我們新增以下檔案:
**TextEditor.java** − 包含SpellChecker作為依賴項的類。
**SpellChecker.java** − 一個依賴類。
MainApp.java - 用於執行和測試的主應用程式。
以下是**TextEditor.java**檔案的內容:
package com.tutorialspoint;
public class TextEditor {
   private SpellChecker spellChecker;

   public TextEditor(SpellChecker spellChecker) {
      System.out.println("Inside TextEditor constructor." );
      this.spellChecker = spellChecker;
   }
   // a getter method to return spellChecker
   public SpellChecker getSpellChecker() {
      return spellChecker;
   }
   public void spellCheck() {
      spellChecker.checkSpelling();
   }
}
以下是另一個依賴類檔案**SpellChecker.java**的內容:
package com.tutorialspoint;
public class SpellChecker {
   public SpellChecker(){
      System.out.println("Inside SpellChecker constructor." );
   }
   public void checkSpelling(){
      System.out.println("Inside checkSpelling." );
   }
}
以下是**MainApp.java**檔案的內容:
package com.tutorialspoint;

import org.springframework.context.ApplicationContext;
import org.springframework.context.support.ClassPathXmlApplicationContext;

public class MainApp {
   public static void main(String[] args) {
      ApplicationContext context = new ClassPathXmlApplicationContext("applicationcontext.xml");
      TextEditor te = (TextEditor) context.getBean("textEditor");
      te.spellCheck();
   }
}
以下是配置檔案**applicationcontext.xml**,其中包含使用**內部bean**的基於setter的注入配置:
<?xml version = "1.0" encoding = "UTF-8"?>

<beans xmlns = "http://www.springframework.org/schema/beans"
   xmlns:xsi = "http://www.w3.org/2001/XMLSchema-instance"
   xsi:schemaLocation = "http://www.springframework.org/schema/beans
   http://www.springframework.org/schema/beans/spring-beans-3.0.xsd">

   <!-- Definition for textEditor bean using inner bean -->
   <bean id = "textEditor" class = "com.tutorialspoint.TextEditor">
      <constructor-arg name = "spellChecker">
         <bean id = "spellChecker" class = "com.tutorialspoint.SpellChecker"/>
      </constructor-arg>
   </bean>

</beans>
輸出
建立原始檔和bean配置檔案後,讓我們執行應用程式。如果應用程式一切正常,它將列印以下訊息:
Inside SpellChecker constructor.
Inside TextEditor constructor.
Inside checkSpelling.
Spring DI - 注入集合建構函式
您已經瞭解瞭如何在Bean配置檔案中使用`
如果您想傳遞多個值,例如Java集合型別(如List、Set和Properties),該怎麼辦?為了處理這種情況,Spring提供了以下型別的集合配置元素:
| 序號 | 元素及描述 |
|---|---|
| 1 |
<list> 這有助於連線,即注入一系列值,允許重複。 |
| 2 |
<set> 這有助於連線一系列值,但不允許重複。 |
| 3 |
<props> 這可用於注入名稱值對的集合,其中名稱和值都是字串。 |
您可以使用<list>或<set>連線java.util.Collection的任何實現或**陣列**。
在這個例子中,我們展示了傳遞集合元素的直接值。
示例
以下示例顯示了一個JavaCollection類,它使用集合作為透過建構函式引數注入的依賴項。
讓我們更新在 Spring DI - 建立專案 一章中建立的專案。我們新增以下檔案:
**JavaCollection.java** − 包含集合作為依賴項的類。
MainApp.java - 用於執行和測試的主應用程式。
以下是**JavaCollection.java**檔案的內容:
package com.tutorialspoint;
import java.util.*;

public class JavaCollection {
   List<String> addressList;
   Set<String>  addressSet;
   Properties addressProp;

   public JavaCollection() {}

   public JavaCollection(List<String> addressList, Set<String> addressSet,
      Properties addressProp) {
      this.addressList = addressList;
      this.addressSet = addressSet;
      this.addressProp = addressProp;
   }
   // a setter method to set List
   public void setAddressList(List<String> addressList) {
      this.addressList = addressList;
   }

   // prints and returns all the elements of the list.
   public List<String> getAddressList() {
      System.out.println("List Elements :"  + addressList);
      return addressList;
   }

   // a setter method to set Set
   public void setAddressSet(Set<String> addressSet) {
      this.addressSet = addressSet;
   }

   // prints and returns all the elements of the Set.
   public Set<String> getAddressSet() {
      System.out.println("Set Elements :"  + addressSet);
      return addressSet;
   }

   // a setter method to set Property
   public void setAddressProp(Properties addressProp) {
      this.addressProp = addressProp;
   }

   // prints and returns all the elements of the Property.
   public Properties getAddressProp() {
      System.out.println("Property Elements :"  + addressProp);
      return addressProp;
   }
}
以下是**MainApp.java**檔案的內容:
package com.tutorialspoint;

import org.springframework.context.ApplicationContext;
import org.springframework.context.support.ClassPathXmlApplicationContext;

public class MainApp {
   public static void main(String[] args) {
      ApplicationContext context = new ClassPathXmlApplicationContext("applicationcontext.xml");
      JavaCollection jc=(JavaCollection)context.getBean("javaCollection");

      jc.getAddressList();
      jc.getAddressSet();
      jc.getAddressProp();
   }
}
以下是配置檔案**applicationcontext.xml**,其中包含所有型別集合的配置:
<?xml version = "1.0" encoding = "UTF-8"?>

<beans xmlns = "http://www.springframework.org/schema/beans"
   xmlns:xsi = "http://www.w3.org/2001/XMLSchema-instance"
   xsi:schemaLocation = "http://www.springframework.org/schema/beans
   http://www.springframework.org/schema/beans/spring-beans-3.0.xsd">

   <bean id = "javaCollection" class = "com.tutorialspoint.JavaCollection">
      <constructor-arg name = "addressList">
         <list>
            <value>INDIA</value>
            <value>JAPAN</value>
            <value>USA</value>
            <value>UK</value>
         </list>
      </constructor-arg>
      <constructor-arg name = "addressSet">
         <set>
            <value>INDIA</value>
            <value>JAPAN</value>
            <value>USA</value>
            <value>UK</value>
         </set>
      </constructor-arg>
      <constructor-arg name = "addressProp">
         <props>
            <prop key = "one">INDIA</prop>
            <prop key = "two">JAPAN</prop>
            <prop key = "three">USA</prop>
            <prop key = "four">UK</prop>
         </props>
      </constructor-arg>
   </bean>
</beans>
建立原始檔和bean配置檔案後,讓我們執行應用程式。如果應用程式一切正常,它將列印以下訊息:
List Elements :[INDIA, JAPAN, USA, UK]
Set Elements :[INDIA, JAPAN, USA, UK]
Property Elements :{four=UK, one=INDIA, two=JAPAN, three=USA}
Spring DI - 注入集合Ref建構函式
您已經瞭解瞭如何在Bean配置檔案中使用`
如果您想傳遞多個值,例如Java集合型別(如List、Set和Properties),該怎麼辦?為了處理這種情況,Spring提供了以下型別的集合配置元素:
| 序號 | 元素及描述 |
|---|---|
| 1 |
<list> 這有助於連線,即注入一系列值,允許重複。 |
| 2 |
<set> 這有助於連線一系列值,但不允許重複。 |
您可以使用<list>或<set>連線java.util.Collection的任何實現或**陣列**。
在這個例子中,我們展示了使用ref傳遞集合元素。
示例
以下示例顯示了一個JavaCollection類,它使用透過setter注入的依賴項集合。
讓我們更新在 Spring DI - 建立專案 一章中建立的專案。我們新增以下檔案:
**Address.java** − 用作依賴項的類。
**JavaCollection.java** − 包含依賴項集合的類。
MainApp.java - 用於執行和測試的主應用程式。
以下是**Address.java**檔案的內容:
package com.tutorialspoint;

public class Address {
   private String name;

   public String getName() {
      return name;
   }
   public void setName(String name) {
      this.name = name;
   }
   @Override
   public String toString() {
      return name;
   }
}
以下是**JavaCollection.java**檔案的內容:
package com.tutorialspoint;
import java.util.*;

public class JavaCollection {
   List<Address> addressList;
   Set<Address>  addressSet;

   public JavaCollection(List<Address> addressList, Set<Address> addressSet) {
      this.addressList = addressList;
      this.addressSet = addressSet;
   }

   // a setter method to set List
   public void setAddressList(List<Address> addressList) {
      this.addressList = addressList;
   }

   // prints and returns all the elements of the list.
   public List<Address> getAddressList() {
      System.out.println("List Elements :"  + addressList);
      return addressList;
   }

   // a setter method to set Set
   public void setAddressSet(Set<Address> addressSet) {
      this.addressSet = addressSet;
   }

   // prints and returns all the elements of the Set.
   public Set<Address> getAddressSet() {
      System.out.println("Set Elements :"  + addressSet);
      return addressSet;
   }
}
以下是**MainApp.java**檔案的內容:
package com.tutorialspoint;

import org.springframework.context.ApplicationContext;
import org.springframework.context.support.ClassPathXmlApplicationContext;

public class MainApp {
   public static void main(String[] args) {
      ApplicationContext context = new ClassPathXmlApplicationContext("applicationcontext.xml");
      JavaCollection jc=(JavaCollection)context.getBean("javaCollection");

      jc.getAddressList();
      jc.getAddressSet();
   }
}
以下是配置檔案**applicationcontext.xml**,其中包含所有型別集合的配置:
<beans xmlns = "http://www.springframework.org/schema/beans"
   xmlns:xsi = "http://www.w3.org/2001/XMLSchema-instance"
   xsi:schemaLocation = "http://www.springframework.org/schema/beans
   http://www.springframework.org/schema/beans/spring-beans-3.0.xsd">

   <bean id = "address1" class = "com.tutorialspoint.Address">
      <property name="name" value="INDIA"></property>
   </bean>
   <bean id = "address2" class = "com.tutorialspoint.Address">
      <property name="name" value="JAPAN"></property>
   </bean>
   <bean id = "address3" class = "com.tutorialspoint.Address">
      <property name="name" value="USA"></property>
   </bean>
   <bean id = "address4" class = "com.tutorialspoint.Address">
      <property name="name" value="UK"></property>
   </bean>
   <!-- Definition for javaCollection -->
   <bean id = "javaCollection" class = "com.tutorialspoint.JavaCollection">
      <constructor-arg name = "addressList">
         <list>
            <ref bean="address1" />
            <ref bean="address2" />
            <ref bean="address3" />
            <ref bean="address4" />
         </list>
      </constructor-arg>
      <constructor-arg name = "addressSet">
         <set>
            <ref bean="address1" />
            <ref bean="address2" />
            <ref bean="address3" />
            <ref bean="address4" />
         </set>
      </constructor-arg>
   </bean>
</beans>
輸出
建立原始檔和bean配置檔案後,讓我們執行應用程式。如果應用程式一切正常,它將列印以下訊息:
List Elements :[INDIA, JAPAN, USA, UK]
Set Elements :[INDIA, JAPAN, USA, UK]
Spring DI - 注入Map建構函式
您已經瞭解瞭如何在Bean配置檔案中使用`
如果您想傳遞Map怎麼辦?在這個例子中,我們展示了使用建構函式注入傳遞Map的直接值。
示例
以下示例顯示了一個JavaCollection類,它使用集合作為透過建構函式引數注入的依賴項。
讓我們更新在 Spring DI - 建立專案 一章中建立的專案。我們新增以下檔案:
**JavaCollection.java** − 包含集合作為依賴項的類。
MainApp.java - 用於執行和測試的主應用程式。
以下是**JavaCollection.java**檔案的內容:
package com.tutorialspoint;
import java.util.*;

public class JavaCollection {
   Map<String, String>  addressMap;
   public JavaCollection() {}

   public JavaCollection(Map<String, String> addressMap) {
      this.addressMap = addressMap;
   }

   // a setter method to set Map
   public void setAddressMap(Map<String, String> addressMap) {
      this.addressMap = addressMap;
   }

   // prints and returns all the elements of the Map.
   public Map<String, String> getAddressMap() {
      System.out.println("Map Elements :"  + addressMap);
      return addressMap;
   }
}
以下是**MainApp.java**檔案的內容:
package com.tutorialspoint;

import org.springframework.context.ApplicationContext;
import org.springframework.context.support.ClassPathXmlApplicationContext;

public class MainApp {
   public static void main(String[] args) {
      ApplicationContext context = new ClassPathXmlApplicationContext("applicationcontext.xml");
      JavaCollection jc=(JavaCollection)context.getBean("javaCollection");
      jc.getAddressMap();
   }
}
以下是配置檔案**applicationcontext.xml**,其中包含所有型別集合的配置:
<?xml version = "1.0" encoding = "UTF-8"?>

<beans xmlns = "http://www.springframework.org/schema/beans"
   xmlns:xsi = "http://www.w3.org/2001/XMLSchema-instance"
   xsi:schemaLocation = "http://www.springframework.org/schema/beans
   http://www.springframework.org/schema/beans/spring-beans-3.0.xsd">
   <bean id = "javaCollection" class = "com.tutorialspoint.JavaCollection">
      <constructor-arg name = "addressMap">
         <map>
            <entry key = "1" value = "INDIA"/>
            <entry key = "2" value = "JAPAN"/>
            <entry key = "3" value = "USA"/>
            <entry key = "4" value = "UK"/>
         </map>
      </constructor-arg>
   </bean>
</beans>
輸出
建立原始檔和bean配置檔案後,讓我們執行應用程式。如果應用程式一切正常,它將列印以下訊息:
Map Elements :{1=INDIA, 2=JAPAN, 3=USA, 4=UK}
Spring DI - Map 引用構造器
您已經瞭解瞭如何在Bean配置檔案中使用`
如果您想傳遞Map怎麼辦?在這個例子中,我們展示了使用建構函式注入傳遞Map的直接值。
示例
以下示例顯示了一個JavaCollection類,它使用集合作為透過建構函式引數注入的依賴項。
讓我們更新在 Spring DI - 建立專案 一章中建立的專案。我們新增以下檔案:
**Address.java** − 用作依賴項的類。
**JavaCollection.java** − 包含依賴項集合的類。
MainApp.java - 用於執行和測試的主應用程式。
以下是**Address.java**檔案的內容:
package com.tutorialspoint;

public class Address {
   private String name;

   public String getName() {
      return name;
   }
   public void setName(String name) {
      this.name = name;
   }
   @Override
   public String toString() {
      return name;
   }
}
以下是**JavaCollection.java**檔案的內容:
package com.tutorialspoint;
import java.util.*;

public class JavaCollection {
   Map<String, Address>  addressMap;
   public JavaCollection() {}

   public JavaCollection(Map<String, Address> addressMap) {
      this.addressMap = addressMap;
   }

   // a setter method to set Map
   public void setAddressMap(Map<String, Address> addressMap) {
      this.addressMap = addressMap;
   }

   // prints and returns all the elements of the Map.
   public Map<String, Address> getAddressMap() {
      System.out.println("Map Elements :"  + addressMap);
      return addressMap;
   }
}
以下是**MainApp.java**檔案的內容:
package com.tutorialspoint;

import org.springframework.context.ApplicationContext;
import org.springframework.context.support.ClassPathXmlApplicationContext;

public class MainApp {
   public static void main(String[] args) {
      ApplicationContext context = new ClassPathXmlApplicationContext("applicationcontext.xml");
      JavaCollection jc=(JavaCollection)context.getBean("javaCollection");
      jc.getAddressMap();
   }
}
以下是配置檔案**applicationcontext.xml**,其中包含所有型別集合的配置:
<?xml version = "1.0" encoding = "UTF-8"?>

<beans xmlns = "http://www.springframework.org/schema/beans"
   xmlns:xsi = "http://www.w3.org/2001/XMLSchema-instance"
   xsi:schemaLocation = "http://www.springframework.org/schema/beans
   http://www.springframework.org/schema/beans/spring-beans-3.0.xsd">
   <bean id = "address1" class = "com.tutorialspoint.Address">
      <property name="name" value="INDIA"></property>
   </bean>
   <bean id = "address2" class = "com.tutorialspoint.Address">
      <property name="name" value="JAPAN"></property>
   </bean>
   <bean id = "address3" class = "com.tutorialspoint.Address">
      <property name="name" value="USA"></property>
   </bean>
   <bean id = "address4" class = "com.tutorialspoint.Address">
      <property name="name" value="UK"></property>
   </bean>
   <bean id = "javaCollection" class = "com.tutorialspoint.JavaCollection">
      <constructor-arg name = "addressMap">
         <map>
            <entry key = "1" value-ref = "address1"/>
            <entry key = "2" value-ref = "address2"/>
            <entry key = "3" value-ref = "address3"/>
            <entry key = "4" value-ref = "address4"/>
         </map>
      </constructor-arg>
   </bean>
</beans>
建立原始檔和bean配置檔案後,讓我們執行應用程式。如果應用程式一切正常,它將列印以下訊息:
Map Elements :{1=INDIA, 2=JAPAN, 3=USA, 4=UK}
Spring DI - 基於Setter的注入
基於Setter的DI是透過容器在呼叫無引數建構函式或無引數靜態工廠方法來例項化bean後,呼叫bean上的setter方法來實現的。
示例
以下示例顯示了一個TextEditor類,它只能使用純基於setter的注入進行依賴注入。
讓我們更新在 Spring DI - 建立專案 一章中建立的專案。我們新增以下檔案:
**TextEditor.java** − 包含SpellChecker作為依賴項的類。
**SpellChecker.java** − 一個依賴類。
MainApp.java - 用於執行和測試的主應用程式。
以下是**TextEditor.java**檔案的內容:
package com.tutorialspoint;
public class TextEditor {
   private SpellChecker spellChecker;

   // a setter method to inject the dependency.
   public void setSpellChecker(SpellChecker spellChecker) {
      System.out.println("Inside setSpellChecker." );
      this.spellChecker = spellChecker;
   }
   // a getter method to return spellChecker
   public SpellChecker getSpellChecker() {
      return spellChecker;
   }
   public void spellCheck() {
      spellChecker.checkSpelling();
   }
}
您需要檢查setter方法的命名約定。為了設定變數spellChecker,我們使用setSpellChecker()方法,這與Java POJO類非常相似。讓我們建立另一個依賴類檔案SpellChecker.java的內容:
package com.tutorialspoint;

public class SpellChecker {
   public SpellChecker(){
      System.out.println("Inside SpellChecker constructor." );
   }
   public void checkSpelling() {
      System.out.println("Inside checkSpelling." );
   }
}
以下是**MainApp.java**檔案的內容:
package com.tutorialspoint;

import org.springframework.context.ApplicationContext;
import org.springframework.context.support.ClassPathXmlApplicationContext;

public class MainApp {
   public static void main(String[] args) {
      ApplicationContext context = new ClassPathXmlApplicationContext("applicationcontext.xml");

      TextEditor te = (TextEditor) context.getBean("textEditor");
      te.spellCheck();
   }
}
以下是配置檔案**applicationcontext.xml**,其中包含基於setter的注入配置:
<?xml version = "1.0" encoding = "UTF-8"?>

<beans xmlns = "http://www.springframework.org/schema/beans"
   xmlns:xsi = "http://www.w3.org/2001/XMLSchema-instance"
   xsi:schemaLocation = "http://www.springframework.org/schema/beans
   http://www.springframework.org/schema/beans/spring-beans-3.0.xsd">

   <!-- Definition for textEditor bean -->
   <bean id = "textEditor" class = "com.tutorialspoint.TextEditor">
      <property name = "spellChecker" ref = "spellChecker"/>
   </bean>

   <!-- Definition for spellChecker bean -->
   <bean id = "spellChecker" class = "com.tutorialspoint.SpellChecker"></bean>
</beans>
您應該注意基於建構函式的注入和基於setter的注入中定義的applicationcontext.xml檔案的區別。唯一的區別在於`
第二個需要注意的重要點是,如果您正在傳遞對物件的引用,則需要使用`
輸出
建立原始檔和bean配置檔案後,讓我們執行應用程式。如果應用程式一切正常,它將列印以下訊息:
Inside SpellChecker constructor.
Inside setSpellChecker.
Inside checkSpelling.
Spring DI - 內部 Bean Setter
如您所知,Java內部類是在其他類的範圍內定義的,同樣,**內部bean**是在另一個bean的範圍內定義的bean。因此,`
<?xml version = "1.0" encoding = "UTF-8"?>

<beans xmlns = "http://www.springframework.org/schema/beans"
   xmlns:xsi = "http://www.w3.org/2001/XMLSchema-instance"
   xsi:schemaLocation = "http://www.springframework.org/schema/beans
   http://www.springframework.org/schema/beans/spring-beans-3.0.xsd">
   <bean id = "outerBean" class = "...">
      <property name = "target">
         <bean id = "innerBean" class = "..."/>
      </property>
   </bean>
</beans>
示例
以下示例顯示了一個TextEditor類,它只能使用純基於setter的注入進行依賴注入。
讓我們更新在 Spring DI - 建立專案 一章中建立的專案。我們新增以下檔案:
**TextEditor.java** − 包含SpellChecker作為依賴項的類。
**SpellChecker.java** − 一個依賴類。
MainApp.java - 用於執行和測試的主應用程式。
以下是**TextEditor.java**檔案的內容:
package com.tutorialspoint;

public class TextEditor {
   private SpellChecker spellChecker;

   // a setter method to inject the dependency.
   public void setSpellChecker(SpellChecker spellChecker) {
      System.out.println("Inside setSpellChecker." );
      this.spellChecker = spellChecker;
   }
   // a getter method to return spellChecker
   public SpellChecker getSpellChecker() {
      return spellChecker;
   }
   public void spellCheck() {
      spellChecker.checkSpelling();
   }
}
以下是另一個依賴類檔案**SpellChecker.java**的內容:
package com.tutorialspoint;

public class SpellChecker {
   public SpellChecker(){
      System.out.println("Inside SpellChecker constructor." );
   }
   public void checkSpelling(){
      System.out.println("Inside checkSpelling." );
   }
}
以下是**MainApp.java**檔案的內容:
package com.tutorialspoint;

import org.springframework.context.ApplicationContext;
import org.springframework.context.support.ClassPathXmlApplicationContext;

public class MainApp {
   public static void main(String[] args) {
      ApplicationContext context = new ClassPathXmlApplicationContext("applicationcontext.xml");
      TextEditor te = (TextEditor) context.getBean("textEditor");
      te.spellCheck();
   }
}
以下是配置檔案**applicationcontext.xml**,其中包含使用**內部bean**的基於setter的注入配置:
<?xml version = "1.0" encoding = "UTF-8"?>

<beans xmlns = "http://www.springframework.org/schema/beans"
   xmlns:xsi = "http://www.w3.org/2001/XMLSchema-instance"
   xsi:schemaLocation = "http://www.springframework.org/schema/beans
   http://www.springframework.org/schema/beans/spring-beans-3.0.xsd">

   <!-- Definition for textEditor bean using inner bean -->
   <bean id = "textEditor" class = "com.tutorialspoint.TextEditor">
      <property name = "spellChecker">
         <bean id = "spellChecker" class = "com.tutorialspoint.SpellChecker"/>
      </property>
   </bean>
</beans>
輸出
建立原始檔和bean配置檔案後,讓我們執行應用程式。如果應用程式一切正常,它將列印以下訊息:
Inside SpellChecker constructor.
Inside setSpellChecker.
Inside checkSpelling.
Spring DI - 集合 Setter
您已經瞭解瞭如何在Bean配置檔案中使用`
如果您想傳遞多個值,例如Java集合型別(如List、Set、Map和Properties),該怎麼辦?為了處理這種情況,Spring提供了以下型別的集合配置元素:
| 序號 | 元素及描述 |
|---|---|
| 1 |
<list> 這有助於連線,即注入一系列值,允許重複。 |
| 2 |
<set> 這有助於連線一系列值,但不允許重複。 |
| 3 |
<props> 這可用於注入名稱值對的集合,其中名稱和值都是字串。 |
您可以使用<list>或<set>連線java.util.Collection的任何實現或**陣列**。
在這個例子中,我們展示了傳遞集合元素的直接值。
示例
以下示例顯示了一個JavaCollection類,它使用透過setter注入的集合作為依賴項。
讓我們更新在 Spring DI - 建立專案 一章中建立的專案。我們新增以下檔案:
**JavaCollection.java** − 包含集合作為依賴項的類。
MainApp.java - 用於執行和測試的主應用程式。
以下是**JavaCollection.java**檔案的內容:
package com.tutorialspoint;
import java.util.*;

public class JavaCollection {
   List<String> addressList;
   Set<String>  addressSet;
   Properties addressProp;

   // a setter method to set List
   public void setAddressList(List<String> addressList) {
      this.addressList = addressList;
   }

   // prints and returns all the elements of the list.
   public List<String> getAddressList() {
      System.out.println("List Elements :"  + addressList);
      return addressList;
   }

   // a setter method to set Set
   public void setAddressSet(Set<String> addressSet) {
      this.addressSet = addressSet;
   }

   // prints and returns all the elements of the Set.
   public Set<String> getAddressSet() {
      System.out.println("Set Elements :"  + addressSet);
      return addressSet;
   }

   // a setter method to set Property
   public void setAddressProp(Properties addressProp) {
      this.addressProp = addressProp;
   }

   // prints and returns all the elements of the Property.
   public Properties getAddressProp() {
      System.out.println("Property Elements :"  + addressProp);
      return addressProp;
   }
}
以下是**MainApp.java**檔案的內容:
package com.tutorialspoint;

import org.springframework.context.ApplicationContext;
import org.springframework.context.support.ClassPathXmlApplicationContext;

public class MainApp {
   public static void main(String[] args) {
      ApplicationContext context = new ClassPathXmlApplicationContext("applicationcontext.xml");
      JavaCollection jc=(JavaCollection)context.getBean("javaCollection");

      jc.getAddressList();
      jc.getAddressSet();
      jc.getAddressProp();
   }
}
以下是配置檔案**applicationcontext.xml**,其中包含所有型別集合的配置:
<?xml version = "1.0" encoding = "UTF-8"?>

<beans xmlns = "http://www.springframework.org/schema/beans"
   xmlns:xsi = "http://www.w3.org/2001/XMLSchema-instance"
   xsi:schemaLocation = "http://www.springframework.org/schema/beans
   http://www.springframework.org/schema/beans/spring-beans-3.0.xsd">

   <!-- Definition for javaCollection -->
   <bean id = "javaCollection" class = "com.tutorialspoint.JavaCollection">
      <!-- results in a setAddressList(java.util.List) call -->
      <property name = "addressList">
         <list>
            <value>INDIA</value>
            <value>JAPAN</value>
            <value>USA</value>
            <value>UK</value>
         </list>
      </property>

      <!-- results in a setAddressSet(java.util.Set) call -->
      <property name = "addressSet">
         <set>
            <value>INDIA</value>
            <value>JAPAN</value>
            <value>USA</value>
            <value>UK</value>
         </set>
      </property>

      <!-- results in a setAddressProp(java.util.Properties) call -->
      <property name = "addressProp">
         <props>
            <prop key = "one">INDIA</prop>
            <prop key = "two">JAPAN</prop>
            <prop key = "three">USA</prop>
            <prop key = "four">UK</prop>
         </props>
      </property>
   </bean>
</beans>
輸出
建立原始檔和bean配置檔案後,讓我們執行應用程式。如果應用程式一切正常,它將列印以下訊息:
List Elements :[INDIA, JAPAN, USA, UK]
Set Elements :[INDIA, JAPAN, USA, UK]
Property Elements :{four=UK, one=INDIA, two=JAPAN, three=USA}
Spring DI - 集合Ref Setter
您已經瞭解瞭如何在Bean配置檔案中使用`
如果您想傳遞多個值,例如Java集合型別(如List、Set、Map和Properties),該怎麼辦?為了處理這種情況,Spring提供了以下型別的集合配置元素:
| 序號 | 元素及描述 |
|---|---|
| 1 |
<list> 這有助於連線,即注入一系列值,允許重複。 |
| 2 |
<set> 這有助於連線一系列值,但不允許重複。 |
您可以使用<list>或<set>連線java.util.Collection的任何實現或**陣列**。
在這個例子中,我們展示了使用ref傳遞集合元素。
示例
以下示例顯示了一個JavaCollection類,它使用透過setter注入的依賴項集合。
讓我們更新在 Spring DI - 建立專案 一章中建立的專案。我們新增以下檔案:
**Address.java** − 用作依賴項的類。
**JavaCollection.java** − 包含依賴項集合的類。
MainApp.java - 用於執行和測試的主應用程式。
以下是**Address.java**檔案的內容:
package com.tutorialspoint;

public class Address {
   private String name;

   public String getName() {
      return name;
   }
   public void setName(String name) {
      this.name = name;
   }
   @Override
   public String toString() {
      return name;
   }
}
以下是**JavaCollection.java**檔案的內容:
package com.tutorialspoint;
import java.util.*;

public class JavaCollection {
   List<Address> addressList;
   Set<Address>  addressSet;

   // a setter method to set List
   public void setAddressList(List<Address> addressList) {
      this.addressList = addressList;
   }

   // prints and returns all the elements of the list.
   public List<Address> getAddressList() {
      System.out.println("List Elements :"  + addressList);
      return addressList;
   }

   // a setter method to set Set
   public void setAddressSet(Set<Address> addressSet) {
      this.addressSet = addressSet;
   }

   // prints and returns all the elements of the Set.
   public Set<Address> getAddressSet() {
      System.out.println("Set Elements :"  + addressSet);
      return addressSet;
   }
}
以下是**MainApp.java**檔案的內容:
package com.tutorialspoint;

import org.springframework.context.ApplicationContext;
import org.springframework.context.support.ClassPathXmlApplicationContext;

public class MainApp {
   public static void main(String[] args) {
      ApplicationContext context = new ClassPathXmlApplicationContext("applicationcontext.xml");
      JavaCollection jc=(JavaCollection)context.getBean("javaCollection");

      jc.getAddressList();
      jc.getAddressSet();
   }
}
以下是配置檔案**applicationcontext.xml**,其中包含所有型別集合的配置:
<beans xmlns = "http://www.springframework.org/schema/beans"
   xmlns:xsi = "http://www.w3.org/2001/XMLSchema-instance"
   xsi:schemaLocation = "http://www.springframework.org/schema/beans
   http://www.springframework.org/schema/beans/spring-beans-3.0.xsd">

   <bean id = "address1" class = "com.tutorialspoint.Address">
      <property name="name" value="INDIA"></property>
   </bean>
   <bean id = "address2" class = "com.tutorialspoint.Address">
      <property name="name" value="JAPAN"></property>
   </bean>
   <bean id = "address3" class = "com.tutorialspoint.Address">
      <property name="name" value="USA"></property>
   </bean>
   <bean id = "address4" class = "com.tutorialspoint.Address">
      <property name="name" value="UK"></property>
   </bean>

   <!-- Definition for javaCollection -->
   <bean id = "javaCollection" class = "com.tutorialspoint.JavaCollection">
      <!-- results in a setAddressList(java.util.List) call -->
      <property name = "addressList">
         <list>
            <ref bean="address1" />
            <ref bean="address2" />
            <ref bean="address3" />
            <ref bean="address4" />
         </list>
      </property>

      <!-- results in a setAddressSet(java.util.Set) call -->
      <property name = "addressSet">
         <set>
            <ref bean="address1" />
            <ref bean="address2" />
            <ref bean="address3" />
            <ref bean="address4" />
         </set>
      </property>
   </bean>
</beans>
輸出
建立原始檔和bean配置檔案後,讓我們執行應用程式。如果應用程式一切正常,它將列印以下訊息:
List Elements :[INDIA, JAPAN, USA, UK]
Set Elements :[INDIA, JAPAN, USA, UK]
Spring DI - Map Setter
您已經瞭解瞭如何在Bean配置檔案中使用`
如果您想傳遞Map怎麼辦?在這個例子中,我們展示了使用setter注入傳遞Map的直接值。
示例
以下示例顯示了一個JavaCollection類,它使用透過setter方法注入的集合作為依賴項。
讓我們更新在 Spring DI - 建立專案 一章中建立的專案。我們新增以下檔案:
**JavaCollection.java** − 包含集合作為依賴項的類。
MainApp.java - 用於執行和測試的主應用程式。
以下是**JavaCollection.java**檔案的內容:
package com.tutorialspoint;
import java.util.*;

public class JavaCollection {
   Map<String, String>  addressMap;
   public JavaCollection() {}

   public JavaCollection(Map<String, String> addressMap) {
      this.addressMap = addressMap;
   }

   // a setter method to set Map
   public void setAddressMap(Map<String, String> addressMap) {
      this.addressMap = addressMap;
   }

   // prints and returns all the elements of the Map.
   public Map<String, String> getAddressMap() {
      System.out.println("Map Elements :"  + addressMap);
      return addressMap;
   }
}
以下是**MainApp.java**檔案的內容:
package com.tutorialspoint;

import org.springframework.context.ApplicationContext;
import org.springframework.context.support.ClassPathXmlApplicationContext;

public class MainApp {
   public static void main(String[] args) {
      ApplicationContext context = new ClassPathXmlApplicationContext("applicationcontext.xml");
      JavaCollection jc=(JavaCollection)context.getBean("javaCollection");
      jc.getAddressMap();
   }
}
以下是配置檔案**applicationcontext.xml**,其中包含所有型別集合的配置:
<?xml version = "1.0" encoding = "UTF-8"?>

<beans xmlns = "http://www.springframework.org/schema/beans"
   xmlns:xsi = "http://www.w3.org/2001/XMLSchema-instance"
   xsi:schemaLocation = "http://www.springframework.org/schema/beans
   http://www.springframework.org/schema/beans/spring-beans-3.0.xsd">

   <bean id = "javaCollection" class = "com.tutorialspoint.JavaCollection">
      <property name = "addressMap">
         <map>
            <entry key = "1" value = "INDIA"/>
            <entry key = "2" value = "JAPAN"/>
            <entry key = "3" value = "USA"/>
            <entry key = "4" value = "UK"/>
         </map>
      </property>
   </bean>
</beans>
輸出
建立原始檔和bean配置檔案後,讓我們執行應用程式。如果應用程式一切正常,它將列印以下訊息:
Map Elements :{1=INDIA, 2=JAPAN, 3=USA, 4=UK}
Spring DI - Map 引用 Setter
您已經瞭解瞭如何在Bean配置檔案中使用`
如果您想傳遞Map怎麼辦?在這個例子中,我們展示了使用setter注入傳遞Map的直接值。
示例
以下示例顯示了一個JavaCollection類,它使用透過setter方法注入的集合作為依賴項。
讓我們更新在 Spring DI - 建立專案 一章中建立的專案。我們新增以下檔案:
**Address.java** − 用作依賴項的類。
**JavaCollection.java** − 包含依賴項集合的類。
MainApp.java - 用於執行和測試的主應用程式。
以下是**Address.java**檔案的內容:
package com.tutorialspoint;

public class Address {
   private String name;

   public String getName() {
      return name;
   }
   public void setName(String name) {
      this.name = name;
   }
   @Override
   public String toString() {
      return name;
   }
}
以下是**JavaCollection.java**檔案的內容:
package com.tutorialspoint;
import java.util.*;

public class JavaCollection {
   Map<String, Address>  addressMap;
   public JavaCollection() {}

   public JavaCollection(Map<String, Address> addressMap) {
      this.addressMap = addressMap;
   }

   // a setter method to set Map
   public void setAddressMap(Map<String, Address> addressMap) {
      this.addressMap = addressMap;
   }

   // prints and returns all the elements of the Map.
   public Map<String, Address> getAddressMap() {
      System.out.println("Map Elements :"  + addressMap);
      return addressMap;
   }
}
以下是**MainApp.java**檔案的內容:
package com.tutorialspoint;

import org.springframework.context.ApplicationContext;
import org.springframework.context.support.ClassPathXmlApplicationContext;

public class MainApp {
   public static void main(String[] args) {
      ApplicationContext context = new ClassPathXmlApplicationContext("applicationcontext.xml");
      JavaCollection jc=(JavaCollection)context.getBean("javaCollection");
      jc.getAddressMap();
   }
}
以下是配置檔案**applicationcontext.xml**,其中包含所有型別集合的配置:
<?xml version = "1.0" encoding = "UTF-8"?>

<beans xmlns = "http://www.springframework.org/schema/beans"
   xmlns:xsi = "http://www.w3.org/2001/XMLSchema-instance"
   xsi:schemaLocation = "http://www.springframework.org/schema/beans
   http://www.springframework.org/schema/beans/spring-beans-3.0.xsd">
   <bean id = "address1" class = "com.tutorialspoint.Address">
      <property name="name" value="INDIA"></property>
   </bean>
   <bean id = "address2" class = "com.tutorialspoint.Address">
      <property name="name" value="JAPAN"></property>
   </bean>
   <bean id = "address3" class = "com.tutorialspoint.Address">
      <property name="name" value="USA"></property>
   </bean>
   <bean id = "address4" class = "com.tutorialspoint.Address">
      <property name="name" value="UK"></property>
   </bean>
   <bean id = "javaCollection" class = "com.tutorialspoint.JavaCollection">
      <property name = "addressMap">
         <map>
            <entry key = "1" value-ref = "address1"/>
            <entry key = "2" value-ref = "address2"/>
            <entry key = "3" value-ref = "address3"/>
            <entry key = "4" value-ref = "address4"/>
         </map>
      </property>
   </bean>
</beans>
輸出
建立原始檔和bean配置檔案後,讓我們執行應用程式。如果應用程式一切正常,它將列印以下訊息:
Map Elements :{1=INDIA, 2=JAPAN, 3=USA, 4=UK}
Spring DI - 自動裝配
您已經學習瞭如何在XML配置檔案中使用`
Spring容器可以**自動裝配**協作bean之間的關係,而無需使用`
自動裝配模式
以下是自動裝配模式,可用於指示Spring容器使用自動裝配進行依賴注入。您可以使用`
| 序號 | 模式及描述 |
|---|---|
| 1 |
no 這是預設設定,這意味著沒有自動裝配,您應該使用顯式bean引用進行連線。您無需為此連線做任何特殊操作。這就是您在依賴注入章節中已經看到的。 |
| 2 |
按屬性名稱自動裝配。Spring容器檢視在XML配置檔案中將`autowire`屬性設定為`byName`的bean的屬性。然後,它嘗試匹配其屬性,並將其與配置檔案中定義的同名bean連線。 |
| 3 |
按屬性資料型別自動裝配。Spring容器檢視在XML配置檔案中將`autowire`屬性設定為`byType`的bean的屬性。然後,如果其**型別**與配置檔案中正好一個bean名稱匹配,它嘗試匹配並連線屬性。如果存在多個這樣的bean,則會丟擲致命異常。 |
| 4 |
類似於byType,但型別適用於建構函式引數。如果容器中沒有正好一個建構函式引數型別的bean,則會引發致命錯誤。 |
| 5 | autodetect Spring首先嚐試使用`constructor`自動裝配,如果失敗,則嘗試使用`byType`自動裝配。 |
您可以使用byType或constructor自動裝配模式連線陣列和其他型別集合。
自動裝配的侷限性
當在整個專案中一致地使用自動裝配時,效果最佳。如果通常不使用自動裝配,則開發人員僅使用它來連線一兩個bean定義可能會令人困惑。雖然自動裝配可以顯著減少指定屬性或建構函式引數的需求,但在使用它們之前,您應該考慮自動裝配的侷限性和缺點。
| 序號 | 侷限性及描述 |
|---|---|
| 1 |
覆蓋可能性 您仍然可以使用` |
| 2 |
基本資料型別 您無法自動裝配所謂的簡單屬性,例如基元、字串和類。 |
| 3 |
令人困惑的性質 自動裝配不如顯式裝配精確,因此,如果可能,請優先使用顯式裝配。 |
Spring DI - 按名稱自動裝配
此模式指定按屬性名稱自動裝配。Spring容器檢視在XML配置檔案中將`auto-wire`屬性設定為`byName`的bean。然後,它嘗試匹配其屬性,並將其與配置檔案中定義的同名bean連線。如果找到匹配項,它將注入這些bean。否則,將不會連線bean。
例如,如果bean定義在配置檔案中設定為按名稱自動裝配,並且它包含一個`spellChecker`屬性(即,它具有`setSpellChecker(...)`方法),Spring將查詢名為spellChecker的bean定義,並使用它來設定屬性。您仍然可以使用`
示例
以下示例顯示了一個TextEditor類,它只能使用純基於setter的注入進行依賴注入。
讓我們更新在 Spring DI - 建立專案 一章中建立的專案。我們新增以下檔案:
**TextEditor.java** − 包含SpellChecker作為依賴項的類。
**SpellChecker.java** − 一個依賴類。
MainApp.java - 用於執行和測試的主應用程式。
以下是**TextEditor.java**檔案的內容:
package com.tutorialspoint;

public class TextEditor {
   private SpellChecker spellChecker;
   private String name;

   public void setSpellChecker( SpellChecker spellChecker ){
      this.spellChecker = spellChecker;
   }
   public SpellChecker getSpellChecker() {
      return spellChecker;
   }
   public void setName(String name) {
      this.name = name;
   }
   public String getName() {
      return name;
   }
   public void spellCheck() {
      spellChecker.checkSpelling();
   }
}
以下是另一個依賴類檔案**SpellChecker.java**的內容:
package com.tutorialspoint;

public class SpellChecker {
   public SpellChecker(){
      System.out.println("Inside SpellChecker constructor." );
   }
   public void checkSpelling(){
      System.out.println("Inside checkSpelling." );
   }
}
以下是**MainApp.java**檔案的內容:
package com.tutorialspoint;

import org.springframework.context.ApplicationContext;
import org.springframework.context.support.ClassPathXmlApplicationContext;

public class MainApp {
   public static void main(String[] args) {
      ApplicationContext context = new ClassPathXmlApplicationContext("applicationcontext.xml");
      TextEditor te = (TextEditor) context.getBean("textEditor");
      te.spellCheck();
   }
}
以下是配置檔案**applicationcontext.xml**,其中包含**按名稱**自動裝配的配置:
<?xml version = "1.0" encoding = "UTF-8"?>

<beans xmlns = "http://www.springframework.org/schema/beans"
   xmlns:xsi = "http://www.w3.org/2001/XMLSchema-instance"
   xsi:schemaLocation = "http://www.springframework.org/schema/beans
   http://www.springframework.org/schema/beans/spring-beans-3.0.xsd">

   <!-- Definition for textEditor bean -->
   <bean id = "textEditor" class = "com.tutorialspoint.TextEditor" autowire = "byName">
      <property name = "name" value = "Generic Text Editor" />
   </bean>

   <!-- Definition for spellChecker bean -->
   <bean id = "spellChecker" class = "com.tutorialspoint.SpellChecker"></bean>
</beans>
輸出
建立原始檔和bean配置檔案後,讓我們執行應用程式。如果應用程式一切正常,它將列印以下訊息:
Inside SpellChecker constructor.
Inside checkSpelling.
Spring DI - 按型別自動裝配
此模式指定按屬性型別自動裝配。Spring容器檢視在XML配置檔案中將`autowire`屬性設定為`byType`的bean。然後,如果其**型別**與配置檔案中正好一個bean名稱匹配,它嘗試匹配並連線屬性。如果找到匹配項,它將注入這些bean。否則,將不會連線bean。
例如,如果在配置檔案中將 Bean 定義設定為按byType自動裝配,並且它包含一個SpellChecker型別的spellChecker屬性,Spring 會查詢名為SpellChecker的 Bean 定義,並用它來設定該屬性。您仍然可以使用<property>標籤來連線其餘的屬性。以下示例將說明這個概念。
示例
以下示例顯示了一個TextEditor類,它只能使用純基於setter的注入進行依賴注入。
讓我們更新在 Spring DI - 建立專案 一章中建立的專案。我們新增以下檔案:
**TextEditor.java** − 包含SpellChecker作為依賴項的類。
**SpellChecker.java** − 一個依賴類。
MainApp.java - 用於執行和測試的主應用程式。
以下是**TextEditor.java**檔案的內容:
package com.tutorialspoint;

public class TextEditor {
   private SpellChecker spellChecker;
   private String name;

   public void setSpellChecker( SpellChecker spellChecker ){
      this.spellChecker = spellChecker;
   }
   public SpellChecker getSpellChecker() {
      return spellChecker;
   }
   public void setName(String name) {
      this.name = name;
   }
   public String getName() {
      return name;
   }
   public void spellCheck() {
      spellChecker.checkSpelling();
   }
}
以下是另一個依賴類檔案**SpellChecker.java**的內容:
package com.tutorialspoint;

public class SpellChecker {
   public SpellChecker(){
      System.out.println("Inside SpellChecker constructor." );
   }
   public void checkSpelling(){
      System.out.println("Inside checkSpelling." );
   }
}
以下是**MainApp.java**檔案的內容:
package com.tutorialspoint;

import org.springframework.context.ApplicationContext;
import org.springframework.context.support.ClassPathXmlApplicationContext;

public class MainApp {
   public static void main(String[] args) {
      ApplicationContext context = new ClassPathXmlApplicationContext("applicationcontext.xml");
      TextEditor te = (TextEditor) context.getBean("textEditor");
      te.spellCheck();
   }
}
以下是配置檔案**applicationcontext.xml**,其中包含**按名稱**自動裝配的配置:
<?xml version = "1.0" encoding = "UTF-8"?>

<beans xmlns = "http://www.springframework.org/schema/beans"
   xmlns:xsi = "http://www.w3.org/2001/XMLSchema-instance"
   xsi:schemaLocation = "http://www.springframework.org/schema/beans
   http://www.springframework.org/schema/beans/spring-beans-3.0.xsd">

   <!-- Definition for textEditor bean -->
   <bean id = "textEditor" class = "com.tutorialspoint.TextEditor" autowire = "byType">
      <property name = "name" value = "Generic Text Editor" />
   </bean>

   <!-- Definition for spellChecker bean -->
   <bean id = "spellChecker" class = "com.tutorialspoint.SpellChecker"></bean>

</beans>
輸出
建立原始檔和bean配置檔案後,讓我們執行應用程式。如果應用程式一切正常,它將列印以下訊息:
Inside SpellChecker constructor.
Inside checkSpelling.
Spring DI - 構造器自動裝配
此模式與byType非常相似,但它適用於建構函式引數。Spring 容器檢視在 XML 配置檔案中autowire屬性設定為constructor的 Bean。然後,它嘗試將建構函式的引數與配置檔案中恰好一個 Bean 名稱匹配並連線。如果找到匹配項,它將注入這些 Bean。否則,Bean將不會被連線。
例如,如果在配置檔案中將 Bean 定義設定為按constructor自動裝配,並且它有一個引數為SpellChecker型別的建構函式,Spring 會查詢名為SpellChecker的 Bean 定義,並用它來設定建構函式的引數。您仍然可以使用<constructor-arg>標籤來連線其餘的引數。以下示例將說明這個概念。
示例
以下示例顯示了一個只能使用建構函式進行依賴注入的類TextEditor。
讓我們更新在 Spring DI - 建立專案 一章中建立的專案。我們新增以下檔案:
**TextEditor.java** − 包含SpellChecker作為依賴項的類。
**SpellChecker.java** − 一個依賴類。
MainApp.java - 用於執行和測試的主應用程式。
以下是**TextEditor.java**檔案的內容:
package com.tutorialspoint;

public class TextEditor {
   private SpellChecker spellChecker;
   private String name;

   public TextEditor(SpellChecker spellChecker, String name) {
      this.spellChecker = spellChecker;
      this.name = name;
   }
   public SpellChecker getSpellChecker() {
      return spellChecker;
   }
   public String getName() {
      return name;
   }
   public void spellCheck() {
      spellChecker.checkSpelling();
   }
}
以下是另一個依賴類檔案**SpellChecker.java**的內容:
package com.tutorialspoint;

public class SpellChecker {
   public SpellChecker(){
      System.out.println("Inside SpellChecker constructor." );
   }
   public void checkSpelling(){
      System.out.println("Inside checkSpelling." );
   }
}
以下是**MainApp.java**檔案的內容:
package com.tutorialspoint;

import org.springframework.context.ApplicationContext;
import org.springframework.context.support.ClassPathXmlApplicationContext;

public class MainApp {
   public static void main(String[] args) {
      ApplicationContext context = new ClassPathXmlApplicationContext("applicationcontext.xml");
      TextEditor te = (TextEditor) context.getBean("textEditor");
      te.spellCheck();
   }
}
以下是配置檔案**applicationcontext.xml**,其中包含**按名稱**自動裝配的配置:
<?xml version = "1.0" encoding = "UTF-8"?>

<beans xmlns = "http://www.springframework.org/schema/beans"
   xmlns:xsi = "http://www.w3.org/2001/XMLSchema-instance"
   xsi:schemaLocation = "http://www.springframework.org/schema/beans
   http://www.springframework.org/schema/beans/spring-beans-3.0.xsd">

   <!-- Definition for textEditor bean -->
   <bean id = "textEditor" class = "com.tutorialspoint.TextEditor" autowire = "constructor">
      <constructor-arg name = "name" value = "Generic Text Editor" />
   </bean>

   <!-- Definition for spellChecker bean -->
   <bean id = "spellChecker" class = "com.tutorialspoint.SpellChecker"></bean>
</beans>
輸出
建立原始檔和bean配置檔案後,讓我們執行應用程式。如果應用程式一切正常,它將列印以下訊息:
Inside SpellChecker constructor.
Inside checkSpelling.
Spring DI - 靜態工廠
Spring 提供了一個使用factory-method屬性注入依賴項的選項。
示例
以下示例顯示了一個TextEditor類,它只能使用純基於setter的注入進行依賴注入。
讓我們更新在 Spring DI - 建立專案 一章中建立的專案。我們新增以下檔案:
**TextEditor.java** − 包含SpellChecker作為依賴項的類。
**SpellChecker.java** − 一個依賴類。
MainApp.java - 用於執行和測試的主應用程式。
以下是**TextEditor.java**檔案的內容:
package com.tutorialspoint;

public class TextEditor {
   private SpellChecker spellChecker;
   private String name;

   public void setSpellChecker( SpellChecker spellChecker ){
      this.spellChecker = spellChecker;
   }
   public SpellChecker getSpellChecker() {
      return spellChecker;
   }
   public void setName(String name) {
      this.name = name;
   }
   public String getName() {
      return name;
   }
   public void spellCheck() {
      spellChecker.checkSpelling();
   }
}
以下是另一個依賴類檔案**SpellChecker.java**的內容:
此類的建構函式是私有的。因此,它的物件不能由其他物件使用new運算子直接建立。它有一個靜態工廠方法來獲取例項。
package com.tutorialspoint;

public class SpellChecker {
   private SpellChecker(){
      System.out.println("Inside SpellChecker constructor." );
   }
   public static SpellChecker getInstance() {
      System.out.println("Inside SpellChecker getInstance." );
      return new SpellChecker();
   }
   public void checkSpelling(){
      System.out.println("Inside checkSpelling." );
   }
}
以下是**MainApp.java**檔案的內容:
package com.tutorialspoint;

import org.springframework.context.ApplicationContext;
import org.springframework.context.support.ClassPathXmlApplicationContext;

public class MainApp {
   public static void main(String[] args) {
      ApplicationContext context = new ClassPathXmlApplicationContext("applicationcontext.xml");
      TextEditor te = (TextEditor) context.getBean("textEditor");
      te.spellCheck();
   }
}
以下是配置檔案**applicationcontext.xml**,其中包含**按名稱**自動裝配的配置:
<?xml version = "1.0" encoding = "UTF-8"?>

<beans xmlns = "http://www.springframework.org/schema/beans"
   xmlns:xsi = "http://www.w3.org/2001/XMLSchema-instance"
   xsi:schemaLocation = "http://www.springframework.org/schema/beans
   http://www.springframework.org/schema/beans/spring-beans-3.0.xsd">

   <!-- Definition for textEditor bean -->
   <bean id = "textEditor" class = "com.tutorialspoint.TextEditor" autowire = "byName">
      <property name = "name" value = "Generic Text Editor" />
   </bean>

   <!-- Definition for spellChecker bean -->
   <bean id = "spellChecker" class = "com.tutorialspoint.SpellChecker" factory-method="getInstance"></bean>
</beans>
建立原始檔和bean配置檔案後,讓我們執行應用程式。如果應用程式一切正常,它將列印以下訊息:
Inside SpellChecker getInstance.
Inside SpellChecker constructor.
Inside checkSpelling.
Spring DI - 非靜態工廠
對於非靜態工廠方法,Spring 提供了一個選項,可以使用 factory-method 屬性以及 factory-bean 屬性來注入依賴項。
示例
以下示例顯示了一個TextEditor類,它只能使用純基於setter的注入進行依賴注入。
讓我們更新在 Spring DI - 建立專案 一章中建立的專案。我們新增以下檔案:
**TextEditor.java** − 包含SpellChecker作為依賴項的類。
**SpellChecker.java** − 一個依賴類。
MainApp.java - 用於執行和測試的主應用程式。
以下是**TextEditor.java**檔案的內容:
package com.tutorialspoint;

public class TextEditor {
   private SpellChecker spellChecker;
   private String name;

   public void setSpellChecker( SpellChecker spellChecker ){
      this.spellChecker = spellChecker;
   }
   public SpellChecker getSpellChecker() {
      return spellChecker;
   }
   public void setName(String name) {
      this.name = name;
   }
   public String getName() {
      return name;
   }
   public void spellCheck() {
      spellChecker.checkSpelling();
   }
}
以下是另一個依賴類檔案**SpellChecker.java**的內容:
此類的建構函式是私有的。因此,它的物件不能由其他物件使用new運算子直接建立。它有一個非靜態工廠方法來獲取例項。
package com.tutorialspoint;

public class SpellChecker {
   private SpellChecker(){
      System.out.println("Inside SpellChecker constructor." );
   }
   public SpellChecker getInstance() {
      System.out.println("Inside SpellChecker getInstance." );
      return new SpellChecker();
   }
   public void checkSpelling(){
      System.out.println("Inside checkSpelling." );
   }
}
以下是**MainApp.java**檔案的內容:
package com.tutorialspoint;

import org.springframework.context.ApplicationContext;
import org.springframework.context.support.ClassPathXmlApplicationContext;

public class MainApp {
   public static void main(String[] args) {
      ApplicationContext context = new ClassPathXmlApplicationContext("applicationcontext.xml");
      TextEditor te = (TextEditor) context.getBean("textEditor");
      te.spellCheck();
   }
}
以下是配置檔案**applicationcontext.xml**,其中包含**按名稱**自動裝配的配置:
<?xml version = "1.0" encoding = "UTF-8"?>

<beans xmlns = "http://www.springframework.org/schema/beans"
   xmlns:xsi = "http://www.w3.org/2001/XMLSchema-instance"
   xsi:schemaLocation = "http://www.springframework.org/schema/beans
   http://www.springframework.org/schema/beans/spring-beans-3.0.xsd">

   <!-- Definition for textEditor bean -->
   <bean id = "textEditor" class = "com.tutorialspoint.TextEditor" autowire = "byName">
      <property name = "name" value = "Generic Text Editor" />
   </bean>

   <bean id = "spellCheckFactory" class = "com.tutorialspoint.SpellChecker"></bean>

   <!-- Definition for spellChecker bean -->
   <bean id = "spellChecker" class = "com.tutorialspoint.SpellChecker" factory-method="getInstance">< factory-bean="spellCheckFactory"/bean>
</beans>
輸出
建立原始檔和bean配置檔案後,讓我們執行應用程式。如果應用程式一切正常,它將列印以下訊息:
Inside SpellChecker constructor.
Inside SpellChecker getInstance.
Inside SpellChecker constructor.
Inside checkSpelling.