- Spring Boot ORM 教程
- Spring Boot ORM - 首頁
- Spring Boot ORM - 概述
- 環境設定
- Spring Boot ORM - JPA
- Spring Boot ORM & Spring Data JPA
- Spring Boot ORM - 建立專案
- Application.properties
- Spring Boot ORM - 更新專案
- Spring Boot ORM - 測試Hibernate
- Spring Boot ORM & EclipseLink
- Maven EclipseLink
- 更新 EclipseLink 專案
- Spring Boot ORM - 測試 EclipseLink
- Spring Boot ORM 有用資源
- Spring Boot ORM 快速指南
- Spring Boot ORM - 有用資源
- Spring Boot ORM - 討論
Spring Boot ORM 快速指南
Spring Boot ORM - 概述
Spring 框架與 Hibernate、Java 永續性 API (JPA)、Java 資料物件 (JDO) 和 iBATIS SQL Maps 等 ORM 框架良好整合。Spring 提供資源管理、資料訪問物件 (DAO) 實現和事務策略。Spring 允許透過依賴管理配置 ORM 庫的功能。Spring 維持統一的 DAO 異常層次結構和所有支援的 ORM 庫的通用事務管理。
Spring IoC 容器簡化了 ORM 配置和部署。以下是使用 Spring 框架建立 ORM DAO 的主要優點:
易於測試 - 使用 Spring IoC,可以輕鬆配置 ORM 實現。每個永續性單元都可以獨立測試。
公共資料訪問異常 - Spring 將 ORM 工具異常包裝到一個公共執行時異常 DataAccessException 中。這種方法有助於在適當的層處理大多數永續性異常(不可恢復)。無需處理 ORM 特定的樣板 catch/throws/異常宣告。
通用資源管理 - Spring 應用程式上下文輕鬆管理永續性物件及其配置。例如,Hibernate SessionFactory 例項、JPA EntityManagerFactory 例項、JDBC DataSource 例項、iBatis SQL Maps 配置物件和其他相關物件。Spring 本身處理本地和 JTA 事務管理。
整合事務管理 - Spring AOP 可用於使用 @Transaction 註解或在 XML 配置檔案中指定事務 AOP 建議來使用宣告性 AOP 風格的攔截器包裝 ORM 程式碼。Spring 處理事務語義、異常處理、回滾等。Spring 允許交換事務管理器而不會影響 ORM 程式碼。
Spring Boot ORM - 環境設定
本章將指導您如何準備開發環境以開始使用 Spring 框架的工作。它還將教您如何在設定 Spring 框架之前在您的機器上設定 JDK、Tomcat 和 Eclipse -
步驟 1 - 設定 Java 開發工具包 (JDK)
Java SE 可免費下載。要下載,請點選此處,下載與您的作業系統相容的版本。
按照說明下載 Java,並執行.exe檔案在您的機器上安裝 Java。在您的機器上安裝 Java 後,您需要設定環境變數以指向正確的安裝目錄。
為 Windows 2000/XP 設定路徑
假設您已將 Java 安裝在 c:\Program Files\java\jdk 目錄中 -
右鍵單擊“我的電腦”,然後選擇“屬性”。
在“高階”選項卡下單擊“環境變數”按鈕。
現在,編輯“Path”變數,並將 Java 可執行檔案目錄的路徑新增到其末尾。例如,如果路徑當前設定為C:\Windows\System32,則按以下方式編輯它
C:\Windows\System32;c:\Program Files\java\jdk\bin
為 Windows 95/98/ME 設定路徑
假設您已將 Java 安裝在 c:\Program Files\java\jdk 目錄中 -
編輯“C:\autoexec.bat”檔案,並在末尾新增以下行 -
SET PATH=%PATH%;C:\Program Files\java\jdk\bin
為 Linux、UNIX、Solaris、FreeBSD 設定路徑
應將環境變數 PATH 設定為指向已安裝 Java 二進位制檔案的目錄。如果您遇到問題,請參考您的 shell 文件。
例如,如果您使用 bash 作為您的 shell,那麼您將在您的.bashrc檔案的末尾新增以下行 -
export PATH=/path/to/java:$PATH'
或者,如果您使用整合開發環境 (IDE),例如 Borland JBuilder、Eclipse、IntelliJ IDEA 或 Sun ONE Studio,您將必須編譯並執行一個簡單的程式以確認 IDE 知道您已安裝 Java 的位置。否則,您將必須按照 IDE 文件中給出的說明進行正確的設定。
步驟 2 - 設定 Spring Tool Suite
本教程中的所有示例都是使用 Spring Tool Suite IDE 編寫的。因此,我們建議您應該在您的機器上安裝最新版本的 Spring Tool Suite。
要安裝 Spring Tool Suite IDE,請從www.eclipse.org/downloads下載最新的 Spring Tool Suite 二進位制檔案。下載安裝程式後,將二進位制分發版解壓縮到方便的位置。例如,在 Windows 上為 C:\sts\sts-4.23.1.RELEASE,或在 Linux/Unix 上為 /usr/local/sts/sts-4.23.1.RELEASE,最後適當地設定 PATH 變數。
可以透過在 Windows 機器上執行以下命令啟動 Spring Tool Suite,或者您可以簡單地雙擊 SpringToolSuite4.exe
E:\sts\sts-4.23.1.RELEASE\SpringToolSuite4.exe
可以透過在 Unix(Solaris、Linux 等)機器上執行以下命令啟動 Eclipse -
$/usr/local/sts/sts-4.23.1.RELEASE/SpringToolSuite4
步驟 3 - 設定 Spring Boot 專案
現在,如果一切正常,您可以繼續設定 Spring Boot。以下是將 Spring Boot 專案下載並安裝到您的機器上的簡單步驟。
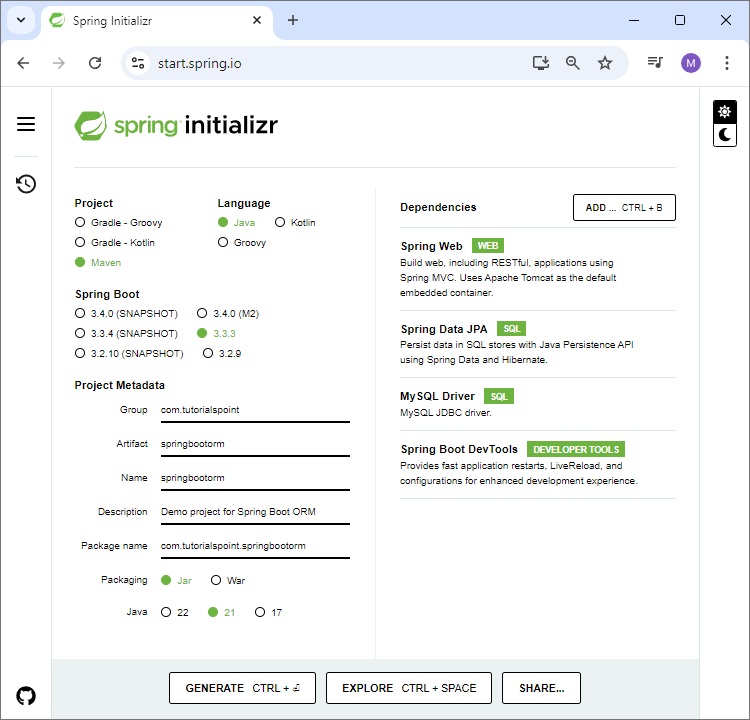
轉到 spring Initializr 連結以建立 spring boot 專案,https://start.spring.io/。
選擇專案為Maven 專案。
選擇語言為Java。
選擇 Spring Boot 版本為3.3.3。
設定專案元資料 - Group 為com.tutorialspoint,Artifact 為springbootorm,name 為springboot-h2,Description 為Spring Boot ORM 演示專案,包名為com.tutorialspoint.springbootorm。
選擇打包方式為Jar。
選擇 java 為21。
新增依賴項為Spring Web、Spring Data JPA、H2 資料庫和 Spring Boot DevTools。
現在單擊“生成”按鈕以生成專案結構。
下載基於 maven 的 spring boot 專案後,將 maven 專案匯入 eclipse,其餘的 eclipse 將會處理。它將下載 maven 依賴項並構建專案,使其準備好進行進一步開發。
步驟 4 - 用於 REST API 測試的 POSTMAN
POSTMAN 是一個用於測試基於 REST 的 API 的有用工具。要安裝 POSTMAN,請從www.postman.com/downloads/下載最新的 POSTMAN 二進位制檔案。下載可安裝檔案後,按照說明進行安裝和使用。
Spring Boot ORM - JPA
Java 永續性 API (JPA) 是一組類和介面,允許將 Java 物件與資料庫進行物件/關係對映。在 JPA 中,實體類在persistence.xml檔案中定義。Spring Boot 不使用persistence.xml。而是使用“實體掃描”,這是查詢並將實體類與永續性提供程式註冊的過程。
什麼是實體掃描?
實體發現 - 當提供程式找到帶有@Entity註釋的類時,它會將其識別為永續性實體並將其註冊。
永續性單元 - 然後將發現的實體與永續性單元關聯,永續性單元定義由單個EntityManager管理的一組實體。
掃描包 - JPA 提供程式掃描指定的包或目錄以查詢用@Entity註釋的類。
預設情況下會掃描自動配置的包。
在 Spring Boot 中配置實體掃描
預設掃描 - 預設情況下,Spring Boot 掃描主應用程式類的包及其子包以查詢實體類。
自定義掃描 - 您可以使用 @EntityScan 註解指定要掃描的包。例如
@SpringBootApplication
@EntityScan(basePackages = {"com.example.entities"})
public class Application {
   // ...
}
Spring Data JPA 儲存庫
Spring Data JPA 實現用於從資料庫(關係型、NoSQL 或其他任何資料庫)訪問資料的介面。Spring Data 儲存庫擴充套件自Repository或CrudRepository。
@Repository
public interface EmployeeRepository extends CrudRepository<Employee, Integer>  {
}
建立和刪除資料庫
如果您使用嵌入式資料庫(如 H2、Derby),JPA 資料庫會自動建立。要建立和刪除表,您的 application.properties 應如下所示 -
spring.jpa.hibernate.ddl-auto=create-drop
對映類之間的關聯
關聯對映可以分為兩種型別 -
單向關聯 - 在這種關聯中,只有一個實體持有對另一個實體的引用。例如,一對多或多對一關係。
雙向關聯 - 在雙向關聯中,兩個實體(源和目標)都有一個彼此引用的關係欄位。例如,多對多關係。
一對多關係(單向)
想象一下部門實體及其員工。每個部門都有許多員工,但每個員工只屬於一個部門。
Department.java
package com.tutorialspoint;

import javax.persistence.*;
import java.util.*;

@Entity
public class Department {
   @Id
   private Long id;

   @OneToMany
   @JoinColumn(name = "department_id")
   private List<Employee> employees;

   public Department() {}

   public Long getId() {
      return id;
   }

   public void setId(Long id) {
      this.id = id;
   }
   public List<Employee> getEmployees() {
      return employees;
   }
   public void setEmployees(List<Employee> employees) {
      this.employees = employees;
   }
}
Employee.java
package com.tutorialspoint;

import javax.persistence.Entity;
import javax.persistence.Id;

@Entity
public class Employee {
   @Id
   private Long id;

   public Long getId() {
      return id;
   }

   public void setId(Long id) {
      this.id = id;
   }
}
多對一關係(單向)
考慮一個學生和一個學校。每個學生只能在一個學校註冊,但每個學校可以有多個學生。
Student.java
package com.tutorialspoint;

import javax.persistence.*;

@Entity
public class Student {
   @Id
   @GeneratedValue(strategy = GenerationType.IDENTITY)
   private Long id;
   private String name;

   @ManyToOne
   @JoinColumn(name = "school_id")
   private School school;

   public Long getId() {
      return id;
   }
   public void setId(Long id) {
      this.id = id;
   }
   public String getName() {
      return name;
   }
   public void setName(String name) {
      this.name = name;
   }
   public School getSchool() {
      return school;
   }
   public void setSchool(School school) {
      this.school = school;
   }
}
School.java
package com.tutorialspoint;

import javax.persistence.Entity;
import javax.persistence.Id;
import java.util.List;

@Entity
public class School {
   @Id
   private Long id;
   private List<Student> students;

   public Long getId() {
      return id;
   }
   public void setId(Long id) {
      this.id = id;
   }
   public List<Student> getStudents() {
      return students;
   }
   public void setStudents(List<Student> students) {
      this.students = students;
   }
}
多對多關係(雙向)
在雙向關聯中,兩個實體(源和目標)都有一個彼此引用的關係欄位。想象一下書籍和作者。每本書有一位作者,但每位作者可以編寫多本書。
Book.java
package com.tutorialspoint;

import javax.persistence.*;

@Entity
public class Book {
   @Id
   private Long id;
   private String title;

   @ManyToOne
   @JoinColumn(name = "author_id")
   private Author author;

   public Long getId() {
      return id;
   }
   public void setId(Long id) {
      this.id = id;
   }
   public String getTitle() {
      return title;
   }
   public void setTitle(String title) {
      this.title = title;
   }
   public Author getAuthor() {
      return author;
   }
   public void setAuthor(Author author) {
      this.author = author;
   }
}
Author.java
package com.tutorialspoint;

import javax.persistence.*;
import java.util.List;

@Entity
public class Author {

   @Id
   private Long id;
   private String name;

   @OneToMany(mappedBy = "author")
   private List<Book> books;

   public Long getId() {
      return id;
   }
   public void setId(Long id) {
      this.id = id;
   }
   public String getName() {
      return name;
   }
   public void setName(String name) {
      this.name = name;
   }
   public List<Book> getBooks() {
      return books;
   }
   public void setBooks(List<Book> books) {
      this.books = books;
   }
}
Spring Boot ORM - 建立專案
使用 STS(Spring Tool Suite),選擇檔案->匯入->現有 Maven 專案,然後單擊下一步。
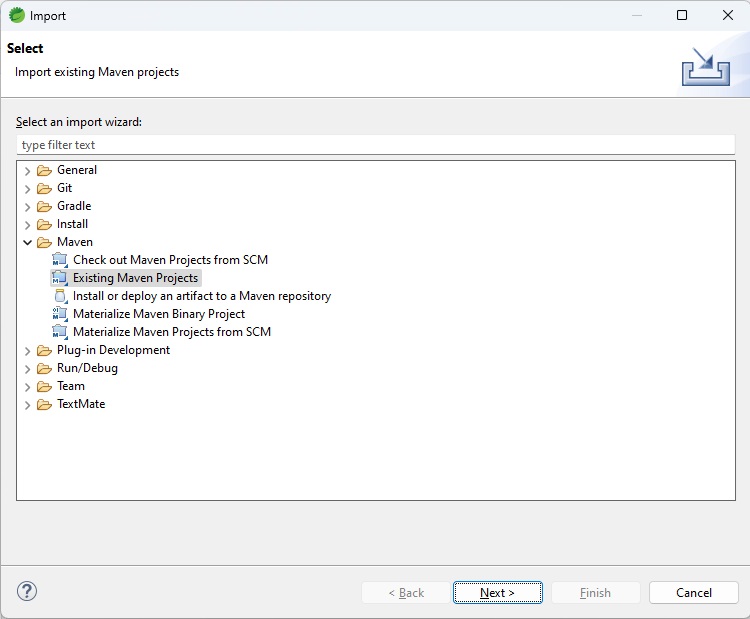
選擇在環境設定期間從 spring initializr 下載並解壓縮的專案,如下所示

單擊“完成”按鈕,將建立一個新專案。

現在我們的專案已準備就緒,讓我們檢查 pom.xml 中的以下依賴項。
Spring Boot 啟動器框架庫
MySQL 聯結器
其他相關依賴項。
由於我們使用的是 spring boot,因此其啟動器專案會自動處理大多數依賴項。
pom.xml
<?xml version="1.0" encoding="UTF-8"?>
<project xmlns="http://maven.apache.org/POM/4.0.0" xmlns:xsi="http://www.w3.org/2001/XMLSchema-instance"
   xsi:schemaLocation="http://maven.apache.org/POM/4.0.0 https://maven.apache.org/xsd/maven-4.0.0.xsd">
   <modelVersion>4.0.0</modelVersion>
   <parent>
      <groupId>org.springframework.boot</groupId>
      <artifactId>spring-boot-starter-parent</artifactId>
      <version>3.3.3</version>
      <relativePath/> <!-- lookup parent from repository -->
   </parent>
   <groupId>com.tutorialspoint</groupId>
   <artifactId>springbootorm</artifactId>
   <version>0.0.1-SNAPSHOT</version>
   <name>springbootorm</name>
   <description>Demo project for Spring Boot ORM</description>
   <url/>
   <licenses>
      <license/>
   </licenses>
   <developers>
      <developer/>
   </developers>
   <scm>
      <connection/>
      <developerConnection/>
      <tag/>
      <url/>
   </scm>
   <properties>
      <java.version>21</java.version>
   </properties>
   <dependencies>
      <dependency>
         <groupId>org.springframework.boot</groupId>
         <artifactId>spring-boot-starter-data-jpa</artifactId>
      </dependency>
      <dependency>
         <groupId>org.springframework.boot</groupId>
         <artifactId>spring-boot-starter-web</artifactId>
      </dependency>
      <dependency>
         <groupId>org.springframework.boot</groupId>
         <artifactId>spring-boot-devtools</artifactId>
         <scope>runtime</scope>
         <optional>true</optional>
      </dependency>
      <dependency>
         <groupId>com.mysql</groupId>
         <artifactId>mysql-connector-j</artifactId>
         <scope>runtime</scope>
      </dependency>
      <dependency>
         <groupId>org.springframework.boot</groupId>
         <artifactId>spring-boot-starter-test</artifactId>
         <scope>test</scope>
      </dependency>
   </dependencies>
   <build>
      <plugins>
         <plugin>
            <groupId>org.springframework.boot</groupId>
            <artifactId>spring-boot-maven-plugin</artifactId>
         </plugin>
      </plugins>
   </build>
</project>
Spring Boot ORM - application.properties
Spring Boot 從 `application.properties` 檔案中讀取應用程式和持久化相關的屬性。在這裡,我們也可以配置Hibernate或其他ORM框架的特定屬性。我們使用通用的屬性,以便可以在不更改太多程式碼的情況下在不同的ORM之間切換。預設情況下,如果在**POM.xml**中未指定其他ORM庫,Spring Boot會將Hibernate配置為ORM提供程式。
在**src -> main -> resources**目錄下建立**application.properties**檔案,並按如下所示更新。
application.properties
spring.application.name=springbootorm
#datasource configurations
spring.datasource.url=jdbc:mysql://:3306/tutorialspoint
spring.datasource.username=root
spring.datasource.password=root@123
spring.datasource.driver-class-name=com.mysql.cj.jdbc.Driver
# show SQL
spring.jpa.show-sql: true
# DDL generation
spring.jpa.generate-ddl=true
以下是application.properties檔案中關鍵屬性的描述。
**spring.datasource** - 資料庫特定屬性,例如連線URL、使用者名稱、密碼、驅動程式類等。
**spring.jpa** - JPA特定屬性,例如顯示SQL,允許建立表等。
Spring Boot ORM - 更新專案
現在讓我們為Spring應用程式新增一個REST API,它可以新增、編輯、刪除和顯示員工資訊。
實體
建立一個名為Employee的實體,以將Employee物件持久化到Employee表。
Employee.java
package com.tutorialspoint.springbootorm.entity;

import jakarta.persistence.Entity;
import jakarta.persistence.GeneratedValue;
import jakarta.persistence.GenerationType;
import jakarta.persistence.Id;

// entity class to persist object to Employee Table
@Entity
public class Employee {

   @Id
   @GeneratedValue(strategy = GenerationType.IDENTITY)
   private int id;
   private String name;
   private int age;
   private String email;

   // setter, getter methods
   public int getId() {
      return id;
   }

   public void setId(int id) {
      this.id = id;
   }

   public String getName() {
      return name;
   }

   public void setName(String name) {
      this.name = name;
   }

   public int getAge() {
      return age;
   }

   public void setAge(int age) {
      this.age = age;
   }

   public String getEmail() {
      return email;
   }

   public void setEmail(String email) {
      this.email = email;
   }
}
倉庫 (Repository)
建立一個倉庫來對Employee物件執行資料庫操作。
EmployeeRepository.java
package com.tutorialspoint.springbootorm.repository;

import org.springframework.data.repository.CrudRepository;
import org.springframework.stereotype.Repository;

import com.tutorialspoint.springbootorm.entity.Employee;

@Repository
public interface EmployeeRepository extends CrudRepository<Employee, Integer>  {
}
服務 (Service)
建立一個服務來呼叫倉庫例項,對Employee物件執行資料庫操作。
EmployeeService.java
package com.tutorialspoint.springbootorm.service;

import java.util.ArrayList;
import java.util.List;

import org.springframework.beans.factory.annotation.Autowired;
import org.springframework.stereotype.Service;

import com.tutorialspoint.springbootorm.entity.Employee;
import com.tutorialspoint.springbootorm.repository.EmployeeRepository;

@Service
public class EmployeeService {

   @Autowired
   EmployeeRepository repository;

   // get an employee by id
   public Employee getEmployeeById(int id) {
      return repository.findById(id).get();
   }

   // get list of all employees
   public List<Employee> getAllEmployees(){
      List<Employee> employees = new ArrayList<Employee>();
      repository.findAll().forEach(employee -> employees.add(employee));
      return employees;
   }

   // create or update an employee
   public void saveOrUpdate(Employee employee) {
      repository.save(employee);
   }

   // delete the employee
   public void deleteEmployeeById(int id) {
      repository.deleteById(id);
   }
}
控制器 (Controller)
為REST API建立一個控制器。
EmployeeController.java
package com.tutorialspoint.springbootorm.controller;

import java.util.List;

import org.springframework.beans.factory.annotation.Autowired;
import org.springframework.web.bind.annotation.DeleteMapping;
import org.springframework.web.bind.annotation.GetMapping;
import org.springframework.web.bind.annotation.PathVariable;
import org.springframework.web.bind.annotation.PostMapping;
import org.springframework.web.bind.annotation.PutMapping;
import org.springframework.web.bind.annotation.RequestBody;
import org.springframework.web.bind.annotation.RequestMapping;
import org.springframework.web.bind.annotation.RestController;

import com.tutorialspoint.springbootorm.entity.Employee;
import com.tutorialspoint.springbootorm.service.EmployeeService;

@RestController
@RequestMapping(path = "/emp")
public class EmployeeController {

   @Autowired
   EmployeeService employeeService;

   // GET mapping to get all the employees
   @GetMapping("/employees")
   public List<Employee> getAllEmployees(){
      return employeeService.getAllEmployees();
   }

   // GET mapping to get an employee by id
   @GetMapping("/employee/{id}")
   public Employee getEmployee(@PathVariable("id") int id) {
      return employeeService.getEmployeeById(id);
   }

   // DELETE mapping to delete an employee by id
   @DeleteMapping("/employee/{id}")
   public void deleteEmployee(@PathVariable("id") int id) {
      employeeService.deleteEmployeeById(id);
   }

   // POST mapping to create a new employee
   @PostMapping("/employee")
   public void addEmployee(@RequestBody Employee employee) {
      employeeService.saveOrUpdate(employee);
   }

   // PUT mapping to update an employee
   @PutMapping("/employee")
   public void updateEmployee(@RequestBody Employee employee) {
      employeeService.saveOrUpdate(employee);
   }
}
主應用程式
啟動應用程式的主應用程式類。
SpringBootOrmApplication.java
package com.tutorialspoint.springbootorm;

import org.springframework.boot.SpringApplication;
import org.springframework.boot.autoconfigure.SpringBootApplication;

// Main Application
@SpringBootApplication
public class SpringBootOrmApplication {
   public static void main(String[] args) {
      SpringApplication.run(SpringBootOrmApplication.class, args);
   }
}
Spring Boot ORM - 測試專案
現在在STS中,右鍵單擊springbootorm專案,選擇**Run As -> Spring Boot App**上下文 -

輸出
您將在STS控制檯中看到類似的結果。
  .   ____          _            __ _ _
 /\\ / ___'_ __ _ _(_)_ __  __ _ \ \ \ \
( ( )\___ | '_ | '_| | '_ \/ _` | \ \ \ \
 \\/  ___)| |_)| | | | | || (_| |  ) ) ) )
  '  |____| .__|_| |_|_| |_\__, | / / / /
 =========|_|==============|___/=/_/_/_/

[32m :: Spring Boot :: [39m              [2m (v3.3.3)[0;39m

[2m2024-08-28T15:38:41.453+05:30[0;39m [32m INFO[0;39m [35m4760[0;39m [2m---[0;39m [2m[springbootorm] [  restartedMain][0;39m [2m[0;39m[36mc.t.s.SpringbootormApplication          [0;39m [2m:[0;39m Starting SpringbootormApplication using Java 21.0.3 with PID 4760 (E:\springbootorm\target\classes started by Tutorialspoint in E:\springbootorm)
[2m2024-08-28T15:38:41.456+05:30[0;39m [32m INFO[0;39m [35m4760[0;39m [2m---[0;39m [2m[springbootorm] [  restartedMain][0;39m [2m[0;39m[36mc.t.s.SpringbootormApplication          [0;39m [2m:[0;39m No active profile set, falling back to 1 default profile: "default"
[2m2024-08-28T15:38:41.517+05:30[0;39m [32m INFO[0;39m [35m4760[0;39m [2m---[0;39m [2m[springbootorm] [  restartedMain][0;39m [2m[0;39m[36m.e.DevToolsPropertyDefaultsPostProcessor[0;39m [2m:[0;39m Devtools property defaults active! Set 'spring.devtools.add-properties' to 'false' to disable
[2m2024-08-28T15:38:41.517+05:30[0;39m [32m INFO[0;39m [35m4760[0;39m [2m---[0;39m [2m[springbootorm] [  restartedMain][0;39m [2m[0;39m[36m.e.DevToolsPropertyDefaultsPostProcessor[0;39m [2m:[0;39m For additional web related logging consider setting the 'logging.level.web' property to 'DEBUG'
[2m2024-08-28T15:38:42.164+05:30[0;39m [32m INFO[0;39m [35m4760[0;39m [2m---[0;39m [2m[springbootorm] [  restartedMain][0;39m [2m[0;39m[36m.s.d.r.c.RepositoryConfigurationDelegate[0;39m [2m:[0;39m Bootstrapping Spring Data JPA repositories in DEFAULT mode.
[2m2024-08-28T15:38:42.214+05:30[0;39m [32m INFO[0;39m [35m4760[0;39m [2m---[0;39m [2m[springbootorm] [  restartedMain][0;39m [2m[0;39m[36m.s.d.r.c.RepositoryConfigurationDelegate[0;39m [2m:[0;39m Finished Spring Data repository scanning in 43 ms. Found 1 JPA repository interface.
[2m2024-08-28T15:38:42.781+05:30[0;39m [32m INFO[0;39m [35m4760[0;39m [2m---[0;39m [2m[springbootorm] [  restartedMain][0;39m [2m[0;39m[36mo.s.b.w.embedded.tomcat.TomcatWebServer [0;39m [2m:[0;39m Tomcat initialized with port 8080 (http)
[2m2024-08-28T15:38:42.797+05:30[0;39m [32m INFO[0;39m [35m4760[0;39m [2m---[0;39m [2m[springbootorm] [  restartedMain][0;39m [2m[0;39m[36mo.apache.catalina.core.StandardService  [0;39m [2m:[0;39m Starting service [Tomcat]
[2m2024-08-28T15:38:42.797+05:30[0;39m [32m INFO[0;39m [35m4760[0;39m [2m---[0;39m [2m[springbootorm] [  restartedMain][0;39m [2m[0;39m[36mo.apache.catalina.core.StandardEngine   [0;39m [2m:[0;39m Starting Servlet engine: [Apache Tomcat/10.1.28]
[2m2024-08-28T15:38:42.848+05:30[0;39m [32m INFO[0;39m [35m4760[0;39m [2m---[0;39m [2m[springbootorm] [  restartedMain][0;39m [2m[0;39m[36mo.a.c.c.C.[Tomcat].[localhost].[/]      [0;39m [2m:[0;39m Initializing Spring embedded WebApplicationContext
[2m2024-08-28T15:38:42.848+05:30[0;39m [32m INFO[0;39m [35m4760[0;39m [2m---[0;39m [2m[springbootorm] [  restartedMain][0;39m [2m[0;39m[36mw.s.c.ServletWebServerApplicationContext[0;39m [2m:[0;39m Root WebApplicationContext: initialization completed in 1330 ms
[2m2024-08-28T15:38:42.969+05:30[0;39m [32m INFO[0;39m [35m4760[0;39m [2m---[0;39m [2m[springbootorm] [  restartedMain][0;39m [2m[0;39m[36mcom.zaxxer.hikari.HikariDataSource      [0;39m [2m:[0;39m HikariPool-1 - Starting...
[2m2024-08-28T15:38:43.457+05:30[0;39m [32m INFO[0;39m [35m4760[0;39m [2m---[0;39m [2m[springbootorm] [  restartedMain][0;39m [2m[0;39m[36mcom.zaxxer.hikari.pool.HikariPool       [0;39m [2m:[0;39m HikariPool-1 - Added connection com.mysql.cj.jdbc.ConnectionImpl@3c6da728
[2m2024-08-28T15:38:43.459+05:30[0;39m [32m INFO[0;39m [35m4760[0;39m [2m---[0;39m [2m[springbootorm] [  restartedMain][0;39m [2m[0;39m[36mcom.zaxxer.hikari.HikariDataSource      [0;39m [2m:[0;39m HikariPool-1 - Start completed.
[2m2024-08-28T15:38:43.504+05:30[0;39m [32m INFO[0;39m [35m4760[0;39m [2m---[0;39m [2m[springbootorm] [  restartedMain][0;39m [2m[0;39m[36mo.hibernate.jpa.internal.util.LogHelper [0;39m [2m:[0;39m HHH000204: Processing PersistenceUnitInfo [name: default]
[2m2024-08-28T15:38:43.564+05:30[0;39m [32m INFO[0;39m [35m4760[0;39m [2m---[0;39m [2m[springbootorm] [  restartedMain][0;39m [2m[0;39m[36morg.hibernate.Version                   [0;39m [2m:[0;39m HHH000412: Hibernate ORM core version 6.5.2.Final
[2m2024-08-28T15:38:43.600+05:30[0;39m [32m INFO[0;39m [35m4760[0;39m [2m---[0;39m [2m[springbootorm] [  restartedMain][0;39m [2m[0;39m[36mo.h.c.internal.RegionFactoryInitiator   [0;39m [2m:[0;39m HHH000026: Second-level cache disabled
[2m2024-08-28T15:38:43.934+05:30[0;39m [32m INFO[0;39m [35m4760[0;39m [2m---[0;39m [2m[springbootorm] [  restartedMain][0;39m [2m[0;39m[36mo.s.o.j.p.SpringPersistenceUnitInfo     [0;39m [2m:[0;39m No LoadTimeWeaver setup: ignoring JPA class transformer
[2m2024-08-28T15:38:44.909+05:30[0;39m [32m INFO[0;39m [35m4760[0;39m [2m---[0;39m [2m[springbootorm] [  restartedMain][0;39m [2m[0;39m[36mo.h.e.t.j.p.i.JtaPlatformInitiator      [0;39m [2m:[0;39m HHH000489: No JTA platform available (set 'hibernate.transaction.jta.platform' to enable JTA platform integration)
Hibernate: create table employee (id integer not null auto_increment, age integer not null, email varchar(255), name varchar(255), primary key (id)) engine=InnoDB
[2m2024-08-28T15:38:45.141+05:30[0;39m [32m INFO[0;39m [35m4760[0;39m [2m---[0;39m [2m[springbootorm] [  restartedMain][0;39m [2m[0;39m[36mj.LocalContainerEntityManagerFactoryBean[0;39m [2m:[0;39m Initialized JPA EntityManagerFactory for persistence unit 'default'
[2m2024-08-28T15:38:45.431+05:30[0;39m [33m WARN[0;39m [35m4760[0;39m [2m---[0;39m [2m[springbootorm] [  restartedMain][0;39m [2m[0;39m[36mJpaBaseConfiguration$JpaWebConfiguration[0;39m [2m:[0;39m spring.jpa.open-in-view is enabled by default. Therefore, database queries may be performed during view rendering. Explicitly configure spring.jpa.open-in-view to disable this warning
[2m2024-08-28T15:38:45.862+05:30[0;39m [32m INFO[0;39m [35m4760[0;39m [2m---[0;39m [2m[springbootorm] [  restartedMain][0;39m [2m[0;39m[36mo.s.b.d.a.OptionalLiveReloadServer      [0;39m [2m:[0;39m LiveReload server is running on port 35729
[2m2024-08-28T15:38:45.901+05:30[0;39m [32m INFO[0;39m [35m4760[0;39m [2m---[0;39m [2m[springbootorm] [  restartedMain][0;39m [2m[0;39m[36mo.s.b.w.embedded.tomcat.TomcatWebServer [0;39m [2m:[0;39m Tomcat started on port 8080 (http) with context path '/'
[2m2024-08-28T15:38:45.909+05:30[0;39m [32m INFO[0;39m [35m4760[0;39m [2m---[0;39m [2m[springbootorm] [  restartedMain][0;39m [2m[0;39m[36mc.t.s.SpringbootormApplication          [0;39m [2m:[0;39m Started SpringbootormApplication in 4.891 seconds (process running for 5.804)
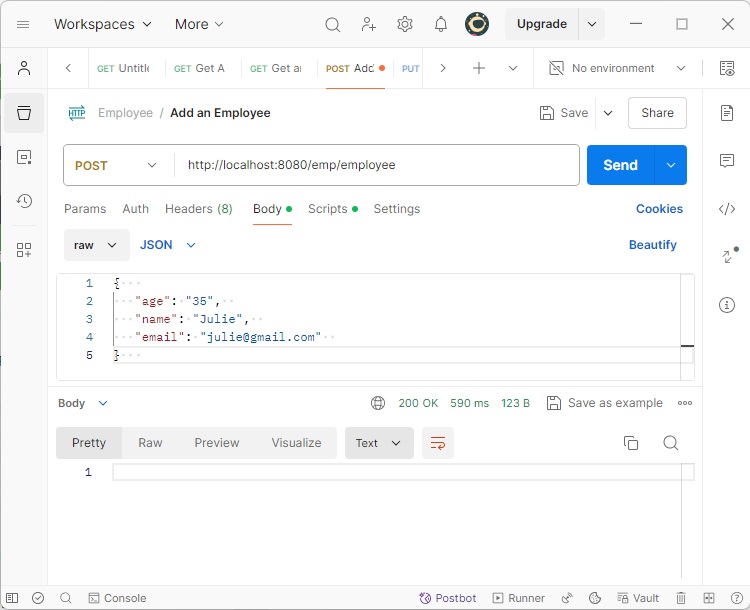
新增員工
伺服器啟動並執行後,使用Postman發出POST請求以首先新增記錄。
在Postman中設定以下引數。
HTTP方法 - **POST**
URL - **https://:8080/emp/employee**
BODY - **員工JSON資料**
{
   "age": "35",
   "name": "Julie",
   "email": "julie@gmail.com"
}
單擊“傳送”按鈕並檢查響應狀態是否為OK。
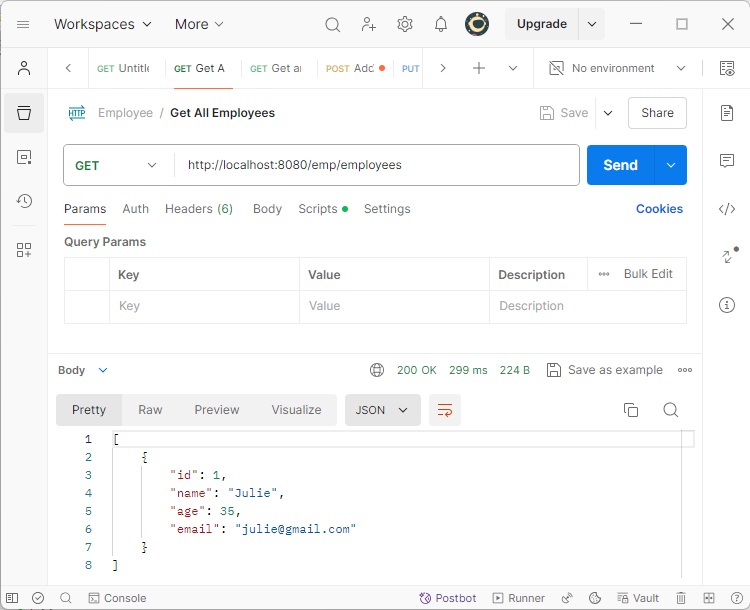
獲取所有員工
現在發出GET請求以獲取所有記錄。
在Postman中設定以下引數。
HTTP方法 - **GET**
URL - **https://:8080/emp/employees**
單擊發送按鈕並驗證響應。
[{
   "id": 1,
   "age": 35,
   "name": "Julie",
   "email": "julie@gmail.com"
}]
Spring Boot ORM - EclipseLink整合
Spring Boot預設使用Hibernate作為ORM實現。為了使用EclipseLink,我們首先需要從**pom.xml**中的**spring-data-jpa**依賴項中排除Hibernate依賴項。
<dependency>
   <groupId>org.springframework.boot</groupId>
   <artifactId>spring-boot-starter-data-jpa</artifactId>
   <exclusions>
      <exclusion>
         <groupId>org.hibernate</groupId>
         <artifactId>hibernate-entitymanager</artifactId>
      </exclusion>
      <exclusion>
         <groupId>org.hibernate</groupId>
         <artifactId>hibernate-core</artifactId>
      </exclusion>
   </exclusions>
</dependency>
現在在**pom.xml**中包含eclipse-link依賴項。
<dependency>
   <groupId>org.eclipse.persistence</groupId>
   <artifactId>org.eclipse.persistence.jpa</artifactId>
   <version>4.0.4</version>
</dependency>
以下是完整的**pom.xml**檔案
pom.xml
<?xml version="1.0" encoding="UTF-8"?>
<project xmlns="http://maven.apache.org/POM/4.0.0" xmlns:xsi="http://www.w3.org/2001/XMLSchema-instance"
   xsi:schemaLocation="http://maven.apache.org/POM/4.0.0 https://maven.apache.org/xsd/maven-4.0.0.xsd">
   <modelVersion>4.0.0</modelVersion>
   <parent>
      <groupId>org.springframework.boot</groupId>
      <artifactId>spring-boot-starter-parent</artifactId>
      <version>3.3.3</version>
      <relativePath/> <!-- lookup parent from repository -->
   </parent>
   <groupId>com.tutorialspoint</groupId>
   <artifactId>springbootorm</artifactId>
   <version>0.0.1-SNAPSHOT</version>
   <name>springbootorm</name>
   <description>Demo project for Spring Boot ORM</description>
   <url/>
   <licenses>
      <license/>
   </licenses>
   <developers>
      <developer/>
   </developers>
   <scm>
      <connection/>
      <developerConnection/>
      <tag/>
      <url/>
   </scm>
   <properties>
      <java.version>21</java.version>
   </properties>
   <dependencies>
      <dependency>
         <groupId>org.springframework.boot</groupId>
         <artifactId>spring-boot-starter-data-jpa</artifactId>
         <exclusions>
            <exclusion>
               <groupId>org.hibernate</groupId>
               <artifactId>hibernate-entitymanager</artifactId>
            </exclusion>
            <exclusion>
               <groupId>org.hibernate</groupId>
               <artifactId>hibernate-core</artifactId>
            </exclusion>
         </exclusions>
      </dependency>
      <dependency>
         <groupId>org.springframework.boot</groupId>
         <artifactId>spring-boot-starter-web</artifactId>
      </dependency>
      <dependency>
         <groupId>org.eclipse.persistence</groupId>
         <artifactId>org.eclipse.persistence.jpa</artifactId>
         <version>4.0.4</version>
      </dependency>
      <dependency>
         <groupId>org.springframework.boot</groupId>
         <artifactId>spring-boot-devtools</artifactId>
         <scope>runtime</scope>
         <optional>true</optional>
      </dependency>
      <dependency>
         <groupId>com.mysql</groupId>
         <artifactId>mysql-connector-j</artifactId>
         <scope>runtime</scope>
      </dependency>
      <dependency>
         <groupId>org.springframework.boot</groupId>
         <artifactId>spring-boot-starter-test</artifactId>
         <scope>test</scope>
      </dependency>
   </dependencies>
   <build>
      <plugins>
         <plugin>
            <groupId>org.springframework.boot</groupId>
            <artifactId>spring-boot-maven-plugin</artifactId>
         </plugin>
      </plugins>
   </build>
</project>
儲存檔案,Eclipse將自動更新依賴項。
Spring Boot ORM - 更新專案以使用EclipseLink
Spring Boot使用**HibernateJpaAutoConfiguration**,預設情況下配置Hibernate實現。為了切換到EclipseLink,我們需要建立一個自定義配置類,該類將擴充套件JpaBaseConfiguration類。JpaBaseConfiguration是用於擴充套件和配置任何ORM實現的JPA的基類。以下是EclipsLinkJpaConfiguration的程式碼。
JPA配置
建立EclipseLink配置類。
EclipsLinkJpaConfiguration.java
package com.tutorialspoint.springbootorm;

import java.util.HashMap;
import java.util.Map;

import javax.sql.DataSource;

import org.eclipse.persistence.config.PersistenceUnitProperties;
import org.eclipse.persistence.logging.SessionLog;
import org.springframework.beans.factory.ObjectProvider;
import org.springframework.boot.autoconfigure.orm.jpa.JpaBaseConfiguration;
import org.springframework.boot.autoconfigure.orm.jpa.JpaProperties;
import org.springframework.context.annotation.Bean;
import org.springframework.context.annotation.Configuration;
import org.springframework.jdbc.datasource.DriverManagerDataSource;
import org.springframework.orm.jpa.vendor.AbstractJpaVendorAdapter;
import org.springframework.orm.jpa.vendor.EclipseLinkJpaVendorAdapter;
import org.springframework.transaction.jta.JtaTransactionManager;

// EclipseLink Specific Configuration Class
@Configuration
public class EclipsLinkJpaConfiguration extends JpaBaseConfiguration {

   protected EclipsLinkJpaConfiguration(DataSource dataSource, JpaProperties properties,
      ObjectProvider<JtaTransactionManager> jtaTransactionManager) {
      super(dataSource, properties, jtaTransactionManager);
   }

   // EclipseLink JPA Adaptor
   @Override
   protected AbstractJpaVendorAdapter createJpaVendorAdapter() {
      return new EclipseLinkJpaVendorAdapter();
   }

   // EclipseLink Properties
   @Override
   protected Map<String, Object> getVendorProperties() {
      Map<String, Object> map = new HashMap<>();
      map.put(PersistenceUnitProperties.WEAVING, "false");
      map.put(PersistenceUnitProperties.LOGGING_LEVEL, SessionLog.FINER_LABEL);
      map.put(PersistenceUnitProperties.DDL_GENERATION, PersistenceUnitProperties.CREATE_ONLY);
      map.put(PersistenceUnitProperties.LOGGING_LEVEL, SessionLog.FINER_LABEL);
      return map;
   }

   // Database Connection properties setup
   @Bean
   public static DataSource dataSource() {
      final DriverManagerDataSource dataSource = new DriverManagerDataSource();
      dataSource.setDriverClassName("com.mysql.cj.jdbc.Driver");
      dataSource.setUrl("jdbc:mysql://:3306/tutorialspoint");
      dataSource.setUsername("root");
      dataSource.setPassword("root@123");
      return dataSource;
   }
}
我們分別使用`createJpaVendorAdapter()`、`dataSource()`和`getVendorProperties()`方法添加了介面卡、資料來源和屬性。
更新實體
同樣更新實體,使用Integer代替int。
Employee.java
package com.tutorialspoint.springbootorm.entity;

import jakarta.persistence.Entity;
import jakarta.persistence.GeneratedValue;
import jakarta.persistence.GenerationType;
import jakarta.persistence.Id;

// entity class to persist object to Employee Table
@Entity
public class Employee {

   @Id
   @GeneratedValue(strategy = GenerationType.IDENTITY)
   private Integer id;
   private String name;
   private Integer age;
   private String email;

   // setter, getter methods
   public Integer getId() {
      return id;
   }

   public void setId(Integer id) {
      this.id = id;
   }

   public String getName() {
      return name;
   }

   public void setName(String name) {
      this.name = name;
   }

   public Integer getAge() {
      return age;
   }

   public void setAge(Integer age) {
      this.age = age;
   }

   public String getEmail() {
      return email;
   }

   public void setEmail(String email) {
      this.email = email;
   }
}
Spring Boot ORM - 測試 EclipseLink
現在在STS中,右鍵單擊springbootorm專案,選擇**Run As -> Spring Boot App**上下文 -
輸出
您將在STS控制檯中看到類似的結果。
  .   ____          _            __ _ _
 /\\ / ___'_ __ _ _(_)_ __  __ _ \ \ \ \
( ( )\___ | '_ | '_| | '_ \/ _` | \ \ \ \
 \\/  ___)| |_)| | | | | || (_| |  ) ) ) )
  '  |____| .__|_| |_|_| |_\__, | / / / /
 =========|_|==============|___/=/_/_/_/

[32m :: Spring Boot :: [39m              [2m (v3.3.3)[0;39m

[2m2024-08-29T09:27:56.504+05:30[0;39m [32m INFO[0;39m [35m4004[0;39m [2m---[0;39m [2m[springbootorm] [  restartedMain][0;39m [2m[0;39m[36mc.t.s.SpringbootormApplication          [0;39m [2m:[0;39m Starting SpringbootormApplication using Java 21.0.3 with PID 4004 (E:\springbootorm\target\classes started by Tutorialspoint in E:\springbootorm)
...
[EL Config]: metadata: 2024-08-29 09:28:00.503--ServerSession(46117356)--Thread(Thread[#38,restartedMain,5,main])--The alias name for the entity class [class com.tutorialspoint.springbootorm.entity.Employee] is being defaulted to: Employee.
[EL Config]: metadata: 2024-08-29 09:28:00.508--ServerSession(46117356)--Thread(Thread[#38,restartedMain,5,main])--The table name for entity [class com.tutorialspoint.springbootorm.entity.Employee] is being defaulted to: EMPLOYEE.
[EL Config]: metadata: 2024-08-29 09:28:00.528--ServerSession(46117356)--Thread(Thread[#38,restartedMain,5,main])--The column name for element [name] is being defaulted to: NAME.
[EL Config]: metadata: 2024-08-29 09:28:00.533--ServerSession(46117356)--Thread(Thread[#38,restartedMain,5,main])--The column name for element [id] is being defaulted to: ID.
[EL Config]: metadata: 2024-08-29 09:28:00.534--ServerSession(46117356)--Thread(Thread[#38,restartedMain,5,main])--The column name for element [age] is being defaulted to: AGE.
[EL Config]: metadata: 2024-08-29 09:28:00.535--ServerSession(46117356)--Thread(Thread[#38,restartedMain,5,main])--The column name for element [email] is being defaulted to: EMAIL.
[EL Finer]: metamodel: 2024-08-29 09:28:00.567--ServerSession(46117356)--Thread(Thread[#38,restartedMain,5,main])--Canonical Metamodel class [com.tutorialspoint.springbootorm.entity.Employee_] not found during initialization.
[2m2024-08-29T09:28:00.568+05:30[0;39m [32m INFO[0;39m [35m4004[0;39m [2m---[0;39m [2m[springbootorm] [  restartedMain][0;39m [2m[0;39m[36mj.LocalContainerEntityManagerFactoryBean[0;39m [2m:[0;39m Initialized JPA EntityManagerFactory for persistence unit 'default'
[EL Finer]: 2024-08-29 09:28:00.634--Thread(Thread[#38,restartedMain,5,main])--initializing session manager
[EL Info]: 2024-08-29 09:28:00.638--ServerSession(46117356)--Thread(Thread[#38,restartedMain,5,main])--EclipseLink, version: Eclipse Persistence Services - 4.0.4.v202407190748-059428cdd2583c46f1f3e50d235854840a6fa9a7
[EL Fine]: connection: 2024-08-29 09:28:01.166--Thread(Thread[#38,restartedMain,5,main])--Detected database platform: org.eclipse.persistence.platform.database.MySQLPlatform
[EL Fine]: connection: 2024-08-29 09:28:01.179--ServerSession(46117356)--Connection(2116562590)--Thread(Thread[#38,restartedMain,5,main])--connecting(DatabaseLogin(
	platform=>MySQLPlatform
	user name=> ""
	connector=>JNDIConnector datasource name=>null
))
[EL Config]: connection: 2024-08-29 09:28:01.225--ServerSession(46117356)--Connection(1122916129)--Thread(Thread[#38,restartedMain,5,main])--Connected: jdbc:mysql://:3306/tutorialspoint
	User: root@localhost
	Database: MySQL  Version: 8.0.39
	Driver: MySQL Connector/J  Version: mysql-connector-j-8.3.0 (Revision: 805f872a57875f311cb82487efcfb070411a3fa0)
[EL Fine]: connection: 2024-08-29 09:28:01.226--ServerSession(46117356)--Connection(610477732)--Thread(Thread[#38,restartedMain,5,main])--connecting(DatabaseLogin(
	platform=>MySQLPlatform
	user name=> ""
	connector=>JNDIConnector datasource name=>null
))
[EL Config]: connection: 2024-08-29 09:28:01.253--ServerSession(46117356)--Connection(1814465297)--Thread(Thread[#38,restartedMain,5,main])--Connected: jdbc:mysql://:3306/tutorialspoint
	User: root@localhost
	Database: MySQL  Version: 8.0.39
	Driver: MySQL Connector/J  Version: mysql-connector-j-8.3.0 (Revision: 805f872a57875f311cb82487efcfb070411a3fa0)
[EL Fine]: connection: 2024-08-29 09:28:01.29--ServerSession(46117356)--Thread(Thread[#38,restartedMain,5,main])--/file:/E:/springbootorm/target/classes/_default login successful
...
[2m2024-08-29T09:28:02.343+05:30[0;39m [32m INFO[0;39m [35m4004[0;39m [2m---[0;39m [2m[springbootorm] [  restartedMain][0;39m [2m[0;39m[36mo.s.b.d.a.OptionalLiveReloadServer      [0;39m [2m:[0;39m LiveReload server is running on port 35729
[2m2024-08-29T09:28:02.377+05:30[0;39m [32m INFO[0;39m [35m4004[0;39m [2m---[0;39m [2m[springbootorm] [  restartedMain][0;39m [2m[0;39m[36mo.s.b.w.embedded.tomcat.TomcatWebServer [0;39m [2m:[0;39m Tomcat started on port 8080 (http) with context path '/'
[2m2024-08-29T09:28:02.385+05:30[0;39m [32m INFO[0;39m [35m4004[0;39m [2m---[0;39m [2m[springbootorm] [  restartedMain][0;39m [2m[0;39m[36mc.t.s.SpringbootormApplication          [0;39m [2m:[0;39m Started SpringbootormApplication in 6.895 seconds (process running for 8.546)
獲取所有員工
現在發出GET請求以獲取所有記錄。
在Postman中設定以下引數。
HTTP方法 - **GET**
URL - **https://:8080/emp/employees**
單擊發送按鈕並驗證響應。
[{
   "id": 1,
   "age": 35,
   "name": "Julie",
   "email": "julie@gmail.com"
}]
您將在STS控制檯中看到類似的更新。
[EL Finer]: connection: 2024-08-29 09:31:20.416--ServerSession(46117356)--Thread(Thread[#50,http-nio-8080-exec-1,5,main])--client acquired: 1215821283
[EL Finer]: transaction: 2024-08-29 09:31:20.43--ClientSession(1215821283)--Thread(Thread[#50,http-nio-8080-exec-1,5,main])--acquire unit of work: 2007319936
[EL Finer]: transaction: 2024-08-29 09:31:20.498--UnitOfWork(2007319936)--Thread(Thread[#50,http-nio-8080-exec-1,5,main])--begin unit of work flush
[EL Finer]: transaction: 2024-08-29 09:31:20.498--UnitOfWork(2007319936)--Thread(Thread[#50,http-nio-8080-exec-1,5,main])--end unit of work flush
[EL Fine]: sql: 2024-08-29 09:31:20.55--ServerSession(46117356)--Connection(135997463)--Thread(Thread[#50,http-nio-8080-exec-1,5,main])--SELECT ID, AGE, EMAIL, NAME FROM EMPLOYEE
[EL Finer]: transaction: 2024-08-29 09:31:20.599--UnitOfWork(2007319936)--Thread(Thread[#50,http-nio-8080-exec-1,5,main])--begin unit of work commit
[EL Finer]: transaction: 2024-08-29 09:31:20.599--UnitOfWork(2007319936)--Thread(Thread[#50,http-nio-8080-exec-1,5,main])--end unit of work commit
[EL Finer]: transaction: 2024-08-29 09:31:20.599--UnitOfWork(2007319936)--Thread(Thread[#50,http-nio-8080-exec-1,5,main])--resume unit of work
[EL Finer]: transaction: 2024-08-29 09:31:20.731--UnitOfWork(2007319936)--Thread(Thread[#50,http-nio-8080-exec-1,5,main])--release unit of work
[EL Finer]: connection: 2024-08-29 09:31:20.731--ClientSession(1215821283)--Thread(Thread[#50,http-nio-8080-exec-1,5,main])--client released