- Koa.js 教程
- Koa.js - 首頁
- Koa.js - 概述
- Koa.js - 環境
- Koa.js - Hello World
- Koa.js - 生成器
- Koa.js - 路由
- Koa.js - URL 構建
- Koa.js - HTTP 方法
- Koa.js - 請求物件
- Koa.js - 響應物件
- Koa.js - 重定向
- Koa.js - 錯誤處理
- Koa.js - 級聯
- Koa.js - 模板引擎
- Koa.js - 表單資料
- Koa.js - 檔案上傳
- Koa.js - 靜態檔案
- Koa.js - Cookie
- Koa.js - 會話
- Koa.js - 身份驗證
- Koa.js - 壓縮
- Koa.js - 快取
- Koa.js - 資料庫
- Koa.js - RESTful API
- Koa.js - 日誌
- Koa.js - 腳手架
- Koa.js - 資源
- Koa.js 有用資源
- Koa.js 快速指南
- Koa.js - 有用資源
- Koa.js - 討論
Koa.js 快速指南
Koa.js - 概述
Web 應用程式框架為您提供了一個簡單的 API 來構建網站、Web 應用和後端。您無需擔心底層協議、流程等。
什麼是 Koa?
Koa 提供了一個最小的介面來構建應用程式。它是一個非常小的框架(600 行程式碼),提供了構建應用程式所需的工具,並且非常靈活。npm 上有大量可用於 Koa 的模組,可以直接插入其中。可以將 Koa 視為 express.js 的核心,去除了所有花裡胡哨的功能。
為什麼選擇 Koa?
Koa 的佔用空間很小(600 行程式碼),並且是在 Node 之上的一層非常薄的抽象層,用於建立伺服器端應用程式。它是完全可插拔的,並且擁有龐大的社群。這也使我們能夠輕鬆擴充套件 Koa 並根據我們的需要使用它。它使用最前沿的技術(ES6)構建,這使其比 express 等舊框架更具優勢。
Pug
Pug(以前稱為 Jade)是一種簡潔的語言,用於編寫 HTML 模板。
- 生成 HTML
- 支援動態程式碼
- 支援可重用性(DRY)
它是 Koa 最流行的模板引擎之一。
MongoDB 和 Mongoose
MongoDB 是一個開源的文件資料庫,旨在簡化開發和擴充套件。我們將使用此資料庫來儲存資料。
Mongoose 是一個 Node.js 客戶端 API,它使我們能夠輕鬆地從 Koa 應用程式訪問我們的資料庫。
Koa.js - 環境
要開始使用 Koa 框架進行開發,您需要安裝 Node 和 npm(Node 包管理器)。如果您還沒有安裝它們,請訪問 Node 設定 在您的本地系統上安裝 Node。透過在終端中執行以下命令確認 Node 和 npm 已安裝。
$ node --version
$ npm --version
您應該會收到類似以下的輸出:
v5.0.0
3.5.2
請確保您的 Node 版本高於 6.5.0。現在我們已經設定了 Node 和 npm,讓我們瞭解一下 npm 是什麼以及如何使用它。
Node 包管理器 (npm)
npm 是 Node 的包管理器。npm 登錄檔是 JavaScript 社群用於 Node.js、前端 Web 應用、移動應用、機器人、路由器以及無數其他需求的開原始碼包的公共集合。npm 允許我們訪問所有這些包並在本地安裝它們。您可以在 npmJS 上瀏覽 npm 上可用的包列表。
如何使用 npm?
有兩種方法可以使用 npm 安裝包:全域性安裝和本地安裝。
全域性安裝 - 此方法通常用於安裝開發工具和基於 CLI 的包。要全域性安裝包,請使用以下命令。
$ npm install -g <package-name>
本地安裝 - 此方法通常用於安裝框架和庫。本地安裝的包只能在其安裝的目錄中使用。要本地安裝包,請使用與上面相同的命令,但不要使用 -g 標誌。
$ npm install <package-name>
每當我們使用 npm 建立專案時,都需要提供一個 package.json 檔案,其中包含我們專案的所有詳細資訊。npm 使我們能夠輕鬆設定此檔案。讓我們設定我們的開發專案。
步驟 1 - 啟動您的終端/cmd,建立一個名為 hello-world 的新資料夾並進入其中:

步驟 2 - 現在要使用 npm 建立 package.json 檔案,請使用以下命令。
npm init
它會詢問您以下資訊:

只需一直按 Enter 鍵,並在“作者姓名”欄位中輸入您的姓名。
步驟 3 - 現在我們已經設定了 package.json 檔案,我們將安裝 Koa。要安裝 Koa 並將其新增到我們的 package.json 檔案中,請使用以下命令。
$ npm install --save koa
要確認 Koa 已正確安裝,請執行以下命令。
$ ls node_modules #(dir node_modules for windows)
提示 - --save 標誌可以替換為 -S 標誌。此標誌確保 Koa 作為依賴項新增到我們的 package.json 檔案中。這樣做的好處是,下次我們需要安裝專案的所有依賴項時,只需執行命令 npm install,它就會在此檔案中找到依賴項併為我們安裝它們。
這就是我們開始使用 Koa 框架進行開發所需的一切。為了使我們的開發過程更容易,我們將從 npm 安裝一個工具 nodemon。此工具的作用是在我們修改任何檔案後立即重新啟動伺服器,否則我們需要在每次檔案修改後手動重新啟動伺服器。要安裝 nodemon,請使用以下命令。
$ npm install -g nodemon
現在我們已經準備好深入學習 Koa 了!
Koa.js - Hello World
完成開發設定後,就可以開始使用 Koa 開發我們的第一個應用程式了。建立一個名為 app.js 的新檔案,並在其中輸入以下內容。
var koa = require('koa');
var app = new koa();

app.use(function* (){
   this.body = 'Hello world!';
});

app.listen(3000, function(){
   console.log('Server running on https://:3000')
});
儲存檔案,轉到終端並輸入。
$ nodemon app.js
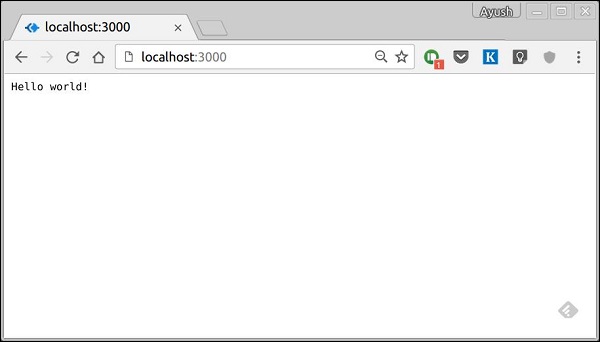
這將啟動伺服器。要測試此應用程式,請開啟瀏覽器並訪問 https://:3000,您應該會收到以下訊息。
此應用程式如何工作?
第一行將 Koa 匯入到我們的檔案中。我們可以透過變數 Koa 訪問其 API。我們用它來建立一個應用程式並將其分配給 var app。
app.use(function) - 此函式是一箇中間件,每當我們的伺服器收到請求時都會呼叫它。我們將在後續章節中詳細瞭解中介軟體。回撥函式是一個生成器,我們將在下一章中看到。此生成器的上下文在 Koa 中稱為上下文。此上下文用於訪問和修改請求和響應物件。我們正在將此響應的主體設定為 Hello world!。
app.listen(port, function) - 此函式繫結並偵聽指定埠上的連線。埠是此處唯一必需的引數。如果應用程式成功執行,則執行回撥函式。
Koa.js - 生成器
JavaScript ES6 最令人興奮的新功能之一是一種新型函式,稱為生成器。在生成器之前,整個指令碼通常用於以自上而下的順序執行,沒有簡單的方法來停止程式碼執行並在稍後恢復相同的堆疊。生成器是可以退出並在以後重新進入的函式。它們的上下文(變數繫結)將在重新進入時儲存。
生成器允許我們在中間停止程式碼執行。因此,讓我們看一下一個簡單的生成器。
var generator_func = function* (){
   yield 1;
   yield 2;
};

var itr = generator_func();
console.log(itr.next());
console.log(itr.next());
console.log(itr.next());
執行上述程式碼時,結果如下。
{ value: 1, done: false }
{ value: 2, done: false }
{ value: undefined, done: true }
讓我們看看上面的程式碼。我們首先建立一個名為 generator_func() 的生成器。我們建立了這個奇怪函式的例項並將其分配給 itr。然後我們開始在 itr 變數上呼叫 next()。
呼叫 next() 會啟動生成器,它會一直執行到遇到 yield。然後它返回一個包含 value 和 done 的物件,其中 value 包含表示式的值。此表示式可以是任何內容。此時,它會暫停執行。再次呼叫此函式(next)時,生成器會從上次 yield 點恢復執行,函式狀態與暫停時的狀態相同,直到下一個 yield 點。這會一直持續到程式碼中沒有更多 yield 點。
Koa 中的生成器
那麼為什麼我們在本教程中討論生成器呢?您可能還記得在 hello world 程式中,我們使用了 function* () 表示法將回調傳遞給 app.use()。Koa 是一個物件,它包含一箇中間件生成器函式陣列,所有這些函式都以堆疊式方式組合並在每次請求時執行。Koa 還實現了控制流的下游和上游。
請檢視以下示例以更好地理解這一點。
var koa = require('koa');
var app = koa();

app.use(function* (next) {
   //do something before yielding to next generator function

   //in line which will be 1st event in downstream
   console.log("1");
   yield next;

   //do something when the execution returns upstream,
   //this will be last event in upstream
   console.log("2");
});
app.use(function* (next) {
   // This shall be 2nd event downstream
   console.log("3");
   yield next;

   // This would be 2nd event upstream
   console.log("4");
});
app.use(function* () {
   // Here it would be last function downstream
   console.log("5");

   // Set response body
   this.body = "Hello Generators";

   // First event of upstream (from the last to first)
   console.log("6");
});

app.listen(3000);
執行上述程式碼並導航到 https://:3000/ 時,我們在控制檯上獲得以下輸出。
1
3
5
6
4
2
這本質上就是 Koa 如何使用生成器。它允許我們使用此屬性建立緊湊的中介軟體併為上游和下游功能編寫程式碼,從而使我們免於回撥。
Koa.js - 路由
Web 框架在不同的路由中提供資源,例如 HTML 頁面、指令碼、影像等。Koa 在核心模組中不支援路由。我們需要使用 Koa-router 模組來輕鬆地在 Koa 中建立路由。使用以下命令安裝此模組。
npm install --save koa-router
現在我們已經安裝了 Koa-router,讓我們來看一個簡單的 GET 路由示例。
var koa = require('koa');
var router = require('koa-router');
var app = koa();

var _ = router();              //Instantiate the router
_.get('/hello', getMessage);   // Define routes

function *getMessage() {
   this.body = "Hello world!";
};

app.use(_.routes());           //Use the routes defined using the router
app.listen(3000);
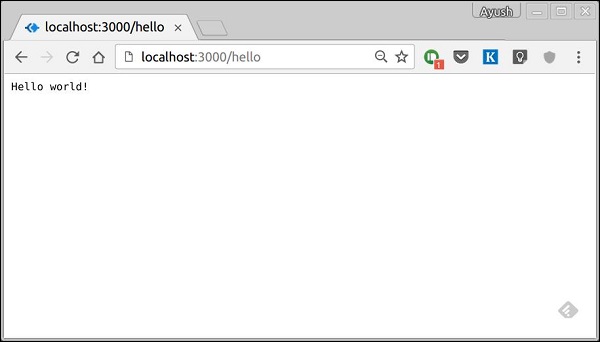
如果我們執行我們的應用程式並轉到 localhost:3000/hello,伺服器將在路由“/hello”處接收一個 get 請求。我們的 Koa 應用程式執行附加到此路由的回撥函式並將“Hello World!”作為響應傳送。
我們還可以在同一路由上使用多種不同的方法。例如,
var koa = require('koa');
var router = require('koa-router');
var app = koa();

var _ = router(); //Instantiate the router

_.get('/hello', getMessage);
_.post('/hello', postMessage);

function *getMessage() {
	this.body = "Hello world!";
};
function *postMessage() {
   this.body = "You just called the post method at '/hello'!\n";
};
app.use(_.routes()); //Use the routes defined using the router
app.listen(3000);
要測試此請求,請開啟終端並使用 cURL 執行以下請求
curl -X POST "https://:3000/hello"

express 提供了一種特殊方法 all,用於使用相同的函式處理特定路由上的所有型別的 http 方法。要使用此方法,請嘗試以下操作:
_.all('/test', allMessage);

function *allMessage(){
   this.body = "All HTTP calls regardless of the verb will get this response";
};
Koa.js - URL 構建
我們現在可以定義路由了;它們是靜態的或固定的。要使用動態路由,我們需要提供不同型別的路由。使用動態路由允許我們傳遞引數並根據它們進行處理。以下是一個動態路由的示例。
var koa = require('koa');
var router = require('koa-router');
var app = koa();

var _ = router();

_.get('/:id', sendID);

function *sendID() {
   this.body = 'The id you specified is ' + this.params.id;
}

app.use(_.routes());
app.listen(3000);
要測試此操作,請轉到 https://:3000/123。您將獲得以下響應。

您可以用任何其他內容替換 URL 中的“123”,它將反映在響應中。以下是上述內容的複雜示例。
var koa = require('koa');
var router = require('koa-router');
var app = koa();

var _ = router();

_.get('/things/:name/:id', sendIdAndName);

function *sendIdAndName(){
   this.body = 'id: ' + this.params.id + ' and name: ' + this.params.name;
};

app.use(_.routes());

app.listen(3000);
要測試此操作,請轉到 https://:3000/things/tutorialspoint/12345。
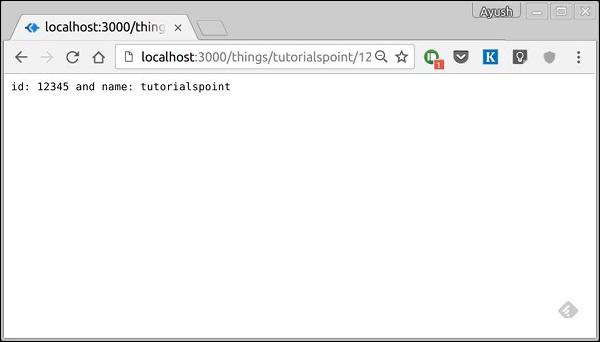
您可以使用 this.params 物件訪問您在 URL 中傳遞的所有引數。請注意,以上兩者具有不同的路徑。它們永遠不會重疊。此外,如果您想在獲得“/things”時執行程式碼,則需要單獨定義它。
模式匹配路由
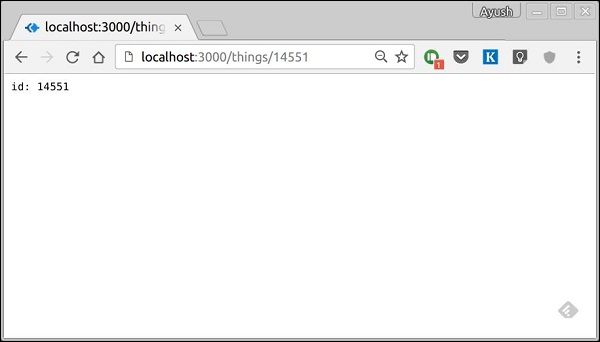
您還可以使用正則表示式來限制 URL 引數匹配。假設您需要 ID 為五位數。您可以使用以下路由定義。
var koa = require('koa');
var router = require('koa-router');
var app = koa();

var _ = router();

_.get('/things/:id([0-9]{5})', sendID);

function *sendID(){
   this.body = 'id: ' + this.params.id;
}

app.use(_.routes());
app.listen(3000);
請注意,這僅匹配具有五位數 ID 的請求。您可以使用更復雜的正則表示式來匹配/驗證您的路由。如果您的任何路由都不匹配請求,您將收到“未找到”訊息作為響應。
例如,如果我們定義與上面相同的路由,則在使用有效 URL 請求時,我們將獲得:
Koa.js - HTTP 方法
HTTP 方法在請求中提供,並指定客戶端請求的操作。下表總結了常用的 HTTP 方法。
| 序號 | 方法及描述 |
|---|---|
| 1 | GET GET 方法請求指定資源的表示形式。使用 GET 的請求應該只檢索資料,並且不應該產生其他影響。 |
| 2 | POST POST 方法請求伺服器接受請求中包含的資料作為 URI 標識的資源的新物件/實體。 |
| 3 |
PUT PUT 方法請求伺服器接受請求中包含的資料作為對 URI 標識的現有物件的修改。如果它不存在,則 PUT 方法應該建立一個。 |
| 4 |
DELETE DELETE 方法請求伺服器刪除指定的資源。 |
這些是最常見的 HTTP 方法。要了解更多資訊,請訪問 https://tutorialspoint.tw/http/http_methods.htm。
Koa.js - 請求物件
Koa Request 物件是 node 原生 request 物件之上的抽象,提供了對日常 HTTP 伺服器開發有用的附加功能。Koa request 物件嵌入在上下文物件 this 中。讓我們在每次收到請求時記錄請求物件。
var koa = require('koa');
var router = require('koa-router');
var app = koa();

var _ = router();

_.get('/hello', getMessage);

function *getMessage(){
   console.log(this.request);
   this.body = 'Your request has been logged.';
}
app.use(_.routes());
app.listen(3000);
當你執行此程式碼並導航到 https://:3000/hello 時,你將收到以下響應。
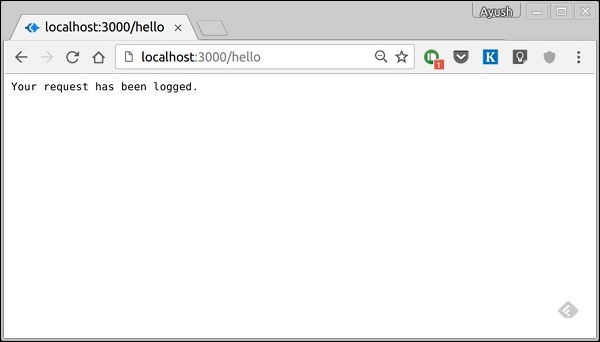
在你的控制檯中,你將看到記錄的請求物件。
{
   method: 'GET',
   url: '/hello/',
   header:
   {
      host: 'localhost:3000',
      connection: 'keep-alive',
      'upgrade-insecure-requests': '1',
      'user-agent': 'Mozilla/5.0 (X11; Linux x86_64)
         AppleWebKit/537.36 (KHTML, like Gecko) Chrome/52.0.2743.116 Safari/537.36',
      accept: 'text/html,application/xhtml+xml,
         application/xml;q = 0.9,image/webp,*/*;q = 0.8',
      dnt: '1',
      'accept-encoding': 'gzip, deflate, sdch',
      'accept-language': 'en-US,en;q = 0.8'
   }
}
我們可以使用此物件訪問請求的許多有用屬性。讓我們看一些例子。
request.header
提供所有請求頭。
request.method
提供請求方法(GET、POST 等)。
request.href
提供完整的請求 URL。
request.path
提供請求的路徑。不包含查詢字串和基本 URL。
request.query
提供解析後的查詢字串。例如,如果我們在如下請求中記錄它 https://:3000/hello/?name=Ayush&age=20&country=India,那麼我們將獲得以下物件。
{
   name: 'Ayush',
   age: '20',
   country: 'India'
}
request.accepts(type)
此函式根據請求的資源是否接受給定的請求型別返回 true 或 false。
你可以在文件中閱讀更多關於 request 物件的資訊 Request。
Koa.js - 響應物件
Koa Response 物件是 node 原生 response 物件之上的抽象,提供了對日常 HTTP 伺服器開發有用的附加功能。Koa response 物件嵌入在上下文物件 this 中。讓我們在每次收到請求時記錄響應物件。
var koa = require('koa');
var router = require('koa-router');
var app = koa();

var _ = router();

_.get('/hello', getMessage);

function *getMessage(){
   this.body = 'Your request has been logged.';
   console.log(this.response);
}

app.use(_.routes());
app.listen(3000);
當你執行此程式碼並導航到 https://:3000/hello 時,你將收到以下響應。
在你的控制檯中,你將看到記錄的請求物件。
{
   status: 200,
   message: 'OK',
   header:
   {
      'content-type': 'text/plain; charset=utf-8',
      'content-length': '12'
   },
   body: 'Your request has been logged.'
}
狀態和訊息由 Koa 自動設定,但我們可以修改它們。如果我們沒有設定響應體,則狀態程式碼設定為 404。一旦我們設定了響應體,狀態程式碼預設設定為 200。我們可以顯式覆蓋此行為。
我們可以使用此物件訪問響應的許多有用屬性。讓我們看一些例子 -
response.header
提供所有響應頭。
response.status
提供響應狀態(200、404、500 等)。此屬性也用於設定響應狀態。
response.message
提供響應訊息。此屬性也用於設定響應的自定義訊息。它與 response.status 相關聯。
response.body
獲取或設定響應體。通常,我們使用上下文物件訪問它。這只是另一種訪問方式。主體可以是以下型別:字串、緩衝區、流、物件或空。
response.type
獲取或設定當前響應的內容型別。
response.get(field)
此函式用於獲取具有不區分大小寫的欄位值的頭的值。
response.set(field, value)
此函式用於使用欄位和值對設定響應上的頭。
response.remove(field)
此函式用於使用欄位名稱取消設定響應上的頭。
你可以在文件中閱讀更多關於 response 物件的資訊 Response。
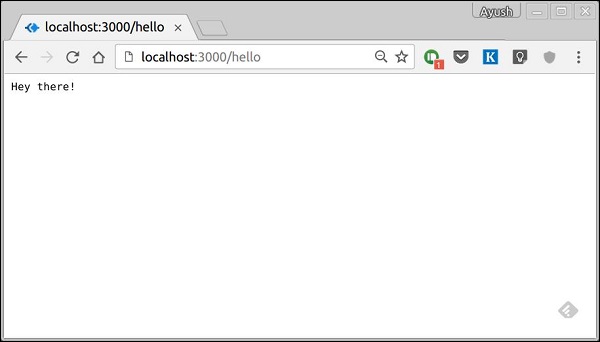
Koa.js - 重定向
重定向在建立網站時非常重要。如果請求了格式錯誤的 URL 或伺服器上出現了一些錯誤,則應將其重定向到相應的錯誤頁面。重定向也可用於阻止使用者訪問網站的受限區域。
讓我們建立一個錯誤頁面,並在有人請求格式錯誤的 URL 時重定向到該頁面。
var koa = require('koa');
var router = require('koa-router');
var app = koa();
var _ = router();

_.get('/not_found', printErrorMessage);
_.get('/hello', printHelloMessage);

app.use(_.routes());
app.use(handle404Errors);

function *printErrorMessage() {
   this.status = 404;
   this.body = "Sorry we do not have this resource.";
}
function *printHelloMessage() {
   this.status = 200;
   this.body = "Hey there!";
}
function *handle404Errors(next) {
   if (404 != this.status) return;
   this.redirect('/not_found');
}
app.listen(3000);
當我們執行此程式碼並導航到除 /hello 之外的任何路由時,我們將被重定向到 /not_found。我們將中介軟體放在最後(對該中介軟體的 app.use 函式呼叫)。這確保我們最後到達中介軟體併發送相應的響應。以下是我們執行上述程式碼時看到的結果。
當我們導航到 https://:3000/hello 時,我們得到 -
如果我們導航到任何其他路由,我們將得到 -

Koa.js - 錯誤處理
錯誤處理在構建 Web 應用程式中起著重要作用。Koa 也為此目的使用中介軟體。
在 Koa 中,你新增一箇中間件,該中介軟體執行 try { yield next } 作為第一個中介軟體之一。如果我們在下游遇到任何錯誤,我們將返回到關聯的 catch 子句並在此處處理錯誤。例如 -
var koa = require('koa');
var app = koa();

//Error handling middleware
app.use(function *(next) {
   try {
      yield next;
   } catch (err) {
      this.status = err.status || 500;
      this.body = err.message;
      this.app.emit('error', err, this);
   }
});

//Create an error in the next middleware
//Set the error message and status code and throw it using context object

app.use(function *(next) {
   //This will set status and message
   this.throw('Error Message', 500);
});

app.listen(3000);
我們在上述程式碼中故意建立了一個錯誤,並在第一個中介軟體的 catch 塊中處理該錯誤。然後將其發出到我們的控制檯並作為響應傳送給我們的客戶端。以下是我們在觸發此錯誤時收到的錯誤訊息。
InternalServerError: Error Message
   at Object.module.exports.throw
      (/home/ayushgp/learning/koa.js/node_modules/koa/lib/context.js:91:23)
   at Object.<anonymous> (/home/ayushgp/learning/koa.js/error.js:18:13)
   at next (native)
   at onFulfilled (/home/ayushgp/learning/koa.js/node_modules/co/index.js:65:19)
   at /home/ayushgp/learning/koa.js/node_modules/co/index.js:54:5
   at Object.co (/home/ayushgp/learning/koa.js/node_modules/co/index.js:50:10)
   at Object.toPromise (/home/ayushgp/learning/koa.js/node_modules/co/index.js:118:63)
   at next (/home/ayushgp/learning/koa.js/node_modules/co/index.js:99:29)
   at onFulfilled (/home/ayushgp/learning/koa.js/node_modules/co/index.js:69:7)
   at /home/ayushgp/learning/koa.js/node_modules/co/index.js:54:5
現在傳送到伺服器的任何請求都將導致此錯誤。
Koa.js - 級聯
中介軟體函式是可以訪問應用程式請求-響應週期中的上下文物件和下一個中介軟體函式的函式。這些函式用於修改請求和響應物件以執行任務,例如解析請求主體、新增響應頭等。Koa 更進一步,先“向下遊”傳遞,然後將控制流回“上游”。這種效果稱為級聯。
以下是在實際操作中的中介軟體函式的簡單示例。
var koa = require('koa');
var app = koa();
var _ = router();

//Simple request time logger
app.use(function* (next) {
   console.log("A new request received at " + Date.now());

   //This function call is very important. It tells that more processing is
   //required for the current request and is in the next middleware function/route handler.
   yield next;
});

app.listen(3000);
上述中介軟體在伺服器上的每個請求都會被呼叫。因此,在每次請求之後,我們將在控制檯中收到以下訊息。
A new request received at 1467267512545
要將其限制在特定路由(及其所有子路由)上,我們只需要像路由一樣建立路由。實際上,正是這些中介軟體處理了我們的請求。
例如,
var koa = require('koa');
var router = require('koa-router');
var app = koa();

var _ = router();

//Simple request time logger
_.get('/request/*', function* (next) {
   console.log("A new request received at " + Date.now());
   yield next;
});

app.use(_.routes());
app.listen(3000);
現在,每當你請求 '/request' 的任何子路由時,它才會記錄時間。
中介軟體呼叫的順序
Koa 中關於中介軟體最重要的內容之一是,它們在檔案中寫入/包含的順序就是它們在下游執行的順序。一旦我們在中介軟體中遇到 yield 語句,它就會切換到下一個中介軟體,直到到達最後一個。然後我們再次開始向上移動並從 yield 語句恢復函式。
例如,在以下程式碼片段中,第一個函式首先執行到 yield,然後是第二個中介軟體到 yield,然後是第三個。因為這裡沒有更多中介軟體,所以我們開始向上移動,以相反的順序執行,即第三個、第二個、第一個。此示例總結了如何以 Koa 方式使用中介軟體。
var koa = require('koa');
var app = koa();

//Order of middlewares
app.use(first);
app.use(second);
app.use(third);

function *first(next) {
   console.log("I'll be logged first. ");

   //Now we yield to the next middleware
   yield next;

   //We'll come back here at the end after all other middlewares have ended
   console.log("I'll be logged last. ");
};

function *second(next) {
   console.log("I'll be logged second. ");
   yield next;
   console.log("I'll be logged fifth. ");
};

function *third(next) {
   console.log("I'll be logged third. ");
   yield next;
   console.log("I'll be logged fourth. ");
};

app.listen(3000);
當我們在執行此程式碼後訪問 '/' 時,在我們的控制檯中我們將得到 -
I'll be logged first.
I'll be logged second.
I'll be logged third.
I'll be logged fourth.
I'll be logged fifth.
I'll be logged last.
下圖總結了上述示例中實際發生的情況。

現在我們知道了如何建立自己的中介軟體,讓我們討論一些最常用的社群建立的中介軟體。
第三方中介軟體
Express 的第三方中介軟體列表可在此處獲得 here.以下是一些最常用的中介軟體 -
- koa-bodyparser
- koa-router
- koa-static
- koa-compress
我們將在後續章節中討論多箇中間件。
Koa.js - 模板引擎
Pug 是一種模板引擎。模板引擎用於消除伺服器程式碼中 HTML 的混亂,避免無休止地連線字串到現有的 HTML 模板。Pug 是一款非常強大的模板引擎,具有各種功能,例如過濾器、包含、繼承、插值等。這方面內容很多。
要在 Koa 中使用 Pug,我們需要使用以下命令安裝它。
$ npm install --save pug koa-pug
安裝 Pug 後,將其設定為應用程式的模板引擎。將以下程式碼新增到 app.js 檔案中。
var koa = require('koa');
var router = require('koa-router');
var app = koa();

var Pug = require('koa-pug');
var pug = new Pug({
   viewPath: './views',
   basedir: './views',
   app: app //Equivalent to app.use(pug)
});

var _ = router(); //Instantiate the router

app.use(_.routes()); //Use the routes defined using the router
app.listen(3000);
現在,建立一個名為 views 的新目錄。在目錄內,建立一個名為 first_view.pug 的檔案,並在其中輸入以下資料。
doctype html
html
   head
      title = "Hello Pug"
   body
      p.greetings#people Hello Views!
要執行此頁面,請將以下路由新增到您的應用程式中。
_.get('/hello', getMessage); // Define routes

function *getMessage(){
   this.render('first_view');
};
你將收到以下輸出 -

Pug 所做的就是將這個非常簡單的標記轉換為 HTML。我們不需要跟蹤關閉標籤,也不需要使用 class 和 id 關鍵字,而是使用 '.' 和 '#' 來定義它們。上述程式碼首先被轉換為
<!DOCTYPE html>
<html>
   <head>
      <title>Hello Pug</title>
   </head>

   <body>
      <p class = "greetings" id = "people">Hello Views!</p>
   </body>
</html>
Pug 能夠做的不僅僅是簡化 HTML 標記。讓我們探索 Pug 的一些這些功能。
簡單標籤
標籤根據其縮排巢狀。就像在上面的例子中,<title> 縮排在 <head> 標籤內,所以它在其中。但是,<body> 標籤在相同的縮排級別,因此它是 <head> 標籤的同級。
我們不需要關閉標籤。一旦 Pug 遇到相同或外部縮排級別的下一個標籤,它就會為我們關閉標籤。
有三種方法可以在標籤內放置文字 -
- 空格分隔 -
h1 Welcome to Pug
- 管道文字 -
div
   | To insert multiline text,
   | You can use the pipe operator.
- 文字塊 -
div.
   But that gets tedious if you have a lot of text.
   You can use "." at the end of tag to denote block of text.
   To put tags inside this block, simply enter tag in a new line and
   indent it accordingly.
註釋
Pug 使用與 JavaScript(//) 相同的語法來建立註釋。這些註釋被轉換為 HTML 註釋(<!--comment-->)。例如,
//This is a Pug comment
此註釋被轉換為 -
<!--This is a Pug comment-->
屬性
要定義屬性,我們使用用括號括起來的逗號分隔的屬性列表。Class 和 ID 屬性有特殊的表示形式。以下程式碼行涵蓋了為給定 HTML 標籤定義屬性、類和 id。
div.container.column.main#division(width = "100",height = "100")
此程式碼行被轉換為 -
<div class = "container column main" id = "division" width = "100" height = "100"></div>
將值傳遞給模板
當我們渲染一個 Pug 模板時,實際上可以從路由處理程式傳遞一個值,然後在模板中使用它。建立一個新的路由處理程式,程式碼如下。
var koa = require('koa');
var router = require('koa-router');
var app = koa();

var Pug = require('koa-pug');
var pug = new Pug({
   viewPath: './views',
   basedir: './views',
   app: app // equals to pug.use(app) and app.use(pug.middleware)
});

var _ = router(); //Instantiate the router

_.get('//dynamic_view', dynamicMessage); // Define routes

function *dynamicMessage(){
   this.render('dynamic', {
      name: "TutorialsPoint",
      url:"https://tutorialspoint.tw"
   });
};

app.use(_.routes()); //Use the routes defined using the router
app.listen(3000);
然後,在 views 目錄中建立一個新的檢視檔案,命名為 dynamic.pug,使用以下程式碼。
html
   head
      title = name
   body
      h1 = name
      a(href = url) URL
在瀏覽器中開啟 **localhost:3000/dynamic**,以下應該是輸出結果。−

我們也可以在文字中使用這些傳遞的變數。要在標籤文字之間插入傳遞的變數,我們使用 #{variableName} 語法。例如,在上面的示例中,如果要插入 Greetings from TutorialsPoint,則必須使用以下程式碼。
html
   head
      title = name
   body
      h1 Greetings from #{name}
      a(href = url) URL
這種使用值的方法稱為插值。
條件語句
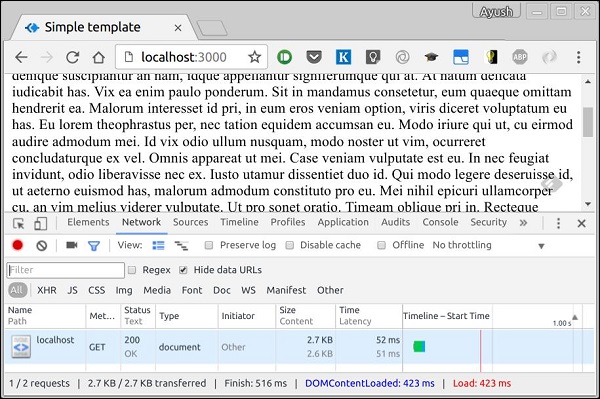
我們也可以使用條件語句和迴圈結構。考慮這個實際示例,如果使用者已登入,我們希望顯示“Hi, User”,否則,我們希望向他顯示“Login/Sign Up”連結。為了實現這一點,我們可以定義一個簡單的模板,例如 −
html
   head
      title Simple template
   body
      if(user)
         h1 Hi, #{user.name}
      else
         a(href = "/sign_up") Sign Up
當我們使用路由渲染它,並且如果我們傳遞一個像這樣的物件 −
this.render('/dynamic',{user:
   {name: "Ayush", age: "20"}
});
它將顯示一條訊息,顯示 Hi, Ayush。但是,如果我們不傳遞任何物件或傳遞一個沒有 user 鍵的物件,那麼我們將得到一個註冊連結。
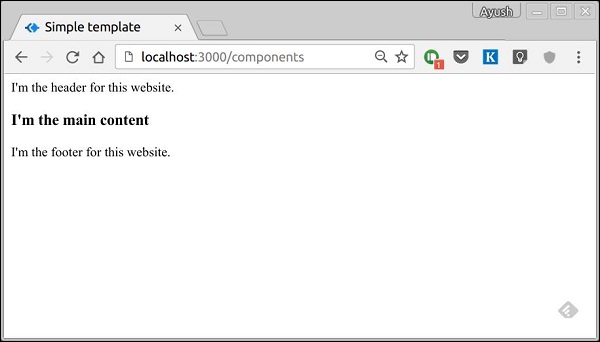
包含和元件
Pug 提供了一種非常直觀的方式來為網頁建立元件。例如,如果您看到一個新聞網站,帶有徽標和類別的標題總是固定的。與其將它複製到每個檢視中,不如使用 include。以下示例顯示瞭如何使用 include −
建立三個具有以下程式碼的檢視 −
header.pug
div.header.
   I'm the header for this website.
content.pug
html
   head
      title Simple template
   body
      include ./header.pug
      h3 I'm the main content
      include ./footer.pug
footer.pug
div.footer.
   I'm the footer for this website.
為此建立一個路由,如下所示。
var koa = require('koa');
var router = require('koa-router');
var app = koa();

var Pug = require('koa-pug');
var pug = new Pug({
   viewPath: './views',
   basedir: './views',
   app: app //Equivalent to app.use(pug)
});

var _ = router(); //Instantiate the router

_.get('/components', getComponents);

function *getComponents(){
   this.render('content.pug');
}

app.use(_.routes()); //Use the routes defined using the router
app.listen(3000);
轉到 **localhost:3000/components**,您應該會看到以下輸出。
**include** 也可以用於包含純文字、CSS 和 JavaScript。
Pug 還有許多其他功能。但是,這些超出了本教程的範圍。您可以在 Pug 上進一步探索 Pug。
Koa.js - 表單資料
表單是 Web 不可或缺的一部分。我們訪問的幾乎每個網站都提供表單,這些表單可以為我們提交或獲取一些資訊。要開始使用表單,我們首先需要安裝 koa-body。要安裝它,請轉到您的終端並使用 −
$ npm install --save koa-body
將您的 app.js 檔案內容替換為以下程式碼。
var koa = require('koa');
var router = require('koa-router');
var bodyParser = require('koa-body');
var app = koa();

//Set up Pug
var Pug = require('koa-pug');
var pug = new Pug({
   viewPath: './views',
   basedir: './views',
   app: app //Equivalent to app.use(pug)
});

//Set up body parsing middleware
app.use(bodyParser({
   formidable:{uploadDir: './uploads'},
   multipart: true,
   urlencoded: true
}));

_.get('/', renderForm);
_.post('/', handleForm);

function * renderForm(){
   this.render('form');
}
function *handleForm(){
   console.log(this.request.body);
   console.log(this.req.body);
   this.body = this.request.body; //This is where the parsed request is stored
}

app.use(_.routes());
app.listen(3000);
我們在這裡做的新的事情是匯入 body 解析器和 multer。我們使用 body 解析器來解析 json 和 x-www-form-urlencoded 標頭請求,而我們使用 multer 來解析 multipart/form-data。
讓我們建立一個 html 表單來測試一下!建立一個名為 form.pug 的新檢視,程式碼如下。
html
   head
      title Form Tester
   body
      form(action = "/", method = "POST")
         div
            label(for = "say") Say:
            input(name = "say" value = "Hi")
         br
         div
            label(for = "to") To:
            input(name = "to" value = "Koa form")
         br
         button(type = "submit") Send my greetings
使用以下命令執行您的伺服器 −
nodemon index.js
現在轉到 localhost:3000/ 並根據需要填寫表單,然後提交。您將收到如下響應 −

檢視您的控制檯,它將向您顯示請求主體作為 JavaScript 物件。例如 −

**this.request.body** 物件包含您解析的請求主體。要使用該物件中的欄位,只需像使用普通 JS 物件一樣使用它們即可。
這只是傳送請求的一種方式。還有許多其他方法,但這裡不相關,因為我們的 Koa 應用程式將以相同的方式處理所有這些請求。要詳細瞭解傳送請求的不同方法,請檢視 此 頁面。
Koa.js - 檔案上傳
Web 應用程式需要提供允許檔案上傳的功能。讓我們看看如何從客戶端接收檔案並在我們的伺服器上儲存它們。
我們已經使用了 koa-body 中介軟體來解析請求。此中介軟體也用於處理檔案上傳。讓我們建立一個允許我們上傳檔案的表單,然後使用 Koa 儲存這些檔案。首先建立一個名為 **file_upload.pug** 的模板,內容如下。
html
   head
      title File uploads
   body
      form(action = "/upload" method = "POST" enctype = "multipart/form-data")
         div
            input(type = "text" name = "name" placeholder = "Name")

         div
            input(type = "file" name = "image")

         div
            input(type = "submit")
請注意,您需要在表單中使用與上面相同的編碼型別。現在讓我們在伺服器上處理這些資料。
var koa = require('koa');
var router = require('koa-router');
var bodyParser = require('koa-body');
var app = koa();

//Set up Pug
var Pug = require('koa-pug');
var pug = new Pug({
   viewPath: './views',
   basedir: './views',
   app: app
});

//Set up body parsing middleware
app.use(bodyParser({
   formidable:{uploadDir: './uploads'},    //This is where the files would come
   multipart: true,
   urlencoded: true
}));

var _ = router(); //Instantiate the router

_.get('/files', renderForm);
_.post('/upload', handleForm);

function * renderForm(){
   this.render('file_upload');
}

function *handleForm(){
   console.log("Files: ", this.request.body.files);
   console.log("Fields: ", this.request.body.fields);
   this.body = "Received your data!"; //This is where the parsed request is stored
}

app.use(_.routes());
app.listen(3000);
當您執行此操作時,您將獲得以下表單。

提交後,您的控制檯將產生以下輸出。

上傳的檔案儲存在上面輸出中的路徑中。您可以使用 **this.request.body.files** 訪問請求中的檔案,並使用 **this.request.body.fields** 訪問該請求中的欄位。
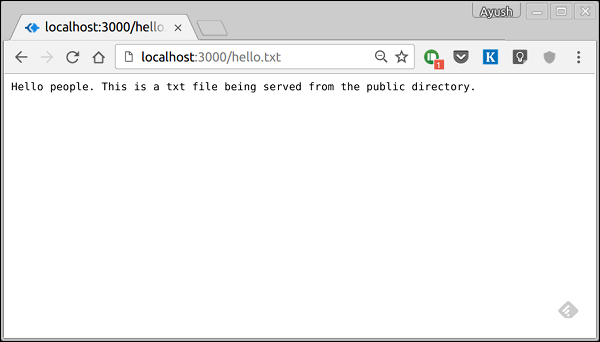
Koa.js - 靜態檔案
靜態檔案是客戶端從伺服器下載的檔案。建立一個新目錄 **public**。Express 預設情況下不允許您提供靜態檔案。
我們需要一箇中間件來服務此目的。繼續安裝 **koa-serve** −
$ npm install --save koa-static
現在我們需要 **使用** 此中介軟體。在此之前,建立一個名為 public 的目錄。我們將在此處儲存所有靜態檔案。這使我們能夠保持伺服器程式碼的安全,因為 public 資料夾以上的內容將無法被客戶端訪問。建立 public 目錄後,在其中建立一個名為 **hello.txt** 的檔案,內容任意。現在將以下內容新增到您的 app.js 中。
var serve = require('koa-static');
var koa = require('koa');
var app = koa();

app.use(serve('./public'));

app.listen(3000);
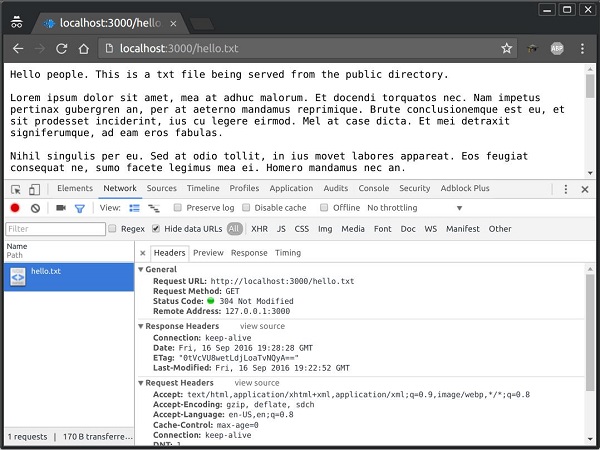
**注意** − Koa 相對靜態目錄查詢檔案,因此靜態目錄的名稱不是 URL 的一部分。根路由現在設定為您的 public 目錄,因此您載入的所有靜態檔案都將考慮 public 作為根目錄。要測試這是否正常工作,請執行您的應用程式並訪問 **https://:3000/hello.txt**
您應該會看到以下輸出。請注意,這不是 HTML 文件或 Pug 檢視,而是一個簡單的 txt 檔案。
多個靜態目錄
我們還可以使用以下方法設定多個靜態資源目錄 −
var serve = require('koa-static');
var koa = require('koa');
var app = koa();

app.use(serve('./public'));
app.use(serve('./images'));

app.listen(3000);
現在,當我們請求檔案時,Koa 將搜尋這些目錄並向我們傳送匹配的檔案。
Koa.js - Cookie
Cookie 是簡單的小檔案/資料,隨伺服器請求傳送到客戶端並在客戶端儲存。每次使用者重新載入網站時,此 Cookie 都會隨請求一起傳送。這有助於跟蹤使用者的操作。HTTP Cookie 有無數種用途。
- 會話管理
- 個性化(推薦系統)
- 使用者跟蹤
要在 Koa 中使用 Cookie,我們有以下函式:**ctx.cookies.set()** 和 **ctx.cookies.get()**。要設定新的 Cookie,讓我們在 Koa 應用程式中定義一個新的路由。
var koa = require('koa');
var router = require('koa-router');
var app = koa();

_.get('/', setACookie);

function *setACookie() {
   this.cookies.set('foo', 'bar', {httpOnly: false});
}

var _ = router();

app.use(_.routes());
app.listen(3000);
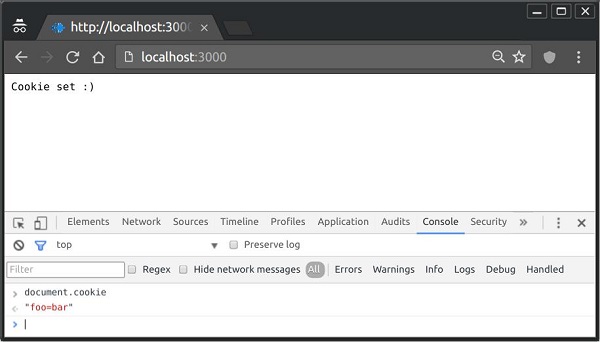
要檢查 Cookie 是否已設定,只需轉到您的瀏覽器,啟動控制檯並輸入 −
console.log(document.cookie);
這將產生以下輸出(您可能還設定了更多 Cookie,可能是由於瀏覽器中的擴充套件程式)。
"foo = bar"
以下是一個上述示例。
瀏覽器每次查詢伺服器時也會發回 Cookie。要在伺服器上檢視 Cookie,請在伺服器控制檯的路由中,將以下程式碼新增到該路由中。
console.log('Cookies: foo = ', this.cookies.get('foo'));
下次您向此路由傳送請求時,您將獲得以下輸出。
Cookies: foo = bar
新增帶有過期時間的 Cookie
您可以新增過期的 Cookie。要新增過期的 Cookie,只需傳遞一個物件,該物件的“expires”屬性設定為您希望它過期的時間即可。例如,
var koa = require('koa');
var router = require('koa-router');
var app = koa();

_.get('/', setACookie);

function *setACookie(){
   //Expires after 360000 ms from the time it is set.
	this.cookies.set('name', 'value', {
      httpOnly: false, expires: 360000 + Date.now() });
}

var _ = router();

app.use(_.routes());
app.listen(3000);
刪除現有 Cookie
要取消設定 Cookie,只需將 Cookie 設定為空字串即可。例如,如果您需要清除名為 **foo** 的 Cookie,請使用以下程式碼。
var koa = require('koa');
var router = require('koa-router');
var app = koa();

_.get('/', setACookie);

function *setACookie(){
   //Expires after 360000 ms from the time it is set.
   this.cookies.set('name', '');
}

var _ = router();

app.use(_.routes());
app.listen(3000);
這將取消設定所述 Cookie。請注意,在客戶端程式碼中不使用 Cookie 時,應保持 **HttpOnly** 選項為 true。
Koa.js - 會話
HTTP 是無狀態的,因此為了將請求與任何其他請求關聯起來,您需要一種方法來在 HTTP 請求之間儲存使用者資料。Cookie 和 URL 引數都是將資料在客戶端和伺服器之間傳輸的合適方法。但是,它們都可以在客戶端讀取。會話恰好解決了這個問題。您為客戶端分配一個 ID,它使用該 ID 進行所有後續請求。與客戶端關聯的資訊儲存在與該 ID 連結的伺服器上。
我們需要 koa-session,因此使用以下命令安裝它 −
npm install --save koa-session
我們將 koa-session 中介軟體到位。在此示例中,我們將使用 RAM 儲存會話。切勿在生產環境中使用此功能。會話中介軟體處理所有內容,即建立會話、設定會話 Cookie 以及在上下文物件中建立會話物件。
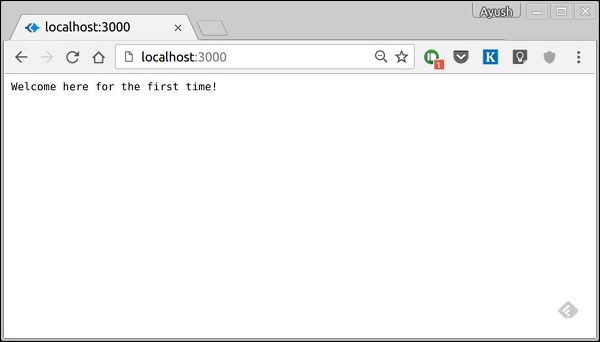
每當我們再次從同一客戶端發出請求時,我們都會將他們的會話資訊儲存在我們這裡(前提是伺服器沒有重新啟動)。我們可以向此會話物件新增更多屬性。在以下示例中,我們將為客戶端建立一個檢視計數器。
var session = require('koa-session');
var koa = require('koa');
var app = koa();

app.keys = ['Shh, its a secret!'];
app.use(session(app));  // Include the session middleware

app.use(function *(){
   var n = this.session.views || 0;
   this.session.views = ++n;

   if(n === 1)
      this.body = 'Welcome here for the first time!';
   else
      this.body = "You've visited this page " + n + " times!";
})

app.listen(3000);
上述程式碼的作用是,當用戶訪問站點時,它會為使用者建立一個新會話並分配一個 Cookie。下次使用者訪問時,將檢查 Cookie 並相應更新 page_view 會話變數。
現在,如果您執行應用程式並轉到 **localhost:3000**,您將收到以下響應。
如果您重新訪問頁面,頁面計數器將增加。在這種情況下,頁面重新整理了 12 次。

Koa.js - 身份驗證
身份驗證是一個過程,其中提供的憑據與本地作業系統或身份驗證伺服器上授權使用者資訊資料庫中的檔案中的憑據進行比較。如果憑據匹配,則該過程完成,並且使用者被授予訪問許可權的授權。
我們將建立一個非常基本的身份驗證系統,它將使用 **基本 HTTP 身份驗證**。這是實施訪問控制的最簡單方法,因為它不需要 Cookie、會話或任何其他內容。要使用此功能,客戶端必須在其發出的每個請求中都發送 Authorization 標頭。使用者名稱和密碼未加密,但連線在一個字串中,如下所示。
username:password
此字串使用 Base64 編碼,並且在該值之前放置單詞 Basic。例如,如果您的使用者名稱是 Ayush,密碼是 India,則字串 **"Ayush:India"** 將以編碼形式傳送到授權標頭中。
Authorization: Basic QXl1c2g6SW5kaWE=
要在您的 koa 應用程式中實現此功能,您需要 koa-basic-auth 中介軟體。使用以下命令安裝它 −
$ npm install --save koa-basic-auth
現在開啟您的 app.js 檔案並在其中輸入以下程式碼。
//This is what the authentication would be checked against
var credentials = { name: 'Ayush', pass: 'India' }

var koa = require('koa');
var auth = require('koa-basic-auth');
var _ = require('koa-router')();

var app = koa();

//Error handling middleware
app.use(function *(next){
   try {
      yield next;
   } catch (err) {
      if (401 == err.status) {
         this.status = 401;
         this.set('WWW-Authenticate', 'Basic');
         this.body = 'You have no access here';
      } else {
         throw err;
      }
   }
});

// Set up authentication here as first middleware.
// This returns an error if user is not authenticated.
_.get('/protected', auth(credentials), function *(){
   this.body = 'You have access to the protected area.';
   yield next;
});

// No authentication middleware present here.
_.get('/unprotected', function*(next){
   this.body = "Anyone can access this area";
   yield next;
});

app.use(_.routes());
app.listen(3000);
我們建立了一個錯誤處理中介軟體來處理所有與身份驗證相關的錯誤。然後,我們建立了 2 個路由 −
**/protected** − 只有當用戶傳送正確的身份驗證標頭時才能訪問此路由。對於所有其他使用者,它將給出錯誤。
**/unprotected** − 任何人都可以訪問此路由,無論是否具有身份驗證。
現在,如果您在沒有身份驗證標頭或使用錯誤的憑據向 /protected 傳送請求,您將收到錯誤。例如,
$ curl https://:3000/protected
您將收到以下響應 −
HTTP/1.1 401 Unauthorized
WWW-Authenticate: Basic
Content-Type: text/plain; charset=utf-8
Content-Length: 28
Date: Sat, 17 Sep 2016 19:05:56 GMT
Connection: keep-alive

Please authenticate yourself
但是,使用正確的憑據,您將獲得預期的響應。例如,
$ curl -H "Authorization: basic QXl1c2g6SW5kaWE=" https://:3000/protected -i
您將收到以下響應 −
HTTP/1.1 200 OK
Content-Type: text/plain; charset=utf-8
Content-Length: 38
Date: Sat, 17 Sep 2016 19:07:33 GMT
Connection: keep-alive

You have access to the protected area.
/unprotected 路由仍然可以被所有人訪問。
Koa.js - 壓縮
壓縮是一種簡單有效的方法,可以節省頻寬並加快網站速度。它僅與現代瀏覽器相容,如果您的使用者也使用舊版瀏覽器,則應謹慎使用。
從伺服器傳送響應時,如果使用壓縮,它可以大大縮短載入時間。我們將使用一個名為 **koa-compress** 的中介軟體來處理檔案的壓縮以及設定適當的標頭。
繼續使用以下命令安裝中介軟體 −
$ npm install --save koa-compress
現在在您的 app.js 檔案中,新增以下程式碼 −
var koa = require('koa');
var router = require('koa-router');
var app = koa();

var Pug = require('koa-pug');
var pug = new Pug({
   viewPath: './views',
   basedir: './views',
   app: app //Equivalent to app.use(pug)
});

app.use(compress({
   filter: function (content_type) {
      return /text/i.test(content_type)
   },
   threshold: 2048,
   flush: require('zlib').Z_SYNC_FLUSH
}));

var _ = router(); //Instantiate the router

_.get('/', getRoot);

function *getRoot(next){
   this.render('index');
}

app.use(_.routes()); //Use the routes defined using the router
app.listen(3000);
這將我們的壓縮中介軟體部署到位。filter 選項是一個函式,它檢查響應內容型別以決定是否進行壓縮。threshold 選項是壓縮的最小響應大小(以位元組為單位)。這確保我們不會壓縮每一個小的響應。
以下是未壓縮的響應。
以下是具有壓縮功能的類似響應。
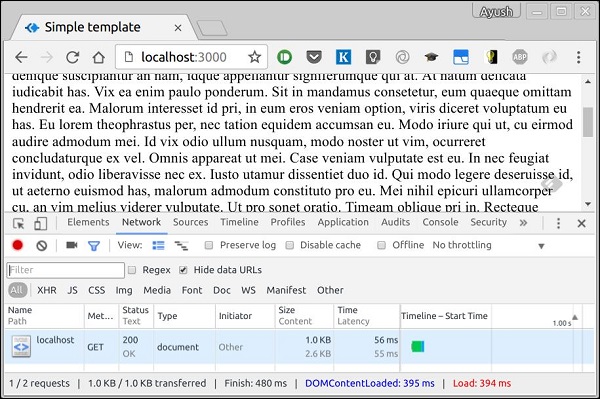
如果您檢視底部的“大小”選項卡,您可以非常清楚地看到兩者之間的區別。當我們壓縮檔案時,效能提升超過 150%。
Koa.js - 快取
快取是指儲存可重用響應以加快後續請求的速度。每個瀏覽器都自帶 HTTP 快取的實現。我們所要做的就是確保每個伺服器響應都提供正確的 HTTP 標頭指令,以指示瀏覽器何時以及快取響應多長時間。
以下是將快取包含在您的 Web 應用中的一些好處:
您的網路成本降低。如果您的內容被快取,您需要為每個後續請求傳送的內容更少。
網站的速度和效能提高。
即使您的客戶端離線,也可以使您的內容可用。
我們將使用 koa-static-cache 中介軟體在我們的應用中實現快取。使用以下命令安裝這些中介軟體:
$ npm install --save koa-static-cache
轉到您的 app.js 檔案,並將以下程式碼新增到其中。
var koa = require('koa');
var app = koa();

var path = require('path');
var staticCache = require('koa-static-cache');

app.use(staticCache(path.join(__dirname, 'public'), {
   maxAge: 365 * 24 * 60 * 60  //Add these files to caches for a year
}))

app.listen(3000);
koa-static-cache 中介軟體用於在客戶端快取伺服器響應。cache-control 標頭根據我們在初始化快取物件時提供的選項進行設定。我們將此快取響應的過期時間設定為 1 年。以下是我們在檔案被快取之前和之後傳送的請求的比較。
在快取此檔案之前,返回的狀態程式碼為 200,表示 OK。響應標頭包含有關要快取的內容的多個資訊,並且還為內容提供了 ETag。

下次傳送請求時,它將與 ETtag 一起傳送。由於我們的內容在伺服器上沒有更改,因此其對應的 ETag 也保持不變,並且客戶端被告知它本地擁有的副本與伺服器將提供的副本是最新的,應該使用本地副本而不是再次請求。
注意:要使任何快取檔案失效,您只需要更改其檔名並更新其引用即可。這將確保您有新的檔案傳送給客戶端,並且客戶端無法從快取中載入它。
Koa.js - 資料庫
我們正在接收請求,但沒有將它們儲存在任何地方。我們需要一個數據庫來儲存資料。我們將使用一個名為 MongoDB 的著名 NoSQL 資料庫。要安裝並瞭解有關 Mongo 的資訊,請訪問此連結。
為了在 Koa 中使用 Mongo,我們需要一個 Node 的客戶端 API。我們有多種選擇,但是對於本教程,我們將堅持使用mongoose。Mongoose 用於 MongoDB 的 Node 中的文件建模。文件建模意味著我們將建立一個模型(類似於面向文件程式設計中的類),然後我們將使用此模型生成文件(就像我們在 OOP 中建立類的文件一樣)。我們所有的處理都將在這些“文件”上完成,最後,我們將這些文件寫入我們的資料庫。
設定 Mongoose
現在我們已經安裝了 Mongo,讓我們以我們安裝其他 Node 包的方式安裝 mongoose。
$ npm install --save mongoose
在開始使用 mongoose 之前,我們必須使用 Mongo shell 建立一個數據庫。要建立新的資料庫,請開啟您的終端並輸入“mongo”。一個 Mongo shell 將啟動,輸入以下內容。
use my_db
將為您建立一個新的資料庫。每當您開啟 Mongo shell 時,它都會預設使用“test”資料庫,您需要使用與上面相同的命令更改到您的資料庫。
要使用 mongoose,我們將在 app.js 檔案中需要它,然後連線到 mongodb:// 上執行的 mongod 服務
var koa = require('koa');
var _ = require('koa-router')();
var app = koa();

var mongoose = require('mongoose');
mongoose.connect('mongodb:///my_db');

app.use(_.routes());
app.listen(3000);
現在我們的應用已連線到我們的資料庫,讓我們建立一個新的模型。此模型將充當我們資料庫中的集合。要建立新的模型,請在定義任何路由之前使用以下程式碼。
var koa = require('koa');
var _ = require('koa-router')();
var app = koa();

var mongoose = require('mongoose');
mongoose.connect('mongodb:///my_db');

var personSchema = mongoose.Schema({
   name: String,
   age: Number,
   nationality: String
});

var Person = mongoose.model("Person", personSchema);

app.use(_.routes());
app.listen(3000);
以上程式碼定義了人的模式,並用於建立 mongoose 模型Person。
儲存文件
現在我們將建立一個新的 HTML 表單,它將獲取一個人的詳細資訊並將其儲存到我們的資料庫中。要建立表單,請在 views 目錄中建立一個名為 person.pug 的新檢視檔案,內容如下。
html
   head
      title Person
   body
      form(action = "/person", method = "POST")
         div
            label(for = "name") Name:
            input(name = "name")
         br
         div
            label(for = "age") Age:
            input(name = "age")
         br
         div
            label(for = "nationality") Nationality:
            input(name = "nationality")
         br
         button(type = "submit") Create new person
還在 index.js 中新增一個新的 get 路由以渲染此文件。
var koa = require('koa');
var _ = require('koa-router')();
var app = koa();

var mongoose = require('mongoose');
mongoose.connect('mongodb:///my_db');

var personSchema = mongoose.Schema({
   name: String,
   age: Number,
   nationality: String
});

var Person = mongoose.model("Person", personSchema);

_.get('/person', getPerson);

function *getPerson(next){
   this.render('person');
   yield next;
}

app.use(_.routes());
app.listen(3000);
轉到 localhost:3000/person 以檢查我們的表單是否顯示正確。請注意,這只是 UI,它還沒有工作。我們的表單如下所示。

我們現在將在 '/person' 上定義一個 post 路由處理程式,它將處理此請求。
var koa = require('koa');
var _ = require('koa-router')();
var app = koa();

var mongoose = require('mongoose');
mongoose.connect('mongodb:///my_db');

var personSchema = mongoose.Schema({
   name: String,
   age: Number,
   nationality: String
});

var Person = mongoose.model("Person", personSchema);

_.post('/person', createPerson);

function *createPerson(next){
   var self = this;
   var personInfo = self.request.body; //Get the parsed information

   if(!personInfo.name || !personInfo.age || !personInfo.nationality){
      self.render(
         'show_message', {message: "Sorry, you provided wrong info", type: "error"});
   } else {
      var newPerson = new Person({
         name: personInfo.name,
         age: personInfo.age,
         nationality: personInfo.nationality
      });
      yield newPerson.save(function(err, res) {
         if(err)
            self.render('show_message',
               {message: "Database error", type: "error"});
         else
            self.render('show_message',
               {message: "New person added", type: "success", person: personInfo});
      });
   }
}

app.use(_.routes());
app.listen(3000);
在上面的程式碼中,如果我們收到任何空欄位或沒有收到任何欄位,我們將傳送錯誤響應。但是,如果我們收到格式良好的文件,那麼我們從 Person 模型建立一個 newPerson 文件,並使用newPerson.save()函式將其儲存到我們的資料庫中。這在 mongoose 中定義,並接受回撥作為引數。此回撥有兩個引數,error 和 response。這將渲染 show_message 檢視,因此我們也需要建立它。
要顯示此路由的響應,我們還需要建立一個show_message檢視。使用以下程式碼建立一個新檢視。
html
   head
      title Person
   body
      if(type = "error")
         h3(style = "color:red") #{message}
      else
         h3 New person, name:
            #{person.name}, age:
            #{person.age} and nationality:
            #{person.nationality} added!
以下是成功提交表單後我們收到的響應(show_message.pug)。

我們現在有一個建立人員的介面!
檢索文件
Mongoose 提供了許多檢索文件的函式,我們將重點介紹其中的三個。所有這些函式也以回撥作為最後一個引數,並且就像 save 函式一樣,它們的 arguments 是 error 和 response。
這三個函式是:
Model.find(conditions, callback)
此函式查詢與 conditions 物件中的欄位匹配的所有文件。在 Mongo 中使用的相同運算子也適用於 mongoose。例如,這將從 persons 集合中獲取所有文件。
Person.find(function(err, response){
   console.log(response);
});
這將獲取 name 欄位為“Ayush”且 age 為 20 的所有文件。
Person.find({name: "Ayush", age: 20},
   function(err, response){
      console.log(response);
   });
我們還可以提供所需的投影,即我們所需的欄位。例如,如果我們只需要 nationality 為“Indian”的人的姓名,則使用:
Person.find({nationality: "Indian"},
   "name", function(err, response) {
      console.log(response);
   });
Model.findOne(conditions, callback)
此函式始終獲取一個最相關的文件。它與 Model.find() 具有完全相同的 arguments。
Model.findById(id, callback)
此函式以_id(由 mongo 定義)作為第一個 arguments,一個可選的投影字串和一個回撥來處理響應。例如,
Person.findById("507f1f77bcf86cd799439011",
   function(err, response){
      console.log(response);
   });
讓我們建立一個路由來檢視所有人員記錄。
var koa = require('koa');
var _ = require('koa-router')();
var app = koa();

var mongoose = require('mongoose');
mongoose.connect('mongodb:///my_db');

var personSchema = mongoose.Schema({
   name: String,
   age: Number,
   nationality: String
});

var Person = mongoose.model("Person", personSchema);

_.get('/people', getPeople);
function *getPeople(next){
   var self = this;

   yield Person.find(function(err, response){
      self.body = response;
   });
}
app.use(_.routes());
app.listen(3000);
更新文件
Mongoose 提供三個函式來更新文件。
Model.update(condition, updates, callback)
此函式以 condition 和 updates 物件作為輸入,並將更改應用於集合中與條件匹配的所有文件。例如,以下程式碼將更新所有 Person 文件,使其 nationality 為“American”。
Person.update({age: 25},
   {nationality: "American"},
   function(err, response){
      console.log(response);
   });
Model.findOneAndUpdate(condition, updates, callback)
它完全按照字面意思執行。根據查詢查詢一個文件,並根據第二個 arguments 更新該文件。它還以回撥作為最後一個 arguments。例如,
Person.findOneAndUpdate({name: "Ayush"},
   {age: 40},
   function(err, response){
      console.log(response);
   });
Model.findByIdAndUpdate(id, updates, callback)
此函式更新由其 id 標識的單個文件。例如,
Person.findByIdAndUpdate("507f1f77bcf86cd799439011",
   {name: "James"},
   function(err, response){
      console.log(response);
   });
讓我們建立一個路由來更新人員。這將是一個 PUT 路由,其 id 作為引數,詳細資訊在有效負載中。
var koa = require('koa');
var _ = require('koa-router')();
var app = koa();
var mongoose = require('mongoose');

mongoose.connect('mongodb:///my_db');

var personSchema = mongoose.Schema({
   name: String,
   age: Number,
   nationality: String
});

var Person = mongoose.model("Person", personSchema);

_.put('/people/:id', updatePerson);

function *updatePerson() {
   var self = this;
   yield Person.findByIdAndUpdate(self.params.id,
      {$set: {self.request.body}}, function(err, response){

      if(err) {
         self.body = {
            message: "Error in updating person with id " + self.params.id};
      } else {
         self.body = response;
      }
   });
}

app.use(_.routes());
app.listen(3000);
要測試此路由,請在您的終端中輸入以下內容(將 id 替換為您建立的人員的 id)。
curl -X PUT --data "name = James&age = 20&nationality = American" https://:3000/people/507f1f77bcf86cd799439011
這將使用以上詳細資訊更新與路由中提供的 id 關聯的文件。
刪除文件
我們已經介紹了Create、Read 和Update,現在我們將瞭解如何使用 mongoose 刪除文件。這裡有三個函式,與 update 完全一樣。
Model.remove(condition, [callback])
此函式以 condition 物件作為輸入,並刪除與條件匹配的所有文件。例如,如果我們需要刪除所有年齡為 20 的人,
Person.remove({age:20});
Model.findOneAndRemove(condition, [callback])
此函式根據 condition 物件刪除一個最相關的文件。例如,
Person.findOneAndRemove({name: "Ayush"});
Model.findByIdAndRemove(id, [callback])
此函式刪除由其 id 標識的單個文件。例如,
Person.findByIdAndRemove("507f1f77bcf86cd799439011");
現在讓我們建立一個路由來從我們的資料庫中刪除人員。
var koa = require('koa');
var _ = require('koa-router')();
var app = koa();

var mongoose = require('mongoose');
mongoose.connect('mongodb:///my_db');

var personSchema = mongoose.Schema({
   name: String,
   age: Number,
   nationality: String
});

var Person = mongoose.model("Person", personSchema);

_.delete('/people/:id', deletePerson);
function *deletePerson(next){
   var self = this;
   yield Person.findByIdAndRemove(self.params.id, function(err, response){
      if(err) {
         self.body = {message: "Error in deleting record id " + self.params.id};
      } else {
         self.body = {message: "Person with id " + self.params.id + " removed."};
      }
   });
}

app.use(_.routes());
app.listen(3000);
要測試它,請使用以下 curl 命令:
curl -X DELETE https://:3000/people/507f1f77bcf86cd799439011
這將刪除具有給定 id 的人員,並生成以下訊息:
{message: "Person with id 507f1f77bcf86cd799439011 removed."}
這總結了我們如何使用 MongoDB、mongoose 和 Koa 建立簡單的 CRUD 應用程式。要進一步探索 mongoose,請閱讀API 文件。
Koa.js - RESTful API
要建立移動應用程式、單頁應用程式,使用 AJAX 呼叫並向客戶端提供資料,您將需要一個 API。一種關於如何構建和命名這些 API 及其端點的流行架構風格稱為REST(表述性狀態轉移)。HTTP 1.1 在設計時就考慮了 REST 原則。REST 由Roy Fielding於 2000 年在其論文 Fielding Dissertations 中提出。
RESTful URI 和方法為我們提供了處理請求所需的大部分資訊。下表總結了如何使用各種動詞以及如何命名 URI。我們將在最後建立一個電影 API,所以讓我們討論一下它將如何構建。
| 方法 | URI | 詳細資訊 | 功能 |
|---|---|---|---|
| GET | /movies | 安全,可快取 | 獲取所有電影及其詳細資訊的列表 |
| GET | /movies/1234 | 安全,可快取 | 獲取電影 ID 1234 的詳細資訊 |
| POST | /movies | N/A | 使用提供的詳細資訊建立一個新的電影。響應包含此新建立資源的 URI。 |
| PUT | /movies/1234 | 冪等 | 修改電影 ID 1234(如果不存在則建立一個)。響應包含此新建立資源的 URI。 |
| DELETE | /movies/1234 | 冪等 | 如果存在,則應刪除電影 ID 1234。響應應包含請求的狀態。 |
| DELETE 或 PUT | /movies | 無效 | 應無效。DELETE 和 PUT 應指定它們正在處理哪個資源。 |
現在讓我們在 Koa 中建立此 API。我們將使用 JSON 作為我們的傳輸資料格式,因為它易於在 JavaScript 中使用,並且具有許多其他優點。將您的 index.js 檔案替換為以下內容:
INDEX.JS
var koa = require('koa');
var router = require('koa-router');
var bodyParser = require('koa-body');

var app = koa();

//Set up body parsing middleware
app.use(bodyParser({
   formidable:{uploadDir: './uploads'},
   multipart: true,
   urlencoded: true
}));

//Require the Router we defined in movies.js
var movies = require('./movies.js');

//Use the Router on the sub route /movies
app.use(movies.routes());

app.listen(3000);
現在我們已經設定好了應用程式,讓我們專注於建立 API。首先設定 movies.js 檔案。我們沒有使用資料庫來儲存電影,而是將它們儲存在記憶體中,因此每次伺服器重啟時,我們新增的電影都會消失。這可以透過使用資料庫或檔案(使用 node fs 模組)輕鬆模擬。
匯入 koa-router,建立一個 Router 並使用 module.exports 匯出它。
var Router = require('koa-router');
var router = Router({
  prefix: '/movies'
});  //Prefixed all routes with /movies

var movies = [
   {id: 101, name: "Fight Club", year: 1999, rating: 8.1},
   {id: 102, name: "Inception", year: 2010, rating: 8.7},
   {id: 103, name: "The Dark Knight", year: 2008, rating: 9},
   {id: 104, name: "12 Angry Men", year: 1957, rating: 8.9}
];

//Routes will go here

module.exports = router;
GET 路由
定義獲取所有電影的 GET 路由。
router.get('/', sendMovies);
function *sendMovies(next){
   this.body = movies;
   yield next;
}
就是這樣。要測試它是否正常工作,請執行您的應用程式,然後開啟終端並輸入 -
curl -i -H "Accept: application/json" -H "Content-Type: application/json" -X GET localhost:3000/movies
您將獲得以下響應 -
[{"id":101,"name":"Fight
Club","year":1999,"rating":8.1},{"id":102,"name":"Inception","year":2010,"rating":8.7},
{"id":103,"name":"The Dark Knight","year":2008,"rating":9},{"id":104,"name":"12 Angry
Men","year":1957,"rating":8.9}]
我們有一個獲取所有電影的路由。現在讓我們建立一個透過其 id 獲取特定電影的路由。
router.get('/:id([0-9]{3,})', sendMovieWithId);

function *sendMovieWithId(next){
   var ctx = this;
   var currMovie = movies.filter(function(movie){
      if(movie.id == ctx.params.id){
         return true;
      }
   });
   if(currMovie.length == 1){
      this.body = currMovie[0];
   } else {
      this.response.status = 404;//Set status to 404 as movie was not found
      this.body = {message: "Not Found"};
   }
   yield next;
}
這將根據我們提供的 id 獲取電影。要測試它,請在您的終端中使用以下命令。
curl -i -H "Accept: application/json" -H "Content-Type: application/json" -X GET localhost:3000/movies/101
您將收到以下響應 −
{"id":101,"name":"Fight Club","year":1999,"rating":8.1}
如果您訪問無效路由,它將產生一個 cannot GET 錯誤,而如果您訪問具有不存在 id 的有效路由,它將產生一個 404 錯誤。
我們完成了 GET 路由。現在,讓我們繼續 POST 路由。
POST 路由
使用以下路由來處理 POST 的資料。
router.post('/', addNewMovie);

function *addNewMovie(next){
   //Check if all fields are provided and are valid:
   if(!this.request.body.name ||
      !this.request.body.year.toString().match(/^[0-9]{4}$/g) ||
      !this.request.body.rating.toString().match(/^[0-9]\.[0-9]$/g)){

      this.response.status = 400;
      this.body = {message: "Bad Request"};
   } else {
      var newId = movies[movies.length-1].id+1;

      movies.push({
         id: newId,
         name: this.request.body.name,
         year: this.request.body.year,
         rating: this.request.body.rating
      });
      this.body = {message: "New movie created.", location: "/movies/" + newId};
   }
   yield next;
}
這將建立一個新的電影並將其儲存在 movies 變數中。要測試此路由,請在您的終端中輸入以下內容 -
curl -X POST --data "name = Toy%20story&year = 1995&rating = 8.5"
https://:3000/movies
您將獲得以下響應 -
{"message":"New movie created.","location":"/movies/105"}
要測試這是否已新增到 movies 物件中,請再次執行 /movies/105 的 get 請求。您將獲得以下響應 -
{"id":105,"name":"Toy story","year":"1995","rating":"8.5"}
讓我們繼續建立 PUT 和 DELETE 路由。
PUT 路由
PUT 路由與 POST 路由幾乎完全相同。我們將為將要更新/建立的物件指定 id。以以下方式建立路由 -
router.put('/:id', updateMovieWithId);

function *updateMovieWithId(next){
   //Check if all fields are provided and are valid:
   if(!this.request.body.name ||
      !this.request.body.year.toString().match(/^[0-9]{4}$/g) ||
      !this.request.body.rating.toString().match(/^[0-9]\.[0-9]$/g) ||
      !this.params.id.toString().match(/^[0-9]{3,}$/g)){

      this.response.status = 400;
      this.body = {message: "Bad Request"};
   } else {
      //Gets us the index of movie with given id.
      var updateIndex = movies.map(function(movie){
         return movie.id;
      }).indexOf(parseInt(this.params.id));

      if(updateIndex === -1){
         //Movie not found, create new movies.push({
            id: this.params.id,
            name: this.request.body.name,
            year: this.request.body.year,
            rating: this.request.body.rating
         });
         this.body = {message: "New movie created.", location: "/movies/" + this.params.id};
      } else {
         //Update existing movie
         movies[updateIndex] = {
            id: this.params.id,
            name: this.request.body.name,
            year: this.request.body.year,
            rating: this.request.body.rating
         };
         this.body = {message: "Movie id " + this.params.id + " updated.", location: "/movies/" + this.params.id};
      }
   }
}
此路由將執行我們在上表中指定的函式。如果物件存在,它將使用新詳細資訊更新物件。如果不存在,它將建立一個新物件。要測試此路由,請使用以下 curl 命令。這將更新現有的電影。要建立新的電影,只需將 id 更改為不存在的 id。
curl -X PUT --data "name = Toy%20story&year = 1995&rating = 8.5"
https://:3000/movies/101
響應
{"message":"Movie id 101 updated.","location":"/movies/101"}
DELETE 路由
使用以下程式碼建立刪除路由。
router.delete('/:id', deleteMovieWithId);

function *deleteMovieWithId(next){
   var removeIndex = movies.map(function(movie){
      return movie.id;
   }).indexOf(this.params.id); //Gets us the index of movie with given id.

   if(removeIndex === -1){
      this.body = {message: "Not found"};
   } else {
      movies.splice(removeIndex, 1);
      this.body = {message: "Movie id " + this.params.id + " removed."};
   }
}
以與其他路由相同的方式測試此路由。成功刪除後(例如 id 105),您將獲得 -
{message: "Movie id 105 removed."}
最後,我們的 movies.js 檔案如下 -
var Router = require('koa-router');
var router = Router({
   prefix: '/movies'
});  //Prefixed all routes with /movies
var movies = [
   {id: 101, name: "Fight Club", year: 1999, rating: 8.1},
   {id: 102, name: "Inception", year: 2010, rating: 8.7},
   {id: 103, name: "The Dark Knight", year: 2008, rating: 9},
   {id: 104, name: "12 Angry Men", year: 1957, rating: 8.9}
];

//Routes will go here
router.get('/', sendMovies);
router.get('/:id([0-9]{3,})', sendMovieWithId);
router.post('/', addNewMovie);
router.put('/:id', updateMovieWithId);
router.delete('/:id', deleteMovieWithId);

function *deleteMovieWithId(next){
   var removeIndex = movies.map(function(movie){
      return movie.id;
   }).indexOf(this.params.id); //Gets us the index of movie with given id.

   if(removeIndex === -1){
      this.body = {message: "Not found"};
   } else {
      movies.splice(removeIndex, 1);
      this.body = {message: "Movie id " + this.params.id + " removed."};
   }
}

function *updateMovieWithId(next) {
   //Check if all fields are provided and are valid:
   if(!this.request.body.name ||
      !this.request.body.year.toString().match(/^[0-9]{4}$/g) ||
      !this.request.body.rating.toString().match(/^[0-9]\.[0-9]$/g) ||
      !this.params.id.toString().match(/^[0-9]{3,}$/g)){

      this.response.status = 400;
      this.body = {message: "Bad Request"};
   } else {
      //Gets us the index of movie with given id.
      var updateIndex = movies.map(function(movie){
         return movie.id;
      }).indexOf(parseInt(this.params.id));

      if(updateIndex === -1){
         //Movie not found, create new
         movies.push({
            id: this.params.id,
            name: this.request.body.name,
            year: this.request.body.year,
            rating: this.request.body.rating
         });
         this.body = {message: "New movie created.", location: "/movies/" + this.params.id};
      } else {
         //Update existing movie
            movies[updateIndex] = {
            id: this.params.id,
            name: this.request.body.name,
            year: this.request.body.year,
            rating: this.request.body.rating
         };
         this.body = {message: "Movie id " + this.params.id + " updated.",
            location: "/movies/" + this.params.id};
      }
   }
}

function *addNewMovie(next){
   //Check if all fields are provided and are valid:
   if(!this.request.body.name ||
      !this.request.body.year.toString().match(/^[0-9]{4}$/g) ||
      !this.request.body.rating.toString().match(/^[0-9]\.[0-9]$/g)){

      this.response.status = 400;
      this.body = {message: "Bad Request"};
   } else {
      var newId = movies[movies.length-1].id+1;

      movies.push({
         id: newId,
         name: this.request.body.name,
         year: this.request.body.year,
         rating: this.request.body.rating
      });
      this.body = {message: "New movie created.", location: "/movies/" + newId};
   }
   yield next;
}
function *sendMovies(next){
   this.body = movies;
   yield next;
}
function *sendMovieWithId(next){
   var ctx = this

   var currMovie = movies.filter(function(movie){
      if(movie.id == ctx.params.id){
         return true;
      }
   });
   if(currMovie.length == 1){
      this.body = currMovie[0];
   } else {
      this.response.status = 404;//Set status to 404 as movie was not found
      this.body = {message: "Not Found"};
   }
   yield next;
}
module.exports = router;
這完成了我們的 REST API。現在您可以使用這種簡單的架構風格和 Koa 建立更復雜的應用程式。
Koa.js - 日誌
在建立 Web 應用程式時,日誌記錄非常有用,因為它們告訴我們哪裡出了問題。我們還獲得了出錯內容的上下文,並且可以提出可能的解決方案。
要在 Koa 中啟用日誌記錄,我們需要中介軟體 koa-logger。使用以下命令安裝它。
$ npm install --save-dev koa-logger
現在在您的應用程式中,新增以下程式碼以啟用日誌記錄。
var logger = require('koa-logger')
var koa = require('koa')

var app = koa()
app.use(logger())

app.use(function*(){
   this.body = "Hello Logger";
})

app.listen(3000)
執行此伺服器並訪問伺服器上的任何路由。您應該看到如下所示的日誌 -

現在,如果您在特定路由或請求上遇到錯誤,這些日誌應該可以幫助您找出每個錯誤的原因。
Koa.js - 腳手架
腳手架使我們能夠輕鬆地建立Web 應用程式的框架。我們手動建立了 public 目錄,添加了中介軟體,建立了單獨的路由檔案等。腳手架工具為我們設定了所有這些內容,以便我們可以直接開始構建應用程式。
我們將使用的腳手架工具稱為Yeoman。它是一個為 Node.js 構建的腳手架工具,但也有幾個其他框架(如 flask、rails、django 等)的生成器。要安裝 yeoman,請在您的終端中輸入以下命令。
$ npm install -g yeoman
Yeoman 使用生成器來構建應用程式。要檢視 npm 上可用於 yeoman 的生成器,請訪問此處。在本教程中,我們將使用“generator-koa”。要安裝此生成器,請在您的終端中輸入以下命令。
$ npm install -g generator-koa
要使用此生成器,請輸入 -
yo koa
然後它將建立一個目錄結構併為您建立以下檔案。它還將為您安裝必要的 npm 模組和 bower 元件。
create package.json
create test/routeSpec.js
create views/layout.html
create views/list.html
create public/styles/main.css
create public/scripts/.gitkeep
create controllers/messages.js
create app.js
create .editorconfig
create .jshintrc

I'm all done. Running npm install & bower install for you to install
the required dependencies.
If this fails, try running the command yourself.
此生成器為我們建立了一個非常簡單的結構。
.
├── controllers
│   └── messages.js
├── public
|   ├── scripts
|   └── styles
|       └── main.css
├── test
|   └── routeSpec.js
├── views
|   ├── layout.html
|   └── list.html
├── .editorconfig
├── .jshintrc
├── app.js
└── package.json
探索 Koa 可用的許多生成器,並選擇最適合您的那個。使用所有生成器的步驟都相同。您需要安裝生成器,使用 yeoman 執行它,它會問您一些問題,然後根據您的答案建立應用程式的框架。
Koa.js - 資源
以下是我們在開發本教程時使用的一些資源 -
Koajs - 示例 社群建立的示例列表
使用 koa.js 的 CRUD API - 一個簡短的螢幕錄影,介紹了在 Koa.js 中建立 CRUD API 的過程。