- JavaMail API 教程
- JavaMail - 首頁
- JavaMail API - 概述
- JavaMail - 環境設定
- JavaMail - 核心類
- JavaMail - 傳送郵件
- JavaMail - 檢查郵件
- JavaMail - 獲取郵件
- JavaMail - 身份驗證
- JavaMail - 回覆郵件
- JavaMail - 轉發郵件
- JavaMail - 刪除郵件
- JavaMail - Gmail SMTP 伺服器
- JavaMail - 資料夾管理
- JavaMail - 配額管理
- JavaMail - 退回郵件
- JavaMail API 協議
- JavaMail - SMTP 伺服器
- JavaMail - IMAP 伺服器
- JavaMail - POP3 伺服器
- JavaMail API 有用資源
- JavaMail - 快速指南
- JavaMail - 有用資源
- JavaMail - 討論
JavaMail API 快速指南
JavaMail API 提供了一個平臺無關且協議無關的框架,用於構建郵件和訊息應用程式。JavaMail API 提供了一組抽象類,定義了構成郵件系統的物件。它是一個可選的包(標準擴充套件),用於讀取、撰寫和傳送電子郵件。
JavaMail 提供了用於構建訊息系統介面的元素,包括系統元件和介面。雖然此規範未定義任何特定實現,但 JavaMail確實包含幾個實現 RFC822 和 MIME 網際網路訊息標準的類。這些類作為 JavaMail 類包的一部分交付。
以下是 JavaMail API 支援的一些協議:
SMTP:簡單郵件傳輸協議的首字母縮寫。它提供了一種傳遞電子郵件的機制。
POP:郵局協議的首字母縮寫。POP 是網際網路上大多數人用於獲取郵件的機制。它定義了對每個使用者單個郵箱的支援。RFC 1939 定義了此協議。
IMAP:網際網路訊息訪問協議的首字母縮寫。它是一種高階的接收郵件協議。除了郵箱可以被多個使用者共享之外,它還為每個使用者提供多個郵箱的支援。它在 RFC 2060 中定義。
MIME:多用途網際網路郵件擴充套件的首字母縮寫。它不是郵件傳輸協議。相反,它定義了傳輸內容:訊息、附件等的格式。這裡有很多不同的文件生效:RFC 822、RFC 2045、RFC 2046 和 RFC 2047。作為 JavaMail API 的使用者,您通常不必擔心這些格式。但是,這些格式確實存在並被您的程式使用。
NNTP 及其他:許多協議由第三方提供商提供。其中一些是網路新聞傳輸協議 (NNTP)、安全多用途網際網路郵件擴充套件 (S/MIME) 等。
這些細節將在後續章節中介紹。
架構
如上所述,Java 應用程式使用 JavaMail API 來撰寫、傳送和接收電子郵件。下圖說明了 JavaMail 的架構。
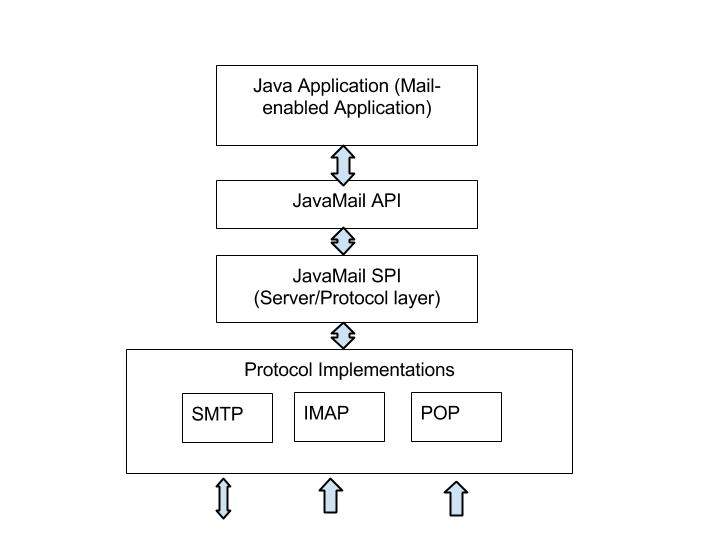
JavaMail API 的抽象機制類似於其他 J2EE API,例如 JDBC、JNDI 和 JMS。如上圖所示,JavaMail API 分為兩個主要部分:
應用程式無關部分:應用程式元件使用應用程式程式設計介面 (API) 來發送和接收郵件訊息,而與底層提供商或使用的協議無關。
服務相關部分:服務提供商介面 (SPI) 使用特定於協議的語言,例如 SMTP、POP、IMAP 和網路新聞傳輸協議 (NNTP)。它用於將電子郵件服務的提供商插入到 J2EE 平臺。
環境設定
使用您的 Java 應用程式傳送電子郵件很簡單,但首先您應該在您的機器上安裝JavaMail API 和Java Activation Framework (JAF)。
僅當您不使用 Java SE 6 或更高版本時,才需要提供javax.activation 包的JavaBeans Activation Framework (JAF) 擴充套件。
您可以從 Java 的標準網站下載最新版本的JavaMail (版本 1.5.0)。
您可以從 Java 的標準網站下載最新版本的JAF (版本 1.1.1)。
下載並解壓縮這些檔案,在新建的頂級目錄中,您將找到這兩個應用程式的許多 jar 檔案。您需要將mail.jar 和activation.jar 檔案新增到您的 CLASSPATH 中。
SMTP 伺服器
要傳送電子郵件,您必須擁有負責傳送郵件的 SMTP 伺服器。您可以使用以下技術之一來獲取 SMTP 伺服器:
安裝並使用任何 SMTP 伺服器,例如 Postfix 伺服器(適用於 Ubuntu)、Apache James 伺服器(Java Apache Mail Enterprise Server)等。(或)
使用主機提供商提供的 SMTP 伺服器,例如:JangoSMTP 網站提供的免費 SMTP 是relay.jangosmtp.net(或)
使用公司提供的 SMTP 伺服器,例如 gmail、yahoo 等。
在後續章節的示例中,我們使用了免費的 JangoSMTP 伺服器來發送電子郵件。您可以訪問此網站建立一個帳戶並配置您的電子郵件地址。
核心類
JavaMail API 包含一些用於傳送、讀取和刪除電子郵件訊息的介面和類。雖然 JavaMail API 中有很多包,但我們將介紹 Java Mail API 中經常使用的兩個主要包:javax.mail 和 javax.mail.internet 包。這些包包含所有 JavaMail 核心類。它們是:
| 類 | 描述 |
|---|---|
| javax.mail.Session | API 的關鍵類。一個多執行緒物件代表連線工廠。 |
| javax.mail.Message | 一個抽象類,它類比電子郵件訊息。子類提供實際的實現。 |
| javax.mail.Address | 一個抽象類,它模擬訊息中的地址(發件人和收件人地址)。子類提供具體的實現。 |
| javax.mail.Authenticator | 一個抽象類,用於保護郵件伺服器上的郵件資源。 |
| javax.mail.Transport | 一個抽象類,它模擬用於傳送電子郵件訊息的訊息傳輸機制。 |
| javax.mail.Store | 一個抽象類,它模擬郵件儲存及其訪問協議,用於儲存和檢索郵件。Store 分為資料夾。 |
| javax.mail.Folder | 一個抽象類,代表郵件訊息的資料夾。它可以包含子資料夾。 |
| javax.mail.internet.MimeMessage | Message 是一個抽象類,因此必須使用子類;在大多數情況下,您將使用 MimeMessage。MimeMessage 是一種瞭解 MIME 型別和標頭的電子郵件訊息。 |
| javax.mail.internet.InternetAddress | 此類使用 RFC822 的語法表示 Internet 電子郵件地址。典型的地址語法形式為user@host.domain 或個人姓名 <user@host.domain>。 |
傳送簡單的電子郵件
這是一個傳送簡單電子郵件的示例。在這裡,我們使用了 JangoSMTP 伺服器,透過它將電子郵件傳送到我們的目標電子郵件地址。“環境設定”章節解釋了設定。
傳送簡單的電子郵件步驟如下:
獲取會話
建立一個預設的 MimeMessage 物件,並在訊息中設定發件人、收件人、主題。
將實際訊息設定為:
message.setText("your text goes here");使用 Transport 物件傳送訊息。
建立 Java 類
建立一個名為SendEmail 的 Java 類檔案,其內容如下:
package com.tutorialspoint;
import java.util.Properties;
import javax.mail.Message;
import javax.mail.MessagingException;
import javax.mail.PasswordAuthentication;
import javax.mail.Session;
import javax.mail.Transport;
import javax.mail.internet.InternetAddress;
import javax.mail.internet.MimeMessage;
public class SendEmail {
public static void main(String[] args) {
// Recipient's email ID needs to be mentioned.
String to = "destinationemail@gmail.com";
// Sender's email ID needs to be mentioned
String from = "fromemail@gmail.com";
final String username = "manishaspatil";//change accordingly
final String password = "******";//change accordingly
// Assuming you are sending email through relay.jangosmtp.net
String host = "relay.jangosmtp.net";
Properties props = new Properties();
props.put("mail.smtp.auth", "true");
props.put("mail.smtp.starttls.enable", "true");
props.put("mail.smtp.host", host);
props.put("mail.smtp.port", "25");
// Get the Session object.
Session session = Session.getInstance(props,
new javax.mail.Authenticator() {
protected PasswordAuthentication getPasswordAuthentication() {
return new PasswordAuthentication(username, password);
}
});
try {
// Create a default MimeMessage object.
Message message = new MimeMessage(session);
// Set From: header field of the header.
message.setFrom(new InternetAddress(from));
// Set To: header field of the header.
message.setRecipients(Message.RecipientType.TO,
InternetAddress.parse(to));
// Set Subject: header field
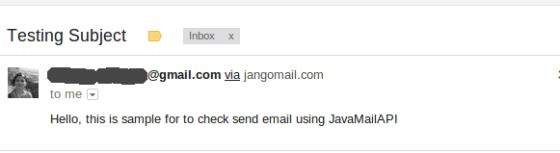
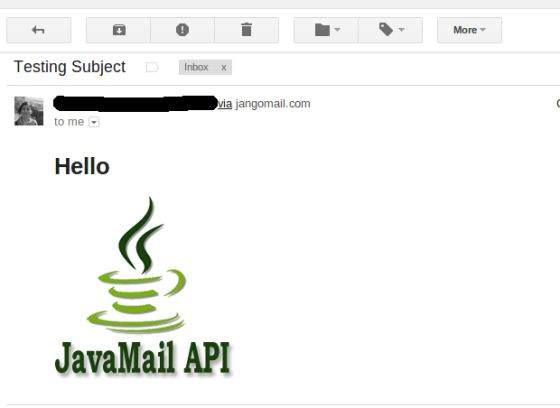
message.setSubject("Testing Subject");
// Now set the actual message
message.setText("Hello, this is sample for to check send " +
"email using JavaMailAPI ");
// Send message
Transport.send(message);
System.out.println("Sent message successfully....");
} catch (MessagingException e) {
throw new RuntimeException(e);
}
}
}
由於我們使用的是主機提供商 JangoSMTP 提供的 SMTP 伺服器,因此我們需要驗證使用者名稱和密碼。javax.mail.PasswordAuthentication 類用於驗證密碼。
編譯和執行
現在我們的類已準備就緒,讓我們編譯上面的類。我已經將 SendEmail.java 類儲存到目錄:/home/manisha/JavaMailAPIExercise。我們需要在類路徑中使用 jar 檔案javax.mail.jar 和activation.jar。執行以下命令從命令提示符編譯該類(這兩個 jar 檔案都放在 /home/manisha/ 目錄中):
javac -cp /home/manisha/activation.jar:/home/manisha/javax.mail.jar: SendEmail.java
現在類已編譯,執行以下命令執行:
java -cp /home/manisha/activation.jar:/home/manisha/javax.mail.jar: SendEmail
驗證輸出
您應該在命令控制檯中看到以下訊息:
Sent message successfully....
由於我透過 JangoSMTP 向我的 gmail 地址傳送電子郵件,因此我的 gmail 帳戶收件箱將收到以下郵件:
傳送帶有附件的電子郵件
這是一個從您的機器傳送帶有附件的電子郵件的示例。本地機器上的檔案是file.txt,位於/home/manisha/。在這裡,我們使用了 JangoSMTP 伺服器,透過它將電子郵件傳送到我們的目標電子郵件地址。“環境設定”章節解釋了設定。
要傳送包含內聯影像的電子郵件,請按照以下步驟操作:
獲取會話
建立一個預設的 MimeMessage 物件,並在訊息中設定發件人、收件人、主題。
將實際訊息設定為如下所示:
messageBodyPart.setText("This is message body");建立一個 MimeMultipart 物件。將上面設定了實際訊息的 messageBodyPart 新增到此多部分物件。
接下來,透過建立 Datahandler 新增附件,如下所示:
messageBodyPart = new MimeBodyPart();
String filename = "/home/manisha/file.txt";
DataSource source = new FileDataSource(filename);
messageBodyPart.setDataHandler(new DataHandler(source));
messageBodyPart.setFileName(filename);
multipart.addBodyPart(messageBodyPart);
接下來,如下所示在訊息中設定多部分:
message.setContent(multipart);
使用 Transport 物件傳送訊息。
建立 Java 類
建立一個名為SendAttachmentInEmail 的 Java 類檔案,其內容如下:
package com.tutorialspoint;
import java.util.Properties;
import javax.activation.DataHandler;
import javax.activation.DataSource;
import javax.activation.FileDataSource;
import javax.mail.BodyPart;
import javax.mail.Message;
import javax.mail.MessagingException;
import javax.mail.Multipart;
import javax.mail.PasswordAuthentication;
import javax.mail.Session;
import javax.mail.Transport;
import javax.mail.internet.InternetAddress;
import javax.mail.internet.MimeBodyPart;
import javax.mail.internet.MimeMessage;
import javax.mail.internet.MimeMultipart;
public class SendAttachmentInEmail {
public static void main(String[] args) {
// Recipient's email ID needs to be mentioned.
String to = "destinationemail@gmail.com";
// Sender's email ID needs to be mentioned
String from = "fromemail@gmail.com";
final String username = "manishaspatil";//change accordingly
final String password = "******";//change accordingly
// Assuming you are sending email through relay.jangosmtp.net
String host = "relay.jangosmtp.net";
Properties props = new Properties();
props.put("mail.smtp.auth", "true");
props.put("mail.smtp.starttls.enable", "true");
props.put("mail.smtp.host", host);
props.put("mail.smtp.port", "25");
// Get the Session object.
Session session = Session.getInstance(props,
new javax.mail.Authenticator() {
protected PasswordAuthentication getPasswordAuthentication() {
return new PasswordAuthentication(username, password);
}
});
try {
// Create a default MimeMessage object.
Message message = new MimeMessage(session);
// Set From: header field of the header.
message.setFrom(new InternetAddress(from));
// Set To: header field of the header.
message.setRecipients(Message.RecipientType.TO,
InternetAddress.parse(to));
// Set Subject: header field
message.setSubject("Testing Subject");
// Create the message part
BodyPart messageBodyPart = new MimeBodyPart();
// Now set the actual message
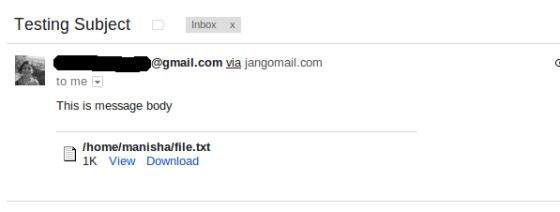
messageBodyPart.setText("This is message body");
// Create a multipar message
Multipart multipart = new MimeMultipart();
// Set text message part
multipart.addBodyPart(messageBodyPart);
// Part two is attachment
messageBodyPart = new MimeBodyPart();
String filename = "/home/manisha/file.txt";
DataSource source = new FileDataSource(filename);
messageBodyPart.setDataHandler(new DataHandler(source));
messageBodyPart.setFileName(filename);
multipart.addBodyPart(messageBodyPart);
// Send the complete message parts
message.setContent(multipart);
// Send message
Transport.send(message);
System.out.println("Sent message successfully....");
} catch (MessagingException e) {
throw new RuntimeException(e);
}
}
}
由於我們使用的是主機提供商 JangoSMTP 提供的 SMTP 伺服器,因此我們需要驗證使用者名稱和密碼。javax.mail.PasswordAuthentication 類用於驗證密碼。
編譯和執行
現在我們的類已準備就緒,讓我們編譯上面的類。我已經將 SendAttachmentInEmail.java 類儲存到目錄:/home/manisha/JavaMailAPIExercise。我們需要在類路徑中使用 jar 檔案javax.mail.jar 和activation.jar。執行以下命令從命令提示符編譯該類(這兩個 jar 檔案都放在 /home/manisha/ 目錄中):
javac -cp /home/manisha/activation.jar:/home/manisha/javax.mail.jar: SendAttachmentInEmail.java
現在類已編譯,執行以下命令執行:
java -cp /home/manisha/activation.jar:/home/manisha/javax.mail.jar: SendAttachmentInEmail
驗證輸出
您應該在命令控制檯中看到以下訊息:
Sent message successfully....
由於我透過 JangoSMTP 向我的 gmail 地址傳送電子郵件,因此我的 gmail 帳戶收件箱將收到以下郵件:
傳送 HTML 電子郵件
這是一個從您的機器傳送 HTML 電子郵件的示例。在這裡,我們使用了 JangoSMTP 伺服器,透過它將電子郵件傳送到我們的目標電子郵件地址。“環境設定”章節解釋了設定。
此示例與傳送簡單電子郵件非常相似,不同之處在於,這裡我們使用 setContent() 方法來設定內容,其第二個引數是“text/html”,用於指定訊息中包含 HTML 內容。使用此示例,您可以傳送任意大小的 HTML 內容。
要傳送包含 HTML 內容的電子郵件,請按照以下步驟操作:
獲取會話
建立一個預設的 MimeMessage 物件,並在訊息中設定發件人、收件人、主題。
使用 setContent() 方法將實際訊息設定為如下所示:
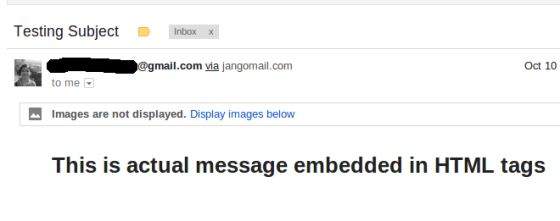
message.setContent("<h1>This is actual message embedded in
   HTML tags</h1>", "text/html");
使用 Transport 物件傳送訊息。
建立 Java 類
建立一個名為SendHTMLEmail 的 Java 類檔案,其內容如下:
package com.tutorialspoint;

import java.util.Properties;

import javax.mail.Message;
import javax.mail.MessagingException;
import javax.mail.PasswordAuthentication;
import javax.mail.Session;
import javax.mail.Transport;
import javax.mail.internet.InternetAddress;
import javax.mail.internet.MimeMessage;

public class SendHTMLEmail {
   public static void main(String[] args) {
      // Recipient's email ID needs to be mentioned.
      String to = "destinationemail@gmail.com";

      // Sender's email ID needs to be mentioned
      String from = "fromemail@gmail.com";
      final String username = "manishaspatil";//change accordingly
      final String password = "******";//change accordingly

      // Assuming you are sending email through relay.jangosmtp.net
      String host = "relay.jangosmtp.net";

      Properties props = new Properties();
      props.put("mail.smtp.auth", "true");
      props.put("mail.smtp.starttls.enable", "true");
      props.put("mail.smtp.host", host);
      props.put("mail.smtp.port", "25");

      // Get the Session object.
      Session session = Session.getInstance(props,
         new javax.mail.Authenticator() {
            protected PasswordAuthentication getPasswordAuthentication() {
               return new PasswordAuthentication(username, password);
            }
	});

      try {
            // Create a default MimeMessage object.
            Message message = new MimeMessage(session);

   	   // Set From: header field of the header.
	   message.setFrom(new InternetAddress(from));

	   // Set To: header field of the header.
	   message.setRecipients(Message.RecipientType.TO,
              InternetAddress.parse(to));

	   // Set Subject: header field
	   message.setSubject("Testing Subject");

	   // Send the actual HTML message, as big as you like
	   message.setContent(
              "<h1>This is actual message embedded in HTML tags</h1>",
             "text/html");

	   // Send message
	   Transport.send(message);

	   System.out.println("Sent message successfully....");

      } catch (MessagingException e) {
	   e.printStackTrace();
	   throw new RuntimeException(e);
      }
   }
}
由於我們使用的是主機提供商 JangoSMTP 提供的 SMTP 伺服器,因此我們需要驗證使用者名稱和密碼。javax.mail.PasswordAuthentication 類用於驗證密碼。
編譯和執行
現在我們的類已經準備好了,讓我們編譯上面的類。我已經將SendHTMLEmail.java類儲存到目錄:/home/manisha/JavaMailAPIExercise。我們需要將javax.mail.jar和activation.jar這兩個jar包新增到類路徑中。從命令提示符執行以下命令來編譯類(這兩個jar包都放在/home/manisha/目錄下)
javac -cp /home/manisha/activation.jar:/home/manisha/javax.mail.jar: SendHTMLEmail.java
現在類已編譯,執行以下命令執行:
java -cp /home/manisha/activation.jar:/home/manisha/javax.mail.jar: SendHTMLEmail
驗證輸出
您應該在命令控制檯中看到以下訊息:
Sent message successfully....
由於我透過 JangoSMTP 向我的 gmail 地址傳送電子郵件,因此我的 gmail 帳戶收件箱將收到以下郵件:
傳送包含內嵌圖片的郵件
這是一個從您的機器傳送包含內嵌圖片的HTML郵件的示例。這裡我們使用了JangoSMTP伺服器來發送郵件到我們的目標郵箱地址。設定方法在環境設定章節中解釋。
要傳送包含內聯影像的電子郵件,請按照以下步驟操作:
獲取會話
建立一個預設的 MimeMessage 物件,並在訊息中設定發件人、收件人、主題。
建立一個MimeMultipart物件。
在我們的示例中,郵件將包含HTML部分和一個圖片。所以首先建立HTML內容,並將其設定為多部件物件,如下所示:
// first part (the html)
BodyPart messageBodyPart = new MimeBodyPart();
String htmlText = "<H1>Hello</H1><img src=\"cid:image\">";
messageBodyPart.setContent(htmlText, "text/html");
// add it
multipart.addBodyPart(messageBodyPart);
接下來,透過建立Datahandler新增圖片,如下所示:
// second part (the image)
messageBodyPart = new MimeBodyPart();
DataSource fds = new FileDataSource(
 "/home/manisha/javamail-mini-logo.png");

messageBodyPart.setDataHandler(new DataHandler(fds));
messageBodyPart.setHeader("Content-ID", "<image>");
接下來,如下所示在訊息中設定多部分:
message.setContent(multipart);
使用 Transport 物件傳送訊息。
建立 Java 類
建立一個名為SendInlineImagesInEmail的java類檔案,其內容如下:
package com.tutorialspoint;

import java.util.Properties;
import javax.activation.DataHandler;
import javax.activation.DataSource;
import javax.activation.FileDataSource;
import javax.mail.BodyPart;
import javax.mail.Message;
import javax.mail.MessagingException;
import javax.mail.PasswordAuthentication;
import javax.mail.Session;
import javax.mail.Transport;
import javax.mail.internet.InternetAddress;
import javax.mail.internet.MimeBodyPart;
import javax.mail.internet.MimeMessage;
import javax.mail.internet.MimeMultipart;

public class SendInlineImagesInEmail {
   public static void main(String[] args) {
      // Recipient's email ID needs to be mentioned.
      String to = "destinationemail@gmail.com";

      // Sender's email ID needs to be mentioned
      String from = "fromemail@gmail.com";
      final String username = "manishaspatil";//change accordingly
      final String password = "******";//change accordingly

      // Assuming you are sending email through relay.jangosmtp.net
      String host = "relay.jangosmtp.net";

      Properties props = new Properties();
      props.put("mail.smtp.auth", "true");
      props.put("mail.smtp.starttls.enable", "true");
      props.put("mail.smtp.host", host);
      props.put("mail.smtp.port", "25");

      Session session = Session.getInstance(props,
         new javax.mail.Authenticator() {
            protected PasswordAuthentication getPasswordAuthentication() {
               return new PasswordAuthentication(username, password);
            }
         });

      try {

         // Create a default MimeMessage object.
         Message message = new MimeMessage(session);

         // Set From: header field of the header.
         message.setFrom(new InternetAddress(from));

         // Set To: header field of the header.
         message.setRecipients(Message.RecipientType.TO,
            InternetAddress.parse(to));

         // Set Subject: header field
         message.setSubject("Testing Subject");

         // This mail has 2 part, the BODY and the embedded image
         MimeMultipart multipart = new MimeMultipart("related");

         // first part (the html)
         BodyPart messageBodyPart = new MimeBodyPart();
         String htmlText = "<H1>Hello</H1><img src=\"cid:image\">";
         messageBodyPart.setContent(htmlText, "text/html");
         // add it
         multipart.addBodyPart(messageBodyPart);

         // second part (the image)
         messageBodyPart = new MimeBodyPart();
         DataSource fds = new FileDataSource(
            "/home/manisha/javamail-mini-logo.png");

         messageBodyPart.setDataHandler(new DataHandler(fds));
         messageBodyPart.setHeader("Content-ID", "<image>");

         // add image to the multipart
         multipart.addBodyPart(messageBodyPart);

         // put everything together
         message.setContent(multipart);
         // Send message
         Transport.send(message);

         System.out.println("Sent message successfully....");

      } catch (MessagingException e) {
         throw new RuntimeException(e);
      }
   }
}
由於我們使用的是主機提供商 JangoSMTP 提供的 SMTP 伺服器,因此我們需要驗證使用者名稱和密碼。javax.mail.PasswordAuthentication 類用於驗證密碼。
編譯和執行
現在我們的類已經準備好了,讓我們編譯上面的類。我已經將SendInlineImagesInEmail.java類儲存到目錄:/home/manisha/JavaMailAPIExercise。我們需要將javax.mail.jar和activation.jar這兩個jar包新增到類路徑中。從命令提示符執行以下命令來編譯類(這兩個jar包都放在/home/manisha/目錄下)
javac -cp /home/manisha/activation.jar:/home/manisha/javax.mail.jar: SendInlineImagesInEmail.java
現在類已編譯,執行以下命令執行:
java -cp /home/manisha/activation.jar:/home/manisha/javax.mail.jar: SendInlineImagesInEmail
驗證輸出
您應該在命令控制檯中看到以下訊息:
Sent message successfully....
由於我透過 JangoSMTP 向我的 gmail 地址傳送電子郵件,因此我的 gmail 帳戶收件箱將收到以下郵件:
檢查郵件
在繼續本章之前,需要理解兩個方面。它們是檢查和獲取。
在JavaMail中檢查郵件是一個過程,我們開啟郵箱中的相應資料夾並獲取每封郵件。這裡我們只檢查每封郵件的頭部,即發件人、收件人、主題。不讀取內容。
在JavaMail中獲取郵件是一個過程,我們開啟郵箱中的相應資料夾並獲取每封郵件。除了頭部,我們還透過識別內容型別來讀取內容。
要使用JavaMail API檢查或獲取郵件,我們需要POP或IMAP伺服器。要檢查和獲取郵件,需要Folder和Store類。這裡我們使用了Gmail的POP3伺服器(pop.gmail.com)。本章將學習如何使用JavaMail API檢查郵件。獲取將在後續章節中介紹。要檢查郵件:
獲取會話
建立pop3 Store物件並連線到pop伺服器。
建立資料夾物件。開啟郵箱中的相應資料夾。
獲取您的郵件。
關閉Store和Folder物件。
建立 Java 類
建立一個名為CheckingMails的java類檔案,其內容如下:
package com.tutorialspoint;

import java.util.Properties;

import javax.mail.Folder;
import javax.mail.Message;
import javax.mail.MessagingException;
import javax.mail.NoSuchProviderException;
import javax.mail.Session;
import javax.mail.Store;

public class CheckingMails {

   public static void check(String host, String storeType, String user,
      String password)
   {
      try {

      //create properties field
      Properties properties = new Properties();

      properties.put("mail.pop3.host", host);
      properties.put("mail.pop3.port", "995");
      properties.put("mail.pop3.starttls.enable", "true");
      Session emailSession = Session.getDefaultInstance(properties);

      //create the POP3 store object and connect with the pop server
      Store store = emailSession.getStore("pop3s");

      store.connect(host, user, password);

      //create the folder object and open it
      Folder emailFolder = store.getFolder("INBOX");
      emailFolder.open(Folder.READ_ONLY);

      // retrieve the messages from the folder in an array and print it
      Message[] messages = emailFolder.getMessages();
      System.out.println("messages.length---" + messages.length);

      for (int i = 0, n = messages.length; i < n; i++) {
         Message message = messages[i];
         System.out.println("---------------------------------");
         System.out.println("Email Number " + (i + 1));
         System.out.println("Subject: " + message.getSubject());
         System.out.println("From: " + message.getFrom()[0]);
         System.out.println("Text: " + message.getContent().toString());

      }

      //close the store and folder objects
      emailFolder.close(false);
      store.close();

      } catch (NoSuchProviderException e) {
         e.printStackTrace();
      } catch (MessagingException e) {
         e.printStackTrace();
      } catch (Exception e) {
         e.printStackTrace();
      }
   }

   public static void main(String[] args) {

      String host = "pop.gmail.com";// change accordingly
      String mailStoreType = "pop3";
      String username = "yourmail@gmail.com";// change accordingly
      String password = "*****";// change accordingly

      check(host, mailStoreType, username, password);

   }

}
編譯和執行
現在我們的類已經準備好了,讓我們編譯上面的類。我已經將CheckingMails.java類儲存到目錄:/home/manisha/JavaMailAPIExercise。我們需要將javax.mail.jar和activation.jar這兩個jar包新增到類路徑中。從命令提示符執行以下命令來編譯類(這兩個jar包都放在/home/manisha/目錄下)
javac -cp /home/manisha/activation.jar:/home/manisha/javax.mail.jar: CheckingMails.java
現在類已編譯,執行以下命令執行:
java -cp /home/manisha/activation.jar:/home/manisha/javax.mail.jar: CheckingMails
驗證輸出
您應該在命令控制檯中看到以下訊息:
messages.length---4
---------------------------------
Email Number 1
Subject: Test Mail--Fetch
From: <abcd@gmail.com>
Text: javax.mail.internet.MimeMultipart@327a5b7f
---------------------------------
Email Number 2
Subject: testing ----checking simple email
From: <abcd@gmail.com>
Text: javax.mail.internet.MimeMultipart@7f0d08bc
---------------------------------
Email Number 3
Subject: Email with attachment
From: <abcd@gmail.com>
Text: javax.mail.internet.MimeMultipart@30b8afce
---------------------------------
Email Number 4
Subject: Email with Inline image
From: <abcd@gmail.com>
Text: javax.mail.internet.MimeMultipart@2d1e165f
這裡我們列印了收件箱中的郵件數量,在本例中為4。我們還列印了每封郵件的主題、發件人地址和正文。
獲取郵件
在上一章中,我們學習瞭如何檢查郵件。現在讓我們看看如何獲取每封郵件並讀取其內容。讓我們編寫一個名為FetchingEmail的Java類,它將讀取以下型別的郵件:
簡單的郵件
帶有附件的郵件
帶有內嵌圖片的郵件
程式碼中遵循的基本步驟如下:
獲取Session物件。
建立POP3 store物件並連線到store。
建立Folder物件並開啟郵箱中的相應資料夾。
檢索郵件。
分別關閉folder和store物件。
建立 Java 類
建立一個名為FetchingEmail的java類檔案,其內容如下:
package com.tutorialspoint;

import java.io.BufferedOutputStream;
import java.io.BufferedReader;
import java.io.DataOutputStream;
import java.io.File;
import java.io.FileOutputStream;
import java.io.IOException;
import java.io.InputStream;
import java.io.InputStreamReader;
import java.util.Date;
import java.util.Properties;

import javax.mail.Address;
import javax.mail.Folder;
import javax.mail.Message;
import javax.mail.MessagingException;
import javax.mail.Multipart;
import javax.mail.NoSuchProviderException;
import javax.mail.Part;
import javax.mail.Session;
import javax.mail.Store;

public class FetchingEmail {

   public static void fetch(String pop3Host, String storeType, String user,
      String password) {
      try {
         // create properties field
         Properties properties = new Properties();
         properties.put("mail.store.protocol", "pop3");
         properties.put("mail.pop3.host", pop3Host);
         properties.put("mail.pop3.port", "995");
         properties.put("mail.pop3.starttls.enable", "true");
         Session emailSession = Session.getDefaultInstance(properties);
         // emailSession.setDebug(true);

         // create the POP3 store object and connect with the pop server
         Store store = emailSession.getStore("pop3s");

         store.connect(pop3Host, user, password);

         // create the folder object and open it
         Folder emailFolder = store.getFolder("INBOX");
         emailFolder.open(Folder.READ_ONLY);

         BufferedReader reader = new BufferedReader(new InputStreamReader(
	      System.in));

         // retrieve the messages from the folder in an array and print it
         Message[] messages = emailFolder.getMessages();
         System.out.println("messages.length---" + messages.length);

         for (int i = 0; i < messages.length; i++) {
            Message message = messages[i];
            System.out.println("---------------------------------");
            writePart(message);
            String line = reader.readLine();
            if ("YES".equals(line)) {
               message.writeTo(System.out);
            } else if ("QUIT".equals(line)) {
               break;
            }
         }

         // close the store and folder objects
         emailFolder.close(false);
         store.close();

      } catch (NoSuchProviderException e) {
         e.printStackTrace();
      } catch (MessagingException e) {
         e.printStackTrace();
      } catch (IOException e) {
         e.printStackTrace();
      } catch (Exception e) {
         e.printStackTrace();
      }
}

   public static void main(String[] args) {

      String host = "pop.gmail.com";// change accordingly
      String mailStoreType = "pop3";
      String username =
         "abc@gmail.com";// change accordingly
      String password = "*****";// change accordingly

      //Call method fetch
      fetch(host, mailStoreType, username, password);

   }

   /*
   * This method checks for content-type
   * based on which, it processes and
   * fetches the content of the message
   */
   public static void writePart(Part p) throws Exception {
      if (p instanceof Message)
         //Call methos writeEnvelope
         writeEnvelope((Message) p);

      System.out.println("----------------------------");
      System.out.println("CONTENT-TYPE: " + p.getContentType());

      //check if the content is plain text
      if (p.isMimeType("text/plain")) {
         System.out.println("This is plain text");
         System.out.println("---------------------------");
         System.out.println((String) p.getContent());
      }
      //check if the content has attachment
      else if (p.isMimeType("multipart/*")) {
         System.out.println("This is a Multipart");
         System.out.println("---------------------------");
         Multipart mp = (Multipart) p.getContent();
         int count = mp.getCount();
         for (int i = 0; i < count; i++)
            writePart(mp.getBodyPart(i));
      }
      //check if the content is a nested message
      else if (p.isMimeType("message/rfc822")) {
         System.out.println("This is a Nested Message");
         System.out.println("---------------------------");
         writePart((Part) p.getContent());
      }
      //check if the content is an inline image
      else if (p.isMimeType("image/jpeg")) {
         System.out.println("--------> image/jpeg");
         Object o = p.getContent();

         InputStream x = (InputStream) o;
         // Construct the required byte array
         System.out.println("x.length = " + x.available());
         int i = 0;
         byte[] bArray = new byte[x.available()];

         while ((i = (int) ((InputStream) x).available()) > 0) {
            int result = (int) (((InputStream) x).read(bArray));
            if (result == -1)
            break;
         }
         FileOutputStream f2 = new FileOutputStream("/tmp/image.jpg");
         f2.write(bArray);
      }
      else if (p.getContentType().contains("image/")) {
         System.out.println("content type" + p.getContentType());
         File f = new File("image" + new Date().getTime() + ".jpg");
         DataOutputStream output = new DataOutputStream(
            new BufferedOutputStream(new FileOutputStream(f)));
            com.sun.mail.util.BASE64DecoderStream test =
                 (com.sun.mail.util.BASE64DecoderStream) p
                  .getContent();
         byte[] buffer = new byte[1024];
         int bytesRead;
         while ((bytesRead = test.read(buffer)) != -1) {
            output.write(buffer, 0, bytesRead);
         }
      }
      else {
         Object o = p.getContent();
         if (o instanceof String) {
            System.out.println("This is a string");
            System.out.println("---------------------------");
            System.out.println((String) o);
         }
         else if (o instanceof InputStream) {
            System.out.println("This is just an input stream");
            System.out.println("---------------------------");
            InputStream is = (InputStream) o;
            is = (InputStream) o;
            int c;
            while ((c = is.read()) != -1)
               System.out.write(c);
         }
         else {
            System.out.println("This is an unknown type");
            System.out.println("---------------------------");
            System.out.println(o.toString());
         }
   }

}
   /*
   * This method would print FROM,TO and SUBJECT of the message
   */
   public static void writeEnvelope(Message m) throws Exception {
      System.out.println("This is the message envelope");
      System.out.println("---------------------------");
      Address[] a;

      // FROM
      if ((a = m.getFrom()) != null) {
         for (int j = 0; j < a.length; j++)
         System.out.println("FROM: " + a[j].toString());
      }

      // TO
      if ((a = m.getRecipients(Message.RecipientType.TO)) != null) {
         for (int j = 0; j < a.length; j++)
         System.out.println("TO: " + a[j].toString());
      }

      // SUBJECT
      if (m.getSubject() != null)
         System.out.println("SUBJECT: " + m.getSubject());

   }

}
您可以透過取消註釋語句emailSession.setDebug(true);來啟用除錯。
編譯和執行
現在我們的類已經準備好了,讓我們編譯上面的類。我已經將FetchingEmail.java類儲存到目錄:/home/manisha/JavaMailAPIExercise。我們需要將javax.mail.jar和activation.jar這兩個jar包新增到類路徑中。從命令提示符執行以下命令來編譯類(這兩個jar包都放在/home/manisha/目錄下)
javac -cp /home/manisha/activation.jar:/home/manisha/javax.mail.jar: FetchingEmail.java
現在類已編譯,執行以下命令執行:
java -cp /home/manisha/activation.jar:/home/manisha/javax.mail.jar: FetchingEmail
驗證輸出
您應該在命令控制檯中看到以下訊息:
messages.length---3
---------------------------------
This is the message envelope
---------------------------
FROM: XYZ <xyz@gmail.com>
TO: ABC <abc@gmail.com>
SUBJECT: Simple Message
----------------------------
CONTENT-TYPE: multipart/alternative; boundary=047d7b343d6ad3e4ea04e8ec6579
This is a Multipart
---------------------------

----------------------------
CONTENT-TYPE: text/plain; charset=ISO-8859-1
This is plain text
---------------------------
Hi am a simple message string....

--
Regards
xyz

This is the message envelope
---------------------------
FROM: XYZ <xyz@gmail.com>
TO: ABC <abc@gmail.com>
SUBJECT: Attachement
----------------------------
CONTENT-TYPE: multipart/mixed; boundary=047d7b343d6a99180904e8ec6751
This is a Multipart
---------------------------

----------------------------
CONTENT-TYPE: text/plain; charset=ISO-8859-1
This is plain text
---------------------------
Hi I've an attachment.Please check

--
Regards
XYZ

----------------------------
CONTENT-TYPE: application/octet-stream; name=sample_attachement
This is just an input stream
---------------------------
Submit your Tutorials, White Papers and Articles into our Tutorials Directory. This is a tutorials database where we are keeping all the tutorials shared by the internet community for the benefit of others.


This is the message envelope
---------------------------
FROM: XYZ <xyz@gmail.com>
TO: ABC <abc@gmail.com>
SUBJECT: Inline Image
----------------------------
CONTENT-TYPE: multipart/related; boundary=f46d04182582be803504e8ece94b
This is a Multipart
---------------------------

----------------------------
CONTENT-TYPE: text/plain; charset=ISO-8859-1
This is plain text
---------------------------
Hi I've an inline image


[image: Inline image 3]

--
Regards
XYZ

----------------------------
CONTENT-TYPE: image/png; name="javamail-mini-logo.png"
content typeimage/png; name="javamail-mini-logo.png"
在這裡您可以看到我們的郵箱中有三封郵件。第一封是一封簡單的郵件,正文為“Hi am a simple message string....”。第二封郵件有一個附件。如上所示,附件的內容也被打印出來。第三封郵件有一個內嵌圖片。
身份驗證
我們將修改檢查郵件章節中的CheckingMails.java。其內容如下:
package com.tutorialspoint;

import java.util.Properties;

import javax.mail.Authenticator;
import javax.mail.Folder;
import javax.mail.Message;
import javax.mail.MessagingException;
import javax.mail.NoSuchProviderException;
import javax.mail.PasswordAuthentication;
import javax.mail.Session;
import javax.mail.Store;

public class CheckingMails {

   public static void check(String host, String storeType, String user,
      String password)
   {
      try {

      // create properties field
      Properties properties = new Properties();

      properties.put("mail.pop3s.host", host);
      properties.put("mail.pop3s.port", "995");
      properties.put("mail.pop3s.starttls.enable", "true");

      // Setup authentication, get session
      Session emailSession = Session.getInstance(properties,
         new javax.mail.Authenticator() {
            protected PasswordAuthentication getPasswordAuthentication() {
               return new PasswordAuthentication(
                  "manishapatil3may@gmail.com", "manisha123");
            }
         });
      // emailSession.setDebug(true);

      // create the POP3 store object and connect with the pop server
      Store store = emailSession.getStore("pop3s");

      store.connect();

      // create the folder object and open it
      Folder emailFolder = store.getFolder("INBOX");
      emailFolder.open(Folder.READ_ONLY);

      // retrieve the messages from the folder in an array and print it
      Message[] messages = emailFolder.getMessages();
      System.out.println("messages.length---" + messages.length);

      for (int i = 0, n = messages.length; i < n; i++) {
         Message message = messages[i];
         System.out.println("---------------------------------");
         System.out.println("Email Number " + (i + 1));
         System.out.println("Subject: " + message.getSubject());
         System.out.println("From: " + message.getFrom()[0]);
         System.out.println("Text: " + message.getContent().toString());
      }

      // close the store and folder objects
      emailFolder.close(false);
      store.close();

      } catch (NoSuchProviderException e) {
         e.printStackTrace();
      } catch (MessagingException e) {
         e.printStackTrace();
      } catch (Exception e) {
         e.printStackTrace();
      }
   }

   public static void main(String[] args) {

      String host = "pop.gmail.com";// change accordingly
      String mailStoreType = "pop3";
      String username = "abc@gmail.com";// change accordingly
      String password = "*****";// change accordingly

      check(host, mailStoreType, username, password);

   }

}
您可以透過取消註釋語句emailSession.setDebug(true);來啟用除錯。
編譯和執行
現在我們的類已經準備好了,讓我們編譯上面的類。我已經將CheckingMails.java類儲存到目錄:/home/manisha/JavaMailAPIExercise。我們需要將javax.mail.jar和activation.jar這兩個jar包新增到類路徑中。從命令提示符執行以下命令來編譯類(這兩個jar包都放在/home/manisha/目錄下)
javac -cp /home/manisha/activation.jar:/home/manisha/javax.mail.jar: CheckingMails.java
現在類已編譯,執行以下命令執行:
java -cp /home/manisha/activation.jar:/home/manisha/javax.mail.jar: CheckingMails
驗證輸出
您可以在命令控制檯中看到類似以下的訊息:
messages.length---3
---------------------------------
Email Number 1
Subject: Today is a nice day
From: XYZ <xyz@gmail.com>
Text: javax.mail.internet.MimeMultipart@45f676cb
---------------------------------
Email Number 2
Subject: hiiii....
From: XYZ <xyz@gmail.com>
Text: javax.mail.internet.MimeMultipart@37f12d4f
---------------------------------
Email Number 3
Subject: helloo
From: XYZ <xyz@gmail.com>
Text: javax.mail.internet.MimeMultipart@3ad5ba3a
回覆郵件
本章我們將學習如何使用JavaMail API回覆郵件。下面程式中遵循的基本步驟是:
獲取包含POP和SMTP伺服器詳細資訊的Session物件。我們需要POP詳細資訊來檢索郵件,需要SMTP詳細資訊來發送郵件。
建立POP3 store物件並連線到store。
建立Folder物件並開啟郵箱中的相應資料夾。
檢索郵件。
遍歷郵件,如果要回復,則鍵入“Y”或“y”。
獲取郵件的所有資訊(收件人、發件人、主題、內容)。
使用Message.reply()方法構建回覆郵件。此方法使用正確的收件人和主題配置一個新郵件。該方法採用一個布林引數,指示是隻回覆發件人(false)還是回覆所有人(true)。
設定郵件的發件人、正文和回覆地址,並透過Transport物件的例項傳送。
分別關閉Transport、folder和store物件。
這裡我們使用了JangoSMTP伺服器來發送郵件到我們的目標郵箱地址。設定方法在環境設定章節中解釋。
建立 Java 類
建立一個名為ReplyToEmail的java類檔案,其內容如下:
package com.tutorialspoint;

import java.io.BufferedReader;
import java.io.InputStreamReader;
import java.util.Date;
import java.util.Properties;

import javax.mail.Folder;
import javax.mail.Message;
import javax.mail.Session;
import javax.mail.Store;
import javax.mail.Transport;
import javax.mail.internet.InternetAddress;
import javax.mail.internet.MimeMessage;

public class ReplyToEmail {
   public static void main(String args[])
   {
      Date date = null;

      Properties properties = new Properties();
      properties.put("mail.store.protocol", "pop3");
      properties.put("mail.pop3s.host", "pop.gmail.com");
      properties.put("mail.pop3s.port", "995");
      properties.put("mail.pop3.starttls.enable", "true");
      properties.put("mail.smtp.auth", "true");
      properties.put("mail.smtp.starttls.enable", "true");
      properties.put("mail.smtp.host", "relay.jangosmtp.net");
      properties.put("mail.smtp.port", "25");
      Session session = Session.getDefaultInstance(properties);

      // session.setDebug(true);
      try
      {
         // Get a Store object and connect to the current host
         Store store = session.getStore("pop3s");
         store.connect("pop.gmail.com", "xyz@gmail.com",
            "*****");//change the user and password accordingly

         Folder folder = store.getFolder("inbox");
         if (!folder.exists()) {
            System.out.println("inbox not found");
               System.exit(0);
         }
         folder.open(Folder.READ_ONLY);

         BufferedReader reader = new BufferedReader(new InputStreamReader(
            System.in));

         Message[] messages = folder.getMessages();
         if (messages.length != 0) {

            for (int i = 0, n = messages.length; i < n; i++) {
               Message message = messages[i];
               date = message.getSentDate();
               // Get all the information from the message
               String from = InternetAddress.toString(message.getFrom());
               if (from != null) {
                  System.out.println("From: " + from);
               }
               String replyTo = InternetAddress.toString(message
	         .getReplyTo());
               if (replyTo != null) {
                  System.out.println("Reply-to: " + replyTo);
               }
               String to = InternetAddress.toString(message
	         .getRecipients(Message.RecipientType.TO));
               if (to != null) {
                  System.out.println("To: " + to);
               }

               String subject = message.getSubject();
               if (subject != null) {
                  System.out.println("Subject: " + subject);
               }
               Date sent = message.getSentDate();
               if (sent != null) {
                  System.out.println("Sent: " + sent);
               }

               System.out.print("Do you want to reply [y/n] : ");
               String ans = reader.readLine();
               if ("Y".equals(ans) || "y".equals(ans)) {

                  Message replyMessage = new MimeMessage(session);
                  replyMessage = (MimeMessage) message.reply(false);
                  replyMessage.setFrom(new InternetAddress(to));
                  replyMessage.setText("Thanks");
                  replyMessage.setReplyTo(message.getReplyTo());

                  // Send the message by authenticating the SMTP server
                  // Create a Transport instance and call the sendMessage
                  Transport t = session.getTransport("smtp");
                  try {
	   	     //connect to the SMTP server using transport instance
		     //change the user and password accordingly
	             t.connect("abc", "****");
	             t.sendMessage(replyMessage,
                        replyMessage.getAllRecipients());
                  } finally {
                     t.close();
                  }
                  System.out.println("message replied successfully ....");

                  // close the store and folder objects
                  folder.close(false);
                  store.close();

               } else if ("n".equals(ans)) {
                  break;
               }
            }//end of for loop

         } else {
            System.out.println("There is no msg....");
         }

      } catch (Exception e) {
         e.printStackTrace();
      }

   }

}
您可以透過取消註釋語句session.setDebug(true);來啟用除錯。
編譯和執行
現在我們的類已經準備好了,讓我們編譯上面的類。我已經將ReplyToEmail.java類儲存到目錄:/home/manisha/JavaMailAPIExercise。我們需要將javax.mail.jar和activation.jar這兩個jar包新增到類路徑中。從命令提示符執行以下命令來編譯類(這兩個jar包都放在/home/manisha/目錄下)
javac -cp /home/manisha/activation.jar:/home/manisha/javax.mail.jar: ReplyToEmail.java
類編譯完成後,執行以下命令執行:
java -cp /home/manisha/activation.jar:/home/manisha/javax.mail.jar: ReplyToEmail
驗證輸出
您應該在命令控制檯中看到以下訊息:
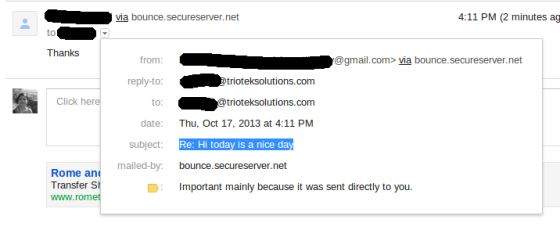
From: ABC <abc@gmail.com>
Reply-to: abc@trioteksolutions.com
To: XYZ <xyz@gmail.com>
Subject: Hi today is a nice day
Sent: Thu Oct 17 15:58:37 IST 2013
Do you want to reply [y/n] : y
message replied successfully ....
檢查郵件傳送到的收件箱。在本例中,收到的郵件如下所示:
轉發郵件
本章我們將學習如何使用JavaMail API轉發郵件。下面程式中遵循的基本步驟是:
獲取包含POP和SMTP伺服器詳細資訊的Session物件。我們需要POP詳細資訊來檢索郵件,需要SMTP詳細資訊來發送郵件。
建立POP3 store物件並連線到store。
建立Folder物件並開啟郵箱中的相應資料夾。
檢索郵件。
遍歷郵件,如果要轉發,則鍵入“Y”或“y”。
獲取郵件的所有資訊(收件人、發件人、主題、內容)。
透過處理構成郵件的各個部分來構建轉發郵件。第一部分是郵件正文,第二部分是要轉發的郵件。將兩者組合成多部分。然後將多部分新增到正確定址的郵件中併發送。
分別關閉Transport、folder和store物件。
這裡我們使用了JangoSMTP伺服器來發送郵件到我們的目標郵箱地址。設定方法在環境設定章節中解釋。
建立 Java 類
建立一個名為ForwardEmail的java類檔案,其內容如下:
package com.tutorialspoint;

import java.io.BufferedReader;
import java.io.InputStreamReader;
import java.util.Date;
import java.util.Properties;

import javax.mail.BodyPart;
import javax.mail.Folder;
import javax.mail.Message;
import javax.mail.Multipart;
import javax.mail.PasswordAuthentication;
import javax.mail.Session;
import javax.mail.Store;
import javax.mail.Transport;
import javax.mail.internet.InternetAddress;
import javax.mail.internet.MimeBodyPart;
import javax.mail.internet.MimeMessage;
import javax.mail.internet.MimeMultipart;

public class ForwardEmail {

   public static void main(String[] args) {
      Properties properties = new Properties();
      properties.put("mail.store.protocol", "pop3");
      properties.put("mail.pop3s.host", "pop.gmail.com");
      properties.put("mail.pop3s.port", "995");
      properties.put("mail.pop3.starttls.enable", "true");
      properties.put("mail.smtp.auth", "true");
      properties.put("mail.smtp.host", "relay.jangosmtp.net");
      properties.put("mail.smtp.port", "25");
      Session session = Session.getDefaultInstance(properties);
      try {
         // session.setDebug(true);
         // Get a Store object and connect to the current host
         Store store = session.getStore("pop3s");
         store.connect("pop.gmail.com", "xyz@gmail.com",
            "*****");//change the user and password accordingly

         // Create a Folder object and open the folder
         Folder folder = store.getFolder("inbox");
         folder.open(Folder.READ_ONLY);
         BufferedReader reader = new BufferedReader(new InputStreamReader(
            System.in));
         Message[] messages = folder.getMessages();
         if (messages.length != 0) {

         for (int i = 0, n = messages.length; i < n; i++) {
            Message message = messages[i];
            // Get all the information from the message
            String from = InternetAddress.toString(message.getFrom());
            if (from != null) {
               System.out.println("From: " + from);
            }
            String replyTo = InternetAddress.toString(message
               .getReplyTo());
            if (replyTo != null) {
               System.out.println("Reply-to: " + replyTo);
            }
            String to = InternetAddress.toString(message
               .getRecipients(Message.RecipientType.TO));
            if (to != null) {
               System.out.println("To: " + to);
            }

            String subject = message.getSubject();
            if (subject != null) {
               System.out.println("Subject: " + subject);
            }
            Date sent = message.getSentDate();
            if (sent != null) {
               System.out.println("Sent: " + sent);
            }
            System.out.print("Do you want to reply [y/n] : ");
            String ans = reader.readLine();
            if ("Y".equals(ans) || "y".equals(ans)) {
               Message forward = new MimeMessage(session);
               // Fill in header
               forward.setRecipients(Message.RecipientType.TO,
               InternetAddress.parse(from));
               forward.setSubject("Fwd: " + message.getSubject());
               forward.setFrom(new InternetAddress(to));

               // Create the message part
               MimeBodyPart messageBodyPart = new MimeBodyPart();
               // Create a multipart message
               Multipart multipart = new MimeMultipart();
               // set content
               messageBodyPart.setContent(message, "message/rfc822");
               // Add part to multi part
               multipart.addBodyPart(messageBodyPart);
               // Associate multi-part with message
               forward.setContent(multipart);
               forward.saveChanges();

               // Send the message by authenticating the SMTP server
               // Create a Transport instance and call the sendMessage
               Transport t = session.getTransport("smtp");
               try {
                  //connect to the SMTP server using transport instance
		  //change the user and password accordingly
                  t.connect("abc", "*****");
                  t.sendMessage(forward, forward.getAllRecipients());
               } finally {
                  t.close();
               }

               System.out.println("message forwarded successfully....");

            // close the store and folder objects
            folder.close(false);
            store.close();
            }// end if

         }// end for
   }// end if
   } catch (Exception e) {
      e.printStackTrace();
   }
}

}
您可以透過取消註釋語句session.setDebug(true);來啟用除錯。
編譯和執行
現在我們的類已經準備好了,讓我們編譯上面的類。我已經將ForwardEmail.java類儲存到目錄:/home/manisha/JavaMailAPIExercise。我們需要將javax.mail.jar和activation.jar這兩個jar包新增到類路徑中。從命令提示符執行以下命令來編譯類(這兩個jar包都放在/home/manisha/目錄下)
javac -cp /home/manisha/activation.jar:/home/manisha/javax.mail.jar: ForwardEmail.java
類編譯完成後,執行以下命令執行:
java -cp /home/manisha/activation.jar:/home/manisha/javax.mail.jar: ForwardEmail
驗證輸出
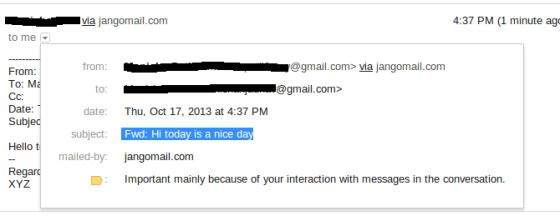
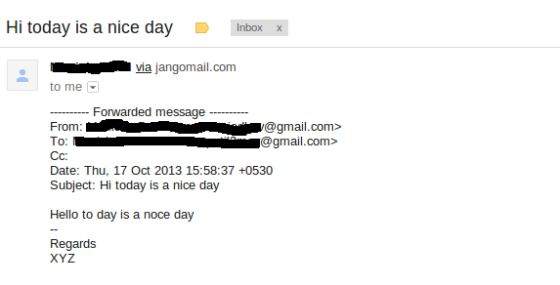
您應該在命令控制檯中看到以下訊息:
From: ABC <abc@gmail.com>
Reply-to: abc@trioteksolutions.com
To: XYZ <xyz@gmail.com>
Subject: Hi today is a nice day
Sent: Thu Oct 17 15:58:37 IST 2013
Do you want to reply [y/n] : y
message forwarded successfully....
檢查郵件傳送到的收件箱。在本例中,轉發的郵件如下所示:
刪除郵件
本章我們將學習如何使用JavaMail API刪除郵件。刪除郵件涉及使用與郵件關聯的Flags。不同狀態有不同的標誌,一些是系統定義的,一些是使用者定義的。預定義的標誌在內部類Flags.Flag中定義,如下所示:
Flags.Flag.ANSWERED
Flags.Flag.DELETED
Flags.Flag.DRAFT
Flags.Flag.FLAGGED
Flags.Flag.RECENT
Flags.Flag.SEEN
Flags.Flag.USER
POP協議只支援刪除郵件。
刪除程式中遵循的基本步驟是:
獲取包含POP和SMTP伺服器詳細資訊的Session物件。我們需要POP詳細資訊來檢索郵件,需要SMTP詳細資訊來發送郵件。
建立POP3 store物件並連線到store。
建立Folder物件,並以READ_WRITE模式開啟郵箱中的相應資料夾。
從收件箱資料夾中檢索郵件。
遍歷郵件,如果要刪除郵件,則鍵入“Y”或“y”,透過在Message物件上呼叫setFlag(Flags.Flag.DELETED, true)方法來刪除。
標記為DELETED的郵件不會被實際刪除,除非我們在Folder物件上呼叫expunge()方法,或關閉帶有expunge設定為true的資料夾。
關閉store物件。
建立 Java 類
建立一個名為ForwardEmail的java類檔案,其內容如下:
package com.tutorialspoint;

import java.io.BufferedReader;
import java.io.IOException;
import java.io.InputStreamReader;
import java.util.Properties;

import javax.mail.Flags;
import javax.mail.Folder;
import javax.mail.Message;
import javax.mail.MessagingException;
import javax.mail.NoSuchProviderException;
import javax.mail.Session;
import javax.mail.Store;

public class DeleteEmail {

   public static void delete(String pop3Host, String storeType, String user,
      String password)
   {
      try
      {
         // get the session object
         Properties properties = new Properties();
         properties.put("mail.store.protocol", "pop3");
         properties.put("mail.pop3s.host", pop3Host);
         properties.put("mail.pop3s.port", "995");
         properties.put("mail.pop3.starttls.enable", "true");
         Session emailSession = Session.getDefaultInstance(properties);
         // emailSession.setDebug(true);

         // create the POP3 store object and connect with the pop server
         Store store = emailSession.getStore("pop3s");

         store.connect(pop3Host, user, password);

         // create the folder object and open it
         Folder emailFolder = store.getFolder("INBOX");
         emailFolder.open(Folder.READ_WRITE);

         BufferedReader reader = new BufferedReader(new InputStreamReader(
            System.in));
         // retrieve the messages from the folder in an array and print it
         Message[] messages = emailFolder.getMessages();
         System.out.println("messages.length---" + messages.length);
         for (int i = 0; i < messages.length; i++) {
            Message message = messages[i];
            System.out.println("---------------------------------");
            System.out.println("Email Number " + (i + 1));
            System.out.println("Subject: " + message.getSubject());
            System.out.println("From: " + message.getFrom()[0]);

            String subject = message.getSubject();
            System.out.print("Do you want to delete this message [y/n] ? ");
            String ans = reader.readLine();
            if ("Y".equals(ans) || "y".equals(ans)) {
	       // set the DELETE flag to true
	       message.setFlag(Flags.Flag.DELETED, true);
	       System.out.println("Marked DELETE for message: " + subject);
            } else if ("n".equals(ans)) {
	       break;
            }
         }
         // expunges the folder to remove messages which are marked deleted
         emailFolder.close(true);
         store.close();

      } catch (NoSuchProviderException e) {
         e.printStackTrace();
      } catch (MessagingException e) {
         e.printStackTrace();
      } catch (IOException io) {
         io.printStackTrace();
      }
   }

   public static void main(String[] args) {

      String host = "pop.gmail.com";// change accordingly
      String mailStoreType = "pop3";
      String username = "abc@gmail.com";// change accordingly
      String password = "*****";// change accordingly

      delete(host, mailStoreType, username, password);

   }

}
您可以透過取消註釋語句emailSession.setDebug(true);來啟用除錯。
編譯和執行
現在我們的類已經準備好了,讓我們編譯上面的類。我已經將DeleteEmail.java類儲存到目錄:/home/manisha/JavaMailAPIExercise。我們需要將javax.mail.jar和activation.jar這兩個jar包新增到類路徑中。從命令提示符執行以下命令來編譯類(這兩個jar包都放在/home/manisha/目錄下)
javac -cp /home/manisha/activation.jar:/home/manisha/javax.mail.jar: DeleteEmail.java
類編譯完成後,執行以下命令執行:
java -cp /home/manisha/activation.jar:/home/manisha/javax.mail.jar: DeleteEmail
驗證輸出
您應該在命令控制檯中看到以下訊息:
messages.length---1
---------------------------------
Email Number 1
Subject: Testing
From: ABC <abc@gmail.com>
Do you want to delete this message [y/n] ? y
Marked DELETE for message: Testing
Gmail SMTP伺服器
在前面所有章節中,我們使用JangoSMTP伺服器傳送郵件。本章我們將學習Gmail提供的SMTP伺服器。Gmail(以及其他一些服務)免費提供其公共SMTP伺服器的使用。
Gmail SMTP伺服器詳細資訊可以在這裡找到這裡。正如您在詳細資訊中看到的,我們可以使用TLS或SSL連線透過Gmail SMTP伺服器傳送郵件。
使用Gmail SMTP伺服器傳送郵件的過程與傳送郵件章節中解釋的類似,只是我們將更改主機伺服器。作為先決條件,發件人郵箱地址應該是有效的Gmail帳戶。讓我們嘗試一個例子。
建立 Java 類
建立一個名為SendEmailUsingGMailSMTP的Java檔案,其內容如下:
package com.tutorialspoint;

import java.util.Properties;

import javax.mail.Message;
import javax.mail.MessagingException;
import javax.mail.PasswordAuthentication;
import javax.mail.Session;
import javax.mail.Transport;
import javax.mail.internet.InternetAddress;
import javax.mail.internet.MimeMessage;

public class SendEmailUsingGMailSMTP {
   public static void main(String[] args) {
      // Recipient's email ID needs to be mentioned.
      String to = "xyz@gmail.com";//change accordingly

      // Sender's email ID needs to be mentioned
      String from = "abc@gmail.com";//change accordingly
      final String username = "abc";//change accordingly
      final String password = "*****";//change accordingly

      // Assuming you are sending email through relay.jangosmtp.net
      String host = "smtp.gmail.com";

      Properties props = new Properties();
      props.put("mail.smtp.auth", "true");
      props.put("mail.smtp.starttls.enable", "true");
      props.put("mail.smtp.host", host);
      props.put("mail.smtp.port", "587");

      // Get the Session object.
      Session session = Session.getInstance(props,
      new javax.mail.Authenticator() {
         protected PasswordAuthentication getPasswordAuthentication() {
            return new PasswordAuthentication(username, password);
         }
      });

      try {
         // Create a default MimeMessage object.
         Message message = new MimeMessage(session);

         // Set From: header field of the header.
         message.setFrom(new InternetAddress(from));

         // Set To: header field of the header.
         message.setRecipients(Message.RecipientType.TO,
         InternetAddress.parse(to));

         // Set Subject: header field
         message.setSubject("Testing Subject");

         // Now set the actual message
         message.setText("Hello, this is sample for to check send "
            + "email using JavaMailAPI ");

         // Send message
         Transport.send(message);

         System.out.println("Sent message successfully....");

      } catch (MessagingException e) {
            throw new RuntimeException(e);
      }
   }
}
這裡主機設定為smtp.gmail.com,埠設定為587。這裡我們啟用了TLS連線。
編譯和執行
現在我們的類已經準備好了,讓我們編譯上面的類。我已經將SendEmailUsingGMailSMTP.java類儲存到目錄:/home/manisha/JavaMailAPIExercise。我們需要將javax.mail.jar和activation.jar這兩個jar包新增到類路徑中。從命令提示符執行以下命令來編譯類(這兩個jar包都放在/home/manisha/目錄下)
javac -cp /home/manisha/activation.jar:/home/manisha/javax.mail.jar: SendEmailUsingGMailSMTP.java
現在類已編譯,執行以下命令執行:
java -cp /home/manisha/activation.jar:/home/manisha/javax.mail.jar: SendEmailUsingGMailSMTP
驗證輸出
您應該在命令控制檯中看到以下訊息:
Sent message successfully....
資料夾管理
到目前為止,我們之前的章節主要處理的是收件箱 (INBOX) 資料夾。這是大多數郵件所在的預設資料夾。有些系統可能將其稱為 INBOX,而其他系統則可能使用其他名稱。但是,您可以始終使用名稱 INBOX 透過 JavaMail API 訪問它。
JavaMail API 將資料夾表示為抽象 Folder 類的例項。
public abstract class Folder extends Object
此類聲明瞭用於向伺服器請求命名資料夾、從資料夾中刪除郵件、搜尋資料夾中特定郵件、列出資料夾中的郵件等的方法。
開啟資料夾
我們不能直接建立一個資料夾,因為Folder 類中唯一的建構函式是protected(受保護的)。我們可以從以下地方獲取Folder:
會話 (Session)
儲存 (Store)
或其他資料夾
以上所有類都具有簽名類似的 getFolder() 方法。
public abstract Folder getFolder(String name) throws MessagingException
一些有助於獲取Folder 物件的方法包括:
| 方法 | 描述 |
|---|---|
| boolean exists() | 檢查資料夾是否存在。在獲取 Folder 物件之前使用此方法。 |
| abstract void open(int mode) | 獲取Folder 時,它是關閉的。使用此方法將其開啟。mode 可以是 Folder.READ_ONLY 或 Folder.READ_WRITE。 |
| abstract boolean isOpen() | 如果資料夾已開啟,此方法返回true;如果已關閉,則返回false。 |
| abstract void close(boolean expunge) | 關閉資料夾。如果expunge 引數為true,則資料夾中任何已刪除的郵件都將從伺服器上的實際檔案中刪除。否則,它們僅被標記為已刪除,但郵件仍然可以恢復。 |
基本資料夾資訊
以下是 Folder 類中一些返回有關資料夾基本資訊的方法:
| 方法 | 描述 |
|---|---|
| abstract String getName() | 返回資料夾的名稱,例如“TutorialsPoint Mail”。 |
| abstract String getFullName() | 返回從根目錄開始的完整層次結構名稱,例如“books/Manisha/TutorialsPoint Mail”。 |
| URLName getURLName() | 返回表示此資料夾的 URLName。 |
| abstract Folder getParent() | 返回包含此資料夾的資料夾名稱,即父資料夾。例如,在之前的“TutorialsPoint Mail”示例中為“Manisha”。 |
| abstract int getType() | 返回一個整數,指示資料夾是否可以包含郵件和/或其他資料夾。 |
| int getMode() | 它返回兩個命名常量之一:Folder.READ_ONLY 或 Folder.READ_WRITE,或者在模式未知時返回 -1。 |
| Store getStore() | 返回從中檢索此資料夾的 Store 物件。 |
| abstract char getSeparator() | 返回分隔符字元,該字元將此 Folder 的路徑名與直接子資料夾的名稱分隔開。 |
管理資料夾
以下是一些有助於管理資料夾的方法:
| 方法 | 描述 |
|---|---|
| abstract boolean create(int type) | 這將在此資料夾的 Store 中建立一個新資料夾。其中type 為:Folder.HOLDS_MESSAGES 或 Folder.HOLDS_FOLDERS。如果資料夾建立成功,則返回true;否則返回false。 |
| abstract boolean delete(boolean recurse) | 僅當資料夾關閉時,此方法才會刪除資料夾。否則,它將丟擲IllegalStateException 異常。如果recurse 為true,則會刪除子資料夾。 |
| abstract boolean renameTo(Folder f) | 這將更改此資料夾的名稱。必須關閉資料夾才能重新命名。否則,將丟擲 IllegalStateException 異常。 |
管理資料夾中的郵件
以下是幫助管理資料夾中郵件的一些方法:
| 方法 | 描述 |
|---|---|
| abstract void appendMessages(Message[] messages) | 顧名思義,陣列中的郵件將放置在此資料夾的末尾。 |
| void copyMessages(Message[] messages, Folder destination) | 這會將郵件從此資料夾複製到作為引數給定的指定資料夾。 |
| abstract Message[] expunge() | 要從資料夾中刪除郵件,請將其 Flags.Flag.DELETED 標誌設定為 true。要從資料夾中物理刪除已刪除的郵件,必須呼叫此方法。 |
列出資料夾的內容
有四種方法可以列出資料夾包含的資料夾:
| 方法 | 描述 |
|---|---|
| Folder[] list() | 這將返回一個數組,其中列出了此資料夾包含的資料夾。 |
| Folder[] listSubscribed() | 這將返回一個數組,其中列出了此資料夾包含的所有已訂閱的資料夾。 |
| abstract Folder[] list(String pattern) | 這與list() 方法類似,只是它允許您指定一個模式。模式是一個字串,用於指定與之匹配的資料夾的名稱。 |
| Folder[] listSubscribed(String pattern) | 這與listSubscribed() 方法類似,只是它允許您指定一個模式。模式是一個字串,用於指定與之匹配的資料夾的名稱。 |
檢查郵件
| 方法 | 描述 |
|---|---|
| abstract int getMessageCount() | 此方法可以在開啟或關閉的資料夾上呼叫。但是,對於關閉的資料夾,此方法可能會(也可能不會)返回 -1,以指示郵件的確切數量不容易獲得。 |
| abstract boolean hasNewMessages() | 如果自上次開啟資料夾以來已向資料夾中添加了新郵件,則此方法返回true。 |
| 它透過檢查資料夾中已設定 RECENT 標誌的郵件來返回新郵件計數。 | int getNewMessageCount() |
| 這可以在開啟或關閉的資料夾上呼叫。但是,對於關閉的資料夾,它可能會返回 -1,以指示獲取真實答案的成本太高。 | int getUnreadMessageCount() |
從資料夾中獲取郵件
Folder 類提供了四種方法用於從開啟的資料夾中檢索郵件:
| 方法 | 描述 |
|---|---|
| abstract Message getMessage(int messageNumber) | 這將返回資料夾中的第 n 條郵件。資料夾中的第一條郵件編號為 1。 |
| Message[] getMessages() | 這將返回一個Message 物件陣列,表示此資料夾中的所有郵件。 |
| Message[] getMessages(int start, int end) | 這將返回資料夾中從 start 開始到 end 結束(包含 start 和 end)的Message 物件陣列。 |
| Message[] getMessages(int[] messageNumbers) | 這將返回一個數組,其中僅包含messageNumbers 陣列中按編號特別標識的郵件。 |
| void fetch(Message[] messages, FetchProfile fp) | 預取給定郵件中 FetchProfile 中指定的專案。FetchProfile 引數指定要預取郵件中的哪些標題。 |
搜尋資料夾
如果伺服器支援搜尋(許多 IMAP 伺服器支援,而大多數 POP 伺服器不支援),則可以輕鬆搜尋滿足特定條件的郵件資料夾。這些條件編碼在 SearchTerm 物件中。以下兩種搜尋方法:
| 方法 | 描述 |
|---|---|
| Message[] search(SearchTerm term) | 搜尋此資料夾中與指定搜尋條件匹配的郵件。返回包含匹配郵件的陣列。如果未找到匹配項,則返回空陣列。 |
| Message[] search(SearchTerm term, Message[] messages) | 搜尋給定的郵件陣列中與指定搜尋條件匹配的郵件。返回包含匹配郵件的陣列。如果未找到匹配項,則返回空陣列。指定的 Message 物件必須屬於此資料夾。 |
標誌
當您需要更改資料夾中整個郵件集的標誌時,標誌修改非常有用。以下是 Folder 類中提供的方法:
| 方法 | 描述 |
|---|---|
| void setFlags(Message[] messages, Flags flag, boolean value) | 設定陣列中指定的郵件的指定標誌。 |
| void setFlags(int start, int end, Flags flag, boolean value) | 設定編號從 start 到 end(包含 start 和 end)的郵件的指定標誌。 |
| void setFlags(int[] messageNumbers, Flags flag, boolean value) | 設定郵件編號在陣列中的郵件的指定標誌。 |
| abstract Flags getPermanentFlags() | 返回此資料夾支援的所有郵件的標誌。 |
配額管理
在 JavaMail 中,配額是電子郵件儲存中郵件數量或金額的限制或固定數量。每個郵件服務請求都計入 JavaMail API 呼叫配額。電子郵件服務可以應用以下配額標準:
包括附件在內的傳出郵件的最大大小。
包括附件在內的傳入郵件的最大大小。
管理員為收件人時郵件的最大大小。
對於配額管理,JavaMail 有以下類:
| 類 | 描述 |
|---|---|
| public class Quota | 此類表示給定配額根目錄的一組配額。每個配額根目錄都有一組資源,由 Quota.Resource 類表示。每個資源都有一個名稱(例如,“STORAGE”)、當前使用情況和使用限制。此類只有一個方法setResourceLimit(String name, long limit)。 |
| public static class Quota.Resource | 表示配額根目錄中的單個資源。 |
| public interface QuotaAwareStore | 支援配額的 Store 實現的介面。getQuota 和 setQuota 方法支援由 IMAP QUOTA 擴充套件定義的配額模型。GmailSSLStore、GmailStore、IMAPSSLStore、IMAPStore 是此介面的已知實現類。 |
讓我們在以下部分檢視一個示例,該示例檢查郵件儲存名稱、限制及其使用情況。
建立 Java 類
建立一個名為QuotaExample 的 Java 類檔案,其內容如下所示(此處省略示例程式碼)。
package com.tutorialspoint;

import java.util.Properties;

import javax.mail.Quota;
import javax.mail.Session;
import javax.mail.Store;

import com.sun.mail.imap.IMAPStore;

public class QuotaExample
{
   public static void main(String[] args)
   {
      try
      {
         Properties properties = new Properties();
         properties.put("mail.store.protocol", "imaps");
         properties.put("mail.imaps.port", "993");
         properties.put("mail.imaps.starttls.enable", "true");
         Session emailSession = Session.getDefaultInstance(properties);
         // emailSession.setDebug(true);

         // create the IMAP3 store object and connect with the pop server
         Store store = emailSession.getStore("imaps");

         //change the user and password accordingly
         store.connect("imap.gmail.com", "abc@gmail.com", "*****");
         IMAPStore imapStore = (IMAPStore) store;
         System.out.println("imapStore ---" + imapStore);

         //get quota
         Quota[] quotas = imapStore.getQuota("INBOX");
         //Iterate through the Quotas
         for (Quota quota : quotas) {
            System.out.println(String.format("quotaRoot:'%s'",
               quota.quotaRoot));
            //Iterate through the Quota Resource
            for (Quota.Resource resource : quota.resources) {
               System.out.println(String.format(
                  "name:'%s', limit:'%s', usage:'%s'", resource.name,
                  resource.limit, resource.usage));
            }
         }
      } catch (Exception e)
      {
         e.printStackTrace();
      }
   }
}
這是透過 IMAP (imap.gmail.com) 伺服器與 Gmail 服務的連線,因為 IMAPStore 實現 QuotaAwareStore。獲取 Store 物件後,獲取 Quota 陣列並對其進行迭代並列印相關資訊。
編譯和執行
現在我們的類已準備就緒,讓我們編譯上面的類。我已經將 QuotaExample.java 類儲存到目錄:/home/manisha/JavaMailAPIExercise。我們需要將javax.mail.jar 和activation.jar新增到類路徑中。從命令提示符執行以下命令來編譯類(這兩個 jar 檔案都位於 /home/manisha/ 目錄中):
javac -cp /home/manisha/activation.jar:/home/manisha/javax.mail.jar: QuotaExample.java
現在類已編譯,執行以下命令執行:
java -cp /home/manisha/activation.jar:/home/manisha/javax.mail.jar: QuotaExample
驗證輸出
您應該在命令控制檯中看到類似的訊息。
imapStore ---imaps://abc%40gmail.com@imap.gmail.com
quotaRoot:''
name:'STORAGE', limit:'15728640', usage:'513'
退回郵件
郵件可能由於多種原因而被退回。此問題在rfc1211 中進行了深入討論。只有伺服器才能確定特定郵箱或使用者名稱是否存在。當伺服器檢測到錯誤時,它將向原始郵件的發件人返回一條郵件,指示失敗的原因。
有很多網際網路標準涵蓋了投遞狀態通知,但是大量伺服器不支援這些新標準,而是使用臨時技術來返回此類失敗郵件。因此,很難將退回郵件與導致問題的原始郵件相關聯。
JavaMail 包含對解析投遞狀態通知的支援。有很多技術和啟發式方法可以解決此問題。其中一項技術是可變信封返回路徑。您可以設定信封中的返回路徑,如下面的示例所示。這是退回郵件傳送到的地址。您可能希望將其設定為與 From: 標頭不同的通用地址,以便您可以處理遠端退回郵件。這可以透過在 JavaMail 中設定mail.smtp.from 屬性來完成。
建立 Java 類
建立一個名為SendEmail 的 Java 類檔案,其內容如下:
import java.util.Properties;

import javax.mail.Message;
import javax.mail.PasswordAuthentication;
import javax.mail.Session;
import javax.mail.Transport;
import javax.mail.internet.InternetAddress;
import javax.mail.internet.MimeMessage;

public class SendEmail {
   public static void main(String[] args) throws Exception {
      String smtpServer = "smtp.gmail.com";
      int port = 587;
      final String userid = "youraddress";//change accordingly
      final String password = "*****";//change accordingly
      String contentType = "text/html";
      String subject = "test: bounce an email to a different address " +
				"from the sender";
      String from = "youraddress@gmail.com";
      String to = "bouncer@fauxmail.com";//some invalid address
      String bounceAddr = "toaddress@gmail.com";//change accordingly
      String body = "Test: get message to bounce to a separate email address";

      Properties props = new Properties();

      props.put("mail.smtp.auth", "true");
      props.put("mail.smtp.starttls.enable", "true");
      props.put("mail.smtp.host", smtpServer);
      props.put("mail.smtp.port", "587");
      props.put("mail.transport.protocol", "smtp");
      props.put("mail.smtp.from", bounceAddr);

      Session mailSession = Session.getInstance(props,
         new javax.mail.Authenticator() {
            protected PasswordAuthentication getPasswordAuthentication() {
               return new PasswordAuthentication(userid, password);
            }
         });

      MimeMessage message = new MimeMessage(mailSession);
      message.addFrom(InternetAddress.parse(from));
      message.setRecipients(Message.RecipientType.TO, to);
      message.setSubject(subject);
      message.setContent(body, contentType);

      Transport transport = mailSession.getTransport();
      try {
         System.out.println("Sending ....");
         transport.connect(smtpServer, port, userid, password);
         transport.sendMessage(message,
            message.getRecipients(Message.RecipientType.TO));
         System.out.println("Sending done ...");
      } catch (Exception e) {
         System.err.println("Error Sending: ");
         e.printStackTrace();

      }
      transport.close();
   }// end function main()
}
在這裡我們可以看到屬性mail.smtp.from 設定的值與from 地址不同。
編譯和執行
現在我們的類已準備就緒,讓我們編譯上面的類。我已經將 SendEmail.java 類儲存到目錄:/home/manisha/JavaMailAPIExercise。我們需要在類路徑中使用 jar 檔案javax.mail.jar 和activation.jar。執行以下命令從命令提示符編譯該類(這兩個 jar 檔案都放在 /home/manisha/ 目錄中):
javac -cp /home/manisha/activation.jar:/home/manisha/javax.mail.jar: SendEmail.java
現在類已編譯,執行以下命令執行:
java -cp /home/manisha/activation.jar:/home/manisha/javax.mail.jar: SendEmail
驗證輸出
您應該在命令控制檯中看到以下訊息:
Sending ....
Sending done ...
SMTP 伺服器
SMTP 是簡單郵件傳輸協議的首字母縮寫。它是用於在網際網路協議 (IP) 網路上進行電子郵件 (電子郵件) 傳輸的網際網路標準。SMTP 使用 TCP 埠 25。透過 SSL 保護的 SMTP 連線簡稱為 SMTPS,儘管 SMTPS 本身並不是一種協議。
JavaMail API 包含com.sun.mail.smtp包,該包充當 SMTP 協議提供程式以訪問 SMTP 伺服器。下表列出了此包中包含的類
| 類 | 描述 |
|---|---|
| SMTPMessage | 此類是 MimeMessage 類的特化,允許您指定在透過 SMTP 傳送此郵件時將使用的各種 SMTP 選項和引數。 |
| SMTPSSLTransport | 此類使用透過 SSL 的 SMTP 來實現 Transport 抽象類,用於郵件提交和傳輸。 |
| SMTPTransport | 此類使用 SMTP 來實現 Transport 抽象類,用於郵件提交和傳輸。 |
下表列出了丟擲的異常
| 異常 | 描述 |
|---|---|
| SMTPAddressFailedException | 當無法傳送郵件時丟擲此異常。 |
| SMTPAddressSucceededException | 當mail.smtp.reportsuccess屬性為 true 時,此異常連結到 SendFailedException。 |
| SMTPSenderFailedException | 當無法傳送郵件時丟擲此異常。 |
| SMTPSendFailedException | 當無法傳送郵件時丟擲此異常。此異常包含郵件伺服器拒絕的傳送方地址。 |
com.sun.mail.smtp提供程式可以選擇使用 SMTP 身份驗證。要使用 SMTP 身份驗證,您需要設定mail.smtp.auth屬性,或者在連線到 SMTP 伺服器時為 SMTP 傳輸提供使用者名稱和密碼。您可以使用以下方法之一執行此操作
在建立郵件會話時提供 Authenticator 物件,並在 Authenticator 回撥期間提供使用者名稱和密碼資訊。可以設定mail.smtp.user屬性來為回撥提供預設使用者名稱,但仍然需要顯式提供密碼。此方法允許您使用靜態 Transport send 方法傳送郵件。例如
Transport.send(message);
使用使用者名稱和密碼引數顯式呼叫 Transport connect 方法。例如
Transport tr = session.getTransport("smtp");
tr.connect(smtphost, username, password);
msg.saveChanges();
tr.sendMessage(msg, msg.getAllRecipients());
tr.close();
SMTP 協議提供程式支援以下屬性,這些屬性可以在 JavaMail Session 物件中設定。這些屬性始終設定為字串。例如
props.put("mail.smtp.port", "587");
IMAP 伺服器
IMAP 是網際網路郵件訪問協議的首字母縮寫。它是一種應用程式層網際網路協議,允許電子郵件客戶端訪問遠端郵件伺服器上的電子郵件。IMAP 伺服器通常監聽眾所周知的埠 143。IMAP over SSL (IMAPS) 埠號為 993。
IMAP 支援線上和離線兩種操作模式。使用 IMAP 的電子郵件客戶端通常會將郵件保留在伺服器上,直到使用者顯式刪除它們。
包com.sun.mail.imap是 JavaMail API 的 IMAP 協議提供程式,它提供對 IMAP 訊息儲存的訪問。下表列出了此提供程式的介面和類
| 類/介面 | 描述 |
|---|---|
| IMAPFolder.ProtocolCommand | 這是一個用於使用者定義的 IMAP 協議命令的簡單介面。 |
| ACL | 這是一個類。特定身份驗證識別符號(使用者或組)的訪問控制列表條目。 |
| IMAPFolder | 此類實現了一個 IMAP 資料夾。 |
| IMAPFolder.FetchProfileItem | 這是一個用於獲取標頭的類。 |
| IMAPMessage | 此類實現了一個 ReadableMime 物件。 |
| IMAPMessage.FetchProfileCondition | 此類實現要對資料夾中的每條郵件執行的測試。 |
| IMAPSSLStore | 此類透過 SSL 提供對 IMAP 訊息儲存的訪問。 |
| IMAPStore | 此類提供對 IMAP 訊息儲存的訪問。 |
| Rights | 此類表示身份驗證識別符號(例如,使用者或組)的一組許可權。 |
| Rights.Right | 此內部類表示單個許可權。 |
| SortTerm | 根據 RFC 5256 定義的特定排序標準。 |
關於此提供程式的一些注意事項
此提供程式同時支援 IMAP4 和 IMAP4rev1 協議。
已連線的 IMAPStore 保持一個 IMAP 協議物件的池,用於與 IMAP 伺服器通訊。當開啟資料夾並需要新的 IMAP 協議物件時,IMAPStore 將從連線池中提供它們,或者如果沒有可用的物件,則建立它們。當資料夾關閉時,如果池中……,則其 IMAP 協議物件將返回到連線池。
已連線的 IMAPStore 物件可能會也可能不會維護一個單獨的 IMAP 協議物件,該物件為儲存提供與 IMAP 伺服器的專用連線。
POP3 伺服器
郵局協議 (POP) 是一種應用程式層網際網路標準協議,本地電子郵件客戶端使用它透過 TCP/IP 連線從遠端伺服器檢索電子郵件。POP 支援對遠端郵箱訪問的簡單下載和刪除要求。POP3 伺服器監聽眾所周知的埠 110。
包com.sun.mail.pop3是 JavaMail API 的 POP3 協議提供程式,它提供對 POP3 訊息儲存的訪問。下表列出了此包中的類
| 名稱 | 描述 |
|---|---|
| POP3Folder | POP3 資料夾(只能是“INBOX”)。 |
| POP3Message | POP3 訊息。 |
| POP3SSLStore | 使用 SSL 的 POP3 訊息儲存。 |
| POP3Store | POP3 訊息儲存。 |
關於此提供程式的一些注意事項
POP3 提供程式僅支援名為INBOX的單個資料夾。由於 POP3 協議的限制,許多 JavaMail API 功能(如事件通知、資料夾管理、標誌管理等)都不允許。
透過使用協議名稱pop3或表單pop3://user:password@host:port/INBOX的 URL,透過 JavaMail API 訪問 POP3 提供程式。
POP3 不支援永久標誌。例如,Flags.Flag.RECENT標誌永遠不會為 POP3 訊息設定。應用程式需要確定 POP3 郵箱中的哪些郵件是新的。
POP3 不支援 Folder.expunge() 方法。要刪除和清除郵件,請在郵件上設定 Flags.Flag.DELETED 標誌,然後使用 Folder.close(true) 方法關閉資料夾。
POP3 不提供接收日期,因此 getReceivedDate 方法將返回 null。
當訪問 POP3 訊息的標頭時,POP3 提供程式使用 TOP 命令來獲取所有標頭,然後將它們快取。
當訪問 POP3 訊息的內容時,POP3 提供程式使用 RETR 命令來獲取整個訊息。
可以使用POP3Message.invalidate方法在不關閉資料夾的情況下使快取的資料失效。