- Java 併發教程
- 併發 - 首頁
- 併發 - 概述
- 併發 - 環境設定
- 併發 - 主要操作
- 執行緒間通訊
- 併發 - 同步
- 併發 - 死鎖
- 實用類示例
- 併發 - ThreadLocal
- 併發 - ThreadLocalRandom
- 鎖示例
- 併發 - 鎖
- 併發 - 讀寫鎖
- 併發 - 條件
- 原子變數示例
- 併發 - AtomicInteger
- 併發 - AtomicLong
- 併發 - AtomicBoolean
- 併發 - AtomicReference
- 併發 - AtomicIntegerArray
- 併發 - AtomicLongArray
- 併發 - AtomicReferenceArray
- 執行器示例
- 併發 - 執行器
- 併發 - ExecutorService
- ScheduledExecutorService
- 執行緒池示例
- 併發 - newFixedThreadPool
- 併發 - newCachedThreadPool
- newScheduledThreadPool
- newSingleThreadExecutor
- 併發 - ThreadPoolExecutor
- ScheduledThreadPoolExecutor
- 高階示例
- 併發 - Futures 和 Callables
- 併發 - Fork-Join 框架
- 併發集合
- 併發 - BlockingQueue
- 併發 - ConcurrentMap
- ConcurrentNavigableMap
- 併發有用資源
- 併發 - 快速指南
- 併發 - 有用資源
- 併發 - 討論
Java 併發 - 快速指南
Java 併發 - 概述
Java 是一種多執行緒程式語言,這意味著我們可以使用 Java 開發多執行緒程式。多執行緒程式包含兩個或多個可以併發執行的部分,並且每個部分可以同時處理不同的任務,從而最佳化可用資源的使用,尤其是在您的計算機具有多個 CPU 時。
根據定義,多工處理是指多個程序共享 CPU 等公共處理資源。多執行緒將多工處理的概念擴充套件到應用程式中,您可以在其中將單個應用程式內的特定操作細分為各個執行緒。每個執行緒都可以並行執行。作業系統不僅在不同的應用程式之間分配處理時間,還在應用程式內的每個執行緒之間分配處理時間。
多執行緒使您能夠以一種方式編寫程式碼,其中多個活動可以在同一個程式中併發進行。
執行緒的生命週期
執行緒在其生命週期中會經歷不同的階段。例如,執行緒誕生、啟動、執行,然後死亡。下圖顯示了執行緒的完整生命週期。
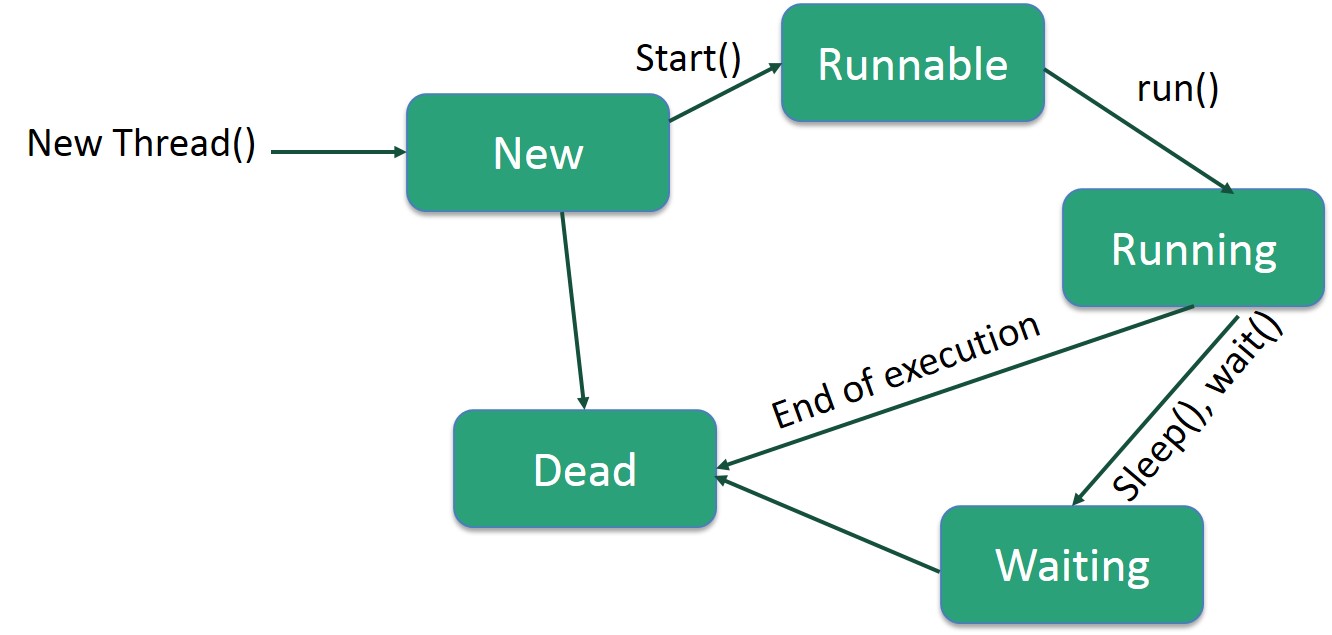
以下是生命週期的階段:
新建 - 新執行緒從新建狀態開始其生命週期。它保持在此狀態,直到程式啟動執行緒。它也被稱為新生執行緒。
可執行 - 新生執行緒啟動後,執行緒變為可執行狀態。處於此狀態的執行緒被認為正在執行其任務。
等待 - 有時,執行緒在等待另一個執行緒執行任務時會轉換到等待狀態。執行緒只有在另一個執行緒發出訊號讓等待執行緒繼續執行時才會轉換回可執行狀態。
計時等待 - 可執行執行緒可以為指定的時間間隔進入計時等待狀態。處於此狀態的執行緒在該時間間隔到期或其正在等待的事件發生時轉換回可執行狀態。
終止(死亡) - 可執行執行緒在完成其任務或以其他方式終止時進入終止狀態。
執行緒優先順序
每個 Java 執行緒都具有一個優先順序,這有助於作業系統確定排程執行緒的順序。
Java 執行緒優先順序介於 MIN_PRIORITY(常量 1)和 MAX_PRIORITY(常量 10)之間。預設情況下,每個執行緒都被賦予 NORM_PRIORITY(常量 5)優先順序。
優先順序較高的執行緒對程式更重要,應在優先順序較低的執行緒之前分配處理器時間。但是,執行緒優先順序不能保證執行緒執行的順序,並且在很大程度上依賴於平臺。
透過實現 Runnable 介面建立執行緒
如果您的類旨在作為執行緒執行,那麼您可以透過實現Runnable介面來實現。您需要遵循三個基本步驟:
步驟 1
作為第一步,您需要實現Runnable介面提供的 run() 方法。此方法為執行緒提供了一個入口點,您將在此方法中放置您的完整業務邏輯。以下是 run() 方法的簡單語法:
public void run( )
步驟 2
作為第二步,您將使用以下建構函式例項化一個Thread物件:
Thread(Runnable threadObj, String threadName);
其中,threadObj 是實現Runnable介面的類的例項,threadName 是賦予新執行緒的名稱。
步驟 3
建立 Thread 物件後,您可以透過呼叫start()方法啟動它,該方法執行對 run() 方法的呼叫。以下是 start() 方法的簡單語法:
void start();
示例
以下是一個建立新執行緒並開始執行它的示例:
即時演示class RunnableDemo implements Runnable {
private Thread t;
private String threadName;
RunnableDemo(String name) {
threadName = name;
System.out.println("Creating " + threadName );
}
public void run() {
System.out.println("Running " + threadName );
try {
for(int i = 4; i > 0; i--) {
System.out.println("Thread: " + threadName + ", " + i);
// Let the thread sleep for a while.
Thread.sleep(50);
}
} catch (InterruptedException e) {
System.out.println("Thread " + threadName + " interrupted.");
}
System.out.println("Thread " + threadName + " exiting.");
}
public void start () {
System.out.println("Starting " + threadName );
if (t == null) {
t = new Thread (this, threadName);
t.start ();
}
}
}
public class TestThread {
public static void main(String args[]) {
RunnableDemo R1 = new RunnableDemo("Thread-1");
R1.start();
RunnableDemo R2 = new RunnableDemo("Thread-2");
R2.start();
}
}
這將產生以下結果:
輸出
Creating Thread-1
Starting Thread-1
Creating Thread-2
Starting Thread-2
Running Thread-1
Thread: Thread-1, 4
Running Thread-2
Thread: Thread-2, 4
Thread: Thread-1, 3
Thread: Thread-2, 3
Thread: Thread-1, 2
Thread: Thread-2, 2
Thread: Thread-1, 1
Thread: Thread-2, 1
Thread Thread-1 exiting.
Thread Thread-2 exiting.
透過擴充套件 Thread 類建立執行緒
建立執行緒的第二種方法是建立一個擴充套件Thread類的新的類,使用以下兩個簡單的步驟。這種方法在處理使用 Thread 類中可用方法建立的多個執行緒方面提供了更大的靈活性。
步驟 1
您需要覆蓋 Thread 類中可用的run()方法。此方法為執行緒提供了一個入口點,您將在此方法中放置您的完整業務邏輯。以下是 run() 方法的簡單語法:
public void run( )
步驟 2
建立 Thread 物件後,您可以透過呼叫start()方法啟動它,該方法執行對 run() 方法的呼叫。以下是 start() 方法的簡單語法:
void start( );
示例
以下是重寫為擴充套件 Thread 的前一個程式:
即時演示class ThreadDemo extends Thread {
private Thread t;
private String threadName;
ThreadDemo(String name) {
threadName = name;
System.out.println("Creating " + threadName );
}
public void run() {
System.out.println("Running " + threadName );
try {
for(int i = 4; i > 0; i--) {
System.out.println("Thread: " + threadName + ", " + i);
// Let the thread sleep for a while.
Thread.sleep(50);
}
} catch (InterruptedException e) {
System.out.println("Thread " + threadName + " interrupted.");
}
System.out.println("Thread " + threadName + " exiting.");
}
public void start () {
System.out.println("Starting " + threadName );
if (t == null) {
t = new Thread (this, threadName);
t.start ();
}
}
}
public class TestThread {
public static void main(String args[]) {
ThreadDemo T1 = new ThreadDemo("Thread-1");
T1.start();
ThreadDemo T2 = new ThreadDemo("Thread-2");
T2.start();
}
}
這將產生以下結果:
輸出
Creating Thread-1
Starting Thread-1
Creating Thread-2
Starting Thread-2
Running Thread-1
Thread: Thread-1, 4
Running Thread-2
Thread: Thread-2, 4
Thread: Thread-1, 3
Thread: Thread-2, 3
Thread: Thread-1, 2
Thread: Thread-2, 2
Thread: Thread-1, 1
Thread: Thread-2, 1
Thread Thread-1 exiting.
Thread Thread-2 exiting.
Java 併發 - 環境設定
在本章中,我們將討論為 Java 設定一個融洽的環境的不同方面。
本地環境設定
如果您仍然希望為 Java 程式語言設定環境,那麼本節將指導您如何在機器上下載和設定 Java。以下是設定環境的步驟。
Java SE 可從以下連結免費獲取 下載 Java。您可以根據您的作業系統下載版本。
按照說明下載 Java 並執行.exe以在您的機器上安裝 Java。在您的機器上安裝 Java 後,您需要設定環境變數以指向正確的安裝目錄:
為 Windows 設定路徑
假設您已將 Java 安裝在c:\Program Files\java\jdk目錄中:
右鍵單擊“我的電腦”,然後選擇“屬性”。
在“高階”選項卡下單擊“環境變數”按鈕。
現在,更改“Path”變數,使其還包含 Java 可執行檔案的路徑。例如,如果路徑當前設定為“C:\WINDOWS\SYSTEM32”,則將路徑更改為“C:\WINDOWS\SYSTEM32;c:\Program Files\java\jdk\bin”。
為 Linux、UNIX、Solaris、FreeBSD 設定路徑
環境變數 PATH 應設定為指向 Java 二進位制檔案安裝的位置。如果您在執行此操作時遇到問題,請參閱您的 shell 文件。
例如,如果您使用bash作為您的 shell,則您將在您的 '.bashrc' 的末尾新增以下行:'export PATH = /path/to/java:$PATH'
流行的 Java 編輯器
要編寫 Java 程式,您需要一個文字編輯器。市場上甚至還有更復雜的 IDE。但目前,您可以考慮以下其中之一:
記事本 - 在 Windows 機器上,您可以使用任何簡單的文字編輯器,如記事本(推薦用於本教程)、TextPad。
Netbeans - 一個開源且免費的 Java IDE,可以從 https://netbeans.org/index.html 下載。
Eclipse - 由 Eclipse 開源社群開發的 Java IDE,可以從 https://www.eclipse.org/ 下載。
Java 併發 - 主要操作
核心 Java 提供對多執行緒程式的完全控制。您可以開發一個多執行緒程式,該程式可以根據您的要求完全暫停、恢復或停止。有各種靜態方法可以線上程物件上使用以控制其行為。下表列出了這些方法:
| 序號 | 方法及描述 |
|---|---|
| 1 | public void suspend() 此方法將執行緒置於掛起狀態,可以使用 resume() 方法恢復。 |
| 2 | public void stop() 此方法完全停止執行緒。 |
| 3 | public void resume() 此方法恢復執行緒,該執行緒使用 suspend() 方法掛起。 |
| 4 | public void wait() 導致當前執行緒等待,直到另一個執行緒呼叫 notify()。 |
| 5 | public void notify() 喚醒一個正在等待此物件監視器的執行緒。 |
請注意,最新版本的 Java 已棄用 suspend()、resume() 和 stop() 方法的使用,因此您需要使用可用的替代方法。
示例
即時演示class RunnableDemo implements Runnable {
public Thread t;
private String threadName;
boolean suspended = false;
RunnableDemo(String name) {
threadName = name;
System.out.println("Creating " + threadName );
}
public void run() {
System.out.println("Running " + threadName );
try {
for(int i = 10; i > 0; i--) {
System.out.println("Thread: " + threadName + ", " + i);
// Let the thread sleep for a while.
Thread.sleep(300);
synchronized(this) {
while(suspended) {
wait();
}
}
}
} catch (InterruptedException e) {
System.out.println("Thread " + threadName + " interrupted.");
}
System.out.println("Thread " + threadName + " exiting.");
}
public void start () {
System.out.println("Starting " + threadName );
if (t == null) {
t = new Thread (this, threadName);
t.start ();
}
}
void suspend() {
suspended = true;
}
synchronized void resume() {
suspended = false;
notify();
}
}
public class TestThread {
public static void main(String args[]) {
RunnableDemo R1 = new RunnableDemo("Thread-1");
R1.start();
RunnableDemo R2 = new RunnableDemo("Thread-2");
R2.start();
try {
Thread.sleep(1000);
R1.suspend();
System.out.println("Suspending First Thread");
Thread.sleep(1000);
R1.resume();
System.out.println("Resuming First Thread");
R2.suspend();
System.out.println("Suspending thread Two");
Thread.sleep(1000);
R2.resume();
System.out.println("Resuming thread Two");
} catch (InterruptedException e) {
System.out.println("Main thread Interrupted");
} try {
System.out.println("Waiting for threads to finish.");
R1.t.join();
R2.t.join();
} catch (InterruptedException e) {
System.out.println("Main thread Interrupted");
}
System.out.println("Main thread exiting.");
}
}
以上程式產生以下輸出:
輸出
Creating Thread-1
Starting Thread-1
Creating Thread-2
Starting Thread-2
Running Thread-1
Thread: Thread-1, 10
Running Thread-2
Thread: Thread-2, 10
Thread: Thread-1, 9
Thread: Thread-2, 9
Thread: Thread-1, 8
Thread: Thread-2, 8
Thread: Thread-1, 7
Thread: Thread-2, 7
Suspending First Thread
Thread: Thread-2, 6
Thread: Thread-2, 5
Thread: Thread-2, 4
Resuming First Thread
Suspending thread Two
Thread: Thread-1, 6
Thread: Thread-1, 5
Thread: Thread-1, 4
Thread: Thread-1, 3
Resuming thread Two
Thread: Thread-2, 3
Waiting for threads to finish.
Thread: Thread-1, 2
Thread: Thread-2, 2
Thread: Thread-1, 1
Thread: Thread-2, 1
Thread Thread-1 exiting.
Thread Thread-2 exiting.
Main thread exiting.
執行緒間通訊
如果您瞭解程序間通訊,那麼理解執行緒間通訊將很容易。當您開發一個兩個或多個執行緒交換某些資訊的應用程式時,執行緒間通訊非常重要。
有三種簡單的方法和一個小技巧可以使執行緒通訊成為可能。所有三種方法都列在下面:
| 序號 | 方法及描述 |
|---|---|
| 1 | public void wait() 導致當前執行緒等待,直到另一個執行緒呼叫 notify()。 |
| 2 | public void notify() 喚醒一個正在等待此物件監視器的執行緒。 |
| 3 | public void notifyAll() 喚醒所有在同一物件上呼叫 wait() 的執行緒。 |
這些方法已在 Object 中實現為final方法,因此它們在所有類中都可用。所有三個方法只能在synchronized上下文中呼叫。
示例
此示例顯示了兩個執行緒如何使用wait()和notify()方法進行通訊。您可以使用相同的概念建立複雜的系統。
即時演示class Chat {
boolean flag = false;
public synchronized void Question(String msg) {
if (flag) {
try {
wait();
} catch (InterruptedException e) {
e.printStackTrace();
}
}
System.out.println(msg);
flag = true;
notify();
}
public synchronized void Answer(String msg) {
if (!flag) {
try {
wait();
} catch (InterruptedException e) {
e.printStackTrace();
}
}
System.out.println(msg);
flag = false;
notify();
}
}
class T1 implements Runnable {
Chat m;
String[] s1 = { "Hi", "How are you ?", "I am also doing fine!" };
public T1(Chat m1) {
this.m = m1;
new Thread(this, "Question").start();
}
public void run() {
for (int i = 0; i < s1.length; i++) {
m.Question(s1[i]);
}
}
}
class T2 implements Runnable {
Chat m;
String[] s2 = { "Hi", "I am good, what about you?", "Great!" };
public T2(Chat m2) {
this.m = m2;
new Thread(this, "Answer").start();
}
public void run() {
for (int i = 0; i < s2.length; i++) {
m.Answer(s2[i]);
}
}
}
public class TestThread {
public static void main(String[] args) {
Chat m = new Chat();
new T1(m);
new T2(m);
}
}
當以上程式編譯並執行時,它會產生以下結果:
輸出
Hi
Hi
How are you ?
I am good, what about you?
I am also doing fine!
Great!
以上示例取自 [https://stackoverflow.com/questions/2170520/inter-thread-communication-in-java] 並進行了修改。
Java 併發 - 同步
帶同步的多執行緒示例
這是同一個示例,它按順序列印計數器值,並且每次我們執行它時,它都會產生相同的結果。
示例
即時演示class PrintDemo {
public void printCount() {
try {
for(int i = 5; i > 0; i--) {
System.out.println("Counter --- " + i );
}
} catch (Exception e) {
System.out.println("Thread interrupted.");
}
}
}
class ThreadDemo extends Thread {
private Thread t;
private String threadName;
PrintDemo PD;
ThreadDemo(String name, PrintDemo pd) {
threadName = name;
PD = pd;
}
public void run() {
synchronized(PD) {
PD.printCount();
}
System.out.println("Thread " + threadName + " exiting.");
}
public void start () {
System.out.println("Starting " + threadName );
if (t == null) {
t = new Thread (this, threadName);
t.start ();
}
}
}
public class TestThread {
public static void main(String args[]) {
PrintDemo PD = new PrintDemo();
ThreadDemo T1 = new ThreadDemo("Thread - 1 ", PD);
ThreadDemo T2 = new ThreadDemo("Thread - 2 ", PD);
T1.start();
T2.start();
// wait for threads to end
try {
T1.join();
T2.join();
} catch (Exception e) {
System.out.println("Interrupted");
}
}
}
每次執行此程式都會產生相同的結果 -
輸出
Starting Thread - 1
Starting Thread - 2
Counter   ---   5
Counter   ---   4
Counter   ---   3
Counter   ---   2
Counter   ---   1
Thread Thread - 1  exiting.
Counter   ---   5
Counter   ---   4
Counter   ---   3
Counter   ---   2
Counter   ---   1
Thread Thread - 2  exiting.
Java 併發 - 死鎖
死鎖描述了一種情況,其中兩個或多個執行緒被永遠阻塞,等待彼此。當多個執行緒需要相同的鎖但以不同的順序獲取它們時,就會發生死鎖。Java 多執行緒程式可能會遇到死鎖情況,因為synchronized關鍵字會導致執行執行緒在等待與指定物件關聯的鎖或監視器時阻塞。這是一個示例。
示例
即時演示public class TestThread {
public static Object Lock1 = new Object();
public static Object Lock2 = new Object();
public static void main(String args[]) {
ThreadDemo1 T1 = new ThreadDemo1();
ThreadDemo2 T2 = new ThreadDemo2();
T1.start();
T2.start();
}
private static class ThreadDemo1 extends Thread {
public void run() {
synchronized (Lock1) {
System.out.println("Thread 1: Holding lock 1...");
try {
Thread.sleep(10);
} catch (InterruptedException e) {}
System.out.println("Thread 1: Waiting for lock 2...");
synchronized (Lock2) {
System.out.println("Thread 1: Holding lock 1 & 2...");
}
}
}
}
private static class ThreadDemo2 extends Thread {
public void run() {
synchronized (Lock2) {
System.out.println("Thread 2: Holding lock 2...");
try {
Thread.sleep(10);
} catch (InterruptedException e) {}
System.out.println("Thread 2: Waiting for lock 1...");
synchronized (Lock1) {
System.out.println("Thread 2: Holding lock 1 & 2...");
}
}
}
}
}
編譯並執行上述程式時,您會發現死鎖情況,以下是程式產生的輸出 -
輸出
Thread 1: Holding lock 1...
Thread 2: Holding lock 2...
Thread 1: Waiting for lock 2...
Thread 2: Waiting for lock 1...
上述程式將永遠掛起,因為兩個執行緒都無法繼續執行並等待彼此釋放鎖,因此您可以透過按 CTRL+C 退出程式。
死鎖解決方案示例
讓我們更改鎖的順序並執行相同的程式,看看這兩個執行緒是否仍然相互等待 -
示例
即時演示public class TestThread {
public static Object Lock1 = new Object();
public static Object Lock2 = new Object();
public static void main(String args[]) {
ThreadDemo1 T1 = new ThreadDemo1();
ThreadDemo2 T2 = new ThreadDemo2();
T1.start();
T2.start();
}
private static class ThreadDemo1 extends Thread {
public void run() {
synchronized (Lock1) {
System.out.println("Thread 1: Holding lock 1...");
try {
Thread.sleep(10);
} catch (InterruptedException e) {}
System.out.println("Thread 1: Waiting for lock 2...");
synchronized (Lock2) {
System.out.println("Thread 1: Holding lock 1 & 2...");
}
}
}
}
private static class ThreadDemo2 extends Thread {
public void run() {
synchronized (Lock1) {
System.out.println("Thread 2: Holding lock 1...");
try {
Thread.sleep(10);
} catch (InterruptedException e) {}
System.out.println("Thread 2: Waiting for lock 2...");
synchronized (Lock2) {
System.out.println("Thread 2: Holding lock 1 & 2...");
}
}
}
}
}
因此,只需更改鎖的順序即可防止程式陷入死鎖情況,並以以下結果完成 -
輸出
Thread 1: Holding lock 1...
Thread 1: Waiting for lock 2...
Thread 1: Holding lock 1 & 2...
Thread 2: Holding lock 1...
Thread 2: Waiting for lock 2...
Thread 2: Holding lock 1 & 2...
以上示例只是為了使概念清晰,但是,這是一個複雜的概念,在開發應用程式以處理死鎖情況之前,您應該深入研究它。
Java 併發 - ThreadLocal 類
ThreadLocal 類用於建立執行緒區域性變數,這些變數只能由同一執行緒讀取和寫入。例如,如果兩個執行緒訪問包含對相同 threadLocal 變數的引用的程式碼,則每個執行緒都不會看到其他執行緒對 threadLocal 變數所做的任何修改。
ThreadLocal 方法
以下是 ThreadLocal 類中可用的一些重要方法。
| 序號 | 方法及描述 |
|---|---|
| 1 | public T get() 返回此執行緒區域性變數在當前執行緒副本中的值。 |
| 2 | protected T initialValue() 返回此執行緒區域性變數的當前執行緒的“初始值”。 |
| 3 | public void remove() 刪除此執行緒區域性變數的當前執行緒的值。 |
| 4 | public void set(T value) 將此執行緒區域性變數的當前執行緒副本設定為指定的值。 |
示例
以下 TestThread 程式演示了 ThreadLocal 類的一些方法。這裡我們使用了兩個計數器變數,一個是普通變數,另一個是 ThreadLocal。
即時演示class RunnableDemo implements Runnable {
int counter;
ThreadLocal<Integer> threadLocalCounter = new ThreadLocal<Integer>();
public void run() {
counter++;
if(threadLocalCounter.get() != null) {
threadLocalCounter.set(threadLocalCounter.get().intValue() + 1);
} else {
threadLocalCounter.set(0);
}
System.out.println("Counter: " + counter);
System.out.println("threadLocalCounter: " + threadLocalCounter.get());
}
}
public class TestThread {
public static void main(String args[]) {
RunnableDemo commonInstance = new RunnableDemo();
Thread t1 = new Thread(commonInstance);
Thread t2 = new Thread(commonInstance);
Thread t3 = new Thread(commonInstance);
Thread t4 = new Thread(commonInstance);
t1.start();
t2.start();
t3.start();
t4.start();
// wait for threads to end
try {
t1.join();
t2.join();
t3.join();
t4.join();
} catch (Exception e) {
System.out.println("Interrupted");
}
}
}
這將產生以下結果。
輸出
Counter: 1
threadLocalCounter: 0
Counter: 2
threadLocalCounter: 0
Counter: 3
threadLocalCounter: 0
Counter: 4
threadLocalCounter: 0
您可以看到 counter 的值被每個執行緒遞增,但 threadLocalCounter 對每個執行緒都保持為 0。
ThreadLocalRandom 類
java.util.concurrent.ThreadLocalRandom 是從 jdk 1.7 開始引入的一個實用程式類,當多個執行緒或 ForkJoinTasks 需要生成隨機數時很有用。它提高了效能,並且與 Math.random() 方法相比爭用更少。
ThreadLocalRandom 方法
以下是 ThreadLocalRandom 類中可用的一些重要方法。
| 序號 | 方法及描述 |
|---|---|
| 1 | public static ThreadLocalRandom current() 返回當前執行緒的 ThreadLocalRandom。 |
| 2 | protected int next(int bits) 生成下一個偽隨機數。 |
| 3 | public double nextDouble(double n) 返回一個偽隨機的、均勻分佈的 double 值,該值介於 0(包含)和指定值(不包含)之間。 |
| 4 | public double nextDouble(double least, double bound) 返回一個偽隨機的、均勻分佈的值,該值介於給定的最小值(包含)和邊界(不包含)之間。 |
| 5 | public int nextInt(int least, int bound) 返回一個偽隨機的、均勻分佈的值,該值介於給定的最小值(包含)和邊界(不包含)之間。 |
| 6 | public long nextLong(long n) 返回一個偽隨機的、均勻分佈的值,該值介於 0(包含)和指定值(不包含)之間。 |
| 7 | public long nextLong(long least, long bound) 返回一個偽隨機的、均勻分佈的值,該值介於給定的最小值(包含)和邊界(不包含)之間。 |
| 8 | public void setSeed(long seed) 丟擲 UnsupportedOperationException。 |
示例
以下 TestThread 程式演示了 Lock 介面的一些方法。這裡我們使用了 lock() 來獲取鎖,使用 unlock() 來釋放鎖。
即時演示import java.util.Random;
import java.util.concurrent.locks.Condition;
import java.util.concurrent.locks.Lock;
import java.util.concurrent.locks.ReentrantLock;
import java.util.concurrent.ThreadLocalRandom;
public class TestThread {
public static void main(final String[] arguments) {
System.out.println("Random Integer: " + new Random().nextInt());
System.out.println("Seeded Random Integer: " + new Random(15).nextInt());
System.out.println(
"Thread Local Random Integer: " + ThreadLocalRandom.current().nextInt());
final ThreadLocalRandom random = ThreadLocalRandom.current();
random.setSeed(15); //exception will come as seeding is not allowed in ThreadLocalRandom.
System.out.println("Seeded Thread Local Random Integer: " + random.nextInt());
}
}
這將產生以下結果。
輸出
Random Integer: 1566889198
Seeded Random Integer: -1159716814
Thread Local Random Integer: 358693993
Exception in thread "main" java.lang.UnsupportedOperationException
        at java.util.concurrent.ThreadLocalRandom.setSeed(Unknown Source)
        at TestThread.main(TestThread.java:21)
這裡我們使用了 ThreadLocalRandom 和 Random 類來獲取隨機數。
Java 併發 - Lock 介面
java.util.concurrent.locks.Lock 介面用作執行緒同步機制,類似於同步塊。新的鎖定機制比同步塊更靈活,並提供更多選項。Lock 和同步塊之間的主要區別如下 -
順序保證 - 同步塊不提供任何關於等待執行緒將獲得訪問許可權的順序的保證。Lock 介面處理此問題。
無超時 - 如果未授予鎖,則同步塊沒有超時選項。Lock 介面提供此選項。
單一方法 - 同步塊必須完全包含在單個方法中,而 lock 介面的 lock() 和 unlock() 方法可以在不同的方法中呼叫。
Lock 方法
以下是 Lock 類中可用的一些重要方法。
| 序號 | 方法及描述 |
|---|---|
| 1 | public void lock() 獲取鎖。 |
| 2 | public void lockInterruptibly() 除非當前執行緒被中斷,否則獲取鎖。 |
| 3 | public Condition newCondition() 返回一個新的 Condition 例項,該例項繫結到此 Lock 例項。 |
| 4 | public boolean tryLock() 僅當呼叫時鎖為空閒時才獲取鎖。 |
| 5 | public boolean tryLock(long time, TimeUnit unit) 如果在給定的等待時間內鎖為空閒並且當前執行緒未被中斷,則獲取鎖。 |
| 6 | public void unlock() 釋放鎖。 |
示例
以下 TestThread 程式演示了 Lock 介面的一些方法。這裡我們使用了 lock() 來獲取鎖,使用 unlock() 來釋放鎖。
即時演示import java.util.concurrent.locks.Lock;
import java.util.concurrent.locks.ReentrantLock;
class PrintDemo {
private final Lock queueLock = new ReentrantLock();
public void print() {
queueLock.lock();
try {
Long duration = (long) (Math.random() * 10000);
System.out.println(Thread.currentThread().getName()
+ " Time Taken " + (duration / 1000) + " seconds.");
Thread.sleep(duration);
} catch (InterruptedException e) {
e.printStackTrace();
} finally {
System.out.printf(
"%s printed the document successfully.\n", Thread.currentThread().getName());
queueLock.unlock();
}
}
}
class ThreadDemo extends Thread {
PrintDemo printDemo;
ThreadDemo(String name, PrintDemo printDemo) {
super(name);
this.printDemo = printDemo;
}
@Override
public void run() {
System.out.printf(
"%s starts printing a document\n", Thread.currentThread().getName());
printDemo.print();
}
}
public class TestThread {
public static void main(String args[]) {
PrintDemo PD = new PrintDemo();
ThreadDemo t1 = new ThreadDemo("Thread - 1 ", PD);
ThreadDemo t2 = new ThreadDemo("Thread - 2 ", PD);
ThreadDemo t3 = new ThreadDemo("Thread - 3 ", PD);
ThreadDemo t4 = new ThreadDemo("Thread - 4 ", PD);
t1.start();
t2.start();
t3.start();
t4.start();
}
}
這將產生以下結果。
輸出
Thread - 1  starts printing a document
Thread - 4  starts printing a document
Thread - 3  starts printing a document
Thread - 2  starts printing a document
Thread - 1   Time Taken 4 seconds.
Thread - 1  printed the document successfully.
Thread - 4   Time Taken 3 seconds.
Thread - 4  printed the document successfully.
Thread - 3   Time Taken 5 seconds.
Thread - 3  printed the document successfully.
Thread - 2   Time Taken 4 seconds.
Thread - 2  printed the document successfully.
這裡我們使用 ReentrantLock 類作為 Lock 介面的實現。ReentrantLock 類允許執行緒鎖定一個方法,即使它已經擁有另一個方法的鎖。
Java 併發 - ReadWriteLock 介面
java.util.concurrent.locks.ReadWriteLock 介面允許多個執行緒同時讀取,但一次只能有一個執行緒寫入。
讀取鎖 - 如果沒有執行緒鎖定 ReadWriteLock 以進行寫入,則多個執行緒可以訪問讀取鎖。
寫入鎖 - 如果沒有執行緒正在讀取或寫入,則一個執行緒可以訪問寫入鎖。
Lock 方法
以下是 Lock 類中可用的一些重要方法。
| 序號 | 方法及描述 |
|---|---|
| 1 | public Lock readLock() 返回用於讀取的鎖。 |
| 2 | public Lock writeLock() 返回用於寫入的鎖。 |
示例
以下 TestThread 程式演示了 ReadWriteLock 介面的這些方法。這裡我們使用了 readlock() 來獲取讀取鎖,使用 writeLock() 來獲取寫入鎖。 即時演示import java.util.concurrent.locks.ReentrantReadWriteLock;
public class TestThread {
private static final ReentrantReadWriteLock lock = new ReentrantReadWriteLock(true);
private static String message = "a";
public static void main(String[] args) throws InterruptedException {
Thread t1 = new Thread(new WriterA());
t1.setName("Writer A");
Thread t2 = new Thread(new WriterB());
t2.setName("Writer B");
Thread t3 = new Thread(new Reader());
t3.setName("Reader");
t1.start();
t2.start();
t3.start();
t1.join();
t2.join();
t3.join();
}
static class Reader implements Runnable {
public void run() {
if(lock.isWriteLocked()) {
System.out.println("Write Lock Present.");
}
lock.readLock().lock();
try {
Long duration = (long) (Math.random() * 10000);
System.out.println(Thread.currentThread().getName()
+ " Time Taken " + (duration / 1000) + " seconds.");
Thread.sleep(duration);
} catch (InterruptedException e) {
e.printStackTrace();
} finally {
System.out.println(Thread.currentThread().getName() +": "+ message );
lock.readLock().unlock();
}
}
}
static class WriterA implements Runnable {
public void run() {
lock.writeLock().lock();
try {
Long duration = (long) (Math.random() * 10000);
System.out.println(Thread.currentThread().getName()
+ " Time Taken " + (duration / 1000) + " seconds.");
Thread.sleep(duration);
} catch (InterruptedException e) {
e.printStackTrace();
} finally {
message = message.concat("a");
lock.writeLock().unlock();
}
}
}
static class WriterB implements Runnable {
public void run() {
lock.writeLock().lock();
try {
Long duration = (long) (Math.random() * 10000);
System.out.println(Thread.currentThread().getName()
+ " Time Taken " + (duration / 1000) + " seconds.");
Thread.sleep(duration);
} catch (InterruptedException e) {
e.printStackTrace();
} finally {
message = message.concat("b");
lock.writeLock().unlock();
}
}
}
}
這將產生以下結果。
輸出
Writer A  Time Taken 6 seconds.
Write Lock Present.
Writer B  Time Taken 2 seconds.
Reader  Time Taken 0 seconds.
Reader: aab
Java 併發 - Condition 介面
java.util.concurrent.locks.Condition 介面提供了一種執行緒能力,可以暫停其執行,直到給定條件為真。Condition 物件必然繫結到一個 Lock,並且必須使用 newCondition() 方法獲取。
Condition 方法
以下是 Condition 類中可用的一些重要方法。
| 序號 | 方法及描述 |
|---|---|
| 1 | public void await() 導致當前執行緒等待,直到它被訊號通知或中斷。 |
| 2 | public boolean await(long time, TimeUnit unit) 導致當前執行緒等待,直到它被訊號通知或中斷,或者指定的等待時間過去。 |
| 3 | public long awaitNanos(long nanosTimeout) 導致當前執行緒等待,直到它被訊號通知或中斷,或者指定的等待時間過去。 |
| 4 | public long awaitUninterruptibly() 導致當前執行緒等待,直到它被訊號通知。 |
| 5 | public long awaitUntil() 導致當前執行緒等待,直到它被訊號通知或中斷,或者指定的截止日期過去。 |
| 6 | public void signal() 喚醒一個等待執行緒。 |
| 7 | public void signalAll() 喚醒所有等待執行緒。 |
示例
以下 TestThread 程式演示了 Condition 介面的這些方法。這裡我們使用了 signal() 來通知,使用 await() 來暫停執行緒。 即時演示import java.util.concurrent.locks.Condition;
import java.util.concurrent.locks.Lock;
import java.util.concurrent.locks.ReentrantLock;
public class TestThread {
public static void main(String[] args) throws InterruptedException {
ItemQueue itemQueue = new ItemQueue(10);
//Create a producer and a consumer.
Thread producer = new Producer(itemQueue);
Thread consumer = new Consumer(itemQueue);
//Start both threads.
producer.start();
consumer.start();
//Wait for both threads to terminate.
producer.join();
consumer.join();
}
static class ItemQueue {
private Object[] items = null;
private int current = 0;
private int placeIndex = 0;
private int removeIndex = 0;
private final Lock lock;
private final Condition isEmpty;
private final Condition isFull;
public ItemQueue(int capacity) {
this.items = new Object[capacity];
lock = new ReentrantLock();
isEmpty = lock.newCondition();
isFull = lock.newCondition();
}
public void add(Object item) throws InterruptedException {
lock.lock();
while(current >= items.length)
isFull.await();
items[placeIndex] = item;
placeIndex = (placeIndex + 1) % items.length;
++current;
//Notify the consumer that there is data available.
isEmpty.signal();
lock.unlock();
}
public Object remove() throws InterruptedException {
Object item = null;
lock.lock();
while(current <= 0) {
isEmpty.await();
}
item = items[removeIndex];
removeIndex = (removeIndex + 1) % items.length;
--current;
//Notify the producer that there is space available.
isFull.signal();
lock.unlock();
return item;
}
public boolean isEmpty() {
return (items.length == 0);
}
}
static class Producer extends Thread {
private final ItemQueue queue;
public Producer(ItemQueue queue) {
this.queue = queue;
}
@Override
public void run() {
String[] numbers =
{"1", "2", "3", "4", "5", "6", "7", "8", "9", "10", "11", "12"};
try {
for(String number: numbers) {
System.out.println("[Producer]: " + number);
}
queue.add(null);
} catch (InterruptedException ex) {
ex.printStackTrace();
}
}
}
static class Consumer extends Thread {
private final ItemQueue queue;
public Consumer(ItemQueue queue) {
this.queue = queue;
}
@Override
public void run() {
try {
do {
Object number = queue.remove();
System.out.println("[Consumer]: " + number);
if(number == null) {
return;
}
} while(!queue.isEmpty());
} catch (InterruptedException ex) {
ex.printStackTrace();
}
}
}
}
這將產生以下結果。
輸出
[Producer]: 1
[Producer]: 2
[Producer]: 3
[Producer]: 4
[Producer]: 5
[Producer]: 6
[Producer]: 7
[Producer]: 8
[Producer]: 9
[Producer]: 10
[Producer]: 11
[Producer]: 12
[Consumer]: null
Java 併發 - AtomicInteger 類
java.util.concurrent.atomic.AtomicInteger 類提供對底層 int 值的操作,這些操作可以原子地讀取和寫入,並且還包含高階原子操作。AtomicInteger 支援對底層 int 變數進行原子操作。它具有 get 和 set 方法,這些方法的工作方式類似於對 volatile 變數的讀取和寫入。也就是說,set 與隨後對同一變數的任何 get 具有 happens-before 關係。原子 compareAndSet 方法也具有這些記憶體一致性特性。
AtomicInteger 方法
以下是 AtomicInteger 類中可用的一些重要方法。
| 序號 | 方法及描述 |
|---|---|
| 1 | public int addAndGet(int delta) 原子地將給定值新增到當前值。 |
| 2 | public boolean compareAndSet(int expect, int update) 如果當前值與預期值相同,則原子地將值設定為給定的更新值。 |
| 3 | public int decrementAndGet() 原子地將當前值減 1。 |
| 4 | public double doubleValue() 將指定數字的值作為 double 返回。 |
| 5 | public float floatValue() 將指定數字的值作為 float 返回。 |
| 6 | public int get() 獲取當前值。 |
| 7 | public int getAndAdd(int delta) 原子地將給定值新增到當前值。 |
| 8 | public int getAndDecrement() 原子地將當前值減 1。 |
| 9 | public int getAndIncrement() 原子地將當前值加 1。 |
| 10 | public int getAndSet(int newValue) 原子地設定為給定值並返回舊值。 |
| 11 | public int incrementAndGet() 原子地將當前值加 1。 |
| 12 | public int intValue() 將指定數字的值作為 int 返回。 |
| 13 | public void lazySet(int newValue) 最終設定為給定值。 |
| 14 | public long longValue() 將指定數字的值作為 long 返回。 |
| 15 | public void set(int newValue) 設定為給定值。 |
| 16 | public String toString() 返回當前值的字串表示形式。 |
| 17 | public boolean weakCompareAndSet(int expect, int update) 如果當前值與預期值相同,則原子地將值設定為給定的更新值。 |
示例
以下 TestThread 程式顯示了在基於執行緒的環境中計數器的非安全實現。
即時演示public class TestThread {
static class Counter {
private int c = 0;
public void increment() {
c++;
}
public int value() {
return c;
}
}
public static void main(final String[] arguments) throws InterruptedException {
final Counter counter = new Counter();
//1000 threads
for(int i = 0; i < 1000 ; i++) {
new Thread(new Runnable() {
public void run() {
counter.increment();
}
}).start();
}
Thread.sleep(6000);
System.out.println("Final number (should be 1000): " + counter.value());
}
}
這可能會根據計算機的速度和執行緒交錯產生以下結果。
輸出
Final number (should be 1000): 1000
示例
以下 TestThread 程式顯示了在基於執行緒的環境中使用 AtomicInteger 對計數器進行安全實現。 即時演示import java.util.concurrent.atomic.AtomicInteger;
public class TestThread {
static class Counter {
private AtomicInteger c = new AtomicInteger(0);
public void increment() {
c.getAndIncrement();
}
public int value() {
return c.get();
}
}
public static void main(final String[] arguments) throws InterruptedException {
final Counter counter = new Counter();
//1000 threads
for(int i = 0; i < 1000 ; i++) {
new Thread(new Runnable() {
public void run() {
counter.increment();
}
}).start();
}
Thread.sleep(6000);
System.out.println("Final number (should be 1000): " + counter.value());
}
}
這將產生以下結果。
輸出
Final number (should be 1000): 1000
Java 併發 - AtomicLong 類
java.util.concurrent.atomic.AtomicLong 類提供對底層 long 值的操作,這些操作可以原子地讀取和寫入,並且還包含高階原子操作。AtomicLong 支援對底層 long 變數進行原子操作。它具有 get 和 set 方法,這些方法的工作方式類似於對 volatile 變數的讀取和寫入。也就是說,set 與隨後對同一變數的任何 get 具有 happens-before 關係。原子 compareAndSet 方法也具有這些記憶體一致性特性。
AtomicLong 方法
以下是 AtomicLong 類中可用的一些重要方法。
| 序號 | 方法及描述 |
|---|---|
| 1 | public long addAndGet(long delta) 原子地將給定值新增到當前值。 |
| 2 | public boolean compareAndSet(long expect, long update) 如果當前值與預期值相同,則原子地將值設定為給定的更新值。 |
| 3 | public long decrementAndGet() 原子地將當前值減 1。 |
| 4 | public double doubleValue() 將指定數字的值作為 double 返回。 |
| 5 | public float floatValue() 將指定數字的值作為 float 返回。 |
| 6 | public long get() 獲取當前值。 |
| 7 | public long getAndAdd(long delta) 原子地將給定值新增到當前值。 |
| 8 | public long getAndDecrement() 原子地將當前值減 1。 |
| 9 | public long getAndIncrement() 原子地將當前值加 1。 |
| 10 | public long getAndSet(long newValue) 原子地設定為給定值並返回舊值。 |
| 11 | public long incrementAndGet() 原子地將當前值加 1。 |
| 12 | public int intValue() 將指定數字的值作為 int 返回。 |
| 13 | public void lazySet(long newValue) 最終設定為給定值。 |
| 14 | public long longValue() 將指定數字的值作為 long 返回。 |
| 15 | public void set(long newValue) 設定為給定值。 |
| 16 | public String toString() 返回當前值的字串表示形式。 |
| 17 | public boolean weakCompareAndSet(long expect, long update) 如果當前值與預期值相同,則原子地將值設定為給定的更新值。 |
示例
以下 TestThread 程式展示了在基於執行緒的環境中使用 AtomicLong 安全實現計數器的示例。
即時演示import java.util.concurrent.atomic.AtomicLong;
public class TestThread {
static class Counter {
private AtomicLong c = new AtomicLong(0);
public void increment() {
c.getAndIncrement();
}
public long value() {
return c.get();
}
}
public static void main(final String[] arguments) throws InterruptedException {
final Counter counter = new Counter();
//1000 threads
for(int i = 0; i < 1000 ; i++) {
new Thread(new Runnable() {
public void run() {
counter.increment();
}
}).start();
}
Thread.sleep(6000);
System.out.println("Final number (should be 1000): " + counter.value());
}
}
這將產生以下結果。
輸出
Final number (should be 1000): 1000
Java 併發 - AtomicBoolean 類
java.util.concurrent.atomic.AtomicBoolean 類提供對底層布林值進行原子操作的方法,包括原子讀寫以及高階原子操作。AtomicBoolean 支援對底層布林變數進行原子操作。它具有 get 和 set 方法,這些方法的工作方式類似於對 volatile 變數的讀寫操作。也就是說,set 操作與隨後對同一變數的任何 get 操作之間存在 happens-before 關係。原子 compareAndSet 方法也具有這些記憶體一致性特性。
AtomicBoolean 方法
以下是 AtomicBoolean 類中一些重要方法的列表。
| 序號 | 方法及描述 |
|---|---|
| 1 | public boolean compareAndSet(boolean expect, boolean update) 如果當前值 == 預期值,則以原子方式將值設定為給定的更新值。 |
| 2 | public boolean get() 返回當前值。 |
| 3 | public boolean getAndSet(boolean newValue) 以原子方式設定為給定值並返回先前的值。 |
| 4 | public void lazySet(boolean newValue) 最終設定為給定值。 |
| 5 | public void set(boolean newValue) 無條件地設定為給定值。 |
| 6 | public String toString() 返回當前值的字串表示形式。 |
| 7 | public boolean weakCompareAndSet(boolean expect, boolean update) 如果當前值 == 預期值,則以原子方式將值設定為給定的更新值。 |
示例
以下 TestThread 程式展示了在基於執行緒的環境中使用 AtomicBoolean 變數的示例。
即時演示import java.util.concurrent.atomic.AtomicBoolean;
public class TestThread {
public static void main(final String[] arguments) throws InterruptedException {
final AtomicBoolean atomicBoolean = new AtomicBoolean(false);
new Thread("Thread 1") {
public void run() {
while(true) {
System.out.println(Thread.currentThread().getName()
+" Waiting for Thread 2 to set Atomic variable to true. Current value is "
+ atomicBoolean.get());
if(atomicBoolean.compareAndSet(true, false)) {
System.out.println("Done!");
break;
}
}
};
}.start();
new Thread("Thread 2") {
public void run() {
System.out.println(Thread.currentThread().getName() +
", Atomic Variable: " +atomicBoolean.get());
System.out.println(Thread.currentThread().getName() +
" is setting the variable to true ");
atomicBoolean.set(true);
System.out.println(Thread.currentThread().getName() +
", Atomic Variable: " +atomicBoolean.get());
};
}.start();
}
}
這將產生以下結果。
輸出
Thread 1 Waiting for Thread 2 to set Atomic variable to true. Current value is false
Thread 1 Waiting for Thread 2 to set Atomic variable to true. Current value is false
Thread 1 Waiting for Thread 2 to set Atomic variable to true. Current value is false
Thread 2, Atomic Variable: false
Thread 1 Waiting for Thread 2 to set Atomic variable to true. Current value is false
Thread 2 is setting the variable to true
Thread 2, Atomic Variable: true
Thread 1 Waiting for Thread 2 to set Atomic variable to true. Current value is false
Done!
Java 併發 - AtomicReference 類
java.util.concurrent.atomic.AtomicReference 類提供對底層物件引用進行原子操作的方法,包括原子讀寫以及高階原子操作。AtomicReference 支援對底層物件引用變數進行原子操作。它具有 get 和 set 方法,這些方法的工作方式類似於對 volatile 變數的讀寫操作。也就是說,set 操作與隨後對同一變數的任何 get 操作之間存在 happens-before 關係。原子 compareAndSet 方法也具有這些記憶體一致性特性。
AtomicReference 方法
以下是 AtomicReference 類中一些重要方法的列表。
| 序號 | 方法及描述 |
|---|---|
| 1 | public boolean compareAndSet(V expect, V update) 如果當前值 == 預期值,則以原子方式將值設定為給定的更新值。 |
| 2 | public boolean get() 返回當前值。 |
| 3 | public boolean getAndSet(V newValue) 以原子方式設定為給定值並返回先前的值。 |
| 4 | public void lazySet(V newValue) 最終設定為給定值。 |
| 5 | public void set(V newValue) 無條件地設定為給定值。 |
| 6 | public String toString() 返回當前值的字串表示形式。 |
| 7 | public boolean weakCompareAndSet(V expect, V update) 如果當前值 == 預期值,則以原子方式將值設定為給定的更新值。 |
示例
以下 TestThread 程式展示了在基於執行緒的環境中使用 AtomicReference 變數的示例。
即時演示import java.util.concurrent.atomic.AtomicReference;
public class TestThread {
private static String message = "hello";
private static AtomicReference<String> atomicReference;
public static void main(final String[] arguments) throws InterruptedException {
atomicReference = new AtomicReference<String>(message);
new Thread("Thread 1") {
public void run() {
atomicReference.compareAndSet(message, "Thread 1");
message = message.concat("-Thread 1!");
};
}.start();
System.out.println("Message is: " + message);
System.out.println("Atomic Reference of Message is: " + atomicReference.get());
}
}
這將產生以下結果。
輸出
Message is: hello
Atomic Reference of Message is: Thread 1
Java 併發 - AtomicIntegerArray 類
java.util.concurrent.atomic.AtomicIntegerArray 類提供對底層 int 陣列進行原子操作的方法,包括原子讀寫以及高階原子操作。AtomicIntegerArray 支援對底層 int 陣列變數進行原子操作。它具有 get 和 set 方法,這些方法的工作方式類似於對 volatile 變數的讀寫操作。也就是說,set 操作與隨後對同一變數的任何 get 操作之間存在 happens-before 關係。原子 compareAndSet 方法也具有這些記憶體一致性特性。
AtomicIntegerArray 方法
以下是 AtomicIntegerArray 類中一些重要方法的列表。
| 序號 | 方法及描述 |
|---|---|
| 1 | public int addAndGet(int i, int delta) 以原子方式將給定值新增到索引 i 處的元素。 |
| 2 | public boolean compareAndSet(int i, int expect, int update) 如果當前值 == 預期值,則以原子方式將位置 i 處的元素設定為給定的更新值。 |
| 3 | public int decrementAndGet(int i) 以原子方式將索引 i 處的元素減 1。 |
| 4 | public int get(int i) 獲取位置 i 處的當前值。 |
| 5 | public int getAndAdd(int i, int delta) 以原子方式將給定值新增到索引 i 處的元素。 |
| 6 | public int getAndDecrement(int i) 以原子方式將索引 i 處的元素減 1。 |
| 7 | public int getAndIncrement(int i) 以原子方式將索引 i 處的元素加 1。 |
| 8 | public int getAndSet(int i, int newValue) 以原子方式將位置 i 處的元素設定為給定值並返回舊值。 |
| 9 | public int incrementAndGet(int i) 以原子方式將索引 i 處的元素加 1。 |
| 10 | public void lazySet(int i, int newValue) 最終將位置 i 處的元素設定為給定值。 |
| 11 | public int length() 返回陣列的長度。 |
| 12 | public void set(int i, int newValue) 將位置 i 處的元素設定為給定值。 |
| 13 | public String toString() 返回陣列當前值的字串表示形式。 |
| 14 | public boolean weakCompareAndSet(int i, int expect, int update) 如果當前值 == 預期值,則以原子方式將位置 i 處的元素設定為給定的更新值。 |
示例
以下 TestThread 程式展示了在基於執行緒的環境中使用 AtomicIntegerArray 變數的示例。
即時演示import java.util.concurrent.atomic.AtomicIntegerArray;
public class TestThread {
private static AtomicIntegerArray atomicIntegerArray = new AtomicIntegerArray(10);
public static void main(final String[] arguments) throws InterruptedException {
for (int i = 0; i<atomicIntegerArray.length(); i++) {
atomicIntegerArray.set(i, 1);
}
Thread t1 = new Thread(new Increment());
Thread t2 = new Thread(new Compare());
t1.start();
t2.start();
t1.join();
t2.join();
System.out.println("Values: ");
for (int i = 0; i<atomicIntegerArray.length(); i++) {
System.out.print(atomicIntegerArray.get(i) + " ");
}
}
static class Increment implements Runnable {
public void run() {
for(int i = 0; i<atomicIntegerArray.length(); i++) {
int add = atomicIntegerArray.incrementAndGet(i);
System.out.println("Thread " + Thread.currentThread().getId()
+ ", index " +i + ", value: "+ add);
}
}
}
static class Compare implements Runnable {
public void run() {
for(int i = 0; i<atomicIntegerArray.length(); i++) {
boolean swapped = atomicIntegerArray.compareAndSet(i, 2, 3);
if(swapped) {
System.out.println("Thread " + Thread.currentThread().getId()
+ ", index " +i + ", value: 3");
}
}
}
}
}
這將產生以下結果。
輸出
Thread 10, index 0, value: 2
Thread 10, index 1, value: 2
Thread 10, index 2, value: 2
Thread 11, index 0, value: 3
Thread 10, index 3, value: 2
Thread 11, index 1, value: 3
Thread 11, index 2, value: 3
Thread 10, index 4, value: 2
Thread 11, index 3, value: 3
Thread 10, index 5, value: 2
Thread 10, index 6, value: 2
Thread 11, index 4, value: 3
Thread 10, index 7, value: 2
Thread 11, index 5, value: 3
Thread 10, index 8, value: 2
Thread 11, index 6, value: 3
Thread 10, index 9, value: 2
Thread 11, index 7, value: 3
Thread 11, index 8, value: 3
Thread 11, index 9, value: 3
Values:
3 3 3 3 3 3 3 3 3 3
Java 併發 - AtomicLongArray 類
java.util.concurrent.atomic.AtomicLongArray 類提供對底層 long 陣列進行原子操作的方法,包括原子讀寫以及高階原子操作。AtomicLongArray 支援對底層 long 陣列變數進行原子操作。它具有 get 和 set 方法,這些方法的工作方式類似於對 volatile 變數的讀寫操作。也就是說,set 操作與隨後對同一變數的任何 get 操作之間存在 happens-before 關係。原子 compareAndSet 方法也具有這些記憶體一致性特性。
AtomicLongArray 方法
以下是 AtomicLongArray 類中一些重要方法的列表。
| 序號 | 方法及描述 |
|---|---|
| 1 | public long addAndGet(int i, long delta) 以原子方式將給定值新增到索引 i 處的元素。 |
| 2 | public boolean compareAndSet(int i, long expect, long update) 如果當前值 == 預期值,則以原子方式將位置 i 處的元素設定為給定的更新值。 |
| 3 | public long decrementAndGet(int i) 以原子方式將索引 i 處的元素減 1。 |
| 4 | public long get(int i) 獲取位置 i 處的當前值。 |
| 5 | public long getAndAdd(int i, long delta) 以原子方式將給定值新增到索引 i 處的元素。 |
| 6 | public long getAndDecrement(int i) 以原子方式將索引 i 處的元素減 1。 |
| 7 | public long getAndIncrement(int i) 以原子方式將索引 i 處的元素加 1。 |
| 8 | public long getAndSet(int i, long newValue) 以原子方式將位置 i 處的元素設定為給定值並返回舊值。 |
| 9 | public long incrementAndGet(int i) 以原子方式將索引 i 處的元素加 1。 |
| 10 | public void lazySet(int i, long newValue) 最終將位置 i 處的元素設定為給定值。 |
| 11 | public int length() 返回陣列的長度。 |
| 12 | public void set(int i, long newValue) 將位置 i 處的元素設定為給定值。 |
| 13 | public String toString() 返回陣列當前值的字串表示形式。 |
| 14 | public boolean weakCompareAndSet(int i, long expect, long update) 如果當前值 == 預期值,則以原子方式將位置 i 處的元素設定為給定的更新值。 |
示例
以下 TestThread 程式展示了在基於執行緒的環境中使用 AtomicIntegerArray 變數的示例。
即時演示import java.util.concurrent.atomic.AtomicLongArray;
public class TestThread {
private static AtomicLongArray atomicLongArray = new AtomicLongArray(10);
public static void main(final String[] arguments) throws InterruptedException {
for (int i = 0; i<atomicLongArray.length(); i++) {
atomicLongArray.set(i, 1);
}
Thread t1 = new Thread(new Increment());
Thread t2 = new Thread(new Compare());
t1.start();
t2.start();
t1.join();
t2.join();
System.out.println("Values: ");
for (int i = 0; i<atomicLongArray.length(); i++) {
System.out.print(atomicLongArray.get(i) + " ");
}
}
static class Increment implements Runnable {
public void run() {
for(int i = 0; i<atomicLongArray.length(); i++) {
long add = atomicLongArray.incrementAndGet(i);
System.out.println("Thread " + Thread.currentThread().getId()
+ ", index " +i + ", value: "+ add);
}
}
}
static class Compare implements Runnable {
public void run() {
for(int i = 0; i<atomicLongArray.length(); i++) {
boolean swapped = atomicLongArray.compareAndSet(i, 2, 3);
if(swapped) {
System.out.println("Thread " + Thread.currentThread().getId()
+ ", index " +i + ", value: 3");
}
}
}
}
}
這將產生以下結果。
輸出
Thread 9, index 0, value: 2
Thread 10, index 0, value: 3
Thread 9, index 1, value: 2
Thread 9, index 2, value: 2
Thread 9, index 3, value: 2
Thread 9, index 4, value: 2
Thread 10, index 1, value: 3
Thread 9, index 5, value: 2
Thread 10, index 2, value: 3
Thread 9, index 6, value: 2
Thread 10, index 3, value: 3
Thread 9, index 7, value: 2
Thread 10, index 4, value: 3
Thread 9, index 8, value: 2
Thread 9, index 9, value: 2
Thread 10, index 5, value: 3
Thread 10, index 6, value: 3
Thread 10, index 7, value: 3
Thread 10, index 8, value: 3
Thread 10, index 9, value: 3
Values:
3 3 3 3 3 3 3 3 3 3
AtomicReferenceArray 類
java.util.concurrent.atomic.AtomicReferenceArray 類提供對底層引用陣列進行原子操作的方法,包括原子讀寫以及高階原子操作。AtomicReferenceArray 支援對底層引用陣列變數進行原子操作。它具有 get 和 set 方法,這些方法的工作方式類似於對 volatile 變數的讀寫操作。也就是說,set 操作與隨後對同一變數的任何 get 操作之間存在 happens-before 關係。原子 compareAndSet 方法也具有這些記憶體一致性特性。
AtomicReferenceArray 方法
以下是 AtomicReferenceArray 類中一些重要方法的列表。
| 序號 | 方法及描述 |
|---|---|
| 1 | public boolean compareAndSet(int i, E expect, E update) 如果當前值 == 預期值,則以原子方式將位置 i 處的元素設定為給定的更新值。 |
| 2 | public E get(int i) 獲取位置 i 處的當前值。 |
| 3 | public E getAndSet(int i, E newValue) 以原子方式將位置 i 處的元素設定為給定值並返回舊值。 |
| 4 | public void lazySet(int i, E newValue) 最終將位置 i 處的元素設定為給定值。 |
| 5 | public int length() 返回陣列的長度。 |
| 6 | public void set(int i, E newValue) 將位置 i 處的元素設定為給定值。 |
| 7 | public String toString() 返回陣列當前值的字串表示形式。 |
| 8 | public boolean weakCompareAndSet(int i, E expect, E update) 如果當前值 == 預期值,則以原子方式將位置 i 處的元素設定為給定的更新值。 |
示例
以下 TestThread 程式展示了在基於執行緒的環境中使用 AtomicReferenceArray 變數的示例。
即時演示import java.util.concurrent.atomic.AtomicReferenceArray;
public class TestThread {
private static String[] source = new String[10];
private static AtomicReferenceArray<String> atomicReferenceArray
= new AtomicReferenceArray<String>(source);
public static void main(final String[] arguments) throws InterruptedException {
for (int i = 0; i<atomicReferenceArray.length(); i++) {
atomicReferenceArray.set(i, "item-2");
}
Thread t1 = new Thread(new Increment());
Thread t2 = new Thread(new Compare());
t1.start();
t2.start();
t1.join();
t2.join();
}
static class Increment implements Runnable {
public void run() {
for(int i = 0; i<atomicReferenceArray.length(); i++) {
String add = atomicReferenceArray.getAndSet(i,"item-"+ (i+1));
System.out.println("Thread " + Thread.currentThread().getId()
+ ", index " +i + ", value: "+ add);
}
}
}
static class Compare implements Runnable {
public void run() {
for(int i = 0; i<atomicReferenceArray.length(); i++) {
System.out.println("Thread " + Thread.currentThread().getId()
+ ", index " +i + ", value: "+ atomicReferenceArray.get(i));
boolean swapped = atomicReferenceArray.compareAndSet(i, "item-2", "updated-item-2");
System.out.println("Item swapped: " + swapped);
if(swapped) {
System.out.println("Thread " + Thread.currentThread().getId()
+ ", index " +i + ", updated-item-2");
}
}
}
}
}
這將產生以下結果。
輸出
Thread 9, index 0, value: item-2
Thread 10, index 0, value: item-1
Item swapped: false
Thread 10, index 1, value: item-2
Item swapped: true
Thread 9, index 1, value: updated-item-2
Thread 10, index 1, updated-item-2
Thread 10, index 2, value: item-3
Item swapped: false
Thread 10, index 3, value: item-2
Item swapped: true
Thread 10, index 3, updated-item-2
Thread 10, index 4, value: item-2
Item swapped: true
Thread 10, index 4, updated-item-2
Thread 10, index 5, value: item-2
Item swapped: true
Thread 10, index 5, updated-item-2
Thread 10, index 6, value: item-2
Thread 9, index 2, value: item-2
Item swapped: true
Thread 9, index 3, value: updated-item-2
Thread 10, index 6, updated-item-2
Thread 10, index 7, value: item-2
Thread 9, index 4, value: updated-item-2
Item swapped: true
Thread 9, index 5, value: updated-item-2
Thread 10, index 7, updated-item-2
Thread 9, index 6, value: updated-item-2
Thread 10, index 8, value: item-2
Thread 9, index 7, value: updated-item-2
Item swapped: true
Thread 9, index 8, value: updated-item-2
Thread 10, index 8, updated-item-2
Thread 9, index 9, value: item-2
Thread 10, index 9, value: item-10
Item swapped: false
Java 併發 - Executor 介面
java.util.concurrent.Executor 介面是一個簡單的介面,用於支援啟動新任務。
ExecutorService 方法
| 序號 | 方法及描述 |
|---|---|
| 1 | void execute(Runnable command) 在將來的某個時間執行給定的命令。 |
示例
以下 TestThread 程式展示了在基於執行緒的環境中使用 Executor 介面的示例。
即時演示import java.util.concurrent.Executor;
import java.util.concurrent.Executors;
import java.util.concurrent.ThreadPoolExecutor;
import java.util.concurrent.TimeUnit;
public class TestThread {
public static void main(final String[] arguments) throws InterruptedException {
Executor executor = Executors.newCachedThreadPool();
executor.execute(new Task());
ThreadPoolExecutor pool = (ThreadPoolExecutor)executor;
pool.shutdown();
}
static class Task implements Runnable {
public void run() {
try {
Long duration = (long) (Math.random() * 5);
System.out.println("Running Task!");
TimeUnit.SECONDS.sleep(duration);
System.out.println("Task Completed");
} catch (InterruptedException e) {
e.printStackTrace();
}
}
}
}
這將產生以下結果。
輸出
Running Task!
Task Completed
ExecutorService 介面
java.util.concurrent.ExecutorService 介面是 Executor 介面的子介面,它添加了管理單個任務和執行器本身生命週期的功能。
ExecutorService 方法
| 序號 | 方法及描述 |
|---|---|
| 1 | boolean awaitTermination(long timeout, TimeUnit unit) 在關閉請求後阻塞,直到所有任務都已完成執行,或者超時發生,或者當前執行緒被中斷,以先發生者為準。 |
| 2 | <T> List<Future<T>> invokeAll(Collection<? extends Callable<T>> tasks) 執行給定的任務,並在所有任務完成後返回一個包含其狀態和結果的 Future 列表。 |
| 3 | <T> List<Future<T>> invokeAll(Collection<? extends Callable<T>> tasks, long timeout, TimeUnit unit) 執行給定的任務,並在所有任務完成後或超時過期時返回一個包含其狀態和結果的 Future 列表,以先發生者為準。 |
| 4 | <T> T invokeAny(Collection<? extends Callable<T>> tasks) 執行給定的任務,如果任何任務已成功完成(即,沒有丟擲異常),則返回其中一個已成功完成的任務的結果。 |
| 5 | <T> T invokeAny(Collection<? extends Callable<T>> tasks, long timeout, TimeUnit unit) 執行給定的任務,如果任何任務在給定超時時間過去之前已成功完成(即,沒有丟擲異常),則返回其中一個已成功完成的任務的結果。 |
| 6 | boolean isShutdown() 如果此執行器已關閉,則返回 true。 |
| 7 | boolean isTerminated() 如果所有任務在關閉後都已完成,則返回 true。 |
| 8 | void shutdown() 啟動有序關閉,其中先前提交的任務將被執行,但不會接受任何新任務。 |
| 9 | List<Runnable> shutdownNow() 嘗試停止所有正在積極執行的任務,停止等待任務的處理,並返回正在等待執行的任務列表。 |
| 10 | <T> Future<T> submit(Callable<T> task) 提交一個返回值的任務以供執行,並返回一個表示任務的待處理結果的 Future。 |
| 11 | Future<?> submit(Runnable task) 提交一個 Runnable 任務以供執行,並返回一個表示該任務的 Future。 |
| 12 | <T> Future<T> submit(Runnable task, T result) 提交一個 Runnable 任務以供執行,並返回一個表示該任務的 Future。 |
示例
以下 TestThread 程式展示了在基於執行緒的環境中使用 ExecutorService 介面的示例。
即時演示import java.util.concurrent.ExecutorService;
import java.util.concurrent.Executors;
import java.util.concurrent.TimeUnit;
public class TestThread {
public static void main(final String[] arguments) throws InterruptedException {
ExecutorService executor = Executors.newSingleThreadExecutor();
try {
executor.submit(new Task());
System.out.println("Shutdown executor");
executor.shutdown();
executor.awaitTermination(5, TimeUnit.SECONDS);
} catch (InterruptedException e) {
System.err.println("tasks interrupted");
} finally {
if (!executor.isTerminated()) {
System.err.println("cancel non-finished tasks");
}
executor.shutdownNow();
System.out.println("shutdown finished");
}
}
static class Task implements Runnable {
public void run() {
try {
Long duration = (long) (Math.random() * 20);
System.out.println("Running Task!");
TimeUnit.SECONDS.sleep(duration);
} catch (InterruptedException e) {
e.printStackTrace();
}
}
}
}
這將產生以下結果。
輸出
Shutdown executor
Running Task!
shutdown finished
cancel non-finished tasks
java.lang.InterruptedException: sleep interrupted
	at java.lang.Thread.sleep(Native Method)
	at java.lang.Thread.sleep(Thread.java:302)
	at java.util.concurrent.TimeUnit.sleep(TimeUnit.java:328)
	at TestThread$Task.run(TestThread.java:39)
	at java.util.concurrent.Executors$RunnableAdapter.call(Executors.java:439)
	at java.util.concurrent.FutureTask$Sync.innerRun(FutureTask.java:303)
	at java.util.concurrent.FutureTask.run(FutureTask.java:138)
	at java.util.concurrent.ThreadPoolExecutor$Worker.runTask(ThreadPoolExecutor.java:895)
	at java.util.concurrent.ThreadPoolExecutor$Worker.run(ThreadPoolExecutor.java:918)
	at java.lang.Thread.run(Thread.java:662)
ScheduledExecutorService 介面
java.util.concurrent.ScheduledExecutorService 介面是 ExecutorService 介面的子介面,它支援任務的未來和/或週期性執行。
ScheduledExecutorService 方法
| 序號 | 方法及描述 |
|---|---|
| 1 | <V> ScheduledFuture<V> schedule(Callable<V> callable, long delay, TimeUnit unit) 建立並執行一個 ScheduledFuture,該 Future 在給定的延遲後啟用。 |
| 2 | ScheduledFuture<?> schedule(Runnable command, long delay, TimeUnit unit) 建立並執行一個一次性操作,該操作在給定的延遲後啟用。 |
| 3 | ScheduledFuture<?> scheduleAtFixedRate(Runnable command, long initialDelay, long period, TimeUnit unit) 建立並執行一個週期性操作,該操作在給定的初始延遲後第一次啟用,隨後以給定的週期啟用;也就是說,執行將在 initialDelay 後開始,然後是 initialDelay+period,然後是 initialDelay + 2 * period,依此類推。 |
| 4 | ScheduledFuture<?> scheduleWithFixedDelay(Runnable command, long initialDelay, long delay, TimeUnit unit) 建立並執行一個週期性操作,該操作在給定的初始延遲後第一次啟用,隨後在一次執行終止與下一次執行開始之間以給定的延遲啟用。 |
示例
以下 TestThread 程式展示了在基於執行緒的環境中使用 ScheduledExecutorService 介面的示例。
即時演示import java.util.concurrent.Executors;
import java.util.concurrent.ScheduledExecutorService;
import java.util.concurrent.ScheduledFuture;
import java.util.concurrent.TimeUnit;
public class TestThread {
public static void main(final String[] arguments) throws InterruptedException {
final ScheduledExecutorService scheduler = Executors.newScheduledThreadPool(1);
final ScheduledFuture<?> beepHandler =
scheduler.scheduleAtFixedRate(new BeepTask(), 2, 2, TimeUnit.SECONDS);
scheduler.schedule(new Runnable() {
@Override
public void run() {
beepHandler.cancel(true);
scheduler.shutdown();
}
}, 10, TimeUnit.SECONDS);
}
static class BeepTask implements Runnable {
public void run() {
System.out.println("beep");
}
}
}
這將產生以下結果。
輸出
beep
beep
beep
beep
newFixedThreadPool 方法
可以透過呼叫 Executors 類的靜態 newFixedThreadPool() 方法來獲取固定執行緒池。
語法
ExecutorService fixedPool = Executors.newFixedThreadPool(2);
其中
最多 2 個執行緒將處於活動狀態以處理任務。
如果提交了超過 2 個執行緒,則它們將儲存在佇列中,直到執行緒可用。
如果執行緒因執行期間發生故障而終止,並且尚未呼叫執行器的關閉操作,則會建立一個新執行緒來代替它。
任何執行緒都存在,直到池關閉。
示例
以下 TestThread 程式展示了在基於執行緒的環境中使用 newFixedThreadPool 方法的示例。
即時演示import java.util.concurrent.ExecutorService;
import java.util.concurrent.Executors;
import java.util.concurrent.ThreadPoolExecutor;
import java.util.concurrent.TimeUnit;
public class TestThread {
public static void main(final String[] arguments) throws InterruptedException {
ExecutorService executor = Executors.newFixedThreadPool(2);
// Cast the object to its class type
ThreadPoolExecutor pool = (ThreadPoolExecutor) executor;
//Stats before tasks execution
System.out.println("Largest executions: "
+ pool.getLargestPoolSize());
System.out.println("Maximum allowed threads: "
+ pool.getMaximumPoolSize());
System.out.println("Current threads in pool: "
+ pool.getPoolSize());
System.out.println("Currently executing threads: "
+ pool.getActiveCount());
System.out.println("Total number of threads(ever scheduled): "
+ pool.getTaskCount());
executor.submit(new Task());
executor.submit(new Task());
//Stats after tasks execution
System.out.println("Core threads: " + pool.getCorePoolSize());
System.out.println("Largest executions: "
+ pool.getLargestPoolSize());
System.out.println("Maximum allowed threads: "
+ pool.getMaximumPoolSize());
System.out.println("Current threads in pool: "
+ pool.getPoolSize());
System.out.println("Currently executing threads: "
+ pool.getActiveCount());
System.out.println("Total number of threads(ever scheduled): "
+ pool.getTaskCount());
executor.shutdown();
}
static class Task implements Runnable {
public void run() {
try {
Long duration = (long) (Math.random() * 5);
System.out.println("Running Task! Thread Name: " +
Thread.currentThread().getName());
TimeUnit.SECONDS.sleep(duration);
System.out.println("Task Completed! Thread Name: " +
Thread.currentThread().getName());
} catch (InterruptedException e) {
e.printStackTrace();
}
}
}
}
這將產生以下結果。
輸出
Largest executions: 0
Maximum allowed threads: 2
Current threads in pool: 0
Currently executing threads: 0
Total number of threads(ever scheduled): 0
Core threads: 2
Largest executions: 2
Maximum allowed threads: 2
Current threads in pool: 2
Currently executing threads: 1
Total number of threads(ever scheduled): 2
Running Task! Thread Name: pool-1-thread-1
Running Task! Thread Name: pool-1-thread-2
Task Completed! Thread Name: pool-1-thread-2
Task Completed! Thread Name: pool-1-thread-1
newCachedThreadPool 方法
可以透過呼叫 Executors 類的靜態方法 newCachedThreadPool() 獲取一個快取執行緒池。
語法
ExecutorService executor = Executors.newCachedThreadPool();
其中
newCachedThreadPool 方法建立一個具有可擴充套件執行緒池的執行器。
此類執行器適用於啟動許多短暫任務的應用程式。
示例
以下 TestThread 程式展示了在基於執行緒的環境中使用 newCachedThreadPool 方法。
即時演示import java.util.concurrent.ExecutorService;
import java.util.concurrent.Executors;
import java.util.concurrent.ThreadPoolExecutor;
import java.util.concurrent.TimeUnit;
public class TestThread {
public static void main(final String[] arguments) throws InterruptedException {
ExecutorService executor = Executors.newCachedThreadPool();
// Cast the object to its class type
ThreadPoolExecutor pool = (ThreadPoolExecutor) executor;
//Stats before tasks execution
System.out.println("Largest executions: "
+ pool.getLargestPoolSize());
System.out.println("Maximum allowed threads: "
+ pool.getMaximumPoolSize());
System.out.println("Current threads in pool: "
+ pool.getPoolSize());
System.out.println("Currently executing threads: "
+ pool.getActiveCount());
System.out.println("Total number of threads(ever scheduled): "
+ pool.getTaskCount());
executor.submit(new Task());
executor.submit(new Task());
//Stats after tasks execution
System.out.println("Core threads: " + pool.getCorePoolSize());
System.out.println("Largest executions: "
+ pool.getLargestPoolSize());
System.out.println("Maximum allowed threads: "
+ pool.getMaximumPoolSize());
System.out.println("Current threads in pool: "
+ pool.getPoolSize());
System.out.println("Currently executing threads: "
+ pool.getActiveCount());
System.out.println("Total number of threads(ever scheduled): "
+ pool.getTaskCount());
executor.shutdown();
}
static class Task implements Runnable {
public void run() {
try {
Long duration = (long) (Math.random() * 5);
System.out.println("Running Task! Thread Name: " +
Thread.currentThread().getName());
TimeUnit.SECONDS.sleep(duration);
System.out.println("Task Completed! Thread Name: " +
Thread.currentThread().getName());
} catch (InterruptedException e) {
e.printStackTrace();
}
}
}
}
這將產生以下結果。
輸出
Largest executions: 0
Maximum allowed threads: 2147483647
Current threads in pool: 0
Currently executing threads: 0
Total number of threads(ever scheduled): 0
Core threads: 0
Largest executions: 2
Maximum allowed threads: 2147483647
Current threads in pool: 2
Currently executing threads: 2
Total number of threads(ever scheduled): 2
Running Task! Thread Name: pool-1-thread-1
Running Task! Thread Name: pool-1-thread-2
Task Completed! Thread Name: pool-1-thread-2
Task Completed! Thread Name: pool-1-thread-1
newScheduledThreadPool 方法
可以透過呼叫 Executors 類的靜態方法 newScheduledThreadPool() 獲取一個排程執行緒池。
語法
ExecutorService executor = Executors.newScheduledThreadPool(1);
示例
以下 TestThread 程式展示了在基於執行緒的環境中使用 newScheduledThreadPool 方法。
即時演示import java.util.concurrent.Executors;
import java.util.concurrent.ScheduledExecutorService;
import java.util.concurrent.ScheduledFuture;
import java.util.concurrent.TimeUnit;
public class TestThread {
public static void main(final String[] arguments) throws InterruptedException {
final ScheduledExecutorService scheduler = Executors.newScheduledThreadPool(1);
final ScheduledFuture<?> beepHandler =
scheduler.scheduleAtFixedRate(new BeepTask(), 2, 2, TimeUnit.SECONDS);
scheduler.schedule(new Runnable() {
@Override
public void run() {
beepHandler.cancel(true);
scheduler.shutdown();
}
}, 10, TimeUnit.SECONDS);
}
static class BeepTask implements Runnable {
public void run() {
System.out.println("beep");
}
}
}
這將產生以下結果。
輸出
beep
beep
beep
beep
newSingleThreadExecutor 方法
可以透過呼叫 Executors 類的靜態方法 newSingleThreadExecutor() 獲取一個單執行緒池。
語法
ExecutorService executor = Executors.newSingleThreadExecutor();
其中,newSingleThreadExecutor 方法建立一個每次執行一個任務的執行器。
示例
以下 TestThread 程式展示了在基於執行緒的環境中使用 newSingleThreadExecutor 方法。
即時演示import java.util.concurrent.ExecutorService;
import java.util.concurrent.Executors;
import java.util.concurrent.TimeUnit;
public class TestThread {
public static void main(final String[] arguments) throws InterruptedException {
ExecutorService executor = Executors.newSingleThreadExecutor();
try {
executor.submit(new Task());
System.out.println("Shutdown executor");
executor.shutdown();
executor.awaitTermination(5, TimeUnit.SECONDS);
} catch (InterruptedException e) {
System.err.println("tasks interrupted");
} finally {
if (!executor.isTerminated()) {
System.err.println("cancel non-finished tasks");
}
executor.shutdownNow();
System.out.println("shutdown finished");
}
}
static class Task implements Runnable {
public void run() {
try {
Long duration = (long) (Math.random() * 20);
System.out.println("Running Task!");
TimeUnit.SECONDS.sleep(duration);
} catch (InterruptedException e) {
e.printStackTrace();
}
}
}
}
這將產生以下結果。
輸出
Shutdown executor
Running Task!
shutdown finished
cancel non-finished tasks
java.lang.InterruptedException: sleep interrupted
	at java.lang.Thread.sleep(Native Method)
	at java.lang.Thread.sleep(Thread.java:302)
	at java.util.concurrent.TimeUnit.sleep(TimeUnit.java:328)
	at TestThread$Task.run(TestThread.java:39)
	at java.util.concurrent.Executors$RunnableAdapter.call(Executors.java:439)
	at java.util.concurrent.FutureTask$Sync.innerRun(FutureTask.java:303)
	at java.util.concurrent.FutureTask.run(FutureTask.java:138)
	at java.util.concurrent.ThreadPoolExecutor$Worker.runTask(ThreadPoolExecutor.java:895)
	at java.util.concurrent.ThreadPoolExecutor$Worker.run(ThreadPoolExecutor.java:918)
	at java.lang.Thread.run(Thread.java:662)
ThreadPoolExecutor 類
java.util.concurrent.ThreadPoolExecutor 是一個 ExecutorService,用於使用可能存在的多個池化執行緒中的一個來執行每個提交的任務,通常使用 Executors 工廠方法進行配置。它還提供各種實用程式方法來檢查當前執行緒的統計資訊並控制它們。
ThreadPoolExecutor 方法
| 序號 | 方法及描述 |
|---|---|
| 1 | protected void afterExecute(Runnable r, Throwable t) 在執行給定 Runnable 完成後呼叫的方法。 |
| 2 | void allowCoreThreadTimeOut(boolean value) 設定控制核心執行緒是否可能超時並終止的策略,如果在保持活動時間內沒有到達任務,則在需要時由新任務替換。 |
| 3 | boolean allowsCoreThreadTimeOut() 如果此池允許核心執行緒超時並在保持活動時間內沒有到達任務時終止,則返回 true,如果需要,則在到達新任務時替換。 |
| 4 | boolean awaitTermination(long timeout, TimeUnit unit) 在關閉請求後阻塞,直到所有任務都已完成執行,或者超時發生,或者當前執行緒被中斷,以先發生者為準。 |
| 5 | protected void beforeExecute(Thread t, Runnable r) 在給定執行緒中執行給定 Runnable 之前呼叫的方法。 |
| 6 | void execute(Runnable command) 在將來的某個時間執行給定的任務。 |
| 7 | protected void finalize() 當不再引用此執行器且它沒有執行緒時,呼叫 shutdown。 |
| 8 | int getActiveCount() 返回正在積極執行任務的執行緒的大致數量。 |
| 9 | long getCompletedTaskCount() 返回已完成執行的任務的大致總數。 |
| 10 | int getCorePoolSize() 返回核心執行緒數。 |
| 11 | long getKeepAliveTime(TimeUnit unit) 返回執行緒保持活動時間,即超過核心池大小的執行緒在被終止之前可以保持空閒的時間量。 |
| 12 | int getLargestPoolSize() 返回池中曾經同時存在的執行緒的最大數量。 |
| 13 | int getMaximumPoolSize() 返回允許的最大執行緒數。 |
| 14 | int getPoolSize() 返回池中當前的執行緒數。 |
| 15 | BlockingQueue 返回此執行器使用的任務佇列。 |
| 15 | RejectedExecutionHandler getRejectedExecutionHandler() 返回當前無法執行任務的處理程式。 |
| 16 | long getTaskCount() 返回曾經安排執行的任務的大致總數。 |
| 17 | ThreadFactory getThreadFactory() 返回用於建立新執行緒的執行緒工廠。 |
| 18 | boolean isShutdown() 如果此執行器已關閉,則返回 true。 |
| 19 | boolean isTerminated() 如果所有任務在關閉後都已完成,則返回 true。 |
| 20 | boolean isTerminating() 如果此執行器在 shutdown() 或 shutdownNow() 後正在終止過程中但尚未完全終止,則返回 true。 |
| 21 | int prestartAllCoreThreads() 啟動所有核心執行緒,使它們空閒等待工作。 |
| 22 | boolean prestartCoreThread() 啟動一個核心執行緒,使它空閒等待工作。 |
| 23 | void purge() 嘗試從工作佇列中刪除所有已取消的 Future 任務。 |
| 24 | boolean remove(Runnable task) 如果存在,則從執行器的內部佇列中刪除此任務,從而導致它在尚未啟動的情況下不執行。 |
| 25 | void setCorePoolSize(int corePoolSize) 設定核心執行緒數。 |
| 26 | void setKeepAliveTime(long time, TimeUnit unit) 設定執行緒在被終止之前可以保持空閒的時間限制。 |
| 27 | void setMaximumPoolSize(int maximumPoolSize) 設定允許的最大執行緒數。 |
| 28 | void setRejectedExecutionHandler(RejectedExecutionHandler handler) 設定無法執行任務的新處理程式。 |
| 29 | void setThreadFactory(ThreadFactory threadFactory) 設定用於建立新執行緒的執行緒工廠。 |
| 30 | void shutdown() 啟動有序關閉,其中先前提交的任務將被執行,但不會接受任何新任務。 |
| 31 | List<Runnable> shutdownNow() 嘗試停止所有正在積極執行的任務,停止等待任務的處理,並返回正在等待執行的任務列表。 |
| 32 | protected void terminated() 執行器終止時呼叫的方法。 |
| 33 | String toString() 返回一個字串,標識此池及其狀態,包括執行狀態和估計的工作執行緒和任務計數的指示。 |
示例
以下 TestThread 程式展示了在基於執行緒的環境中使用 ThreadPoolExecutor 介面。
即時演示import java.util.concurrent.Executors;
import java.util.concurrent.ThreadPoolExecutor;
import java.util.concurrent.TimeUnit;
public class TestThread {
public static void main(final String[] arguments) throws InterruptedException {
ThreadPoolExecutor executor = (ThreadPoolExecutor)Executors.newCachedThreadPool();
//Stats before tasks execution
System.out.println("Largest executions: "
+ executor.getLargestPoolSize());
System.out.println("Maximum allowed threads: "
+ executor.getMaximumPoolSize());
System.out.println("Current threads in pool: "
+ executor.getPoolSize());
System.out.println("Currently executing threads: "
+ executor.getActiveCount());
System.out.println("Total number of threads(ever scheduled): "
+ executor.getTaskCount());
executor.submit(new Task());
executor.submit(new Task());
//Stats after tasks execution
System.out.println("Core threads: " + executor.getCorePoolSize());
System.out.println("Largest executions: "
+ executor.getLargestPoolSize());
System.out.println("Maximum allowed threads: "
+ executor.getMaximumPoolSize());
System.out.println("Current threads in pool: "
+ executor.getPoolSize());
System.out.println("Currently executing threads: "
+ executor.getActiveCount());
System.out.println("Total number of threads(ever scheduled): "
+ executor.getTaskCount());
executor.shutdown();
}
static class Task implements Runnable {
public void run() {
try {
Long duration = (long) (Math.random() * 5);
System.out.println("Running Task! Thread Name: " +
Thread.currentThread().getName());
TimeUnit.SECONDS.sleep(duration);
System.out.println("Task Completed! Thread Name: " +
Thread.currentThread().getName());
} catch (InterruptedException e) {
e.printStackTrace();
}
}
}
}
這將產生以下結果。
輸出
Largest executions: 0
Maximum allowed threads: 2147483647
Current threads in pool: 0
Currently executing threads: 0
Total number of threads(ever scheduled): 0
Core threads: 0
Largest executions: 2
Maximum allowed threads: 2147483647
Current threads in pool: 2
Currently executing threads: 2
Total number of threads(ever scheduled): 2
Running Task! Thread Name: pool-1-thread-2
Running Task! Thread Name: pool-1-thread-1
Task Completed! Thread Name: pool-1-thread-1
Task Completed! Thread Name: pool-1-thread-2
ScheduledThreadPoolExecutor 類
java.util.concurrent.ScheduledThreadPoolExecutor 是 ThreadPoolExecutor 的子類,此外還可以排程命令在給定延遲後執行,或定期執行。
ScheduledThreadPoolExecutor 方法
| 序號 | 方法及描述 |
|---|---|
| 1 | protected <V> RunnableScheduledFuture<V> decorateTask(Callable<V> callable, RunnableScheduledFuture<V> task) 修改或替換用於執行可呼叫的任務。 |
| 2 | protected <V> RunnableScheduledFuture<V> decorateTask(Runnable runnable, RunnableScheduledFuture<V> task) 修改或替換用於執行可執行的任務。 |
| 3 | void execute(Runnable command) 執行命令,無需延遲。 |
| 4 | boolean getContinueExistingPeriodicTasksAfterShutdownPolicy() 獲取有關即使在此執行器已關閉後是否繼續執行現有定期任務的策略。 |
| 5 | boolean getExecuteExistingDelayedTasksAfterShutdownPolicy() 獲取有關即使在此執行器已關閉後是否執行現有延遲任務的策略。 |
| 6 | BlockingQueue<Runnable> getQueue() 返回此執行器使用的任務佇列。 |
| 7 | boolean getRemoveOnCancelPolicy() 獲取有關在取消時是否應立即從工作佇列中刪除取消的任務的策略。 |
| 8 | <V> ScheduledFuture<V> schedule(Callable<V> callable, long delay, TimeUnit unit) 建立並執行一個 ScheduledFuture,該 Future 在給定的延遲後啟用。 |
| 9 | ScheduledFuture<?> schedule(Runnable command, long delay, TimeUnit unit) 建立並執行一個一次性操作,該操作在給定的延遲後啟用。 |
| 10 | ScheduledFuture<?> scheduleAtFixedRate(Runnable command, long initialDelay, long period, TimeUnit unit) 建立並執行一個週期性操作,該操作在給定的初始延遲後第一次啟用,隨後以給定的週期啟用;也就是說,執行將在 initialDelay 後開始,然後是 initialDelay+period,然後是 initialDelay + 2 * period,依此類推。 |
| 11 | ScheduledFuture<?> scheduleWithFixedDelay(Runnable command, long initialDelay, long delay, TimeUnit unit) 建立並執行一個週期性操作,該操作在給定的初始延遲後第一次啟用,隨後在一次執行終止與下一次執行開始之間以給定的延遲啟用。 |
| 12 | void setContinueExistingPeriodicTasksAfterShutdownPolicy (boolean value) 設定有關即使在此執行器已關閉後是否繼續執行現有定期任務的策略。 |
| 13 | void setExecuteExistingDelayedTasksAfterShutdownPolicy (boolean value) 設定有關即使在此執行器已關閉後是否執行現有延遲任務的策略。 |
| 14 | void setRemoveOnCancelPolicy(boolean value) 設定有關在取消時是否應立即從工作佇列中刪除取消的任務的策略。 |
| 15 | void shutdown() 啟動有序關閉,其中先前提交的任務將被執行,但不會接受任何新任務。 |
| 16 | List<Runnable> shutdownNow() 嘗試停止所有正在積極執行的任務,停止等待任務的處理,並返回正在等待執行的任務列表。 |
| 17 | <T> Future<T> submit(Callable<T> task) 提交一個返回值的任務以供執行,並返回一個表示任務的待處理結果的 Future。 |
| 18 | Future<?> submit(Runnable task) 提交一個 Runnable 任務以供執行,並返回一個表示該任務的 Future。 |
| 19 | <T> Future<T> submit(Runnable task, T result) 提交一個 Runnable 任務以供執行,並返回一個表示該任務的 Future。 |
示例
以下 TestThread 程式展示了在基於執行緒的環境中使用 ScheduledThreadPoolExecutor 介面。
即時演示import java.util.concurrent.Executors;
import java.util.concurrent.ScheduledThreadPoolExecutor;
import java.util.concurrent.ScheduledFuture;
import java.util.concurrent.TimeUnit;
public class TestThread {
public static void main(final String[] arguments) throws InterruptedException {
final ScheduledThreadPoolExecutor scheduler =
(ScheduledThreadPoolExecutor)Executors.newScheduledThreadPool(1);
final ScheduledFuture<?> beepHandler =
scheduler.scheduleAtFixedRate(new BeepTask(), 2, 2, TimeUnit.SECONDS);
scheduler.schedule(new Runnable() {
@Override
public void run() {
beepHandler.cancel(true);
scheduler.shutdown();
}
}, 10, TimeUnit.SECONDS);
}
static class BeepTask implements Runnable {
public void run() {
System.out.println("beep");
}
}
}
這將產生以下結果。
輸出
beep
beep
beep
beep
Java 併發 - Futures 和 Callables
java.util.concurrent.Callable 物件可以返回執行緒完成的計算結果,這與只能執行執行緒的可執行介面形成對比。Callable 物件返回 Future 物件,該物件提供方法來監視執行緒執行的任務的進度。Future 物件可用於檢查 Callable 的狀態,然後線上程完成時從 Callable 中檢索結果。它還提供超時功能。
語法
//submit the callable using ThreadExecutor
//and get the result as a Future object
Future<Long> result10 = executor.submit(new FactorialService(10));

//get the result using get method of the Future object
//get method waits till the thread execution and then return the result of the execution.
Long factorial10 = result10.get();
示例
以下 TestThread 程式展示了在基於執行緒的環境中使用 Futures 和 Callables。
即時演示import java.util.concurrent.Callable;
import java.util.concurrent.ExecutionException;
import java.util.concurrent.ExecutorService;
import java.util.concurrent.Executors;
import java.util.concurrent.Future;
public class TestThread {
public static void main(final String[] arguments) throws InterruptedException,
ExecutionException {
ExecutorService executor = Executors.newSingleThreadExecutor();
System.out.println("Factorial Service called for 10!");
Future<Long> result10 = executor.submit(new FactorialService(10));
System.out.println("Factorial Service called for 20!");
Future<Long> result20 = executor.submit(new FactorialService(20));
Long factorial10 = result10.get();
System.out.println("10! = " + factorial10);
Long factorial20 = result20.get();
System.out.println("20! = " + factorial20);
executor.shutdown();
}
static class FactorialService implements Callable<Long> {
private int number;
public FactorialService(int number) {
this.number = number;
}
@Override
public Long call() throws Exception {
return factorial();
}
private Long factorial() throws InterruptedException {
long result = 1;
while (number != 0) {
result = number * result;
number--;
Thread.sleep(100);
}
return result;
}
}
}
這將產生以下結果。
輸出
Factorial Service called for 10!
Factorial Service called for 20!
10! = 3628800
20! = 2432902008176640000
Java 併發 - Fork-Join 框架
Fork-Join 框架允許將某個任務分解成多個工作執行緒,然後等待結果並將它們組合起來。它在很大程度上利用了多處理器機器的容量。以下是 Fork-Join 框架中使用的核心概念和物件。
Fork(分叉)
Fork 是一個任務將自身拆分成更小且獨立的子任務的過程,這些子任務可以併發執行。
語法
Sum left  = new Sum(array, low, mid);
left.fork();
這裡 Sum 是 RecursiveTask 的子類,left.fork() 將任務拆分成子任務。
Join(合併)
Join 是一個任務在子任務完成執行後合併所有子任務結果的過程,否則它將繼續等待。
語法
left.join();
這裡 left 是 Sum 類的物件。
ForkJoinPool
它是一個專為 Fork-Join 任務拆分而設計的特殊執行緒池。
語法
ForkJoinPool forkJoinPool = new ForkJoinPool(4);
這裡是一個新的 ForkJoinPool,其並行級別為 4 個 CPU。
RecursiveAction
RecursiveAction 表示一個不返回值的任務。
語法
class Writer extends RecursiveAction {
   @Override
   protected void compute() { }
}
RecursiveTask
RecursiveTask 表示一個返回值的任務。
語法
class Sum extends RecursiveTask<Long> {
   @Override
   protected Long compute() { return null; }
}
示例
以下 TestThread 程式展示了在基於執行緒的環境中使用 Fork-Join 框架。
即時演示import java.util.concurrent.ExecutionException;
import java.util.concurrent.ForkJoinPool;
import java.util.concurrent.RecursiveTask;
public class TestThread {
public static void main(final String[] arguments) throws InterruptedException,
ExecutionException {
int nThreads = Runtime.getRuntime().availableProcessors();
System.out.println(nThreads);
int[] numbers = new int[1000];
for(int i = 0; i < numbers.length; i++) {
numbers[i] = i;
}
ForkJoinPool forkJoinPool = new ForkJoinPool(nThreads);
Long result = forkJoinPool.invoke(new Sum(numbers,0,numbers.length));
System.out.println(result);
}
static class Sum extends RecursiveTask<Long> {
int low;
int high;
int[] array;
Sum(int[] array, int low, int high) {
this.array = array;
this.low = low;
this.high = high;
}
protected Long compute() {
if(high - low <= 10) {
long sum = 0;
for(int i = low; i < high; ++i)
sum += array[i];
return sum;
} else {
int mid = low + (high - low) / 2;
Sum left = new Sum(array, low, mid);
Sum right = new Sum(array, mid, high);
left.fork();
long rightResult = right.compute();
long leftResult = left.join();
return leftResult + rightResult;
}
}
}
}
這將產生以下結果。
輸出
32
499500
Java 併發 - BlockingQueue 介面
java.util.concurrent.BlockingQueue 介面是 Queue 介面的子介面,此外還支援諸如在佇列變為空之前等待檢索元素以及在儲存元素之前等待佇列中有空間的操作。
BlockingQueue 方法
| 序號 | 方法及描述 |
|---|---|
| 1 | boolean add(E e) 如果可以在不違反容量限制的情況下立即將指定的元素插入此佇列,則插入指定的元素,成功時返回 true,如果當前沒有可用空間,則丟擲 IllegalStateException。 |
| 2 | boolean contains(Object o) 如果此佇列包含指定的元素,則返回 true。 |
| 3 | int drainTo(Collection<? super E> c) 從此佇列中刪除所有可用元素,並將它們新增到給定的集合中。 |
| 4 | int drainTo(Collection<? super E> c, int maxElements) 從此佇列中刪除最多給定數量的可用元素,並將它們新增到給定的集合中。 |
| 5 | boolean offer(E e) 如果可以在不違反容量限制的情況下立即將指定的元素插入此佇列,則插入指定的元素,成功時返回 true,如果當前沒有可用空間,則返回 false。 |
| 6 | boolean offer(E e, long timeout, TimeUnit unit) 將指定的元素插入此佇列,如果必要,等待最多指定等待時間,直到有空間可用。 |
| 7 | E poll(long timeout, TimeUnit unit) 檢索並刪除此佇列的頭,如果必要,等待最多指定等待時間,直到有元素可用。 |
| 8 | void put(E e) 將指定的元素插入此佇列,如果必要,等待直到有空間可用。 |
| 9 | int remainingCapacity() 返回此佇列在理想情況下(在沒有記憶體或資源限制的情況下)可以接受的額外元素的數量,如果沒有內在限制,則返回 Integer.MAX_VALUE。 |
| 10 | boolean remove(Object o) 如果存在,則從此佇列中刪除指定元素的單個例項。 |
| 11 | E take() 檢索並移除此佇列的頭部,如有必要,等待直到有元素可用。 |
示例
以下 TestThread 程式展示了在基於執行緒的環境中使用 BlockingQueue 介面。
即時演示import java.util.Random;
import java.util.concurrent.ArrayBlockingQueue;
import java.util.concurrent.BlockingQueue;
public class TestThread {
public static void main(final String[] arguments) throws InterruptedException {
BlockingQueue<Integer> queue = new ArrayBlockingQueue<Integer>(10);
Producer producer = new Producer(queue);
Consumer consumer = new Consumer(queue);
new Thread(producer).start();
new Thread(consumer).start();
Thread.sleep(4000);
}
static class Producer implements Runnable {
private BlockingQueue<Integer> queue;
public Producer(BlockingQueue queue) {
this.queue = queue;
}
@Override
public void run() {
Random random = new Random();
try {
int result = random.nextInt(100);
Thread.sleep(1000);
queue.put(result);
System.out.println("Added: " + result);
result = random.nextInt(100);
Thread.sleep(1000);
queue.put(result);
System.out.println("Added: " + result);
result = random.nextInt(100);
Thread.sleep(1000);
queue.put(result);
System.out.println("Added: " + result);
} catch (InterruptedException e) {
e.printStackTrace();
}
}
}
static class Consumer implements Runnable {
private BlockingQueue<Integer> queue;
public Consumer(BlockingQueue queue) {
this.queue = queue;
}
@Override
public void run() {
try {
System.out.println("Removed: " + queue.take());
System.out.println("Removed: " + queue.take());
System.out.println("Removed: " + queue.take());
} catch (InterruptedException e) {
e.printStackTrace();
}
}
}
}
這將產生以下結果。
輸出
Added: 52
Removed: 52
Added: 70
Removed: 70
Added: 27
Removed: 27
Java 併發 - ConcurrentMap 介面
java.util.concurrent.ConcurrentMap 介面是 Map 介面的子介面,支援對底層 map 變數進行原子操作。它具有 get 和 set 方法,其工作方式類似於對 volatile 變數的讀寫。也就是說,set 與隨後對同一變數的任何 get 之間存在 happens-before 關係。此介面確保執行緒安全性和原子性保證。
ConcurrentMap 方法
| 序號 | 方法及描述 |
|---|---|
| 1 | default V compute(K key, BiFunction<? super K,? super V,? extends V> remappingFunction) 嘗試為指定的鍵及其當前對映值(如果當前沒有對映則為 null)計算對映。 |
| 2 | default V computeIfAbsent(K key, Function<? super K,? extends V> mappingFunction) 如果指定的鍵尚未與值關聯(或對映到 null),則嘗試使用給定的對映函式計算其值,並將其輸入到此對映中,除非為 null。 |
| 3 | default V computeIfPresent(K key, BiFunction<? super K,? super V,? extends V> remappingFunction) 如果指定鍵的值存在且不為 null,則嘗試根據鍵及其當前對映值計算新的對映。 |
| 4 | default void forEach(BiConsumer<? super K,? super V> action) 對該對映中的每個條目執行給定的操作,直到所有條目都已處理或操作引發異常。 |
| 5 | default V getOrDefault(Object key, V defaultValue) 返回指定鍵對映到的值,如果此對映不包含該鍵的對映,則返回 defaultValue。 |
| 6 | default V merge(K key, V value, BiFunction<? super V,? super V,? extends V> remappingFunction) 如果指定的鍵尚未與值關聯或與 null 關聯,則將其與給定的非 null 值關聯。 |
| 7 | V putIfAbsent(K key, V value) 如果指定的鍵尚未與值關聯,則將其與給定的值關聯。 |
| 8 | boolean remove(Object key, Object value) 僅噹噹前對映到給定值時,才移除鍵的條目。 |
| 9 | V replace(K key, V value) 僅噹噹前對映到某個值時,才替換鍵的條目。 |
| 10 | boolean replace(K key, V oldValue, V newValue) 僅噹噹前對映到給定值時,才替換鍵的條目。 |
| 11 | default void replaceAll(BiFunction<? super K,? super V,? extends V> function) 將每個條目的值替換為對該條目呼叫給定函式的結果,直到所有條目都已處理或函式引發異常。 |
示例
以下 TestThread 程式展示了 ConcurrentMap 與 HashMap 的用法。
即時演示import java.util.ConcurrentModificationException;
import java.util.HashMap;
import java.util.Iterator;
import java.util.Map;
import java.util.concurrent.ConcurrentHashMap;
public class TestThread {
public static void main(final String[] arguments) {
Map<String,String> map = new ConcurrentHashMap<String, String>();
map.put("1", "One");
map.put("2", "Two");
map.put("3", "Three");
map.put("5", "Five");
map.put("6", "Six");
System.out.println("Initial ConcurrentHashMap: " + map);
Iterator<String> iterator = map.keySet().iterator();
try {
while(iterator.hasNext()) {
String key = iterator.next();
if(key.equals("3")) {
map.put("4", "Four");
}
}
} catch(ConcurrentModificationException cme) {
cme.printStackTrace();
}
System.out.println("ConcurrentHashMap after modification: " + map);
map = new HashMap<String, String>();
map.put("1", "One");
map.put("2", "Two");
map.put("3", "Three");
map.put("5", "Five");
map.put("6", "Six");
System.out.println("Initial HashMap: " + map);
iterator = map.keySet().iterator();
try {
while(iterator.hasNext()) {
String key = iterator.next();
if(key.equals("3")) {
map.put("4", "Four");
}
}
System.out.println("HashMap after modification: " + map);
} catch(ConcurrentModificationException cme) {
cme.printStackTrace();
}
}
}
這將產生以下結果。
輸出
Initial ConcurrentHashMap: {1 = One, 2 = Two, 3 = Three, 5 = Five, 6 = Six}
ConcurrentHashMap after modification: {1 = One, 2 = Two, 3 = Three, 4 = Four, 5 = Five, 6 = Six}
Initial HashMap: {1 = One, 2 = Two, 3 = Three, 5 = Five, 6 = Six}
java.util.ConcurrentModificationException
	at java.util.HashMap$HashIterator.nextNode(Unknown Source)
	at java.util.HashMap$KeyIterator.next(Unknown Source)
	at TestThread.main(TestThread.java:48)
ConcurrentNavigableMap 介面
java.util.concurrent.ConcurrentNavigableMap 介面是 ConcurrentMap 介面的子介面,支援 NavigableMap 操作,並且對其可導航子對映遞迴執行此操作,以及近似匹配。
ConcurrentMap 方法
| 序號 | 方法及描述 |
|---|---|
| 1 | NavigableSet<K> descendingKeySet() 返回此對映中包含的鍵的反向順序 NavigableSet 檢視。 |
| 2 | ConcurrentNavigableMap<K,V> descendingMap() 返回此對映中包含的對映的反向順序檢視。 |
| 3 | ConcurrentNavigableMap<K,V> headMap(K toKey) 返回此對映的一部分的檢視,其鍵嚴格小於 toKey。 |
| 4 | ConcurrentNavigableMap<K,V> headMap(K toKey, boolean inclusive) 返回此對映的一部分的檢視,其鍵小於(如果 inclusive 為 true,則小於或等於)toKey。 |
| 5 | NavigableSet<K> keySet() 返回此對映中包含的鍵的 NavigableSet 檢視。 |
| 6 | NavigableSet<K> navigableKeySet() 返回此對映中包含的鍵的 NavigableSet 檢視。 |
| 7 | ConcurrentNavigableMap<K,V> subMap(K fromKey, boolean fromInclusive, K toKey, boolean toInclusive) 返回此對映的一部分的檢視,其鍵範圍從 fromKey 到 toKey。 |
| 8 | ConcurrentNavigableMap<K,V> subMap(K fromKey, K toKey) 返回此對映的一部分的檢視,其鍵範圍從 fromKey(包含)到 toKey(不包含)。 |
| 9 | ConcurrentNavigableMap<K,V> tailMap(K fromKey) 返回此對映的一部分的檢視,其鍵大於或等於 fromKey。 |
| 10 | ConcurrentNavigableMap<K,V> tailMap(K fromKey, boolean inclusive) 返回此對映的一部分的檢視,其鍵大於(如果 inclusive 為 true,則大於或等於)fromKey。 |
示例
以下 TestThread 程式展示了 ConcurrentNavigableMap 的用法。
即時演示import java.util.concurrent.ConcurrentNavigableMap;
import java.util.concurrent.ConcurrentSkipListMap;
public class TestThread {
public static void main(final String[] arguments) {
ConcurrentNavigableMap<String,String> map =
new ConcurrentSkipListMap<String, String>();
map.put("1", "One");
map.put("2", "Two");
map.put("3", "Three");
map.put("5", "Five");
map.put("6", "Six");
System.out.println("Initial ConcurrentHashMap: "+map);
System.out.println("HeadMap(\"2\") of ConcurrentHashMap: "+map.headMap("2"));
System.out.println("TailMap(\"2\") of ConcurrentHashMap: "+map.tailMap("2"));
System.out.println(
"SubMap(\"2\", \"4\") of ConcurrentHashMap: "+map.subMap("2","4"));
}
}
這將產生以下結果。
輸出
Initial ConcurrentHashMap: {1 = One, 2 = Two, 3 = Three, 5 = Five, 6 = Six}
HeadMap("2") of ConcurrentHashMap: {1 = One}
TailMap("2") of ConcurrentHashMap: {2 = Two, 3 = Three, 5 = Five, 6 = Six}
SubMap("2", "4") of ConcurrentHashMap: {2 = Two, 3 = Three}