
 資料結構
資料結構 網路
網路 關係資料庫管理系統 (RDBMS)
 作業系統
作業系統 Java
Java iOS
iOS HTML
HTML CSS
CSS Android
 Python
 C語言程式設計
 C++
C++ C#
C# MongoDB
 MySQL
MySQL Javascript
 PHP
PHP超聲波感測器與Arduino介面
在本教程中,我們將超聲波感測器HC-SR04與Arduino連線,以釐米為單位獲取到表面的距離。
電路圖
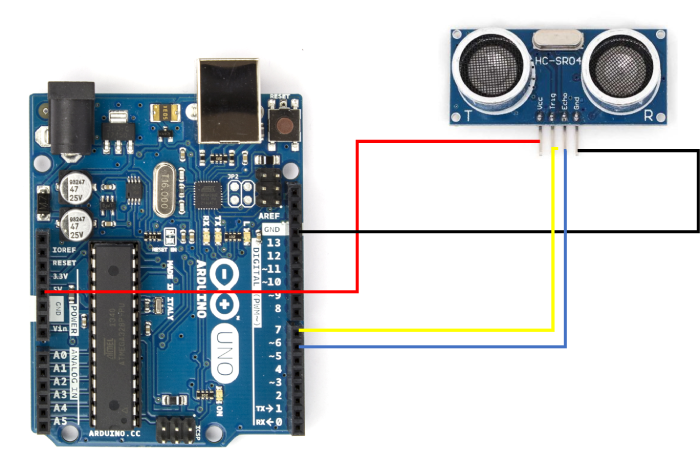
如您所見,您需要將HC-SR04的Vcc引腳連線到5V,GND連線到GND,Trig引腳連線到Arduino Uno的7號引腳,Echo引腳連線到6號引腳。實際上您可以選擇任何GPIO引腳,而不僅僅是7號和6號引腳。您只需要確保程式碼中的定義正確。
HC-SR04的工作原理
HC-SR04以40,000 Hz的頻率發射超聲波。為了使其發射波,我們需要在觸發引腳上施加10微秒的高電平脈衝。模組會響應發射8個脈衝的聲波脈衝。這8個脈衝模式有助於將模組發射的脈衝與環境噪聲區分開來。一旦脈衝發射,ECHO引腳變為高電平,並保持高電平,直到所有反射脈衝都被接收。如果在此期間內未接收到所有反射脈衝,模組將在38毫秒後超時。

以下時序圖解釋了模組的行為:
Echo引腳保持高電平的時間可以幫助確定感測器與反射表面的距離。空氣中的聲速為340 m/s,或每微秒0.034釐米。如果ECHO引腳保持高電平100微秒,則波浪傳播的距離為:100 * 0.034 = 3.4釐米。因此,到表面的距離為3.4 / 2 = 1.7釐米(因為波浪從表面反射回來並再次覆蓋相同的距離)。
您可以此處瞭解更多關於超聲波感測器工作原理的資訊。
示例
完整的程式碼如下:
#define echoPin 6
#define triggerPin 7

void setup() {
   pinMode(triggerPin, OUTPUT);       // Sets the trigPin as an OUTPUT
   pinMode(echoPin, INPUT);          // Sets the echoPin as an INPUT
   Serial.begin(9600);             // Serial Communication is starting with 9600 of baudrate speed
   Serial.println("Ultrasonic Sensor HC-SR04 Test"); // print some text in Serial Monitor

   Serial.println("with Arduino UNO");
}
void loop() {
   long highPulseDuration;
   int calculatedDistanceCm;

   //Set the trigPin to low, before setting it to high for the pulse
   digitalWrite(triggerPin, LOW);
   delayMicroseconds(5);

   // Create the 10 seconds pulse on the trig pin
   digitalWrite(triggerPin, HIGH);
   delayMicroseconds(10);

   // Set the pin to low to end the pulse
   digitalWrite(triggerPin, LOW);

   // Read the duration of the high pulse on the echo pin
   highPulseDuration = pulseIn(echoPin, HIGH);

   // Calculating the distance
   calculatedDistanceCm = highPulseDuration * 0.034 / 2; // Speed of
   sound wave divided by 2 (go and back)

   // Displays the distance on the Serial Monitor
   Serial.print("Calculated Distance: ");
   Serial.print(calculatedDistanceCm);
   Serial.println(" cm");
}
如您所見,我們首先定義回波和觸發引腳。
#define echoPin 6
#define triggerPin 7
在setup函式中,我們將echoPin設定為輸入,觸發引腳設定為輸出,並初始化Serial。
void setup() {
   pinMode(triggerPin, OUTPUT); // Sets the trigPin as an OUTPUT
   pinMode(echoPin, INPUT); // Sets the echoPin as an INPUT
   Serial.begin(9600); // Serial Communication is starting with 9600 of baudrate speed
   Serial.println("Ultrasonic Sensor HC-SR04 Test"); // print some text in Serial Monitor
   Serial.println("with Arduino UNO");
}
在loop函式中,我們執行以下操作:
定義用於測量高電平脈衝持續時間的變數
清除觸發引腳(將其設定為低電平),然後將其設定為高電平10微秒,然後再次設定為低電平。這會產生來自觸發引腳的10微秒高電平脈衝。
接下來,我們使用**pulseIn**函式記錄回波引腳上高電平脈衝的持續時間。您可以此處閱讀更多關於**pulseIn**函式的資訊。
根據ECHO引腳脈衝的持續時間,我們計算出到反射表面的距離,並以釐米為單位打印出來。
void loop() {
   long highPulseDuration;
   int calculatedDistanceCm;

   //Set the trigPin to low, before setting it to high for the pulse
   digitalWrite(triggerPin, LOW);
   delayMicroseconds(5);

   // Create the 10 seconds pulse on the trig pin
   digitalWrite(triggerPin, HIGH);
   delayMicroseconds(10);

   // Set the pin to low to end the pulse
   digitalWrite(triggerPin, LOW);

   // Read the duration of the high pulse on the echo pin
   highPulseDuration = pulseIn(echoPin, HIGH);

   // Calculating the distance
   calculatedDistanceCm = highPulseDuration * 0.034 / 2; // Speed of
   sound wave divided by 2 (go and back)

   // Displays the distance on the Serial Monitor
   Serial.print("Calculated Distance: ");
   Serial.print(calculatedDistanceCm);
   Serial.println(" cm");
}

4K+ 次瀏覽
