
 資料結構
資料結構 網路
網路 關係資料庫管理系統
 作業系統
作業系統 Java
Java iOS
iOS HTML
HTML CSS
CSS Android
 Python
 C語言程式設計
 C++
C++ C#
C# MongoDB
 MySQL
MySQL Javascript
 PHP
PHP如何在Android中建立CircularImageView?
此示例演示瞭如何在Android中**建立CircularImageView**。
**步驟 1** - 在Android Studio中建立一個新專案,轉到檔案⇒新建專案,並填寫所有必需的詳細資訊以建立新專案。
**步驟 2** - 要建立圓形檢視,我們應該在gradle檔案中新增CircularImageView庫,如下所示。
apply plugin: 'com.android.application'
android {
   compileSdkVersion 28
   defaultConfig {
      applicationId "com.example.andy.myapplication"
      minSdkVersion 15
      targetSdkVersion 28
      versionCode 1
      versionName "1.0"
      testInstrumentationRunner "android.support.test.runner.AndroidJUnitRunner"
   }
   buildTypes {
      release {
         minifyEnabled false
         proguardFiles getDefaultProguardFile('proguard-android.txt'), 'proguard-rules.pro'
      }
   }
}
dependencies {
   implementation fileTree(dir: 'libs', include: ['*.jar'])
   implementation 'com.android.support:appcompat-v7:28.0.0'
   implementation 'com.android.support.constraint:constraint-layout:1.1.3'
   testImplementation 'junit:junit:4.12'
   androidTestImplementation 'com.android.support.test:runner:1.0.2'
   implementation 'com.mikhaellopez:circularimageview:3.2.0'
   androidTestImplementation 'com.android.support.test.espresso:espresso-core:3.0.2'
}
**步驟 3** - 以下是修改後的主活動檔案MainActivity.java的內容。此檔案可以包含每個基本的生命週期方法。我們在activity_main.xml中建立了一個**CircularImageView**。
import android.support.v7.app.AppCompatActivity;
import android.os.Bundle;
public class MainActivity extends AppCompatActivity {
   @Override
   protected void onCreate(Bundle savedInstanceState) {
      super.onCreate(savedInstanceState);
      setContentView(R.layout.activity_main);
   }
}
**步驟 4** - 以下將是res/layout/activity_main.xml檔案的內容,以包含**CircularImageView**。
<?xml version = "1.0" encoding = "utf-8"?>
<android.support.constraint.ConstraintLayout xmlns:android = "http://schemas.android.com/apk/res/android"
xmlns:app = "http://schemas.android.com/apk/res-auto"
   xmlns:tools = "http://schemas.android.com/tools"
   android:layout_width = "match_parent"
   android:layout_height = "match_parent"
   tools:context = ".MainActivity">
<LinearLayout
   android:layout_width = "match_parent"
   android:gravity = "center_horizontal"
   android:orientation = "vertical"
   android:layout_height = "match_parent">
   <com.mikhaellopez.circularimageview.CircularImageView
      android:layout_width = "250dp"
      android:layout_height = "250dp"
      android:src = "@drawable/image"
      app:civ_border_color = "#EEEEEE"
      app:civ_border_width = "4dp"
      app:civ_shadow = "true"
      app:civ_shadow_radius = "10"
      app:civ_shadow_color = "#8BC34A"/>
   <TextView
      android:text = "Mohammad Mohtashim"
      android:layout_width = "match_parent"
      android:layout_height = "match_parent"
      android:layout_marginTop = "20dp"
      android:textSize = "20sp"
      android:textAlignment = "center"/>
</LinearLayout>
</android.support.constraint.ConstraintLayout>
在上述佈局中,我們已將CircularImageView宣告為com.mikhaellopez.circularimageview.CircularImageView,並從drawable添加了影像,其id為image。
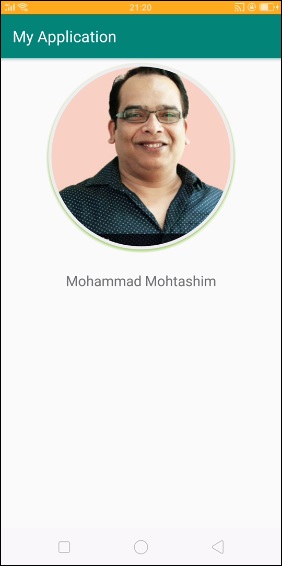
讓我們嘗試執行您的應用程式。我假設您已將您的實際Android移動裝置連線到您的計算機。要從Android Studio執行應用程式,請開啟您專案的一個活動檔案,然後單擊執行![]() 工具欄中的圖示。選擇您的移動裝置作為選項,然後檢查您的移動裝置,它將顯示您的預設螢幕 -
工具欄中的圖示。選擇您的移動裝置作為選項,然後檢查您的移動裝置,它將顯示您的預設螢幕 -
CircularImageView的屬性
**app:civ_border** - 此屬性用於建立邊框,預設值為true
**app:civ_border_color** - 此屬性用於建立邊框顏色,預設顏色為白色
**app:civ_border_width** - 此屬性用於建立邊框寬度,預設值為4dp
**app:civ_background_color** - 此屬性用於建立背景顏色,預設背景顏色為白色
**app:civ_shadow** - 此屬性用於為影像建立陰影,預設值為false,如果需要陰影,則需要將其設定為true
**app:civ_shadow_color** - 此屬性用於為影像建立陰影顏色,預設值為黑色
**app:civ_shadow_radius** - 此屬性用於為影像建立陰影半徑,預設值為8.0f
**app:civ_shadow_gravity** - 此屬性用於為影像建立陰影重力,預設值為底部。
點選此處下載有關此主題的專案。

926 次瀏覽
