- Hazelcast 教程
- Hazelcast - 首頁
- Hazelcast - 簡介
- Hazelcast - 設定
- Hazelcast - 第一個應用
- Hazelcast - 配置
- 設定多節點例項
- Hazelcast - 資料結構
- Hazelcast - 客戶端
- Hazelcast - 序列化
- Hazelcast 高階特性
- Hazelcast - Spring 整合
- Hazelcast - 監控
- Map Reduce & 聚合
- Hazelcast - 集合監聽器
- 常見問題 & 效能技巧
- Hazelcast 有用資源
- Hazelcast 快速指南
- Hazelcast - 有用資源
- Hazelcast - 討論
Hazelcast 快速指南
Hazelcast - 簡介
分散式記憶體資料網格
資料網格是分散式快取的超集。分散式快取通常僅用於儲存和檢索跨快取伺服器分佈的鍵值對。但是,資料網格除了支援儲存鍵值對之外,還支援其他功能,例如:
它支援其他資料結構,例如鎖、訊號量、集合、列表和佇列。
它提供了一種透過豐富的查詢語言(例如 SQL)查詢儲存資料的途徑。
它提供了一個分散式執行引擎,有助於並行操作資料。
Hazelcast 的優勢
支援多種資料結構 − Hazelcast 支援使用多種資料結構以及 Map。一些例子包括 Lock、Semaphore、Queue、List 等。
快速讀寫訪問 − 鑑於所有資料都在記憶體中,Hazelcast 提供了非常高速的資料讀寫訪問。
高可用性 − Hazelcast 支援跨機器分發資料,並額外支援備份。這意味著資料並非儲存在單一機器上。因此,即使機器發生故障(這在分散式環境中經常發生),資料也不會丟失。
高效能 − Hazelcast 提供了可用於在多臺工作機器之間分配工作負載/計算/查詢的構造。這意味著計算/查詢使用來自多臺機器的資源,從而大大縮短了執行時間。
易於使用 − Hazelcast 實現並擴充套件了許多 java.util.concurrent 構造,這使得它非常易於使用並與程式碼整合。要在機器上開始使用 Hazelcast 的配置只需將 Hazelcast jar 新增到我們的類路徑中。
Hazelcast 與其他快取和鍵值儲存的比較
將 Hazelcast 與其他快取(如 Ehcache、Guava 和 Caffeine)進行比較可能並不十分有用。這是因為,與其他快取不同,Hazelcast 是一個分散式快取,即它將資料分佈在機器/JVM 上。雖然 Hazelcast 也可在單個 JVM 上執行良好,但它在分散式環境中更有用。
同樣,將它與 MongoDB 等資料庫進行比較也沒有多大用處。這是因為 Hazelcast 主要將資料儲存在記憶體中(儘管它也支援寫入磁碟)。因此,它提供高速的讀寫速度,但其侷限性在於資料需要儲存在記憶體中。
與其他資料儲存不同,Hazelcast 還支援快取/儲存複雜資料型別並提供查詢它們的介面。
但是,可以與也提供類似功能的Redis進行比較。
Hazelcast 與 Redis 的比較
就功能而言,Redis 和 Hazelcast 非常相似。但是,以下幾點是 Hazelcast 優於 Redis 的地方:
從一開始就為分散式環境而構建 − 與最初作為單機快取的 Redis 不同,Hazelcast 從一開始就為分散式環境而構建。
簡單的叢集擴充套件/縮容 − 在 Hazelcast 中,維護新增或刪除節點的叢集非常簡單,例如,新增節點只需啟動具有所需配置的節點即可。刪除節點需要簡單地關閉節點。Hazelcast 自動處理資料的劃分等。對 Redis 進行相同的設定並執行上述操作需要更多注意和人工操作。
支援故障轉移所需資源更少 − Redis 採用主從方法。為了實現故障轉移,Redis 需要額外的資源來設定Redis Sentinel。這些 Sentinel 節點負責在原始主節點出現故障時將從節點提升為主節點。在 Hazelcast 中,所有節點都被視為平等的,其他節點會檢測到節點故障。因此,節點出現故障的情況處理得相當透明,而且無需任何額外的監控伺服器。
簡單的分散式計算 − Hazelcast 透過其EntryProcessor提供了一個簡單的介面,用於將程式碼傳送到資料以進行並行處理。這減少了網路上的資料傳輸。Redis 也支援這一點,但是實現這一點需要了解 Lua 指令碼,這增加了額外的學習曲線。
Hazelcast - 設定
Hazelcast 需要 Java 1.6 或更高版本。Hazelcast 也可以與 .NET、C++ 或其他基於 JVM 的語言(如 Scala 和 Clojure)一起使用。但是,在本教程中,我們將使用 Java 8。
在我們繼續之前,以下是本教程將使用的專案設定。
hazelcast/
├── com.example.demo/
│ ├── SingleInstanceHazelcastExample.java
│ ├── MultiInstanceHazelcastExample.java
│ ├── Server.java
│ └── ....
├── pom.xml
├── target/
├── hazelcast.xml
├── hazelcast-multicast.xml
├── ...
目前,我們只需建立包,即 hazelcast 目錄內的 com.example.demo。然後,只需 cd 到該目錄。我們將在接下來的部分中檢視其他檔案。
安裝 Hazelcast
安裝 Hazelcast 只需將 JAR 檔案新增到您的構建檔案中即可。POM 檔案或 build.gradle 檔案取決於您分別使用 Maven 還是 Gradle。
如果您使用的是 Gradle,將以下內容新增到 build.gradle 檔案就足夠了:
dependencies {
   compile "com.hazelcast:hazelcast:3.12.12”
}
教程的 POM
我們將使用以下 POM 用於我們的教程:
<?xml version="1.0" encoding="UTF-8"?>
<project xmlns="http://maven.apache.org/POM/4.0.0"
   xmlns:xsi="http://www.w3.org/2001/XMLSchema-instance"
   xsi:schemaLocation="http://maven.apache.org/POM/4.0.0 http://maven.apache.org/xsd/maven-4.0.0.xsd">
   <modelVersion>1.0.0</modelVersion>
   <groupId>com.example</groupId>
   <artifactId>demo</artifactId>
   <version>0.0.1-SNAPSHOT</version>
   <name>demo</name>
   <description>Demo project for Hazelcast</description>

   <properties>
      <maven.compiler.source>1.8</maven.compiler.source>
      <maven.compiler.target>1.8</maven.compiler.target>
   </properties>

   <dependencies>
      <dependency>
         <groupId>com.hazelcast</groupId>
         <artifactId>hazelcast</artifactId>
         <version>3.12.12</version>
      </dependency>
   </dependencies>

   <!-- Below build plugin is not needed for Hazelcast, it is being used only to created a shaded JAR so that -->
   <!-- using the output i.e. the JAR becomes simple for testing snippets in the tutorial-->
   <build>
      <plugins>
         <plugin>
            <!-- Create a shaded JAR and specify the entry point class-->
            <groupId>org.apache.maven.plugins</groupId>
            <artifactId>maven-shade-plugin</artifactId>
            <version>3.2.4</version>
            <executions>
               <execution>
                  <phase>package</phase>
                     <goals>
                     <goal>shade</goal>
                  </goals>
               </execution>
            </executions>
         </plugin>
      </plugins>
   </build>
</project>
Hazelcast - 第一個應用
Hazelcast 可以獨立執行(單節點),也可以執行多個節點以形成叢集。讓我們首先嚐試啟動單個例項。
單例項
示例
現在,讓我們嘗試建立和使用 Hazelcast 叢集的單個例項。為此,我們將建立 SingleInstanceHazelcastExample.java 檔案。
package com.example.demo;

import java.util.Map;
import com.hazelcast.core.Hazelcast;
import com.hazelcast.core.HazelcastInstance;

public class SingleInstanceHazelcastExample {
   public static void main(String... args){
      //initialize hazelcast server/instance
      HazelcastInstance hazelcast = Hazelcast.newHazelcastInstance();
      System.out.println(“Hello world”);

      // perform a graceful shutdown
      hazelcast.shutdown();
   }
}
現在讓我們編譯程式碼並執行它:
mvn clean install
java -cp target/demo-0.0.1-SNAPSHOT.jar
com.example.demo.SingleInstanceHazelcastExample
輸出
如果您執行上述程式碼,輸出將是:
Hello World
但是,更重要的是,您還會注意到來自 Hazelcast 的日誌行,這表示 Hazelcast 已啟動。由於我們只執行一次此程式碼,即單個 JVM,因此我們的叢集中只有一個成員。
Jan 30, 2021 10:26:51 AM com.hazelcast.config.XmlConfigLocator
INFO: Loading 'hazelcast-default.xml' from classpath.
Jan 30, 2021 10:26:51 AM com.hazelcast.instance.AddressPicker
INFO: [LOCAL] [dev] [3.12.12] Prefer IPv4 stack is true.
Jan 30, 2021 10:26:52 AM com.hazelcast.instance.AddressPicker
INFO: [LOCAL] [dev] [3.12.12] Picked [localhost]:5701, using socket
ServerSocket[addr=/0:0:0:0:0:0:0:0,localport=5701], bind any local is true
Jan 30, 2021 10:26:52 AM com.hazelcast.system
...

Members {size:1, ver:1} [
   Member [localhost]:5701 - 9b764311-9f74-40e5-8a0a-85193bce227b this
]

Jan 30, 2021 10:26:56 AM com.hazelcast.core.LifecycleService
INFO: [localhost]:5701 [dev] [3.12.12] [localhost]:5701 is STARTED
...

You will also notice log lines from Hazelcast at the end which signifies
Hazelcast was shutdown:
INFO: [localhost]:5701 [dev] [3.12.12] Hazelcast Shutdown is completed in 784 ms.
Jan 30, 2021 10:26:57 AM com.hazelcast.core.LifecycleService
INFO: [localhost]:5701 [dev] [3.12.12] [localhost]:5701 is SHUTDOWN
叢集:多例項
現在,讓我們建立 MultiInstanceHazelcastExample.java 檔案(如下所示),它將用於多例項叢集。
package com.example.demo;

import com.hazelcast.core.Hazelcast;
import com.hazelcast.core.HazelcastInstance;

public class MultiInstanceHazelcastExample {
   public static void main(String... args) throws InterruptedException{
      //initialize hazelcast server/instance
      HazelcastInstance hazelcast = Hazelcast.newHazelcastInstance();

      //print the socket address of this member and also the size of the cluster
      System.out.println(String.format("[%s]: No. of hazelcast members: %s",
         hazelcast.getCluster().getLocalMember().getSocketAddress(),
         hazelcast.getCluster().getMembers().size()));

      // wait for the member to join
      Thread.sleep(30000);

      //perform a graceful shutdown
      hazelcast.shutdown();
   }
}
讓我們在兩個不同的 shell上執行以下命令:
java -cp .\target\demo-0.0.1-SNAPSHOT.jar
com.example.demo.MultiInstanceHazelcastExample
您會在第一個 shell上注意到 Hazelcast 例項已啟動並已分配成員。請注意輸出的最後一行,該行顯示使用埠 5701 的單個成員。
Jan 30, 2021 12:20:21 PM com.hazelcast.internal.cluster.ClusterService
INFO: [localhost]:5701 [dev] [3.12.12]
Members {size:1, ver:1} [
   Member [localhost]:5701 - b0d5607b-47ab-47a2-b0eb-6c17c031fc2f this
]
Jan 30, 2021 12:20:21 PM com.hazelcast.core.LifecycleService
INFO: [localhost]:5701 [dev] [3.12.12] [localhost]:5701 is STARTED
[/localhost:5701]: No. of hazelcast members: 1
您會在第二個 shell上注意到 Hazelcast 例項已加入第一個例項。請注意輸出的最後一行,該行顯示現在有使用埠 5702 的兩個成員。
INFO: [localhost]:5702 [dev] [3.12.12]
Members {size:2, ver:2} [
   Member [localhost]:5701 - b0d5607b-47ab-47a2-b0eb-6c17c031fc2f
   Member [localhost]:5702 - 037b5fd9-1a1e-46f2-ae59-14c7b9724ec6 this
]
Jan 30, 2021 12:20:46 PM com.hazelcast.core.LifecycleService
INFO: [localhost]:5702 [dev] [3.12.12] [localhost]:5702 is STARTED
[/localhost:5702]: No. of hazelcast members: 2
Hazelcast - 配置
Hazelcast 支援基於程式的配置和基於 XML 的配置。但是,鑑於其易用性,基於 XML 的配置在生產中大量使用。但是 XML 配置在內部使用程式配置。
XML 配置
這些配置需要放在 hazelcast.xml 中。該檔案按以下位置(按相同順序)搜尋,並從第一個可用位置選擇:
透過系統屬性 - Dhazelcast.config=/path/to/hazelcast.xml 將 XML 的位置傳遞給 JVM
當前工作目錄中的 hazelcast.xml
類路徑中的 hazelcast.xml
Hazelcast 提供的預設 hazelcast.xml
找到 XML 後,Hazelcast 將從 XML 檔案載入所需的配置。
讓我們用一個例子來試試。在當前目錄中建立一個名為 hazelcast.xml 的 XML 檔案。
<hazelcast
   xsi:schemaLocation="http://www.hazelcast.com/schema/config
   http://www.hazelcast.com/schema/config/hazelcast-config-3.12.12.xsd"
   xmlns="http://www.hazelcast.com/schema/config"
   xmlns:xsi="http://www.w3.org/2001/XMLSchema-instance">
   <!-- name of the instance -->
   <instance-name>XML_Hazelcast_Instance</instance-name>
</hazelcast>
目前,XML 只包含用於驗證的 Hazelcast XML 的模式位置。但更重要的是,它包含例項名稱。
示例
現在建立一個包含以下內容的 XMLConfigLoadExample.java 檔案。
package com.example.demo;

import com.hazelcast.core.Hazelcast;
import com.hazelcast.core.HazelcastInstance;

public class XMLConfigLoadExample {
   public static void main(String... args) throws InterruptedException{
      //initialize hazelcast server/instance
      HazelcastInstance hazelcast = Hazelcast.newHazelcastInstance();

      //specified the name written in the XML file
      System.out.println(String.format("Name of the instance: %s",hazelcast.getName()));

      //perform a graceful shutdown
      hazelcast.shutdown();
   }
}
使用以下命令執行上述 Java 檔案:
java -Dhazelcast.config=hazelcast.xml -cp .\target\demo-0.0.1-SNAPSHOT.jar
com.example.demo.XMLConfigLoadExample
輸出
上述命令的輸出將是:
Jan 30, 2021 1:21:41 PM com.hazelcast.config.XmlConfigLocator
INFO: Loading configuration hazelcast.xml from System property
'hazelcast.config'
Jan 30, 2021 1:21:41 PM com.hazelcast.config.XmlConfigLocator
INFO: Using configuration file at C:\Users\demo\eclipseworkspace\
hazelcast\hazelcast.xml
...
Members {size:1, ver:1} [
   Member [localhost]:5701 - 3d400aed-ddb9-4e59-9429-3ab7773e7e09 this
]
Name of cluster: XML_Hazelcast_Instance
如您所見,Hazelcast 載入了配置並列印了在配置中指定的名稱(最後一行)。
可以在 XML 中指定許多配置選項。完整列表可在以下位置找到:
隨著教程的進行,我們將瞭解其中一些配置。
程式配置
如前所述,XML 配置最終是透過程式配置完成的。因此,讓我們嘗試對我們在 XML 配置中看到的相同示例進行程式配置。為此,讓我們建立包含以下內容的 ProgramaticConfigLoadExample.java 檔案。
示例
package com.example.demo;

import com.hazelcast.config.Config;
import com.hazelcast.core.Hazelcast;
import com.hazelcast.core.HazelcastInstance;

public class ProgramaticConfigLoadExample {
   public static void main(String... args) throws InterruptedException {
      Config config = new Config();
      config.setInstanceName("Programtic_Hazelcast_Instance");

      // initialize hazelcast server/instance
      HazelcastInstance hazelcast = Hazelcast.newHazelcastInstance(config);

      // specified the name written in the XML file
      System.out.println(String.format("Name of the instance: %s", hazelcast.getName()));

      // perform a graceful shutdown
      hazelcast.shutdown();
   }
}
讓我們透過以下方式執行程式碼,而不傳遞任何 hazelcast.xml 檔案:
java -cp .\target\demo-0.0.1-SNAPSHOT.jar
com.example.demo.ProgramaticConfigLoadExample
輸出
上述程式碼的輸出是:
Name of the instance: Programtic_Hazelcast_Instance
日誌記錄
為了避免依賴關係,Hazelcast 預設使用基於 JDK 的日誌記錄。但它也支援透過slf4j、log4j進行日誌記錄。例如,如果我們想透過 sl4j 和 logback 設定日誌記錄,我們可以更新 POM 以包含以下依賴項:
<!-- contains both sl4j bindings and the logback core -->
<dependency>
   <groupId>ch.qos.logback</groupId>
   <artifactId>logback-classic</artifactId>
   <version>1.2.3</version>
</dependency>
示例
定義一個 logback.xml 配置檔案並將其新增到您的類路徑中,例如 src/main/resources。
<configuration>
   <appender name="STDOUT" class="ch.qos.logback.core.ConsoleAppender">
      <encoder>
         <pattern>%d{HH:mm:ss.SSS} [%thread] %-5level %logger{36} - %msg%n</pattern>
      </encoder>
   </appender>

   <root level="info">
      <appender-ref ref="STDOUT" />
   </root>

   <logger name="com.hazelcast" level="error">
      <appender-ref ref="STDOUT" />
   </logger>
</configuration>
現在,當我們執行以下命令時,我們會注意到有關 Hazelcast 成員建立等的元資訊未列印。這是因為我們將 Hazelcast 的日誌級別設定為錯誤,並要求 Hazelcast 使用 sl4j 記錄器。
java -Dhazelcast.logging.type=slf4j -cp .\target\demo-0.0.1-SNAPSHOT.jar com.example.demo.SingleInstanceHazelcastExample
輸出
John
變數
寫入 XML 配置檔案的值可能會因環境而異。例如,在生產環境中,您可能使用與開發環境不同的使用者名稱/密碼連線到 Hazelcast 叢集。無需維護單獨的 XML 檔案,也可以在 XML 檔案中編寫變數,然後透過命令列或以程式設計方式將這些變數傳遞給 Hazelcast。這是一個從命令列選擇例項名稱的示例。
因此,這是我們的包含變數 ${varname} 的 XML 檔案
<hazelcast
   xsi:schemaLocation="http://www.hazelcast.com/schema/config
   http://www.hazelcast.com/schema/config/hazelcast-config-3.12.12.xsd"
   xmlns="http://www.hazelcast.com/schema/config"
   xmlns:xsi="http://www.w3.org/2001/XMLSchema-instance">

   <instance-name>${instance_name}</instance-name>
</hazelcast>
示例
這是我們將用來列印變數值的示例 Java 程式碼:
package com.example.demo;

import java.util.Map;
import com.hazelcast.core.Hazelcast;
import com.hazelcast.core.HazelcastInstance;

public class XMLConfigLoadWithVariable {
   public static void main(String... args) throws InterruptedException {
      // initialize hazelcast server/instance
      HazelcastInstance hazelcast = Hazelcast.newHazelcastInstance();

      // specified the name written in the XML file
      System.out.println(String.format("Name of the instance: %s", hazelcast.getName()));

      // perform a graceful shutdown
      hazelcast.shutdown();
   }
}
以下是命令:
java -Dhazelcast.config=others\hazelcast.xml -Dinstance_name=dev_cluster -cp
.\target\demo-0.0.1-SNAPSHOT.jar com.example.demo.XMLConfigLoadWithVariable
輸出
輸出顯示 Hazelcast 正確替換了變數。
Name of the instance: dev_cluster
Hazelcast - 設定多節點例項
鑑於 Hazelcast 是一個分散式 IMDG,通常在多臺機器上設定,它需要訪問內部/外部網路。最重要的用例是在叢集內發現 Hazelcast 節點。
Hazelcast 需要以下埠:
1 個入站埠,用於接收來自其他 Hazelcast 節點/客戶端的 ping/資料
n 個出站埠,用於向叢集的其他成員傳送 ping/資料。
節點發現通過幾種方式發生:
組播
TCP/IP
Amazon EC2 自動發現
其中,我們將瞭解組播和 TCP/IP
組播
預設情況下啟用多播加入機制。https://en.wikipedia.org/wiki/Multicast 是一種通訊方式,其中訊息被傳輸到組中的所有節點。Hazelcast 使用此方法來發現叢集中的其他成員。我們之前看過的所有示例都使用多播來發現成員。
示例
現在讓我們明確地啟用它。將以下內容儲存到 hazelcast-multicast.xml 中
<hazelcast
   xsi:schemaLocation="http://www.hazelcast.com/schema/config
   http://www.hazelcast.com/schema/config/hazelcast-config-3.12.12.xsd"
   xmlns="http://www.hazelcast.com/schema/config"
   xmlns:xsi="http://www.w3.org/2001/XMLSchema-instance">

   <network>
      <join>
         <multicast enabled="true" />
      </join>
   </network>
</hazelcast>
然後,讓我們執行以下操作:
java -Dhazelcast.config=hazelcast-multicast.xml -cp .\target\demo-0.0.1-
SNAPSHOT.jar com.example.demo.XMLConfigLoadExample
輸出
在輸出中,我們注意到 Hazelcast 的以下幾行,這有效地意味著使用多播聯結器來發現成員。
Jan 30, 2021 5:26:15 PM com.hazelcast.instance.Node
INFO: [localhost]:5701 [dev] [3.12.12] Creating MulticastJoiner
預設情況下,多播接受來自多播組中所有機器的通訊。這可能是一個安全問題,這就是為什麼通常在內部部署中,多播通訊會被防火牆阻止的原因。因此,雖然多播非常適合開發工作,但在生產環境中,最好使用基於 TCP/IP 的發現機制。
TCP/IP
由於多播的缺點,TCP/IP 是首選的通訊方式。對於 TCP/IP,成員只能連線到已知/列出的成員。
示例
讓我們使用 TCP/IP 進行發現機制。將以下內容儲存到 hazelcast-tcp.xml 中
<hazelcast
   xsi:schemaLocation="http://www.hazelcast.com/schema/config
   http://www.hazelcast.com/schema/config/hazelcast-config-3.12.12.xsd"
   xmlns="http://www.hazelcast.com/schema/config"
   xmlns:xsi="http://www.w3.org/2001/XMLSchema-instance">

   <network>
      <join>
         <multicast enabled="false" />
         <tcp-ip enabled="true">
            <members>localhost</members>
         </tcp-ip>
      </join>
   </network>
</hazelcast>
然後,讓我們執行以下命令:
java -Dhazelcast.config=hazelcast-tcp.xml -cp .\target\demo-0.0.1-SNAPSHOT.jar
com.example.demo.XMLConfigLoadExample
輸出
輸出如下:
INFO: [localhost]:5701 [dev] [3.12.12] Creating TcpIpJoiner
Jan 30, 2021 8:09:29 PM
com.hazelcast.spi.impl.operationexecutor.impl.OperationExecutorImpl
上述輸出顯示使用 TCP/IP 聯結器加入了兩個成員。
如果您在兩個不同的 shell 上執行以下命令:
java '-Dhazelcast.config=hazelcast-tcp.xml' -cp .\target\demo-0.0.1-SNAPSHOT.jar
com.example.demo.MultiInstanceHazelcastExample
我們將看到以下輸出:
Members {size:2, ver:2} [
   Member [localhost]:5701 - 62eedeae-2701-4df0-843c-7c3655e16b0f
   Member [localhost]:5702 - 859c1b46-06e6-495a-8565-7320f7738dd1 this
]
上述輸出意味著節點能夠使用 TCP/IP 加入,並且兩者都使用 localhost 作為 IP 地址。
請注意,我們可以在 XML 配置檔案中指定更多 IP 或機器名稱(這些名稱將由 DNS 解析)。
<hazelcast
   xsi:schemaLocation="http://www.hazelcast.com/schema/config
   http://www.hazelcast.com/schema/config/hazelcast-config-3.12.12.xsd"
   xmlns="http://www.hazelcast.com/schema/config"
   xmlns:xsi="http://www.w3.org/2001/XMLSchema-instance">

   <network>
      <join>
         <multicast enabled="false" />
         <tcp-ip enabled="true">
            <members>machine1, machine2....</members>
         </tcp-ip>
      </join>
   </network>
</hazelcast>
Hazelcast - 資料結構
java.util.concurrent 包提供了諸如 AtomicLong、CountDownLatch、ConcurrentHashMap 等資料結構,當多個執行緒讀取/寫入資料到資料結構時,這些資料結構非常有用。但是為了提供執行緒安全性,所有這些執行緒都應該在單個 JVM/機器上。
分散式資料結構有兩個主要優點:
效能提升 - 如果多臺機器可以訪問資料,它們都可以並行工作,並在更短的時間內完成工作。
資料備份 - 如果一個 JVM/機器宕機,我們還有其他 JVM/機器儲存著資料。
Hazelcast 提供了一種跨 JVM/機器分佈資料結構的方法。
Hazelcast - 客戶端
Hazelcast 客戶端是 Hazelcast 成員的輕量級客戶端。Hazelcast 成員負責儲存資料和分割槽。它們在傳統的客戶端-伺服器模型中充當伺服器。
建立 Hazelcast 客戶端只是為了訪問儲存在叢集 Hazelcast 成員中的資料。它們不負責儲存資料,也不承擔任何儲存資料的責任。
客戶端具有自己的生命週期,並且不會影響 Hazelcast 成員例項。
首先讓我們建立 Server.java 並執行它。
import java.util.Map;
import com.hazelcast.core.Hazelcast;
import com.hazelcast.core.HazelcastInstance;
public class Server {
   public static void main(String... args){
      //initialize hazelcast server/instance
      HazelcastInstance hazelcast = Hazelcast.newHazelcastInstance();
      //create a simple map
      Map<String, String> vehicleOwners = hazelcast.getMap("vehicleOwnerMap");
      // add key-value to map
      vehicleOwners.put("John", "Honda-9235");
      // do not shutdown, let the server run
      //hazelcast.shutdown();
   }
}
現在,執行上面的類。
java -cp .\target\demo-0.0.1-SNAPSHOT.jar com.example.demo.Server
為了設定客戶端,我們還需要新增客戶端 jar。
<dependency>
   <groupId>com.hazelcast</groupId>
   <artifactId>hazelcast-client</artifactId>
   <version>3.12.12</version>
</dependency>
現在讓我們建立 Client.java。請注意,與 Hazelcast 成員類似,客戶端也可以透過程式設計方式或透過 XML 配置進行配置(即,透過 -Dhazelcast.client.config 或 hazelcast-client.xml)。
示例
讓我們使用預設配置,這意味著我們的客戶端能夠連線到本地例項。
import java.util.Map;
import com.hazelcast.client.HazelcastClient;
import com.hazelcast.core.HazelcastInstance;
public class Client {
   public static void main(String... args){
      //initialize hazelcast client
      HazelcastInstance hzClient = HazelcastClient.newHazelcastClient();
      //read from map
      Map<String, String> vehicleOwners = hzClient.getMap("vehicleOwnerMap");
      System.out.println(vehicleOwners.get("John"));
      System.out.println("Member of cluster: " +
      hzClient.getCluster().getMembers());
      // perform shutdown
      hzClient.getLifecycleService().shutdown();
   }
}
現在,執行上面的類。
java -cp .\target\demo-0.0.1-SNAPSHOT.jar com.example.demo.Client
輸出
它將產生以下輸出:
Honda-9235
Member of cluster: [Member [localhost]:5701 - a47ec375-3105-42cd-96c7-fc5eb382e1b0]
從輸出中可以看到:
叢集只包含一個成員,來自 Server.java。
客戶端能夠訪問儲存在伺服器中的對映。
負載均衡
Hazelcast 客戶端支援使用各種演算法進行負載均衡。負載均衡確保負載在成員之間共享,並且叢集的單個成員不會過載。預設負載均衡機制設定為輪詢。可以透過在配置中使用 loadBalancer 標籤來更改它。
我們可以使用配置中的 load-balancer 標籤指定負載均衡器的型別。以下是一個選擇隨機選擇節點的策略的示例。
<hazelcast-client xmlns="http://www.hazelcast.com/schema/client-config"
   xmlns:xsi="http://www.w3.org/2001/XMLSchema-instance"
   xsi:schemaLocation="http://www.hazelcast.com/schema/client-config
   http://www.hazelcast.com/schema/client-config/hazelcastclient-config-4.2.xsd">
      <load-balancer type="random"/>
</hazelcast-client>
故障轉移
在分散式環境中,成員可能會任意失敗。為了支援故障轉移,建議提供多個成員的地址。如果客戶端可以訪問任何一個成員,則足以將其定址到其他成員。可以在客戶端配置中指定引數 addressList。
例如,如果我們使用以下配置:
<hazelcast-client xmlns="http://www.hazelcast.com/schema/client-config"
   xmlns:xsi="http://www.w3.org/2001/XMLSchema-instance"
   xsi:schemaLocation="http://www.hazelcast.com/schema/client-config
   http://www.hazelcast.com/schema/client-config/hazelcastclient-config-4.2.xsd">
   <address-list>machine1, machine2</address-list>
</hazelcast-client>
即使 machine1 宕機,客戶端也可以使用 machine2 來訪問叢集中的其他成員。
Hazelcast - 序列化
Hazelcast 最適合用於資料/查詢分佈在多臺機器上的環境。這需要將資料從我們的 Java 物件序列化為可以跨網路傳輸的位元組陣列。
Hazelcast 支援各種型別的序列化。但是,讓我們來看一些常用的序列化方式,即 Java 序列化和 Java Externalizable。
Java 序列化
示例
首先讓我們來看一下 Java 序列化。假設我們定義了一個實現了 Serializable 介面的 Employee 類。
public class Employee implements Serializable{
   private static final long serialVersionUID = 1L;
   private String name;
   private String department;
   public Employee(String name, String department) {
      super();
      this.name = name;
      this.department = department;
   }
   public String getName() {
      return name;
   }
   public void setName(String name) {
      this.name = name;
   }
   public String getDepartment() {
      return department;
   }
   public void setDepartment(String department) {
      this.department = department;
   }
   @Override
   public String toString() {
      return "Employee [name=" + name + ", department=" + department + "]";
   }
}
現在讓我們編寫程式碼將 Employee 物件新增到 Hazelcast 對映中。
public class EmployeeExample {
   public static void main(String... args){
      //initialize hazelcast server/instance
      HazelcastInstance hazelcast = Hazelcast.newHazelcastInstance();
      //create a set to track employees
      Map<Employee, String> employeeOwners=hazelcast.getMap("employeeVehicleMap");
      Employee emp1 = new Employee("John Smith", "Computer Science");
      // add employee to set
      System.out.println("Serializing key-value and add to map");
      employeeOwners.put(emp1, "Honda");
      // check if emp1 is present in the set
      System.out.println("Serializing key for searching and Deserializing
      value got out of map");
      System.out.println(employeeOwners.get(emp1));
      // perform a graceful shutdown
      hazelcast.shutdown();
   }
}
輸出
它將產生以下輸出:
Serializing key-value and add to map
Serializing key for searching and Deserializing value got out of map
Honda
這裡非常重要的一點是,只需實現 Serializable 介面,我們就可以讓 Hazelcast 使用 Java 序列化。還要注意,Hazelcast 儲存鍵和值的序列化資料,而不是像 HashMap 一樣將其儲存在記憶體中。因此,Hazelcast 承擔了序列化和反序列化的重任。
示例
但是,這裡有一個陷阱。在上面的例子中,如果員工的部門發生了變化怎麼辦?這個人仍然是同一個人。
public class EmployeeExampleFailing {
   public static void main(String... args){
      //initialize hazelcast server/instance
      HazelcastInstance hazelcast = Hazelcast.newHazelcastInstance();
      //create a set to track employees
      Map<Employee, String> employeeOwners=hazelcast.getMap("employeeVehicleMap");
      Employee emp1 = new Employee("John Smith", "Computer Science");
      // add employee to map
      System.out.println("Serializing key-value and add to map");
      employeeOwners.put(emp1, "Honda");
      Employee empDeptChange = new Employee("John Smith", "Electronics");
      // check if emp1 is present in the set
      System.out.println("Checking if employee with John Smith is present");
      System.out.println(employeeOwners.containsKey(empDeptChange));
      Employee empSameDept = new Employee("John Smith", "Computer Science");
      System.out.println("Checking if employee with John Smith is present");
      System.out.println(employeeOwners.containsKey(empSameDept));
      // perform a graceful shutdown
      hazelcast.shutdown();
   }
}
輸出
它將產生以下輸出:
Serializing key-value and add to map
Checking if employee with name John Smith is present
false
Checking if employee with name John Smith is present
true
這是因為 Hazelcast 在比較時不會反序列化鍵,即 Employee。它直接比較序列化鍵的位元組碼。因此,具有與所有屬性相同值的同一個物件將被視為相同。但是,如果這些屬性的值發生變化,例如上述場景中的部門,則這兩個鍵將被視為唯一。
Java Externalizable
如果在上面的例子中,我們在對鍵進行序列化/反序列化時不關心部門的值怎麼辦?Hazelcast 還支援 Java Externalizable,它使我們可以控制用於序列化和反序列化的標記。
示例
讓我們相應地修改我們的 Employee 類:
public class EmplyoeeExternalizable implements Externalizable {
   private static final long serialVersionUID = 1L;
   private String name;
   private String department;
   public EmplyoeeExternalizable(String name, String department) {
      super();
      this.name = name;
      this.department = department;
   }
   @Override
   public void readExternal(ObjectInput in) throws IOException,
   ClassNotFoundException {
      System.out.println("Deserializaing....");
      this.name = in.readUTF();
   }
   @Override
   public void writeExternal(ObjectOutput out) throws IOException {
      System.out.println("Serializing....");
      out.writeUTF(name);
   }
   public String getName() {
      return name;
   }
   public void setName(String name) {
      this.name = name;
   }
   public String getDepartment() {
      return department;
   }
   public void setDepartment(String department) {
      this.department = department;
   }
   @Override
   public String toString() {
      return "Employee [name=" + name + ", department=" + department + "]";
   }
}
因此,正如您從程式碼中看到的,我們添加了 readExternal/writeExternal 方法,這些方法負責序列化/反序列化。鑑於我們在序列化/反序列化時對部門不感興趣,我們在 readExternal/writeExternal 方法中排除了這些部門。
示例
現在,如果我們執行以下程式碼:
public class EmployeeExamplePassing {
   public static void main(String... args){
      //initialize hazelcast server/instance
      HazelcastInstance hazelcast = Hazelcast.newHazelcastInstance();
      //create a set to track employees
      Map<EmplyoeeExternalizable, String> employeeOwners=hazelcast.getMap("employeeVehicleMap");
      EmplyoeeExternalizable emp1 = new EmplyoeeExternalizable("John Smith", "Computer Science");
      // add employee to map
      employeeOwners.put(emp1, "Honda");
      EmplyoeeExternalizable empDeptChange = new EmplyoeeExternalizable("John Smith", "Electronics");
      // check if emp1 is present in the set
      System.out.println("Checking if employee with John Smith is present");
      System.out.println(employeeOwners.containsKey(empDeptChange));
      EmplyoeeExternalizable empSameDept = new EmplyoeeExternalizable("John Smith", "Computer Science");
      System.out.println("Checking if employee with John Smith is present");
      System.out.println(employeeOwners.containsKey(empSameDept));
      // perform a graceful shutdown
      hazelcast.shutdown();
   }
}
輸出
我們得到的輸出是:
Serializing....
Checking if employee with John Smith is present
Serializing....
true
Checking if employee with John Smith is present
Serializing....
true
正如輸出所示,使用 Externalizable 介面,我們可以為 Hazelcast 提供僅包含員工名稱的序列化資料。
還要注意,Hazelcast 會對我們的鍵進行兩次序列化:
一次是在儲存鍵時,
第二次是在對映中搜索給定鍵時。如前所述,這是因為 Hazelcast 使用序列化的位元組陣列進行鍵比較。
總的來說,如果我們想要更好地控制要序列化的屬性以及如何處理它們,與 Serializable 相比,使用 Externalizable 具有更多優勢。
Hazelcast - Spring 整合
Hazelcast 提供了一種簡單的方法來與 Spring Boot 應用程式整合。讓我們透過一個例子來理解這一點。
我們將建立一個簡單的 API 應用程式,該應用程式提供一個 API 來獲取公司員工資訊。為此,我們將使用 Spring Boot 驅動的 RESTController 以及 Hazelcast 來快取資料。
請注意,為了在 Spring Boot 中整合 Hazelcast,我們需要兩樣東西:
將 Hazelcast 新增為我們專案的依賴項。
定義一個配置(靜態的或程式設計的),並使其可用於 Hazelcast。
讓我們首先定義 POM。請注意,我們必須指定 Hazelcast JAR 才能在 Spring Boot 專案中使用它。
<?xml version="1.0" encoding="UTF-8"?>
<project xmlns="http://maven.apache.org/POM/4.0.0"
   xmlns:xsi="http://www.w3.org/2001/XMLSchema-instance"
   xsi:schemaLocation="http://maven.apache.org/POM/4.0.0 http://maven.apache.org/xsd/maven-4.0.0.xsd">
   <modelVersion>4.0.0</modelVersion>
   <groupId>com.example</groupId>
   <artifactId>hazelcast</artifactId>
   <version>0.0.1-SNAPSHOT</version>
   <name>demo</name>
   <description>Demo project to explain Hazelcast integration with Spring Boot</description>

   <properties>
      <maven.compiler.target>1.8</maven.compiler.target>
      <maven.compiler.source>1.8</maven.compiler.source>
   </properties>
   <parent>
      <groupId>org.springframework.boot</groupId>
      <artifactId>spring-boot-starter-parent</artifactId>
      <version>2.4.0</version>
   </parent>
   <dependencies>
      <dependency>
         <groupId>org.springframework.boot</groupId>
         <artifactId>spring-boot-starter-web</artifactId>
      </dependency>
      <dependency>
         <groupId>org.springframework.boot</groupId>
         <artifactId>spring-boot-starter-cache</artifactId>
      </dependency>
      <dependency>
         <groupId>com.hazelcast</groupId>
         <artifactId>hazelcast-all</artifactId>
         <version>4.0.2</version>
      </dependency>
   </dependencies>
   <build>
      <plugins>
         <plugin>
            <groupId>org.springframework.boot</groupId>
            <artifactId>spring-boot-maven-plugin</artifactId>
         </plugin>
      </plugins>
   </build>
</project>
還要將 hazelcast.xml 新增到 src/main/resources 中:
<hazelcast
   xsi:schemaLocation="http://www.hazelcast.com/schema/config
   http://www.hazelcast.com/schema/config/hazelcast-config-3.12.12.xsd"
   xmlns="http://www.hazelcast.com/schema/config"
   xmlns:xsi="http://www.w3.org/2001/XMLSchema-instance">

   <instance-name>XML_Hazelcast_Instance</instance-name>
</hazelcast>
定義 Spring Boot 使用的入口檔案。確保我們已指定 @EnableCaching:
package com.example.demo;
import org.springframework.boot.SpringApplication;
import org.springframework.boot.autoconfigure.SpringBootApplication;
import org.springframework.cache.annotation.EnableCaching;
@EnableCaching
@SpringBootApplication
public class CompanyApplication {
   public static void main(String[] args) {
      SpringApplication.run(CompanyApplication.class, args);
   }
}
讓我們定義我們的員工 POJO:
package com.example.demo;
import java.io.Serializable;
public class Employee implements Serializable{
   private static final long serialVersionUID = 1L;
   private int empId;
   private String name;
   private String department;
   public Employee(Integer id, String name, String department) {
      super();
      this.empId = id;
      this.name = name;
      this.department = department;
   }
   public int getEmpId() {
      return empId;
   }
   public void setEmpId(int empId) {
      this.empId = empId;
   }
   public String getName() {
      return name;
   }
   public void setName(String name) {
      this.name = name;
   }
   public String getDepartment() {
      return department;
   }
   public void setDepartment(String department) {
      this.department = department;
   }
   @Override
   public String toString() {
      return "Employee [empId=" + empId + ", name=" + name + ", department=" + department + "]";
   }
}
最終,讓我們定義一個基本的 REST 控制器來訪問員工:
package com.example.demo;
import org.springframework.cache.annotation.Cacheable;
import org.springframework.web.bind.annotation.GetMapping;
import org.springframework.web.bind.annotation.PathVariable;
import org.springframework.web.bind.annotation.RequestMapping;
import org.springframework.web.bind.annotation.RestController;
@RestController
@RequestMapping("/v1/")
class CompanyApplicationController{
   @Cacheable(value = "employee")
   @GetMapping("employee/{id}")
   public Employee getSubscriber(@PathVariable("id") int id) throws
   InterruptedException {
      System.out.println("Finding employee information with id " + id + " ...");
      Thread.sleep(5000);
      return new Employee(id, "John Smith", "CS");
   }
}
現在讓我們透過執行以下命令來執行上述應用程式:
mvn clean install
mvn spring-boot:run
您會注意到,該命令的輸出將包含 Hazelcast 成員資訊,這意味著使用 hazelcast.xml 配置會自動為我們配置 Hazelcast 例項。
Members {size:1, ver:1} [
   Member [localhost]:5701 - 91b3df1d-a226-428a-bb74-6eec0a6abb14 this
]
現在讓我們透過 curl 或使用瀏覽器訪問 API:
curl -X GET https://:8080/v1/employee/5
API 的輸出將是我們的示例員工。
{
   "empId": 5,
   "name": "John Smith",
   "department": "CS"
}
在伺服器日誌(即 Spring Boot 應用程式執行的位置)中,我們看到以下行:
Finding employee information with id 5 ...
但是,請注意,訪問資訊需要近 5 秒(因為我們添加了休眠)。但是,如果我們再次呼叫 API,API 的輸出會立即顯示。這是因為我們指定了 @Cacheable 註解。我們第一次 API 呼叫的資料已使用 Hazelcast 作為後端進行快取。
Hazelcast - 監控
Hazelcast 提供多種監控叢集的方法。我們將研究如何透過 REST API 和 JMX 進行監控。讓我們首先研究 REST API。
透過 REST API 監控 Hazelcast
要透過 REST API 監控叢集的執行狀況或成員狀態,必須啟用成員之間的基於 REST API 的通訊。這可以透過配置和程式設計方式完成。
讓我們透過 hazelcast-monitoring.xml 中的 XML 配置啟用基於 REST 的監控:
<hazelcast
   xsi:schemaLocation="http://www.hazelcast.com/schema/config
   http://www.hazelcast.com/schema/config/hazelcast-config-3.12.12.xsd"
   xmlns="http://www.hazelcast.com/schema/config"
   xmlns:xsi="http://www.w3.org/2001/XMLSchema-instance">
   <instance-name>XML_Hazelcast_Instance</instance-name>

   <network>
      <rest-api enabled="true">
         <endpoint-group name="CLUSTER_READ" enabled="true" />
         <endpoint-group name="HEALTH_CHECK" enabled="true" />
      </rest-api>
   </network>
</hazelcast>
讓我們建立一個在 Server.java 檔案中無限期執行的 Hazelcast 例項:
public class Server {
   public static void main(String... args){
      //initialize hazelcast server/instance
      HazelcastInstance hazelcast = Hazelcast.newHazelcastInstance();
      // do not shutdown, let the server run
      //hazelcast.shutdown();
   }
}
現在讓我們執行啟動叢集:
java '-Dhazelcast.config=hazelcast-monitoring.xml' -cp .\target\demo-0.0.1-
SNAPSHOT.jar com.example.demo.Server
啟動後,可以透過呼叫 API 來找出叢集的執行狀況,例如:
https://:5701/hazelcast/health
上述 API 呼叫的輸出:
Hazelcast::NodeState=ACTIVE
Hazelcast::ClusterState=ACTIVE
Hazelcast::ClusterSafe=TRUE
Hazelcast::MigrationQueueSize=0
Hazelcast::ClusterSize=1
這顯示我們的叢集中有一個成員,並且它是活動的。
可以使用以下方法查詢有關節點的更多詳細資訊,例如 IP、埠、名稱:
https://:5701/hazelcast/rest/cluster
上述 API 的輸出:
Members {size:1, ver:1} [
   Member [localhost]:5701 - e6afefcb-6b7c-48b3-9ccb-63b4f147d79d this
]
ConnectionCount: 1
AllConnectionCount: 2
JMX 監控
Hazelcast 還支援監控其內部嵌入的資料結構,例如 IMap、Iqueue 等。
要啟用 JMX 監控,我們首先需要啟用基於 JVM 的 JMX 代理。這可以透過將“-Dcom.sun.management.jmxremote”傳遞給 JVM 來完成。為了使用不同的埠或使用身份驗證,我們可以分別使用 -Dcom.sun.management.jmxremote.port、-Dcom.sun.management.jmxremote.authenticate。
除此之外,我們還必須為 Hazelcast MBean 啟用 JMX。讓我們透過 hazelcast-monitoring.xml 中的 XML 配置啟用基於 JMX 的監控:
<hazelcast
   xsi:schemaLocation="http://www.hazelcast.com/schema/config
   http://www.hazelcast.com/schema/config/hazelcast-config-3.12.12.xsd"
   xmlns="http://www.hazelcast.com/schema/config"
   xmlns:xsi="http://www.w3.org/2001/XMLSchema-instance">
   <instance-name>XML_Hazelcast_Instance</instance-name>

   <properties>
      <property name="hazelcast.jmx">true</property>
   </properties>
</hazelcast>
讓我們在 Server.java 檔案中建立一個無限期執行的 Hazelcast 例項並新增一個對映:
class Server {
   public static void main(String... args){
      //initialize hazelcast server/instance
      HazelcastInstance hazelcast = Hazelcast.newHazelcastInstance();
      //create a simple map
      Map<String, String> vehicleOwners = hazelcast.getMap("vehicleOwnerMap");
      // add key-value to map
      vehicleOwners.put("John", "Honda-9235");
      // do not shutdown, let the server run
      //hazelcast.shutdown();
   }
}
現在我們可以執行以下命令來啟用 JMX:
java '-Dcom.sun.management.jmxremote' '-Dhazelcast.config=others\hazelcastmonitoring.
xml' -cp .\target\demo-0.0.1-SNAPSHOT.jar com.example.demo.Server
現在可以透過 JMX 客戶端(如 jConsole、VisualVM 等)連線 JMX 埠。
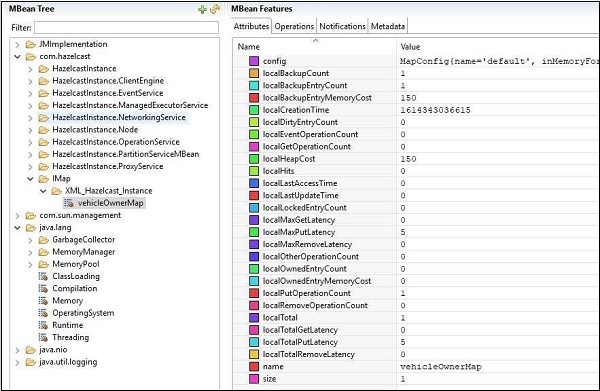
以下是使用jConsole連線並檢視VehicleMap屬性後獲得的快照。可以看到,地圖名稱為vehicleOwnerMap,地圖大小為1。
Hazelcast - Map Reduce與聚合
MapReduce是一種計算模型,當您擁有大量資料並且需要多臺機器(即分散式環境)來計算資料時,它非常有用。它涉及將資料“對映”到鍵值對,然後“歸約”,即對這些鍵進行分組並在值上執行操作。
鑑於Hazelcast的設計考慮了分散式環境,因此實現Map-Reduce框架是很自然的。
讓我們來看一個例子。
例如,假設我們有關於汽車(品牌和車牌號)及其車主的資料。
Honda-9235, John
Hyundai-235, Alice
Honda-935, Bob
Mercedes-235, Janice
Honda-925, Catnis
Hyundai-1925, Jane
現在,我們必須找出每個品牌的汽車數量,例如現代、本田等。
示例
讓我們嘗試使用MapReduce來找出答案:
package com.example.demo;

import java.lang.reflect.Array;
import java.util.ArrayList;
import java.util.Map;
import java.util.concurrent.ExecutionException;
import java.util.concurrent.atomic.AtomicInteger;

import com.hazelcast.core.Hazelcast;
import com.hazelcast.core.HazelcastInstance;
import com.hazelcast.core.ICompletableFuture;
import com.hazelcast.core.IMap;
import com.hazelcast.mapreduce.Context;
import com.hazelcast.mapreduce.Job;
import com.hazelcast.mapreduce.JobTracker;
import com.hazelcast.mapreduce.KeyValueSource;
import com.hazelcast.mapreduce.Mapper;
import com.hazelcast.mapreduce.Reducer;
import com.hazelcast.mapreduce.ReducerFactory;

public class MapReduce {
   public static void main(String[] args) throws ExecutionException,
   InterruptedException {
      try {
         // create two Hazelcast instances
         HazelcastInstance hzMember = Hazelcast.newHazelcastInstance();
         Hazelcast.newHazelcastInstance();
         IMap<String, String> vehicleOwnerMap=hzMember.getMap("vehicleOwnerMap");
         vehicleOwnerMap.put("Honda-9235", "John");
         vehicleOwnerMap.putc"Hyundai-235", "Alice");
         vehicleOwnerMap.put("Honda-935", "Bob");
         vehicleOwnerMap.put("Mercedes-235", "Janice");
         vehicleOwnerMap.put("Honda-925", "Catnis");
         vehicleOwnerMap.put("Hyundai-1925", "Jane");
         KeyValueSource<String, String> kvs=KeyValueSource.fromMap(vehicleOwnerMap);
         JobTracker tracker = hzMember.getJobTracker("vehicleBrandJob");
         Job<String, String> job = tracker.newJob(kvs);
         ICompletableFuture<Map<String, Integer>> myMapReduceFuture =
            job.mapper(new BrandMapper())
            .reducer(new BrandReducerFactory()).submit();
         Map<String, Integer&g; result = myMapReduceFuture.get();
         System.out.println("Final output: " + result);
      } finally {
         Hazelcast.shutdownAll();
      }
   }
   private static class BrandMapper implements Mapper<String, String, String, Integer> {
      @Override
      public void map(String key, String value, Context<String, Integer>
      context) {
         context.emit(key.split("-", 0)[0], 1);
      }
   }
   private static class BrandReducerFactory implements ReducerFactory<String, Integer, Integer> {
      @Override
      public Reducer<Integer, Integer> newReducer(String key) {
         return new BrandReducer();
      }
   }
   private static class BrandReducer extends Reducer<Integer, Integer> {
      private AtomicInteger count = new AtomicInteger(0);
      @Override
      public void reduce(Integer value) {
         count.addAndGet(value);
      }
      @Override
      public Integer finalizeReduce() {
         return count.get();
      }
   }
}
讓我們嘗試理解這段程式碼:
- 我們建立Hazelcast成員。在這個例子中,我們只有一個成員,但也可以有多個成員。
我們使用虛擬資料建立一個地圖,並從中建立一個鍵值儲存。
我們建立一個Map-Reduce作業,並要求它使用鍵值儲存作為資料。
然後我們將作業提交到叢集並等待完成。
對映器建立一個鍵,即從原始鍵中提取品牌資訊,並將值設定為1,然後將該資訊作為K-V發出給歸約器。
歸約器簡單地對值求和,根據鍵(即品牌名稱)對資料進行分組。
輸出
程式碼輸出:
Final output: {Mercedes=1, Hyundai=2, Honda=3}
Hazelcast - 集合監聽器
當給定的集合(例如佇列、集合、列表等)更新時,Hazelcast支援新增監聽器。典型的事件包括條目新增和條目刪除。
讓我們透過一個例子看看如何實現集合監聽器。假設我們想要實現一個跟蹤集合中元素數量的監聽器。
示例
首先,讓我們實現生產者:
public class SetTimedProducer{
   public static void main(String... args) throws IOException,
   InterruptedException {
      //initialize hazelcast instance
      HazelcastInstance hazelcast = Hazelcast.newHazelcastInstance();
      Thread.sleep(5000);
      // create a set
      ISet<String> hzFruits = hazelcast.getSet("fruits");
      hzFruits.add("Mango");
      Thread.sleep(2000);
      hzFruits.add("Apple");
      Thread.sleep(2000);
      hzFruits.add("Banana");
      System.exit(0);
   }
}
現在讓我們實現監聽器:
package com.example.demo;

import java.io.IOException;
import com.hazelcast.core.ISet;
import com.hazelcast.core.ItemEvent;
import com.hazelcast.core.ItemListener;
import com.hazelcast.core.Hazelcast;
import com.hazelcast.core.HazelcastInstance;

public class SetListener{
   public static void main(String... args) throws IOException, InterruptedException {
      //initialize hazelcast instance
      HazelcastInstance hazelcast = Hazelcast.newHazelcastInstance();
      // create a set
      ISet<String> hzFruits = hazelcast.getSet("fruits");
      ItemListener<String> listener = new FruitListener<String>();
      hzFruits.addItemListener(listener, true);
      System.exit(0);
   }
   private static class FruitListener<String> implements ItemListener<String> {
      private int count = 0;
      @Override
      public void itemAdded(ItemEvent<String> item) {
         System.out.println("item added" + item);
         count ++;
         System.out.println("Total elements" + count);
      }
      @Override
      public void itemRemoved(ItemEvent<String> item) {
         count --;
      }
   }
}
我們將首先執行生產者:
java -cp .\target\demo-0.0.1-SNAPSHOT.jar com.example.demo.SetTimedProducer
然後,我們執行監聽器並讓它無限期執行:
java -cp .\target\demo-0.0.1-SNAPSHOT.jar com.example.demo.SetListener
輸出
監聽器的輸出如下:
item added: ItemEvent{
   event=ADDED, item=Mango, member=Member [localhost]:5701-c28a60b7-3259-44bf-8793-54063d244394 this}
Total elements: 1

item added: ItemEvent{
   event=ADDED, item=Apple, member=Member [localhost]:5701-c28a60b7-3259-44bf-8793-54063d244394 this}
Total elements: 2

item added: ItemEvent{
   event=ADDED, item=Banana, member=Member [localhost]:5701-c28a60b7-3259-44bf-8793-54063d244394 this}
Total elements: 3
呼叫hzFruits.addItemListener(listener, true) 告訴Hazelcast提供成員資訊。如果設定為false,我們只會收到新增/刪除條目的通知。這有助於避免需要序列化和反序列化條目以使其可供監聽器訪問。
Hazelcast - 常見陷阱與效能提示
單機Hazelcast佇列
Hazelcast佇列儲存在一個成員上(以及不同機器上的備份)。這實際上意味著佇列可以容納單臺機器上可以容納的任意數量的專案。因此,新增更多成員不會擴充套件佇列容量。載入超過一臺機器在佇列中可以處理的資料可能會導致機器崩潰。
使用Map的set方法而不是put方法
如果我們使用IMap的put(key, newValue),Hazelcast會返回oldValue。這意味著,在反序列化中花費了額外的計算和時間。這也包括從網路傳送的更多資料。相反,如果我們對oldValue不感興趣,我們可以使用set(key, value),它返回void。
讓我們看看如何儲存和注入對Hazelcast結構的引用。以下程式碼建立了一個名為“stock”的地圖,並在一個地方新增芒果,在另一個地方新增蘋果。
//initialize hazelcast instance
HazelcastInstance hazelcast = Hazelcast.newHazelcastInstance();

// create a map
IMap<String, String> hzStockTemp = hazelcast.getMap("stock");
hzStock.put("Mango", "4");

IMap<String, String> hzStockTemp2 = hazelcast.getMap("stock");
hzStock.put("Apple", "3");
然而,這裡的問題是我們兩次使用了getMap("stock")。雖然在單節點環境中此呼叫看起來無害,但在叢集環境中會造成速度緩慢。函式呼叫getMap()涉及到與叢集其他成員的網路往返。
因此,建議我們將對地圖的引用儲存在本地,並在操作地圖時使用該引用。例如:
// create a map
IMap<String, String> hzStock = hazelcast.getMap("stock");
hzStock.put("Mango", "4");
hzStock.put("Apple", "3");
Hazelcast使用序列化資料進行物件比較
正如我們在前面的例子中看到的,務必注意Hazelcast在比較鍵時不使用反序列化物件。因此,它無法訪問我們在equals/hashCode方法中編寫的程式碼。根據Hazelcast,如果兩個Java物件的屬性值相同,則鍵相等。
使用監控
在大規模分散式系統中,監控起著非常重要的作用。使用REST API和JMX進行監控對於採取主動措施而不是被動措施非常重要。
同構叢集
Hazelcast假設所有機器都是相同的,即所有機器具有相同的資源。但是,如果我們的叢集包含一臺效能較低的機器(例如,記憶體較少,CPU能力較低等),那麼如果計算發生在那臺機器上,就會造成速度緩慢。更糟糕的是,較弱的機器可能會耗盡資源,導致級聯故障。因此,Hazelcast成員必須具有相同的資源能力。