
 資料結構
資料結構 網路
網路 RDBMS
RDBMS 作業系統
作業系統 Java
Java iOS
iOS HTML
HTML CSS
CSS Android
 Python
 C 程式設計
 C++
C++ C#
C# MongoDB
 MySQL
MySQL Javascript
 PHP
PHP使用 MATLAB App Designer 建立應用程式
MATLAB 是一種強大且高階的程式語言,廣泛應用於工程和科學領域,用於系統設計。MATLAB 最重要的特點是它提供了一個易於使用的圖形使用者介面 (GUI)。MATLAB 具有內建的 App Designer 工具,允許使用者開發各種應用程式,將他們的概念無縫地轉換為使用者友好的 GUI。總的來說,MATLAB 是一款非常有價值的工具,可以以簡化和易於訪問的方式傳達複雜的資訊。
在本教程中,我們將探討**如何使用 MATLAB 中的 App Designer 建立 GUI 應用程式**。
如何使用 MATLAB App Designer 建立應用程式?
下面解釋了使用 MATLAB 中的 App Designer 建立應用程式的分步過程
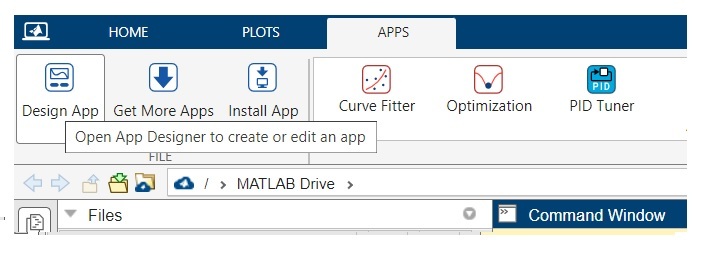
**步驟 (1)** – 開啟 MATLAB 並啟動 App Designer。有兩種方法可以做到這一點
在 MATLAB 命令視窗中輸入“appdesigner”命令並按 Enter 鍵。
單擊“應用程式”選項卡並選擇“App Designer”選項。
**步驟 (2)** – 建立一個空白應用程式。
**步驟 (3)** – 使用按鈕、文字欄位、繪圖等元件設計使用者介面。
**步驟 (4)** – 使用右側顯示的屬性編輯器工具自定義每個元件的屬性。
**步驟 (5)** – 透過編寫 MATLAB 程式碼為應用程式的元件新增功能。
**步驟 (6)** – 單擊 App Designer 功能區中的“執行”按鈕執行應用程式,並檢查其工作方式。
**步驟 (7)** – 如果應用程式的 UI 或功能存在任何錯誤,請使用 MATLAB 提供的除錯工具除錯應用程式。
**步驟 (8)** – 單擊 App Designer 視窗中的“儲存”按鈕儲存應用程式。在 MATLAB 中,我們可以將應用程式儲存為“.mlapp”檔案或作為獨立應用程式,該應用程式無需 MATLAB 即可執行。
這就是在 MATLAB 中設計 GUI 應用程式所涉及的步驟。
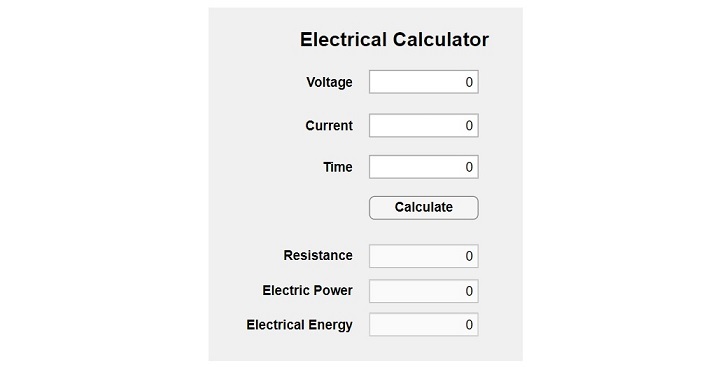
現在,為了更多地瞭解 MATLAB App Designer 中的應用程式設計,讓我們設計一個簡單的計算器應用程式,該應用程式可以計算電路中的電阻、電功率和電能。
示例:使用 MATLAB App Designer 建立應用程式
設計一個計算器應用程式以計算電阻、電功率和電能,需要六個數字編輯欄位,其中三個可編輯,用於接受電壓 (V)、電流 (I) 和時間 (t),而三個不可編輯,用於儲存電阻 (R)、電功率 (P) 和電能 (E) 的值。
它還將有一個按鈕來計算並顯示結果。我們還可以為應用程式新增一個標籤以獲得更好的外觀。
因此,讓我們開始開發應用程式。
**步驟 (1)** – 開啟 MATLAB App Designer 並建立一個黑色應用程式。
**步驟 (2)** – 從左側顯示的元件庫中拖放六個數字欄位、六個文字編輯欄位、一個標籤和一個按鈕到應用程式畫布上。根據您希望應用程式中顯示的方式排列這些元件。
**步驟 (3)** – 編寫 MATLAB 程式碼以在單擊“計算”按鈕時執行電阻、電功率、電能的計算。
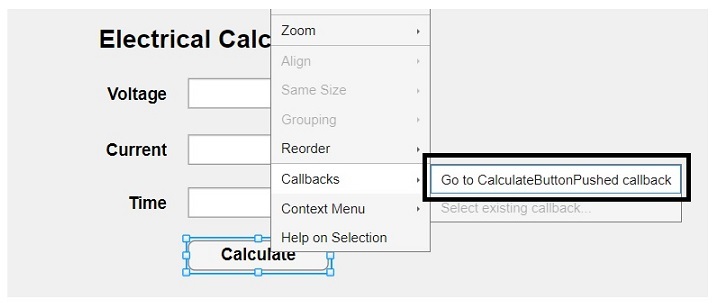
單擊突出顯示的選項後,您將獲得一個空間來貼上以下程式碼。
% Button pushed function: CalculateButton
function CalculateButtonPushed(app, event)
    % Get values from the editable fields
    V = app.VoltageEditField.Value;
    I = app.CurrentEditField.Value;
    t = app.TimeEditField.Value;

    % Calculate resistance, power, and energy
    R = V / I;
    P = V * I;
    E = P * t;

    % Update non-editable fields with calculated values
    app.ResistanceEditField.Value = R;
    app.ElectricPowerEditField.Value = P;
    app.ElectricalEnergyEditField.Value = E;
end
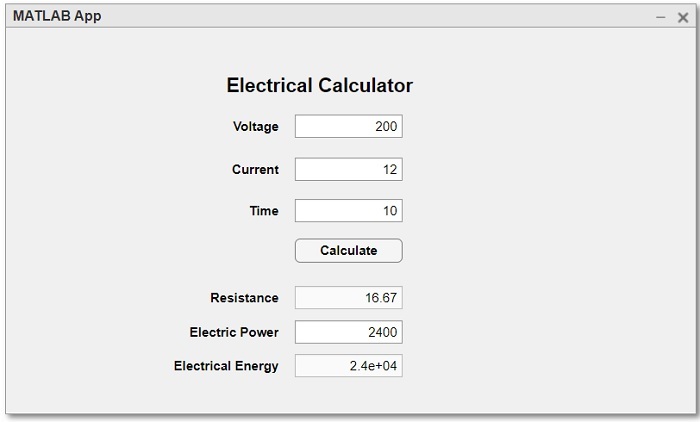
**步驟 (4)** – 執行並測試應用程式的功能。
MATLAB 應用程式程式碼
以下是上述應用程式的完整 MATLAB 程式碼。
classdef app1 < matlab.apps.AppBase

    % Properties that correspond to app components
    properties (Access = public)
        UIFigure                        matlab.ui.Figure
        ElectricalCalculatorLabel       matlab.ui.control.Label
        CalculateButton                 matlab.ui.control.Button
        ElectricPowerEditField          matlab.ui.control.NumericEditField
        ElectricPowerEditFieldLabel     matlab.ui.control.Label
        ElectricalEnergyEditField       matlab.ui.control.NumericEditField
        ElectricalEnergyEditFieldLabel  matlab.ui.control.Label
        CurrentEditField                matlab.ui.control.NumericEditField
        CurrentEditFieldLabel           matlab.ui.control.Label
        TimeEditField                   matlab.ui.control.NumericEditField
        TimeEditFieldLabel              matlab.ui.control.Label
        ResistanceEditField             matlab.ui.control.NumericEditField
        ResistanceEditFieldLabel        matlab.ui.control.Label
        VoltageEditField                matlab.ui.control.NumericEditField
        VoltageEditFieldLabel           matlab.ui.control.Label
    end

    % Callbacks that handle component events
    methods (Access = private)

        % Button pushed function: CalculateButton
        function CalculateButtonPushed(app, event)
            % Get values from the editable fields
            V = app.VoltageEditField.Value;
            I = app.CurrentEditField.Value;
            t = app.TimeEditField.Value;

            % Calculate resistance, power, and energy
            R = V / I;
            P = V * I;
            E = P * t;

            % Update non-editable fields with calculated values
            app.ResistanceEditField.Value = R;
            app.ElectricPowerEditField.Value = P;
            app.ElectricalEnergyEditField.Value = E;
        end
    end

    % Component initialization
    methods (Access = private)

        % Create UIFigure and components
        function createComponents(app)

            % Create UIFigure and hide until all components are created
            app.UIFigure = uifigure('Visible', 'off');
            app.UIFigure.Position = [100 100 640 480];
            app.UIFigure.Name = 'MATLAB App';

            % Create VoltageEditFieldLabel
            app.VoltageEditFieldLabel = uilabel(app.UIFigure);
            app.VoltageEditFieldLabel.HorizontalAlignment = 'right';
            app.VoltageEditFieldLabel.FontWeight = 'bold';
            app.VoltageEditFieldLabel.Position = [207 378 47 22];
            app.VoltageEditFieldLabel.Text = 'Voltage';

            % Create VoltageEditField
            app.VoltageEditField = uieditfield(app.UIFigure, 'numeric');
            app.VoltageEditField.Position = [269 378 100 22];

            % Create ResistanceEditFieldLabel
            app.ResistanceEditFieldLabel = uilabel(app.UIFigure);
            app.ResistanceEditFieldLabel.HorizontalAlignment = 'right';
            app.ResistanceEditFieldLabel.FontWeight = 'bold';
            app.ResistanceEditFieldLabel.Position = [186 219 68 22];
            app.ResistanceEditFieldLabel.Text = 'Resistance';

            % Create ResistanceEditField
            app.ResistanceEditField = uieditfield(app.UIFigure, 'numeric');
            app.ResistanceEditField.Editable = 'off';
            app.ResistanceEditField.Position = [269 219 100 22];

            % Create TimeEditFieldLabel
            app.TimeEditFieldLabel = uilabel(app.UIFigure);
            app.TimeEditFieldLabel.HorizontalAlignment = 'right';
            app.TimeEditFieldLabel.FontWeight = 'bold';
            app.TimeEditFieldLabel.Position = [221 300 33 22];
            app.TimeEditFieldLabel.Text = 'Time';

            % Create TimeEditField
            app.TimeEditField = uieditfield(app.UIFigure, 'numeric');
            app.TimeEditField.Position = [269 300 100 22];

            % Create CurrentEditFieldLabel
            app.CurrentEditFieldLabel = uilabel(app.UIFigure);
            app.CurrentEditFieldLabel.HorizontalAlignment = 'right';
            app.CurrentEditFieldLabel.FontWeight = 'bold';
            app.CurrentEditFieldLabel.Position = [206 338 48 22];
            app.CurrentEditFieldLabel.Text = 'Current';

            % Create CurrentEditField
            app.CurrentEditField = uieditfield(app.UIFigure, 'numeric');
            app.CurrentEditField.Position = [269 338 100 22];

            % Create ElectricalEnergyEditFieldLabel
            app.ElectricalEnergyEditFieldLabel = uilabel(app.UIFigure);
            app.ElectricalEnergyEditFieldLabel.HorizontalAlignment = 'right';
            app.ElectricalEnergyEditFieldLabel.FontWeight = 'bold';
            app.ElectricalEnergyEditFieldLabel.Position = [152 156 102 22];
            app.ElectricalEnergyEditFieldLabel.Text = 'Electrical Energy';

            % Create ElectricalEnergyEditField
            app.ElectricalEnergyEditField = uieditfield(app.UIFigure, 'numeric');
            app.ElectricalEnergyEditField.Editable = 'off';
            app.ElectricalEnergyEditField.Position = [269 156 100 22];

            % Create ElectricPowerEditFieldLabel
            app.ElectricPowerEditFieldLabel = uilabel(app.UIFigure);
            app.ElectricPowerEditFieldLabel.HorizontalAlignment = 'right';
            app.ElectricPowerEditFieldLabel.FontWeight = 'bold';
            app.ElectricPowerEditFieldLabel.Position = [166 187 88 22];
            app.ElectricPowerEditFieldLabel.Text = 'Electric Power';

            % Create ElectricPowerEditField
            app.ElectricPowerEditField = uieditfield(app.UIFigure, 'numeric');
            app.ElectricPowerEditField.Position = [269 187 100 22];

            % Create CalculateButton
            app.CalculateButton = uibutton(app.UIFigure, 'push');
            app.CalculateButton.ButtonPushedFcn = createCallbackFcn(app, @CalculateButtonPushed, true);
            app.CalculateButton.FontWeight = 'bold';
            app.CalculateButton.Position = [269 263 100 22];
            app.CalculateButton.Text = 'Calculate';

            % Create ElectricalCalculatorLabel
            app.ElectricalCalculatorLabel = uilabel(app.UIFigure);
            app.ElectricalCalculatorLabel.HorizontalAlignment = 'center';
            app.ElectricalCalculatorLabel.FontSize = 18;
            app.ElectricalCalculatorLabel.FontWeight = 'bold';
            app.ElectricalCalculatorLabel.Position = [199 416 186 23];
            app.ElectricalCalculatorLabel.Text = 'Electrical Calculator';

            % Show the figure after all components are created
            app.UIFigure.Visible = 'on';
        end
    end

    % App creation and deletion
    methods (Access = public)

        % Construct app
        function app = app1

            % Create UIFigure and components
            createComponents(app)

            % Register the app with App Designer
            registerApp(app, app.UIFigure)

            if nargout == 0
                clear app
            end
        end

        % Code that executes before app deletion
        function delete(app)

            % Delete UIFigure when app is deleted
            delete(app.UIFigure)
        end
    end
end
結論
在本教程中,我們透過一個示例解釋了在 MATLAB 中建立應用程式的分步過程。您可以按照相同的步驟使用 MATLAB App Designer 建立任何型別的 GUI 應用程式。

407 次檢視
