Apache HttpClient - 快速指南
Apache HttpClient - 概述
超文字傳輸協議 (HTTP) 是一種用於分散式、協作式超媒體資訊系統的應用層協議。自1990年以來,它是全球資訊網(即網際網路)資料通訊的基礎。HTTP 是一種通用且無狀態的協議,也可以使用其請求方法、錯誤程式碼和標頭的擴充套件用於其他目的。
基本上,HTTP 是一種基於 TCP/IP 的通訊協議,用於在全球資訊網上傳遞資料(HTML 檔案、影像檔案、查詢結果等)。預設埠是 TCP 80,但也可以使用其他埠。它為計算機之間以標準化方式進行通訊提供了一種方法。HTTP 規範定義了客戶端如何構建和傳送請求資料到伺服器,以及伺服器如何響應這些請求。
什麼是 HTTP 客戶端
HTTP 客戶端是一個傳輸庫,它駐留在客戶端,傳送和接收 HTTP 訊息。它提供最新的、功能豐富的和高效的實現,滿足最新的 HTTP 標準。
此外,使用客戶端庫,可以構建基於 HTTP 的應用程式,例如 Web 瀏覽器、Web 服務客戶端等。
HTTP 客戶端的功能
以下是 HTTP 客戶端的主要功能:
HttpClient 庫實現了所有可用的 HTTP 方法。
HttpClient 庫提供 API 以使用安全套接字層協議保護請求。
使用 HttpClient,您可以使用代理建立連線。
您可以使用基本、摘要、NTLMv1、NTLMv2、NTLM2 會話等身份驗證方案對連線進行身份驗證。
HttpClient 庫支援透過多執行緒傳送請求。它使用 **ClientConnectionPoolManager** 管理從各種執行緒建立的多個連線。
使用 Apache HttpClient 庫,您可以設定連線超時。
Apache HttpClient - 環境設定
本章將解釋如何在 Eclipse IDE 中為 HttpClient 設定環境。在繼續安裝之前,請確保您的系統中已安裝 Eclipse。如果沒有,請下載並安裝 Eclipse。
有關 Eclipse 的更多資訊,請參閱我們的 Eclipse 教程。
步驟 1 - 下載依賴 JAR 檔案
開啟 HttpClient (元件) 網站的官方 主頁 並轉到下載頁面
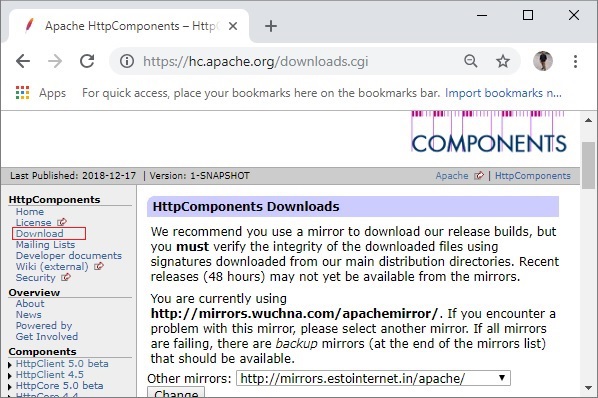
然後,下載最新穩定版本的 **HttpClient**。在本教程中,我們使用的是 4.5.6 版本,因此請下載檔案 **4.5.6.zip**。
在下載的資料夾中,您會找到一個名為 **lib** 的資料夾,其中包含需要新增到專案類路徑中的必需 Jar 檔案,以便使用 HttpClient。
步驟 2 - 建立專案並設定構建路徑
開啟 Eclipse 並建立一個示例專案。右鍵單擊專案,選擇 **構建路徑 → 配置構建路徑** 選項,如下所示。

在 **Java 構建路徑** 框架的 **庫** 選項卡中,單擊 **新增外部 JARs**。
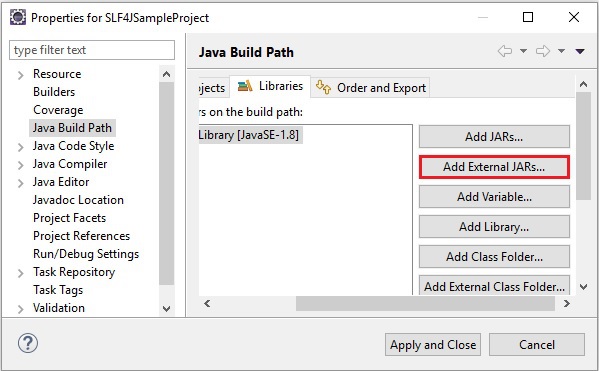
然後選擇 lib 資料夾中的所有 jar 檔案,然後單擊 **應用並關閉**。

您已準備好使用 Eclipse 中的 HttpClient 庫。
Apache HttpClient - HTTP GET 請求
GET 方法用於使用給定的 URI 從給定的伺服器檢索資訊。使用 GET 的請求應該只檢索資料,並且不應該對資料產生其他影響。
HttpClient API 提供了一個名為 **HttpGet** 的類,它表示 GET 請求方法。
請按照以下步驟使用 HttpClient 庫傳送 GET 請求
步驟 1 - 建立 HttpClient 物件
**HttpClients** 類的 **createDefault()** 方法返回一個 **CloseableHttpClient** 物件,它是 **HttpClient** 介面的基本實現。
使用此方法,建立一個 HttpClient 物件,如下所示:
CloseableHttpClient httpclient = HttpClients.createDefault();
步驟 2 - 建立 HttpGet 物件
**HttpGet** 類表示 HTTP GET 請求,它使用 URI 檢索給定伺服器的資訊。
透過例項化此類來建立一個 HTTP GET 請求。此類的建構函式接受一個表示 URI 的字串值。
HttpGet httpget = new HttpGet("https://tutorialspoint.tw/");
步驟 3 - 執行 GET 請求
**CloseableHttpClient** 類的 **execute()** 方法接受一個 HttpUriRequest(介面)物件(即 HttpGet、HttpPost、HttpPut、HttpHead 等)並返回一個響應物件。
使用此方法執行請求,如下所示:
HttpResponse httpresponse = httpclient.execute(httpget);
示例
以下示例演示了使用 HttpClient 庫執行 HTTP GET 請求。
import java.util.Scanner;
import org.apache.http.HttpResponse;
import org.apache.http.client.methods.HttpGet;
import org.apache.http.impl.client.CloseableHttpClient;
import org.apache.http.impl.client.HttpClients;

public class HttpGetExample {

   public static void main(String args[]) throws Exception{

      //Creating a HttpClient object
      CloseableHttpClient httpclient = HttpClients.createDefault();

      //Creating a HttpGet object
      HttpGet httpget = new HttpGet("https://tutorialspoint.tw/ ");

      //Printing the method used
      System.out.println("Request Type: "+httpget.getMethod());

      //Executing the Get request
      HttpResponse httpresponse = httpclient.execute(httpget);

      Scanner sc = new Scanner(httpresponse.getEntity().getContent());

      //Printing the status line
      System.out.println(httpresponse.getStatusLine());
      while(sc.hasNext()) {
         System.out.println(sc.nextLine());
      }
   }
}
輸出
以上程式生成以下輸出:
Request Type: GET
<!DOCTYPE html>
<!--[if IE 8]><html class = "ie ie8"> <![endif]-->
<!--[if IE 9]><html class = "ie ie9"> <![endif]-->
<!--[if gt IE 9]><!-->
<html lang = "en-US"> <!--<![endif]-->
<head>
<!-- Basic -->
<meta charset = "utf-8">
<title>Parallax Scrolling, Java Cryptography, YAML, Python Data Science, Java
i18n, GitLab, TestRail, VersionOne, DBUtils, Common CLI, Seaborn, Ansible,
LOLCODE, Current Affairs 2018, Apache Commons Collections</title>
<meta name = "Description" content = "Parallax Scrolling, Java Cryptography, YAML,
Python Data Science, Java i18n, GitLab, TestRail, VersionOne, DBUtils, Common
CLI, Seaborn, Ansible, LOLCODE, Current Affairs 2018, Intellij Idea, Apache
Commons Collections, Java 9, GSON, TestLink, Inter Process Communication (IPC),
Logo, PySpark, Google Tag Manager, Free IFSC Code, SAP Workflow"/>
<meta name = "Keywords" content = "Python Data Science, Java i18n, GitLab,
TestRail, VersionOne, DBUtils, Common CLI, Seaborn, Ansible, LOLCODE, Gson,
TestLink, Inter Process Communication (IPC), Logo"/>
<meta http-equiv = "X-UA-Compatible" content = "IE = edge">
<meta name = "viewport" content = "width = device-width,initial-scale = 1.0,userscalable = yes">
<link href = "https://cdn.muicss.com/mui-0.9.39/extra/mui-rem.min.css"
rel = "stylesheet" type = "text/css" />
<link rel = "stylesheet" href="/questions/css/home.css?v = 3" />
<script src = "/questions/js/jquery.min.js"></script>
<script src = "/questions/js/fontawesome.js"></script>
<script src = "https://cdn.muicss.com/mui-0.9.39/js/mui.min.js"></script>
</head>
. . . . . . . . . . . . . . . . . . . . . . . .
. . . . . . . . . . . . . . . . . . . . . . . .
. . . . . . . . . . . . . . . . . . . . . . . .
. . . . . . . . . . . . . . . . . . . . . . . .
</script>
</body>
</html>
Apache HttpClient - HTTP POST 請求
POST 請求用於將資料傳送到伺服器;例如,使用 HTML 表單傳送客戶資訊、檔案上傳等。
HttpClient API 提供了一個名為 **HttpPost** 的類,它表示 POST 請求。
請按照以下步驟使用 HttpClient 庫傳送 HTTP POST 請求。
步驟 1 - 建立 HttpClient 物件
**HttpClients** 類的 **createDefault()** 方法返回 **CloseableHttpClient** 類的物件,它是 **HttpClient** 介面的基本實現。
使用此方法,建立一個 HttpClient 物件。
CloseableHttpClient httpClient = HttpClients.createDefault();
步驟 2 - 建立 HttpPost 物件
**HttpPost** 類表示 **HTTP POST** 請求。這會發送所需的資料並使用 URI 檢索給定伺服器的資訊。
透過例項化 **HttpPost** 類並將其建構函式的引數設定為表示 URI 的字串值來建立此請求。
HttpGet httpGet = new HttpGet("https://tutorialspoint.tw/");
步驟 3 - 執行 GET 請求
**CloseableHttpClient** 物件的 **execute()** 方法接受一個 HttpUriRequest(介面)物件(即 HttpGet、HttpPost、HttpPut、HttpHead 等)並返回一個響應物件。
HttpResponse httpResponse = httpclient.execute(httpget);
示例
以下示例演示了使用 HttpClient 庫執行 HTTP POST 請求。
import org.apache.http.HttpResponse;
import org.apache.http.client.methods.HttpPost;
import org.apache.http.impl.client.CloseableHttpClient;
import org.apache.http.impl.client.HttpClients;

public class HttpPostExample {

   public static void main(String args[]) throws Exception{

      //Creating a HttpClient object
      CloseableHttpClient httpclient = HttpClients.createDefault();

      //Creating a HttpGet object
      HttpPost httppost = new HttpPost("https://tutorialspoint.tw/");

      //Printing the method used
      System.out.println("Request Type: "+httppost.getMethod());

      //Executing the Get request
      HttpResponse httpresponse = httpclient.execute(httppost);

      Scanner sc = new Scanner(httpresponse.getEntity().getContent());

      //Printing the status line
      System.out.println(httpresponse.getStatusLine());
      while(sc.hasNext()) {
         System.out.println(sc.nextLine());
      }
   }
}
輸出
以上程式生成以下輸出。
Request Type: POST
<!DOCTYPE html>
<!--[if IE 8]><html class = "ie ie8"> <![endif]-->
<!--[if IE 9]><html class = "ie ie9"> <![endif]-->
<!--[if gt IE 9]><!-->
<html lang = "en-US"> <!--<![endif]-->
<head>
<!-- Basic -->
<meta charset = "utf-8">
<title>Parallax Scrolling, Java Cryptography, YAML, Python Data Science, Java
i18n, GitLab, TestRail, VersionOne, DBUtils, Common CLI, Seaborn, Ansible,
LOLCODE, Current Affairs 2018, Apache Commons Collections</title>
<meta name = "Description" content = "Parallax Scrolling, Java Cryptography, YAML,
Python Data Science, Java i18n, GitLab, TestRail, VersionOne, DBUtils, Common
CLI, Seaborn, Ansible, LOLCODE, Current Affairs 2018, Intellij Idea, Apache
Commons Collections, Java 9, GSON, TestLink, Inter Process Communication (IPC),
Logo, PySpark, Google Tag Manager, Free IFSC Code, SAP Workflow"/>
<meta name = "Keywords" content="Python Data Science, Java i18n, GitLab,
TestRail, VersionOne, DBUtils, Common CLI, Seaborn, Ansible, LOLCODE, Gson,
TestLink, Inter Process Communication (IPC), Logo"/>
<meta http-equiv = "X-UA-Compatible" content = "IE = edge">
<meta name = "viewport" conten t= "width = device-width,initial-scale = 1.0,userscalable = yes">
<link href = "https://cdn.muicss.com/mui-0.9.39/extra/mui-rem.min.css"
rel = "stylesheet" type = "text/css" />
<link rel = "stylesheet" href = "/questions/css/home.css?v = 3" />
<script src = "/questions/js/jquery.min.js"></script>
<script src = "/questions/js/fontawesome.js"></script>
<script src = "https://cdn.muicss.com/mui-0.9.39/js/mui.min.js"></script>
</head>
. . . . . . . . . . . . . . . . . . . . . . . .
. . . . . . . . . . . . . . . . . . . . . . . .
. . . . . . . . . . . . . . . . . . . . . . . .
. . . . . . . . . . . . . . . . . . . . . . . .
</script>
</body>
</html>
Apache HttpClient - 響應處理器
建議使用響應處理器處理 HTTP 響應。本章將討論如何建立響應處理器以及如何使用它們來處理響應。
如果使用響應處理器,所有 HTTP 連線都將自動釋放。
建立響應處理器
HttpClient API 提供了一個名為 **ResponseHandler** 的介面,位於 **org.apache.http.client.** 包中。為了建立一個響應處理器,請實現此介面並覆蓋其 **handleResponse()** 方法。
每個響應都有一個狀態程式碼,如果狀態程式碼介於 200 和 300 之間,則表示操作已成功接收、理解和接受。因此,在我們的示例中,我們將處理具有此類狀態程式碼的響應實體。
使用響應處理器執行請求
請按照以下步驟使用響應處理器執行請求。
步驟 1 - 建立 HttpClient 物件
**HttpClients** 類的 **createDefault()** 方法返回 **CloseableHttpClient** 類的物件,它是 **HttpClient** 介面的基本實現。使用此方法建立 HttpClient 物件
CloseableHttpClient httpclient = HttpClients.createDefault();
步驟 2 - 例項化響應處理器
使用以下程式碼行例項化上面建立的響應處理器物件:
ResponseHandler<String> responseHandler = new MyResponseHandler();
步驟 3 - 建立 HttpGet 物件
**HttpGet** 類表示 HTTP GET 請求,它使用 URI 檢索給定伺服器的資訊。
透過例項化 HttpGet 類並將其建構函式的引數設定為表示 URI 的字串來建立 HttpGet 請求。
ResponseHandler<String> responseHandler = new MyResponseHandler();
步驟 4 - 使用響應處理器執行 GET 請求
**CloseableHttpClient** 類有一個 **execute()** 方法的變體,它接受兩個物件 **ResponseHandler** 和 HttpUriRequest,並返回一個響應物件。
String httpResponse = httpclient.execute(httpget, responseHandler);
示例
以下示例演示了響應處理器的用法。
import java.io.IOException;
import org.apache.http.HttpEntity;
import org.apache.http.HttpResponse;
import org.apache.http.client.ResponseHandler;
import org.apache.http.client.methods.HttpGet;
import org.apache.http.impl.client.CloseableHttpClient;
import org.apache.http.impl.client.HttpClients;
import org.apache.http.util.EntityUtils;

class MyResponseHandler implements ResponseHandler<String>{

   public String handleResponse(final HttpResponse response) throws IOException{

      //Get the status of the response
      int status = response.getStatusLine().getStatusCode();
      if (status >= 200 && status < 300) {
         HttpEntity entity = response.getEntity();
         if(entity == null) {
            return "";
         } else {
            return EntityUtils.toString(entity);
         }

      } else {
         return ""+status;
      }
   }
}

public class ResponseHandlerExample {

   public static void main(String args[]) throws Exception{

      //Create an HttpClient object
      CloseableHttpClient httpclient = HttpClients.createDefault();

      //instantiate the response handler
      ResponseHandler<String> responseHandler = new MyResponseHandler();

      //Create an HttpGet object
      HttpGet httpget = new HttpGet("https://tutorialspoint.tw/");

      //Execute the Get request by passing the response handler object and HttpGet object
      String httpresponse = httpclient.execute(httpget, responseHandler);

      System.out.println(httpresponse);
   }
}
輸出
以上程式生成以下輸出:
<!DOCTYPE html>
<!--[if IE 8]><html class = "ie ie8"> <![endif]-->
<!--[if IE 9]><html class = "ie ie9"> <![endif]-->
<!--[if gt IE 9]><!-->
<html lang = "en-US"> <!--<![endif]-->
<head>
<!-- Basic -->
<meta charset = "utf-8">
<meta http-equiv = "X-UA-Compatible" content = "IE = edge">
<meta name = "viewport" content = "width = device-width,initial-scale = 1.0,userscalable = yes">
<link href = "https://cdn.muicss.com/mui-0.9.39/extra/mui-rem.min.css"
rel = "stylesheet" type = "text/css" />
<link rel = "stylesheet" href = "/questions/css/home.css?v = 3" />
<script src = "/questions/js/jquery.min.js"></script>
<script src = "/questions/js/fontawesome.js"></script>
<script src = "https://cdn.muicss.com/mui-0.9.39/js/mui.min.js"></script>
</head>
. . . . . . . . . . . . . . . . . . . . . . . . .
. . . . . . . . . . . . . . . . . . . . . . . . .
. . . . . . . . . . . . . . . . . . . . . . . . .
. . . . . . . . . . . . . . . . . . . . . . . . .
<script>
window.dataLayer = window.dataLayer || [];
function gtag() {dataLayer.push(arguments);}
gtag('js', new Date());
gtag('config', 'UA-232293-17');
</script>
</body>
Apache HttpClient - 關閉連線
如果您是手動處理 HTTP 響應而不是使用響應處理器,則需要自己關閉所有 HTTP 連線。本章解釋如何手動關閉連線。
手動關閉 HTTP 連線時,請按照以下步驟操作:
步驟 1 - 建立 HttpClient 物件
**HttpClients** 類的 **createDefault()** 方法返回 **CloseableHttpClient** 類的物件,它是 HttpClient 介面的基本實現。
使用此方法,建立一個 **HttpClient** 物件,如下所示:
CloseableHttpClient httpClient = HttpClients.createDefault();
步驟 2 - 開始一個 try-finally 塊
開始一個 try-finally 塊,在 try 塊中編寫程式中的其餘程式碼,並在 finally 塊中關閉 CloseableHttpClient 物件。
CloseableHttpClient httpClient = HttpClients.createDefault();
try{
   //Remaining code . . . . . . . . . . . . . . .
}finally{
   httpClient.close();
}
步驟 3 - 建立 HttpGetobject
**HttpGet** 類表示 HTTP GET 請求,它使用 URI 檢索給定伺服器的資訊。
透過傳遞表示 URI 的字串來例項化 HttpGet 類建立一個 HTTP GET 請求。
HttpGet httpGet = new HttpGet("https://tutorialspoint.tw/");
步驟 4 - 執行 GET 請求
**CloseableHttpClient** 物件的 **execute()** 方法接受一個 **HttpUriRequest**(介面)物件(即 HttpGet、HttpPost、HttpPut、HttpHead 等)並返回一個響應物件。
使用給定方法執行請求:
HttpResponse httpResponse = httpclient.execute(httpGet);
步驟 5 - 開始另一個(巢狀的)try-finally 塊
開始另一個 try-finally 塊(巢狀在之前的 try-finally 塊中),在 try 塊中編寫程式中的其餘程式碼,並在 finally 塊中關閉 HttpResponse 物件。
CloseableHttpClient httpclient = HttpClients.createDefault();
try{
   . . . . . . .
   . . . . . . .
   CloseableHttpResponse httpresponse = httpclient.execute(httpget);
   try{
      . . . . . . .
      . . . . . . .
   }finally{
      httpresponse.close();
   }
}finally{
   httpclient.close();
}
示例
無論何時建立/獲取諸如請求、響應流等物件,請在下一行開始一個 try finally 塊,在 try 塊中編寫其餘程式碼,並在 finally 塊中關閉相應物件,如下面的程式所示:
import java.util.Scanner;
import org.apache.http.client.methods.CloseableHttpResponse;
import org.apache.http.client.methods.HttpGet;
import org.apache.http.impl.client.CloseableHttpClient;
import org.apache.http.impl.client.HttpClients;

public class CloseConnectionExample {

   public static void main(String args[])throws Exception{

      //Create an HttpClient object
      CloseableHttpClient httpclient = HttpClients.createDefault();

      try{
         //Create an HttpGet object
         HttpGet httpget = new HttpGet("https://tutorialspoint.tw/");

         //Execute the Get request
         CloseableHttpResponse httpresponse = httpclient.execute(httpget);

         try{
            Scanner sc = new Scanner(httpresponse.getEntity().getContent());
            while(sc.hasNext()) {
               System.out.println(sc.nextLine());
            }
         }finally{
            httpresponse.close();
         }
      }finally{
         httpclient.close();
      }
   }
}
輸出
執行上述程式後,將生成以下輸出:
<!DOCTYPE html>
<!--[if IE 8]><html class = "ie ie8"> <![endif]-->
<!--[if IE 9]><html class = "ie ie9"> <![endif]-->
<!--[if gt IE 9]><!-->
<html lang = "en-US"> <!--<![endif]-->
<head>
<!-- Basic -->
<meta charset = "utf-8">
<meta http-equiv = "X-UA-Compatible" content = "IE = edge">
<meta name = "viewport" content = "width = device-width,initial-scale = 1.0,userscalable = yes">
<link href = "https://cdn.muicss.com/mui-0.9.39/extra/mui-rem.min.css"
rel = "stylesheet" type = "text/css" />
<link rel = "stylesheet" href = "/questions/css/home.css?v = 3" />
<script src = "/questions/js/jquery.min.js"></script>
<script src = "/questions/js/fontawesome.js"></script>
<script src = "https://cdn.muicss.com/mui-0.9.39/js/mui.min.js"></script>
</head>
. . . . . . . . . . . . . . . . . . . . . . . . .
. . . . . . . . . . . . . . . . . . . . . . . . .
. . . . . . . . . . . . . . . . . . . . . . . . .
. . . . . . . . . . . . . . . . . . . . . . . . .
<script>
window.dataLayer = window.dataLayer || [];
function gtag() {dataLayer.push(arguments);}
gtag('js', new Date());
gtag('config', 'UA-232293-17');
</script>
</body>
</html>
Apache HttpClient - 中止請求
您可以使用`abort()`方法中止當前HTTP請求,即在特定請求上呼叫此方法後,將中止其執行。
如果在一次執行後呼叫此方法,則該執行的響應不會受到影響,後續執行將被中止。
示例
如果您觀察下面的示例,我們建立了一個HttpGet請求,並使用`getMethod()`列印了使用的請求格式。
然後,我們使用相同的請求進行了另一次執行。再次列印了第一次執行的狀體行。最後,列印了第二次執行的狀體行。
正如所討論的,第一次執行(abort方法之前的執行)的響應被列印(包括abort方法之後寫入的第二個狀態行),並且abort方法之後當前請求的所有後續執行都因引發異常而失敗。
import org.apache.http.HttpResponse;
import org.apache.http.client.methods.HttpGet;
import org.apache.http.impl.client.CloseableHttpClient;
import org.apache.http.impl.client.HttpClients;

public class HttpGetExample {
   public static void main(String args[]) throws Exception{

      //Creating an HttpClient object
      CloseableHttpClient httpclient = HttpClients.createDefault();

      //Creating an HttpGet object
      HttpGet httpget = new HttpGet("https://tutorialspoint.tw/");

      //Printing the method used
      System.out.println(httpget.getMethod());

      //Executing the Get request
      HttpResponse httpresponse = httpclient.execute(httpget);

      //Printing the status line
      System.out.println(httpresponse.getStatusLine());

      httpget.abort();
      System.out.println(httpresponse.getEntity().getContentLength());

      //Executing the Get request
      HttpResponse httpresponse2 = httpclient.execute(httpget);
      System.out.println(httpresponse2.getStatusLine());
   }
}
輸出
執行上述程式後,將生成以下輸出:
On executing, the above program generates the following output.
GET
HTTP/1.1 200 OK
-1
Exception in thread "main" org.apache.http.impl.execchain.RequestAbortedException:
Request aborted
at org.apache.http.impl.execchain.MainClientExec.execute(MainClientExec.java:180)
at org.apache.http.impl.execchain.ProtocolExec.execute(ProtocolExec.java:185)
at org.apache.http.impl.execchain.RetryExec.execute(RetryExec.java:89)
at org.apache.http.impl.execchain.RedirectExec.execute(RedirectExec.java:110)
at org.apache.http.impl.client.InternalHttpClient.doExecute(InternalHttpClient.java:185)
at org.apache.http.impl.client.CloseableHttpClient.execute(CloseableHttpClient.java:83)
at org.apache.http.impl.client.CloseableHttpClient.execute(CloseableHttpClient.java:108)
at HttpGetExample.main(HttpGetExample.java:32)
Apache HttpClient - 攔截器
攔截器可以阻止或更改請求或響應。協議攔截器通常作用於特定的標頭或一組相關的標頭。HttpClient庫提供對攔截器的支援。
請求攔截器
`HttpRequestInterceptor`介面表示請求攔截器。此介面包含一個名為process的方法,您需要在其中編寫攔截請求的程式碼塊。
在客戶端,此方法在將請求傳送到伺服器之前驗證/處理請求;在伺服器端,此方法在評估請求主體之前執行。
建立請求攔截器
您可以按照以下步驟建立請求攔截器。
步驟1 - 建立HttpRequestInterceptor物件
透過實現其抽象方法process來建立HttpRequestInterceptor介面的物件。
HttpRequestInterceptor requestInterceptor = new HttpRequestInterceptor() {
@Override
 public void process(HttpRequest request, HttpContext context) throws
HttpException, IOException {
   //Method implementation . . . . .
};
步驟2 - 例項化CloseableHttpClient物件
如下所示,透過將上面建立的攔截器新增到其中來構建自定義`CloseableHttpClient`物件:
//Creating a CloseableHttpClient object
CloseableHttpClient httpclient =
HttpClients.custom().addInterceptorFirst(requestInterceptor).build();
使用此物件,您可以照常執行請求。
示例
以下示例演示了請求攔截器的用法。在這個例子中,我們建立了一個HTTP GET請求物件,並向其中添加了三個標頭:sample-header、demoheader和test-header。
在攔截器的`processor()`方法中,我們正在驗證傳送的請求的標頭;如果任何標頭是`sample-header`,我們將嘗試將其刪除並顯示該特定請求的標頭列表。
import java.io.IOException;
import org.apache.http.Header;
import org.apache.http.HttpException;
import org.apache.http.HttpRequest;
import org.apache.http.HttpRequestInterceptor;
import org.apache.http.HttpResponse;
import org.apache.http.client.methods.HttpGet;
import org.apache.http.impl.client.CloseableHttpClient;
import org.apache.http.impl.client.HttpClients;
import org.apache.http.message.BasicHeader;
import org.apache.http.protocol.HttpContext;

public class InterceptorsExample {

   public static void main(String args[]) throws Exception{

      //Creating an HttpRequestInterceptor
      HttpRequestInterceptor requestInterceptor = new HttpRequestInterceptor() {
         @Override
         public void process(HttpRequest request, HttpContext context) throws
         HttpException, IOException {
            if(request.containsHeader("sample-header")) {
               System.out.println("Contains header sample-header, removing it..");
               request.removeHeaders("sample-header");
            }
            //Printing remaining list of headers
            Header[] headers= request.getAllHeaders();
            for (int i = 0; i<headers.length;i++) {
               System.out.println(headers[i].getName());
            }
         }
      };

      //Creating a CloseableHttpClient object
      CloseableHttpClient httpclient =
      HttpClients.custom().addInterceptorFirst(requestInterceptor).build();

      //Creating a request object
      HttpGet httpget1 = new HttpGet("https://tutorialspoint.tw/");

      //Setting the header to it
      httpget1.setHeader(new BasicHeader("sample-header","My first header"));
      httpget1.setHeader(new BasicHeader("demo-header","My second header"));
      httpget1.setHeader(new BasicHeader("test-header","My third header"));

      //Executing the request
      HttpResponse httpresponse = httpclient.execute(httpget1);

      //Printing the status line
      System.out.println(httpresponse.getStatusLine());
   }
}
輸出
執行上述程式後,將生成以下輸出:
Contains header sample-header, removing it..
demo-header
test-header
HTTP/1.1 200 OK
響應攔截器
`HttpResponseInterceptor`介面表示響應攔截器。此介面包含一個名為`process()`的方法。在此方法中,您需要編寫攔截響應的程式碼塊。
在伺服器端,此方法在將響應傳送到客戶端之前驗證/處理響應;在客戶端,此方法在評估響應主體之前執行。
建立響應攔截器
您可以按照以下步驟建立響應攔截器:
步驟1 - 建立HttpResponseInterceptor物件
透過實現其抽象方法`process`來建立`HttpResponseInterceptor`介面的物件。
HttpResponseInterceptor responseInterceptor = new HttpResponseInterceptor() {
   @Override
   public void process(HttpResponse response, HttpContext context) throws HttpException, IOException {
      //Method implementation . . . . . . . .
   }
};
步驟2:例項化CloseableHttpClient物件
如下所示,透過將上面建立的攔截器新增到其中來構建自定義`CloseableHttpClient`物件:
//Creating a CloseableHttpClient object
CloseableHttpClient httpclient =
HttpClients.custom().addInterceptorFirst(responseInterceptor).build();
使用此物件,您可以照常執行請求。
示例
以下示例演示了響應攔截器的用法。在這個例子中,我們在處理器中向響應添加了三個標頭:sample-header、demo-header和test-header。
執行請求並獲得響應後,我們使用`getAllHeaders()`方法列印了響應的所有標頭的名稱。
並且在輸出中,您可以看到列表中三個標頭的名稱。
import java.io.IOException;
import org.apache.http.Header;
import org.apache.http.HttpException;
import org.apache.http.HttpResponse;
import org.apache.http.HttpResponseInterceptor;
import org.apache.http.client.methods.HttpGet;
import org.apache.http.impl.client.CloseableHttpClient;
import org.apache.http.impl.client.HttpClients;
import org.apache.http.protocol.HttpContext;

public class ResponseInterceptorsExample {

   public static void main(String args[]) throws Exception{

      //Creating an HttpRequestInterceptor
      HttpResponseInterceptor responseInterceptor = new HttpResponseInterceptor() {
         @Override
         public void process(HttpResponse response, HttpContext context) throws
         HttpException, IOException {
            System.out.println("Adding header sample_header, demo-header, test_header to the response");
            response.setHeader("sample-header", "My first header");
            response.setHeader("demo-header", "My second header");
            response.setHeader("test-header", "My third header");
         }
      };

      //Creating a CloseableHttpClient object
      CloseableHttpClient httpclient = HttpClients.custom().addInterceptorFirst(responseInterceptor).build();

      //Creating a request object
      HttpGet httpget1 = new HttpGet("https://tutorialspoint.tw/");

      //Executing the request
      HttpResponse httpresponse = httpclient.execute(httpget1);

      //Printing remaining list of headers
      Header[] headers = httpresponse.getAllHeaders();

      for (int i = 0; i<headers.length;i++) {
         System.out.println(headers[i].getName());
      }
   }
}
輸出
執行上述程式後,將生成以下結果:
On executing the above program generates the following output.
Adding header sample_header, demo-header, test_header to the response
Accept-Ranges
Access-Control-Allow-Headers
Access-Control-Allow-Origin
Cache-Control
Content-Type
Date
Expires
Last-Modified
Server
Vary
X-Cache
sample-header
demo-header
test-header
Apache HttpClient - 使用者身份驗證
使用HttpClient,您可以連線到需要使用者名稱和密碼的網站。本章解釋瞭如何針對需要使用者名稱和密碼的站點執行客戶端請求。
步驟1 - 建立CredentialsProvider物件
`CredentialsProvider`介面維護一個集合以儲存使用者登入憑據。您可以透過例項化`BasicCredentialsProvider`類(此介面的預設實現)來建立其物件。
CredentialsProvider credentialsPovider = new BasicCredentialsProvider();
步驟2 - 設定憑據
您可以使用`setCredentials()`方法將所需的憑據設定為CredentialsProvider物件。
此方法接受兩個物件,如下所示:
`AuthScope`物件 - 身份驗證範圍,指定主機名、埠號和身份驗證方案名稱等詳細資訊。
`Credentials`物件 - 指定憑據(使用者名稱、密碼)。
如下所示,使用`setCredentials()`方法為主機和代理設定憑據:
credsProvider.setCredentials(new AuthScope("example.com", 80),
   new UsernamePasswordCredentials("user", "mypass"));
credsProvider.setCredentials(new AuthScope("localhost", 8000),
   new UsernamePasswordCredentials("abc", "passwd"));
步驟3 - 建立HttpClientBuilder物件
使用`HttpClients`類的`custom()`方法建立一個`HttpClientBuilder`。
//Creating the HttpClientBuilder
HttpClientBuilder clientbuilder = HttpClients.custom();
步驟4 - 設定credentialsPovider
您可以使用`setDefaultCredentialsProvider()`方法將上面建立的credentialsPovider物件設定為HttpClientBuilder。
將上一步中建立的CredentialProvider物件傳遞給`CredentialsProvider`物件()方法,將其設定為客戶端構建器。
clientbuilder = clientbuilder.setDefaultCredentialsProvider(credsProvider);
步驟5 - 構建CloseableHttpClient
使用`HttpClientBuilder`類的`build()`方法構建`CloseableHttpClient`物件。
CloseableHttpClient httpclient = clientbuilder.build()
步驟6 - 建立HttpGet物件並執行它
透過例項化HttpGet類來建立一個HttpRequest物件。使用`execute()`方法執行此請求。
//Creating a HttpGet object
HttpGet httpget = new HttpGet("https://tutorialspoint.tw/ ");

//Executing the Get request
HttpResponse httpresponse = httpclient.execute(httpget);
示例
以下是一個示例程式,演示了針對需要使用者身份驗證的目標站點執行HTTP請求。
import org.apache.http.Header;
import org.apache.http.HttpResponse;
import org.apache.http.auth.AuthScope;
import org.apache.http.auth.Credentials;
import org.apache.http.auth.UsernamePasswordCredentials;
import org.apache.http.client.CredentialsProvider;
import org.apache.http.client.methods.HttpGet;
import org.apache.http.impl.client.BasicCredentialsProvider;
import org.apache.http.impl.client.CloseableHttpClient;
import org.apache.http.impl.client.HttpClientBuilder;
import org.apache.http.impl.client.HttpClients;

public class UserAuthenticationExample {

   public static void main(String args[]) throws Exception{

      //Create an object of credentialsProvider
      CredentialsProvider credentialsPovider = new BasicCredentialsProvider();

      //Set the credentials
      AuthScope scope = new AuthScope("https://tutorialspoint.tw/questions/", 80);

      Credentials credentials = new UsernamePasswordCredentials("USERNAME", "PASSWORD");
      credentialsPovider.setCredentials(scope,credentials);

      //Creating the HttpClientBuilder
      HttpClientBuilder clientbuilder = HttpClients.custom();

      //Setting the credentials
      clientbuilder = clientbuilder.setDefaultCredentialsProvider(credentialsPovider);

      //Building the CloseableHttpClient object
      CloseableHttpClient httpclient = clientbuilder.build();

      //Creating a HttpGet object
      HttpGet httpget = new HttpGet("https://tutorialspoint.tw/questions/index.php");

      //Printing the method used
      System.out.println(httpget.getMethod());

      //Executing the Get request
      HttpResponse httpresponse = httpclient.execute(httpget);

      //Printing the status line
      System.out.println(httpresponse.getStatusLine());
      int statusCode = httpresponse.getStatusLine().getStatusCode();
      System.out.println(statusCode);

      Header[] headers= httpresponse.getAllHeaders();
      for (int i = 0; i<headers.length;i++) {
         System.out.println(headers[i].getName());
      }
   }
}
輸出
執行上述程式後,將生成以下輸出。
GET
HTTP/1.1 200 OK
200
Apache HttpClient - 使用代理
代理伺服器是客戶端和網際網路之間的中間伺服器。代理伺服器提供以下基本功能:
防火牆和網路資料過濾
網路連線共享
資料快取
使用HttpClient庫,您可以使用代理傳送HTTP請求。請按照以下步驟操作:
步驟1 - 建立HttpHost物件
透過傳遞表示代理主機名稱的字串引數(您需要從中傳送請求)到其建構函式中,例項化`org.apache.http`包的`HttpHost`類。
//Creating an HttpHost object for proxy
HttpHost proxyHost = new HttpHost("localhost");
同樣,建立另一個HttpHost物件來表示需要將請求傳送到的目標主機。
//Creating an HttpHost object for target
HttpHost targetHost = new HttpHost("google.com");
步驟2 - 建立HttpRoutePlanner物件
`HttpRoutePlanner`介面計算到指定主機的路由。透過例項化`DefaultProxyRoutePlanner`類(此介面的實現)來建立此介面的物件。將其建構函式的引數設定為上面建立的代理主機:
//creating a RoutePlanner object
HttpRoutePlanner routePlanner = new DefaultProxyRoutePlanner(proxyhost);
步驟3 - 將路由規劃器設定為客戶端構建器
使用`HttpClients`類的`custom()`方法建立一個`HttpClientBuilder`物件,並使用`setRoutePlanner()`方法將上面建立的路由規劃器設定為該物件。
//Setting the route planner to the HttpClientBuilder object
HttpClientBuilder clientBuilder = HttpClients.custom();

clientBuilder = clientBuilder.setRoutePlanner(routePlanner);
步驟4 - 構建CloseableHttpClient物件
透過呼叫`build()`方法構建`CloseableHttpClient`物件。
//Building a CloseableHttpClient
CloseableHttpClient httpClient = clientBuilder.build();
步驟5 - 建立HttpGetobject
透過例項化`HttpGet`類來建立一個HTTP GET請求。
//Creating an HttpGet object
HttpGet httpGet = new HttpGet("/");
步驟6 - 執行請求
`execute()`方法的變體之一接受`HttpHost`和`HttpRequest`物件並執行請求。使用此方法執行請求:
//Executing the Get request
HttpResponse httpResponse = httpclient.execute(targetHost, httpGet);
示例
以下示例演示如何透過代理將HTTP請求傳送到伺服器。在此示例中,我們透過localhost將HTTP GET請求傳送到google.com。我們列印了響應的標頭和響應的主體。
import org.apache.http.Header;
import org.apache.http.HttpEntity;
import org.apache.http.HttpHost;
import org.apache.http.HttpResponse;
import org.apache.http.client.methods.HttpGet;
import org.apache.http.conn.routing.HttpRoutePlanner;
import org.apache.http.impl.client.CloseableHttpClient;
import org.apache.http.impl.client.HttpClientBuilder;
import org.apache.http.impl.client.HttpClients;
import org.apache.http.impl.conn.DefaultProxyRoutePlanner;
import org.apache.http.util.EntityUtils;

public class RequestViaProxyExample {

   public static void main(String args[]) throws Exception{

      //Creating an HttpHost object for proxy
      HttpHost proxyhost = new HttpHost("localhost");

      //Creating an HttpHost object for target
      HttpHost targethost = new HttpHost("google.com");

      //creating a RoutePlanner object
      HttpRoutePlanner routePlanner = new DefaultProxyRoutePlanner(proxyhost);

      //Setting the route planner to the HttpClientBuilder object
      HttpClientBuilder clientBuilder = HttpClients.custom();
      clientBuilder = clientBuilder.setRoutePlanner(routePlanner);

      //Building a CloseableHttpClient
      CloseableHttpClient httpclient = clientBuilder.build();

      //Creating an HttpGet object
      HttpGet httpget = new HttpGet("/");

      //Executing the Get request
      HttpResponse httpresponse = httpclient.execute(targethost, httpget);

      //Printing the status line
      System.out.println(httpresponse.getStatusLine());

      //Printing all the headers of the response
      Header[] headers = httpresponse.getAllHeaders();

      for (int i = 0; i < headers.length; i++) {
         System.out.println(headers[i]);
      }

      //Printing the body of the response
      HttpEntity entity = httpresponse.getEntity();

      if (entity != null) {
         System.out.println(EntityUtils.toString(entity));
      }
   }
}
輸出
執行上述程式後,將生成以下輸出:
HTTP/1.1 200 OK
Date: Sun, 23 Dec 2018 10:21:47 GMT
Server: Apache/2.4.9 (Win64) PHP/5.5.13
Last-Modified: Tue, 24 Jun 2014 10:46:24 GMT
ETag: "2e-4fc92abc3c000"
Accept-Ranges: bytes
Content-Length: 46
Content-Type: text/html
<html><body><h1>It works!</h1></body></html>
Apache HttpClient - 代理身份驗證
本章將學習如何建立一個使用使用者名稱和密碼進行身份驗證的HttpRequest,並透過代理將其隧道傳輸到目標主機,並透過示例進行說明。
步驟1 - 建立CredentialsProvider物件
`CredentialsProvider`介面維護一個集合以儲存使用者登入憑據。您可以透過例項化BasicCredentialsProvider類(此介面的預設實現)來建立其物件。
CredentialsProvider credentialsPovider = new BasicCredentialsProvider();
步驟2 - 設定憑據
您可以使用`setCredentials()`方法將所需的憑據設定為CredentialsProvider物件。此方法接受兩個物件:
`AuthScope`物件 - 身份驗證範圍,指定主機名、埠號和身份驗證方案名稱等詳細資訊。
`Credentials`物件 - 指定憑據(使用者名稱、密碼)。如下所示,使用`setCredentials()`方法為主機和代理設定憑據。
credsProvider.setCredentials(new AuthScope("example.com", 80), new
   UsernamePasswordCredentials("user", "mypass"));
credsProvider.setCredentials(new AuthScope("localhost", 8000), new
   UsernamePasswordCredentials("abc", "passwd"));
步驟3 - 建立HttpClientBuilder物件
如下所示,使用`HttpClients`類的`custom()`方法建立一個`HttpClientBuilder`:
//Creating the HttpClientBuilder
HttpClientBuilder clientbuilder = HttpClients.custom();
步驟4 - 設定CredentialsProvider
您可以使用`setDefaultCredentialsProvider()`方法將CredentialsProvider物件設定為HttpClientBuilder物件。將先前建立的`CredentialsProvider`物件傳遞給此方法。
clientbuilder = clientbuilder.setDefaultCredentialsProvider(credsProvider);
步驟5 - 構建CloseableHttpClient
使用`build()`方法構建`CloseableHttpClient`物件。
CloseableHttpClient httpclient = clientbuilder.build();
步驟6 - 建立代理和目標主機
透過例項化`HttpHost`類來建立目標和代理主機。
//Creating the target and proxy hosts
HttpHost target = new HttpHost("example.com", 80, "http");
HttpHost proxy = new HttpHost("localhost", 8000, "http");
步驟7 - 設定代理並構建RequestConfig物件
使用`custom()`方法建立一個`RequestConfig.Builder`物件。使用`setProxy()`方法將先前建立的proxyHost物件設定為`RequestConfig.Builder`。最後,使用`build()`方法構建`RequestConfig`物件。
RequestConfig.Builder reqconfigconbuilder= RequestConfig.custom();
reqconfigconbuilder = reqconfigconbuilder.setProxy(proxyHost);
RequestConfig config = reqconfigconbuilder.build();
步驟8 - 建立HttpGet請求物件並將其配置物件設定為它。
透過例項化HttpGet類來建立一個`HttpGet`物件。使用`setConfig()`方法將上一步中建立的配置物件設定為此物件。
//Create the HttpGet request object
HttpGet httpGet = new HttpGet("/");

//Setting the config to the request
httpget.setConfig(config);
步驟9 - 執行請求
透過將HttpHost物件(目標)和請求(HttpGet)作為引數傳遞給`execute()`方法來執行請求。
HttpResponse httpResponse = httpclient.execute(targetHost, httpget);
示例
以下示例演示如何使用使用者名稱和密碼透過代理執行HTTP請求。
import org.apache.http.HttpHost;
import org.apache.http.HttpResponse;
import org.apache.http.auth.AuthScope;
import org.apache.http.auth.UsernamePasswordCredentials;
import org.apache.http.client.CredentialsProvider;
import org.apache.http.client.config.RequestConfig;
import org.apache.http.client.methods.HttpGet;
import org.apache.http.impl.client.BasicCredentialsProvider;
import org.apache.http.impl.client.CloseableHttpClient;
import org.apache.http.impl.client.HttpClientBuilder;
import org.apache.http.impl.client.HttpClients;

public class ProxyAuthenticationExample {
   public static void main(String[] args) throws Exception {

      //Creating the CredentialsProvider object
      CredentialsProvider credsProvider = new BasicCredentialsProvider();

      //Setting the credentials
      credsProvider.setCredentials(new AuthScope("example.com", 80),
         new UsernamePasswordCredentials("user", "mypass"));
      credsProvider.setCredentials(new AuthScope("localhost", 8000),
         new UsernamePasswordCredentials("abc", "passwd"));

      //Creating the HttpClientBuilder
      HttpClientBuilder clientbuilder = HttpClients.custom();

      //Setting the credentials
      clientbuilder = clientbuilder.setDefaultCredentialsProvider(credsProvider);

      //Building the CloseableHttpClient object
      CloseableHttpClient httpclient = clientbuilder.build();


      //Create the target and proxy hosts
      HttpHost targetHost = new HttpHost("example.com", 80, "http");
      HttpHost proxyHost = new HttpHost("localhost", 8000, "http");

      //Setting the proxy
      RequestConfig.Builder reqconfigconbuilder= RequestConfig.custom();
      reqconfigconbuilder = reqconfigconbuilder.setProxy(proxyHost);
      RequestConfig config = reqconfigconbuilder.build();

      //Create the HttpGet request object
      HttpGet httpget = new HttpGet("/");

      //Setting the config to the request
      httpget.setConfig(config);

      //Printing the status line
      HttpResponse response = httpclient.execute(targetHost, httpget);
      System.out.println(response.getStatusLine());

   }
}
輸出
執行上述程式後,將生成以下輸出:
HTTP/1.1 200 OK
Apache HttpClient - 基於表單的登入
使用HttpClient庫,您可以透過傳遞引數來發送請求或登入表單。
請按照以下步驟登入表單。
步驟 1 - 建立 HttpClient 物件
`HttpClients`類的`createDefault()`方法返回`CloseableHttpClient`類的物件,它是HttpClient介面的基本實現。使用此方法建立HttpClient物件:
CloseableHttpClient httpClient = HttpClients.createDefault();
步驟2 - 建立RequestBuilder物件
`RequestBuilder`類用於透過向其中新增引數來構建請求。如果請求型別是PUT或POST,它會將引數作為URL編碼實體新增到請求中
使用post()方法建立一個(POST型別的)RequestBuilder物件。
//Building the post request object
RequestBuilder reqbuilder = RequestBuilder.post();
步驟3 - 將Uri和引數設定為RequestBuilder。
使用RequestBuilder類的`setUri()`和`addParameter()`方法將URI和引數設定為RequestBuilder物件。
//Set URI and parameters
RequestBuilder reqbuilder = reqbuilder.setUri("http://httpbin.org/post");
reqbuilder = reqbuilder1.addParameter("Name", "username").addParameter("password", "password");
步驟4 - 構建HttpUriRequest物件
設定所需引數後,使用`build()`方法構建`HttpUriRequest`物件。
//Building the HttpUriRequest object
HttpUriRequest httppost = reqbuilder2.build();
步驟5 - 執行請求
`CloseableHttpClient`物件的execute方法接受一個HttpUriRequest(介面)物件(即HttpGet、HttpPost、HttpPut、HttpHead等)並返回一個響應物件。
將上一步中建立的HttpUriRequest傳遞給`execute()`方法來執行它。
//Execute the request
HttpResponse httpresponse = httpclient.execute(httppost);
示例
以下示例演示如何透過傳送登入憑據來登入表單。在這裡,我們向表單傳送了兩個引數 - `username`和`password`,並嘗試列印請求的訊息實體和狀態。
import org.apache.http.HttpResponse;
import org.apache.http.client.methods.HttpUriRequest;
import org.apache.http.client.methods.RequestBuilder;
import org.apache.http.impl.client.CloseableHttpClient;
import org.apache.http.impl.client.HttpClients;
import org.apache.http.util.EntityUtils;
import java.io.IOException;
import java.net.URISyntaxException;

public class FormLoginExample {

   public static void main(String args[]) throws Exception {

      //Creating CloseableHttpClient object
      CloseableHttpClient httpclient = HttpClients.createDefault();

      //Creating the RequestBuilder object
      RequestBuilder reqbuilder = RequestBuilder.post();

      //Setting URI and parameters
      RequestBuilder reqbuilder1 = reqbuilder.setUri("http://httpbin.org/post");
      RequestBuilder reqbuilder2 = reqbuilder1.addParameter("Name",
         "username").addParameter("password", "password");

      //Building the HttpUriRequest object
      HttpUriRequest httppost = reqbuilder2.build();

      //Executing the request
      HttpResponse httpresponse = httpclient.execute(httppost);

      //Printing the status and the contents of the response
      System.out.println(EntityUtils.toString(httpresponse.getEntity()));
      System.out.println(httpresponse.getStatusLine());
   }
}
輸出
執行上述程式後,將生成以下輸出:
{
   "args": {},
   "data": "",
   "files": {},
   "form": {
      "Name": "username",
      "password": "password"
   },
   "headers": {
      "Accept-Encoding": "gzip,deflate",
      "Connection": "close",
      "Content-Length": "31",
      "Content-Type": "application/x-www-form-urlencoded; charset = UTF-8",
      "Host": "httpbin.org",
      "User-Agent": "Apache-HttpClient/4.5.6 (Java/1.8.0_91)"
   },
   "json": null,
   "origin": "117.216.245.180",
   "url": "http://httpbin.org/post"
}
HTTP/1.1 200 OK
使用Cookie的表單登入
如果您的表單儲存Cookie,而不是建立預設的`CloseableHttpClient`物件。
透過例項化BasicCookieStore類來`建立一個CookieStore物件`。
//Creating a BasicCookieStore object
BasicCookieStore cookieStore = new BasicCookieStore();
使用**HttpClients**類的**custom()**方法**建立一個HttpClientBuilder**。
//Creating an HttpClientBuilder object
HttpClientBuilder clientbuilder = HttpClients.custom();
使用setDefaultCookieStore()方法**將Cookie儲存區設定到客戶端構建器**。
//Setting default cookie store to the client builder object
Clientbuilder = clientbuilder.setDefaultCookieStore(cookieStore);
使用`build()`方法構建`CloseableHttpClient`物件。
//Building the CloseableHttpClient object
CloseableHttpClient httpclient = clientbuilder1.build();
如上所述構建**HttpUriRequest**物件,透過執行請求。
如果頁面儲存Cookie,則您傳遞的引數將新增到Cookie儲存區。
您可以列印**CookieStore**物件的內容,在那裡您可以看到您的引數(以及頁面可能已經儲存的先前引數)。
要列印Cookie,請使用**getCookies()**方法從**CookieStore**物件獲取所有Cookie。此方法返回一個**List**物件。使用迭代器,如下所示列印列表物件的內容:
//Printing the cookies
List list = cookieStore.getCookies();

System.out.println("list of cookies");
Iterator it = list.iterator();
if(it.hasNext()) {
   System.out.println(it.next());
}
Apache HttpClient - Cookie管理
Cookie是儲存在客戶端計算機上的文字檔案,它們用於各種資訊跟蹤目的。
HttpClient提供對Cookie的支援,您可以建立和管理Cookie。
建立Cookie
按照以下步驟使用HttpClient庫建立Cookie。
步驟1 - 建立CookieStore物件
**CookieStore**介面表示Cookie物件的抽象儲存區。您可以透過例項化**BasicCookieStore**類(此介面的預設實現)來建立一個Cookie儲存區。
//Creating the CookieStore object
CookieStore cookieStore = new BasicCookieStore();
步驟2 - 建立ClientCookie物件
除了Cookie的功能外,ClientCookie還可以獲取伺服器中的原始Cookie。您可以透過例項化**BasicClientCookie**類來建立一個客戶端Cookie。對於此類的建構函式,您需要傳遞希望儲存在該特定Cookie中的鍵值對。
//Creating client cookie
BasicClientCookie clientCookie = new BasicClientCookie("name","Raju");
步驟3 - 設定Cookie的值
對於客戶端Cookie,您可以使用相應的方法設定/刪除路徑、值、版本、過期日期、域、註釋和屬性。
Calendar myCal = new GregorianCalendar(2018, 9, 26);
Date expiryDate = myCal.getTime();
clientcookie.setExpiryDate(expiryDate);
clientcookie.setPath("/");
clientcookie.setSecure(true);
clientcookie.setValue("25");
clientcookie.setVersion(5);
步驟4 - 將Cookie新增到Cookie儲存區
您可以使用**BasicCookieStore**類的**addCookie()**方法將Cookie新增到Cookie儲存區。
將所需的Cookie新增到**CookieStore**。
//Adding the created cookies to cookie store
cookiestore.addCookie(clientcookie);
示例
以下示例演示如何建立Cookie並將它們新增到Cookie儲存區。在這裡,我們建立了一個Cookie儲存區,透過設定域和路徑值建立了一批Cookie,並將這些Cookie新增到Cookie儲存區。
import org.apache.http.client.CookieStore;
import org.apache.http.impl.client.BasicCookieStore;
import org.apache.http.impl.cookie.BasicClientCookie;

public class CookieHandlingExample {

   public static void main(String args[]) throws Exception{

      //Creating the CookieStore object
      CookieStore cookiestore = new BasicCookieStore();

      //Creating client cookies
      BasicClientCookie clientcookie1 = new BasicClientCookie("name","Raju");
      BasicClientCookie clientcookie2 = new BasicClientCookie("age","28");
      BasicClientCookie clientcookie3 = new BasicClientCookie("place","Hyderabad");

      //Setting domains and paths to the created cookies
      clientcookie1.setDomain(".sample.com");
      clientcookie2.setDomain(".sample.com");
      clientcookie3.setDomain(".sample.com");

      clientcookie1.setPath("/");
      clientcookie2.setPath("/");
      clientcookie3.setPath("/");

      //Adding the created cookies to cookie store
      cookiestore.addCookie(clientcookie1);
      cookiestore.addCookie(clientcookie2);
      cookiestore.addCookie(clientcookie3);
   }
}
檢索Cookie
您可以使用**BasicCookieStore**類的**getCookies()**方法獲取新增到Cookie儲存區的Cookie。此方法返回一個列表,其中包含Cookie儲存區中的所有Cookie。
您可以使用迭代器如下所示列印Cookie儲存區的內容:
//Retrieving the cookies
List list = cookieStore.getCookies();

//Creating an iterator to the obtained list
Iterator it = list.iterator();
while(it.hasNext()) {
   System.out.println(it.next());
}
示例
以下示例演示如何從Cookie儲存區檢索Cookie。在這裡,我們將一堆Cookie新增到Cookie儲存區並將其檢索回來。
import org.apache.http.client.CookieStore;
import org.apache.http.impl.client.BasicCookieStore;
import org.apache.http.impl.cookie.BasicClientCookie;

public class CookieHandlingExample {

   public static void main(String args[]) throws Exception{

      //Creating the CookieStore object
      CookieStore cookiestore = new BasicCookieStore();

      //Creating client cookies
      BasicClientCookie clientcookie1 = new BasicClientCookie("name","Raju");
      BasicClientCookie clientcookie2 = new BasicClientCookie("age","28");
      BasicClientCookie clientcookie3 = new BasicClientCookie("place","Hyderabad");

      //Setting domains and paths to the created cookies
      clientcookie1.setDomain(".sample.com");
      clientcookie2.setDomain(".sample.com");
      clientcookie3.setDomain(".sample.com");

      clientcookie1.setPath("/");
      clientcookie2.setPath("/");
      clientcookie3.setPath("/");

      //Adding the created cookies to cookie store
      cookiestore.addCookie(clientcookie1);
      cookiestore.addCookie(clientcookie2);
      cookiestore.addCookie(clientcookie3);
   }
}
輸出
執行此程式後,將生成以下輸出:
[version: 0][name: age][value: 28][domain: .sample.com][path: /][expiry: null]
[version: 0][name: name][value: Raju][domain: my.example.com][path: /][expiry:
null]
[version: 0][name: place][value: Hyderabad][domain: .sample.com][path:
/][expiry: null]
Apache HttpClient - 多執行緒
多執行緒程式包含兩個或多個可以同時執行的部分,每個部分可以同時處理不同的任務,從而最佳地利用可用資源。
您可以透過編寫多執行緒HttpClient程式來執行來自多個執行緒的請求。
如果要從執行緒連續執行多個客戶端請求,則需要建立一個**ClientConnectionPoolManager**。它維護一個**HttpClientConnections**池,併為來自執行緒的多個請求提供服務。
連線管理器根據路由對連線進行池化。如果管理器對特定路由有連線,則它透過從池中租賃現有連線來為這些路由中的新請求提供服務,而不是建立一個新的連線。
按照以下步驟從多個執行緒執行請求:
步驟1 - 建立客戶端連線池管理器
透過例項化**PoolingHttpClientConnectionManager**類來建立客戶端連線池管理器。
PoolingHttpClientConnectionManager connManager = new
   PoolingHttpClientConnectionManager();
步驟2 - 設定最大連線數
使用**setMaxTotal()**方法設定池中的最大連線數。
//Set the maximum number of connections in the pool
connManager.setMaxTotal(100);
步驟3 - 建立ClientBuilder物件
如下所示,透過使用**setConnectionManager()**方法設定連線管理器來建立一個**ClientBuilder**物件:
HttpClientBuilder clientbuilder =
HttpClients.custom().setConnectionManager(connManager);
步驟4 - 建立HttpGet請求物件
透過將所需的URI作為引數傳遞給其建構函式來例項化HttpGet類。
HttpGet httpget1 = new HttpGet("URI1");
HttpGet httpget2 = new HttpGet("URI2");
. . . . . . . . . . . .
步驟5 - 實現run方法
確保您已建立一個類,使其成為執行緒(透過擴充套件執行緒類或實現Runnable介面),並實現了run方法。
public class ClientMultiThreaded extends Thread {
   public void run() {
      //Run method implementation . . . . . . . . . .
   }
}
步驟6 - 建立執行緒物件
透過例項化上面建立的Thread類(ClientMultiThreaded)來建立執行緒物件。
將HttpClient物件、相應的HttpGet物件和表示ID的整數傳遞給這些執行緒。
ClientMultiThreaded thread1 = new ClientMultiThreaded(httpclient,httpget1, 1);
ClientMultiThreaded thread2 = new ClientMultiThreaded(httpclient,httpget2, 2);
. . . . . . . . . . . . . . . . . . . . . . . . . . . . . . . . . . . . . . . .
. . . . . . . . . . . . . . . . . . . . . . . . . . . . . . . . . . . .. . . .
. . . . . . . . . . . . . . . . . . . . . . . . . . . . . . . . . . . . . . . .
步驟7 - 啟動和加入執行緒
使用**start()**方法啟動所有執行緒,並使用join**method()**方法加入它們。
thread1.start();
thread2.start();
. . . . . . . .
thread1.join();
thread2.join();
. . . . . . . . . . . .
步驟8 - run方法實現
在run方法中,執行請求,檢索響應並列印結果。
示例
以下示例演示了同時從多個執行緒執行HTTP請求。在此示例中,我們嘗試從多個執行緒執行各種請求,並嘗試列印狀態以及每個客戶端讀取的位元組數。
import org.apache.http.HttpEntity;
import org.apache.http.client.methods.CloseableHttpResponse;
import org.apache.http.client.methods.HttpGet;
import org.apache.http.impl.client.CloseableHttpClient;
import org.apache.http.impl.client.HttpClientBuilder;
import org.apache.http.impl.client.HttpClients;
import org.apache.http.impl.conn.PoolingHttpClientConnectionManager;
import org.apache.http.util.EntityUtils;

public class ClientMultiThreaded extends Thread {
   CloseableHttpClient httpClient;
   HttpGet httpget;
   int id;

   public ClientMultiThreaded(CloseableHttpClient httpClient, HttpGet httpget,
   int id) {
      this.httpClient = httpClient;
      this.httpget = httpget;
      this.id = id;
   }
   @Override
   public void run() {
      try{
         //Executing the request
         CloseableHttpResponse httpresponse = httpClient.execute(httpget);

         //Displaying the status of the request.
         System.out.println("status of thread "+id+":"+httpresponse.getStatusLine());

         //Retrieving the HttpEntity and displaying the no.of bytes read
         HttpEntity entity = httpresponse.getEntity();
         if (entity != null) {
            System.out.println("Bytes read by thread thread "+id+":
               "+EntityUtils.toByteArray(entity).length);
         }
      }catch(Exception e) {
         System.out.println(e.getMessage());
      }
   }

   public static void main(String[] args) throws Exception {

      //Creating the Client Connection Pool Manager by instantiating the PoolingHttpClientConnectionManager class.
      PoolingHttpClientConnectionManager connManager = new PoolingHttpClientConnectionManager();

      //Set the maximum number of connections in the pool
      connManager.setMaxTotal(100);

      //Create a ClientBuilder Object by setting the connection manager
      HttpClientBuilder clientbuilder = HttpClients.custom().setConnectionManager(connManager);

      //Build the CloseableHttpClient object using the build() method.
      CloseableHttpClient httpclient = clientbuilder.build();

      //Creating the HttpGet requests
      HttpGet httpget1 = new HttpGet("https://tutorialspoint.tw/");
      HttpGet httpget2 = new HttpGet("http://www.google.com/");
      HttpGet httpget3 = new HttpGet("https://www.qries.com/");
      HttpGet httpget4 = new HttpGet("https://in.yahoo.com/");

      //Creating the Thread objects
      ClientMultiThreaded thread1 = new ClientMultiThreaded(httpclient,httpget1, 1);
      ClientMultiThreaded thread2 = new ClientMultiThreaded(httpclient,httpget2, 2);
      ClientMultiThreaded thread3 = new ClientMultiThreaded(httpclient,httpget3, 3);
      ClientMultiThreaded thread4 = new ClientMultiThreaded(httpclient,httpget4, 4);

      //Starting all the threads
      thread1.start();
      thread2.start();
      thread3.start();
      thread4.start();

      //Joining all the threads
      thread1.join();
      thread2.join();
      thread3.join();
      thread4.join();
   }
}
輸出
執行上述程式後,將生成以下輸出:
status of thread 1: HTTP/1.1 200 OK
Bytes read by thread thread 1: 36907
status of thread 2: HTTP/1.1 200 OK
Bytes read by thread thread 2: 13725
status of thread 3: HTTP/1.1 200 OK
Bytes read by thread thread 3: 17319
status of thread 4: HTTP/1.1 200 OK
Bytes read by thread thread 4: 127018
Apache HttpClient - 自定義SSL上下文
使用安全套接字層,您可以建立客戶端和伺服器之間的安全連線。它有助於保護敏感資訊,例如信用卡號碼、使用者名稱、密碼、PIN碼等。
您可以使用**HttpClient**庫建立自己的SSL上下文,使連線更安全。
按照以下步驟使用HttpClient庫自定義SSLContext:
步驟1 - 建立SSLContextBuilder物件
**SSLContextBuilder**是SSLContext物件的構建器。使用**SSLContexts**類的**custom()**方法建立其物件。
//Creating SSLContextBuilder object
SSLContextBuilder SSLBuilder = SSLContexts.custom();
步驟2 - 載入金鑰庫
在路徑**Java_home_directory/jre/lib/security/**中,您可以找到一個名為cacerts的檔案。將其儲存為您的金鑰庫檔案(副檔名為.jks)。使用**SSLContextBuilder**類的**loadTrustMaterial()**方法載入金鑰庫檔案及其密碼(預設為**changeit**)。
//Loading the Keystore file
File file = new File("mykeystore.jks");
SSLBuilder = SSLBuilder.loadTrustMaterial(file, "changeit".toCharArray());
步驟3 - 構建SSLContext物件
SSLContext物件表示安全套接字協議實現。使用**build()**方法構建SSLContext。
//Building the SSLContext
SSLContext sslContext = SSLBuilder.build();
步驟4 - 建立SSLConnectionSocketFactory物件
**SSLConnectionSocketFactory**是用於TSL和SSL連線的分層套接字工廠。使用它,您可以使用受信任證書列表驗證Https伺服器並驗證給定的Https伺服器。
您可以透過多種方式建立它。根據您建立**SSLConnectionSocketFactory**物件的方式,您可以允許所有主機、僅允許自簽名證書、僅允許特定協議等。
**要僅允許特定協議**,請透過將SSLContext物件、表示需要支援的協議的字串陣列、表示需要支援的密碼套件的字串陣列以及HostnameVerifier物件傳遞給其建構函式來建立**SSLConnectionSocketFactory**物件。
new SSLConnectionSocketFactory(sslcontext, new String[]{"TLSv1"}, null,
   SSLConnectionSocketFactory.getDefaultHostnameVerifier());
**要允許所有主機**,請透過傳遞SSLContext物件和**NoopHostnameVerifier**物件來建立**SSLConnectionSocketFactory**物件。
//Creating SSLConnectionSocketFactory SSLConnectionSocketFactory object
SSLConnectionSocketFactory sslConSocFactory = new SSLConnectionSocketFactory(sslcontext, new NoopHostnameVerifier());
步驟5 - 建立HttpClientBuilder物件
使用**HttpClients**類的**custom()**方法建立一個HttpClientBuilder物件。
//Creating HttpClientBuilder
HttpClientBuilder clientbuilder = HttpClients.custom();
步驟6 - 設定SSLConnectionSocketFactory物件
使用**setSSLSocketFactory()**方法將SSLConnectionSocketFactory物件設定為**HttpClientBuilder**。
//Setting the SSLConnectionSocketFactory
clientbuilder = clientbuilder.setSSLSocketFactory(sslConSocFactory);
步驟7 - 構建CloseableHttpClient物件
透過呼叫`build()`方法構建`CloseableHttpClient`物件。
//Building the CloseableHttpClient
CloseableHttpClient httpclient = clientbuilder.build();
步驟8 - 建立HttpGet物件
**HttpGet** 類表示 HTTP GET 請求,它使用 URI 檢索給定伺服器的資訊。
透過傳遞表示 URI 的字串來例項化 HttpGet 類建立一個 HTTP GET 請求。
//Creating the HttpGet request
HttpGet httpget = new HttpGet("https://example.com/");
步驟9 - 執行請求
使用**execute()**方法執行請求。
//Executing the request
HttpResponse httpresponse = httpclient.execute(httpget);
示例
以下示例演示了SSLContrext的自定義:
import java.io.File;
import javax.net.ssl.SSLContext;
import org.apache.http.HttpEntity;
import org.apache.http.HttpResponse;
import org.apache.http.client.methods.HttpGet;
import org.apache.http.conn.ssl.NoopHostnameVerifier;
import org.apache.http.conn.ssl.SSLConnectionSocketFactory;
import org.apache.http.impl.client.CloseableHttpClient;
import org.apache.http.impl.client.HttpClientBuilder;
import org.apache.http.impl.client.HttpClients;
import org.apache.http.ssl.SSLContextBuilder;
import org.apache.http.ssl.SSLContexts;
import org.apache.http.util.EntityUtils;

public class ClientCustomSSL {

   public final static void main(String[] args) throws Exception {

      //Creating SSLContextBuilder object
      SSLContextBuilder SSLBuilder = SSLContexts.custom();

      //Loading the Keystore file
      File file = new File("mykeystore.jks");
      SSLBuilder = SSLBuilder.loadTrustMaterial(file,
         "changeit".toCharArray());

      //Building the SSLContext usiong the build() method
      SSLContext sslcontext = SSLBuilder.build();

      //Creating SSLConnectionSocketFactory object
      SSLConnectionSocketFactory sslConSocFactory = new SSLConnectionSocketFactory(sslcontext, new NoopHostnameVerifier());

      //Creating HttpClientBuilder
      HttpClientBuilder clientbuilder = HttpClients.custom();

      //Setting the SSLConnectionSocketFactory
      clientbuilder = clientbuilder.setSSLSocketFactory(sslConSocFactory);

      //Building the CloseableHttpClient
      CloseableHttpClient httpclient = clientbuilder.build();

      //Creating the HttpGet request
      HttpGet httpget = new HttpGet("https://example.com/");

      //Executing the request
      HttpResponse httpresponse = httpclient.execute(httpget);

      //printing the status line
      System.out.println(httpresponse.getStatusLine());

      //Retrieving the HttpEntity and displaying the no.of bytes read
      HttpEntity entity = httpresponse.getEntity();
      if (entity != null) {
         System.out.println(EntityUtils.toByteArray(entity).length);
      }
   }
}
輸出
執行上述程式後,將生成以下輸出。
HTTP/1.1 200 OK
1270
Apache HttpClient - 分塊上傳
使用HttpClient,我們可以執行分塊上傳,即我們可以將較大的物件分成較小的部分上傳。在本章中,我們將透過上傳一個簡單的文字檔案來演示HttpClient中的分塊上傳。
通常,任何分塊上傳都包含三個部分。
上傳初始化
上傳物件部分
完成分塊上傳
對於使用HttpClient的分塊上傳,我們需要遵循以下步驟:
建立一個多部分構建器。
向其中新增所需的部分。
完成構建並獲得多部分HttpEntity。
透過設定上述多部分實體來構建請求。
執行請求。
以下是使用HttpClient庫上傳多部分實體的步驟。
步驟 1 - 建立 HttpClient 物件
`HttpClients`類的`createDefault()`方法返回`CloseableHttpClient`類的物件,它是HttpClient介面的基本實現。使用此方法建立HttpClient物件:
//Creating CloseableHttpClient object
CloseableHttpClient httpclient = HttpClients.createDefault();
步驟2 - 建立FileBody物件
**FileBody**類表示由檔案支援的二進位制主體部分。透過傳遞一個**File**物件和一個表示內容型別的**ContentType**物件來例項化此類。
//Creating a File object
File file = new File("sample.txt");

//Creating the FileBody object
FileBody filebody = new FileBody(file, ContentType.DEFAULT_BINARY);
步驟3 - 建立MultipartEntityBuilder
**MultipartEntityBuilder**類用於構建多部分**HttpEntity**物件。使用**create()**方法(同一類)建立其物件。
//Creating the MultipartEntityBuilder
MultipartEntityBuilder entitybuilder = MultipartEntityBuilder.create();
步驟4 - 設定模式
**MultipartEntityBuilder**有三種模式:STRICT、RFC6532和BROWSER_COMPATIBLE。使用**setMode()**方法將其設定為所需的模式。
//Setting the mode
entitybuilder.setMode(HttpMultipartMode.BROWSER_COMPATIBLE);
步驟5 - 新增各種所需的部分
使用**addTextBody()**、addPart()和**addBinaryBody()**方法,您可以將簡單的文字、檔案、流和其他物件新增到**MultipartBuilder**。使用這些方法新增所需的內容。
//Adding text
entitybuilder.addTextBody("sample_text", "This is the text part of our file");
//Adding a file
entitybuilder.addBinaryBody("image", new File("logo.png"));
步驟6 - 構建單個實體
您可以使用**MultipartEntityBuilder**類的**build()**方法將所有這些部分構建到單個實體中。使用此方法,將所有部分構建到單個**HttpEntity**中。
//Building a single entity using the parts
HttpEntity mutiPartHttpEntity = entityBuilder.build();
步驟7 - 建立RequestBuilder物件
**RequestBuilder**類用於透過向其中新增引數來構建請求。如果請求型別為PUT或POST,則它會將引數作為URL編碼實體新增到請求中。
使用**post()**方法建立一個(POST型別的)RequestBuilder物件。並將要向其傳送請求的Uri作為引數傳遞給它。
//Building the post request object
RequestBuilder reqbuilder = RequestBuilder.post("http://httpbin.org/post");
步驟8 - 將實體物件設定為RequestBuilder
使用**RequestBuilder**類的**setEntity()**方法將上面建立的多部分實體設定為RequestBuilder。
//Setting the entity object to the RequestBuilder
reqbuilder.setEntity(mutiPartHttpEntity);
步驟9 - 構建HttpUriRequest
使用**RequestBuilder**類的**build()**方法構建**HttpUriRequest**請求物件。
//Building the request
HttpUriRequest multipartRequest = reqbuilder.build();
步驟10 - 執行請求
使用**execute()**方法執行上一步中構建的請求(將請求作為引數傳遞給此方法)。
//Executing the request
HttpResponse httpresponse = httpclient.execute(multipartRequest);
示例
以下示例演示如何使用HttpClient庫傳送多部分請求。在此示例中,我們嘗試傳送一個由檔案支援的多部分請求。
import org.apache.http.HttpEntity;
import org.apache.http.HttpResponse;
import org.apache.http.client.methods.HttpUriRequest;
import org.apache.http.client.methods.RequestBuilder;
import org.apache.http.entity.ContentType;
import org.apache.http.entity.mime.HttpMultipartMode;
import org.apache.http.entity.mime.MultipartEntityBuilder;
import org.apache.http.entity.mime.content.FileBody;
import org.apache.http.impl.client.CloseableHttpClient;
import org.apache.http.impl.client.HttpClients;
import org.apache.http.util.EntityUtils;
import java.io.File;
import java.io.IOException;
import java.net.URISyntaxException;

public class MultipartUploadExample {

   public static void main(String args[]) throws Exception{

      //Creating CloseableHttpClient object
      CloseableHttpClient httpclient = HttpClients.createDefault();

      //Creating a file object
      File file = new File("sample.txt");

      //Creating the FileBody object
      FileBody filebody = new FileBody(file, ContentType.DEFAULT_BINARY);

      //Creating the MultipartEntityBuilder
      MultipartEntityBuilder entitybuilder = MultipartEntityBuilder.create();

      //Setting the mode
      entitybuilder.setMode(HttpMultipartMode.BROWSER_COMPATIBLE);

      //Adding text
      entitybuilder.addTextBody("sample_text", "This is the text part of our file");

      //Adding a file
      entitybuilder.addBinaryBody("image", new File("logo.png"));

      //Building a single entity using the parts
      HttpEntity mutiPartHttpEntity = entitybuilder.build();

      //Building the RequestBuilder request object
      RequestBuilder reqbuilder = RequestBuilder.post("http://httpbin.org/post");

      //Set the entity object to the RequestBuilder
      reqbuilder.setEntity(mutiPartHttpEntity);

      //Building the request
      HttpUriRequest multipartRequest = reqbuilder.build();

      //Executing the request
      HttpResponse httpresponse = httpclient.execute(multipartRequest);

      //Printing the status and the contents of the response
      System.out.println(EntityUtils.toString(httpresponse.getEntity()));
      System.out.println(httpresponse.getStatusLine());
   }
}
輸出
執行上述程式後,將生成以下輸出:
{
   "args": {},
   "data": "",
   "files": {
      "image": "data:application/octets66PohrH3IWNk1FzpohfdXPIfv9X3490FGcuXsHn9X0piCwomF/xdgADZ9GsfSyvLYAAAAAE
      lFTkSuQmCC"
   },
   "form": {
      "sample_text": "This is the text part of our file"
   },
   "headers": {
      "Accept-Encoding": "gzip,deflate",
      "Connection": "close",
      "Content-Length": "11104",
      "Content-Type": "multipart/form-data;
      boundary=UFJbPHT7mTwpVq70LpZgCi5I2nvxd1g-I8Rt",
      "Host": "httpbin.org",
      "User-Agent": "Apache-HttpClient/4.5.6 (Java/1.8.0_91)"
   },
   "json": null,
   "origin": "117.216.245.180",
   "url": "http://httpbin.org/post"
}
HTTP/1.1 200 OK