- Apache ActiveMQ 教程
- Apache ActiveMQ - 首頁
- Apache ActiveMQ - 概述
- Apache ActiveMQ - 環境設定
- Apache ActiveMQ - 功能特性
- Apache ActiveMQ - 執行 Broker 伺服器
- Apache ActiveMQ - 管理控制檯
- Apache ActiveMQ 基於佇列的示例
- Apache ActiveMQ - 生產者應用程式
- Apache ActiveMQ - 消費者應用程式
- Apache ActiveMQ - 測試應用程式
- Apache ActiveMQ 基於主題的示例
- Apache ActiveMQ - 釋出者應用程式
- Apache ActiveMQ - 訂閱者應用程式
- Apache ActiveMQ - 測試應用程式
- Apache ActiveMQ 有用資源
- Apache ActiveMQ 快速指南
- Apache ActiveMQ - 有用資源
- Apache ActiveMQ - 討論
Apache ActiveMQ 快速指南
Apache ActiveMQ - 概述
什麼是 ActiveMQ?
ActiveMQ 是一個用 Java 編寫的開源訊息代理。它完全符合 JMS 1.1 標準。它由 Apache 軟體基金會開發和維護,並根據 Apache 許可證授權。它為企業級訊息應用程式提供高可用性、可擴充套件性、可靠性、效能和安全性。
JMS 是一種允許開發基於訊息的系統的規範。ActiveMQ 充當訊息代理,位於應用程式之間,允許它們以非同步和可靠的方式進行通訊。

訊息型別
為了更好地理解,下面解釋了兩種訊息選項。
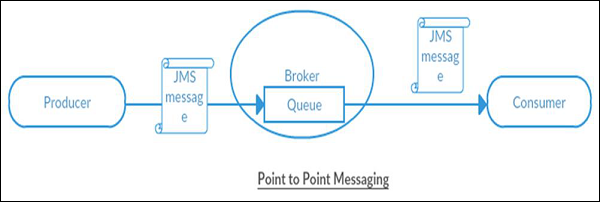
點對點
在這種型別的通訊中,代理僅向一個消費者傳送訊息,而其他消費者將等待直到他們從代理接收訊息。沒有消費者會收到相同的訊息。
如果沒有消費者,代理將儲存訊息,直到獲得消費者。這種型別的通訊也稱為**基於佇列的通訊**,其中生產者將訊息傳送到佇列,並且只有一個消費者從佇列中獲取一條訊息。如果有多個消費者,他們可能會收到下一條訊息,但他們不會收到與其他消費者相同的 訊息。
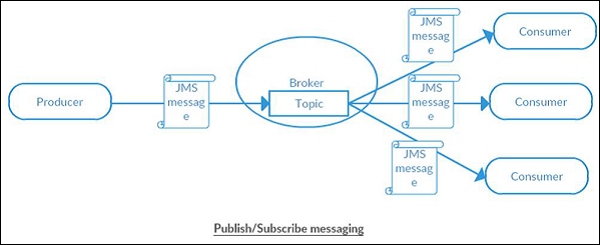
釋出/訂閱
在這種型別的通訊中,代理向所有活動消費者傳送相同的訊息副本。這種型別的通訊也稱為**基於主題的通訊**,其中代理向所有訂閱特定主題的活動消費者傳送相同的訊息。此模型支援單向通訊,其中不需要驗證已傳輸的訊息。
Apache ActiveMQ - 環境設定
本章將指導您如何準備開發環境以開始使用 ActiveMQ。它還將教您如何在設定 ActiveMQ 之前在您的機器上設定 JDK、Maven 和 Eclipse -
設定 Java 開發工具包 (JDK)
您可以從 Oracle 的 Java 網站下載最新版本的 SDK - Java SE 下載。 您將在下載的檔案中找到安裝 JDK 的說明,請按照給定的說明安裝和配置設定。最後設定 PATH 和 JAVA_HOME 環境變數以引用包含 java 和 javac 的目錄,通常分別為 java_install_dir/bin 和 java_install_dir。
如果您執行的是 Windows 並已將 JDK 安裝在 C:\jdk-11.0.11 中,則必須將以下行新增到您的 C:\autoexec.bat 檔案中。
set PATH=C:\jdk-11.0.11;%PATH%
set JAVA_HOME=C:\jdk-11.0.11
或者,在 Windows NT/2000/XP 上,您必須右鍵單擊“我的電腦”,選擇“屬性”→“高階”→“環境變數”。然後,您必須更新 PATH 值並單擊“確定”按鈕。
在 Unix(Solaris、Linux 等)上,如果 SDK 安裝在 /usr/local/jdk-11.0.11 中並且您使用的是 C shell,則必須將以下內容新增到您的 .cshrc 檔案中。
setenv PATH /usr/local/jdk-11.0.11/bin:$PATH
setenv JAVA_HOME /usr/local/jdk-11.0.11
或者,如果您使用的是整合開發環境 (IDE),例如 Borland JBuilder、Eclipse、IntelliJ IDEA 或 Sun ONE Studio,則必須編譯並執行一個簡單的程式以確認 IDE 知道您安裝 Java 的位置。否則,您必須按照 IDE 文件中給出的說明進行正確的設定。
設定 Eclipse IDE
本教程中的所有示例都是使用 Eclipse IDE 編寫的。因此,我們建議您應該在您的機器上安裝最新版本的 Eclipse。
要安裝 Eclipse IDE,請從 www.eclipse.org/downloads/ 下載最新的 Eclipse 二進位制檔案。下載安裝後,將二進位制分發版解壓縮到方便的位置。例如,在 Windows 上為 C:\eclipse,或在 Linux/Unix 上為 /usr/local/eclipse,最後適當地設定 PATH 變數。
可以透過在 Windows 機器上執行以下命令啟動 Eclipse,或者您可以簡單地雙擊 eclipse.exe
%C:\eclipse\eclipse.exe
可以透過在 Unix(Solaris、Linux 等)機器上執行以下命令啟動 Eclipse -
$/usr/local/eclipse/eclipse
成功啟動後,如果一切正常,則應顯示以下結果 -

設定 Maven
在本教程中,我們使用 maven 來執行和構建基於 spring 的示例以執行基於 ActiveMQ 的應用程式。請按照 Maven - 環境設定 來安裝 maven。
下載 ActiveMQ
您可以從其官方頁面下載最新穩定版本的 ActiveMQ。請按照 下載 ActivMQ 下載 ActiveMQ。我們使用了 2022 年 2 月 15 日釋出的 5.13.4 版本。將存檔內容解壓縮到您選擇的資料夾中。我們已解壓縮到 **F:/ → Apache → apache-activemq-5.16.4**。
Apache ActiveMQ - 功能特性
ActiveMQ 旨在為企業級訊息應用程式提供高可用性、可擴充套件性、可靠性、效能和安全性。以下是 ActiveMQ 的一些主要功能。
**JMS 相容** - ActiveMQ 完全符合 JMS 1.1 標準。JMS 規範提供了一種用於同步或非同步訊息傳遞、一次且僅一次訊息傳遞、訂閱者的訊息永續性等的標準機制。
**連線選項** - ActiveMQ 支援 HTTP/S、多播、SSL、Stomp、TCP、UDP、XMPP,從而提供廣泛的連線選項,並允許各種系統使用它們選擇的協議進行通訊。
**可插拔架構** - ActiveMQ 允許選擇永續性機制,並提供根據應用程式需求自定義安全性的選項,以進行身份驗證和授權。
**多平臺** - ActiveMQ 為許多流行的語言(如 Java、C、C++、.NET、Perl、PHP、Python、Ruby 等)提供客戶端 API。ActiveMQ Broker 將在 JVM 中執行,但客戶端可以使用任何支援的語言編寫。
**Broker 叢集** - ActiveMQ 允許準備一個用於擴充套件的 Broker 網路,並且可以支援不同型別的拓撲。
**功能豐富** - ActiveMQ 為 Broker 和客戶端提供許多高階功能,並支援 Apache Camel。
**簡單的管理介面** - ActiveMQ 管理控制檯易於使用,但仍然提供許多強大的管理功能。
Apache ActiveMQ - 執行 Broker 伺服器
我們已下載 ActiveMQ 的最新版本,如 ActiveMQ - 環境設定 中所述。現在轉到資料夾 **F:/ → Apache → apache-activemq-5.16.4/bin** 並鍵入以下命令。
示例
F:\Apache\apache-activemq-5.16.4\bin>activemq start
輸出
您將看到類似的輸出,ActiveMQ 將開始執行。
Java Runtime: Oracle Corporation 11.0.11 C:\Program Files\Java\jdk-11.0.11
   Heap sizes: current=1048576k  free=1041918k  max=1048576k
    JVM args: -Dcom.sun.management.jmxremote -Xms1G -Xmx1G -Djava.util.logging.config.file=logging.properties -Djava.security.auth.login.config=F:\Apache\apache-activemq-5.16.4\bin\..\conf\login.config -Dactivemq.classpath=F:\Apache\apache-activemq-5.16.4\bin\..\conf;F:\Apache\apache-activemq-5.16.4\bin\../conf;F:\Apache\apache-activemq-5.16.4\bin\../conf; -Dactivemq.home=F:\Apache\apache-activemq-5.16.4\bin\.. -Dactivemq.base=F:\Apache\apache-activemq-5.16.4\bin\.. -Dactivemq.conf=F:\Apache\apache-activemq-5.16.4\bin\..\conf -Dactivemq.data=F:\Apache\apache-activemq-5.16.4\bin\..\data -Djava.io.tmpdir=F:\Apache\apache-activemq-5.16.4\bin\..\data\tmp
Extensions classpath:
   [F:\Apache\apache-activemq-5.16.4\bin\..\lib,F:\Apache\apache-activemq-5.16.4\bin\..\lib\camel,F:\Apache\apache-activemq-5.16.4\bin\..\lib\optional,F:\Apache\apache-activemq-5.16.4\bin\..\lib\web,F:\Apache\apache-activemq-5.16.4\bin\..\lib\extra]
ACTIVEMQ_HOME: F:\Apache\apache-activemq-5.16.4\bin\..
ACTIVEMQ_BASE: F:\Apache\apache-activemq-5.16.4\bin\..
ACTIVEMQ_CONF: F:\Apache\apache-activemq-5.16.4\bin\..\conf
ACTIVEMQ_DATA: F:\Apache\apache-activemq-5.16.4\bin\..\data
Loading message broker from: xbean:activemq.xml
 INFO | Refreshing org.apache.activemq.xbean.XBeanBrokerFactory$1@53fe15ff: startup date [Sat Feb 26 12:50:18 IST 2022]; root of context hierarchy
 INFO | Using Persistence Adapter: KahaDBPersistenceAdapter[F:\Apache\apache-activemq-5.16.4\bin\..\data\kahadb]
 INFO | PListStore:[F:\Apache\apache-activemq-5.16.4\bin\..\data\localhost\tmp_storage] started
 INFO | Apache ActiveMQ 5.16.4 (localhost, ID:DESKTOP-86KD9FC-52669-1645860020983-0:1) is starting
 INFO | Listening for connections at: tcp://DESKTOP-86KD9FC:61616?maximumConnections=1000&wireFormat.maxFrameSize=104857600
 INFO | Connector openwire started
 INFO | Listening for connections at: amqp://DESKTOP-86KD9FC:5672?maximumConnections=1000&wireFormat.maxFrameSize=104857600
 INFO | Connector amqp started
 INFO | Listening for connections at: stomp://DESKTOP-86KD9FC:61613?maximumConnections=1000&wireFormat.maxFrameSize=104857600
 INFO | Connector stomp started
 INFO | Listening for connections at: mqtt://DESKTOP-86KD9FC:1883?maximumConnections=1000&wireFormat.maxFrameSize=104857600
 INFO | Connector mqtt started
 INFO | Starting Jetty server
 INFO | Creating Jetty connector
 WARN | ServletContext@o.e.j.s.ServletContextHandler@4f966719{/,null,STARTING} has uncovered http methods for path: /
 INFO | Listening for connections at ws://DESKTOP-86KD9FC:61614?maximumConnections=1000&wireFormat.maxFrameSize=104857600
 INFO | Connector ws started
 INFO | Apache ActiveMQ 5.16.4 (localhost, ID:DESKTOP-86KD9FC-52669-1645860020983-0:1) started
 INFO | For help or more information please see: http://activemq.apache.org
 INFO | ActiveMQ WebConsole available at http://127.0.0.1:8161/
 INFO | ActiveMQ Jolokia REST API available at http://127.0.0.1:8161/api/jolokia/
驗證
現在在瀏覽器中開啟 **http://127.0.0.1:8161/admin/**。它將要求輸入憑據。使用 admin/admin 作為使用者名稱/密碼,它將載入 ActiveMQ 管理控制檯,您可以在其中檢查佇列、主題、連線等。
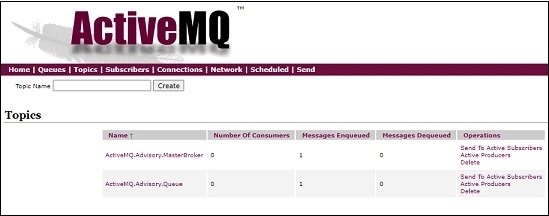
Apache ActiveMQ - 管理控制檯
一旦 ActiveMQ 伺服器啟動並執行。您可以使用管理控制檯來管理佇列、主題、訂閱者、連線、網路等。
在瀏覽器中開啟 **http://127.0.0.1:8161/admin/**。它將要求輸入憑據。使用 admin/admin 作為使用者名稱/密碼,它將載入 ActiveMQ 管理控制檯,您可以在其中檢查佇列、主題、連線等。
佇列
單擊“佇列”選項卡,輸入佇列名稱為 testQueue 並單擊“建立”按鈕。現在您可以在列表中看到該佇列。

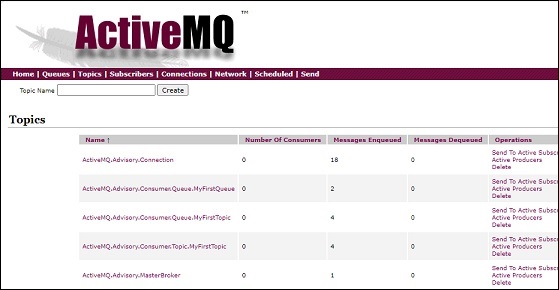
主題
同樣,您可以建立主題並在“主題”選項卡中檢查主題。
其他
同樣,您可以瀏覽訂閱者、連線、網路橋、排程程式詳細資訊。
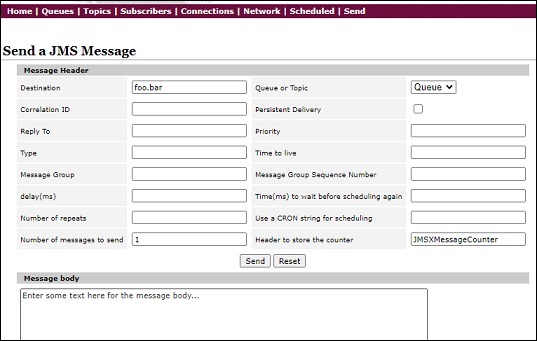
傳送
“傳送”選項卡允許透過指定目標和其他詳細資訊將 JMS 訊息傳送到特定佇列或主題。
Apache ActiveMQ - 生產者應用程式
現在讓我們建立一個生產者應用程式,它將訊息傳送到 ActiveMQ 佇列。
建立專案
使用 eclipse,選擇 **檔案** → **新建** → **Maven 專案**。勾選 **建立簡單的專案(跳過原型選擇)** 並單擊“下一步”。
輸入詳細資訊,如下所示 -
**groupId** - com.tutorialspoint
**artifactId** - producer
**version** - 0.0.1-SNAPSHOT
**name** - ActiveMQ 生產者
單擊“完成”按鈕,將建立一個新專案。
pom.xml
現在更新 pom.xml 的內容以包含 ActiveMQ 的依賴項。
<project xmlns="http://maven.apache.org/POM/4.0.0"
   xmlns:xsi="http://www.w3.org/2001/XMLSchema-instance"
   xsi:schemaLocation="http://maven.apache.org/POM/4.0.0
   https://maven.apache.org/xsd/maven-4.0.0.xsd">

   <modelVersion>4.0.0</modelVersion>
   <groupId>com.tutorialspoint.activemq</groupId>
   <artifactId>producer</artifactId>
   <version>0.0.1-SNAPSHOT</version>
   <name>ActiveMQ Producer</name>
   <dependencies>
      <dependency>
         <groupId>org.apache.geronimo.specs</groupId>
         <artifactId>geronimo-jms_1.1_spec</artifactId>
         <version>1.1</version>
      </dependency>
      <dependency>
         <groupId>org.apache.qpid</groupId>
         <artifactId>qpid-jms-client</artifactId>
         <version>0.40.0</version>
      </dependency>
   </dependencies>
   <build>
      <plugins>
         <plugin>
            <groupId>org.apache.maven.plugins</groupId>
            <artifactId>maven-compiler-plugin</artifactId>
            <version>2.1</version>
            <configuration>
               <source>1.6</source>
               <target>1.6</target>
            </configuration>
         </plugin>
         <plugin>
            <groupId>org.fusesource.mvnplugins</groupId>
            <artifactId>maven-uberize-plugin</artifactId>
            <version>1.14</version>
            <executions>
               <execution>
                  <phase>package</phase>
                  <goals><goal>uberize</goal></goals>
               </execution>
            </executions>
         </plugin>
      </plugins>
   </build>
</project>
現在建立一個生產者類,它將訊息傳送到 ActiveMQ 佇列。
package com.tutorialspoint.activemq;

import java.io.Console;
import java.util.Scanner;

import javax.jms.Connection;
import javax.jms.Destination;
import javax.jms.MessageProducer;
import javax.jms.Session;
import javax.jms.TextMessage;

import org.apache.qpid.jms.JmsConnectionFactory;

public class Producer {
   public static void main(String[] args) throws Exception {

      // Create a connection to ActiveMQ JMS broker using AMQP protocol
      JmsConnectionFactory factory = new JmsConnectionFactory("amqp://:5672");
      Connection connection = factory.createConnection("admin", "password");
      connection.start();

      // Create a session
      Session session = connection.createSession(false, Session.AUTO_ACKNOWLEDGE);

      // Create a queue
      Destination destination = session.createQueue("MyFirstQueue");

      // Create a producer specific to queue
      MessageProducer producer = session.createProducer(destination);

      Scanner input = new Scanner(System.in);
      String response;
      do {
         System.out.println("Enter message: ");
         response = input.nextLine();
         // Create a message object
         TextMessage msg = session.createTextMessage(response);

         // Send the message to the queue
         producer.send(msg);

      } while (!response.equalsIgnoreCase("Quit"));
      input.close();

      // Close the connection
      connection.close();
   }
}
生產者類建立連線,啟動會話,建立生產者,然後要求使用者輸入訊息。如果使用者輸入 quit,則應用程式終止,否則它將訊息傳送到佇列。
我們將在 ActiveMQ - 測試應用程式 一章中執行此應用程式。
Apache ActiveMQ - 消費者應用程式
現在讓我們建立一個消費者應用程式,它將從 ActiveMQ 佇列接收訊息。
建立專案
使用 eclipse,選擇 **檔案** → **新建** → **Maven 專案**。勾選 **建立簡單的專案(跳過原型選擇)** 並單擊“下一步”。
輸入詳細資訊,如下所示 -
**groupId** - com.tutorialspoint
**artifactId** - consumer
**version** - 0.0.1-SNAPSHOT
**name** - ActiveMQ 消費者
單擊“完成”按鈕,將建立一個新專案。
pom.xml
現在更新 pom.xml 的內容以包含 ActiveMQ 的依賴項。
<project xmlns="http://maven.apache.org/POM/4.0.0"
   xmlns:xsi="http://www.w3.org/2001/XMLSchema-instance"
   xsi:schemaLocation="http://maven.apache.org/POM/4.0.0
   https://maven.apache.org/xsd/maven-4.0.0.xsd">

   <modelVersion>4.0.0</modelVersion>
   <groupId>com.tutorialspoint.activemq</groupId>
   <artifactId>consumer</artifactId>
   <version>0.0.1-SNAPSHOT</version>
   <name>ActiveMQ Consumer</name>
   <dependencies>
      <dependency>
         <groupId>org.apache.geronimo.specs</groupId>
         <artifactId>geronimo-jms_1.1_spec</artifactId>
         <version>1.1</version>
      </dependency>
      <dependency>
         <groupId>org.apache.qpid</groupId>
         <artifactId>qpid-jms-client</artifactId>
         <version>0.40.0</version>
      </dependency>
   </dependencies>
   <build>
      <plugins>
         <plugin>
            <groupId>org.apache.maven.plugins</groupId>
            <artifactId>maven-compiler-plugin</artifactId>
            <version>2.1</version>
            <configuration>
               <source>1.6</source>
               <target>1.6</target>
            </configuration>
         </plugin>
         <plugin>
            <groupId>org.fusesource.mvnplugins</groupId>
            <artifactId>maven-uberize-plugin</artifactId>
            <version>1.14</version>
            <executions>
               <execution>
                  <phase>package</phase>
                  <goals><goal>uberize</goal></goals>
               </execution>
            </executions>
         </plugin>
      </plugins>
   </build>
</project>
現在建立一個消費者類,它將從 ActiveMQ 佇列接收訊息。
package com.tutorialspoint.activemq;

import java.io.Console;

import javax.jms.Connection;
import javax.jms.Destination;
import javax.jms.Message;
import javax.jms.MessageConsumer;
import javax.jms.MessageProducer;
import javax.jms.Session;
import javax.jms.TextMessage;

import org.apache.qpid.jms.JmsConnectionFactory;

public class Consumer {
   public static void main(String[] args) throws Exception {
      // Create a connection to ActiveMQ JMS broker using AMQP protocol
      JmsConnectionFactory factory = new JmsConnectionFactory("amqp://:5672");
      Connection connection = factory.createConnection("admin", "password");
      connection.start();

      // Create a session
      Session session = connection.createSession(false, Session.AUTO_ACKNOWLEDGE);

      // Create a queue
      Destination destination = session.createQueue("MyFirstQueue");

      // Create a consumer specific to queue
      MessageConsumer consumer = session.createConsumer(destination);

      Console c = System.console();
      String response;
      do {
         // Receive the message
         Message msg = consumer.receive();
         response = ((TextMessage) msg).getText();

         System.out.println("Received = "+response);

      } while (!response.equalsIgnoreCase("Quit"));

      // Close the connection
      connection.close();
   }
}
消費者類建立連線,啟動會話,建立消費者,然後從佇列接收訊息(如果有)。如果佇列包含 quit 作為訊息,則應用程式終止,否則它將繼續輪詢佇列以獲取訊息。
我們將在 ActiveMQ - 測試應用程式 一章中執行此應用程式。
Apache ActiveMQ - 測試應用程式
啟動 ActiveMQ 伺服器
現在讓我們啟動 ActiveMQ 伺服器。轉到資料夾 **F:/ → Apache → apache-activemq-5.16.4/bin** 並鍵入以下命令。
示例
F:\Apache\apache-activemq-5.16.4\bin>activemq start
輸出
您將看到類似的輸出,ActiveMQ 將開始執行。
...
INFO | Apache ActiveMQ 5.16.4 (localhost, ID:DESKTOP-86KD9FC-52669-1645860020983-0:1) started
INFO | For help or more information please see: http://activemq.apache.org
INFO | ActiveMQ WebConsole available at http://127.0.0.1:8161/
INFO | ActiveMQ Jolokia REST API available at http://127.0.0.1:8161/api/jolokia/
啟動生產者應用程式
在 eclipse 中,右鍵單擊 Producer.java 原始碼,然後選擇“以 Java 應用程式執行”。生產者應用程式將開始執行,您將看到如下輸出 -
SLF4J: Failed to load class "org.slf4j.impl.StaticLoggerBinder".
SLF4J: Defaulting to no-operation (NOP) logger implementation
SLF4J: See http://www.slf4j.org/codes.html#StaticLoggerBinder for further details.
Enter message:
啟動消費者應用程式
在 eclipse 中,右鍵單擊 Consumer.java 原始碼,然後選擇“以 Java 應用程式執行”。消費者應用程式將開始執行,您將看到如下輸出 -
SLF4J: Failed to load class "org.slf4j.impl.StaticLoggerBinder".
SLF4J: Defaulting to no-operation (NOP) logger implementation
SLF4J: See http://www.slf4j.org/codes.html#StaticLoggerBinder for further details.
傳送訊息
在生產者控制檯視窗中,鍵入 Hi 並按 Enter 鍵傳送訊息。
SLF4J: Failed to load class "org.slf4j.impl.StaticLoggerBinder".
SLF4J: Defaulting to no-operation (NOP) logger implementation
SLF4J: See http://www.slf4j.org/codes.html#StaticLoggerBinder for further details.
Enter message:
Hi
接收訊息
在消費者控制檯視窗中驗證是否已收到訊息。
SLF4J: Failed to load class "org.slf4j.impl.StaticLoggerBinder".
SLF4J: Defaulting to no-operation (NOP) logger implementation
SLF4J: See http://www.slf4j.org/codes.html#StaticLoggerBinder for further details.
Received = Hi
傳送 quit 作為訊息以終止生產者和消費者控制檯視窗會話。
驗證
現在在瀏覽器中開啟 **http://127.0.0.1:8161/admin/**。它將要求輸入憑據。使用 admin/admin 作為使用者名稱/密碼,它將載入 ActiveMQ 管理控制檯,您可以在其中檢查佇列以檢查狀態。它將顯示已入隊和已傳遞的 2 條訊息。

Apache ActiveMQ - 釋出者應用程式
現在讓我們建立一個釋出者應用程式,它將訊息傳送到 ActiveMQ 佇列。
建立專案
使用 eclipse,選擇 **檔案** → **新建** → **Maven 專案**。勾選 **建立簡單的專案(跳過原型選擇)** 並單擊“下一步”。
輸入詳細資訊,如下所示 -
**groupId** - com.tutorialspoint
**artifactId** - publisher
**version** - 0.0.1-SNAPSHOT
**name** - ActiveMQ 釋出者
單擊“完成”按鈕,將建立一個新專案。
pom.xml
現在更新 pom.xml 的內容以包含 ActiveMQ 的依賴項。
<project xmlns="http://maven.apache.org/POM/4.0.0"
   xmlns:xsi="http://www.w3.org/2001/XMLSchema-instance"
   xsi:schemaLocation="http://maven.apache.org/POM/4.0.0
   https://maven.apache.org/xsd/maven-4.0.0.xsd">

   <modelVersion>4.0.0</modelVersion>
   <groupId>com.tutorialspoint.activemq</groupId>
   <artifactId>publisher</artifactId>
   <version>0.0.1-SNAPSHOT</version>
   <name>ActiveMQ Publisher</name>
   <dependencies>
      <dependency>
         <groupId>org.apache.geronimo.specs</groupId>
         <artifactId>geronimo-jms_1.1_spec</artifactId>
         <version>1.1</version>
      </dependency>
      <dependency>
         <groupId>org.apache.qpid</groupId>
         <artifactId>qpid-jms-client</artifactId>
         <version>0.40.0</version>
      </dependency>
   </dependencies>
   <build>
      <plugins>
         <plugin>
            <groupId>org.apache.maven.plugins</groupId>
            <artifactId>maven-compiler-plugin</artifactId>
            <version>2.1</version>
            <configuration>
               <source>1.6</source>
               <target>1.6</target>
            </configuration>
         </plugin>
         <plugin>
            <groupId>org.fusesource.mvnplugins</groupId>
            <artifactId>maven-uberize-plugin</artifactId>
            <version>1.14</version>
            <executions>
               <execution>
                  <phase>package</phase>
                  <goals><goal>uberize</goal></goals>
               </execution>
            </executions>
         </plugin>
      </plugins>
   </build>
</project>
現在建立一個釋出者類,它將訊息傳送到 ActiveMQ 主題以將其廣播給所有訂閱者。
package com.tutorialspoint.activemq;

import java.io.Console;
import java.util.Scanner;

import javax.jms.Connection;
import javax.jms.Destination;
import javax.jms.MessageProducer;
import javax.jms.Session;
import javax.jms.TextMessage;

import org.apache.qpid.jms.JmsConnectionFactory;

public class Publisher {
   public static void main(String[] args) throws Exception {
      // Create a connection to ActiveMQ JMS broker using AMQP protocol
      JmsConnectionFactory factory = new JmsConnectionFactory("amqp://:5672");
      Connection connection = factory.createConnection("admin", "password");
      connection.start();

      // Create a session
      Session session = connection.createSession(false, Session.AUTO_ACKNOWLEDGE);

      // Create a topic
      Destination destination = session.createTopic("MyFirstTopic");

      // Create a publisher specific to topic
      MessageProducer publisher = session.createProducer(destination);

      Scanner input = new Scanner(System.in);
      String response;
      do {
         System.out.println("Enter message: ");
         response = input.nextLine();
         // Create a message object
         TextMessage msg = session.createTextMessage(response);

         // Send the message to the topic
         publisher.send(msg);

      } while (!response.equalsIgnoreCase("Quit"));
      input.close();

      // Close the connection
      connection.close();
   }
}
生產者類建立連線,啟動會話,建立生產者,然後要求使用者輸入訊息。如果使用者輸入 quit,則應用程式終止,否則它將訊息傳送到主題。
我們將在 ActiveMQ - 測試應用程式 一章中執行此應用程式。
Apache ActiveMQ - 訂閱者應用程式
現在讓我們建立一個訂閱者應用程式,它將從 ActiveMQ 主題接收訊息。
建立專案
使用 eclipse,選擇 **檔案** → **新建** → **Maven 專案**。勾選 **建立簡單的專案(跳過原型選擇)** 並單擊“下一步”。
輸入詳細資訊,如下所示 -
**groupId** - com.tutorialspoint
**artifactId** - subscriber
**version** - 0.0.1-SNAPSHOT
**name** - ActiveMQ 訂閱者
單擊“完成”按鈕,將建立一個新專案。
pom.xml
現在更新 pom.xml 的內容以包含 ActiveMQ 的依賴項。
<project xmlns="http://maven.apache.org/POM/4.0.0"
   xmlns:xsi="http://www.w3.org/2001/XMLSchema-instance"
   xsi:schemaLocation="http://maven.apache.org/POM/4.0.0
   https://maven.apache.org/xsd/maven-4.0.0.xsd">

   <modelVersion>4.0.0</modelVersion>
   <groupId>com.tutorialspoint.activemq</groupId>
   <artifactId>subscriber</artifactId>
   <version>0.0.1-SNAPSHOT</version>
   <name>ActiveMQ Subscriber</name>
   <dependencies>
      <dependency>
         <groupId>org.apache.geronimo.specs</groupId>
         <artifactId>geronimo-jms_1.1_spec</artifactId>
         <version>1.1</version>
      </dependency>
      <dependency>
         <groupId>org.apache.qpid</groupId>
         <artifactId>qpid-jms-client</artifactId>
         <version>0.40.0</version>
      </dependency>
   </dependencies>
   <build>
      <plugins>
         <plugin>
            <groupId>org.apache.maven.plugins</groupId>
            <artifactId>maven-compiler-plugin</artifactId>
            <version>2.1</version>
            <configuration>
               <source>1.6</source>
               <target>1.6</target>
            </configuration>
         </plugin>
         <plugin>
            <groupId>org.fusesource.mvnplugins</groupId>
            <artifactId>maven-uberize-plugin</artifactId>
            <version>1.14</version>
            <executions>
               <execution>
                  <phase>package</phase>
                  <goals><goal>uberize</goal></goals>
               </execution>
            </executions>
         </plugin>
      </plugins>
   </build>
</project>
現在建立一個 Subscriber 類,它將接收來自 ActiveMQ 佇列的訊息。
package com.tutorialspoint.activemq;

import java.io.Console;

import javax.jms.Connection;
import javax.jms.Destination;
import javax.jms.Message;
import javax.jms.MessageConsumer;
import javax.jms.MessageProducer;
import javax.jms.Session;
import javax.jms.TextMessage;

import org.apache.qpid.jms.JmsConnectionFactory;

public class Subscriber {
   public static void main(String[] args) throws Exception {
      // Create a connection to ActiveMQ JMS broker using AMQP protocol
      JmsConnectionFactory factory = new JmsConnectionFactory("amqp://:5672");
      Connection connection = factory.createConnection("admin", "password");
      connection.start();

      // Create a session
      Session session = connection.createSession(false, Session.AUTO_ACKNOWLEDGE);

      // Create a topic
      Destination destination = session.createTopic("MyFirstTopic");

      // Create a subscriber specific to topic
      MessageConsumer subscriber = session.createConsumer(destination);

      Console c = System.console();
      String response;
      do {
         // Receive the message
         Message msg = subscriber.receive();
         response = ((TextMessage) msg).getText();

         System.out.println("Received = "+response);

      } while (!response.equalsIgnoreCase("Quit"));

      // Close the connection
      connection.close();
   }
}
Subscriber 類建立一個連線,啟動會話,建立一個消費者,然後接收主題中的訊息(如果有)。如果主題包含 quit 作為訊息,則應用程式終止,否則它將繼續輪詢佇列以獲取訊息。
我們將多次執行此應用程式,以便在ActiveMQ - 測試應用程式章節中建立多個訂閱者。
Apache ActiveMQ - 測試應用程式主題
啟動 ActiveMQ 伺服器
現在讓我們啟動 ActiveMQ 伺服器。轉到資料夾 **F:/ → Apache → apache-activemq-5.16.4/bin** 並鍵入以下命令。
示例
F:\Apache\apache-activemq-5.16.4\bin>activemq start
輸出
您將看到類似的輸出,ActiveMQ 將開始執行。
...
INFO | Apache ActiveMQ 5.16.4 (localhost, ID:DESKTOP-86KD9FC-52669-1645860020983-0:1) started
INFO | For help or more information please see: http://activemq.apache.org
INFO | ActiveMQ WebConsole available at http://127.0.0.1:8161/
INFO | ActiveMQ Jolokia REST API available at http://127.0.0.1:8161/api/jolokia/
啟動釋出者應用程式
在 Eclipse 中,右鍵單擊 Publisher.java 原始檔,然後選擇“Run As”→“Java Application”。釋出者應用程式將開始執行,您將看到如下輸出:
SLF4J: Failed to load class "org.slf4j.impl.StaticLoggerBinder".
SLF4J: Defaulting to no-operation (NOP) logger implementation
SLF4J: See http://www.slf4j.org/codes.html#StaticLoggerBinder for further details.
Enter message:
啟動訂閱者應用程式
在 Eclipse 中,右鍵單擊 Subscriber.java 原始檔,然後選擇“Run As”→“Java Application”。訂閱者應用程式將開始執行,您將看到如下輸出:
SLF4J: Failed to load class "org.slf4j.impl.StaticLoggerBinder".
SLF4J: Defaulting to no-operation (NOP) logger implementation
SLF4J: See http://www.slf4j.org/codes.html#StaticLoggerBinder for further details.
啟動另一個訂閱者應用程式
在 Eclipse 中,再次右鍵單擊 Subscriber.java 原始檔,然後選擇“Run As”→“Java Application”。另一個訂閱者應用程式將開始執行,您將看到如下輸出:
SLF4J: Failed to load class "org.slf4j.impl.StaticLoggerBinder".
SLF4J: Defaulting to no-operation (NOP) logger implementation
SLF4J: See http://www.slf4j.org/codes.html#StaticLoggerBinder for further details.
傳送訊息
在釋出者控制檯視窗中,鍵入 Hi 並按 Enter 鍵傳送訊息。
SLF4J: Failed to load class "org.slf4j.impl.StaticLoggerBinder".
SLF4J: Defaulting to no-operation (NOP) logger implementation
SLF4J: See http://www.slf4j.org/codes.html#StaticLoggerBinder for further details.
Enter message:
Hi
接收訊息
在訂閱者控制檯視窗中驗證每個視窗是否都收到了訊息。
SLF4J: Failed to load class "org.slf4j.impl.StaticLoggerBinder".
SLF4J: Defaulting to no-operation (NOP) logger implementation
SLF4J: See http://www.slf4j.org/codes.html#StaticLoggerBinder for further details.
Received = Hi
傳送 Quit 作為訊息以終止所有釋出者和訂閱者控制檯視窗會話。
驗證
現在在瀏覽器中開啟http://127.0.0.1:8161/admin/。它將要求輸入憑據。使用 admin/admin 作為使用者名稱/密碼,它將載入 ActiveMQ 管理控制檯,您可以在其中檢查主題以檢查狀態。它將顯示排隊和已傳送的多個訊息。