
 資料結構
資料結構 網路
網路 關係資料庫管理系統(RDBMS)
 作業系統
作業系統 Java
Java iOS
iOS HTML
HTML CSS
CSS Android
 Python
 C 語言程式設計
 C++
C++ C#
C# MongoDB
 MySQL
MySQL Javascript
 PHP
PHPAndroid:如何在 Firebase Storage 上上傳圖片?
什麼是 Firebase Storage?
Firebase 是 Google 著名的雲平臺服務提供商之一,它為 Android、IOS 和 Web 應用程式提供資料庫、儲存、託管和其他雲服務。在本文中,我們將特別關注 Firebase Storage,以及如何使用它將圖片從 Android 裝置上傳到 Firebase Storage。
Firebase Storage 的實現
我們將建立一個簡單的 Android 應用程式,其中我們將顯示兩個按鈕和一個影像檢視。我們將使用一個按鈕來選擇圖片,另一個按鈕將圖片上傳到我們的 Firebase Storage。我們還將使用一個影像檢視來顯示使用者從裝置中選擇的圖片。我們將遵循分步指南,使用 Kotlin 在我們的 Android 應用程式中實現 Firebase Storage。
步驟 1:在 Android Studio 中建立一個新專案
導航到 Android Studio 並點選“新建專案”。
點選“新建專案”後,您將看到以下螢幕。
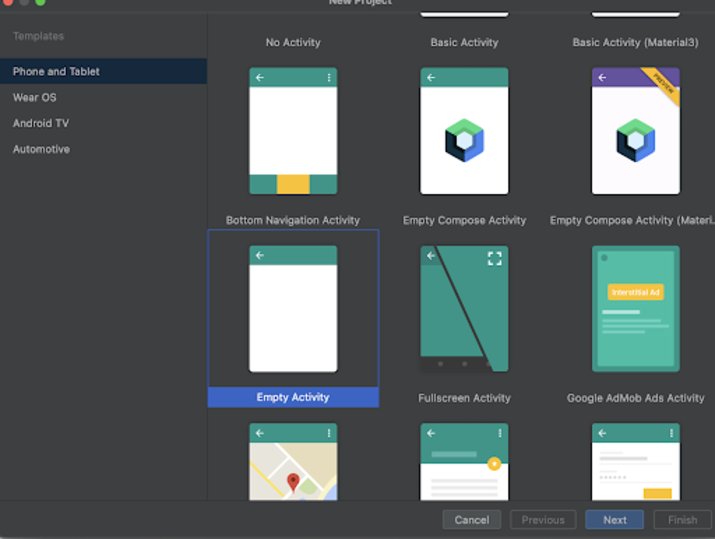
在這個螢幕中,我們只需選擇“Empty Activity”並點選“Next”。點選“Next”後,您將看到以下螢幕。
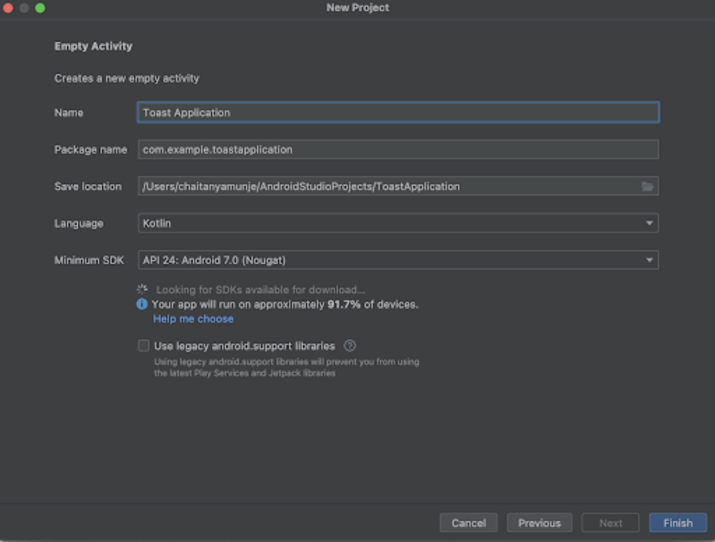
在這個螢幕中,我們只需指定專案名稱。然後包名稱將自動生成。
注意 - 請確保選擇 Kotlin 作為語言。
指定所有詳細資訊後,點選“Finish”以建立一個新的 Android Studio 專案。
專案建立後,我們將看到開啟的兩個檔案:activity_main.xml 和 MainActivity.kt 檔案。
步驟 2:將您的專案連線到 Firebase Storage
專案建立後。在 Android Studio 工具欄頂部出現的 Android Studio 中導航到“Tools”選項卡。在其中點選 Firebase > 然後點選 Firebase Storage,您將看到以下螢幕。
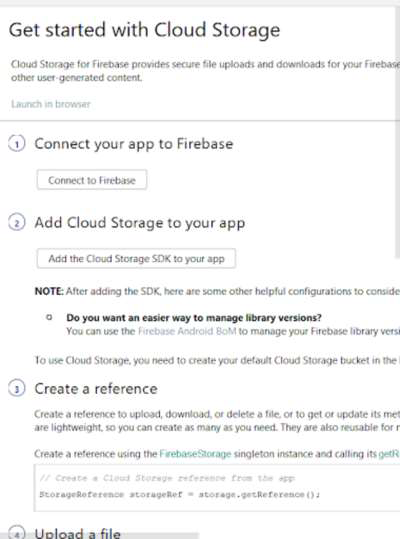
之後,您只需點選“Connect to Firebase”將您的應用程式連線到 Firebase。然後,您必須點選“Add cloud Storage to Firebase”以向其新增 Firebase Storage 依賴項。點選這兩個按鈕後,您將看到以下螢幕。
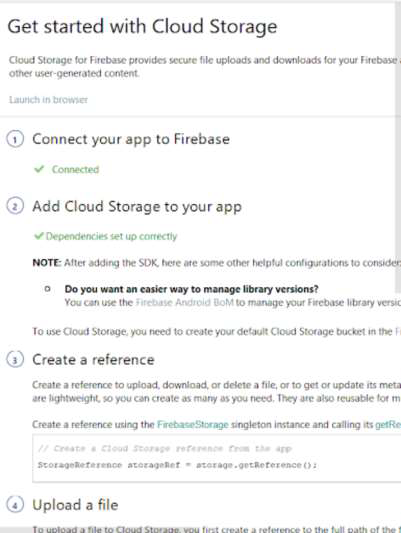
現在我們的應用程式已連線到 Firebase Storage。
步驟 3:使用 activity_main.xml
導航到 activity_main.xml。如果此檔案不可見,要開啟此檔案,請在左側面板中導航到 app > res > layout > activity_main.xml 以開啟此檔案。開啟此檔案後,將以下程式碼新增到其中。程式碼中添加了註釋以便詳細瞭解。
<?xml version="1.0" encoding="utf-8"?>
<RelativeLayout xmlns:android="http://schemas.android.com/apk/res/android"
   xmlns:tools="http://schemas.android.com/tools"
   android:layout_width="match_parent"
   android:layout_height="match_parent"
   tools:context=".MainActivity">

   <!-- creating text view for displaying heading-->
   <TextView
      android:id="@+id/idTVHeading"
      android:layout_width="match_parent"
      android:layout_height="wrap_content"
      android:layout_margin="20dp"
      android:gravity="center"
      android:text="Firebase Storage in Android"
      android:textAlignment="center"
      android:textAllCaps="false"
      android:textColor="#FF000000"
      android:textSize="20sp"
      android:textStyle="bold" />

   <!-- creating an image view for displaying image-->
   <ImageView
      android:id="@+id/idIVImage"
      android:layout_width="match_parent"
      android:layout_height="300dp"
      android:layout_below="@id/idTVHeading"
      android:layout_margin="10dp"
      android:padding="3dp" />

   <!-- creating a button to choose image-->
   <Button
      android:id="@+id/idBtnChooseImage"
      android:layout_width="match_parent"
      android:layout_height="wrap_content"
      android:layout_below="@id/idIVImage"
      android:layout_margin="10dp"
      android:padding="4dp"
      android:text="Choose Image"
      android:textAllCaps="false" />

   <!-- creating a button to upload image-->
   <Button
      android:id="@+id/idBtnUploadImage"
      android:layout_width="match_parent"
      android:layout_height="wrap_content"
      android:layout_below="@id/idBtnChooseImage"
      android:layout_margin="10dp"
      android:padding="4dp"
      android:text="Upload Image"
      android:textAllCaps="false" />

</RelativeLayout>
說明 - 在上面的程式碼中,我們正在建立一個根佈局作為相對佈局。在這個佈局中,我們建立一個文字檢視來顯示應用程式的標題。建立此文字檢視後,我們建立一個影像檢視。在這個影像檢視中,我們將顯示使用者從其裝置中選擇的影像。之後,我們新增兩個按鈕。一個按鈕用於從使用者裝置中選擇影像,另一個按鈕用於將影像上傳到 Firebase Storage。
步驟 4:使用 MainActivity.kt 檔案
導航到 app > java > 您的應用程式包名稱 > MainActivity.kt 檔案,並將以下程式碼新增到其中。程式碼中添加了註釋以便詳細瞭解。
package com.gtappdevelopers.androidapplication

import android.app.ProgressDialog
import android.content.Intent
import android.graphics.Bitmap
import android.net.Uri
import android.os.Bundle
import android.provider.MediaStore
import android.widget.Button
import android.widget.ImageView
import android.widget.Toast
import androidx.appcompat.app.AppCompatActivity
import com.google.firebase.storage.FirebaseStorage
import com.google.firebase.storage.StorageReference
import java.util.*

class MainActivity : AppCompatActivity() {
   // creating variable for buttons, image view and Uri for file.
   lateinit var chooseImageBtn: Button
   lateinit var uploadImageBtn: Button
   lateinit var imageView: ImageView
   var fileUri: Uri? = null;

   override fun onCreate(savedInstanceState: Bundle?) {
      super.onCreate(savedInstanceState)
      setContentView(R.layout.activity_main)
      // on below line initializing variables for buttons and image view.
      chooseImageBtn = findViewById(R.id.idBtnChooseImage)
      uploadImageBtn = findViewById(R.id.idBtnUploadImage)
      imageView = findViewById(R.id.idIVImage)

      // on below line adding click listener for our choose image button.
      chooseImageBtn.setOnClickListener {
         // on below line calling intent to get our image from phone storage.
         val intent = Intent()
         // on below line setting type of files which we want to pick in our case we are picking images.
         intent.type = "image/*"
         // on below line we are setting action to get content
         intent.action = Intent.ACTION_GET_CONTENT
         // on below line calling start activity for result to choose image.
         startActivityForResult(
            // on below line creating chooser to choose image.
            Intent.createChooser(
               intent,
               "Pick your image to upload"
            ),
            22
         )
      }

      // on below line adding click listener to upload image.
      uploadImageBtn.setOnClickListener {
         // on below line calling upload image button to upload our image.
         uploadImage()
      }
   }

   // on below line adding on activity result method this method is called when user picks the image.
   override fun onActivityResult(requestCode: Int, resultCode: Int, data: Intent?) {
      super.onActivityResult(requestCode, resultCode, data)
      // on below line we are checking if the result is ok
      if (requestCode == 22 && resultCode == RESULT_OK && data != null && data.data != null) {
         // on below line initializing file uri with the data which we get from intent
         fileUri = data.data
         try {
            // on below line getting bitmap for image from file uri.
            val bitmap: Bitmap = MediaStore.Images.Media.getBitmap(contentResolver, fileUri);
            // on below line setting bitmap for our image view.
            imageView.setImageBitmap(bitmap)
         } catch (e: Exception) {
            // handling exception on below line
            e.printStackTrace()
         }
      }
   }

   // on below line creating a function to upload our image.
   fun uploadImage() {
      // on below line checking weather our file uri is null or not.
      if (fileUri != null) {
         // on below line displaying a progress dialog when uploading an image.
         val progressDialog = ProgressDialog(this)
         // on below line setting title and message for our progress dialog and displaying our progress dialog.
         progressDialog.setTitle("Uploading...")
         progressDialog.setMessage("Uploading your image..")
         progressDialog.show()

         // on below line creating a storage refrence for firebase storage and creating a child in it with
         // random uuid.
         val ref: StorageReference = FirebaseStorage.getInstance().getReference()
         .child(UUID.randomUUID().toString())
         // on below line adding a file to our storage.
         ref.putFile(fileUri!!).addOnSuccessListener {
            // this method is called when file is uploaded.
            // in this case we are dismissing our progress dialog and displaying a toast message
            progressDialog.dismiss()
            Toast.makeText(applicationContext, "Image Uploaded..", Toast.LENGTH_SHORT).show()
         }.addOnFailureListener {
            // this method is called when there is failure in file upload.
            // in this case we are dismissing the dialog and displaying toast message
            progressDialog.dismiss()
            Toast.makeText(applicationContext, "Fail to Upload Image..", Toast.LENGTH_SHORT)
            .show()
         }
      }
   }
}
說明 - 在上面的程式碼中,我們首先為影像檢視、上傳影像按鈕、選擇影像按鈕和我們的檔案 uri 的 URI 變數建立變數。然後,在我們的 onCreate 方法中,我們使用我們在 activity_main.xml 中指定的 id 初始化這些變數。
然後,我們為“選擇影像”按鈕新增一個點選監聽器。在點選方法中,我們為意圖建立一個變數,然後將其型別設定為影像,因為我們想要選擇影像。然後,我們將它的操作設定為獲取影像。之後,我們將設定 start activity for the result 來顯示我們的影像選擇器。在此,我們建立了一個影像選擇器,用於從使用者的裝置中選擇我們的影像。
之後,我們建立一個 onActivityResult 方法,我們將在其中將使用者選擇的影像設定到我們的影像檢視中。在這個方法中,我們首先從我們選擇的影像中獲取資料並將其設定為我們的檔案 uri。之後,我們從該檔案 uri 建立一個位圖並將該點陣圖設定為我們的影像檢視,以在我們的影像檢視中顯示選定的影像。
之後,我們建立一個上傳影像的方法。在這個方法中,我們檢查檔案 uri 是否不為空。在這種情況下,我們在下面的行中顯示一個進度條以顯示影像上傳的進度。在這個進度對話方塊中,我們顯示此進度對話方塊的標題和訊息。然後在下面的行中,我們建立一個儲存引用變數來獲取我們必須上傳影像的引用。在這個引用中,我們指定一個隨機 uuid 來上傳我們的影像。之後,我們呼叫 put file 方法將我們的檔案上傳到 Firebase 儲存。對於此方法,有兩個回撥,一個是 onSuccessListner。當我們的影像上傳時,將呼叫此方法,並且在此方法中,我們將顯示一條吐司訊息並關閉我們的進度對話方塊。另一個方法是 onFailureListner。當影像上傳操作失敗時,將呼叫此方法。在這種情況下,我們也顯示吐司訊息並關閉我們的進度對話方塊。
步驟 5:向 AndroidManifest.xml 檔案新增許可權
導航到 app > AndroidManifest.xml 並向其中新增以下 internet 和 read storage 許可權。
<uses-permission android:name="android.permission.INTERNET" />
<uses-permission android:name="android.permission.ACCESS_NETWORK_STATE" />
<uses-permission android:name="android.permission.READ_EXTERNAL_STORAGE" />
步驟 6:在 Firebase 控制檯中配置 Firebase Storage
導航到 https://console.firebase.google.com/ 以訪問 Firebase 控制檯。確保您使用在 Android Studio 中登入的同一帳戶登入。之後,您必須導航到 Firebase 控制檯左側面板中的“構建選項”。從中點選“Storage”以新增專案的 Firebase Storage。之後,您只需點選“Get started”選項,然後您將看到以下螢幕。
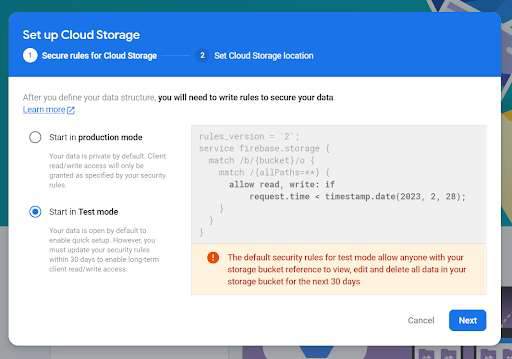
在此,請確保選擇“測試模式”,因為我們沒有為我們的應用程式實現使用者身份驗證。然後只需點選“Next”以配置 Firebase Storage。
現在點選綠色播放圖示來執行您的應用程式。
注意 - 確保您已連線到您的真實裝置或模擬器

結論
在以上教程中,我們學習了什麼是 Firebase Storage 以及如何在 Android 應用程式中使用它來儲存其中的影像。

5000+ 瀏覽量
