
 資料結構
資料結構 網路
網路 關係資料庫管理系統 (RDBMS)
 作業系統
作業系統 Java
Java iOS
iOS HTML
HTML CSS
CSS Android
 Python
 C語言程式設計
 C++
C++ C#
C# MongoDB
 MySQL
MySQL Javascript
 PHP
PHP使用OpenCV在Python中進行模板匹配
模板匹配是一種技術,可以透過它從實際影像中匹配補丁或模板。這基本上是一種模式匹配機制。
在Python中,有OpenCV模組。使用OpenCV,我們可以輕鬆找到匹配項。因此,在這個問題中,使用了OpenCV模板匹配技術。
要使用OpenCV功能,我們需要使用pip下載它們。
sudo pip3 install opencv-python
對於模板匹配任務,存在一個精度因子,此因子稱為閾值。例如,我們可以說可以使用這種模板匹配方案輕鬆建立面部識別方案。我們可以提供一些眼睛或面部其他部位的影像,然後使用這些影像作為模板,它可以輕鬆找到匹配項,但眼睛存在不同的變化。因此,如果我們將精度級別設定為50%,它將比精度級別100%檢測得更好。通常,在不同情況下,精度級別為80%。
模板匹配步驟
獲取實際影像並將其轉換為灰度影像。
將模板作為灰度影像
模板在實際影像上滑動並找到精度級別匹配的位置。
當結果大於精度級別時,將該位置標記為已檢測到。
對於第一種情況,輸入影像和模板為:
主影像

模板

示例程式碼
import cv2
import numpy as np
#open the main image and convert it to gray scale image
main_image = cv2.imread('main_image.png')
gray_image = cv2.cvtColor(main_image, cv2.COLOR_BGR2GRAY)
#open the template as gray scale image
template = cv2.imread('template1.png', 0)
width, height = template.shape[::-1] #get the width and height
#match the template using cv2.matchTemplate
match = cv2.matchTemplate(gray_image, template, cv2.TM_CCOEFF_NORMED)
threshold = 0.8
position = np.where(match >= threshold) #get the location of template in the image
for point in zip(*position[::-1]): #draw the rectangle around the matched template
cv2.rectangle(main_image, point, (point[0] + width, point[1] + height), (0, 204, 153), 0)
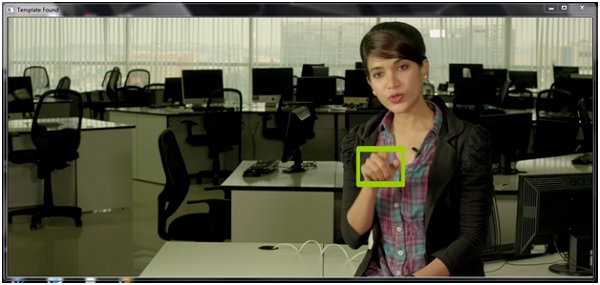
cv2.imshow('Template Found', main_image)
cv2.waitKey(0)
輸出
上述程式碼不支援多尺度。因此,如果模板的大小不同,它將無法檢測到。因此,在下一部分中,我們將看到如何使用多尺度功能來檢測模板。
在這種方法中,實際影像被轉換為不同的尺寸,每次它都匹配模式,並找到最大的相關係數來定位匹配項。
這裡的實際影像相同,模板在這裡:

示例程式碼
import imutils
import cv2
import numpy as np
#Open template and get canny
template = cv2.imread('template3.jpg')
template = cv2.cvtColor(template, cv2.COLOR_BGR2GRAY)
template = cv2.Canny(template, 10, 25)
(height, width) = template.shape[:2]
#open the main image and convert it to gray scale image
main_image = cv2.imread('main_image.png')
gray_image = cv2.cvtColor(main_image, cv2.COLOR_BGR2GRAY)
temp_found = None
for scale in np.linspace(0.2, 1.0, 20)[::-1]:
   #resize the image and store the ratio
   resized_img = imutils.resize(gray_image, width = int(gray_image.shape[1] * scale))
   ratio = gray_image.shape[1] / float(resized_img.shape[1])
   if resized_img.shape[0] < height or resized_img.shape[1] < width:
      break
   #Convert to edged image for checking
   e = cv2.Canny(resized_img, 10, 25)
   match = cv2.matchTemplate(e, template, cv2.TM_CCOEFF)
   (_, val_max, _, loc_max) = cv2.minMaxLoc(match)
   if temp_found is None or val_max>temp_found[0]:
      temp_found = (val_max, loc_max, ratio)
#Get information from temp_found to compute x,y coordinate
(_, loc_max, r) = temp_found
(x_start, y_start) = (int(loc_max[0]), int(loc_max[1]))
(x_end, y_end) = (int((loc_max[0] + width)), int((loc_max[1] + height)))
#Draw rectangle around the template
cv2.rectangle(main_image, (x_start, y_start), (x_end, y_end), (153, 22, 0), 5)
cv2.imshow('Template Found', main_image)
cv2.waitKey(0)
輸出


更新於:2019年7月30日
818 次瀏覽

廣告