
 資料結構
資料結構 網路
網路 關係資料庫管理系統 (RDBMS)
 作業系統
作業系統 Java
Java iOS
iOS HTML
HTML CSS
CSS Android
 Python
 C語言程式設計
 C++
C++ C#
C# MongoDB
 MySQL
MySQL Javascript
 PHP
PHPSpring Boot Actuator:Spring Boot 中的生產級特性
Spring Boot Actuator 是 Spring Boot 框架中最強大和最有用的特性之一。Spring Boot 中的 Actuator 模組幫助應用程式開發者輕鬆實現生產級特性,例如指標、健康檢查、安全性等。

本文將指導您如何啟用 Spring Boot Actuator,配置端點以及如何在 application.properties 檔案中修改預設設定。請注意,Spring Boot Actuator 僅適用於 Spring Boot 應用程式,無法整合到非 Spring Boot 應用程式中。
支援的端點列表
以下是撰寫本文時支援的 Actuator 端點列表。每個新版本都會向端點新增新功能。在本文中,我將解釋在生產環境中常用的幾個端點。
- actuator
- autoconfig
- beans
- configprops
- dump
- env
- health
- info
- metrics
- mappings
- shutdown
- trace
- logfile
- flyway
- liquibase
如何啟用 Actuator 端點?
預設情況下,Actuator 端點已在您的 Spring Boot 應用程式中啟用。但是,在您的應用程式中啟用 Actuator 功能非常簡單。如果您將所需的依賴項新增到您的 pom.xml 檔案中,則將啟用您的應用程式的 Actuator 功能。
<dependency>
<groupId>org.springframework.boot</groupId>
<artifactId>spring-boot-starter-actuator</artifactId>
</dependency>
在 pom.xml 檔案中新增上述條目後,重新啟動應用程式。它將被啟用。請注意,Actuator 模組中有多個端點。預設情況下,只有少數端點啟用,並且只有少數端點可供匿名使用者訪問。某些端點將具有安全保護以禁止未經授權的訪問。可以修改這些配置以更改每個端點的行為。
端點配置
每個端點都具有在應用程式啟動時啟用的預設配置。端點的一個重要屬性是“sensitive”,如果此屬性的值為“false”,則表示可以在無需任何身份驗證的情況下訪問此端點。如果值為“true”,則必須在類路徑中新增 Spring Security 模組才能訪問端點。這些值也可以在 application.properties 檔案中配置。
這是一個配置示例
endpoints.info.id=information
endpoints.info.sensitive=false
endpoints.info.enabled=true
information.app.name=Actuator Example
information.app.description=Actuator Example
information.app.version=1.0.0
指標 (Metrics)
此端點的預設 URI 為 */metrics*。當您在類路徑中新增 Spring Boot Actuator 模組時,此端點將預設啟用。顧名思義,此功能對於查詢有關記憶體、堆、處理器、類載入和執行緒池的資訊非常有用。
我們可以將指標分類為系統指標、資料來源指標、快取指標和會話指標。應用程式開發人員還可以將他們自己的指標實現新增到他們的 Spring Boot 應用程式中。
如果您執行應用程式並訪問 /metrics 端點 URI,您將獲得如下所示的 JSON 響應
{
   "mem":200162,
   "mem.free":42675,
   "processors":4,
   "instance.uptime":11631,
   "uptime":27519,
   "systemload.average":-1.0,
   "heap.committed":153088,
   "heap.init":65536,
   "heap.used":110412,
   "heap":921600,
   "nonheap.committed":48320,
   "nonheap.init":2496,
   "nonheap.used":47075,
   "nonheap":0,
   "threads.peak":13,
   "threads.daemon":10,
   "threads.totalStarted":16,
   "threads":12,
   "classes":5773,
   "classes.loaded":5773,
   "classes.unloaded":0,
   "gc.ps_scavenge.count":8,
   "gc.ps_scavenge.time":196,
   "gc.ps_marksweep.count":1,
   "gc.ps_marksweep.time":127,
   "httpsessions.max":-1,
   "httpsessions.active":0
}
健康檢查 (Health)
對於任何生產應用程式而言,定期檢查應用程式是啟動還是關閉都非常重要。此端點透過公開一個返回應用程式狀態訊息的端點 URI /health 來滿足此要求。當您訪問 URI 時,您將獲得如下所示的響應訊息
{ "status" : "UP"
}
上述訊息表示應用程式當前正在執行,沒有任何問題。監控工具可以使用此服務來檢查並警告應用程式是否未執行。
資訊 (Info)
Info 端點在 URI /info 處預設公開。如果您訪問此端點,它將顯示有關應用程式的資訊。請檢視以下配置
endpoints.info.id=information
endpoints.info.sensitive=false
endpoints.info.enabled=true
info.app.name=Spring Boot Actuator Sample Application
info.app.description=Spring Boot Actuator Sample Application
info.app.version=1.0.0
上述配置將預設端點 *info* 修改為 *information*。還設定了應用程式的詳細資訊名稱、描述和版本。端點的 sensitive 屬性確保相應的端點可以公開或需要身份驗證。另一個啟用的屬性是確保您是否要公開該端點。
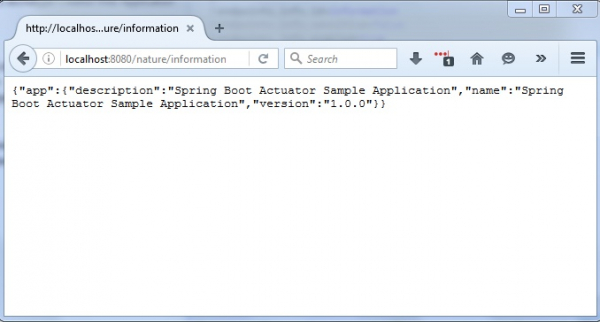
如果您執行應用程式並訪問 /information 端點,您將看到以下資訊以 JSON 格式顯示。
{
   “app”:
{
   “description”:“Spring Boot Actuator Sample Application”,
   “name”:“Spring Boot Actuator Sample Application”,
   “version”:“1.0.0”
}
}
示例應用程式
我編寫了一個非常簡單的示例應用程式來演示 Spring Boot Actuator 功能。您可以按照以下步驟完成第一個 Spring Boot Actuator 應用程式的設定。
建立 Maven 專案
第一步是建立一個 Maven 專案。示例應用程式的最終包結構將類似於以下結構
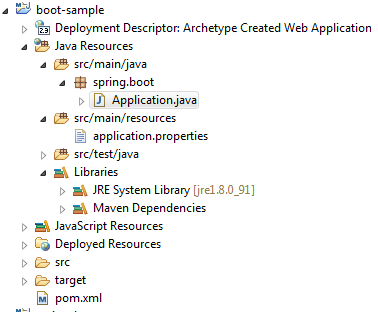
建立 Maven 構建檔案
建立一個 pom.xml 檔案並將以下條目新增到 Maven 構建檔案中。
project xmlns="http://maven.apache.org/POM/4.0.0" xmlns:xsi="http://www.w3.org/2001/XMLSchema-instance"
xsi:schemaLocation="http://maven.apache.org/POM/4.0.0 http://maven.apache.org/maven-v4_0_0.xsd">
<modelVersion>4.0.0</modelVersion>
<groupId>org.spring</groupId>
<artifactId>boot-sample</artifactId>
<packaging>war</packaging>
<version>0.0.1-SNAPSHOT</version>
<name>boot-sample Maven Webapp</name>
<url>http://maven.apache.org</url>
<parent>
<groupId>org.springframework.boot</groupId>
<artifactId>spring-boot-starter-parent</artifactId>
<version>1.3.3.RELEASE</version>
</parent>
<dependencies>
<dependency>
<groupId>org.springframework.boot</groupId>
<artifactId>spring-boot-starter-web</artifactId>
</dependency>
<dependency>
<groupId>org.springframework.boot</groupId>
<artifactId>spring-boot-starter-actuator</artifactId>
</dependency>
</dependencies>
<build>
<finalName>boot-sample</finalName>
</build>
</project>
建立 Spring Boot 應用程式檔案
Spring Boot 應用程式啟動器檔案用於執行 Spring Boot 應用程式。此類必須使用 @SpringBootApplication 註解進行註解。
Application.java
package spring.boot;
import org.springframework.boot.SpringApplication;
import org.springframework.boot.autoconfigure.SpringBootApplication;
@SpringBootApplication
public class Application {
   public static void main(String[] args) {
   SpringApplication.run(Application.class, args);
   }
}
建立應用程式屬性檔案
此檔案是用於載入自定義配置的重要 Spring Boot 配置檔案。
application.properties
server.contextPath=/nature
endpoints.info.id=information
endpoints.info.sensitive=false
endpoints.info.enabled=true
info.app.name=Spring Boot Actuator Sample Application
info.app.description=Spring Boot Actuator Sample Application
info.app.version=1.0.0
執行 Spring Boot Actuator 示例應用程式
構建專案後,只需右鍵單擊 *Application.java* 檔案即可啟動 Spring Boot 應用程式。啟動應用程式時,將啟用 Actuator 端點。以下是訪問 Actuator 端點的 URL 和示例應用程式的螢幕截圖。
https://:8080/nature/health

https://:8080/nature/metrics

https://:8080/nature/info
在本文中,我解釋了關於 Spring Boot Actuator 的關鍵概念,並提供了一個簡單的示例來演示如何啟用端點以及如何配置幾個端點,例如 info、metrics 和 health。您可以透過類似的方式配置 Actuator 模組支援的任何其他端點。

瀏覽量:519
