
 資料結構
資料結構 網路
網路 關係資料庫管理系統 (RDBMS)
 作業系統
作業系統 Java
Java iOS
iOS HTML
HTML CSS
CSS Android
 Python
 C語言程式設計
 C++
C++ C#
C# MongoDB
 MySQL
MySQL Javascript
 PHP
PHP如何在Spring Boot中實現簡單的身份驗證?
Spring Boot因其簡單性和提高生產率的聲譽而被廣泛認為是用於開發Java應用程式的框架。許多應用程式中一個重要的考慮因素是身份驗證的實現,這保證只有授權人員才能訪問特定資源。
在Spring Boot中,透過利用其內建的安全功能和庫,整合身份驗證既高效又方便。此功能使開發人員能夠專注於核心業務邏輯,而無需重新建立現有解決方案。
開發人員可以通過幾個簡單的步驟來確保其Spring Boot應用程式的安全並保護敏感資料。這些步驟包括在Spring Boot中實現身份驗證,為應用程式開發建立安全的基礎。透過這樣做,使用者將需要在訪問受保護的資源之前進行身份驗證。本文探討了在Spring Boot中實現簡單身份驗證的過程,提供了有效保護應用程式的寶貴見解。
Spring Boot
Spring Boot是一個基於Java的開源框架,它是一個可靠且使用者友好的解決方案,可以輕鬆開發和部署強大的獨立應用程式。
Spring Boot旨在最大限度地減少配置和樣板程式碼,使開發人員能夠快速構建強大且可擴充套件的應用程式。憑藉其明確的理念和自動設定功能,Spring Boot無需手動配置,併為開發基於Spring的應用程式提供了和諧的環境。
這句話展示了廣泛的功能。它包括嵌入式伺服器、依賴項管理和強大的安全選項。憑藉這些功能,它已成為希望構建微服務、Web應用程式和RESTful API 的人士的熱門選擇。
方法
在Spring Boot中,可以找到幾種實現簡單身份驗證的方法。讓我們探索三種常見的方法
使用記憶體身份驗證
使用資料庫身份驗證
使用LDAP身份驗證
使用記憶體身份驗證
在這種方法中,應用程式將其使用者憑據儲存在其記憶體中。為了定義使用者名稱、密碼和角色等使用者詳細資訊,需要實現UserDetailsService介面。在身份驗證過程中,Spring Security將提供的憑據與儲存在記憶體中的憑據進行比較。根據匹配情況,它要麼授予使用者訪問許可權,要麼拒絕使用者訪問許可權。
演算法
建立一個實現UserDetailsService介面的配置類。
在配置類中定義使用者詳細資訊(使用者名稱、密碼、角色)。
在身份驗證過程中,Spring Security將提供的憑據與記憶體中的使用者詳細資訊進行比較。
根據匹配情況授予或拒絕訪問許可權。
示例
//pom.xml
<dependencies>
   <!-- Other dependencies -->
   <dependency>
      <groupId>org.springframework.boot</groupId>
      <artifactId>spring-boot-starter-security</artifactId>
   </dependency>
</dependencies>
// WebSecurityConfigurerAdapter.java
import org.springframework.context.annotation.Configuration;
import org.springframework.security.config.annotation.authentication.
builde
rs.AuthenticationManagerBuilder;
import org.springframework.security.config.annotation.web.builders.
HttpSecu
rity;
import org.springframework.security.config.annotation.web.configuration.
Ena
bleWebSecurity;
import org.springframework.security.config.annotation.web.configuration.
Web
SecurityConfigurerAdapter;

@Configuration
@EnableWebSecurity
public class SecurityConfig extends WebSecurityConfigurerAdapter {

   @Override
   protected void configure(AuthenticationManagerBuilder auth)
throws Exception {
      auth.inMemoryAuthentication()

.withUser("admin").password("{noop}password").roles("ADMIN")
            .and()

.withUser("user").password("{noop}password").roles("USER");
   }

   @Override
   protected void configure(HttpSecurity http) throws Exception {
      http.authorizeRequests()
            .antMatchers("/admin").hasRole("ADMIN")
            .antMatchers("/user").hasRole("USER")
            .anyRequest().authenticated()
            .and()
            .formLogin();
   }
}
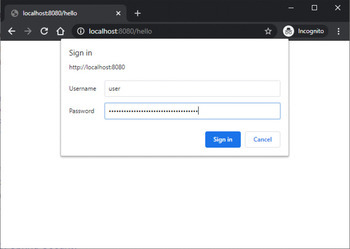
輸出

使用資料庫身份驗證
透過這種方法,使用者憑據儲存在資料庫中。建立使用者實體以及與資料庫互動的儲存庫。在身份驗證過程中,Spring Security利用UserDetailsService介面從資料庫載入使用者詳細資訊,並將它們與提供的憑據進行比較以授予或拒絕訪問許可權。
演算法
建立一個使用者實體並定義一個與資料庫互動的儲存庫。
實現UserDetailsService介面以從資料庫載入使用者詳細資訊。
在身份驗證過程中,Spring Security根據提供的憑據從資料庫檢索使用者詳細資訊。
將檢索到的憑據與提供的憑據進行比較,並相應地授予或拒絕訪問許可權。
示例
//pom.xml
<dependencies>
   <!-- Other dependencies -->
   <dependency>
      <groupId>org.springframework.boot</groupId>
      <artifactId>spring-boot-starter-security</artifactId>
   </dependency>
   <dependency>
      <groupId>org.springframework.boot</groupId>
      <artifactId>spring-boot-starter-data-jpa</artifactId>
   </dependency>
   <!-- Add your database driver dependency -->
</dependencies>

// application.properties
spring.datasource.url=jdbc:<localhost:8080/hello>
spring.datasource.username=<user>
spring.datasource.password=<password>
spring.jpa.show-sql=true

//User.java
import javax.persistence.Entity;
import javax.persistence.GeneratedValue;
import javax.persistence.GenerationType;
import javax.persistence.Id;

@Entity
public class User {
   @Id
   @GeneratedValue(strategy = GenerationType.IDENTITY)
   private Long id;
   private String username;
   private String password;
   private boolean enabled;

   // Getters and setters
   // Constructors
}

// UserDetailsService.java
import org.springframework.beans.factory.annotation.Autowired;
import org.springframework.security.core.userdetails.UserDetails;
import org.springframework.security.core.userdetails.UserDetailsService;
import org.springframework.security.core.userdetails.
UsernameNotFoundExcept
ion;
import org.springframework.stereotype.Service;

@Service
public class UserDetailsServiceImpl implements UserDetailsService {

   private UserRepository userRepository;

   @Autowired
   public UserDetailsServiceImpl(UserRepository userRepository) {
      this.userRepository = userRepository;
   }

   @Override
   public UserDetails loadUserByUsername(String username) throws UsernameNotFoundException {
      User user = userRepository.findByUsername(username)
            .orElseThrow(() -> new UsernameNotFoundException("User not found with username: " + username));

      return new org.springframework.security.core.userdetails.User(
            user.getUsername(),
            user.getPassword(),
            user.isEnabled(),
            true,
            true,
            true,
            Collections.emptyList()
      );
   }
}

// UserRepository.java
import java.util.Optional;
import org.springframework.data.jpa.repository.JpaRepository;

public interface UserRepository extends JpaRepository<User, Long> {
   Optional<User> findByUsername(String username);
}

// WebSecurityConfigurerAdapter.java
import org.springframework.beans.factory.annotation.Autowired;
import org.springframework.context.annotation.Configuration;
import org.springframework.security.config.annotation.authentication.
builde
rs.AuthenticationManagerBuilder;
import org.springframework.security.config.annotation.web.builders.
HttpSecu
rity;
import org.springframework.security.config.annotation.web.configuration.
Ena
bleWebSecurity;
import org.springframework.security.config.annotation.web.configuration.
Web
SecurityConfigurerAdapter;
import org.springframework.security.crypto.password.PasswordEncoder;

@Configuration
@EnableWebSecurity
public class SecurityConfig extends WebSecurityConfigurerAdapter {

   private UserDetailsServiceImpl userDetailsService;
   private PasswordEncoder passwordEncoder;

   @Autowired
   public SecurityConfig(UserDetailsServiceImpl userDetailsService, PasswordEncoder passwordEncoder) {
      this.userDetailsService = userDetailsService;
      this.passwordEncoder = passwordEncoder;
   }

   @Override
   protected void configure(AuthenticationManagerBuilder auth) throws Exception {

auth.userDetailsService(userDetailsService).passwordEncoder(passwordEncoder);
   }

   @Override
   protected void configure(HttpSecurity http) throws Exception {
      http.authorizeRequests()
            .antMatchers("/admin").hasRole("ADMIN")
            .antMatchers("/user").hasAnyRole("ADMIN", "USER")
            .anyRequest().authenticated()
            .and()
            .formLogin();
   }
}
輸出
使用LDAP身份驗證
當使用LDAP伺服器進行使用者管理時,LDAP身份驗證非常適用。Spring Security與LDAP伺服器整合,允許針對LDAP伺服器進行身份驗證。配置包括指定LDAP伺服器連線詳細資訊,包括主機、埠和憑據。此外,還定義搜尋基礎和過濾器以在LDAP目錄中查詢使用者條目。然後,Spring Security將提供的憑據與LDAP伺服器進行驗證以進行身份驗證。
演算法
配置LDAP伺服器的連線詳細資訊,包括主機、埠和憑據。
定義搜尋基礎和過濾器以在LDAP目錄中查詢使用者條目。
在身份驗證過程中,Spring Security將提供的憑據與LDAP伺服器進行驗證。
根據身份驗證結果授予或拒絕訪問許可權。
示例
@Configuration
@EnableWebSecurity
public class SecurityConfig extends WebSecurityConfigurerAdapter {

   @Override
   protected void configure(AuthenticationManagerBuilder auth) throws Exception {
      auth.ldapAuthentication()
         .userDnPatterns("uid={0},ou=users")
         .groupSearchBase("ou=groups")
         .contextSource()
            .url("ldap://:389/dc=mycompany,dc=com")
            .managerDn("cn=admin,dc=mycompany,dc=com")
            .managerPassword("admin");
   }

   @Override
   protected void configure(HttpSecurity http) throws Exception {
      http.authorizeRequests()
         .antMatchers("/user").hasRole("USER")
         .anyRequest().authenticated()
         .and()
         .formLogin();
   }

   public static void main(String[] args) {
      SpringApplication.run(SecurityConfig.class, args);
   }
}
輸出

結論
在本教程中,在Spring Boot中實現簡單的身份驗證對於保護應用程式並確保只有授權使用者才能訪問受保護的資源至關重要。無論使用記憶體身份驗證、資料庫身份驗證還是LDAP身份驗證,Spring Boot都透過Spring Security提供方便的功能來簡化身份驗證過程。透過選擇最合適的方法並配置必要的元件,開發人員可以建立一個強大的身份驗證系統來保護其應用程式並保護敏感資料免遭未經授權的訪問。

880 次瀏覽
