
 資料結構
資料結構 網路
網路 關係資料庫管理系統 (RDBMS)
 作業系統
作業系統 Java
Java iOS
iOS HTML
HTML CSS
CSS Android
 Python
 C語言程式設計
 C++
C++ C#
C# MongoDB
 MySQL
MySQL Javascript
 PHP
PHP如何在Android中使用氣泡圖?
此示例演示如何在Android中使用氣泡圖。
步驟1 − 在Android Studio中建立一個新專案,轉到檔案 ⇒ 新建專案,並填寫所有必需的詳細資訊以建立新專案。
步驟2 − 開啟build.gradle(模組級別)並新增庫依賴項。
apply plugin: 'com.android.application'
android {
   packagingOptions {
      exclude 'META-INF/proguard/androidx-annotations.pro'
   }
   packagingOptions {
      exclude 'META-INF/DEPENDENCIES'
      exclude 'META-INF/LICENSE'
      exclude 'META-INF/LICENSE.txt'
      exclude 'META-INF/license.txt'
      exclude 'META-INF/NOTICE'
      exclude 'META-INF/NOTICE.txt'
      exclude 'META-INF/notice.txt'
      exclude 'META-INF/ASL2.0'
   }
   compileSdkVersion 28
   defaultConfig {
      applicationId "com.example.andy.myapplication"
      minSdkVersion 15
      targetSdkVersion 28
      versionCode 1
      versionName "1.0"
      testInstrumentationRunner "android.support.test.runner.AndroidJUnitRunner"
   }
   buildTypes {
      release {
         minifyEnabled false
         proguardFiles getDefaultProguardFile('proguard-android.txt'), 'proguard-rules.pro'
      }
   }
}
dependencies {
   implementation fileTree(dir: 'libs', include: ['*.jar'])
   implementation 'com.android.support:appcompat-v7:28.0.0'
   implementation 'com.android.support.constraint:constraint-layout:1.1.3'
   implementation 'com.github.PhilJay:MPAndroidChart:v3.1.0-alpha'
   testImplementation 'junit:junit:4.12'
   androidTestImplementation 'com.android.support.test:runner:1.0.2'
   androidTestImplementation 'com.android.support.test.espresso:espresso-core:3.0.2'
}
步驟3 − 開啟build.gradle(應用程式級別)並新增庫依賴項。
// Top-level build file where you can add configuration options common to all sub-projects/modules.
buildscript {
   repositories {
      google()
      jcenter()
   }
   dependencies {
      classpath 'com.android.tools.build:gradle:3.2.1'
      // NOTE: Do not place your application dependencies here; they belong
      // in the individual module build.gradle files
   }
}
allprojects {
   repositories {
      google()
      jcenter()
      maven { url 'https://jitpack.io' }
   }
}
task clean(type: Delete) {
   delete rootProject.buildDir
}
步驟4 − 將以下程式碼新增到res/layout/activity_main.xml。
<?xml version = "1.0" encoding = "utf-8"?>
<android.support.constraint.ConstraintLayout xmlns:android = "http://schemas.android.com/apk/res/android"
   xmlns:app = "http://schemas.android.com/apk/res-auto"
   xmlns:tools = "http://schemas.android.com/tools"
   android:layout_width = "match_parent"
   android:layout_height = "match_parent"
   tools:context = ".MainActivity">
   <com.github.mikephil.charting.charts.BubbleChart
      android:id = "@+id/BubbleChart"
      android:layout_width = "fill_parent"
      android:layout_height = "fill_parent" />
</android.support.constraint.ConstraintLayout>
在上面的程式碼中,我們使用了氣泡圖表檢視來顯示氣泡圖。
步驟4 − 將以下程式碼新增到src/MainActivity.java
package com.example.andy.myapplication;
import android.graphics.Color;
import android.os.Bundle;
import android.support.v7.app.AppCompatActivity;
import com.github.mikephil.charting.charts.BubbleChart;
import com.github.mikephil.charting.charts.CandleStickChart;
import com.github.mikephil.charting.charts.ScatterChart;
import com.github.mikephil.charting.data.BarEntry;
import com.github.mikephil.charting.data.BubbleData;
import com.github.mikephil.charting.data.BubbleDataSet;
import com.github.mikephil.charting.data.BubbleEntry;
import com.github.mikephil.charting.data.CandleData;
import com.github.mikephil.charting.data.CandleDataSet;
import com.github.mikephil.charting.data.CandleEntry;
import com.github.mikephil.charting.data.ScatterData;
import com.github.mikephil.charting.data.ScatterDataSet;
import com.github.mikephil.charting.utils.ColorTemplate;
import java.util.ArrayList;
public class MainActivity extends AppCompatActivity {
   BubbleChart bubbleChart;
   BubbleData bubbleData;
   BubbleDataSet bubbleDataSet;
   ArrayList bubbleEntries;
   @Override
   protected void onCreate(Bundle savedInstanceState) {
      super.onCreate(savedInstanceState);
      setContentView(R.layout.activity_main);
      bubbleChart = findViewById(R.id.BubbleChart);
      getEntries();
      bubbleDataSet = new BubbleDataSet(bubbleEntries, "");
      bubbleData = new BubbleData(bubbleDataSet);
      bubbleChart.setData(bubbleData);
      bubbleDataSet.setColors(ColorTemplate.JOYFUL_COLORS);
      bubbleDataSet.setValueTextColor(Color.BLACK);
      bubbleDataSet.setValueTextSize(18f);
   }
   private void getEntries() {
      bubbleEntries = new ArrayList<>();
      bubbleEntries.add(new BubbleEntry(0, 1,0.21f));
      bubbleEntries.add(new BubbleEntry(1, 2,0.12f));
      bubbleEntries.add(new BubbleEntry(2, 3,0.20f));
      bubbleEntries.add(new BubbleEntry(2,4, 0.52f));
      bubbleEntries.add(new BubbleEntry(3, 5,0.29f));
      bubbleEntries.add(new BubbleEntry(4, 6,0.62f));
   }
}
讓我們嘗試執行您的應用程式。我假設您已將您的實際Android移動裝置連線到您的計算機。要從Android Studio執行應用程式,請開啟您專案中的一個活動檔案,然後單擊執行![]() 工具欄中的圖示。選擇您的移動裝置作為選項,然後檢查您的移動裝置,它將顯示您的預設螢幕 –
工具欄中的圖示。選擇您的移動裝置作為選項,然後檢查您的移動裝置,它將顯示您的預設螢幕 –
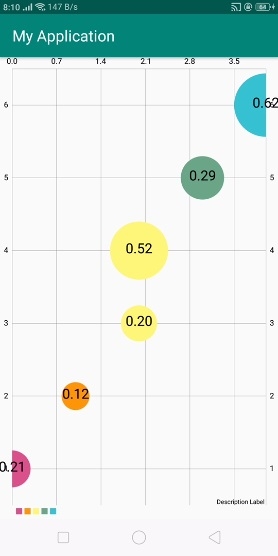
在上述結果中,它根據我們的資料集值顯示氣泡圖。
點選這裡下載專案程式碼

更新於:2019年7月30日
494 次瀏覽

廣告