
 資料結構
資料結構 網路
網路 關係型資料庫管理系統
 作業系統
作業系統 Java
Java iOS
iOS HTML
HTML CSS
CSS Android
 Python
 C 程式設計
 C++
C++ C#
C# MongoDB
 MySQL
MySQL Javascript
 PHP
PHP如何在 PowerShell 中使用 Azure REST API?
要使用 PowerShell 使用 Azure REST API,我們首先需要使用 **Connect-AzAccount** 連線到 Azure 雲帳戶。連線到 Azure 帳戶後,您可以使用以下授權標頭(與 MS 網站上提供的一樣),其中包含一個用於對 REST API 進行身份驗證的承載令牌。
$azContext = Get-AzContext
$azProfile = [Microsoft.Azure.Commands.Common.Authentication.Abstractions.AzureRm
ProfileProvider]::Instance.Profile
$profileClient = New-Object -
TypeName Microsoft.Azure.Commands.ResourceManager.Common.RMProfileClient -
ArgumentList ($azProfile)
$token = $profileClient.AcquireAccessToken($azContext.Subscription.TenantId)
$authHeader = @{
   'Content-Type'='application/json'
   'Authorization'='Bearer ' + $token.AccessToken
}
獲得授權標頭後,您可以將其用於身份驗證。現在假設我們需要使用 REST API 列出 Azure 訂閱中的所有虛擬機器。
https://docs.microsoft.com/en-us/rest/api/compute/virtual-machines/list-all/
我們將使用以下 REST API URL 獲取所有虛擬機器。
https://management.azure.com/subscriptions/{subscriptionId}/providers/Microsoft.Compute /virtualMachines?api-version=2021-03-01
在這裡,我們需要提供一個訂閱 ID,從中我們需要列出虛擬機器。
我們的命令如下所示:
$restUri = https://management.azure.com/subscriptions/xxxxx-xxxxx-x--xxxxx/providers/Microsoft.Compute/virtualMachines?api-version=2021-03-01
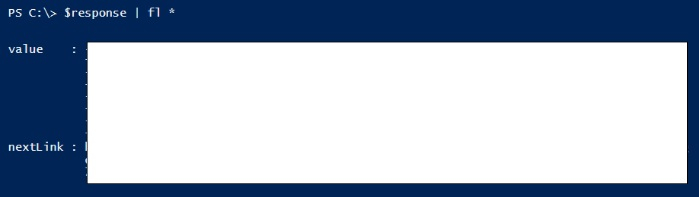
$response = Invoke-RestMethod -Uri $restUri -Method Get -Headers $authHeader
輸出
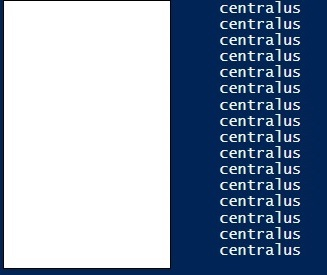
您可以進一步擴充套件屬性。
PS C:\> $response.value | Select Name, location
輸出

更新於:2021年9月1日
5K+ 次瀏覽

廣告