
 資料結構
資料結構 網路
網路 關係資料庫管理系統
 作業系統
作業系統 Java
Java iOS
iOS HTML
HTML CSS
CSS Android
 Python
 C 程式設計
 C++
C++ C#
C# MongoDB
 MySQL
MySQL Javascript
 PHP
PHP如何在 Ubuntu 上使用 Pydio 設定自己的檔案伺服器
在本文中,我們將學習如何使用 Pydio 託管檔案共享伺服器,它可以在沒有強大硬體的情況下執行良好。我們將安裝社群版,但如果我們使用企業許可證,則對於少於 10 人的團隊是免費的。
Pydio 是一款類似 Dropbox 的實用程式,允許檔案共享。Pydio 與其他檔案同步服務一樣,擁有良好的功能,包括 Web 介面、Mac、Windows 和 Linux 的原生客戶端、IOS 和 Android 的移動客戶端。它能夠與公眾中的其他 Pydio 使用者共享檔案。
先決條件
- 無 root 許可權的使用者
- 已安裝 Apache 以及 LAMP,併為訪問設定了 https
- 如果公開暴露,則需要一個 FQDN。
- 已安裝 Postfix。
安裝 Pydio
我們將使用以下命令安裝所有依賴項和 Pydio,在此之前,我們需要更新機器。下載 Pydio 並解壓縮它,然後將程式碼移動到 Apache 中的預設資料夾。
$ sudo apt-get update
$ sudo apt-get install php5 libapache2-mod-php5
sudo apt-get install php5 libapache2-mod-php5
Reading package lists... Done
Building dependency tree
Reading state information... Done
libapache2-mod-php5 is already the newest version.
php5 is already the newest version.
The following packages were automatically installed and are no longer required:
libntdb1 python-ntdb
Use 'apt-get autoremove' to remove them.
0 upgraded, 0 newly installed, 0 to remove and 3 not upgraded.
root@ubuntu:~# sudo apt-get remove php5 libapache2-mod-php5
Reading package lists... Done
Building dependency tree
Reading state information... Done
The following packages were automatically installed and are no longer required:
libntdb1 python-ntdb
Use 'apt-get autoremove' to remove them.
The following extra packages will be installed:
libapache2-mod-php5filter
Suggested packages:
php-pear
The following packages will be REMOVED:
libapache2-mod-php5 php5
The following NEW packages will be installed:
libapache2-mod-php5filter
0 upgraded, 1 newly installed, 2 to remove and 3 not upgraded.
Need to get 2,205 kB of archives.
After this operation, 33.8 kB disk space will be freed.
Do you want to continue? [Y/n] y
Get:1 http://us.archive.ubuntu.com/ubuntu/ trusty-updates/universe libapache2-mod-php5filter amd64 5.5.9+dfsg-1ubuntu4.17 [2,205 kB]
Fetched 2,205 kB in 5s (370 kB/s)
(Reading database ... 201552 files and directories currently installed.)
Removing php5 (5.5.9+dfsg-1ubuntu4.17) ...
dpkg: libapache2-mod-php5: dependency problems, but removing anyway as you requested:
phpmyadmin depends on libapache2-mod-php5 | libapache2-mod-php5filter | php5-cgi | php5-fpm | php5; however:
Package libapache2-mod-php5 is to be removed.
Package libapache2-mod-php5filter is not installed.
Package php5-cgi is not installed.
Package php5-fpm is not installed.
Package php5 is not installed.
apache2_invoke prerm: Disable module php5
* Restarting web server apache2 AH00558: apache2: Could not reliably determine the server's fully qualified domain name, using 127.0.1.1. Set the 'ServerName' directive globally to suppress this message
[ OK ]
Selecting previously unselected package libapache2-mod-php5filter.
(Reading database ... 201540 files and directories currently installed.)
Preparing to unpack .../libapache2-mod-php5filter_5.5.9+dfsg-1ubuntu4.17_amd64.deb ...
Unpacking libapache2-mod-php5filter (5.5.9+dfsg-1ubuntu4.17) ...
Setting up libapache2-mod-php5filter (5.5.9+dfsg-1ubuntu4.17) ...
..
..
Creating config file /etc/php5/apache2filter/php.ini with new version
..
..
* Restarting web server apache2 AH00558: apache2: Could not reliably determine the server's fully qualified domain name, using 127.0.1.1. Set the 'ServerName' directive globally to suppress this message
[ OK ]
root@ubuntu:~# sudo apt-get install php5 libapache2-mod-php5
Reading package lists... Done
Building dependency tree
Reading state information... Done
The following packages were automatically installed and are no longer required:
libntdb1 python-ntdb
Use 'apt-get autoremove' to remove them.
Suggested packages:
php-pear
The following packages will be REMOVED:
libapache2-mod-php5filter
The following NEW packages will be installed:
libapache2-mod-php5 php5
0 upgraded, 2 newly installed, 1 to remove and 3 not upgraded.
Need to get 0 B/2,213 kB of archives.
After this operation, 33.8 kB of additional disk space will be used.
Do you want to continue? [Y/n] y
Selecting previously unselected package php5.
(Reading database ... 201551 files and directories currently installed.)
Preparing to unpack .../php5_5.5.9+dfsg-1ubuntu4.17_all.deb ...
Unpacking php5 (5.5.9+dfsg-1ubuntu4.17) ...
dpkg: libapache2-mod-php5filter: dependency problems, but removing anyway as you requested:
phpmyadmin depends on libapache2-mod-php5 | libapache2-mod-php5filter | php5-cgi | php5-fpm | php5; however:
Package libapache2-mod-php5 is not installed.
Package libapache2-mod-php5filter is to be removed.
Package php5-cgi is not installed.
Package php5-fpm is not installed.
Package php5 is not configured yet.
apache2_invoke prerm: Disable module php5filter
* Restarting web server apache2 AH00558: apache2: Could not reliably determine the server's fully qualified domain name, using 127.0.1.1. Set the 'ServerName' directive globally to suppress this message
[ OK ]
Selecting previously unselected package libapache2-mod-php5.
(Reading database ... 201548 files and directories currently installed.)
Preparing to unpack .../libapache2-mod-php5_5.5.9+dfsg-1ubuntu4.17_amd64.deb ...
Unpacking libapache2-mod-php5 (5.5.9+dfsg-1ubuntu4.17) ...
Setting up libapache2-mod-php5 (5.5.9+dfsg-1ubuntu4.17) ...
* Restarting web server apache2 AH00558: apache2: Could not reliably determine the server's fully qualified domain name, using 127.0.1.1. Set the 'ServerName' directive globally to suppress this message
[ OK ]
Setting up php5 (5.5.9+dfsg-1ubuntu4.17) ...
$ wget https://download.pydio.com/641qt8npdernapoevdm/pydio-enterprise-6.4.1.tar.gz
wget -P ~/ http://vorboss.dl.sourceforge.net/project/ajaxplorer/pydio/stable-channel/6.2.2/pydio-core-6.2.2.tar.gz
--2016-06-02 09:17:35-- http://vorboss.dl.sourceforge.net/project/ajaxplorer/pydio/stable-channel/6.2.2/pydio-core-6.2.2.tar.gz
Resolving vorboss.dl.sourceforge.net (vorboss.dl.sourceforge.net)... 5.10.152.194
Connecting to vorboss.dl.sourceforge.net (vorboss.dl.sourceforge.net)|5.10.152.194|:80... connected.
HTTP request sent, awaiting response... 200 OK
Length: 15735734 (15M) [application/x-gzip]
Saving to: ‘/root/pydio-core-6.2.2.tar.gz.1’
100%[======================================>] 1,57,35,734 917KB/s in 28s
2016-06-02 09:18:03 (549 KB/s) - ‘/root/pydio-core-6.2.2.tar.gz.1’ saved [15735734/15735734]
$ tar -xvzf ~/pydio-enterprise-6.4.1.tar.gz
$ sudo mv ~/pydio-core-6.4.1 /var/www/pydio
更改資料夾許可權為 Apache,以便我們可以儲存資料並更新配置檔案
$ sudo chown -R www-data:www-data /var/www/pydio
設定 PHP 模組以執行 Pydio
安裝一些 PHP 模組以工作
$ sudo apt-get install php5-mcrypt php5-gd php5-sqlite
預設情況下,mcrypt 未啟用,可以使用 phpenmod 啟用它
$ sudo php5enmod mcrypt
為了使同步客戶端工作,我們需要啟用並安裝 a2enmod
$ sudo a2enmod rewrite
我們需要修改 php.ini 檔案,並且需要更新這些行
$ sudo vi /etc/php5/apache2/php.ini
找到 output_buffering = 4096 的行,並將其更改為 off
; Default Value: Off
; Development Value: 4096
; Production Value: 4096
; https://php.net.tw/output-buffering
output_buffering = Off
我們還需要修改 upload_max_filesize = 2M,並將 2M 更改為任何較大的數字,例如 1G
; Maximum allowed size for uploaded files.
; https://php.net.tw/upload-max-filesize
upload_max_filesize = 1G
此外,我們還需要更改 post_max_size
; Maximum size of POST data that PHP will accept.
; Its value may be 0 to disable the limit. It is ignored if POST data reading
; is disabled through enable_post_data_reading.
; https://php.net.tw/post-max-size
post_max_size = 1G
儲存檔案並重新啟動。
為 Pydio 配置 Apache
在 /etc/apache2/sites-available 中建立一個新檔案 pydio.conf
$ sudo nano /etc/apache2/sites-available/pydio.conf
<VirtualHost *:80>
   ServerAdmin pydio@localhost.localdomain.com
   ServerName 192.168.100.111
   DocumentRoot /var/www/pydio
   ErrorLog ${APACHE_LOG_DIR}/pydio-error.log
   CustomLog ${APACHE_LOG_DIR}/pydio-access.log combined
   <Directory /var/www/pydio/>
      AllowOverride All
   </Directory>
</VirtualHost>
我們將停用預設的 Apache 配置。
$ sudo a2dissite 000-default
我們需要啟用兩個配置檔案
$ sudo a2ensite pydio
重新啟動 apache 服務
$ sudo service apache2 restart
自定義 PHP 郵件傳送器以支援 Pydio。
我們需要編輯 Postfix 配置檔案 /etc/postfix/main.cf
$ sudo nano /etc/postfix/main.cf
搜尋 inet_interfaces,並使用你的本地主機更新所有內容
mailbox_size_limit = 0
recipient_delimiter = +
inet_interfaces = all
inet_protocols = all
重新啟動 Postifx 服務
$ sudo service postfix restart
完成 Pydio 設定
在我們完成 Pydio 設定後,我們將透過瀏覽器使用 https://伺服器系統的 IP 地址訪問它。第一個頁面將使用診斷工具對機器進行診斷,然後點選“點選此處繼續到 Pydio”

它將啟動 Pydio 歡迎螢幕

點選“開始嚮導”按鈕,並在欄位中提供資訊

應用程式標題,它將顯示在瀏覽器的標題欄中
歡迎訊息,顯示在登入螢幕上。
管理員登入,管理員的登入使用者名稱。
管理員顯示名稱,這將是管理員的顯示名稱。
管理員密碼,提供管理員密碼。
點選螢幕底部的“>>”按鈕繼續。
在進入資料庫連線之前,我們需要在 MySql 中為 Pydio 建立一個數據庫和使用者
$ sudo mysql -uroot -p
mysql> create database pydio;
Query OK, 1 row affected (0.00 sec)
mysql> CREATE user 'pydio'@'localhost' IDENTIFIED BY 'pydio1234';
Query OK, 0 rows affected (0.00 sec)
mysql> GRANT ALL privileges ON pydio.* TO 'pydio'@'localhost';
Query OK, 0 rows affected (0.01 sec)
mysql> \q
下一頁將找到資料庫連線設定,從資料庫下拉選單中選擇 Sqlite 3。點選“測試連線”按鈕以測試一切是否正常。
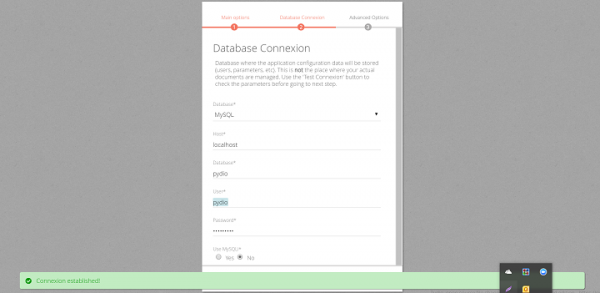
然後點選“>”按鈕繼續。
在頁面上的高階選項中,我們需要啟用電子郵件支援。
要啟用電子郵件,我們從選單中選擇“是”。
要使用 PHP 郵件傳送器,請選擇“郵件”。
提供管理員電子郵件的電子郵件地址。
我們可以使用“嘗試使用配置的資料傳送電子郵件”按鈕檢查傳送配置資料的電子郵件,以確保配置正常工作。

最後,點選“安裝 Pydio”按鈕。
訪問 Pydio
我們可以使用 http://IP 地址從瀏覽器訪問 Pydio。

我們可以使用以下連結下載客戶端。
IOS 客戶端:https://itunes.apple.com
Android 客戶端:https://play.google.com
當我們安裝 Pydio 客戶端時,它允許你分別選擇和同步每個工作區。當我們第一次執行客戶端設定時,可以選擇與本地資料夾同步的內容。設定同步後,我們以後可以新增工作區。
透過此設定和配置,我們可以擁有自己的檔案伺服器,例如 Dropbox 或任何其他線上儲存等,使用 Pydio 透過原生客戶端和主要桌面控制你的資料,資料可以在我們任何需要的時候訪問。

95 次瀏覽
